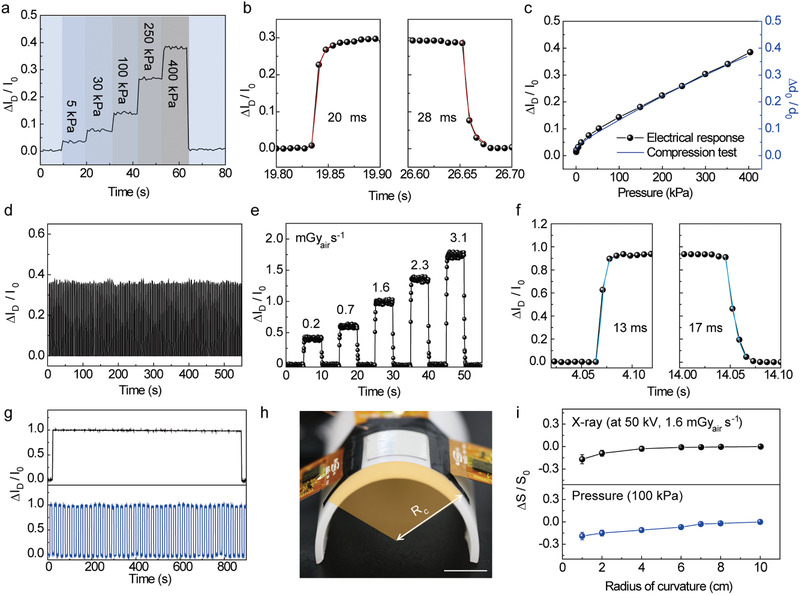
Figure 3.

Characteristics of the sensors in the multiplexed detector for tactile pressures and X‐rays. a) Real‐time detection of the ∆I D/I 0 when the pressure was applied stepwise ranging from 5 to 400 kPa without X‐ray irradiation (the biases of 30, 2, and 30 V were applied to the terminals of the V G, V D, and V photoconductor, respectively). b) Response and recovery time of the multiplexed detector with the applied pressure of 250 kPa. c) Comparison between electrical response of the multiplexed detector under applied pressure and true strain–stress curve from the compression test of PDMS. d) Reliability of the multiplexed detector during the repetitive application of 100 cycles at a pressure of 400 kPa. e) Real‐time detection of the ∆I D/I 0 during X‐ray irradiation with different dose rates from 0.2 to 3.1 mGyair s−1 (V photoconductor = 30 V). The voltage of the X‐ray tube was kept at 50 kV. f) Response and recovery time of the multiplexed detector with the X‐ray dose rate of 1.6 mGyair s−1. g) Photostability of the multiplexed detector during the continuous (top) or repetitive (bottom) X‐ray irradiation (1.6 mGyair s−1). h) Photograph of the experimental setup for the bending test. Scale bar: 1 cm. i) Relative changes in sensitivities (∆S D/S 0) of the multiplexed detector for each physical quantity (i.e., X‐ray and tactile pressure) with different radii of bending curvatures.
