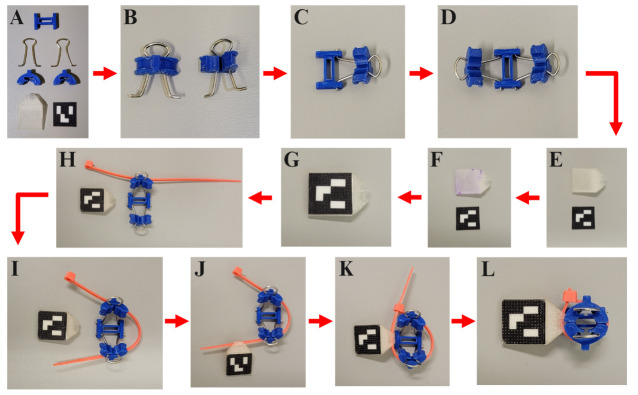
Figure 6. Instructions for connecting the ArUco marker mounting assembly.
A) Gather each of the seven ArUco marker mounting pieces: (1×) I-Bracket, (2×) in. binder clip wire loops, (2×) C-Clamps, (1×) ArUco marker mount, and (1×) 15 mm × 15 mm paper printed ArUco marker. B) Pinch the binder clip wire loops together to slot them into the C-Clamps. C) With your index finger and thumb, slide the C-Clamp down the binder clip wire loop until it almost reaches the protruding prongs at the end. Then, insert the prongs into the holes of the I-Bracket. D) Repeat the process described in panel C for the opposite side of the I-Bracket. E) Orient the ArUco marker mount and paper-printed marker as depicted in the image. The tip of the ArUco marker mount should slant down into the workspace surface. F) Place glue on top of the ArUco marker mount 15 mm × 15 mm square surface. G) Adhere the paper-printed marker to the ArUco marker mount. H) Place a 4 in. cable tie into the side hole of one of the C-Clamps. I) Wrap the cable tie around the assembly, threading it through the second C-Clamp hole. J) Slide the cable tie through the marker mount so that the marker is facing away from the assembly. K) Close the cable tie so that it is tightly bound around the assembly. L) Cut the excess length of the cable tie.

