



Summary
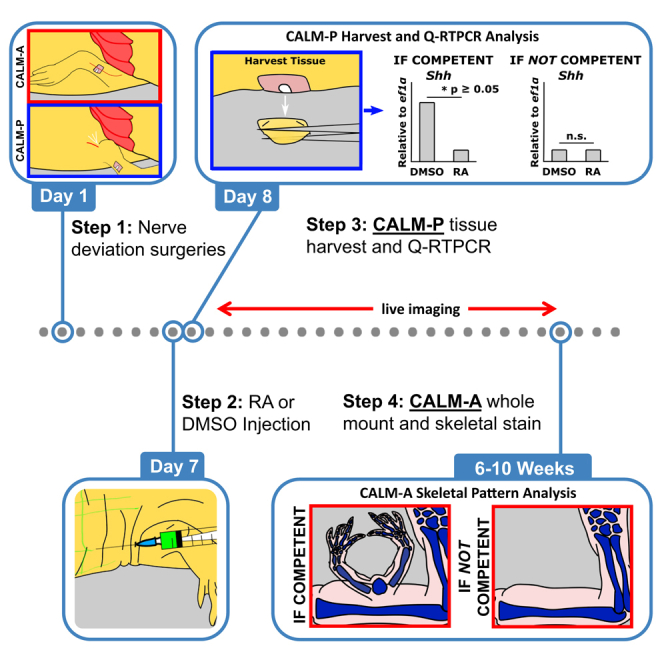
A key question in limb regeneration is how axolotl limb cells become competent to specific types of regeneration signals. Here, we present the competency accessory limb model (CALM), a regenerative assay that assesses whether limb cells have achieved the ability to respond to patterning signals. We describe the steps for positioning a wound, deviating the nerve into a limb wound site, and injecting retinoic acid. We also detail the harvest and analyses in both anterior and posterior CALMs.
For complete details on the use and execution of this protocol, please refer to Raymond et al.1
Subject areas: Cell Biology, Developmental biology, Model Organisms, Molecular Biology
Graphical abstract
Highlights
-
•
Steps to assess patterning competency in axolotl using the competency ALM (CALM)
-
•
Instructions on performing RA injections and tissue collection
-
•
Instructions for analyzing the outcomes in the anterior and posterior CALM variants
-
•
Guidance for training on and troubleshooting nerve deviation surgery
Publisher’s note: Undertaking any experimental protocol requires adherence to local institutional guidelines for laboratory safety and ethics.
A key question in limb regeneration is how axolotl limb cells become competent to specific types of regeneration signals. Here, we present the competency accessory limb model (CALM), a regenerative assay that assesses whether limb cells have achieved the ability to respond to patterning signals. We describe the steps for positioning a wound, deviating the nerve into a limb wound site, and injecting retinoic acid. We also detail the harvest and analyses in both anterior and posterior CALMs.
Before you begin
Urodele amphibians, such as the axolotl, are unique among tetrapods in their remarkable ability to regenerate complex limb structures. This capacity has driven considerable interest in understanding the fundamental biology of regenerative patterning, with the long-term goal of translating these insights to improve regenerative potential in mammals. In urodeles, regenerative patterning involves several coordinated steps. Following injury, mature limb cells undergo dedifferentiation, acquiring a new state that makes them responsive to patterning signals.1 Dedifferentiated cells from the anterior (A) and posterior (P) regions of the limb then produce key patterning cues, most notably FGF8 (an anterior cue) and Shh (a posterior cue), which together establish a positional “blueprint” for the missing limb structures.2 Finally, cells organize in accordance with this blueprint and re-differentiate to form the multiple, integrated tissues of the regenerated limb.
In mammals, the inability to regenerate complex limb structures likely results from failure at one or more of these steps. To dissect this process, researchers working with urodeles have developed a suite of experimental tools that allow investigation of each regenerative stage individually. Among these, the axolotl has emerged as a particularly powerful model due to its amenability to surgical manipulation.
One widely used assay for studying regenerative patterning is the Accessory Limb Model (ALM), first described by Endo et al.3 In this model, a piece of limb tissue is grafted into a limb wound site that is also supplied with a deviated nerve. If the grafted tissue provides opposing anterior/posterior (A/P) positional information relative to the host site, an ectopic (“accessory”) limb is induced. Thus, the ALM is frequently used to assess the A/P identity of grafted tissue.4 While successful ectopic limb formation indicates that the host cells are competent to respond to patterning cues, the absence of an accessory limb merely suggests a lack of opposing A/P information -without necessarily ruling out cellular competency. As such, the standard ALM is not well-suited for directly assaying the initial establishment of patterning competency in dedifferentiated limb cells.
To overcome this limitation, our group has developed a modified version of the ALM, termed the Competency-Accessory Limb Model (CALM), which is specifically designed to assess patterning competency. The CALM differs from the ALM in two critical ways. First, no tissue is grafted into the wound; instead, the wound is simply innervated via a deviated nerve. In this context, ectopic limb formation will only occur if: 1) the wound-site cells are competent, and 2) they receive the appropriate A/P patterning signals. Second, instead of grafting tissue to provide posterior positional information, Retinoic Acid (RA) is administered. RA was selected because it elicits well-characterized morphological and gene expression changes in both anterior and posterior cells,2,5,6 changes that we have shown to occur only in limb cells that have acquired patterning competency.1 Here, we provide a standardized protocol for implementing the CALM assay, enabling researchers to reproducibly evaluate patterning competency during limb regeneration.
The following protocol describes how the CALM-A and CALM-P, the two prongs of the CALM assay for patterning competency, are performed on the forelimbs of live Mexican Axolotl. The steps of the CALM are 1) surgical deviation of the brachial nerve bundle to anterior or posteriorly positioned skin wounds, 2) treatment with Retinoic Acid (RA) and vehicle, and 3) analysis of CALM-A and CALM-P patterning competency phenotypes. The nerve-deviation surgery generates a regeneration-permissive environment that, over a period of 6 days, leads to the induction of patterning competency in the wounded limb cells.1 The subsequent RA treatment manipulates the positional information in cells that have this achieved patterning competency, which can be identified by changes in transcription (CALM-P) and pattern induction (CALM-A).
Although CALM-A and CALM-P can theoretically be performed on the same animal, we typically perform CALM-P first. This is due to differences in animal requirements and assay duration: CALM-P generally requires more animals to obtain sufficient RNA for qRT-PCR and yields results within days, whereas CALM-A involves long-term regeneration and can take months. Furthermore, in our experience, CALM-P results are predictive of the outcomes observed in CALM-A. When possible, we perform both the CALM-A and CALM-P on animals from the same clutch, synchronizing both nerve deviation surgeries and RA treatments. If this is not feasible, we use size-matched animals to maintain consistent regenerative timing across experimental groups.
This protocol is optimized for 7–10 cm axolotls (measured from snout to tail tip), as their relatively transparent skin allows for clear visualization of internal anatomical landmarks required for precise wound placement. While the procedure can be adapted for animals outside this size range, shifts in the timing of patterning competency may occur. We therefore recommend performing a pilot study when using differently sized animals to determine the appropriate timing for RA treatment. This can be achieved via time-course analysis of gene expression (qRT-PCR) for established anterior-posterior (A/P) markers such as Shh, Hand2, Alx4, and Fgf8, normalized to Ef1α. We have found that increased expression of these markers, relative to mature limb tissue, correlates with the induction of patterning competency.1
The first and most technically difficult step of the CALM is to perform the nerve deviation surgery. We strongly recommend extensive practice of this procedure in advance, as it requires precision and consistency to achieve reproducible results. Both CALM-A and CALM-P should ideally be performed on intact (“virgin”) limbs that have not undergone prior amputation. Virgin limbs possess more robust and reliably positioned nerve bundles, which minimizes variability in surgical success and regenerative timing. In some experiments, we have substituted the nerve deviation step with the implantation of beads soaked in FGF and BMP agonists, which can mimic the inductive environment provided by the nerve.1 This alternative approach is particularly useful for probing upstream signaling pathways involved in the establishment of patterning competency.
RA or vehicle treatment is administered one week after nerve deviation surgery. In our laboratory, we deliver RA systemically via a subcutaneous abdominal injection. However, other methods of RA delivery or activation of RA signaling are likely to be effective, provided they reprogram positional identity toward a proximal/posterior/ventral limb fate.7
Last, it should be noted that the duration of, and phenotypes analyzed in, the CALM-A and CALM-P differ. The phenotype induced in the CALM-A, if the limb cells have achieved patterning competency at the time of RA treatment, is the patterning and generation of complex limb structures. Generating a new limb takes time -upwards of nine weeks. In contrast, the phenotype documented in the CALM-P are the shifts in A/P gene expression that occur in patterning competent cells when treated with RA. These transcriptional shifts happen within hours of the RA treatment.1 Therefore, if a specific research question requires evaluating patterning competency within a tight temporal window, such as during the induction of this property, the fast timing between RA treatment and the collection of the samples makes the CALM-P an ideal platform. However, whenever possible, we recommend performing both prongs of the CALM assay, the CALM-A and CALM-P, to rigorously test for pattering competency in the axolotl limb cells.
Institutional permissions
All animal use and procedures are conducted in accordance with the recommendations of the Guide for Care and Use of Laboratory Animals of the NIH, and all experiments were approved by the Institutional Animal Care and Use Committee of UMass Boston.
Preparation for nerve-deviation surgery (day 1)
Timing: approximately 30 min
-
1.
Ensure all reagents, clean surgical tools and materials are on hand.
-
2.
Ensure that all animal housing and surgery beds have been thoroughly cleaned with hot water.
-
3.
Make Tricaine Solution for knocking out the animals. We add phenol-red to our tricaine to ensure that the pH of the solution is neutral when used on the animals.
-
4.
Prepare ice buckets for post-surgery recovery.
-
5.
Fill spray bottles with fresh Holfreter’s Solution for post-surgery recovery.
Note: We supplement our animal housing water (Holfreter’s Solution) with API Pond Stress Coat water conditioner (API), according to manufactures instructions, in order to help maintain the mucus membranes and aid in healing following surgery.
Preparation for RA treatment (6 days post-surgery)
-
6.Find the average weight in grams of animals.
-
a.Animals should be sized-matched as closely as possible and without food for 24 h prior to weighing.
-
b.Anesthetize animals in Tricaine solution for 15 min or until non-responsive to toe pinch.
-
c.Put animals on a surgery bed with at least 2 kimwipes moistened with Holfreter’s Solution.
-
d.Zero a scale using an empty surgery bed with kimwipes moistened with 40% Holfreter’s Solution.
-
e.Place animals on the empty surgery bed and record the weight in grams.
-
f.Calculate the average weight of animals.
-
a.
-
7.Prepare 150 mg/kg RA solution.
-
a.Defrost an aliquot of 150 mg/mL stock solution of RA in DMSO.
-
b.Using the average weight, calculate the amount of RA per animal and determine the total volume needed for total number of injected animals.Note: We recommend an injection volume of 30 μL and to prepare a sufficient volume for 1.2∗n doses.
-
c.Dilute the necessary volume of stock RA solution in DMSO to achieve the final dosing volume.Note: For example, if the animals average 3.2 grams in a 10-animal dosing group and each dose will be 30 μL, then the calculation will be as follows:RA per Animal:TOTAL Volume:DILUTION of RA Stock:
 CRITICAL: Retinoic acid (RA) is light sensitive, so keep covered in aluminum foil on ice. Prepared RA solution should be used immediately. Discard any remaining thawed RA stock solution, which can lead to variable potency following multiple freeze/thaw cycles.
-
a.
Key resources table
| REAGENT or RESOURCE | SOURCE | IDENTIFIER |
|---|---|---|
| Biological samples | ||
| Tissue regenerates used for RNA isolation | axolotl limb blastemas | N/A |
| Chemicals, peptides, and recombinant proteins | ||
| Pentair Aquatic Eco-Systems Inc. Tricaine S (MS222) | Pentair | TRS1 |
| API Pond Stress Coat | API | AP140C |
| Retinoic acid, >98% (HPLC) powder | Sigma-Aldrich | R2625-500MG |
| BioReagent dimethyl sulfoxide (DMSO) | Sigma-Aldrich | D8418-100ML |
| Calcium chloride anhydrous, 5 kilograms | Research Products International | C20010-5000.0 |
| Magnesium sulfate, heptahydrate | Research Products International | M65240-1000.0 |
| Potassium chloride, 1 kilogram | Research Products International | P41000-1000.0 |
| Sodium chloride crystal | MilliporeSigma | SX0420-5 |
| Tris hydrochloride, Ultrapure grade | VWR | 97061-260 |
| Phenol red solution, 0.5%, liquid, sterile-filtered, BioReagent, suitable for cell culture | Sigma-Aldrich | P0290-100ML |
| Sodium hydroxide pellets, ACS grade | VWR | 97064-486 |
| Tripure isolation reagent | Roche | 11667165001 |
| Experimental models: Organisms/strains | ||
| Ambystoma mexicanum, white/GFP, male/female, 7–10 cm snout to tail tip | Ambystoma Genetic Stock Center | RRID: AGSC_101 RRID: AGSC_110 |
| Oligonucleotides | ||
| 5' - CGGGCACAGGGATTTCA-TC | Integrated DNA Technologies | Ef1α Forward Sequence |
| 5' - TGCCGGCTTCAAACTCT-CC | Integrated DNA Technologies | Ef1α Reverse Sequence |
| 5' - AGTGACCAGACCGGTGAA-AG | Integrated DNA Technologies | Shh Forward Sequence |
| 5' - CGCTCCGTCTCTATCACG-TA | Integrated DNA Technologies | Shh Reverse Sequence |
| 5' - CCAGCTACATCGCCTACC-TC | Integrated DNA Technologies |
Hand2 Forward Sequence |
| 5' - AGCTCTTTCTTGCGCTTG-TC | Integrated DNA Technologies |
Hand2 Reverse Sequence |
| 5' - GGGTAACCTCTTTGGGAC-TG | Integrated DNA Technologies |
Alx4 Forward Sequence |
| 5' - TTAAGTGCCCTGTCATGT-GG | Integrated DNA Technologies |
Alx4 Reverse Sequence |
| 5' - AGCTGATTGGCAAGAGCA-AT | Integrated DNA Technologies |
Fgf8 Forward Sequence |
| 5' - GTGAAGGCCATGTACCAT-CC | Integrated DNA Technologies |
Fgf8 Reverse Sequence |
| Software and algorithms | ||
| ZEN Pro | Carl Zeiss Microscopy, LLC | Zen core 3.11: https://www.micro-shop.zeiss.com/de/de/softwarefinder/software-categories/zen-core/zen-core/ |
| Other | ||
| #5 Watchmaker forceps | Indigo Instruments | 22490 |
| Noyes curved micro-dissecting scissors | Indigo Instruments | 22220 |
| 125 mm dissecting scissors | Indigo Instruments | 22212 |
| Zeiss Stemi 305 stereo microscope with 5:1 zoom | Carl Zeiss Microscopy, LLC | 435063-9010-100 |
| Schott MLS 6,000 K LED fiber optic illuminator | Schott | A20400/6000 |
| Zeiss Discovery.V8 SteREO (or equivalent) | Carl Zeiss Microscopy, LLC | 435449-0000-000 |
| Kimtech Science brand Kimwipes | Kimtech | 34155 |
| Absorbent bench pads | VWR | 56,617–018 |
| SHARD disposable biopsy punch (2.5 mm) | AD Surgical | A750-BP25 |
Materials and equipment
Concentrated Holfreter’s stock solution
| Reagent | Final concentration | Amount |
|---|---|---|
| CaCl2 | N/A | 56 g |
| MgSO4-7H20 | N/A | 30 g |
| KCl | N/A | 60 g |
| NaCl | N/A | 640 g |
| MilliQ Water | N/A | Backfill to 4 L |
| Total | N/A | 4 L |
Store at room temperature indefinitely
Working Holfreter’s solution (Animal housing water)
-
•
Dilute 250 mL of Concentrated Holfreter’s Stock Solution in 19.75 L of diH2O
-
•
Adjust pH to 7.0.
[Store at room temperature indefinitely].
Tricaine in working Holfreter’s solution
-
•
Add 2 grams of Tricaine (Ethyl 3-aminobenzoate methanesulfonate salt) powder to 1900 mL of Working Holfreter’s Solution.
-
•
Add 2 mL of 1 M TrisHCl and 250 μL of phenol red solution on the stir bar.
-
•
Adjust pH to 7.0 using NaOH and fill to 2 L with Working Holfreter’s Solution.
[solution should be stored at 4oC for no more than one week].
Step-by-step method details
Nerve deviation surgery (day 1)
The nerve-deviation surgery will induce the formation of an ectopic blastema on the lateral surface of the limb. By positioning the wound site and the nerve on the anterior or posterior sides of the limb, the researcher controls the A/P positional information in the cells that contribute to the induced blastemas. See Figure 1 and Supplemental Video for positional definitions.
Note: This procedure can be performed in batches to save time.
-
1.Prepare the surgical area.
-
a.Spray the bench top under the surgical stereomicroscope with 70% ethanol and wipe.
-
b.Ensure all surgical tools are sharpened and cleaned by spraying with 70% ethanol. Alternatively, tools can be sterilized using an autoclave or a bead sterilizer.
-
a.
-
2.Anesthetize animals and prepare for surgery.
-
a.To anesthetize animals for surgery, place them in a Tricaine solution for 15–20 min (Figure 2A).Note: Animals are considered knocked out when they no longer respond to a tail or toe pinch (troubleshooting 1).
-
b.The animals are then placed on their side on a rigid surgical tray covered in kimwipes moistened with Working Holfreter’s Solution so that the limb to be operated on is facing the surgeon (Figure 2B).
-
i.Cover the animals with moistened kimwipes.
-
ii.Place them either on ice or in a refrigerator until surgery is performed (up to 15 min).
-
i.
-
c.Spray the animals (covered in moistened kimwipes) with Working Holfreter’s Solution every 5–10 min with Working Holfreter’s Solution to prevent them from drying out.CRITICAL: Do not allow the animal’s skin to dry, as this will cause discomfort for the amphibian, compromise the integrity of the skin, and decrease the success rate of the surgery.
-
a.
-
3.Nerve-Deviation (see Methods Video S1).
- a.
-
b.Use the wound positioning guide described in Figure 1 and Methods Video S1 for either anterior or posterior nerve deviations for the CALM-A or CALM-P, respectively.
-
c.Create wound site for nerve-deviation (Figures 3A-C’).
-
i.Use the forceps to pinch the skin over the desired A/P position and gently pull it outwards from the underlying tissue with forceps (troubleshooting 2).
-
ii.Using Noyes (micro-dissecting) scissors, generate a wound site by cutting a square of skin away, being careful not to damage the underlying muscle (troubleshooting 3).CRITICAL: Ensure proper positioning of the wound site to control the initial positional information within the blastema.CRITICAL: Avoid damage to the underlying tissues beneath the skin, as this can alter the cellular contribution to the blastema.
-
i.
-
d.Dissect out nerve from underlying connective tissue (Figures 3D–3F) (troubleshooting 4).
-
i.Make an incision through the skin from the armpit of the limb to the elbow using Noyes scissors (Figure 3D).
-
ii.Dissect the nerve from the surrounding connective tissue and sever it at the elbow (Figures 3E and 3F) (troubleshooting 5).CRITICAL: Do not handle or pinch the nerve proximal to the cut end, as this can damage the nerve and prevent it from inducing a regenerative response (Figure 3F).
-
i.
-
e.Create a “tunnel” for the nerve between the epidermis and the underlying mesenchymal tissue (Figures 3G and G’).
-
i.Push the closed forceps under the epidermis from the ventral nerve-dissection wound to the anterior (or another positioned wound site), following the direction of least distance.
-
ii.Gently open and close the forceps to widen the tunnel.
-
i.
-
f.Deviate nerve into wound site and trim (Figures 3H and 3I).
-
i.Channel the severed nerve through the tunnel and into the wound site and position it at the center of the wound, handling only the distal ending (troubleshooting 6).
-
ii.Trim the damaged distal portion of the nerve.
-
i.
-
g.Place the animal on its surgical tray on a bed of ice and lightly pack the ice around the animal’s body, being careful not to disrupt the surgery site.
-
h.Keep the animal on ice for 20 min (Figure 2D).
-
i.Mist with Working Holfreter’s Solution regularly (approximately every 5 min) to avoid the skin from drying out.
-
i.
-
i.Place the animal back into housing with fresh Working Holfreter’s Solution.CRITICAL: Ensure the nerve does not become dislodged from the wound site, or the blastema will fail to form due to a lack of pro-regenerative signaling from the nerve.Optional: Animal housing can be supplemented with API Stress Coat solution to help with healing.
-
4.
Monitor the wound site(s) for blastema formation until day 6 or 7.
Note: We will normally see early to mid-bud staged blastemas by days 5–71 before proceeding to the next step (RA treatment).
Figure 1.

Positioning of wounds for CALM nerve deviations
To determine the position of anterior or posterior, begin by pulling the limb out from the body and aligning the A/P axis of the autopod with the A/P body axis. The wound sites should be positioned in the mid-stylopod.
(A) The CALM-A position will be on the side of the arm closest to the head of the animal. The Brachial Artery runs along the dorsal-anterior region of the limb and serves as a good landmark for the position of the wound site.
(B) The CALM-P wound position is on the side of the limb, facing towards the tail of the animal. The white-toned nerve bundle and Auxiliary Artery can be used as visual landmarks because they enter the limb from the trunk on the posterior side of the limb. The Blue dotted line indicates the dorsal apex.
Figure 2.

Surgical setup
(A) Animal is submerged in a container filled with Tricaine solution. Also pictured is a timer and an example surgical tray.
(B) Once the animal is anesthetized, it is laid on its side on a surgery tray covered with moistened kimwipes, then covered with moistened kimwipes and kept moist by frequently misting with Working Holfreter’s Solution.
(C) The animal is placed under the stereomicroscope with gooseneck lamps for surgery. The required surgical tools for nerve-deviation surgery – 2 #5 watchmaker forceps and a pair of micro-dissecting (Noyes) scissors – are also pictured.
(D) The animal is placed on and covered with ice after surgery. The targeted limb and wound site should remain exposed to prevent disruption of the surgery site and frequently misted with Working Holfreter’s Solution.
Figure 3.

Surgical procedure for the CALM-A and CALM-P
(A) For the CALM-A nerve deviation, position the limb to access the anterior surface. Use the branchial artery, which marks the dorsal end of where the wound should be positioned, as a visual landmark run through this region. (A’) For the CALM-P nerve deviation, blood vessels and nerve bundles that enter the limb on this site are visible through the flank skin.
(B-B’) Make incisions through the full thickness of the skin without damaging the underlying mesenchyme to generate a small window.
(C-C’) Cut away the flap of skin to create an even wound site.
(D) Make an incision through the skin along the posterior-ventral side of the limb, extending from the base of the limb to the elbow.
(E) Carefully peel back the skin and dissect the brachial nerve out from the surrounding connective tissue.
(F) Sever the nerve at the elbow joint and carefully dissect the nerve out to the base of the limb, handling only the distal tip.
(G-G’) Create a tunnel from the posterior-ventral incision to the wound site in the shortest direction possible.
(H-H’) Pull the nerve through the tunnel into the wound handling only the distal tip.
(I-I’) Position the nerve in the center of the wound site and trim away the excess distal tip that was handled during surgery. CALM-A-specific steps are colored in red, CALM-P-specific steps are colored in blue, and general steps are colored in black.
Related to step 3: (Timestamp: 00:07-01:26) The positioning of the anterior wound and generation of the anterior wound site, (Timestamp: 01:27-04:48) the process locating the nerve and dissecting it out from the underlying connective tissue by locating the nerve (applicable to CALM-A and CALM-P), (Timestamp: 04:49-05:13) making a channel through the dermis to the anterior site for nerve deviation (applicable to CALM-A and CALM-P), (Timestamp: 05:14-06:28) Deviating the nerve through the channel into the wound site and trimming the distal nerve tip (applicable to CALM-A and CALM-P), (Timestamp: 06:29-07:55) the positioning of the posterior wound and generation of the posterior wound site, and (Timestamp: 07:56-08:47) the incision location for nerve deviation in the CALM-P. Related to step 6: (Timestamp: 08:48-09:47) The RA injection procedure in which the injection is performed beneath the dermis of the abdomen near the hindlimb.
Retinoic acid injection (day 6 or 7)
Treatment with Retinoic Acid (RA) 6–7 days post nerve-deviation surgery reprograms the anterior/posterior pattern information in limb cells when they become broadly competent to limb patterning signals.1,5,8
-
5.
Prepare the surgical area, anesthetize animals, and prepare animals on surgical trays as described above (see Steps 1 and 2).
-
6.RA injection (see Methods Video S1).
-
a.Position animal for RA injection.
-
i.Rip the moistened kimwipe to expose the animal’s abdomen.
-
ii.Place the animal under the stereomicroscope and angle the goose-head surgical lamp to ensure the surgical site is illuminated and in focus.
-
i.
-
b.Using forceps, pinch the skin of the abdomen near the hindlimb and gently lift it up from the underlying tissue.
-
c.Gently insert a 25-gauge needle containing the RA solution (150 mg/kg RA in DMSO) between the skin and the abdominal muscle.Note: We recommend inserting at least 75% of the needle between the skin and the abdominal wall.
- d.
-
e.Slowly retract the needle and put pressure on the injection site to close the wound and prevent leakage of the RA solution.CRITICAL: If the needle is removed too quickly, back pressure will cause the RA to leak out of the injection site.Note: It is normal to see RA solution enter the lymphatic tubes.Note: DMSO-treated control groups will be injected in the same manner, substituting DMSO for the RA solution.
-
a.
-
7.Place animals on ice for 10 min covered in foil.
-
a.Mist them with fresh Working Holfreter’s Solution to keep their skin moist.
-
b.Return animal to their cleaned housing containers with fresh Working Holfreter’s Solution.
-
a.
-
8.
Animals should be housed in darkness for 2 days to allow RA treatment to have full effect.
(CALM-P) blastema harvest for expressional analysis
We have found that RA robustly suppresses the expression of Shh in patterning competent posterior limb cells.1,8 This change in expression can be detected in posterior nerve-deviation blastemas harvested within 24 h post-RA treatment.1 We utilize qRT-PCR to quantify this change in gene expression, and our procedure for this is described below. If using qRT-PCR to analyze your CAMP-P samples, we suggest using a minimum of six biological replicates per sample group. Additionally, we typically pool 4 blastemas per sample to ensure a high purified RNA yield, which generally leads to better (less variable) qRT-PCR data. However, other techniques to quantify expression are also suitable, and this protocol can be easily modified by replacing the Tripure steps with ones that are appropriate to these techniques.
-
9.
Prepare the surgical area, anesthetize animals, and prepare each animal on a surgical tray as described above (see Steps 1 and 2).
-
10.
For each biological replicate of each sample group, fill a 1.5 mL collection tube with Tripure (for qRT-PCR) and place the tubes on ice.
Note: We typically use 500 μL of Tripure per tube.
-
11.Harvest blastemas.
-
a.Position animal for blastema.
-
i.Rip the moistened kimwipe above the forelimb.
-
ii.Place the animal under the stereomicroscope and angle the goose-head surgical lamp to ensure the surgical site is illuminated and in focus.
-
i.
-
b.Using forceps, gently pinch the contours of the original wound site to separate the wound epithelium from the surrounding mature tissue (Figure 4A).
-
c.Using two forceps, gently hold the limb with one and pinch off the blastema with the other (Figures 4B and 4C).
-
d.Transfer the blastema into a labeled 1.5 ml sample collection tube labeled containing 500 μL of Tripure and dissociate tissue.
- e.
- f.
-
a.
Figure 4.

Blastema harvest and expressional analysis for CALM-P
(A) Position the limb so that the posterior-located blastema is accessible.
(B) Using forceps, pinch along the contours of the original wound site to help separate the blastema from the surrounding mature tissue.
(C) At the blastema’s base, pinch using forceps to separate the blastemal mesenchyme from the underlying corrective tissue.
(D) Complete blastema dissection by pulling the tissue away from the limb, severing any remaining connections.
(E) Process blastema samples for qRT-PCR (using primers for Ef1α and Shh) or alternate expressional analysis technique.
(F) Example bar graphs of Shh qRT-PCR data represent treatment outcomes on non-competent (left) vs patterning competent blastemas (right).
(CALM-A) morphological phenotype analysis
The response of patterning competent anterior blastemas to RA treatment is the induction of ectopic limb structures.1,5 The CALM-A leverages this morphogenic phenomenon to determine whether competency was achieved by analyzing the treated blastema’s development over time and using whole-mount skeletal staining to visualize the skeletal pattern of the final structure (if one forms).
-
12.Weekly imaging of wound site.
-
a.Anesthetize animals and prepare each animal on a surgical tray as described above (see Step 2).
-
b.Clean and prepare stereomicroscope for imaging.
-
c.Fill a blackened imaging tub with fresh Working Holfreter’s Solution. The tub should be large enough to submerge the entire animal.
-
d.Image blastema.
-
i.Remove animal from the surgery bed and place in the imaging tub under the imaging stereoscope (Figure 5A).
-
ii.Using forceps, position the limb so the profiles of the initial wound site and the blastema are visible while keeping the imaging field submerged in the tub (Figure 5A).
-
iii.Orient the imaging tub so the host limb is positioned at the bottom of the screen so the blastema is centered near the lower end of the imaging field. This allows space for the blastema to “grow” in subsequent images (Figure 5A).
-
iv.Use consistent magnification to capture the entire structure in each of the limbs being imaged (Figure 5A).Note: In the later weeks of imaging, the ectopic structure could potentially extend off the screen if too large a magnification is used. We recommend starting with a 2.5× magnification, though this can vary depending upon the size of the host animal.Optional: Use multiple magnifications for imaging.
-
i.
-
e.Return the animal into housing and monitor until it has recovered.
-
a.
-
13.Harvesting the host limb for whole mount staining.CRITICAL: This step is performed at the end of the CALM-A protocol when the limb tissue has completed patterning and differentiation. In white-strain animals, this is determined when well-formed skeletal elements are visualized through the skin. In wild-type animals, this is determined when pigmentation is apparent in the most distal regions of the ectopic structures. If limbs are harvested prior to this point, the skeletal tissue may not be sufficiently differentiated to stain with the skeletal staining. When no limb structures form, differentiation can be determined by visualizing the re-establishment of capillaries within the skin of the surgery site in white-strain animals or the presence of pigment in wild-type animals.
-
a.Prepare the surgical areas, anesthetize animals and prepare for surgery as described above (see Steps 1 and 2).
-
b.Harvest the host limbs.
-
i.Tear the moistened kimwipe above the forelimb.
-
ii.Place the animal under the stereomicroscope and angle the goose-head surgical lamp to ensure the surgical site is illuminated and in focus.
-
iii.Using forceps, extend the (CALM-A) limb away from the animal’s trunk and use surgical scissors to amputate the limb proximal to the CALM-A site.CRITICAL: Use care in amputation to ensure the ectopic structure is not damaged.
-
i.
-
c.Position, press, and fix limbs overnight.
-
i.Place both limbs into a Petri Dish lid and position so the ectopic structure is laid down flat.
-
ii.Cover limbs in 4% paraformaldehyde solution and place the Petri Dish on top of the limbs.
-
iii.Place scintillation vials (or light weights) on top of the Petri Dish to press limbs flat.
-
iv.Incubate overnight at 4C.Note: This method of fixation allows for better visualization of the ectopic skeletal elements, which often grow with a different A/P orientation than the host limb.
-
i.
-
d.Perform desired skeletal staining protocol, clear tissues, and document with stereomicroscope.Note: We recommend Horton and Maden’s Alcian Blue and Alizarin Red protocol.11
-
e.Score ectopic phenotypes using the guide in Figure 5B.
-
a.
Figure 5.

CALM-A sample processing and expected outcomes
(A) After DMSO or RA injection, CALM-A blastemas are imaged weekly in housing water to monitor for ectopic pattern formation. Once patterning is completed after 6-10 weeks, the limbs are harvested, and whole-mount skeletal staining is employed to score the ectopic skeletal patterns for patterning competency.
(B) Expected outcomes: if the CALM-A fails to achieve competency, then a simple nodule or no pattern will form. If the CALM-A achieves patterning competency, then a hypomorph limb phenotype or a fully patterned single or 2+ limb phenotype will form.
Expected outcomes
This 2-pronged CALM protocol is designed to test whether axolotl limb cells have broadly acquired the competency to pattern limb structures. If the limb cells have achieved competency, the expression of Shh will be suppressed in the CALM-P and ectopic limb structures will form in the CALM-A following RA treatment. If the limb cells are not competent, no significant changes in Shh will be detected in the CALM-P and the CALM-A surgery site will heal without forming ectopic limb structures. These assays can be easily complemented with other types of analyses to characterize expressional, epigenetic, and signaling behaviors in cells as they acquire competency.
Limitations
A technical limitation of the CALM is the need to perform this assay on limbs that have not previously regenerated (i.e. “virgin limbs”). This is because limbs with previous amputations tend to have successively more branched nerves, which makes the nerve-deviation surgery more challenging and can lead to variation in developmental rates. The CALM will not likely be compatible with experiments requiring prior amputations or limb nerve manipulation. Moreover, this limitation poses additional difficulty when growing animals for the CALM assay, since it is common husbandry practice to co-house clutch mates during the early stages of rearing and they tend to be aggressive toward each other. Because of this, it is highly recommended to separate larvae that are intended for the CALM assay into individual housing as soon after hatching as possible.
The other current limitation of this assay is the lack of molecular markers for patterning competent cells. In this iteration of the CALM assay, we leverage changes in Shh expression as a proxy for patterning competency in the CALM-P. This current marker was chosen because its expression in posterior blastema cells correlates with the activation of patterning competency (6 days post-surgery), is lost when patterning competency is suppressed, and exhibits fast (within hours) changes in expression following RA treatment. While changes in Shh work as an indicator of patterning competency in this context, having additional markers for this property would increase the rigor of these expression-based assays. In addition to Shh, there are several other limb patterning genes that are altered by RA treatment. However, some of these expression changes happen in tissues that have not achieved patterning competency, such as mature limb tissue.12 For example, the proximal/distal markers Meis2 and Tig1, and the anterior/posterior marker Hoxd10, are RA responsive in both non-competent and patterning competent tissue.1,12 Therefore, it is essential that candidate markers for patterning competency are validated in both types of tissues to evaluate their feasibly for use in the CALM assay and other patterning competency experiments.
Troubleshooting
Problem 1
When attempting to anesthetize animals, they are not knocked out after 15–20 min (related to Step 2a and all other anesthetization steps).
The timing of anesthesia can vary depending on animal size. This procedure is optimized for 7–10 cm animals. However, the duration of Tricaine Solution exposure will be longer in larger animals and shorter in smaller animals. The objective is to anesthetize the animals for the duration of surgery and the approximately 30-min recovery period. We therefore recommend optimizing the duration of Tricaine Solution exposure if the animal sizes are outside of the 7–10 cm range.
Potential solution
-
•
Phenotypic variation: There is some variation within animals, with some having a greater tolerance to Tricaine than others. Increase the amount of time animals remain in Tricaine until they are no longer responsive to tail or toe pinch.
-
•
Animals are too large or have been anesthetized multiple times: As animals grow larger or are exposed to Tricaine multiple times within a single study, they become increasingly resistant. Increase the amount of time study animals are exposed to Tricaine until they are completely knocked out.
Problem 2
During the initial stage of the CALM assay, the researcher is unable to find the proper location in the anterior/posterior axis to position the wound site (related to Step 3c).
Improper positioning of the wound site can cause variance with the CALM assay. Shifts in position could impact the contribution of anterior/posterior cells to the blastema, which respond differently (regarding gene expression and patterning outcomes) to the RA treatment.
Potential solution
-
•
Locating the anterior position: When the forelimb is laid on the side of the animal both the anterior and dorsal axes are visible. To locate the anterior, find the Brachial Artery, which runs through the anterior-dorsal side of the limb (Figure 1A and Methods Video S1).
-
•
Locating the posterior position: Pull the limb forward toward the head of the animal. At the most proximal portion of the limb, the Auxiliary Artery and a nerve bundle enter at the posterior side. Position the wound site mid-way up (Figure 1B and Methods Video S1).
Problem 3
The wound site into which the nerve will be deviated is too large (related to Step 3c).
An excessively large wound site can lead to cells from neighboring limb axes contributing to the blastema. Similar to improper wound positioning, this can lead to “contaminate” positional information contributing to the blastema, which can make the experimental results more difficult to interpret. This is a common issue with researchers initially learning the assay.
Potential solution
-
•
Aim for ¼ of limb circumference or less: By keeping the wound site to this size or smaller, it will limit contamination of cells from other limb axes. We recommend aiming for 2 mm × 2 mm wound sites in most animals.
-
•
Practice wound sizing on animals. We have found that increasing practice in sizing and shaping wounds leads to better results in the assay. We recommend practicing on recently deceased animals to follow NC3R guidelines.13
-
•
Use a biopsy punch: If the animal’s limb is large enough to allow for it, a 2.5 mm SHARD Disposable Biopsy Punch (AD Surgical) may be used to generate the wound site, as these have yielded good results in our hands in 7-10 cm-sized animals. Gently push the sharp end into the desired location on the limb and twist it back and forth. This may not completely cut through the skin but will leave an impression that will allow cutting with scissors. Care must be used to avoid damaging underlying structures.
Problem 4
The limb moves during the dissection of the nerve (related to Step 3d).
During the initial incision along the ventral limb surface and the subsequent dissection of the nerve, it is common that the limb can move due to surgical manipulation or the force of gravity. This can make it difficult to make clean cuts and dissect the nerves without excess damage to the surrounding tissues.
Potential solution
-
•
Immobilize the limb with a damp kimwipe: Once the limb is in the desired position, place a rolled-up, damp kimwipe over the limb in the desired position. This will help to immobilize the tissue and make it easier to cut and dissect.
Problem 5
The nerve cannot be easily found during nerve dissection, and/or excess damage is done to surrounding tissues (related to Step 3d).
This is one of the most difficult aspects of learning this assay, in part because the nerves can blend in with the surrounding tissue as it is almost transparent. The brachial nerve bundle in the axolotl can be identified by its white color and close proximity to blood vessels. Additionally, during dissection, sometimes the nerve will only partially come loose from the surrounding connective tissue. This is indicative that the nerve is bifurcated.
Potential solution
-
•
Look for the blood vessel: A large, often visible through the skin, nerve bundle enters the limb accompanied by a large blood vessel. They traverse the limb from the proximal-posterior-ventral side to the anterior ventral side of the elbow joint. Position the incision along these landmarks and carefully pull the skin open to dissect. Oftentimes, the nerve is immediately visible. If not, carefully push around the tissues near the blood vessel using closed forceps until the nerve is found. Cut it as close to the elbow as possible and gently tug it away from the surrounding tissue until it is completely outside of the limb.
-
•
Use smaller, white-strain animals. White and other non-pigmented strain animals are easier to perform nerve deviations on because structures beneath the skin surface are often visible to the naked eye. This is particularly true in small animals (7 cm), as their skin is semitransparent.
-
•
Look for the bifurcation: If the nerve stops separating from the underlying connective tissue, that can mean that it has bifurcated. If this occurs, look for the other bundle and follow it as closely to the elbow as possible. Sever the remaining nerve section’s distal end and dissect both bundles. Both should be tunneled and deviated into the wound site.
Problem 6
When the nerve is deviated into the wound site, it does not reach or is very tight and will likely shift out of the wound site (related to Step 3f).
Because the nerve plays a critical role with the wound epithelium in establishing and maintaining the blastema, the lack or loss of pro-regenerative nerve signaling invariably leads to assay failure. This issue is usually caused by cutting the nerve too short, an issue with the tunneling position, or the nerve not being completely dissected out.
Potential solution
-
•
The nerve was cut too short: During nerve dissection, it is recommended to sever the nerve bundle as close to the elbow as possible. Though there are some cases where the nerve becomes overly branched, which may prevent this, severing here will give adequate length to deviate the nerve and trim it to remain in the center of the wound site. We recommend using animals with “virgin limbs” whenever possible.
-
•
Improper tunneling direction for nerve bundle: Use the shortest tunneling direction to ensure that enough nerve reaches the wound site.
-
•
Incomplete nerve dissection: Often, if the nerve is not completely dissected out, there will be insufficient length to deviate. A dissection is considered complete when the nerve bundle has reached the most proximal position on the limb.
Resource availability
Lead contact
Further information and requests for resources and reagents should be directed to and will be fulfilled by the lead contact, Dr. Catherine D. McCusker (catherine.mccusker@umb.edu).
Technical contact
Technical questions on executing this protocol should be directed to and will be answered by the technical contact, Dr. Catherine D. McCusker (catherine.mccusker@umb.edu).
Materials availability
This study did not generate any unique reagents.
Data and code availability
This study did not generate/analyze datasets/code.
Acknowledgments
This work was supported by the Eunice Kennedy Shriver National Institute of Child Health and Human Development of the National Institutes of Health (2R15HD092180-02). Matthew Cherubino, Holly MacMullen, and Kurt Jancsy kindly provided photographs of the surgical areas and live animals.
Author contributions
M.J.R. compiled and wrote the manuscript and worked on the figures. C.D.M. wrote and edited the manuscript and figures.
Declaration of interests
The authors declare no competing interests.
Footnotes
Supplemental information can be found online at https://doi.org/10.1016/j.xpro.2025.103920.
Contributor Information
Michael J. Raymond, Jr., Email: mraymond7@bwh.harvard.edu.
Catherine D. McCusker, Email: catherine.mccukser@umb.edu.
References
- 1.Raymond M.J., Cherubino M.A., Vieira W.A., Manon S., McCusker C.D. Neural regulation of H3K27me3 during the induction of patterning competency in regenerating Axolotl limb cells. Commun. Biol. 2025;8:659. doi: 10.1038/s42003-025-08084-x. [DOI] [PMC free article] [PubMed] [Google Scholar]
- 2.Nacu E., Gromberg E., Oliveira C.R., Drechsel D., Tanaka E.M. FGF8 and SHH substitute for anterior–posterior tissue interactions to induce limb regeneration. Nature. 2016;533:407–410. doi: 10.1038/nature17972. [DOI] [PubMed] [Google Scholar]
- 3.Endo T., Bryant S.V., Gardiner D.M. A stepwise model system for limb regeneration. Dev. Biol. 2004;270:135–145. doi: 10.1016/j.ydbio.2004.02.016. [DOI] [PubMed] [Google Scholar]
- 4.Raymond M., Mccusker C.D. In: Salamanders. Methods in Molecular Biology. Seifert A.W., Currie J.D., editors. Springer Protocols; 2023. The Accessory Limb Model Regenerative Assay and Its Derivatives; pp. 217–233. [DOI] [PubMed] [Google Scholar]
- 5.McCusker C., Lehrberg J., Gardiner D. Position-specific induction of ectopic limbs in non-regenerating blastemas on axolotl forelimbs. Regeneration. 2014;1:27–34. doi: 10.1002/reg2.10. [DOI] [PMC free article] [PubMed] [Google Scholar]
- 6.Vieira W.A., Raymond M., Kelley K., Cherubino M.A., Sahin H., McCusker C.D. Integration failure of regenerated limb tissue is associated with incongruencies in positional information in the Mexican axolotl. Front. Cell Dev. Biol. 2023;11 doi: 10.3389/fcell.2023.1152510. [DOI] [PMC free article] [PubMed] [Google Scholar]
- 7.Bryant S.V., Gardiner D.M. Retinoic acid, local cell-cell interactions, and pattern formation in vertebrate limbs. Dev. Biol. 1992;152:1–25. doi: 10.1016/0012-1606(92)90152-7. [DOI] [PubMed] [Google Scholar]
- 8.Vieira W.A., Wells K.M., Raymond M.J., De Souza L., Garcia E., McCusker C.D. FGF, BMP, and RA signaling are sufficient for the induction of complete limb regeneration from non-regenerating wounds on Ambystoma mexicanum limbs. Dev. Biol. 2019;451:146–157. doi: 10.1016/j.ydbio.2019.04.008. [DOI] [PMC free article] [PubMed] [Google Scholar]
- 9.Niazi I.A., Pescitelli M.J., Stocum D.L. Stage-dependent effects of retinoic acid on regenerating urodele limbs. Wilhelm Roux. Archiv. 1985;194:355–363. doi: 10.1007/BF00877373. [DOI] [Google Scholar]
- 10.Crawford K., Stocum D.L. Retinoic acid coordinately proximalizes regenerate pattern and blastema differential affinity in axolotl limbs. Development. 1988;102:687–698. doi: 10.1242/dev.102.4.687. [DOI] [PubMed] [Google Scholar]
- 11.Horton C., Maden M. Endogenous distribution of retinoids during normal development and teratogenesis in the mouse embryo. Dev. Dyn. 1995;202:312–323. doi: 10.1002/aja.1002020310. [DOI] [PubMed] [Google Scholar]
- 12.Oliveira C.R., Knapp D., Elewa A., Gerber T., Gonzalez Malagon S.G., Gates P.B., Walters H.E., Petzold A., Arce H., Cordoba R.C., et al. Tig1 regulates proximo-distal identity during salamander limb regeneration. Nat. Commun. 2022;13:1141. doi: 10.1038/s41467-022-28755-1. [DOI] [PMC free article] [PubMed] [Google Scholar]
- 13.Prescott M.J., Lidster K. Improving quality of science through better animal welfare: The NC3Rs strategy. Lab Anim. 2017;46:152–156. doi: 10.1038/laban.1217. [DOI] [PubMed] [Google Scholar]
Associated Data
This section collects any data citations, data availability statements, or supplementary materials included in this article.
Supplementary Materials
Related to step 3: (Timestamp: 00:07-01:26) The positioning of the anterior wound and generation of the anterior wound site, (Timestamp: 01:27-04:48) the process locating the nerve and dissecting it out from the underlying connective tissue by locating the nerve (applicable to CALM-A and CALM-P), (Timestamp: 04:49-05:13) making a channel through the dermis to the anterior site for nerve deviation (applicable to CALM-A and CALM-P), (Timestamp: 05:14-06:28) Deviating the nerve through the channel into the wound site and trimming the distal nerve tip (applicable to CALM-A and CALM-P), (Timestamp: 06:29-07:55) the positioning of the posterior wound and generation of the posterior wound site, and (Timestamp: 07:56-08:47) the incision location for nerve deviation in the CALM-P. Related to step 6: (Timestamp: 08:48-09:47) The RA injection procedure in which the injection is performed beneath the dermis of the abdomen near the hindlimb.
Data Availability Statement
This study did not generate/analyze datasets/code.