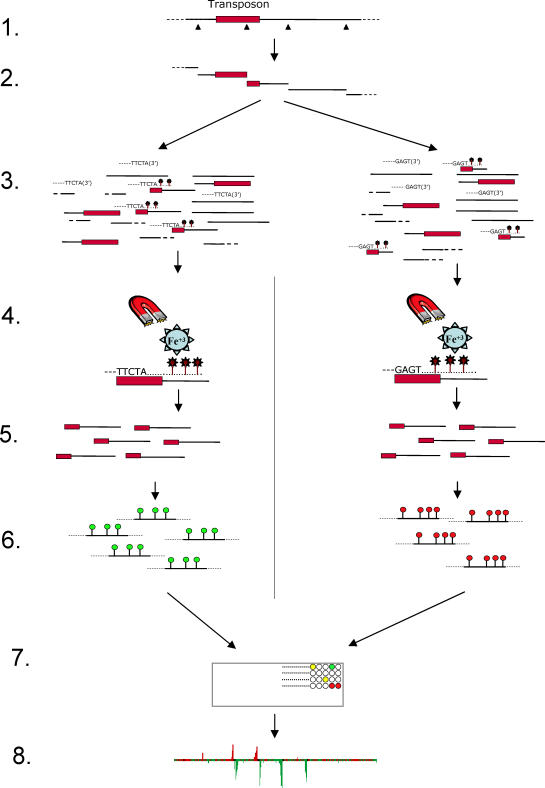
Figure 1. A General Schematic Diagram of the Steps Involved in Extracting, Labeling, and Identifying the Position of Transposons within a Genome.
Step 1. Genomic DNA is digested with a restriction endonuclease containing a cut site (triangle) within the transposon (red box). This results in multiple restriction fragments, including ones containing transposon and contiguous flanking DNA.
Step 2. Digested DNA (which may be pooled from multiple separate digests) is mixed with oligonucleotide probes that have been designed to anneal to specific sequences within the transposon. Separate probe sets anneal to different transposons (as shown), or separate genomic DNA samples are used to compare transposon content from different sources.
Step 3. After heat denaturation and reannealing, the mixture is incubated in the presence of a DNA polymerase and dNTPs, one of which is biotinylated (stick with star atop it). This allows specific extension from the annealed 3′ probe termini.
Step 4. Extended probes and their annealed templates are purified away from the mixture using magnetic streptavidin-coated beads (star labeled with Fe+3).
Step 5. The extracted templates are released by heating.
Step 6. The templates are labeled using Cy3- or Cy5-labeled nucleotides (green and red lollipops, respectively) in the presence of random primers and a DNA polymerase.
Step 7. Differentially labeled DNAs are hybridized to a microarray slide with features distributed throughout the genome. After washing, the array is scanned to identify features (circles) that are common to both DNA sources (yellow circles) or that have been differentially extracted (green or red circles).
Step 8. The log2 ratio of signal intensity for the two dyes is quantitated and graphically represented along each chromosome to identify contiguous segments of differential signal that correspond to the DNA flanking the original transposons.

