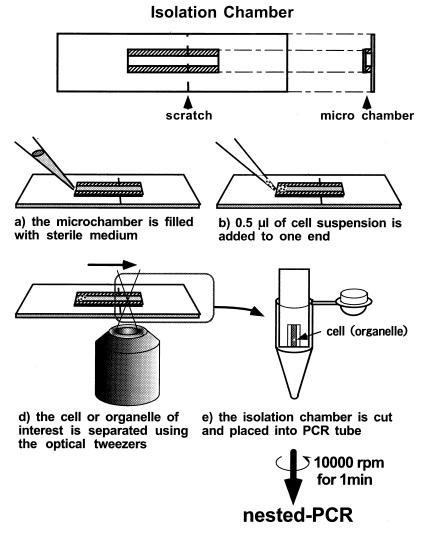
Figure 3.
The optical isolation process and the “isolation microchamber.” The microchamber is formed by separating a large (5 × 30 × 0.15 mm, length × width × thickness) and a small (9 × 3 × 0.15 mm) coverslip with two thin strips of adhesive tape (9 × 1 × 0.1 mm). The inside dimensions of the chamber were 9 × 1 × 0.1 mm. A small scratch was made on the chamber with a diamond knife. The bottoms of 5-cm diameter Petri dishes were cut out with a knife and replaced with thin, plastic film (≈100-μm thick). Filter paper was cut and placed in the dishes, and roughly 200 μl of distilled water was added dropwise to keep the inside of the dish moist. Then, the chamber was placed inside the dish and attached to the plastic film by using one drop of distilled water. First, the chamber was filled with sterile buffer containing 1.5% sucrose and 0.1% BSA (a). The BSA was added to prevent cells from adhering to the glass chamber. Then, 0.5 μl of cell suspension was carefully applied to one end of the chamber (b). The cells were observed with a microscope, and a single cell was trapped with the optical tweezers and transferred to the opposite end of the chamber (c). The transfer was processed automatically with a microscopic stage control system (MCU26 X, Y, Z-Axes Motor Control; Zeiss) at a velocity of 1–60 μm/sec. When the cell moved past the scratch in the chamber, the chamber was cut immediately, and the piece containing the cell of interest was placed in a PCR tube (d). The PCR tube was centrifuged for 5 sec to drop the cell into the tube. With this technique, it was possible to procure a living cell or intact organelles in a suspension within only 5–10 min.

