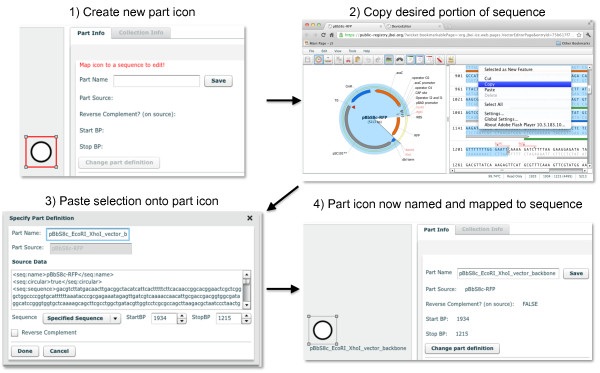
Figure 2.
Mapping a DeviceEditor part icon to an annotated DNA sequence. A new part icon on the design canvas (top left) is created by clicking on the desired SBOLv icon (here "Origin of Replication") in the left panel of the user interface (Figure 1). At this point, a DNA sequence has yet to be mapped to the part icon. In a separate browser-tab or software application, the desired portion of a DNA sequence (here the pBbS8c-rfp backbone [27] spanning from XhoI to EcoRI) is selected and copied (top right) to the clipboard. Third-party software (here VectorEditor) may embed meta-data (including jbei-seq format [28] sequence data) into the clipboard along with the plain-text DNA sequence selection (see Methods). Returning to DeviceEditor, the copied DNA sequence is pasted (mapped) from the clipboard onto the part icon. Clipboard meta-data provides DeviceEditor with the selected start and stop base pairs (here 1934 to 1215) within the circular source sequence, along with the source's name (here pBbS8c-rfp), entire sequence, and feature annotations (displayed in the "Source Data" field; bottom left). If the third-party software (e.g. ApE [29]) does not embed this meta-data, the sequence annotations are not transferred to DeviceEditor, and the user must specify the source name and the selected start and stop base-pairs within the copied sequence. The user may alternatively map a Genbank-format sequence file to the part icon, which preserves the source name and feature annotations. The name for the part icon (here "pBbS8c_EcoRI_XhoI_vector_backbone") is specified, along with whether the part is associated with the reverse complement of the selected sequence. The "Done" button is clicked, the part icon has now been named, and the desired annotated DNA sequence has been mapped to the part icon (bottom right).

