Figure 4.
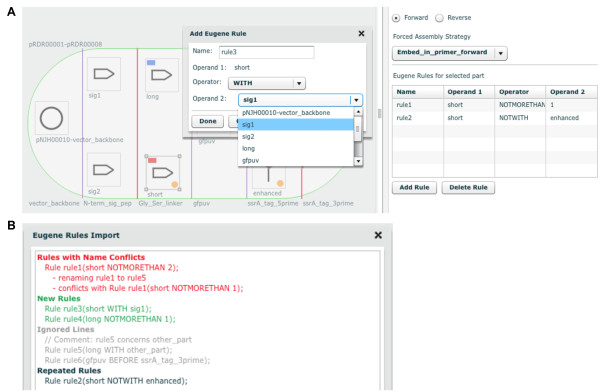
Adding Eugene design specification rules. (A) Graphical user interface for creating and modifying rules. A part icon (here "short", bottom left) on the design canvas is clicked, followed by the "Add Rule" button in the right panel of the user interface (bottom right). The name for the rule (here "rule3") is specified, and one of three Eugene operators (NOTMORETHAN, WITH or NOTWITH) is selected (here "WITH"). For the NOTMORETHAN operator, the maximum number of times the part may be present in a single construct is specified. For the WITH or NOTWITH operators, the other part icon on the design canvas (Operand 2, here "sig1") that should or should not be present in a single construct, respectively, with the selected part icon (Operand 1, here "short") is chosen. The list of Eugene rules associated with the selected part icon is shown in the right panel of the user interface (right). Part icons with associated Eugene rules are visually identified on the design canvas by an orange circle indicator light at bottom right, and part icons with specified forced assembly strategies are distinguished with a blue (bin consensus-matching assembly strategy) or a red (bin consensus-breaking assembly strategy) rectangle indicator at top left. (B) Importing Eugene rules from a file. From the "File" pull-down menu of the user interface (Figure 1, top left), "Import Eugene Rules" is clicked and a Eugene rules file (e.g. Additional file 3) is selected. The Eugene Rules Import dialog displays imported rules in green, rules identical to current rules in black, imported rules with names conflicting with current rules displayed in red (alternative names are auto-generated for the imported rules to resolve conflicts), and ignored rules (e.g. comment lines or rules with invalid operators or operands not present in the current design) in light grey. Importing a set of Eugene rules facilitates the batch creation of multiple rules for complex designs (Figure 5).

