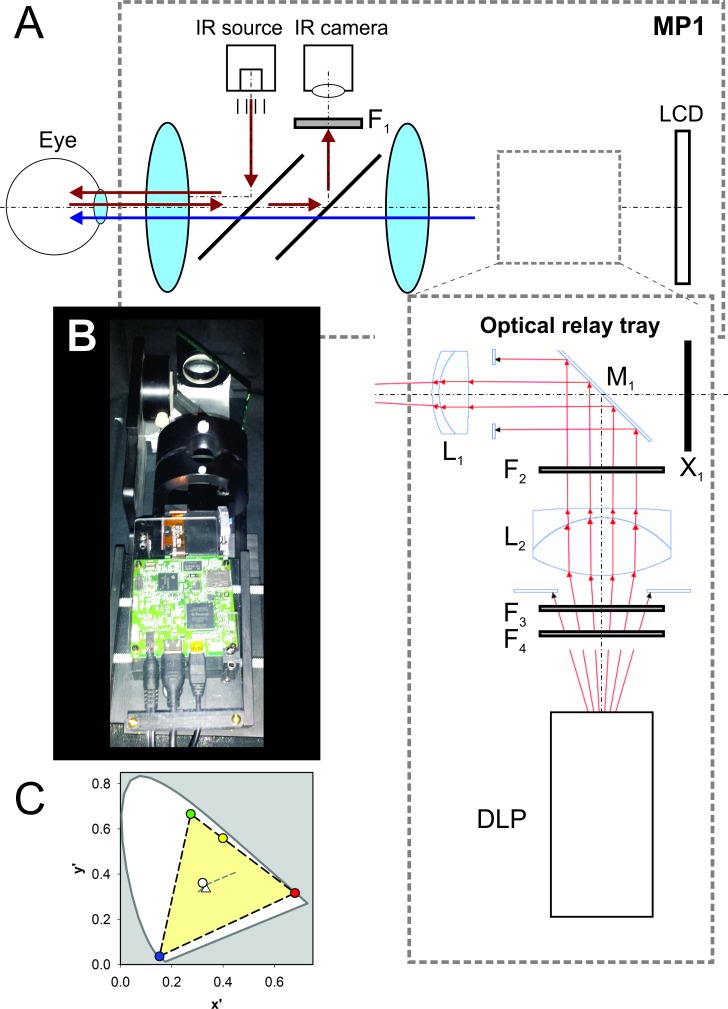
Figure 1.
Modification of the MP1 microperimeter to optically couple an external DLP projector. (A) Schematic of the MP1 system and the light paths under the unmodified and modified conditions. The retina is illuminated with an infrared source and the reflected light from the retina is imaged with a camera (light path shown with red arrows). In addition, a stimulus shown on the internal LCD screen is imaged on the retina (light path shown with blue arrow). Modification adds F1 and the optical relay tray. F1 is a long-pass filter in front of the camera in order to minimize the stray light originating from the external DLP; this is relevant only when the modified MP1 is used under high-luminance conditions. The optical relay tray is introduced between the final lens and the LCD using the rail normally carrying the filters used for scotopic testing. The relay tray bends the light path 90° away from the LCD (front-surface mirror M1) and focuses the DLP projector onto the retina along the stimulus path. Ray traces are shown with red. Two lenses, L1 and L2, are used to form a virtual image at the same plane as the LCD. Filters F2, F3, and F4 spectrally shape and attenuate the DLP light output. X1 is an opaque cover to prevent stray light from the internal LCD from reaching the eye. (B) Photograph of the optical relay tray inserted into the MP1 scotopic filter slot. (C) Judd chromaticity diagram of the DLP light coupled to the modified MP1. Red-, green-, blue-, yellow-, and white-filled circles correspond to R, G, B settings of (255, 0, 0), (0, 255, 0), (0, 0, 255), (255, 255, 0), and (255, 255, 255), respectively. Dashed lines delineate the final system gamut (light yellow area) within the standard observer. Triangle symbol indicates the equal-energy white point in the diagram. Gray dashed line shows the position of several CIE standard illuminators.

