Abstract
The use of pleural and lung ultrasound is being performed increasingly by respiratory and critical care clinicians around the world. This article describes how to create cheap and reliable lung and pleural phantoms for teaching. The phantoms described replicate the appearance of normal ventilating lung, pneumothorax (including the contact or lung point), pulmonary oedema, pleural effusion and empyema. The pleural effusion phantom can be used to teach procedural ultrasound (pleurocentesis).
Keywords: education, lung ultrasound, pleural phantoms, thoracic
Introduction
The use of ultrasound for the study of the lung was first documented in the 1960s by physicists, not physicians. 1 It is only in recent times that ultrasound has been increasingly used as a diagnostic tool in critical care practice. 2 Respiratory and critical care physicians now routinely use ultrasound in the emergency and intensive care settings for the diagnosis of heart failure, adult respiratory distress syndrome, pneumonia, pleural effusion, lung contusion and pneumothorax. 3 – 6 With its increasing use the need for an effective teaching model is required. Lung ultrasound presents a unique challenge as many diagnoses are based on artifactual rather than real images, and these artifacts remain poorly understood. 7 – 10 Tissue phantoms have been used as the basis for ultrasound calibration and teaching and must possess acoustic properties similar to those of the tissue being simulated. 11
Aim
The primary aim of this article is to describe how to create thoracic and lung phantoms that simulate the appearance of normal and pathological lung, for use in teaching diagnostic and procedural ultrasound.
We also describe how to integrate use of these phantoms into an effective thoracic ultrasound training course.
Finally, in addition to describing the production of phantoms and how to use them in a training course, this article describes the ultrasound appearance of normal and pathological thoracic conditions including pleural effusion, empyema, pneumothorax and pulmonary oedema.
Essential requirements
The phantoms must be cheap and easily made from readily accessible materials.
The phantoms must be able to replicate the ultrasound appearance of normal lung during respiration, pneumothorax, contact point, pulmonary oedema, anechoic pleural effusions and echogenic pleural effusions.
The phantom must be able to be used in teaching drainage of pleural effusions, using both the “mark‐the‐spot” technique and real‐time needle guidance.
Phantoms should last at least half a day (teaching at least 10 participants in a course).
Background
Gaining competence in basic clinician‐performed ultrasound involves several steps, for which there are published guidelines throughout the world. 12 – 14 These often entail completion of an introductory course, where essential knowledge and skills are introduced. Next follows a period of supervised ultrasound practice during which the knowledge and skills are consolidated. Finally a test demonstrating the trainee has gained adequate clinical understanding, image interpretation skills and technical ultrasound ability is often recommended before a candidate begins independent practice.
Basic generic ultrasound knowledge includes an understanding of ultrasound physics, how to use the ultrasound machine (knobology), and optimisation of the image.
The next step is gaining the technical skill required to perform an ultrasound examination. This requires knowledge of the normal anatomy, an understanding of the transducer, and an understanding of the best technique required to perform the scan and achieve the required image.
Following this, the requirements include image interpretation and pattern recognition. Candidates must recognise and understand the normal ultrasound appearance, as well as common variations, and the ultrasound appearance of pathology.
Finally, integration of the ultrasound findings into the clinical picture must be undertaken. Ultrasound is only one tool in the assessment of a patient and while it is incredibly versatile and useful, it does have limitations. The user must understand these and utilise the ultrasound findings appropriately.
During the learning process, exposure to a range of normal and abnormal pathology is essential. Teaching critical care ultrasound must often rely on retrospective still image and video image analysis. We have also found phantoms particularly useful, and have had excellent student feedback when using these as an aid to improving understanding of the image, pathology and ultrasound technique. We have not come across any phantoms used to demonstrate the appearance of normal or abnormal lung, apart from the commercial phantoms used to demonstrate and teach pleural effusion detection and drainage.
Ultrasound guided pleurocentesis has been shown to have a higher success rate and a lower adverse event rate than non‐ultrasound guided pleurocentesis. Ultrasound guided procedures have also been shown to be completed more rapidly, and generally with fewer complications. 15 , 16
Simulation training in lung ultrasound has been shown to enhance performance and reduce time to competence in procedural ultrasound. 17
Numerous simulation models have been used including cadaver models, live animal models, models made from parts of animals (particularly porcine, bovine, chicken and turkey models), or synthetic models synthesised from gelatin or silicone. 18 Computer aided simulation models have also been created for teaching and are rapidly advancing. 19 These may ultimately provide the best training opportunities but currently are prohibitively expensive and limited in their function.
There is at least one commercially available thoracic ultrasound model available for teaching ultrasound guided pleural effusion assessment and drainage (Blue PhantomTM). It demonstrates a single pathology – pleural effusion, and can be used for teaching effusion marking and drainage. It is durable, clean, not made of animal products, and there is definitely a role for this phantom in teaching pleural and lung ultrasound. The disadvantages of this model are that it only demonstrates a single pathology – pleural effusion. It is also relatively expensive, particularly if you are only using it to train a few people, and it is not dynamic – it does not ventilate.
Methods
Literature searches were performed using the following terms – lung, pleural, thoracic, chest, phantom, model, simulation, training, teaching and ultrasound.
These searches did not provide a single answer. The author then began experimenting with various simple ultrasound phantoms. The various material tested are listed in Table 1.
Table 1.
Ingredients used in the search for the best recipe.
| Chest Wall | Lung | Pleura | Pleural fluid | Echogenic material in pleural fluid (empyema) |
|---|---|---|---|---|
| Gelatin | Natural sponge | Latex gloves | Milk | Oats |
| Silicon | Synthetic sponge, large holes | Large balloons | Water | Crushed cereal |
| Chicken breast | Synthetic sponge, mixed holes | Plastic bags of varying thickness | Talc | |
| Turkey breast | Synthetic sponge, fine holes | Resealable, slide‐locking plastic bags | Graphite particles | |
| Liver | Thin plastic film | Psyllium husk (Metamucil) | ||
| Pork ribs |
Table 2.
Ingredients for the pleural effusion / empyema phantom for diagnostic and procedural ultrasound teaching.
| Plastic bucket | Framework of the chest wall |
| Pork rib / loin | The chest wall |
| Resealable, slide‐locking plastic bags | The pleural cavity |
| Synthetic, fine‐holed sponge | The lung |
| Water | Pleural and interstitial fluid |
| Psyllium husk (Metamucil) | Echogenic material to create empyema |
| Strong adhesive tape | To hold it all together |
| Absorbent sheet and kidney dish | To contain any mess |
The author presented these prototype phantoms at a thoracic ultrasound workshop in Italy in 2010. 20 Since then, a partially aerated polyurethane sponge has been described as a phantom to study “synthetic comets” 21 . However, to date, no single article could be found describing a thoracic ultrasound model that met all the requirements of our desired model.
Recipe 1 – Pleural effusion and empyema phantom
This phantom simulates the appearance of a patient's chest wall as they sit forward ready for drainage of a pleural effusion. A pleural effusion of varying size is evident and the free fluid may be hyopechoic (transudate‐like) or contain echogenic debris (empyema‐like).
Figure 1.
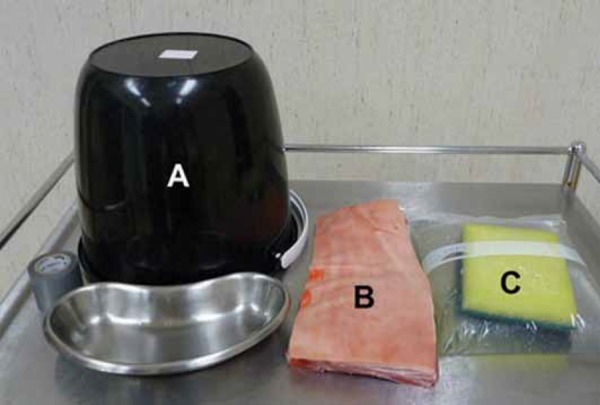
Ingredients for pleural effusion phantom.
A: Inverted bucket to recreate the frame of the chest wall
B: Pork ribs with skin and subcutaneous fat still attached to simulate the human chest wall
C: A 22×25cm resealable, slide‐locking plastic bag, filled with water and a saturated synthetic sponge to simulate the pleura, effusion and lung
Other equipment should include an ultrasound probe cover, strong adhesive tape, a pleural effusion drainage needle, and a kidney dish to catch dripping water (this appears once the plastic bag has been punctured).
Figure 2.
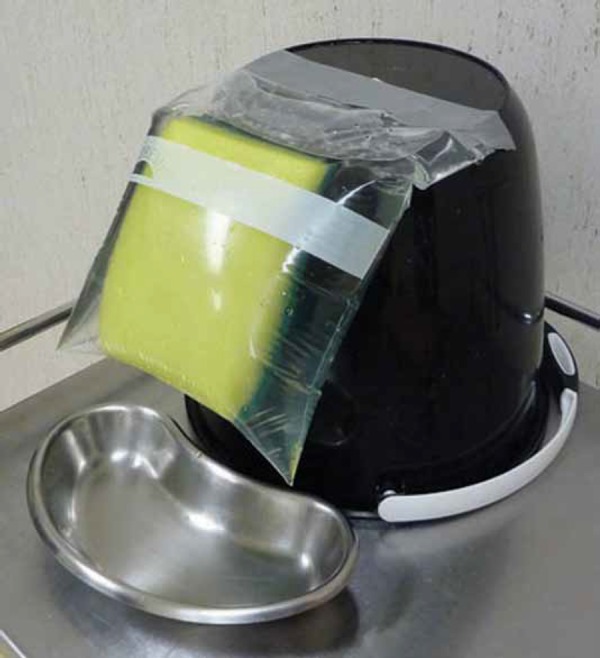
The bucket creates the framework for the phantom. The plastic bag filled with water and a sponge simulates the pleura, effusion and lung.
Figure 3.
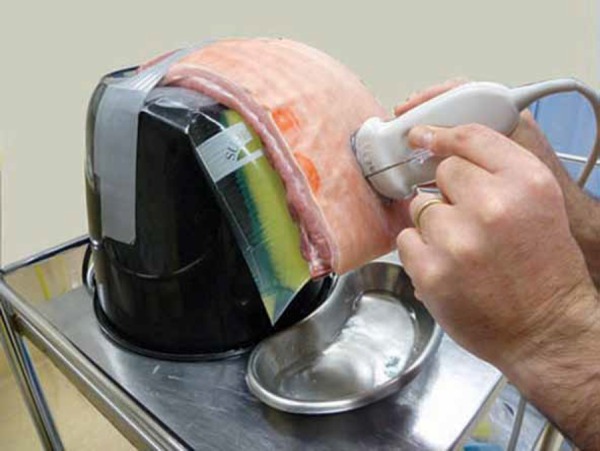
The pork rib is placed over the bag and attached to the bucket; this simulates the human chest wall. Ultrasound gel may be required between the rib cage and the bag.
Note: An ultrasound probe cover and gloves are recommended but were excluded from these photographs for visual simplicity.
The procedure
Turn a bucket upside down and fix it to an appropriate surface. This will act as the framework for your model.
Half fill a large, resealable, slide‐locking plastic storage bag (22×25cm) with water. Take the sponge and hold it under the water, squeezing it a few times to ensure it becomes saturated. Now try to lock the bag expelling all the air. A small amount of psyllium husk (Metamucil) may be added to the water (pleural fluid) if the appearance of an empyema (with echogenic debris) is required.
Attach the bag that represents the pleura, pleural effusion and lung to the bucket. Thick adhesive tape does this effectively.
The next step is to attach the pork rib over the bag, with the skin facing outward. This can be done with adhesive tape or plastic locking ties.
Using the phantom
This phantom can be used to teach candidates the appearance of either a pleural effusion or an empyema, then how to measure and mark it for drainage, and finally, it can be used for demonstrating how to perform the drainage procedure.
The following is the outline provided to those supervising this station during a thoracic ultrasound course.
1. Preparation
Ensure cleanliness – use a probe cover, gloves, absorbent sheeting and a kidney dish to collect any drips.
Make sure you are comfortable and everything is lined up for ease of operation (the screen, the patient, the probe, as well as your hand and eye).
2. Explore the phantom
With the probe oriented longitudinally (vertically), explore the phantom.
Identify skin, subcutaneous tissue, intercostal muscles, ribs, intercostal vessels (if evident), parietal pleura, pleural effusion and lung.
3. Determine and measure the best position for effusion drainage, finding a good‐sized pocket of fluid
In the ventilating patient be aware that the lung and diaphragm move through the respiratory cycle. Ensure that the site you have chosen is clear of these structures throughout respiration.
Ensure that the probe is positioned longitudinally (across the ribs) and perpendicular to the skin.
Adjust the probe position so the midpoint of the image (and probe) lie just above a rib (to avoid the intercostal vessels).
Measure the depth from skin to effusion, and then the depth of the effusion to lung.
Carefully remove the probe, noting its position on the skin, mark the midpoint of the transducer footprint – this should match the midpoint of the image noted previously and is the point for needle placement.
4. Needle placement under direct ultrasound control
There are several techniques available for this. The out‐of‐plane technique is described here.
Set up as you did before, with the probe in the same position, but this time do not remove the probe.
With the depth to effusion in mind, place the needle adjacent to the midpoint of the transducer. Aim the needle to a position where you anticipate it will hit the effusion directly beneath the probe.
Figure 4.
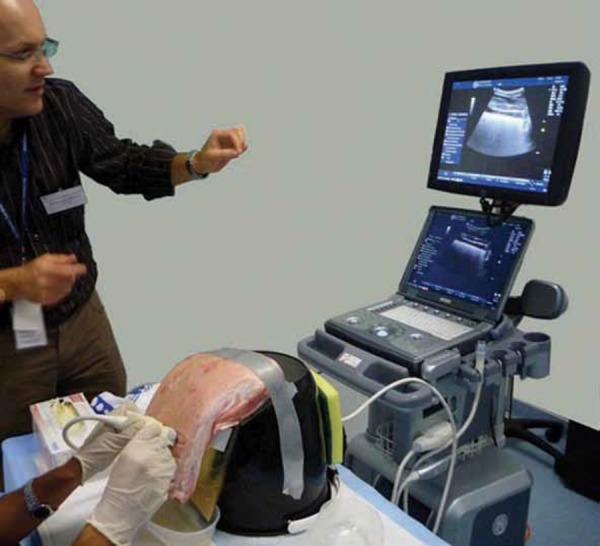
The phantom in use; note the operator, transducer, phantom and ultrasound screen are all in line. In this case a small amount of psyllium husk has been added to the fluid to create the appearance of empyema.
Video 1.
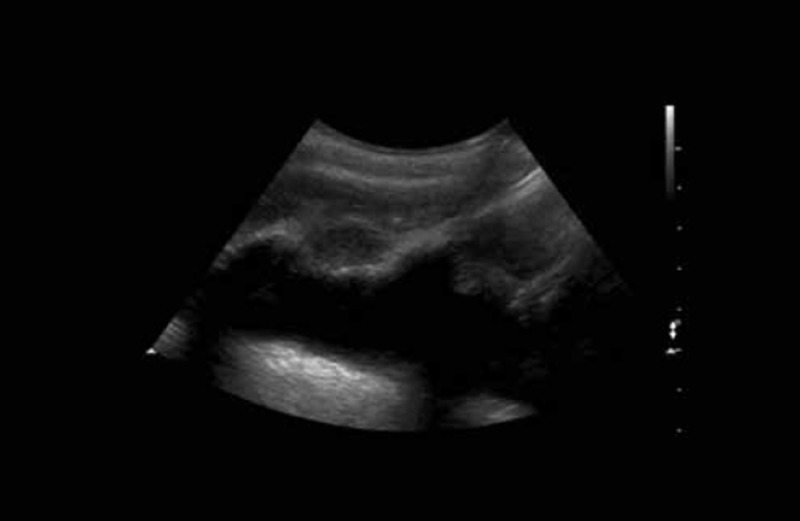
Pleural effusion phantom
This video demonstrates real‐time ultrasound guidance of a needle entering a pleural effusion using the out‐of‐plane technique.
Duration 1 min 55 sec
STEP 1: Get the target into the middle of the screen, measure its size and depth, and ensure it is safe throughout the respiratory cycle. Aim to put the needle into the effusion just above a rib, in order to avoid the intercostal neurovascular bundle.
STEP 2: The needle is entered alongside the midpoint of the transducer, perpendicular to the skin, aiming for the pleural effusion. In this case the phantom effusion is seen to be 3.5 cm below the skin, and is about 2 cm in depth.
STEP 3: Proceed slowly, slightly jiggling the needle will make the tip more evident. The probe is fanned slightly toward the needle and the tip is seen (the echogenic point) slowly moving toward and then into the effusion.
STEP 4: If more than simple aspiration is required the Seldinger technique may be used to place an intercostal catheter.
Figure 5.
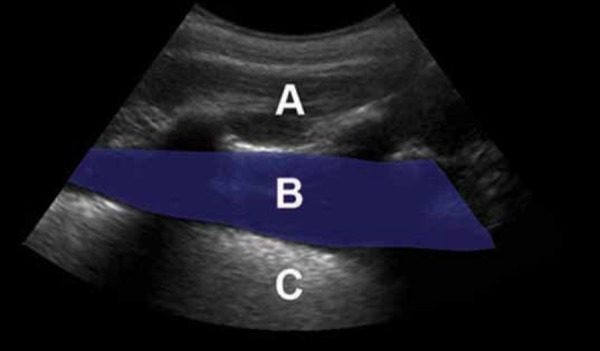
Phantom pleural effusion, curvilinear transducer. The curvilinear transducer is most commonly used for this purpose as it gives a broad and deep field of view.
A: Chest wall (pork rib cage)
B: Pleural fluid (water inside plastic bag)
C: Lung (synthetic sponge also in the water‐filled plastic bag) To achieve the appearance of empyema where the effusion contains echogenic debris, add a teaspoon of Metamucil (psyllium husk) to the liquid.
Figure 6.
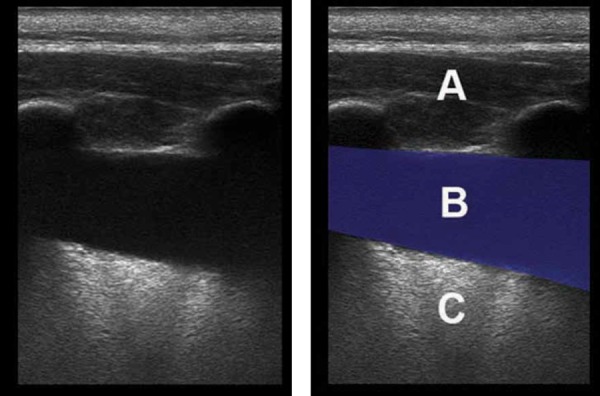
Phantom pleural effusion, linear transducer.
The anechoic stripe (B) seen between the chest wall (A) and echogenic air‐filled lung (C) has the appearance of pleural fluid.
Slowly advance the needle about 5mm. Fan the probe toward the needle to visualise the tip. Now put the probe back in the original position and advance the needle a little more. Fan the probe again to see the needle tip once more. Gently jiggling the needle may make it more apparent on the image. Continue this process, following the tip of the needle until it lies within the pleural effusion.
Note that the needle holes in the plastic bag will cause the pleural fluid to slowly leak out – into the kidney dish waiting below. Get the first candidates to aim towards the top of the effusion; as the volume gets less subsequent trainees will need to direct their needles lower, towards the remaining effusion.
Table 3.
Ingredients for normal ventilating lung, pneumothorax, contact point and wet lung phantoms.
| Shallow tray (2–3cm deep) | To hold the phantom |
|---|---|
| Water | To soak the lung |
| Chicken breast or pork ribs | To simulate the chest wall |
| Synthetic, fine‐holed sponge | The lung |
Video 2.
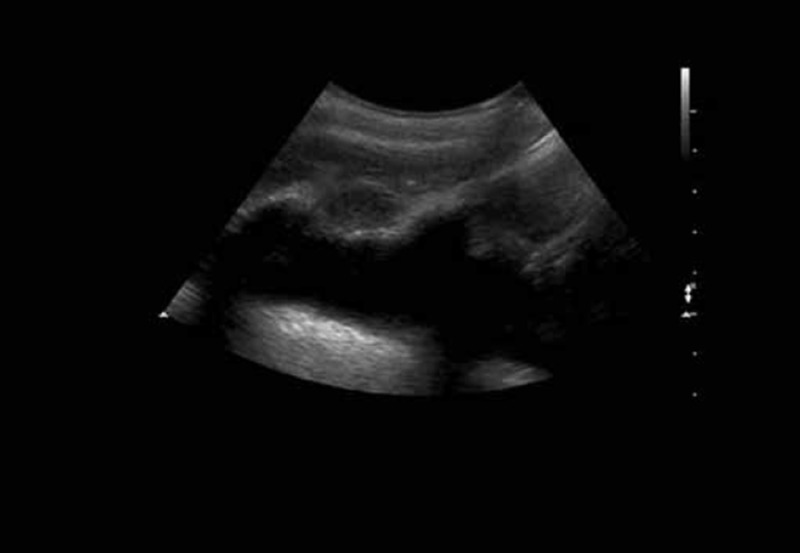
Pleural effusion; phantom and real examples
This video shows the pleural effusion phantoms well as two large and one small real pleural effusions. http://youtu.be/733AJmrP13Q Duration 2 min 7 sec
Video 3.
Normal lung; phantoms and real examples
This video shows several phantoms that demonstrate the appearance of normal ventilating lung, as well as real examples for comparison. http://youtu.be/PJonkGoGKkc Duration 3 min 32 sec
One bag tends to last for approximately 10 candidates and 30–45 minutes of needling.
Pre‐prepared bags can be used to replace the spent one, as required.
Recipe 2 – Normal Ventilating Lung, Pneumothorax (Including Contact Point) and Pulmonary Oedema Phantoms
This is a very simple phantom that replicates the appearance of normal ventilating lung, pneumothorax (including contact point) and “wet” lung (pulmonary oedema, pulmonary contusion etc).
The Procedure and Using the Phantom 1. Normal lung
Place the tray onto an appropriate surface. Fill it to about 1 cm deep with water.
Lay the sponge in the water and squeeze it flat under the water so it becomes saturated.
Now squeeze the sponge until it is just damp. Place it onto a dry surface and lay a chicken breast or pork ribs on top of it. The damp sponge represents normal lung and the chicken breast or the pork the chest wall.
Figure 7.
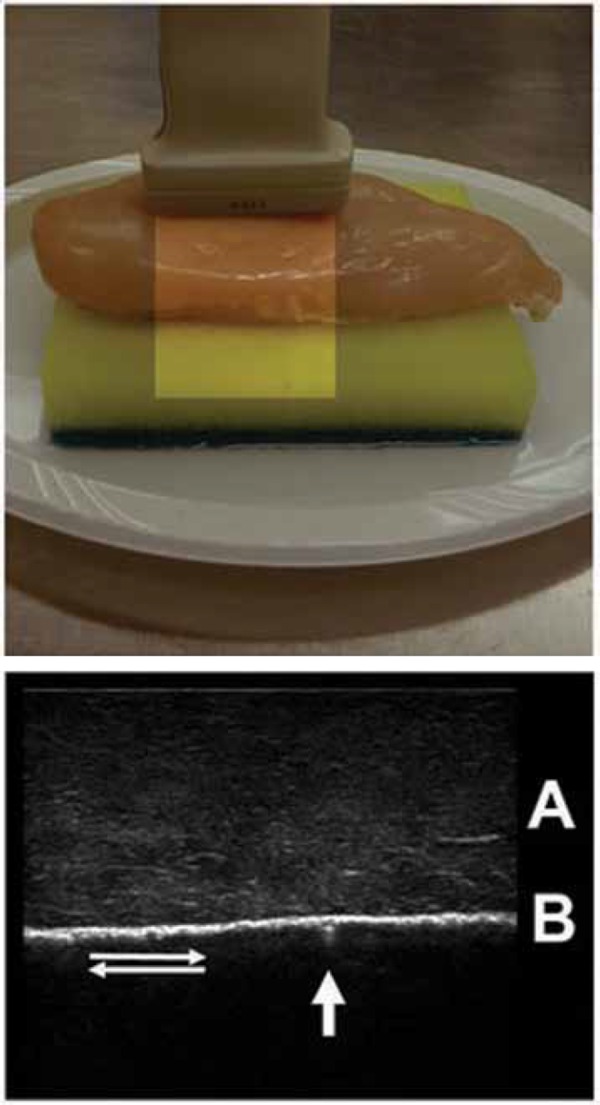
A simple normal lung phantom and corresponding ultrasound image – chicken breast and synthetic sponge.
A: The simulated chest wall (chicken breast)
B: The pleural interface with opposing parietal and visceral pleura (synthetic sponge wrapped in plastic cling film to allow easy lung sliding) An assistant slides the sponge up and down the back of the simulated chest wall whilst the trainee scans. This simulates the normal ventilating lung. Sliding occurs between the two pleural surfaces as the diaphragm descends and ascends with each respiratory cycle.
Note the small comet tail artifact (arrow). In normal lung these are few and weak fading within a few millimetres of the pleural surface. They probably represent reverberation of ultrasound within tiny pockets of interstitial fluid. Watch also for lung sliding with each respiratory cycle (double arrows).
Numerous pathologies including non‐ventilating lung, bullae and pleuradhesis may disrupt the normal appearance.
Figure 8.
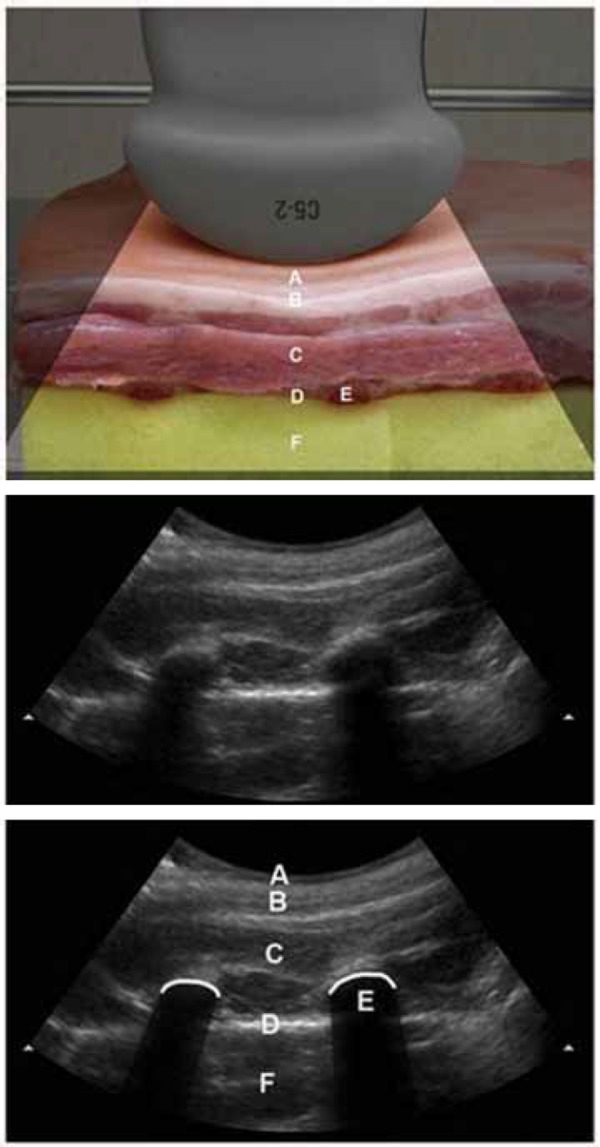
Thoracic phantom using pork ribs and sponge with curvilinear probe.
A: Skin
B: Subcutaneous fat
C: Muscles of the chest wall
D: Pleural surface
E: Rib with posterior acoustic shadowingF: Lung (damp sponge).
With a probe cover on the ultrasound transducer scan the sponge through the chicken breast. A second person slides the sponge against the chicken breast first one way and then the other to simulate respiration.
The appearance of normal ventilating lung on ultrasound is well described. 22
Ensure candidates note the pleural surface with lung sliding one way and then the other with inspiration and expiration. This has been described as “living lung”, as it has a shimmering appearance, or a line of ants walking up and down with each breath.
Figure 9.
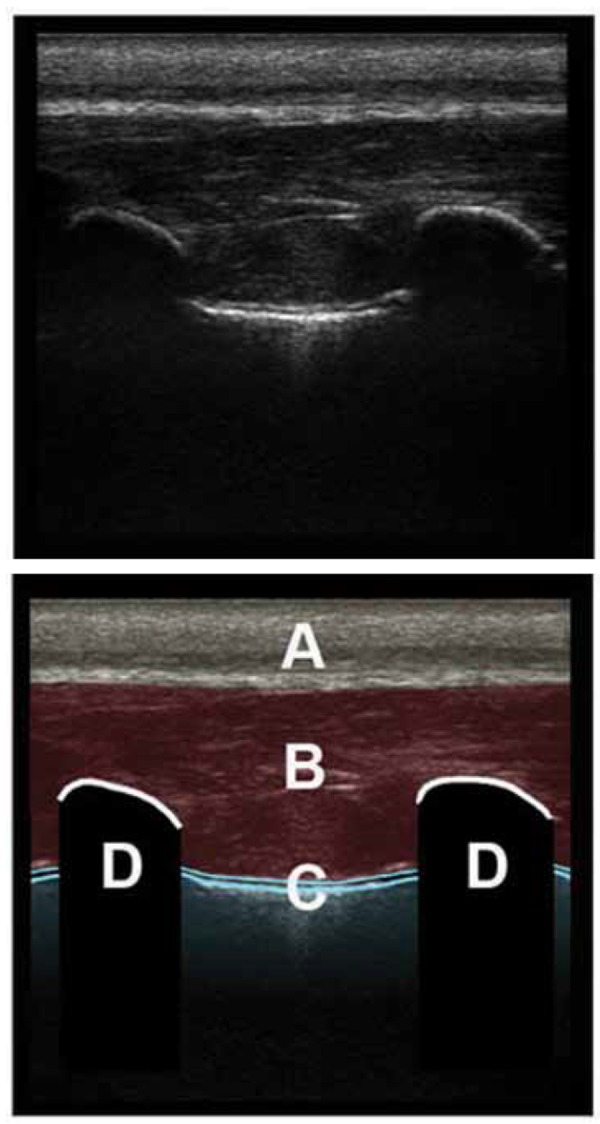
Thoracic phantom using pork ribs and sponge with linear probe.
The probe is placed longitudinally along the chest wall, demonstrating two ribs in cross section.
A: Skin, subcutaneous tissue and fat
B: Muscles of the chest wall
C: The surfaces of the apposed pleura, comet tail artifact and lung sliding
D: Ribs in transverse section, with posterior acoustic shadowing. Where the image is taken over costal cartilage the pleura can be seen in continuity deep to the ribs.
As well as the sliding, note the occasional comet tail artifact projected down from the lung surface. These tend to fade with increasing depth and are few in number. They probably represent reverberation within tiny pockets of interstitial fluid.
Some use M‐mode to help differentiate normal lung from pneumothorax on a still 2 dimensional image. In the normal ventilated lung M‐mode creates linear patterns through the static chest wall, and then deep to the pleural surfaces, because of the constantly moving lung, broken irregular granular patterns are created. This has been called the “Seashore sign” 22 , likened to waves abutting the seashore. The waves represent the linear chest wall marking and the sand the moving lung. This phantom creates a very realistic representation of the M‐mode image of normal ventilating lung.
2. Pneumothorax and the contact point
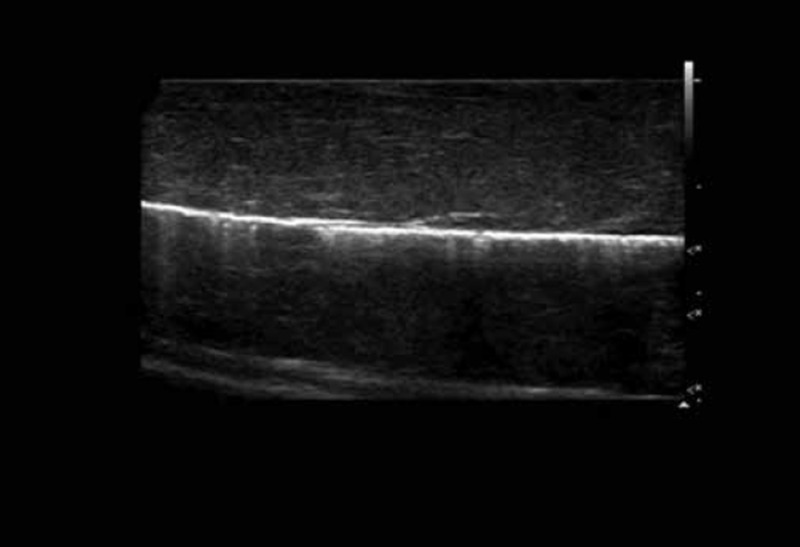
In order to simulate pneumothorax the second person holds the chicken breast or pork ribs up in the air, so contact with the sponge is lost and the appearance of pneumothorax is simulated. Partial contact with the sponge will simulate the lung or contact point of pneumothorax. This is the point where the parietal and visceral pleura make contact in a submassive pneumothorax.
Pneumothorax involves the loss of the sliding sign and associated comet tail artifact as all that lies deep to the parietal pleura is air. This interface acts as a mirror surface and reverberation occurs with replication of the chest wall image displayed deep to the pleural surface.
It is important to realise that, in those with significant underlying lung disease, ultrasound findings suggesting pneumothorax may be unreliable. Patients who have non‐ventilating lung (such as the left lung in a right sided endobronchial intubation), or patients with bullae and emphysema, prior pleuradhesis, or ICU patients, may lose the typical lung sliding, and ultrasound alone should not be relied upon to make the diagnosis. It is however thought that a contact point, particularly one that moves with inspiration and expiration is a highly specific ultrasound sign of pneumothorax.
The M‐mode picture of pneumothorax differs significantly from that of normal ventilating lung. In pneumothorax the same linear pattern is created by the chest wall. Deep to the parietal pleural surface however, there is no moving lung. Instead a mirror surface is created by the tissue / free air interface. Reverberation of the sound waves from this highly reflective surface creates an ongoing pattern of the lines of the chest wall deep to the pleural surface. This has been called the “Stratosphere” sign. 22 Once again this is well simulated by this phantom.
3. Wet lung / Interstitial oedema
Begin by saturating the sponge and leave it wet, lying in the tray of water. Put the chicken or ribs on the sponge and scan again. Have someone slide the wet sponge up and down to again simulate ventilation. The appearance of the sponge surface will replicate the appearance of lung in pulmonary oedema.
Interstitial fluid may be diffuse or focal and may be the result of pulmonary oedema, either cardiac or inflammatory, pulmonary contusion or acute lung injury (ALI). Fluid pockets surrounded by air create ideal foci for reverberation and ring down artifact. Unlike the small comet tail artifacts described earlier for normal lung, intense well defined ringdown artifacts or “lung rockets” reach down to the deep surface of the ultrasound image. This is presumably because there is no loss of ultrasound energy as it reverberates within a fluid medium, and time gain compensation thus makes the artifact more pronounced in a way similar to post cystic enhancement.
Video 4.
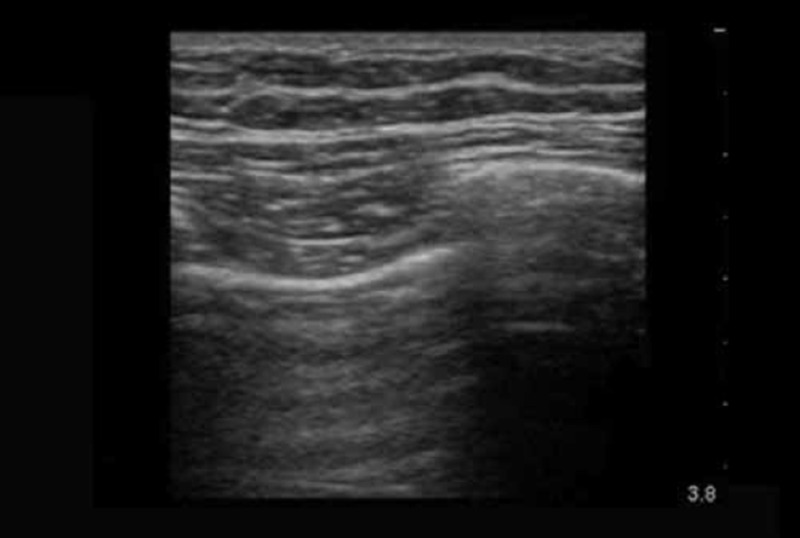
Pneumothorax and contact point; phantoms and real examples This video shows several examples of pneumothorax seen on real patients and includes two cases that show the contact or lung point. The phantom is shown for comparison. http://youtu.be/NA2hQbv7HXQ Duration 5 min 2 sec
Video 5.
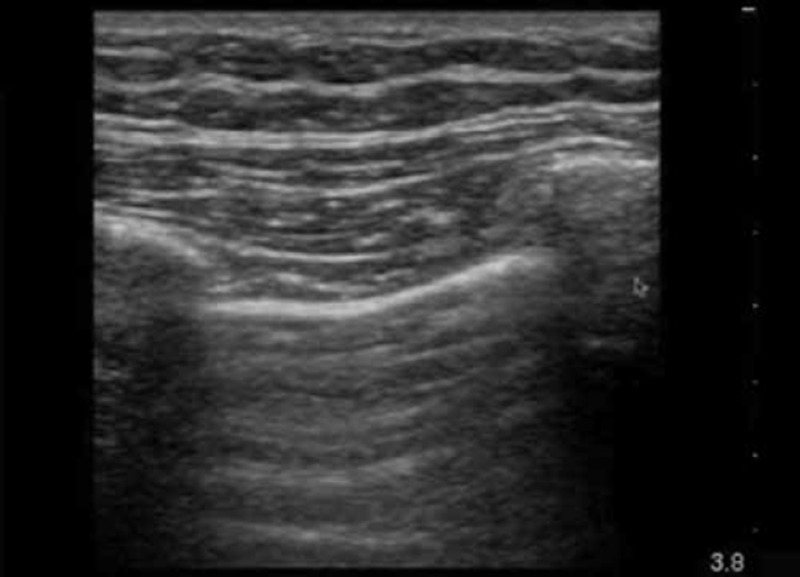
Pulmonary oedema; phantoms and real examples
This video demonstrates the appearance of pulmonary oedema with lung rockets or B‐lines on real patients and on the phantom. http://youtu.be/rG3RKV040U4 Duration 3 min 14 sec
Video 6.
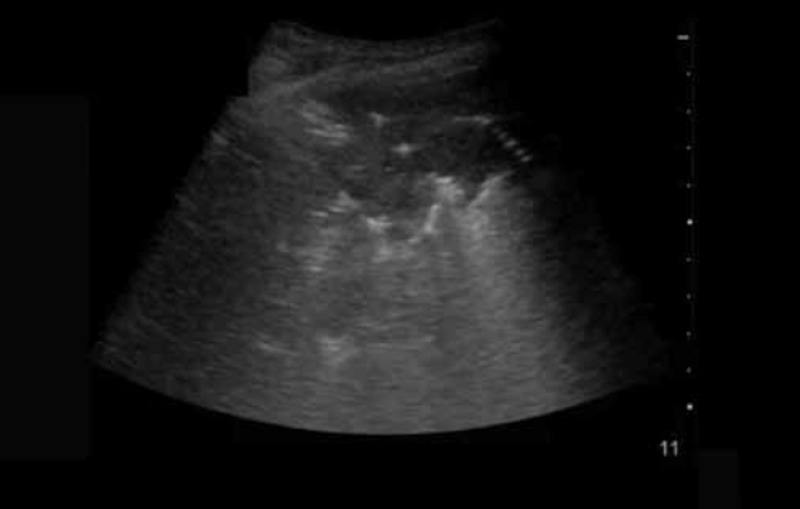
Other lung pathology including consolidation
This video is an ultrasound of a patient with pneumonia. It demonstrates the appearance of consolidation and sonographic air bronchograms. http://youtu.be/i305unDhjas Duration 52 seconds
Figure 10.
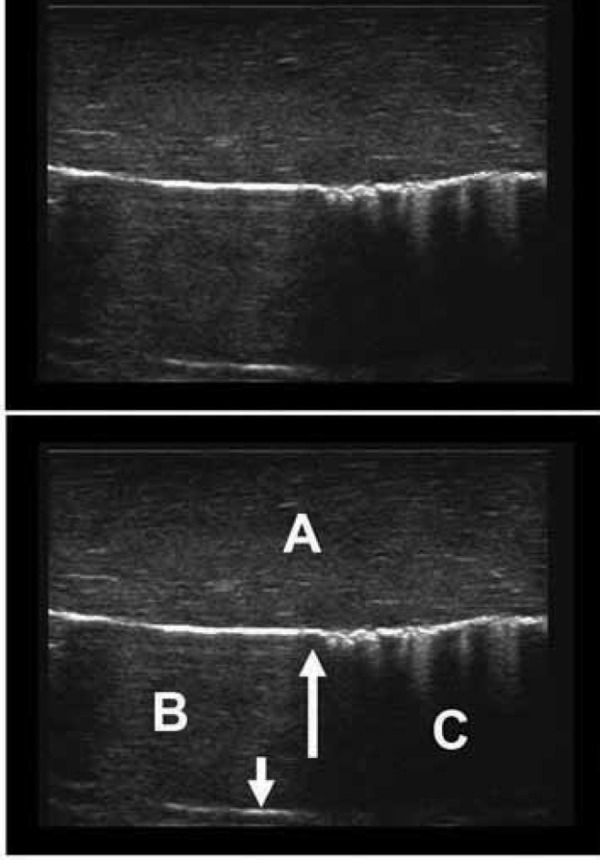
Chicken and damp sponge phantom – pneumothorax contact point.
This simulation is created by rubbing a damp sponge up and down the back of the simulated chest wall, but only keeping part of it in contact. This is the appearance of the “contact” or “lung” point that confirms the presence of a pneumothorax. This is the point at which the parietal and visceral pleura make contact, and moves with respiration (unless there are adhesions).
A: Simulated chest wall, chicken breast in this case, although pork ribs are an effective alternative.
B: The area of pneumothorax where the unapposed bright parietal pleural surface acts as a reflective surface. It is a straight line that is motionless during respiration, and deep to it, static reverberation artifact is present (small arrow).
C: To the right of the larger arrow the parietal and visceral pleural surfaces make contact (the lung point). The bright pleural line is now not as flat, reflecting the tiny irregularities in the lung surface and several comet tail artifacts are seen. With each respiration, where the two pleural surfaces are apposed the lung can be seen to slide up and down (sliding sign).
Figure 11.
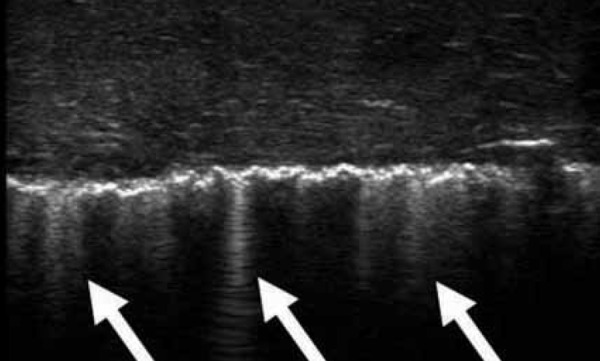
Interstitial oedema with more prominent, well defined and intense ringdown artifact. These are known as “lung rockets”. This pattern occurs with pulmonary oedema but also other processes that cause intersitial / alveolar fluid to accumulate. This includes pulmonary contusion. In this case a pulmonary contusion is seen on the first video; compare it to the clip taken on the normal side. Note how the normal, very minor comet tails seen radiating just deep to the pleural surface, are replaced by far more intense echogenic ringdown artifact that reaches the deepest part of the image. These artifacts are known as “lung rockets” or “B‐lines”.
Conclusion
Thoracic and lung ultrasound is a relatively new field. Whilst ultrasound has been used for some time to characterise, measure and drain pleural effusions by sonographers and radiologists, the use of ultrasound to detect pneumothoracies and to assess for pulmonary oedema, consolidation and other pathological pulmonary processes is relatively new. In addition clinicians from non‐imaging specialties such as respiratory physicians and critical care physicians are now beginning to embrace thoracic and lung ultrasound.
It is essential that this group of clinicians understand the considerable advantages and also the definite limitations of ultrasound before embarking on using it in their patients. Appropriate guidance and education is imperative. It is hoped that this article will provide new users and trainers alike with some understanding of lung ultrasound, and some effective tools they can use in improving their thoracic and lung ultrasound education.
It is anticipated that these simple and affordable phantoms will help to familiarise trainees with the ultrasound appearance of various lung pathologies. It is also hoped that they will stimulate discussion, enthusiasm and experimentation among those of us who teach ultrasound on a regular basis.
References
- 1. Dunn F, Fry WJ. Ultrasonic absorption and reflection by lung tissue. Phys Med Biol 1961; 5: 401–10. [DOI] [PubMed] [Google Scholar]
- 2. Soldati G, Sher S. Bedside lung ultrasound in critical care practice. Minerva Anestesiol 2009; 75 (9): 509–17. [PubMed] [Google Scholar]
- 3. Copetti R, Soldati G, Copetti P. Chest sonography: A useful tool to differentiate acute cardiogenic pulmonary edema from acute respiratory distress syndrome. Cardiovasc Ultrasound 2008; 6: 16. [DOI] [PMC free article] [PubMed] [Google Scholar]
- 4. Parlamento S, Copetti R, Di Bartolomeo S. Evaluation of lung ultrasound for the diagnosis of pneumonia in the ED. Am J Emerg Med 2009; 27: 379–84. [DOI] [PubMed] [Google Scholar]
- 5. Lichtenstein DA, Mezière G, Lascols N, Biderman P, Courret JP, Gepner A, et al. Ultrasound diagnosis of occult pneumothorax. Crit Care Med 2005; 33: 1231–38. [DOI] [PubMed] [Google Scholar]
- 6. Soldati G, Testa A, Silva FR, Carbone L, Portale G, Silveri NG. Chest ultrasonography in lung contusion. Chest 2006; 130: 533–38. [DOI] [PubMed] [Google Scholar]
- 7. Avruch L, Cooperberg PL. The ring down artifact. J Ultrasound Med 1985; 4: 21–8. [DOI] [PubMed] [Google Scholar]
- 8. Jambrik Z, Monti S, Coppola V, Agricola E, Mottola G, Miniati M, et al. Usefulness of ultrasound lung comets as a nonradiologic sign of extravascular lung water. Am J Cardiol 2004; 93: 1265–70. [DOI] [PubMed] [Google Scholar]
- 9. Kremkau FW, Taylor KJ. Artifacts in ultrasound imaging. J Ultrasound Med 1986; 5: 227–37. [DOI] [PubMed] [Google Scholar]
- 10. Soldati G, Copetti R, Sher S. Sonographic interstitial syndrome: The sound of lung water. J Ultrasound Med 2009; 28: 163–74. [DOI] [PubMed] [Google Scholar]
- 11. Browne JE, Ramnarine KV, Watson AJ, Hoskins PR. Assessment of the acoustic properties of common tissue‐mimicking test phantoms. Ultrasound Med Biol 2003; 29: 1053–60. [DOI] [PubMed] [Google Scholar]
- 12. Royal College of Radiology . Ultrasound training recommendations for medical and surgical specialities. UK: Royal College of Radiology; 2005. [Google Scholar]
- 13. American College of Radiology . ACR practice guidelines for performing and interpreting diagnostic ultrasound examinations. American College of Radiology; 2006. [Google Scholar]
- 14. European Federation of Societies for Ultrasound in Medicine and Biology . Minimum training requirements for the practice of medical ultrasound in Europe. Appendix 11: thoracic ultrasound, 2009.
- 15. Jones PW, Moyers JP, Rogers JT, Rodriguez RM, Lee YC, Light RW. Ultrasound‐guided thoracocentesis: is it a safer method? Chest 2003; 123: 418–23. [DOI] [PubMed] [Google Scholar]
- 16. Rahman NM, Singanayagam A, Davies HE, Wrightson JM, Mishra EK, Lee YC, et al. Diagnostic accuracy, safety and utilization of respiratory physician‐delivered ultrasound. Thorax 2010; 65 (5): 449–53. [DOI] [PubMed] [Google Scholar]
- 17. Wrightson JM, Fysh E, Maskell NA, Lee YC. Risk reduction in pleural procedures: sonography, simulation and supervision. Curr Opin Pulm Med 2010; 16 (4): 340–50. [DOI] [PubMed] [Google Scholar]
- 18. Culjat MO, Goldenberg D, Tewari P, Singh RS. A review of tissue substitutes for ultrasound imaging. Ultrasound Med Biol 2010; 36 (6): 861–73. [DOI] [PubMed] [Google Scholar]
- 19. Sun B, McKenzie FD. Realtime sonography simulation for medical training. Int J of Education and Information Tech 2011; 3 (5): 328–35. [Google Scholar]
- 20. Rippey J. Thoracic ultrasound workshop with novel lung ultrasound phantoms. First presented at Winfocus, Rome: 2010. [Google Scholar]
- 21. Soldati G, Giunta V, Sher S, Melosi F, Dini C. “Synthetic” comets: A new look at lung sonography. Ultrasound Med Biol 2011; 37 (11): 1762–70. [DOI] [PubMed] [Google Scholar]
- 22. Lichtenstien D. Lung ultrasound in the critically ill. Ten signs: the alphabet for performing the BLUE protocol. Available online at http://www.wcume.org/wp‐content/uploads/2011/05/Lichtenstein.pdf [Verified October 2011].


