Figure 2.
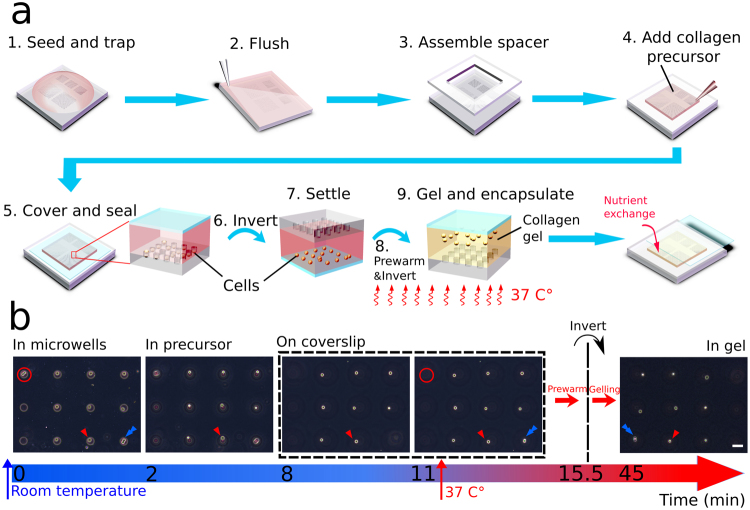
Schematics and images to illustrate the drop-patterning method. (a) 1. A cell suspension is seeded on a substrate containing arrays of microwells. The cells are allowed to settle for 5 minutes. 2. Excess cells are gently flushed away with PBS. 3. A PDMS spacer is assembled onto the microwell substrate to create a chamber. 4–5. Once filled with collagen solution, the entire chamber is sealed with a coverslip. 6. The chip is inverted and the trapped cells begin falling out. 7–9. When most cells settle on the glass coverslip, the chip is prewarmed at 37 °C for 4.5 minutes and then inverted again. The cells start falling back into the collagen precursor and the collagen is allowed to gel at 37 °C. After the cell pattern is encapsulated in the collagen gel, the coverslip is carefully slid aside for nutrient exchange (see also Figure S2). (b) On chip, real-time monitoring (bright-field imaging) of cell-array embedding in collagen by drop-patterning. (Movie S1) The imaging started immediately after the first inversion, and always focused on a single cell indicated with a red triangle. The cell doublet in the red circle was stuck in the well and did not fall into the collagen precursor. The blue arrow may be used to keep track of a cell/position before and after the second inversion. Bright-field images of the cells in collagen before and after gelation are presented in Figure S4 to show the structural difference between collagen precursor and collagen gel. (Scale bar: 50 µm).

