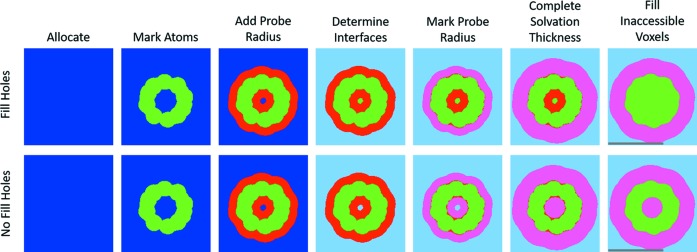
Figure 3.
Stages in determining voxelized solvent and solvation. Here, a slice of C60 is shown as an example of the stages. First the required space is determined, allocated and marked blue (or 0). Second, all voxels within the atomic radius of each atom are marked as excluded volume (green or 1). Third, an additional Probe Radius is added around each atom, marking only blue voxels as red (2). The fourth step is to determine the interfaces between the solvent and the molecule. Depending on how the user chooses to treat ‘trapped’ volume (Fill Holes or not), this is either a trivial swap of blue to light blue (No Fill Holes) or a 3D flood-fill in order to differentiate between inner and outer interfaces. In the case of Fill Holes, the blue voxels that are not changed to light blue are marked as excluded volume (green, 1). The fifth stage marks all red voxels within one Probe Radius of the interface between light blue (3) and red (2) as pink (4). In the sixth stage, the solvation layer thickness is completed from the interface between pink (4) and light blue (3). The final stage marks the remaining red voxels (2) as excluded volume (green, 1). The gray scale bars in the rightmost figures correspond to 1 nm.

