
Fig. 3. This schematic diagram illustrates how tempering and fortification strategies operate to enhance resilience in response to adversity.
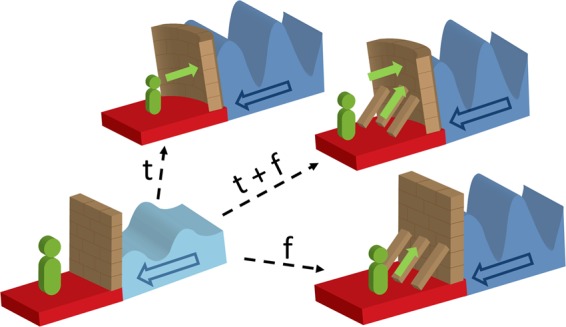
The ability to withstand increasing pressure induced by allostatic load (represented by the dark blue arrow) requires active engagement (represented by green arrow) to either reuse dormant but pre-existing skills (tempering (t)) and transfer or deploy such skills for use in new contexts (depicted by curvature in the tempered wall) to produce tempered resilience, or acquire additional skills (fortification (f); depicted by braced wall) to ‘further build’ resilience culminating in fortified resilience. To enhance stability, the tempered wall also needs fortification (depicted by the tempered and fortified wall (t + f) that represents tempered and fortified resilience). Tempering and fortification ultimately repair, modify and strengthen the integrity of stress-responsive systems (neurobiological and psychosocial), to produce adaptive resilience (Ra). However, fortification may operate independently, when the systems have been overwhelmed. The intensity of adversity is depicted by the colour change from a lighter (low intensity) to a darker (high intensity) blue colour. The duration is depicted by the wavelength, which can be intermittent, short or prolonged. It is important to capture this variability in adversity as it reflects the varying degrees of allostatic load.