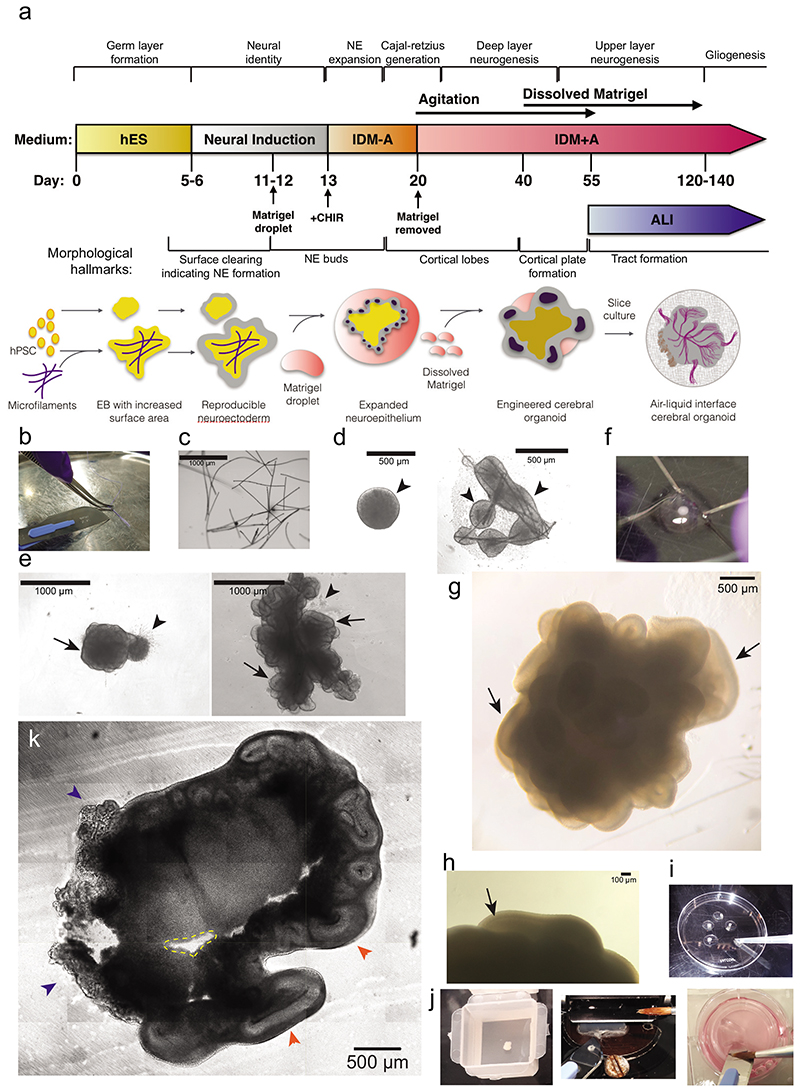
Figure 1. Methodological overview and key steps.
a. Timeline of the protocol for generating improved cerebral organoids and air-liquid interface (ALI) cultures with key developmental stages provided above and morphological hallmarks provided below. NE = neuroepithelium. b. Image to demonstrate microscaffold preparation. The suture is splayed with the blunt side of the scalpel blade, then cut into 1 mm pieces on a sterile tray. c. Image showing rehydrated fibres observed under a phase contrast microscope (scale bar = 1000 μm). d. Images of round EB at day 7 after successful neural induction (left-hand panel), showing a smooth border and brightening edges (arrowheads), and a micropatterned organoid at day 7 (right-hand panel), demonstrating bright smooth edges (arrowheads) indicative of proper neural induction. e. Images of reduced-size organoid made with 3,000 cells at Day 12 observed under phase contrast (left-hand panel) and a micropatterned organoid at Day 13 (right-hand panel). Note that both organoids predominantly consist of neuroepithelial buds (arrows) with sparse disorganized areas of migratory cells (arrowheads). Scale bars = 1000 μm. f. Image to show the process of removing Matrigel droplets by microdissection with syringe needles. One needle is used as a pin to hold the Matrigel droplet while the other is used as a blade to cut or tear off the Matrigel until most is removed. g. Bright-field image at day 50 showing well-formed, large and smooth cortical lobes (arrows) covering the entire organoid. h. Image to show a visible cortical plate under phase contrast on a Day 58 organoid (arrow). Scale bar = 100 μm. i. Image to show process of preparation for slice culture. Organoids are transferred to the lid of a 60 mm dish with a cut 1 ml tip and gently washed with HBSS. j. Image of an organoid just after embedding in 3% low-melt agarose within a peel-A-way mold (left-hand panel). We also provide an image to show the process of section collection with a scalpel and a brush (middle panel); the brush is used to manipulate the section only through contact with the agarose. The tissue section is slid and loaded onto the scalpel blade for transfer, before being deposited onto the cell culture insert by gently pushing the edge of the section off the scalpel blade (right-hand panel). The brush can also be used to apply medium to the scalpel blade to facilitate sliding of the tissue section off the blade. k. Bright-field image of a tissue slice of a 54-day old organoid immediately after sectioning. The ALI-CO displays regions of choroid plexus (blue arrowheads) and large cortical walls organized around what is left of the cortical ventricles (orange arrowheads). Small cavities (dashed yellow line) in the organoid section can be caused by detachment of small regions of necrotic tissue that is particularly brittle. Scale bar = 500 μm.

