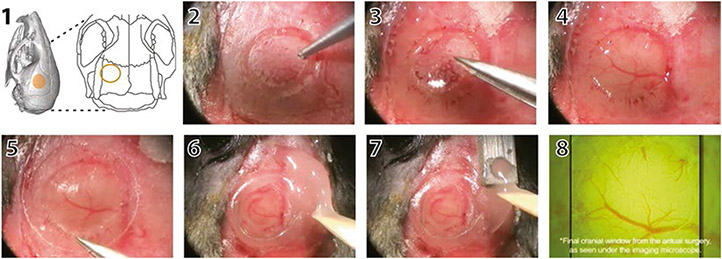
Fig. 3.
Cranial window surgery for in vivo imaging with 2PE microscopy. The location of the cranial window is selected based on anatomical landmarks or functional imaging (1). In this case, the window was placed over the left barrel cortex. Under anesthesia, the skull is exposed, and a circular portion of the bone is gently carved with a pneumatic drill (2). Next, the bone flap is removed with small forceps (3) taking care not to damage the underlying meninges and vasculature (4). A glass coverslip is gently placed over the craniotomy (5). The edges of the glass window are sealed with cyanoacrylate glue and dental cement (6). A small well is also made around the window with dental acrylic to accommodate the objective lens and a drop of water for imaging. A titanium bar is then embedded in the dental acrylic (7), which can later be used to attach the mouse on to the microscope stage. The cortical vasculature can be seen under the microscope objective (7). Please refer to Mostany R and C Portera-Cailliau (2008) for a video of the procedure

