Abstract
Microstructure and texture evolution of directed-laser deposited super-duplex stainless-steel, in the as-received block, were characterized using light and electron microscopies and electron backscattered diffraction. Mechanical properties in different directions were studied. Local FCC-depleted and FCC-rich zones and extensive precipitation of oxides were detected at the matrix wherein the different types of reformed austenite were surrounded by the elongated coarse ferrite. A vertical gradient of austenite content, caused by overall change in cooling rate, generated a waning hardness distribution along the building direction. The texture of austenite across the different deposition layers was not as intense as that of the ferrite. A dominant ⫽ND fibre, embedding strong Cube , was calculated for ferrite on the layer away from the bottom while the Goss appeared in the layer near the building substrate due to the considerable epitaxially developed grains. The less intensified multi-component texture of austenite at the layer near the substrate changed to ⫽ND fibre adorned by Rotated-Goss and Goss components at the upper layers where an incomplete fibre with a major Rotated-Cube was also partially inherited from the parent phase. The inter-phase boundaries obeying Kurdjumov-Sachs orientation relationship were predominantly formed at all layers. A slight increase of Σ3 coincidence site lattice interfaces was observed in austenite across the build direction. The possible mechanical anisotropy was depressed due to complex and multi-component transformation texture of the austenite. The material showed brittleness corresponding to significantly high tensile strength and low impact toughness.
Keywords: Directed laser deposition, Super-duplex stainless steels, Microstructure, Texture, Mechanical properties
1. Introduction
Ferritic-austenitic steels, known as bi-phase/duplex stainless steels (DSSs) were initially developed, based on Cr–Ni–Mo–Fe system, in 1930's [1]. These alloys in which the fraction of phases, roughly consisting 50% of ferrite () and 50% of austenite (), are adjusted by the optimized amount of phase stabilizers [2] have been recently on the benchmark for printability examinations using metal additive manufacturing (MAM) technology benefiting an accurate, single-step and geometrical-free fabricating ability over subtractive paths. They have been lately attracting interests from materials scientists and commercial laser MAM system suppliers, after the initiation of the research on laser powder bed fusion (LPBF) of ferromagnetic alloys, carried out by Kruth et al. [3], and further excavation on the processing of austenitic stainless steels, such as AISI 316 [4]. These studies suggested a significantly improved properties compared to the equivalent wrought and cast alloys. Nonetheless, the different MAM processes with their multiple parameters can individually have complicated influence on the metallurgical behaviour of the materials.
The metallurgical reflection of dual-phase powder granules to the localized moving heat source during 3D-printing were unclear until the pioneering selective laser melting (SLM) studies, inspired by the material's behaviour from the welding point of view, was accomplished by Davidson and Singamnen [5] on DSS grade of UNS S31803 in which the detailed density and microstructural examinations validated the laser AM feasibility of the alloy by adjusting the process parameters. Later on, similar SLM research by Hengsbach et al. [6] indicated the printability of DSSs and superiority of the applied method compared to the time-consuming conventional approaches. Subtractive methods such as powder metallurgy sintering often offered a porous structure unless the fabrication process is carried out under proper vacuum [7]. Otherwise, extra costly post-processing operations, e.g., hot isostatic pressing, are required [8].
During recent years, a few researchers have been trying to characterize the microstructural features of additively developed DSSs. The establishment of a monophasic structure containing a substantially high dislocation density has shown to be an attribute peculiar to the nature of LPBF (due to the extremely rapid cooling rate arising from the process parameters) of DSS and hyper-DSS, conducted by Saeidi et al. [9], and Feng et al. [10], respectively, with the least concerns about brittle secondary phase formation in the as-built state. Such an accumulation of dislocations in the single ferritic matrix generated in small grains, i.e., a higher density of grain boundaries, not only promotes the mechanical properties including hardness and tensile strength (although a significant reduction in ductility is expected), but also facilitates the post-SLM heat treatment, to further adjust the equilibrium phase balance between and [6]. Nigon et al. [11] detected a preferred orientation of the material when a fully ferritic matrix of SLMed DSS 2205 changed to a duplex structure through the solution annealing. The significant density of dislocations appeared to be a driving force for the subsequent nucleation of the secondary and its volume fraction after annealing. Papula et al. [12] observed the preferred crystallographic orientation of the MAMed DSS that was evidently influenced by the type of strategy applied for deposition. They also detected the compressive residual stress state in the outer surfaces of developed DSS cylinders and explained the beneficial effect of solution annealing in diminishing the residual stress.
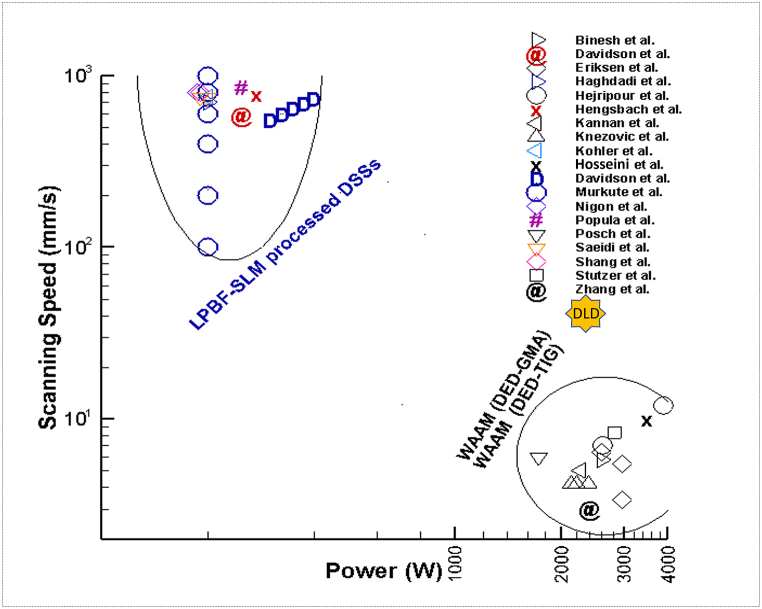
Fig. 1, representing the main process parameters (power of the heat source and scanning speed), utilized in three common MAM techniques for fabrication of DSSs, obviously portends of the two areas inscribed in circles. The drastically higher cooling rate (e.g., significantly higher than in casting and in arc welding [13]) in SLM is due to the less magnitude of power and higher values of deposition speed compared to the wire and arc additive manufacturing (WAAM). Achieving a slightly moderate heat input or, in other words, a medium cooling rate is possible by adjusting the parameters in between [14] and, thus, an entirely different behaviour of the DSS parts during printing is expected compared to those of SLMed and WAAMed parts. Blown-powder directed laser deposition (DLD), categorized among the directed energy deposition (DED) methods, is an advanced variant of laser AM technologies with a considerably high deposition rate [15]. In comparison with SLM, the higher power of the laser and slower deposition/scanning speed (the locus of DLD in Fig. 1, showing the parameters used within the present work) can input a greater thermal energy to the material and, therefore, the slower cooling rate may facilitate the solid-state transformation of in order to attain the equilibrium phase balance (duplex structure) in as-built condition.
Fig. 1.
Source power and travel speed used in MAM of DSSs, extracted from the literatures [5,6,[10], [11], [12],[16], [17], [18], [19], [20], [21], [22], [23], [24], [25], [26], [27], [28], [29]]. GMA and TIG are the abbreviations used for gas-metal-arc and tungsten-inert-gas welding processes, respectively.
Considering the growing application of DLD and the widespread acceptance of DSSs as economical corrosion resistant alloys with the superb mechanical properties, the aim of this study is to discuss the microstructural features, texture evolution, and mechanical properties of the DLDed super-duplex stainless-steel (SDSS) grade of AISI SAF 2507 (EN 1.4410, UNS S32750), often called SDSS 2507.
2. Methodology
2.1. Materials and 3D-printing method
A block of the volume was fabricated, using DLD machine Trumpf True Laser Cell 3000 and the parameters in Table 1(a), by the vacuum inert-gas-atomized powder of SDSS 2507 with the chemical composition listed in Table 1(b). , and equal to 62.5, 98.1 and 154.0 , respectively, were the characteristic size distribution values of the powder analyzed by the laser diffractometer, based on ASTM B822.
Table 1.
(a) DLD parameters used for fabrication. (b) Chemical composition of SDSS 2507 powder (weight %).
| (a) | ||||||||||||
|---|---|---|---|---|---|---|---|---|---|---|---|---|
| Laser power (W) | Deposition speed (mm/s) | Powder feeding rate (g/min) | Laser diameter (mm) | Layer thickness (mm) | Hatch distance (mm) | |||||||
| 2300 | 41.6 | 16 | 2 | 0.9 | 1.3 | |||||||
| (b) | ||||||||||||
| UNS | Fe | Cr | Ni | Mo | N | Cu | Mn | Si | C | S | P | |
| S32750 | Bal. | 25.4 | 6.8 | 3.8 | 0.28 | 0.02 | 0.71 | 0.56 | 0.009 | 0.006 | 0.007 | 2.29 |
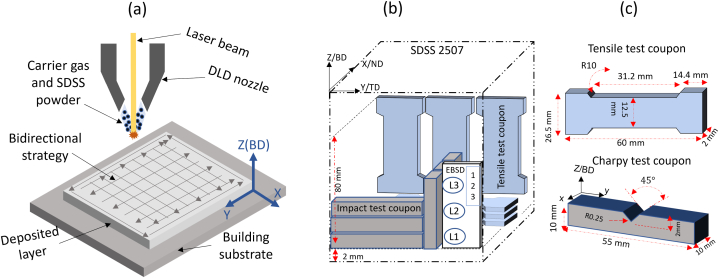
The part was fabricated in an orthogonal (bidirectional) deposition strategy, illustrated in Fig. 2(a), where the layers are deposited in 90° on top of each other toward the coordinate axis Z representing the building direction (BD). Each layer was followed by a peripheral finishing pass. Hereafter, the plane XY addresses the surface normal to BD while the plane YZ represents the building plane.
Fig. 2.
Illustrations of (a) DLD heat source and the applied deposition strategy, (b) mechanical test specimen locations and orientations, and texture examination areas, and (c) tensile and Charpy impact test samples.
2.2. Estimation of density
The theoretical method of Archimedes, the actual techniques of Gas Pycnometry (Pycnometer AccuPyc II 1340), and image analysis were used to examine the density. According to Archimedes principle, the weight of the samples in air () and water () were plugged into Equation (1) [30], to estimate the actual density (). The relative density was subsequently computed by Equation (2) [30]. The theoretical density was 7.85 .
| (1) |
| (2) |
The image analysis included the calculation of the mean void fraction of forty macrographs, each with a magnification of 50x, in planes normal and parallel to BD.
2.3. Optical microscopy (OM)
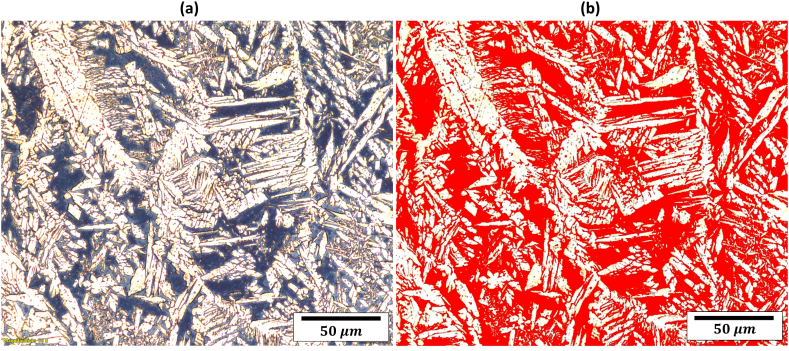
Metallographic samples were sectioned, mounted, ground and polished up to 1 μm diamond suspension, cleaned, and chemically etched by immersing in Beraha (85 mL water, 15 mL HCl and 1 g ) within multiple cycles (3 12s) etching time to observe the microstructural features and estimate the phase ratio as a function of distance from the bottom of the block by using the digital microscope Olympus GX53 equipped with the software Olympus Stream Essentials. Each point on the corresponding graph represents an average phase fraction in an area of 2.4 acquired by processing of 50 micrographs, as shown by Fig. 3(a and b), in 200x.
Fig. 3.
Micrographs used for (a) image processing and (b) calculation of the phase fractions.
2.4. Scanning electron microscopy (SEM)
The same procedures used for OM were also used for SEM sample preparation. The etching process was replaced by 0.04 μm OP-S suspension at the last polishing stage. The Field Emission SEM instrument of Zeiss SUPRA 35 V P equipped with Energy Dispersive Spectroscopy (EDS) detector, Electron Back-scattered Diffraction (EBSD), and OIM TSL software imposing a bi-phasic (FCC + BCC) system were applied for microstructure and crystallographic visualizations on surfaces, shown in Fig. 2(b). Z, Y and X axes in Fig. 2(b) represent BD, TD, and ND (building, transverse, and normal directions), respectively. The mounting system was EB⫽ND(X) and TA⫽TD(Y) where EB addresses the electron beam and TA shows the tilt axis of the sample. An accelerating voltage of 25 keV, a working distance of 25 mm, and different step sizes, given in Table 2, were exerted. The large-area maps using coarse step sizes were applied to be able to derive the crystallographic texture and substructural information of large columnar grains. The fine step sizes within the acquisition of small-area-scanning were used to avoid the inaccurate misorientations that might be generated from the accumulation of angles across several interfaces and to compensate for the disability of the coarse step size in detecting the fine grains. The software ATEX [31] was also used in local crystallography measurements. The data collected were subjected to grain dilation cleaning with a maximum grain size of 2 pixels. Adopting the harmonic series calculation and Triclinic sample symmetry, recommended by Randle et al. [32], the pole figures, inverse pole figures (IPFs), and orientation distribution functions (ODF) in the Euler space were elucidated in three DLD layers L1, L2 and L3 (Fig. 2(b)), with 3–5, 18–20 and 38–40 mm away from the building substrate, respectively.
Table 2.
EBSD parameters used in different areas.
| Sample of interest | Area | Magnification(x) | Step size |
|---|---|---|---|
| Peripheral zone 1 | 1100 1100 | 250 | 1.00 |
| FCC-poor zone 2 | 1000 | 0.30 | |
| FCC-rich zone 3 | 50 | 5000 | 0.05 |
| Layer L1 | 1800 | 150 | 2.00 |
| Layer L2 | 1800 | 150 | 2.00 |
| Layer L3 | 1800 | 150 | 2.00 |
2.5. Mechanical tests
Rectangular flat tensile specimens and standard Charpy test coupons, prepared with the locations and geometries illustrated in Fig. 2(b–c), were tested with the repetitions of three in directions normal and parallel to BD. The notch in transverse Charpy test coupons, seen in Fig. 2(c), laid in the plane normal to the BD. An Innovatest Nova 330 with a diamond indenter, force of 10 kg, and loading time of 10 s were used to evaluate the hardness across the BD. The average hardness values at the bottom, middle and top of the block were also estimated in planes normal and parallel to BD.
3. Results and discussion
3.1. Density
The block tested for the density measurements is shown in Fig. 4(a). The density values estimated by the three methods, listed in Table 3, suggest the pore fractions of 3%.
Fig. 4.
(a) The DLDed block, (b) surface parallel to BD, and (c) micrograph showing the defect.
Table 3.
Density values (in as-built condition).
| Method | Archimedes | Pycnometry | Image analysis |
|---|---|---|---|
| Density (%) | 97.5 | 97.6 | 98.2 |
An image survey of the material suggests the formation of spherical pores, shown in Fig. 4(b). The voids are as large as tens of micrometres in size, that may contain trappable gases originating from the carrier gas as well as the gas inclusions introduced from the powder or the vaporized elements available in the composition with the low vapour pressure. Gas entrapment can also be augmented by technological processes, such as the keyhole forming under the high magnitudes of the laser power applied during DLD. In some cases, the pores appeared to join and pave the way for crack propagation as shown in Fig. 4(c).
3.2. Microstructural findings
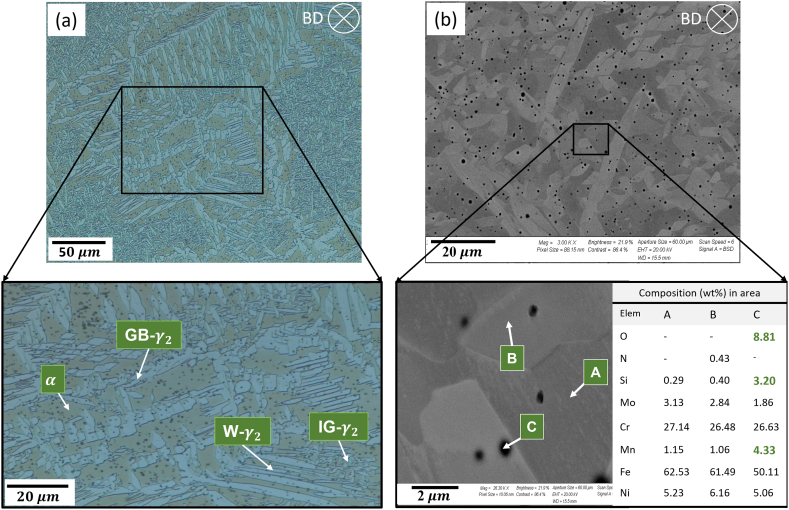
The microstructure of the plane normal to BD, shown in Fig. 5(a), conveys the formation of a double-phase structure exhibiting extensively nucleated and grown within the ferritic matrix. The results of the chemical analysis in Fig. 5(b) show the substantial formation of particles, with the high concentration of O, Mn, and Si, precipitated on both austenitic and ferritic matrix all over the material. The average size of the precipitations was 0.3.
Fig. 5.
(a) Optical micrograph and (b) Back-scattered electron image accompanied by the EDS analysis result, at the surface normal to BD. Abbreviations are listed in Table 4.
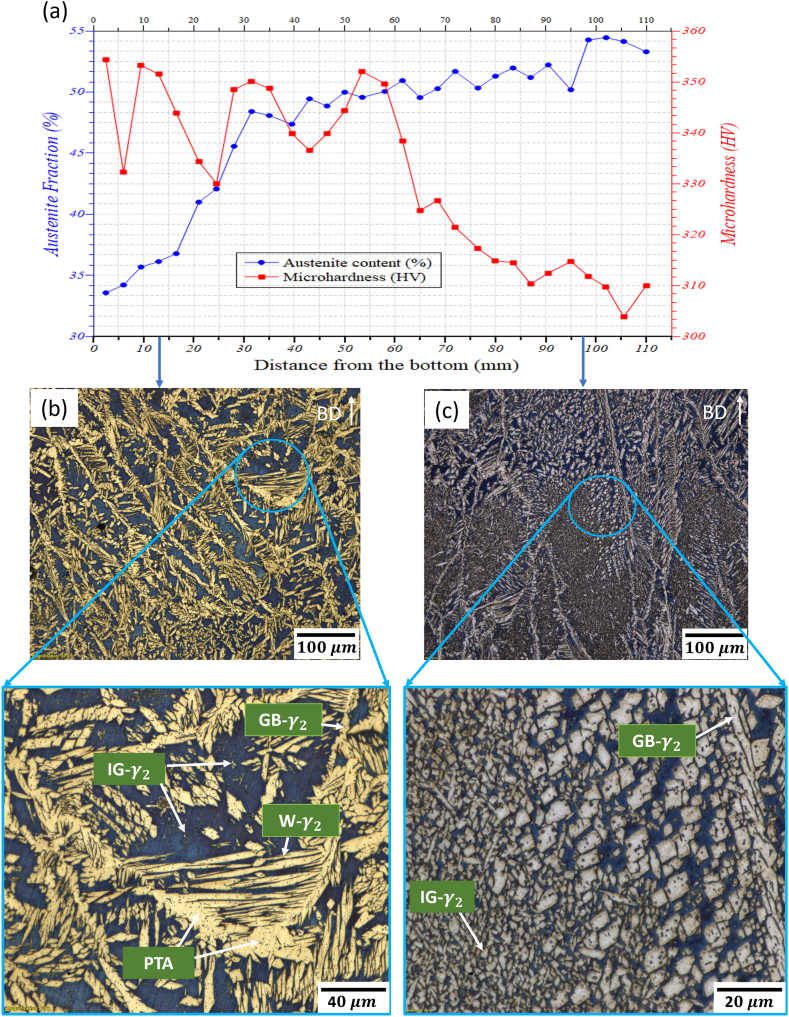
Thanks to the slower rate of cooling induced by DLD, time was provided for the rapidly solidified and supersaturated (considering the low solubility of N in [33]) to sufficiently touch the biphasic thermal range below the solvus limit in the ternary phase diagram of Fe-Cr-Ni [34] and decompose to + in as-built condition. This is in contrast with the result of high cooling rate MAM method where an absolute monophasic material was established [35]. Although the primary solidification mode is ferritic, due to the compositional effect ( = 2.29 in Table 1), the addition of 0.28 wt% N as strong -stablizer can result in an N-induced thermal shift to the solvus line and augment the susceptibility of the material to produce even at higher temperatures [36]. An overall gradient of content as a function of distance, seen in Fig. 6(a), elucidates that the transformation from unstable to can be intensified at further distances from the bottom of the block where the material cools down slower through the limited path of heat dissipation.
Fig. 6.
(a) Distribution of and hardness as a function of distance from the substrate. Micrographs of the building plane showing (b) the limited nucleation of IG- in areas close to the substrate and (c) extensive nucleation of IG-, far away from the substrate. Abbreviations are listed in Table 4.
The influence of annealing induced by the cyclic heat effect during the layer-on-layer printing resulted in microstructural changes, shown in Fig. 6(b and c), indicating the immense nucleation and growth of at the centre of the pools far away from the bottom where its fraction took a lead of 5% with respect to the stable equilibrium state seen in distance ranging from 42 to 95 mm. This shows the dominant effect of the cooling rate as the material is deposited upward. It should be noticed that despite the high magnitude of the heat input applied, there has been time for the laser source to travel back and forth and remelt the adjacent and underneath layers with the length of 80 mm. This may facilitate the further dissipation of the heat from the pre-deposited layers particularly at the layers closer to the substrate where the heat is easily transferred through a wide path, resulting in with a content of about 30–40%. A slight in-situ change of parameters including the deposition speed and laser power during DLD or altering the chemical composition across the BD aiming to achieve a rather homogeneous microstructure could be two gradient solution worth to study.
Table 4 tabulates the different types and morphologies of thermally activated [37], distinguishable in Fig. 5, Fig. 6, determined by the magnitude of the transformation depending on the local cooling speed and concentration of -stabilizers. The primary and secondary (namely ) are developed within the dissolution and reformation of this phase during the first cooling from the melt, reheating through the successive DLD layer depositions, and re-cooling. Accordingly, the parallel arrays of W- extended from the allotriomorph islands of GB- laid on - boundaries toward the middle of are seen in Fig. 6(b) where the micro-sized IG- with varying morphologies appeared to be extensively embedded in the middle of the ferritic matrix in Fig. 6(c). The predominantly precipitated IG- compared to PTA [38], and W- occupying the micrograph of Fig. 6(b) is a characteristic associated to the prolonged cooling time and higher degree of reformation in areas further away from the bottom. Despite its small lattice diffusion comparing the boundary diffusion of GB-, the continuous rectangular films of IG-, seen in Fig. 6(c), grew bigger under the immense effects of reformation, supersaturation, and slower cooling rate. and were the two phases observed though the susceptibility of SDSS to form the detrimental intermetallic phases, such as sigma (σ) and chi (χ), when exposed to the temperature range of 600–1000 °C may exist [39].
Table 4.
Types and morphologies observed in .
| type | Morphology |
|---|---|
| Grain boundary-γ, GB- | Elongated islands and sometimes finger shape |
| Widmanstätten-γ, W- | Thin plates extended from GB- |
| Intra-granular-γ, IG- | Continuous squarish and colonies of tiny grains |
| Partially transformed-γ (PTA) | Polygonal trapezoidal and palm shape |
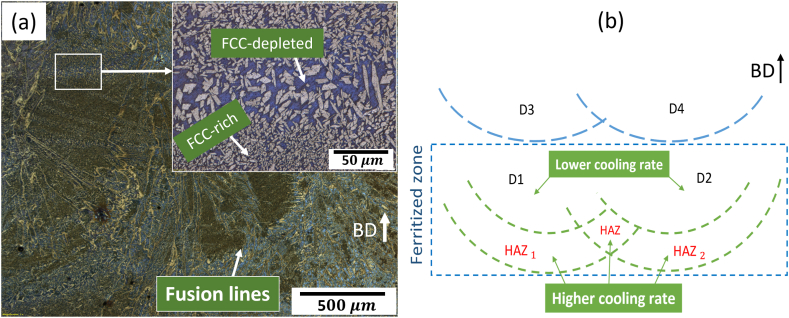
The local FCC-rich and FCC-depleted areas are distinguished at the building plane in Fig. 7(a), where almost each DLD line left a heat affected zone (HAZ) contiguous to the fusion border. The illustration shown in Fig. 7(b) may help to better understand this metallurgical phenomenon. The two solidified DLD layers, and , both containing , are fully ferritized when soaked above the solvus limit through the annealing induced by the deposition of subsequent layers and and, subsequently, introduce a higher extent of in slower-cooling-rate area (central region of the pools) by facilitating the modifying transformation + + + [40] during re-cooling. This transformation is done under a para-equilibrium mechanism controlled by the diffusion of interstitial C and N [41]. and (left by , and , respectively) are FCC-depleted zones established by the faster-cooling-rate when the modifying transformation is limitedly accomplished. Due to the highly complex and heterogeneous thermal cycling of the DLD process, the size of FCC-depleted area could vary and develop bigger in some layers. The large width ( 1.45 mm) and depth ( 0.85 mm) of the solidified pools, seen in Fig. 4(b), can be referred to the high energy of the laser source and the consequent heat input being able to ferritize the previously deposited layers.
Fig. 7.
(a)Micrograph of the building plane, and (b) illustration of four consequent DLD lines.
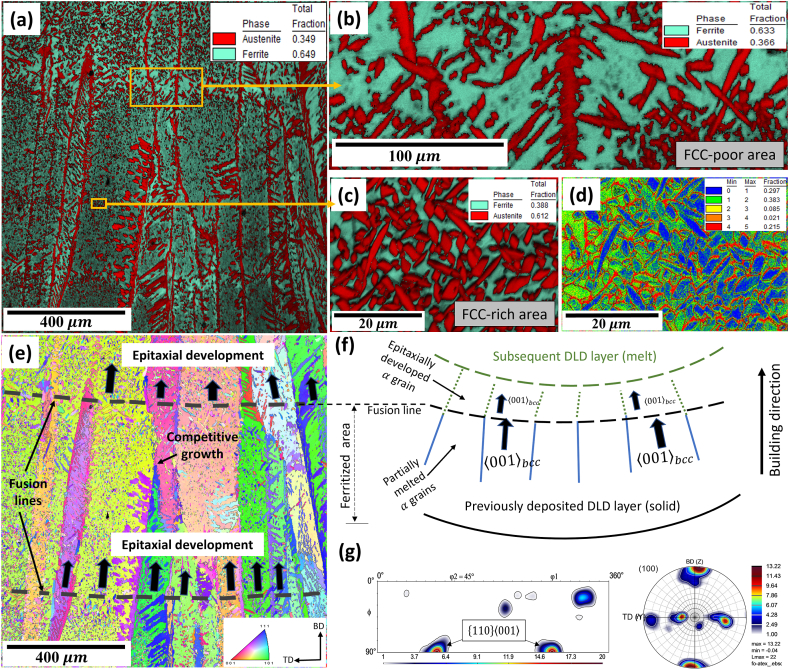
EBSD phase distribution maps of Fig. 8(a–c), taken from the three DLD lines near to the side of the block, closely exhibit the FCC-rich area with the content almost twice as that of the FCC-depleted zone underneath the fusion line. The growth of some columnar grains, with their length axis greater than the depth of the pool, proceeded into three pools with similar Euler angles (no altering in the original orientation in Fig. 8(e)) inherited from the partially-melted crystals in previous layer acting as a substrate for the liquid, as illustrated in Fig. 8(f), to arrange its atoms and predominantly create the boundaries perpendicular to the fusion interface. The (100) pole figure, shown in Fig. 8(g), of BCC crystals demonstrates the preferred alignment of along BD generating the texture component of clustered in the ODF shown in the same figure. was attributed to the easy growth direction of BCC crystals [42]. This Epitaxial type of growth had a major contribution in the texture development of . On this basis, similarity in chemical composition of the successive layers and, thereby, suitable wettability of the existing crystalline substrate of by the melt can be the reason for the epitaxial development [43]. In a competitional mechanism manifested away from the fusion border, the grains laying essentially normal to the fusion line tended to develop more effortlessly than those less favourably orientated, with a disorientation of >10° with respect to the normal of the fusion border.
Fig. 8.
(a) Phase distribution map of three DLD lines including (b) FCC-poor area and (c) FCC-rich area. (d) Kernel average misorientation (KAM) map of FCC-rich area. (e) ND-projected orientation plot of three DLD lines. (f) An illustration, inspired by Kou [43], of epitaxially developed microstructure of marked by detected by (g) pole figure and ODF section 45° of BCC crystals in the corresponding area.
The degree of IG- precipitation in FCC-rich zone can be used as an indicator of the distribution of the local strain. The angular deviation from the orientations at 1st nearest-neighbours with respect to the orientation of a given pixel is computed using KAM analysis. Thus, assuming the Kernel exclusion angle of 5°, excluding the misorientation angles (MAs) overpassing the tolerance value defined for the grains, the local misorientation distribution in FCC-rich zone, mapped in Fig. 8(d), showed the intensity of the local strain at the two-phase vicinity. A significant number of the bonds in FCC-rich area between the BCC and FCC unit cells with the different lattice constants and packing factors seems to generate the high density of MA close to α/γ interfaces. It can increase the strength of the material by resisting the dislocation motion [44].
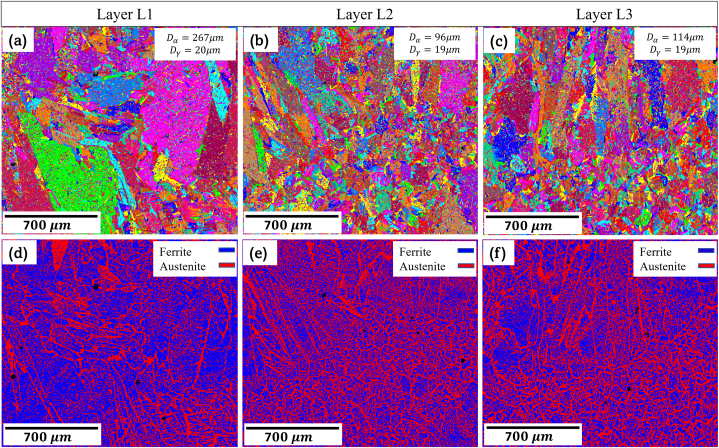
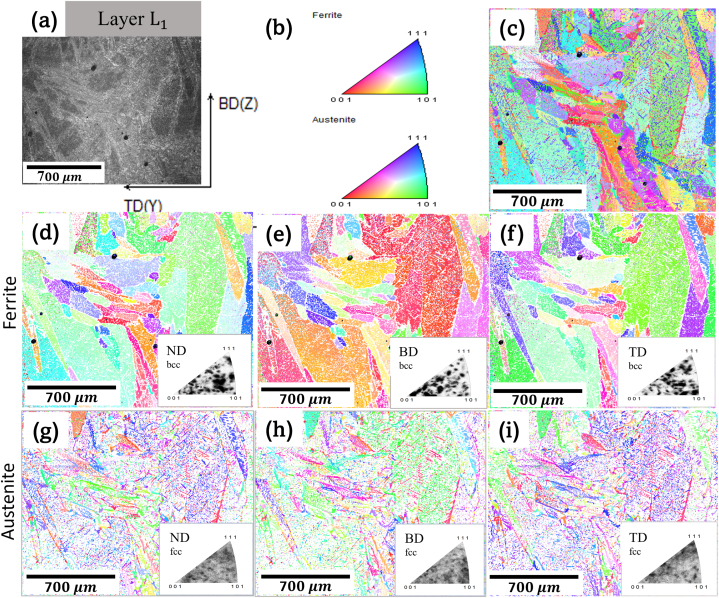
The large-area EBSD maps of grain and phase distributions at the layers L1, L2 and L3, marked in Fig. 2(b), with 3–5, 18–20 and 38–40 mm of distance from the substrate, respectively, are shown in Fig. 9(a–f). The coarse grain size ( 267) and less columnar ferritic matrix in area L1 can be under influence of a wider path for the dissipation of the heat through the building substrate in comparison with L3 where the narrow thermal pathway generated the slim morphology and smaller grains ( 114 ) laying toward the steepest thermal gradient. However, only a few numbers of grains were mapped due to their often coarse and columnar architecture shaped under an intensive directionally oriented solidification front while the occasional equiaxed morphology limitedly appeared because of the isotropic thermal dissipation. A significant change in grain size of was not observed. The increase of content from 35% in L1 to 47% in L3 in Fig. 9(d–f) is compatible with its overall gradient before reaching to the stable phase balance condition manifested in phase analysis results shown in Fig. 6(a). Nevertheless, the fraction of in layer L3 could be a little higher than what estimated by the acquisition of EBSD with the step size of 2 as the microstructural observations showed the intensified nucleation of tiny IG- driven by the slower cooling at further distances from the bottom.
Fig. 9.
(a–c) Grains map and (d–f) phase distribution map of the layers L1, L2 and L3, respectively.
3.3. Orientation maps
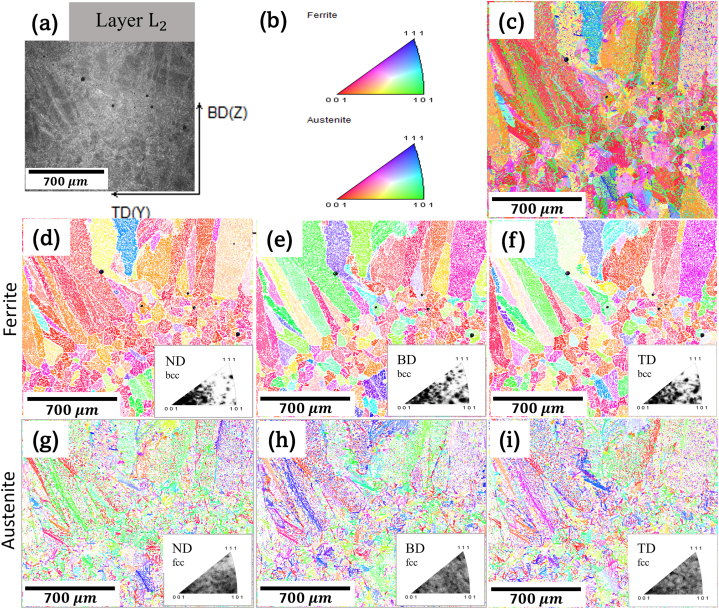
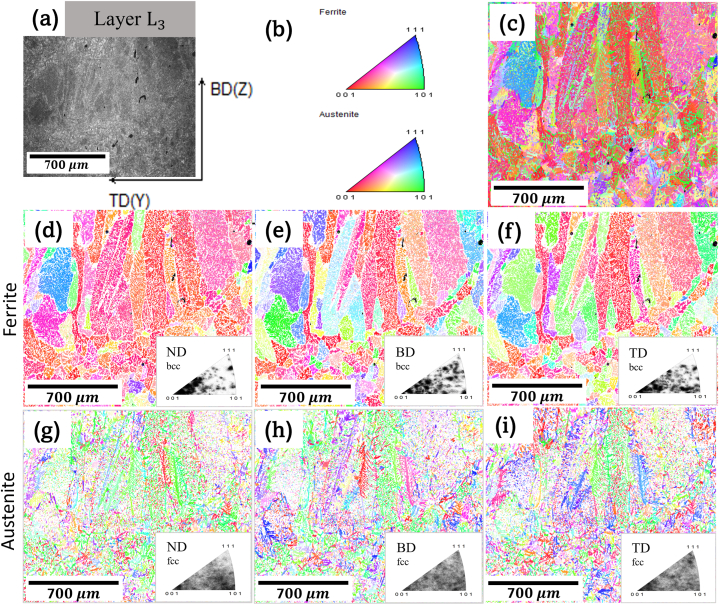
The quality image and orientation colour maps of layers L1, L2 and L3 are exhibited in Fig. 10, Fig. 11, Fig. 12, respectively. The individual orientation maps, embedding the discrete IPFs, of each phase with 90° rotations about their reference frames are also shown in Fig. 10, Fig. 11, Fig. 12. Most of the BCC crystals in layer L1 are roughly orientated with their ⟨001⟩ in BD and ⟨110⟩ in ND as shown in Fig. 10(d–f). It is believed that the orientation ⫽BD in columnar within the layer L1 can be established by the orientation-linked physical features such as surface energy during solidification and thermal conductivity, as well as the significant rate of solidification under the influence of the steep thermal gradient [45]. This is in contrast with the FCC crystals with scattered orientations in Fig. 10(g–i), creating probably a texture-less structure due to the limited nucleation of reformed that will be further explained.
Fig. 10.
(a) The image quality and reference axes, (b) the orientation colour code, (c) overall orientation distribution colour map (d–f) orientation maps embedding the discrete IPF of projected in ND, BD, and TD, and (g–i) orientation maps embedding the discrete IPF of projected in ND, BD, and TD, respectively, in zone L1.
Fig. 11.
(a) The image quality and reference axes, (b) the orientation colour code, (c) overall orientation distribution colour map (d–f) orientation maps embedding the discrete IPF of projected in ND, BD, and TD, and (g–i) orientation maps embedding the discrete IPF of projected in ND, BD, and TD, respectively, in zone L2.
Fig. 12.
(a) The image quality and reference axes, (b) the orientation colour code, (c) overall orientation distribution colour map (d–f) orientation maps embedding the discrete IPF of projected in ND, BD, and TD, and (g–i) orientation maps embedding the discrete IPF of projected in ND, BD, and TD, respectively, in zone L3.
Given in Fig. 11, Fig. 12, the overall view of the orientation colour maps and the accumulation of the points at the discrete IPF of suggest a sharp ND, while the orientation remains almost aligned with BD and TD after rotating the laboratory reference axes. As the slope of thermal gradient diminishes at 20 and 40 mm away from the bottom in layers L2 and L3, respectively, the orientation changed to in which the probability of the formation of a strong Cube texture is likely high as the discrete BD-projected IPFs still tend to roughly keep an accumulation in . This represents the dominant rule of epitaxial development, as described by Fig. 8(e and f), and cube-on-cube ( ⫽ , ⫽ ) orientation relationship (OR) of along the BD which is roughly identical to the steepest thermal gradient.
The discrete IPFs of Fig. 10, Fig. 11 and 12(e) still show a significant misalignment of with BD in grains outgrown under the effects of curved geometry of the DLD pool (Fig. 4(b)) and the free solidification surface. This might produce the - high angle boundaries (HABs) at the microstructure. The degree of disorientation is augmented in layer L1 since the region is in the vicinity of the building substrate. The susceptibility of to form a strong texture in ND became more intensified far away from the bottom at layer L3, shown in Fig. 12(e–f), as the material was deposited upward.
Compared to layer L1, partial alignments of the along ND in (the child phase) in both L2 and L3 appeared to be superseded from (the parent phase) during the extensive transformation of and under the increasing influence of the thermal cycling induced by the top and adjoining DLD passes. The considerable imbalance observed in the phase ratio, i.e., the larger fraction of reformed in upper layers, on the tendency of this phase to be preferably oriented will be discussed later. Accordingly, most of the reformed grains, including IG-, GB- and W-, in Fig. 11, Fig. 12(g-h) showed the preferred clustering of both axes and in ND. This demonstrates the multi-component transformation texture of probably able to depress the overall texture intensity and the possible anisotropy.
3.4. Texture characterization
The preferred orientations developed in and grains in DLDed SDSS 2507, involving the liquid-solid (solidification) and solid-solid transformations, are specified by the couple , the Miller indices of a family of the crystallographic planes aligned along the building plane followed by a family of crystallographic directions parallel to the BD. Attempts were made to extract the sensible characteristic texture of the material as the substantial cube-on-cube and epitaxial mechanism of growth were already observed in . The typical loci addressing the fibres and prevalent texture components of BCC and FCC crystals in the Euler space [46], and the corresponding ODF projections of = 45°, 0°, used as a guide in texture analysis, are illustrated in the patterns of Fig. 13(a and b).
Fig. 13.
(a) Illustration of the 3D Euler space and (b) ODF section = 45°, 0°, displaying the characteristic fibres and components of the texture in BCC and FCC crystals [47].
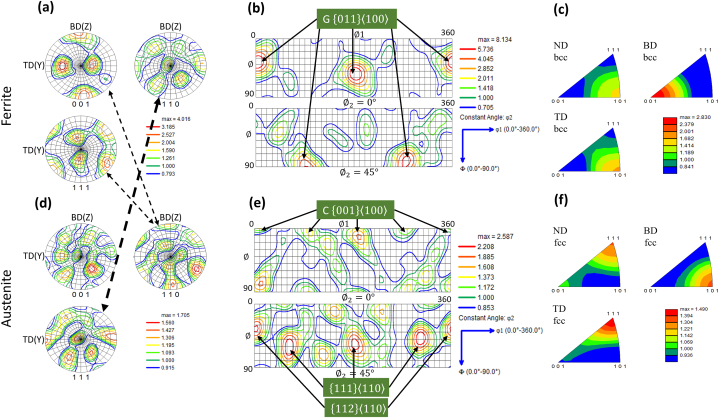
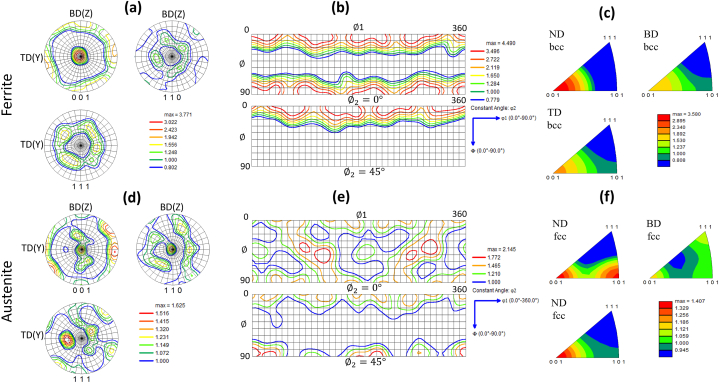
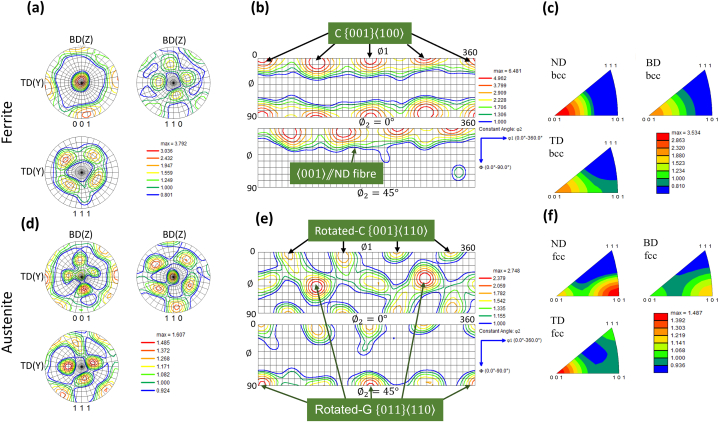
The texture evolution of the and in three regions L1, L2 and L3 are exhibited in Fig. 14, Fig. 15, Fig. 16, respectively, through the pole figures, ODFs and IPFs. The overall view of the intensities revealed a significantly textured mainly due to the restricted orientation of growth, as previously observed in orientation maps, compared to . In general, a change in overall intensities as a function of distance from the bottom is roughly shown. The peak-type components of were intensified within the ODFs as the distance from the substrate increases. Giving their Bung's notation, the calculated texture components, and their volume fractions are listed in Table 5.
Fig. 14.
(a, d) Pole figures, (b, e) ODF sections and (c, f) IPFs of and in layer L1.
Fig. 15.
(a, d) Pole figures, (b, e) ODF sections and (c, f) IPFs of and in layer L2.
Fig. 16.
(a, d) Pole figures, (b, e) ODF sections and (c, f) IPFs of and in layer L3.
Table 5.
Calculated texture components in layers L1 and L3.
| Layer | Phase | Characteristic component/fibre | Volume fraction (%) | |
|---|---|---|---|---|
| L1 | G | 0/180/360°, 45°, 0° | 35 | |
| 90/270°, 90°, 45° | ||||
| Low intensity | Start at 40°, 36°, 45° | 11 | ||
| {111}⟨110⟩ | 0/60/180/300/360°, 55°, 45° | 12 | ||
| {112}⟨110⟩ | 0/60/180/300/360°, 35°, 45° | 10 | ||
| C {001}⟨100⟩ | 0/90/180/270/360°,0/90°,0° 45/135/225/315°, 0°, 45° | 8 | ||
| Several non-renowned components | – | – | ||
| L3 | ⫽ND fibre | 0-360°, 0°, 45° | – | |
| C | 0/90/180/270/360°,0/90°,0° 45/135/225/315°, 0°, 45° | 34 | ||
| Rotated-G | 90/270°, 45°, 0° 0/180/360°, 90°, 45° | 15 | ||
| Rotated-C | 45/135/225/315°, 0/90°, 0° 0/90/180/270/360°, 0°, 45° | 11 | ||
| G | 0/180/360°,45°,0° 90/270°, 90°, 45° | 6 | ||
| Slight ⫽ND fibre | 0-360°, 0°, 45° | – |
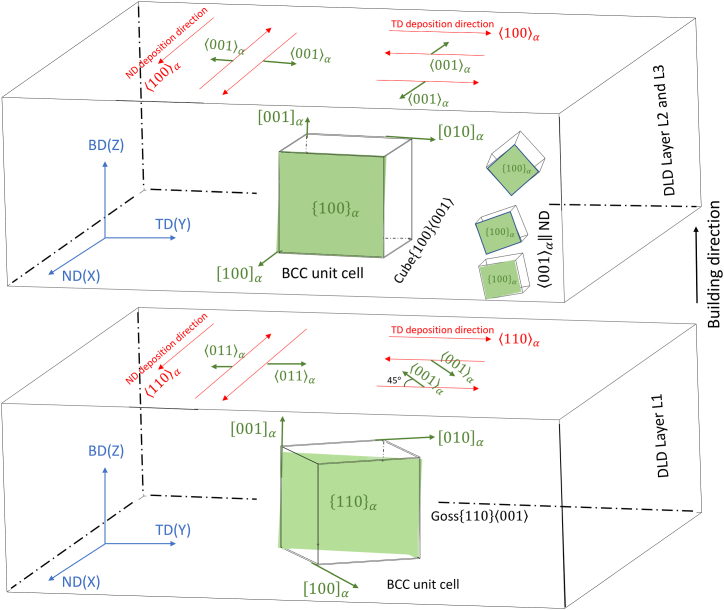
The IPFs marked the ⫽BD in area L1 where the sharp intensity G of 7.5 times random appeared in with a volume fraction of 35% at the ODF sections 0°, 45° (with a deviation of 5° along ) and the corresponding pole figures in Fig. 14(a–c). The origin of G, one of the major solidification textures in casting of ferritic stainless steels, can be referred to the competitional mechanism of the growth at the area close to the substrate and maintaining the considerable concentration of substitutional elements including Cr and Mo. The intensity of this component is the strongest probably because of the limited volume fraction of the solid-state transformation and preserving a considerable concentration of α-stabilizers within the ferritic matrix of L1. Moreover, as also referred by Ref. [45], when the remaining could not undergo any further transformation, the orientation density of G was strongly maintained after a little randomization (e.g., a low intensity of non-renowned in ODF section 45°). The preferred BCC lattice orientation was about 45° from the DLD deposition directions, ND and TD, while their are parallel to the said coordinates, as shown in the illustration of Fig. 17. The identical intensities in IPFs with respect to the sample coordinates ND and TD are probably resulted from the bidirectional strategy applied in DLD.
Fig. 17.
Illustration of the Goss and cube-on-cube texture development of across the layers L1-L3.
The intensity of the texture in in layer L1, Fig. 14(d–f), is not as strong as and a randomization somehow tended to occur by the presence of several less intensified components. Nonetheless, the component close to with 2 times random is seen at the ODF section 45°, which is also roughly exhibited by (111) pole figure and a very small preference of found to be aligned along ND and TD in the corresponding IPFs, too. The small volume fraction (12%) of the said texture combined with the other outspread and weak peaks of and C components indicate a relatively multi-component/random in layer L1 suggesting the more diverse sets of the possible active ORs between BCC and FCC.
A closer look at the pole figures in Fig. 14(a, d) may help to further proceed for an estimation of OR between BCC and FCC crystals. The approximate coincidence of the intensities in the (110) poles of with the (111) in , i.e., , and, in a similar manner, the conformity of the intensities of (111) poles in with those of the (110) in , i.e., , are observed. This parallelism, marked by black arrows, can agree with the ORs of the type Kurdjumov-Sachs (K–S) [48] or Nishiyama-Wassermann (N–S) [49], regarding the crystallographic data, listed in Table 6, representing some degree of misorientation in habit planes between FCC and BCC. This estimation is further reinforced when the cube edges, i.e., the high intensity (100) poles, of the BCC partly overlap the face diagonals, i.e., the (110) poles, of the FCC at the corresponding pole figures. Observation of this preference clarifies an orientation-based feature of the transformation despite the high cooling rate, particularly near the substrate, applied during the laser AM. Yet, the multi-component behaviour of the texture of in layer L1, where the PTA grains were occasionally saved (Fig. 6(b)), may be linked to the limited nucleation of the reformed specially IG-, compared to other layers.
Table 6.
ORs between and with FCC and BCC crystals, respectively [50].
| OR | Parallel planes | Parallel directions | Angle/axis pair (min) |
|---|---|---|---|
| K–S | 42.85° <0.968 0.178 0.178> | ||
| N–W | 45.98° <0.976 0.083 0.201> | ||
| Bain | 45° <1 0 0> | ||
| Pitsch | 45.98° <0.08 0.2 0.98> | ||
| Greninger–Troiano | 44.23° < 0.973 0.189 0.133> |
The crystallographic orientations at further distance from the bottom, in layer L2 resemble those in layer L3. The texture plots in Fig. 16 are the intensified version of what exhibited in Fig. 15. Thus, the components are summarized in the same row in Table 5. The clustered (100) poles in Fig. 15, Fig. 16 display the fibre ⫽ND. It clearly identifies the θ-fibre, depicted in Fig. 13, that is noticed by the corresponding ODF section 45° in Fig. 15, Fig. 16 while the major peak-type C (, ( ∅ )=(0/90/180/270/360°, 0/90°, 0°)/(45/135/225/315°, 0°, 45°)) with 6 times random is sharply exhibited in ODF projections = 0°, 45° in layer L3. The corresponding component in layer L2 is weaker and tilted along , the angle of rotation about ND in Euler space. The predominantly formed C-texture within as the primary solidified phase in DLDed SDSS 2507 was not unexpected since the easy growth direction and the BCC crystal axis were shown to be intensively aligned with , as explained by Fig. 8. This phenomenon has been observed in other fusion-based processes, such as through-thickness texture established in optimum heat-transfer direction of as-cast ferritic stainless-steel strip [51]. According to Fig. 17, the laser deposition directions, ND and TD, are in line with within the layers L2 and L3.
The texture components of in layer L2 and L3 resemble each other. In fact, the components detected in layer L2 are the split and weakened versions of what has been shown for layer L3. The slight clustering in (100) poles of , partly following those of their parent phase, i.e., , is noticed in Fig. 15, Fig. 16 in layers L2 and L3, respectively. Accordingly, started to partially inherit the crystallographic orientation from with a slight ⫽ND in which the C component was replaced by a weak Rotated-C (, ( )=(45/135/225/315°, 0/90°, 0°)/(0/90/180/270/360°, 0°, 45°)) with 2 times random as a transformation texture. Moreover, the spots in (110) pole figure of the in L3 correspond to the Rotated-G, clarified by the Bunge notation (, ( )=(90/270/45°, 45°, 0°)/(0/180/360°, 90°, 45°)) with the highest intensity as the major preferred orientation in ODF sections = 0°, 45°, in Fig. 16(d–e) wherein the weak G component with less than 2 times random was also formed. Thus, the FCC crystals at further distances from the substrate, where the volume fraction of reformed increased by the slower cooling rate, tended to form an -fiber, characterized by ⫽ND, while slightly following the orientation of the BCC crystals, i.e., ⫽ND comprising the Rotated-C. Overall, the three components seem to be formed under the higher degree of transformation.
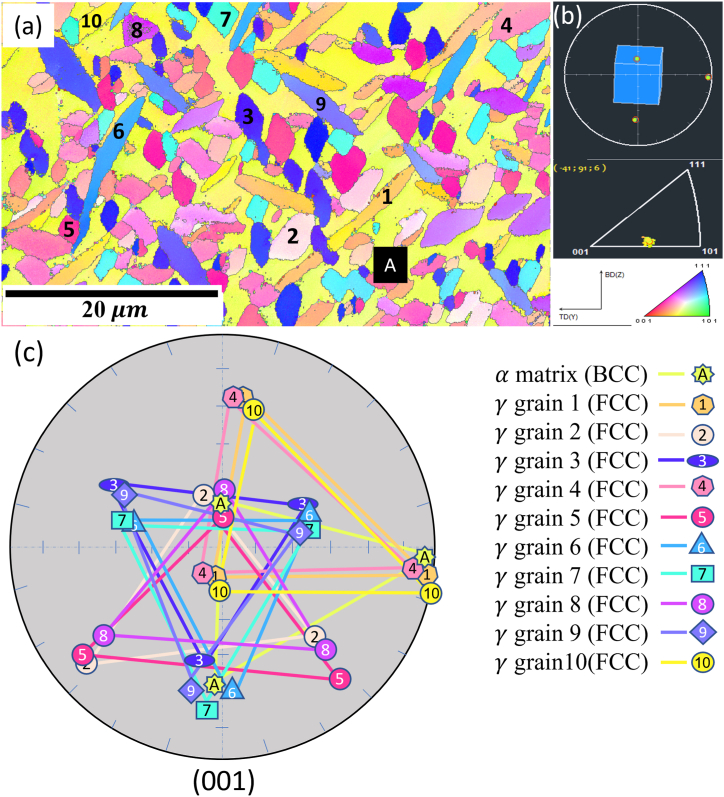
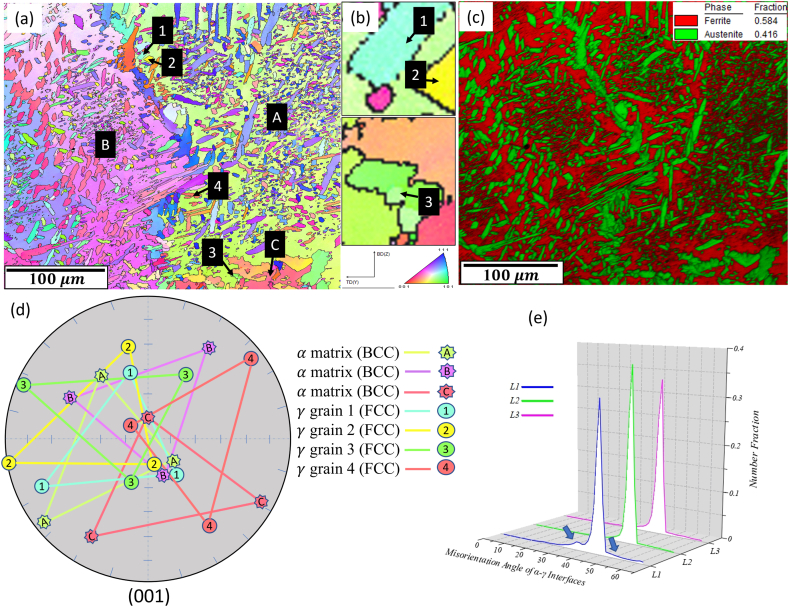
Plotting the local orientation for the diverse types of reformed , already observed in Fig. 5, Fig. 6, may help to understand the orientation associated with the nucleation mechanism of this phase in the as-built condition of DLDed SDSS. Fig. 18(a) shows the orientation colour map of single grain named A. It embedded only several tiny crystals of acicular, round shape and squarish IG-, marked 1–10, nucleated in FCC-rich zone under the effect of slower cooling. The local orientation of the matrix was calculated in Fig. 18(b). Surprisingly, all the (001) poles of the IG- crystals, nucleated in different orientations with respect to the matrix, are preferably positioned based on K–S, as shown in Fig. 18(c). This can intensify the transformation texture at layers further away from the substrate. On the other side, the disobeying local crystallographic orientation of grains 1 to 4 (seen in Fig. 19(a–c)), developed in the vicinity of the GB- and W- and extended into the grains (marked by A, B and C), with respect to K–S OR is shown in Fig. 19(d). The magnified images in Fig. 19(b) show the often equiaxed morphology of these grains precipitated at the vicinity of GB-. The austenitic identity of the characterized grains is shown in Fig. 19(c). Mapping the overall (001) poles in Fig. 19(d) clarifies the random orientation of the corresponding FCC crystals comparing to the ones in Fig. 18(c). This phenomenon could generate a hump, marked by blue arrows, in the histogram of the MA distribution of the neighbouring BCC and FCC pixels, plotted in Fig. 19(e), in layer L1 compared to the other layers. The dominant formation of the GB- and W- in the areas closer to the building substrate was discussed in the preliminary microstructural studies and depicted in Fig. 6(b).
Fig. 18.
ND-projected IPF of FCC-rich zone within single grain of , titled A. (b) Local average orientation of the matrix A shown by IPF and (001) poles. (c) Overall (001) poles of the IG- grains, numbered 1 to 10, and A.
Fig. 19.
ND-projected IPF of GB- and W- developed within the boundaries of three grains namely A, B and C. (b) Magnified images of the grains 1, 2 and 3. (c) Phase distribution map of the area. (d) Overall (001) poles of the three grains and the crystals numbered 1 to 4. (e) - MA distribution in layers L1, L2 and L3.
3.5. Interfaces
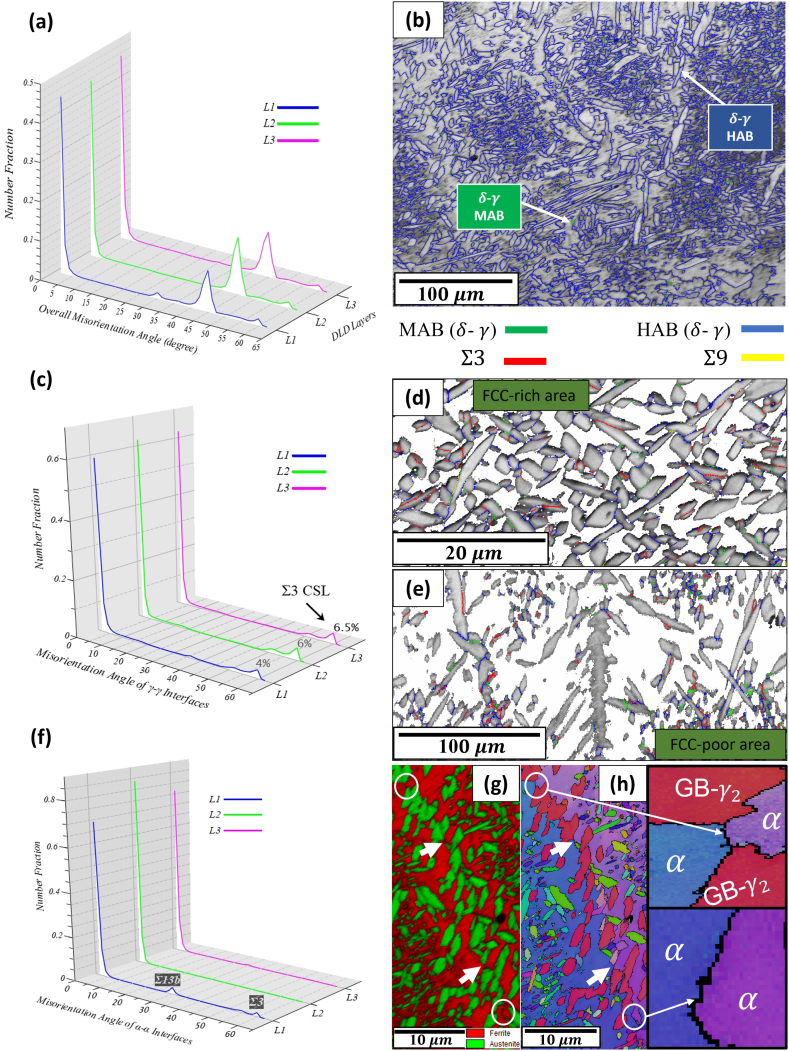
The overall functionality of the polycrystalline materials is profoundly influenced by the properties of their microstructural interfaces. Here, the entire interfaces, categorized into α-α, α-γ and γ-γ GBs, and their contribution numbers within the certain layers are listed in Table 7. It is believed that the low angle boundaries (LABs, 1 MA 5°) of α-α had the most contribution within this phase since α-α medium angle boundaries (MABs, 5 MA 15°) and HABs (MA 15°) were preferably occupied by the GB-. Nonetheless, the α-α HABs should not be excluded particularly in layer L1 where the cooling is believed to be faster. An increment of 4.4% in overall number of GBs and 30.2% in γ-γ interfaces are observed in Table 7, as the material was built upward from layer L1 to L3.
Table 7.
Contribution (number and percentage) of the GB types α-α, γ-γ and α-γ.
| Layer | Interface type |
|||
|---|---|---|---|---|
| Overall number of interfaces | α-α | γ-γ | α-γ | |
| L1 | 761,572 (100%) | 325,075 (42.7%) | 192,417 (25.3%) | 244,080 (32%) |
| L2 | 760,132 (100%) | 226,350 (29.8%) | 237,208 (31.2%) | 296,574 (39%) |
| L3 | 795,199 (100%) | 275,762 (34.7%) | 250,620 (31.5%) | 268,817 (33.8%) |
Considering the minimum MA of 1° (the sub-boundaries with MA<1° should be investigated by transmission electron microscopy), a predominant contribution (more than 40%) of the LABs along with two peaks at 42-46° and 60° are visible within the broad range of the entire MA distributions in all layers in Fig. 20(a). The former is in agreement with the possible active interphase ORs given in Table 6, mostly K–S and N–W shown by MA angle/axis pairs of 42.85°/<0.968 0.178 0.178> and 45.98°/<0.976 0.083 0.201>, respectively, and the latter indicates the 1st order twin boundary, namely coincidence site lattice (CSL) of Σ3. The coherent boundary characterized by 60°/<111> between γ grains are Σ3 [52]. The dominant formation of interphase HABs is shown in Fig. 20(b). A slight increment, from 4% in L1 to 6.5% in L3, in overall population of Σ3 at γ-γ interfaces is noticed in Fig. 20(c). Fig. 20(d–e) show the predominantly settled Σ3 among IG- interfaces particularly in FCC-rich area, and a negligible trace of Σ9 (2nd order twin with 38.9°<110> [53]) in . According to some research [54], the higher frequency of low interfacial energy CSLs, e.g., Σ3 and Σ9, giving rise to the discontinuous random HABs may reduce the dissolution susceptibility of GBs and increase the pitting resistance of the large ferritic matrix particularly at the upper layers which are found to be crowded more by IG-. While displays a considerable fraction of HABs, the LABs were overwhelmingly populated on the - interfaces, shown in Fig. 20(f). The GB character distribution analysis inferred a very small population of high-mobility boundaries of Σ13b (27.8°/<111> [55]) and Σ3 as α-α HABs settled only at layer L1. Lack of GB- precipitation on the small segments of - HABs, marked by circles in Fig. 20(g and h), due to the fast cooling demonstrates that the said interface can still be representative for further studies in as-built state of DLDed SDSS and should not be excluded.
Fig. 20.
(a, c, f) Histograms of MA distribution in overall, - and - neighbouring pixels across the layers L1, L2 and L3. (b) Micrograph showing the - boundarie. s. (d, e) Development of CSL boundaries in FCC-rich and FCC-poor areas. (g, h) Phase distribution map and grains displaying the - HAB segments, respectively.
3.6. Mechanical properties
Table 8 lists the results of mechanical tests carried out on the test coupons extracted in normal and parallel to BD. The underlying microstructures relying on the vertical enhancement of created a descending distribution of the microhardness across the BD, as exhibited in Fig. 6(a). Decrements in the average values of the hardness from the bottom to the top of the block measured on the planes ZY and XY was expected due to the increased degree of reformation as the material was printed upward. The hardness was evaluated up to 5 mm distance from the top surface meaning that the last several layers, where the content of may decline by the lack of imposed ferritization and precipitation of , were excluded. The microhardness values of the two surfaces in each area (bottom, middle and top) are close to each other. A fall of ∼50 H V in hardness, measured on the surface ⊥BD(Z), was observed from the bottom ( 355 H V) to the top ( 305 H V) of the block. The maximum difference of the hardness with respect to the specification of reference alloy (5 A), based on ASTM A890/A890 M, corresponds to the bottom area due to its dominant ferritic structure.
Table 8.
Mechanical assessment with respect to the directions.
| Material | Direction | (MPa) | UTS (MPa) | Elongation (%) | Toughness (J) | Microhardness (Vickers) |
|---|---|---|---|---|---|---|
| DLDed SDSS 2507 | ‖BD(Z) | 585.5 | 998.8 | 13.6 | 16.1 | T: 311.9 ± 3.6 |
| M: 337.4 10.4 | ||||||
| B: 341.7 ± 12.7 | ||||||
| ⊥BD(Z) | 609.9 | 1066 | 14.5 | 17.2 | T: 304.7 ± 5.4 | |
| M: 332.9 7.5 | ||||||
| B: 354.9 ± 9.7 | ||||||
| Reference alloy (5 A) | 515 (min) | 690 (min) | 18 (min) | 120 (min) | 210–295 |
Note: B, M and T are bottom, middle and top areas of the SDSS block, respectively.
Anisotropic behaviour of crystalline materials may occur because of the changes in positioning of atoms in different directions and it can be inferred essentially to the grains’ preferred orientational aspects, namely texture, profoundly influencing the materials properties including the toughness and plasticity in most cases. The correlation between the micro-texture analysis and the mechanical behaviour would be possible only if the test coupons were extracted from the same area of the block where the EBSD analyses were carried out. Anyway, the possible mechanical anisotropy seemed to be largely depressed through the phase transformation. As noticed in texture analysis, the prior strong single component of the parent phase, including G in layer L1 and C in both layers L2 and L3, were partly transformed into complex texture of the child phase weakening the overall texture and the possible anisotropy effect. This is witnessed by the tensile and toughness behaviour of the material in two directions. The small difference of the values of the Yield (), Ultimate Tensile Strength (UTS), elongation and ductility, listed in Table 8, in the directions parallel and normal to the BD can suggest the efficient deposition strategy although the anisotropy could not be 100% avoided. The multi-component and weak texture of on the layer near the bottom which is closer to the tensile test coupons in the direction ⊥BD(Z), as illustrated in Fig. 2(b), appeared to behave a little stronger by the magnitudes of 610 and 1066 MPa of and UTS, respectively. Nevertheless, the reason for the significantly low ductility and elongation of DLDed SDSS 2507 compared to the equivalent cast alloy, given in Table 8, can be attributed to the formation of the pores, defects, and the observed Si and Mn-rich oxides. This would be a continuation work in addition to other similar topics.
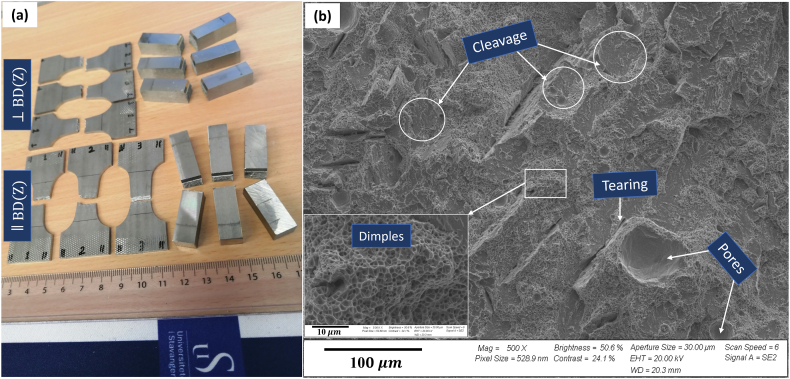
The Charpy toughness test specimens, presented in Fig. 21(a), were halved with no sign of deformation and with the maximum energy of 17.2 J absorbed in the direction ⊥BD(Z). The fracture morphologies obtained by secondary electron image, shown by Fig. 21(b), exhibit a dominant mode of brittle mechanism with a significant portion of the large flat cleavage facets coexisted with the occasional presence of shallow and stretched dimples in which the tearing edges rarely appeared due to the rupture of the fine grains. It can be perceived that the defects and voids significantly influenced the toughness of the material.
Fig. 21.
(a) The ruptured mechanical test samples. (b) Fracture surface of the Charpy specimen.
4. Conclusion
In summary, the following results are suggested within the studies on the DLD of SDSS 2507.
-
•
The density of 97% were assessed by Archimedes, Pycnometer and image processing.
-
•
The local and global gradient of were generated under the effect of the cooling rate. FCC-rich and FCC-depleted areas were formed under the effect of the uneven local cooling rate.
-
•
Increase in fraction of the by the distance from the bottom of the SDSS block led to the gradual reduction of the hardness.
-
•
The intensity of the texture was stronger in compared to . The extensive epitaxial and competitional development of had a key role in its texture marked by strong G at the bottom and a sharp C included in ⫽ND fibre far away from the bottom. The greater concentration of the IG- obeying the K–S OR led to the more textured decorated by Rotated-G as well as low intensity Rotated-C and G components. A randomization of occurred at the bottom due to the phase imbalance and less content of reformed .
-
•
An increase in population of Σ3 at γ-γ interfaces was observed while - interfaces were almost entirely populated by LABs except the small HAB segments formed at the fast cooled areas with no precipitation of GB-.
-
•
The tensile strength at the directions parallel and normal to BD were close to each other while the values found to be remarkably higher comparing the reference alloy. The material showed the high degree of brittleness during the Charpy test probably due to the considerable formation of the oxides as well as defects all over the microstructure.
-
•
The possible mechanical anisotropy under the intensified texture in was largely depressed by the multi-component transformation texture of .
Author contribution statement
Navid Sayyar, Vidar Hansen: Conceived and designed the experiments; Performed the experiments; Analyzed and interpreted the data; Contributed reagents, materials, analysis tools or data; Wrote the paper.
Wakshum Mekonnen Tucho, Mona Wetrhus Minde: Analyzed and interpreted the data; Wrote the paper.
Data availability statement
No data was used for the research described in the article.
Funding sources
This research did not receive any specific grant from funding agencies in the public, commercial, or not-for-profit sectors.
Declaration of competing interest
The authors declare that they have no known competing financial interests or personal relationships that could have appeared to influence the work reported in this paper.
Acknowledgment
The authors would like to express their gratitude to Sture H Sørli and Nordic Additive Manufacturing AS for their support and contributions in materials production and valuable discussions.
References
- 1.Karlsson L. Welding of stainless steels. Duplex and superduplex steels. Biuletyn Instytutu Spawalnictwa. 2000;14:28–33. doi: 10.1080/09507110009549131. [DOI] [Google Scholar]
- 2.Alvarez-Armas I., Degallaix-Moreuil S. John Wiley and Sons; 2013. Duplex Stainless Steels. [DOI] [Google Scholar]
- 3.Kruth J.P., Froyen L., Van Vaerenbergh J., Mercelis P., Rombouts M., Lauwers B. Selective laser melting of iron-based powder. J. Mater. Process. Technol. 2004:616–622. doi: 10.1016/j.jmatprotec.2003.11.051. Elsevier. [DOI] [Google Scholar]
- 4.Tolosa I., Garciandia F., Zubiri F., Zapirain F., Esnaola A. Study of mechanical properties of AISI 316 stainless steel processed by “selective laser melting”. following different manufacturing strategies, International Journal of Advanced Manufacturing Technology. 2010;51:639–647. doi: 10.1007/S00170-010-2631-5/METRICS. [DOI] [Google Scholar]
- 5.Davidson K., Singamneni S. Selective laser melting of duplex stainless steel powders: an investigation. Mater. Manuf. Process. 2016;31:1543–1555. doi: 10.1080/10426914.2015.1090605. [DOI] [Google Scholar]
- 6.Hengsbach F., Koppa P., Duschik K., Holzweissig M.J., Burns M., Nellesen J., Tillmann W., Troster T., Hoyer K.P., Schaper M. Duplex stainless steel fabricated by selective laser melting - microstructural and mechanical properties. Mater. Des. 2017;133:136–142. doi: 10.1016/j.matdes.2017.07.046. [DOI] [Google Scholar]
- 7.Mariappan R., Kumaran S., Srinivasa Rao T., Chandrasekar S.B. Microstructure and mechanical properties of duplex stainless steels sintered in different atmospheres. Powder Metall. 2011;54:236–241. doi: 10.1179/003258909X12502679013657. [DOI] [Google Scholar]
- 8.Shang F., Wang Z., Chen X., Ji Z., Ren S., Qu X. UNS S32707 hyper-duplex stainless steel processed by powder injection molding and supersolidus liquid-phase sintering in nitrogen sintering atmosphere. Vacuum. 2021;184 doi: 10.1016/j.vacuum.2020.109910. [DOI] [Google Scholar]
- 9.Saeidi K., Kevetkova L., Lofaj F., Shen Z. Novel ferritic stainless steel formed by laser melting from duplex stainless steel powder with advanced mechanical properties and high ductility. Mater. Sci. Eng. 2016;665:59–65. doi: 10.1016/j.msea.2016.04.027. [DOI] [Google Scholar]
- 10.Feng S., Xiaoqiu C., Peng Z., Zuchun J., Fei M., Shubin R., Xuanhui Q. Novel ferritic stainless steel with advanced mechanical properties and significant magnetic responses processed by selective laser melting. Mater. Trans. 2019;60:1096–1102. doi: 10.2320/matertrans.M2018374. [DOI] [Google Scholar]
- 11.Nigon G.N., Burkan Isgor O., Pasebani S. The effect of annealing on the selective laser melting of 2205 duplex stainless steel: microstructure, grain orientation, and manufacturing challenges. Opt Laser. Technol. 2021;134 doi: 10.1016/j.optlastec.2020.106643. [DOI] [Google Scholar]
- 12.Papula S., Song M., Pateras A., Chen X.B., Brandt M., Easton M., Yagodzinskyy Y., Virkkunen I., Hanninen H. Selective laser melting of duplex stainless Steel 2205: effect of post-processing heat treatment on microstructure, mechanical properties, and corrosion resistance. Materials. 2019;12:2468. doi: 10.3390/ma12152468. [DOI] [PMC free article] [PubMed] [Google Scholar]
- 13.Elmer J.W., Allen S.M., Eagar T.W. Microstructural development during solidification of stainless steel alloys. Metall. Trans. A. 1989;20:2117–2131. doi: 10.1007/BF02650298. [DOI] [Google Scholar]
- 14.Mukherjee T., DebRoy T. A digital twin for rapid qualification of 3D printed metallic components. Appl. Mater. Today. 2019;14:59–65. doi: 10.1016/J.APMT.2018.11.003. [DOI] [Google Scholar]
- 15.Li Z., Sui S., Ma X., Tan H., Zhong C., Bi G., Clare A.T., Gasser A., Chen J. High deposition rate powder- and wire-based laser directed energy deposition of metallic materials: a review. Int. J. Mach. Tool Manufact. 2022;181 doi: 10.1016/J.IJMACHTOOLS.2022.103942. [DOI] [Google Scholar]
- 16.Saeidi K., Alvi S., Lofaj F., Petkov V.I., Akhtar F. Advanced mechanical strength in post heat treated SLM 2507 at room and high temperature promoted by hard/ductile sigma precipitates. Metals. 2019;9:199. doi: 10.3390/met9020199. [DOI] [Google Scholar]
- 17.Murkute P., Pasebani S., Burkan Isgor O. Effects of heat treatment and applied stresses on the corrosion performance of additively manufactured super duplex stainless steel clads. Materialia (Oxf). 2020;14 doi: 10.1016/j.mtla.2020.100878. [DOI] [PMC free article] [PubMed] [Google Scholar]
- 18.Haghdadi N., Laleh M., Chen H., Chen Z., Ledermueller C., Liao X., Ringer S., Primig S. On the pitting corrosion of 2205 duplex stainless steel produced by laser powder bed fusion additive manufacturing in the as-built and post-processed conditions. Mater. Des. 2021;212 doi: 10.1016/j.matdes.2021.110260. [DOI] [Google Scholar]
- 19.Kohler M.L., Kunz J., Herzog S., Kaletsch A., Broeckmann C. Microstructure analysis of novel LPBF-processed duplex stainless steels correlated to their mechanical and corrosion properties. Mater. Sci. Eng. 2021:801. doi: 10.1016/j.msea.2020.140432. [DOI] [Google Scholar]
- 20.Davidson K.P., Singamneni S.B. Metallographic evaluation of duplex stainless steel powders processed by selective laser melting. Rapid Prototyp. J. 2017;23:1146–1163. doi: 10.1108/RPJ-04-2016-0053. [DOI] [Google Scholar]
- 21.Binesh F., Bahrami A., Hebel M., Aidun D.K. Preservation of natural phase balance in multi-pass and wire arc additive manufacturing-made duplex stainless steel structures. J. Mater. Eng. Perform. 2021;30:2552–2565. doi: 10.1007/s11665-021-05593-8. [DOI] [Google Scholar]
- 22.Eriksson M., Lervag M., Sorensen C., Robertstad A., Bronstad B.M., Nyhus B., Aune R., Ren X., Akselsen O.M. MATEC Web of Conferences. 2018. Additive manufacture of superduplex stainless steel using WAAM. [DOI] [Google Scholar]
- 23.Hejripour F., Binesh F., Hebel M., Aidun D.K. Thermal modeling and characterization of wire arc additive manufactured duplex stainless steel. J. Mater. Process. Technol. 2019;272:58–71. doi: 10.1016/j.jmatprotec.2019.05.003. [DOI] [Google Scholar]
- 24.Rajesh Kannan A., Siva Shanmugam N., Rajkumar V., Vishnukumar M. Insight into the microstructural features and corrosion properties of wire arc additive manufactured super duplex stainless steel (ER2594) Mater. Lett. 2020;270 doi: 10.1016/j.matlet.2020.127680. [DOI] [Google Scholar]
- 25.Posch G., Chladil K., Chladil H. Material properties of CMT—metal additive manufactured duplex stainless steel blade-like geometries. Weld. World. 2017;61:873–882. doi: 10.1007/s40194-017-0474-5. [DOI] [Google Scholar]
- 26.Hosseini V.A., Hogstrom M., Hurtig K., Valiente Bermejo M.A., Stridh L.E., Karlsson L. Wire-arc additive manufacturing of a duplex stainless steel: thermal cycle analysis and microstructure characterization. Weld. World. 2019;63:975–987. doi: 10.1007/s40194-019-00735-y. [DOI] [Google Scholar]
- 27.Knezovic N., Topic A., Garasic I., Juric I. Proceedings of the 30th DAAAM International Symposium on Intelligent Manufacturing and Automation. DAAAM International; 2019. Application of wire and arc additive manufacturing for fabrication of duplex stainless steel part; pp. 599–604. [DOI] [Google Scholar]
- 28.Stutzer J., Totzauer T., Wittig B., Zinke M., Juttner S. GMAW cold wire technology for adjusting the ferrite–austenite ratio of wire and arc additive manufactured duplex stainless steel components. Metals. 2019;9 doi: 10.3390/met9050564. [DOI] [Google Scholar]
- 29.Zhang X., Wang K., Zhou Q., Ding J., Ganguly S., Grasso M., Yang D., Xu X., Dirisu P., Williams S.W. Microstructure and mechanical properties of TOP-TIG-wire and arc additive manufactured super duplex stainless steel (ER2594) Mater. Sci. Eng. 2019:762. doi: 10.1016/j.msea.2019.138097. [DOI] [Google Scholar]
- 30.Bai S., Perevoshchikova N., Sha Y., Wu X. The effects of selective laser melting process parameters on relative density of the AlSi10Mg parts and suitable procedures of the Archimedes method. Appl. Sci. 2019;9:583. doi: 10.3390/APP9030583. [DOI] [Google Scholar]
- 31.Beausir B., Fundenberger J.-J. Université de Lorraine - Metz; 2017. Analysis Tools for Electron and X-Ray Diffraction, ATEX-Software.www.atex-software.eu [Google Scholar]
- 32.Randle V., Engler O. 2000. Introduction to Texture Analysis, Introduction to Texture Analysis. [DOI] [Google Scholar]
- 33.Nohrer M., Mayer W., Primig S., Zamberger S., Kozeschnik E., Leitner H. Influence of deformation on the precipitation behavior of Nb(CN) in austenite and ferrite. Metall Mater Trans A Phys Metall Mater Sci. 2014;45:4210–4219. doi: 10.1007/S11661-014-2373-3/TABLES/5. [DOI] [Google Scholar]
- 34.Hayes F.H., Hetherington M.G., Longbottom R.D. 2013. Thermodynamics of Duplex Stainless Steels; pp. 263–272. [DOI] [Google Scholar]
- 35.Davidson K.P., Singamneni S. The mechanics of machining selective laser melted super duplex stainless steels. J. Mater. Res. Technol. 2022;17:601–611. doi: 10.1016/J.JMRT.2022.01.025. [DOI] [Google Scholar]
- 36.Lippold J.C., Kotecki D.J. John Wiley and Sons, Inc.; Hoboken, NJ, USA: 2005. Welding Metallurgy and Weldability of Stainless Steels. [Google Scholar]
- 37.Arun D., Devendranath Ramkumar K., Vimala R. Multi-pass arc welding techniques of 12 mm thick super-duplex stainless steel. J. Mater. Process. Technol. 2019;271:126–143. doi: 10.1016/J.JMATPROTEC.2019.03.031. [DOI] [Google Scholar]
- 38.Liou H.Y., Hsieh R.I., Tsai W.T. Microstructure and stress corrosion cracking in simulated heat-affected zones of duplex stainless steels. Corrosion Sci. 2002;44:2841–2856. doi: 10.1016/S0010-938X(02)00068-9. [DOI] [Google Scholar]
- 39.dos Santos D.C., Magnabosco R. Kinetic study to predict sigma phase formation in duplex stainless steels. Metall Mater Trans A Phys Metall Mater Sci. 2016;47:1554–1565. doi: 10.1007/S11661-016-3323-Z/FIGURES/16. [DOI] [Google Scholar]
- 40.Khan W.N., Mahajan S., Chhibber R. Investigations on reformed austenite in the microstructure of dissimilar super duplex/pipeline steel weld. Mater. Lett. 2021;285 doi: 10.1016/J.MATLET.2020.129109. [DOI] [Google Scholar]
- 41.Palmer T., Elmer J., Babu S., Vitek J. 2003. Characterization of Low Temperature Ferrite/austenite Transformations in the Heat Affected Zone of 2205 Duplex Stainless Steel Arc Welds.https://www.osti.gov/biblio/15007726 (accessed December 28, 2022) [Google Scholar]
- 42.Nelson T.W., Lippold J.C., Mills M.J. Nature and evolution of the fusion boundary in ferritic-austenitic dissimilar weld metals, Part 1-Nucleation and growth. Weld. J. 1999;78:276s–277s. [Google Scholar]
- 43.Kou S. John Wiley & Sons, Inc.; Hoboken, NJ, USA: 2002. Welding Metallurgy. [DOI] [Google Scholar]
- 44.Pan Q., Zhang L., Feng R., Feng R., Lu Q., An K., Chuang A.C., Poplawsky J.D., Liaw P., Lu A.L. Gradient cell–structured high-entropy alloy with exceptional strength and ductility. Science. 2021;374:984–989. doi: 10.1126/science.abj8114. [DOI] [PubMed] [Google Scholar]
- 45.Eghlimi A., Shamanian M. Evaluation of microstructure and texture across the welded interface of super duplex stainless steel and high strength low alloy steel. Surf. Coat. Technol. 2015;264:150–162. doi: 10.1016/j.surfcoat.2014.12.060. [DOI] [Google Scholar]
- 46.Suwas S., Ray R.K. 2014. Crystallographic Texture of Materials. [DOI] [Google Scholar]
- 47.Kestens L.A.I., Pirgazi H. Texture formation in metal alloys with cubic crystal structures. Mater. Sci. Technol. 2016;32:1303–1315. doi: 10.1080/02670836.2016.1231746. [DOI] [Google Scholar]
- 48.Kurdjumow G., Sachs G. Über den Mechanismus der Stahlhärtung. Z. Phys. 1930;64:325–343. doi: 10.1007/BF01397346/METRICS. [DOI] [Google Scholar]
- 49.Liu M., Zhang Y., Wang X., Beausir B., Zhao X., Zuo L., Esling C. Crystal defect associated selection of phase transformation orientation relationships (ORs) Acta Mater. 2018;152:315–326. doi: 10.1016/J.ACTAMAT.2018.04.031. [DOI] [Google Scholar]
- 50.Haghdadi N., Cizek P., Hodgson P.D., Tari V., Rohrer G.S., Beladi H. Effect of ferrite-to-austenite phase transformation path on the interface crystallographic character distributions in a duplex stainless steel. Acta Mater. 2018;145:196–209. doi: 10.1016/J.ACTAMAT.2017.11.057. [DOI] [Google Scholar]
- 51.Hunter A., Ferry M. Texture enhancement by inoculation during casting of ferritic stainless steel strip. Metall Mater Trans A Phys Metall Mater Sci. 2002;33:1499–1507. doi: 10.1007/S11661-002-0072-Y/METRICS. [DOI] [Google Scholar]
- 52.Deng L., Xia J., Wang B., Xiang H. Effect of cold rolling and subsequent annealing on the corrosion resistance of Ag-containing CD4MCu duplex stainless steels. J. Mater. Eng. Perform. 2022:1–15. doi: 10.1007/s11665-022-07226-0. [DOI] [Google Scholar]
- 53.Dan Sathiaraj G., Skrotzki W., Pukenas A., Schaarschuch R., Jose Immanuel R., Panigrahi S.K., Arout Chelvane J., Satheesh Kumar S.S. Effect of annealing on the microstructure and texture of cold rolled CrCoNi medium-entropy alloy. Intermetallics. 2018;101:87–98. doi: 10.1016/J.INTERMET.2018.07.014. [DOI] [Google Scholar]
- 54.Han L., Han T., Chen G., Wang B., Sun J., Wang Y. Influence of heat input on microstructure, hardness and pitting corrosion of weld metal in duplex stainless steel welded by keyhole-TIG. Mater. Char. 2021;175 doi: 10.1016/J.MATCHAR.2021.111052. [DOI] [Google Scholar]
- 55.Liu H., Zheng J., Ma M., Wei L., Chen L. Structure–mechanical property–formability relationships for 444-type W-containing ferritic stainless steels. J. Mater. Eng. Perform. 2021;30:467–478. doi: 10.1007/S11665-020-05294-8/FIGURES/16. [DOI] [Google Scholar]
Associated Data
This section collects any data citations, data availability statements, or supplementary materials included in this article.
Data Availability Statement
No data was used for the research described in the article.


