

Abstract
CRISPR-Cas9 has become a powerful and popular gene editing tool. Successful application of this tool in the lab, however, can still be quite daunting to many newcomers to molecular biology, mostly because it’s a relatively lengthy process involving multiple steps, with variations of each step. Here, we provide a reliable, stepwise and newcomer-friendly protocol to knock out a target gene in wild-type human fibroblasts. This protocol involves sgRNA design using CRISPOR, construction of an “all-in-one” vector expressing both sgRNA and Cas9 using Golden Gate cloning, streamlined production of high-titer lentiviruses in 1 week after molecular cloning, and transduction of cells to generate a knockout cell pool. We further introduce a protocol of lentiviral transduction of ex vivo mouse embryonic salivary epithelial explants. In summary, our protocol is useful for new researchers to apply CRISPR-Cas9 to generate stable gene knockout cells and tissue explants using lentivirus.
Basic protocol 1: sgRNA design using CRISPOR
Basic protocol 2: Cloning sgRNA in plasmid vector containing Cas9 encoding sequence using golden gate assembly
Basic protocol 3: Lentivirus packaging
Basic protocol 4: lentiviral transduction of cells
Basic protocol 5: Lentivirus transduction of salivary gland epithelial buds
Keywords: CRISPR, Cas9, lentivirus, integrin, mouse salivary gland
INTRODUCTION:
CRISPR-Cas9 is a genome editing technology that can remove, add, or alter sections of the DNA sequence (Cong et al., 2013; Hsu, Lander, & Zhang, 2014; Jinek et al., 2012; Mali et al., 2013). It consists of two parts: single-guide RNA (sgRNA) and Cas9. sgRNA contains a short pre-designed sequence that is complementary to the target DNA sequence (usually 20 bases long). Cas9 is an endonuclease that can recognize the DNA that binds to the sgRNA and cuts both strands of DNA at the same place. The double-strand DNA break can activate two major forms of DNA repair: Homology Directed Repair (HDR) and Non-Homologous End Joining (NHEJ). HDR allows insertion of exogenous DNA sequences between the two broken ends and therefore can be used for genetic knock-in (KI). NHEJ, in comparison, is error-prone and simply joins the two broken ends of DNA, which can result in frameshift mutations that generate gene knock-out (KO).
Delivery of sgRNA and Cas9 to cells is a key step in CRISPR-Cas9 workflow. They can be transfected together or separately as plasmids, or as pre-complexed RNA and protein called ribonucleoproteins (RNPs). In addition, multiple transfection methods are available, including physical, chemical and viral transfection. Each method has advantages and disadvantages in terms of efficiency, throughput, skill required and equipment, and need to match with specific research aims (Lino, Harper, Carney, & Timlin, 2018).
For many researchers, generating a specific gene-KO cell line or tissue explant using CRISPR-Cas9 system is often needed, but can be challenging. Those who are not very familiar with molecular biology may get lost in the numerous papers using similar but somewhat different methods to achieve gene KO, and may not know where to start. Here in this paper, we describe a robust, streamlined protocol used in our lab that allow newcomers with minimal experience to successfully generate a gene-KO cell pool from wild-type cells. We further introduce an optimized protocol for lentivirus-based sgRNA delivery to the ex vivo cultures of mouse embryonic salivary epithelial explants to achieve highly efficient gene KO.
BASIC PROTOCOL 1
sgRNA Design
Many online web-based tools are available to assist in sgRNA designs, such as CRISPOR, CHOPCHOP, CRISPRko, etc. Some of these tools can show scores predicting efficacy and off-target effects. Here, we show how to use CRISPOR to design sgRNA for ITGA5, which encodes human integrin α5, a well-known fibronectin receptor that regulates cell adhesion and migration (Figure 1).
Figure 1.
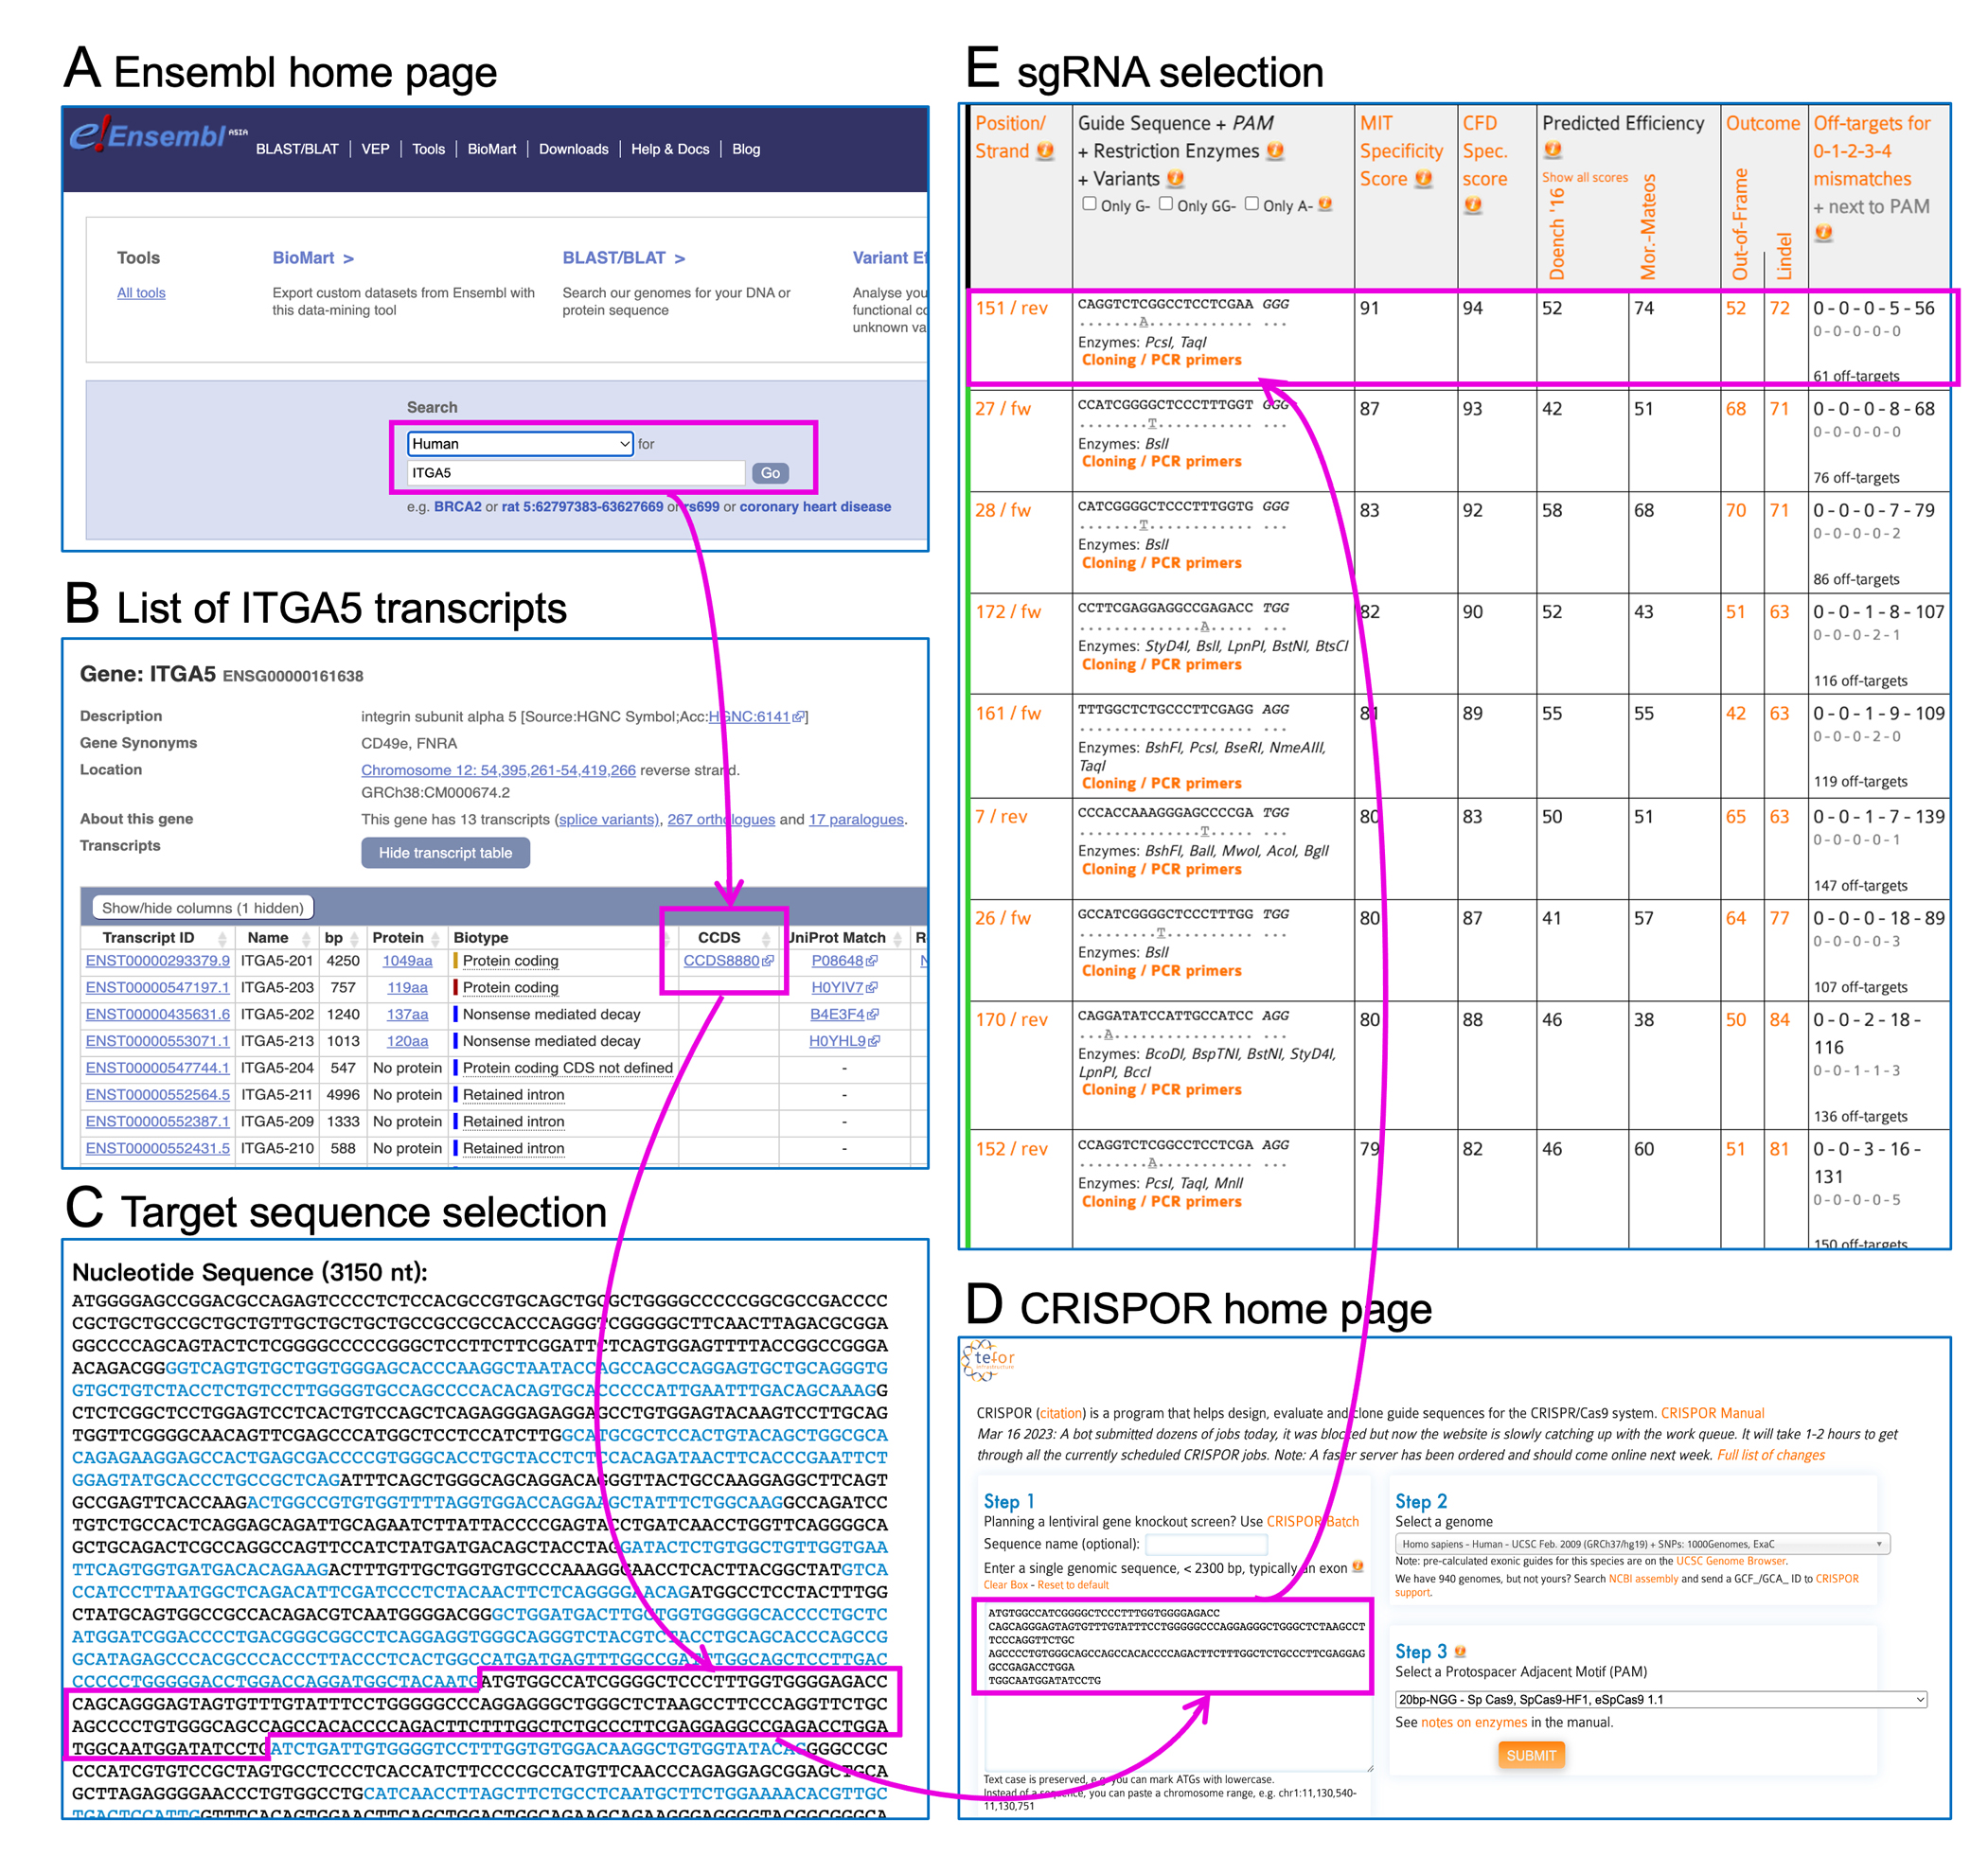
sgRNA design workflow. (A) Type in gene name (ITGA5) on Ensembl home page. (B) Find the major transcript of ITGA5. (C) Select an exon sequence for sgRNA design. (D) Copy and paste the sequence on CRISPOR home page. (E) Select high quality sgRNA(s) from sgRNA candidates based on specificity and off-target scores.
-
Find target genomic DNA sequence. Here we go to Ensembl (https://useast.ensembl.org/index.html), type in gene name (ITGA5) (Figure 1A). Usually, multiple transcripts are associated with one single gene. Click and open the “CCDS” (Consensus Coding Sequence) link associated with the single major transcript to get the nucleotide sequence of all exons (Figure 1B).
It is preferable to select an exon closer to the N’ terminus rather than the C’ terminus as the sequence for sgRNA design, because a frameshift mutation is more destructive when most of the protein has not been translated (Figure 1C).
Go to the CRISPOR website: http://crispor.tefor.net/. Copy and paste the exon sequence selected above, choose the respective genome (Homo sapiens) and select a Protospacer Adjacent Motif (PAM) (if you use Cas9, then select NGG, the default), and click “submit” (Figure 1D).
A table containing guide sequence candidates and their scores will appear. A list of 20bp guide sequence candidates is in column 2 and sorted by specificity score by default (Figure 1E). Selection of “good” guide sequence for actual use is a balanced decision based on the scores predicting different aspects of a sgRNA. Generally, we recommend using the guide sequence with >90 MIT Specificity Score (column 3) and CFD Specificity Score (column 4), and relatively high Outcome scores (column 6). Since we will use a lenticrispr v2 plasmid backbone containing a U6 promoter (lenticrispr v2 plasmid backbone containing a U6 promoter https://www.addgene.org/52961/) for RNA guide sequence, we also pay attention to the Doench 2016 score, which was found to be best score predicting the efficacy of sgRNA expressed driven by a U6 promoter. When other scores are similar, we choose sgRNAs with higher Doench 2016 scores (usually more than 40). In addition, we exclude all the guide sequence candidates in column 2 flagged “inefficient” due to certain motifs in their sequence (Graf, Li, Chu, & Rajewsky, 2019). Finally, we select at least 4 guide sequences for each gene of interest. Try different exons if a single exon cannot generate enough ideal guide sequences. For control, we use sgRNA targeted to LacZ, which is not present in the human genome.
-
Some modifications are required before sending the guide sequence for synthesis. To facilitate expression driven by U6 promoter, we prefix a guide sequence with a “G” if it does not start with one. Since we will use Esp3I-based Golden Gate cloning for subsequent sgRNA insertion, “cacc” and “aaac” should be added to the beginning of the forward and reverse sgRNA sequences, respectively.
For example, one of the sgRNA we use for targeting ITGA5 is “CAGGTCTCGGCCTCCTCGAA”. Add “G” at the beginning to make “gCAGGTCTCGGCCTCCTCGAA”, hence the reverse complementary “TTCGAGGAGGCCGAGACCTGc”. The final pair of oligos should be ordered as “caccgCAGGTCTCGGCCTCCTCGAA” and “aaacTTCGAGGAGGCCGAGACCTGc”.
We usually order oligos from Integrated DNA Technologies (IDT, https://www.idtdna.com/pages). Generally, the minimum scale of sgRNA oligos should be sufficient for subsequent cloning. We recommend ordering oligos in 96-well plates with a layout shown below to facilitate multi-channel pipetting (Table 1).
Table 1.
96-well plate layout for oligo synthesis. Every same-color 8 wells contain sgRNAs targeting the same gene. The forward and reverse sequence of sgRNAs are arranged in adjacent rows.
| 1 | 2 | 3 | 4 | 5 | 6 | 7 | 8 | 9 | 10 | 11 | 12 | |
|---|---|---|---|---|---|---|---|---|---|---|---|---|
| A | Gene1-sgRNA 1-forward | Gene1-sgRNA2-forward | Gene1-sgRNA3-forward | Gene1-sgRNA4-forward | ||||||||
| B | Gene1-sgRNA 1-reverse | Gene1-sgRNA 2-reverse | Gene1-sgRNA 3-reverse | Gene1-sgRNA 4-reverse | ||||||||
| C | ||||||||||||
| D | ||||||||||||
| E | ||||||||||||
| F | ||||||||||||
| G | ||||||||||||
| H | ||||||||||||
| I |
BASIC PROTOCOL 2
Cloning sgRNA in plasmid vector containing Cas9 encoding sequence using Golden Gate cloning.
As mentioned above, we use a LentiCRISPRv2 plasmid backbone containing a U6 promoter (https://www.addgene.org/52961/) for sgRNA and Cas9 encoding sequence. Cloning the sgRNA into the plasmid vector takes a few steps, as introduced below.
[*Copyeditor: Name of the company and cat. no. of the highlighted reagents below should be provided by the authors]
Materials:
Oligo pairs (synthesized by company)
LentiCRISPR v2 plasmid (Addgene: https://www.addgene.org/52961/)
Esp3I (New England BioLabs)
T4 DNA ligase (New England BioLabs)
T3 Polynucleotide Kinase (New England BioLabs)
Competent E. coli cells (New England BioLabs)
LB broth (KD Medical, cat. no. BLE-3030)
Terrific Broth (Fisher Scientific, cat. no. Quality Biological Inc 340071131)
14 mL Round Bottom Polystyrene Test Tube (Corning, Falcon, cat. no. 352001)
LB agar (Invitrogen imMedia Growth Medium, agar, ampicillin. cat. no. Q60120)
Electrophoresis-grade agarose (MilliporeSigma, cat. no. A9539)
Crystal violet (Sigma, cat. no. C0775)
Gel extraction kit (Qiagen, cat. no. 28706X4)
DNA miniprep kit (Qiagen, cat. no. 27104)
Water (molecular biology grade)
1.5ml Eppendorf tubes
96-well PCR plate
Multichannel pipette
Razor blade
Water bath
Incubator shaker (for bacterial culture)
ThermoMixer (Eppendorf)
Section 1: Preparing fragments for ligation
-
1
For a small number (<5) of oligo pairs, anneal them in individual 1.5 mL tubes. For a larger number of oligo pairs, anneal them in a 96-well PCR plate.
In the latter case, order oligo pairs in formats of 100 μM solutions in a 96-well plate and use a multichannel pipette to transfer and mix oligos.
-
2
For each oligo pair, mix 10 μL oligo 1 + 10 μL oligo 2 + 80 μL water (10 μM duplex). Heat the tubes or 96-well PCR plate at 95°C for 5 mins. Then cool down on bench for 15–30 mins to form oligo duplexes.
-
3
In a new set of tubes or wells in the 96-well PCR plate, add 200 μL water to each tube or well.
-
4
Transfer 1 μL of each 10 μM duplex to the new tubes or wells to obtain a final concentration of 0.05 μM.
-
5
Linearize the lentiCRISPR v2 vector with Esp3I (isoschizomer of BsmBI). Set up a 50 μL digestion reaction in a 1.5 mL tube as shown in Table 2.
-
6
Incubate the reaction at 37°C for 1–2 hours.
-
7
During the incubation, make 1% agarose gel with 0.0001% crystal violet (see “Regents and Solutions” for detail) for gel extraction (Figure 2A).
-
8
After incubation, when the agarose gel solidifies, pull off the comb and place it in an electrophoresis apparatus. Cover the gel with 1X TAE buffer, load the samples, and run the gel at 100 V for 15–20 minutes. Do not add crystal violet to the running buffer (Figure 2B). For the lentiCRISPR v2 vector, we are expecting 2 bands at 13 kb and 1873 bp (filler sequence) (Figure 2C).
-
9
Cut the larger band using razor blade at 13 kb (1mm around the band) and purify with the Qiagen gel purification kit.
Table 2.
Components of each 50 μL digestion reaction mixture for linearizing the lentiCRISPR v2 vector with Esp3I.
| Stock | for 50 μL |
|---|---|
| Water | 34.5 |
| 10× CutSmart Buffer | 5 |
| Plasmid (1 μg/μL) | 10 |
| Esp3I (10 U/μL) | 0.5 |
Figure 2.

Agarose gel electrophoresis of the lentiCRISPR v2 vector after Esp3I digestion. (A) Pour fresh-made 1% agarose gel into casting tray, inset comb. (B) When the agarose gel solidifies, pull off the comb and place it in an electrophoresis apparatus. Cover the gel with 1X TAE buffer, load the samples, and run the gel at 100 V for 15–20 minutes. (C) After electrophoresis, 2 bands at 13 kb and 1873 bp (filler sequence) can be seen. The 13 kd band will be cut with razor blade for gel purification (not shown).
Purified DNA fragments can be stored at −20°C and used for multiple freeze-thaws.
Section 2: Ligation
-
10
Make a master mix (6 reactions: 4 ITGA5 gRNA+1 control gRNA+1) without the oligo duplex, and aliquot 19 μL into a new set of tubes or wells. Components of each 20 μL reaction are listed in Table 3.
-
11
Transfer 1 μL of each diluted oligo duplex into these tubes or wells.
Use a multichannel for a large number of reactions in the 96-well plate format.
-
12
Ligate at room temperature for 10–15 min.
Thaw competent cells when starting the ligation reaction and warm up sufficient ampicillin selection plates at 37°C.
Table 3.
Components of reaction mixture for ligating gRNA and vector.
| Stock | for 20 μL | X6 |
|---|---|---|
| Water | 13 | 78 |
| Digested vector (50 ng/μL) | 1 | 6 |
| 10× T4 ligase buffer | 2 | 12 |
| T4 PNK | 2 | 12 |
| T4 ligase | 1 | 6 |
| 0.05 μM oligo duplex | to add | to add |
Section 3: Transformation and miniprep
-
13
Turn on a water bath set at 42°C.
-
14
Thaw 2 competent cell aliquots (50 μL/tube) on ice for 10–15 min. Aliquot 15 μL competent cells into a new set of tubes or wells.
-
15
Mix 1 μL reaction mixture into each aliquot of competent cells.
-
16
Incubate on ice for 10 min. Do not mix.
-
17
Heat shock at 42°C in the water bath for exactly 30 sec.
-
18
Place on ice for 3 min.
-
19
Add 50 μL clean broth (e.g., LB) to each tube or well, and spread cells onto an ampicillin selection plate.
The broth does not have to be sterile, miscellaneous bacteria is not easy to grow on agar plates containing antibiotics.
Antibiotic in the agar plate should match the antibiotic-resistant gene in the plasmid.
-
20
Incubate the plate at 30°C for 24 h. There should be plenty of colonies on the plate.
-
21
Inoculate 2 colonies of each construct into 2 mL LB broth (or TB broth) in 14 mL Falcon tubes. Grow at 30°C for 24 h in an incubator shaker (250 rpm).
[*Copyeditor: For the centrifugation step below, g force should be provided instead of rpm. Please ask the authors to replace it]
-
22
Collect bacteria (centrifuge at 9000rpm for 1 min) for DNA minipreps using a Qiagen DNA miniprep kit.
BASIC PROTOCOL 3
Lentivirus packaging
Here we use the 2nd generation lentivirus packaging system with a 3rd generation transfer plasmid. It takes 5 days to get concentrated virus ready for transduction. Lentivirus should be handled in BSL-2 or higher conditions.
Materials
293 cells (Takara, cat. no. 632273)
DMEM (Thermo Fisher, cat. no. 11965118)
Fetal bovine serum (GE Healthcare/Cytiva, cat. no. SH30070.03)
200 mM L-glutamine (Thermo Fisher, cat. no. 25030081)
100x PenStrep (10,000 units/mL penicillin, 10,000 μg/mL streptomycin; Thermo Fisher, cat. no. 15140163)
DMEM/F-12 (Thermo Fisher, cat. no. 11039047)
25 mM chloroquine in PBS (MilliporeSigma, cat. no. C6628, see Reagents and Solutions)
Packaging plasmid psPAX2
VSV-G envelope plasmid pMD2.G
Your lentiviral transfer plasmids (e.g., sgRNA-expressing plasmids made from pW212)
HBS (pH = 7.10, see Reagents and Solutions)
1 M HEPES-NaOH, pH 7.50
5 M NaCl
150 mM Na2HPO4
2 M CaCl2 (see Reagents and Solutions)
0.45 μm Steriflip filter (MilliporeSigma, cat. no. SE1M003M00)
5x PEG-it reagent (System Biosciences, cat. no. LV825A-1)
Lenti-X GoStix Plus (Takara, cat. no. 631281)
10-cm Cell Culture/Petri Dishes (Thermo Fisher, Nunc, cat. no. 15038)
15-cm Cell Culture/Petri Dishes (Thermo Fisher, Nunc, cat. no. 1748888)
5 mL Serological Pipet (Corning, Falcon, cat. no. 356543)
50 mL conical centrifuge tubes (Fisher scientific, Falcon, 352098)
Centrifuge with swing bucket rotors with 50mL conical centrigue tube adaptors (Eppendorf centrifuge, cat. no. 5810R)
Day 1: Seed 293 cells for transfection.
-
1
For each virus to make, seed 4 million 293 cells per 10-cm dish in 10 mL DMEM Complete medium (see Reagents and Solutions), or 10 million 293 cells per 15-cm dish in 20 mL complete medium.
293 cells should be 50~80% confluent at transfection. Cells are usually good within 20 passages, if cells are slow growing, consider using early passage stocks.
-
2
Packaging in a 10-cm dish is often sufficient, but a 15-cm dish may be preferred for lentiviral vectors expected to be more difficult. For example, if the lentiviral vector is large so that the between-LTR length is approaching the packaging limit (~8.5 kb).
293 cells are used for lentivirus packaging because they are very easy to transfect. We routinely get >80% transfection efficiency with the classical calcium co-precipitation method using 293TN from System Biosciences or AAV-293 from Takara Clontech (Takara, Cat# 632273).
Day 2: Transfection
-
3
Check seeded cells: they should be ~80% confluent.
If cells are slightly lower confluency, wait for half a day before transfecting. Cells can be transfected within 50–80% confluence, but the more cells you have the higher titer you will get.
If the cells are apparently slow growing, consider using lower passage cells.
-
4
Warm up 2x HBS (pH = 7.10, see Reagents and Solutions) and 0.3 M CaCl2 (see Reagents and Solutions) solution to room temperature.
-
5
Thaw the stock plasmid DNAs: your lentiviral vector, the packaging plasmid psPAX2 and the envelope plasmid pMD2.G.
-
6
Warm up enough DMEM Complete medium (see Reagents and Solutions) at 37°C. Each 10-cm dish will use 24 mL medium in total, whereas each 15-cm dish will use 60 mL medium in total.
-
7
Thaw an aliquot of 25 mM chloroquine (1000x) that is sufficient for the medium.
-
8
In a tissue culture hood, add chloroquine to DMEM Complete medium for a final 25 μM concentration. Replace medium in each dish containing cells with 8 mL fresh medium (20 mL if transfecting for 15-cm dish) with 25 μM chloroquine. Put the cells back in the incubator.
-
9
For each dish to transfect, prepare two 15 mL tubes: (1) remove their lids; (2) label one tube with the transfer plasmid to transfect.
-
10
In the unlabeled set of 15 mL tubes, add 1 mL of 2x HBS to each tube (2.25 mL if transfecting for 15-cm dish).
-
11
In the labeled set of 15 mL tubes, add 10 μg each of the lentiviral transfer plasmid, psPAX2 and pMD2.G (22.5 μg each of the plasmid if transfecting for 15-cm dish).
-
12
Take up to 4 dishes each time to the hood. Process them one by one for transfection.
-
13
For each transfection, use a 5 mL pipet to add 1 mL of 0.3 M CaCl2 (2.25 mL if transfecting for 15-cm dish) to the 15 mL tube containing the plasmid DNA mixture. Pipet to mix well. Add this mixture into the tube containing 2× HBS drop by drop. Pipet to mix well.
“Drop by drop” in this step is to minimize pH fluctuation of HBS, hence small precipitates can form. No need to be too slow, though.
-
14
Immediately add this mixture drop by drop into a 10-cm dish containing cells for transfection.
“Drop by drop” in this step is to allow even distribution of virus across cells in the dish. You can also shaking the plates horizontally to achieve even distribution of virus if not adding it drop by drop.
-
15
After 6–12 hours of transfection (can be overnight), replace the medium with 8 mL of fresh medium (20 mL if transfecting for 15-cm dish) with 25 μM chloroquine.
Day 3–4: Collect virus-containing supernatant
-
16
Warm up medium with 25 μM chloroquine prepared on the day of transfection.
-
17
At ~24 hour after the first medium change, collect the supernatant into a 50 mL tube, and add back 8 mL fresh medium with 25 μM chloroquine (or 20 mL for 15-cm dish). Store the supernatant at 4°C.
-
18
After another 24 hours, collect the supernatant into the same 50 mL tube stored at 4°C.
When testing new constructs, the Lenti-X GoStix Plus (Takara, 631281) can be used as a handy tool to estimate the viral titer at this point. The Lenti-X GoStix Plus can also be used to examine the titer after the virus is concentrated.
-
19
Filter the pooled supernatant through a 0.45 μm SteriFlip filter.
If not concentrating the virus, the filtered solution can be directly used, or stored at −80°C after freezing in liquid N2 or dry ice.
-
20
To concentrate virus, add ~4 mL 5x PEG-it reagent (or ~10 mL for 15-cm dish format), mix well by pipetting or inverting. Refrigerate for at least 12 hours at 4°C. Virus solution with PEG is stable for up to 5 days at 4°C.
Day 5: Collect concentrated virus
-
21
Check the appearance of virus + PEG solution. With PEG and refrigerating, it should become turbid as virus precipitates from the solution.
-
22
Pre-cool a swinging-bucket centrifuge to 4°C.
-
23
Spin virus + PEG solution at 1500x g for 30 min at 4°C to pellet the virus.
There should be a visible light yellow to white colored pellet.
Keep the tubes on ice during transfer.
-
24
In a tissue culture hood, remove the supernatant as much as possible by aspirating while tilting the 50 mL tube. Be careful not to touch the pellet.
-
25
Resuspend the pellet with 1/10 to 1/100 of the original viral solution volume of DMEM/F12 medium (can contain PenStrep). We typically use 500 μL.
The Lenti-X GoStix Plus (Takara, 631281) can be used to estimate the viral titer at this point after 1:100 dilution of the viral stock.
Empirically, a GoStix value of 50 is equivalent to ~5 × 10⁵ IFU/mL.
The typical yield of a 10-cm dish packaging of lenti-sgRNA using pW212 backbone is 500 μL at 1.5 × 10⁸ IFU/mL.
-
26
Store at −80°C.
Aliquoting is not necessary, as PEG provides cryoprotection for the solution, and data has shown freeze-thaw for up to 5 times does not seem to affect the virus titer.
BASIC PROTOCOL 4
Lentivirus transduction of cells
Lentiviral particles can efficiently transduce numerous cell lines and result in stably transfected cells. The plasmid backbone we use confer puromycin resistance. Optimal puromycin concentration to kill host cell line should be pre-determined.
Materials
Pre-collected lentivirus
BJ-5ta cells (ATCC, cat. no. CRL-4001)
Puromycin (e.g., Sigma, SBR00017)
Polybrene (e.g., Sigma, 107689)
Complete DMEM medium (see Reagents and Solutions)
12-well tissue culture plates
24-well tissue culture plates
Section 1: Determination of optimal puromycin concentration.
-
1
Seed cells in a 24-well plate and incubate at 37°C, 10% CO2 overnight to reach ~70% confluence. Since we will test 7 concentrations: 0, 0.5, 1, 2, 3, 4, 5 μg/mL puromycin, and 3 replicates are needed for each condition, a total of 21 wells is needed. Incubate at 37°C, 10% CO2 overnight.
For BJ-5ta cells, we seed 50,000 cells per well.
-
2
The next day, aspirate old medium and change to complete medium with puromycin concentrations outlined in step 1.
-
3
Observe cell viability at 24, 48 and 72 hours after cell exposure to puromycin. Dead cells detach and float in the media. Find the lowest puromycin concentration that can kill 100% cells within 2 days and use that concentration for initial selection. Stably transfected cells can be maintained in medium containing a lower puromycin concentration.
We use 1μg/mL puromycin for initial selection after lentivirus infection, and 0.5 μg/mL for maintenance.
Section 2: Lentivirus transduction into cells.
-
4
Based on cell number, virus concentration and multiplicity of infection (MOI), roughly estimate the volume of lentivirus needed for transduction.
We test MOI=10 or 100.
-
5
Seed cells in a 12-well plate and incubate at 37°C, 10% CO2 overnight to reach ~70% confluence.
For BJ-5ta cells, we seed 1×10⁵ cells per well. Other tissue culture plates can be used based on cell growth rate and the amount of virus collected previously.
For 4 ITGA5 gRNA and 1 control gRNA, 10 wells are needed for testing 2 MOIs.
-
6
The next day, aspirate the old medium and replace with a 500μL pre-mixture of complete medium, virus and polybrene (8 μg/mL) to each well.
For example, the estimated total cell number per well is 2×10⁵. For an MOI of 10, 2×10⁶ viral particles are needed, equivalent to 20 μL concentrated virus at a titer of 1×10⁸ IFU/mL.
-
7
24 hours after infection, change the virus-containing medium to fresh medium.
-
8
Wait for another day before adding puromycin at pre-determined concentration to the medium.
-
9
Select the cells for at least 3 days. Change to fresh medium containing puromycin as needed. When reaching >80% confluency, transfer cells to larger tissue culture plates.
-
10
Cells can be verified for gene KO at this point by PCR, western-blot or immunofluorescence, etc.
[*Copyeditor: Below, I believe the word “heterozygous” needs to be replaced with “heterogenous”. Please double check with authors]
The transfection efficiency with lentivirus is usually very high, resulting in a heterozygous cell pool that can suffice most experimental needs, so that further serial dilutions to obtain single cell colonies may be avoided.
BASIC PROTOCOL 5
Lentivirus transduction of salivary gland epithelial buds
This protocol demonstrates the transduction of 20 buds with 2 different viruses (10 buds per virus). Adjust according to your needs.
Materials
Timed pregnant Cas9 transgenic mice at E13-E13.5 for isolating embryonic salivary glands
70% ethanol in a spray bottle
Standard forceps (e.g. Fine Science Tools, 11000–12)
Fine sharp scissors (Fine Science Tools, 14060–10)
DMEM/F-12 (e.g., Thermo Fisher, 11039047)
100x PenStrep (10,000 units/mL penicillin, 10,000 μg/mL streptomycin, e.g., Thermo Fisher, 15140163)
DMEM/F-12 + 1x PenStrep (referred to as “medium” throughout this protocol): add 5 mL 100x PenStrep to 500 mL DMEM/F-12
Dissecting microscope (e.g., Leica M80; any common dissecting microscope should work)
Dumont #5 forceps (Fine Science Tools, 11251–20)
Dumont #5 fine forceps (Fine Science Tools, 11254–20)
Scalpel (Fine Science Tools, 10011–00 and 10003–12)
10-cm dish (e.g., Corning 430167)
35-mm dish (e.g., Corning, 430165)
Pyrex spot plate (Fisher Scientific 13–748B)
22×22 mm coverslip (e.g., MilliporeSigma, C9802)
Dispase (Thermo Fisher, 17105041); dilute in DMEM/F-12 medium at 5–10 U/mL, aliquot and store at −20°C
5% BSA (MilliporeSigma, A8577; diluted in DMEM/F-12)
200 μL low-retention pipette tips (Rainin, 30389187)
20 μL low-retention tips (Rainin, 30389190)
20 μg/mL FGF7 (R&D Systems, 5028-KG-025); divide into 25 μL aliquots and store at −20°C
100x ITS supplement (Thermo Fisher, 41400045)
Growth factor-reduced Matrigel (Corning, 356231; stock is usually 9–10 mg/mL)
Ultra-low attachment 96-well V-bottom plate (S-bio, MS-9096VZ)
Concentrated virus stocks at −80°C.
Polybrene (4 mg/mL in water; MilliporeSigma, H9268)
Please follow the procedures described in this paper (Sekiguchi, Mehlferber, Matsumoto, & Wang, 2023) to obtain single epithelial buds of embryonic salivary glands.
-
At room temperature, thaw the two viruses stored at −80°C, when buds are ready and stored in 5% BSA in medium.
Each bud will need 10 μL virus stock, so make sure there is at least 105 μL of each virus.
The titer of the virus stock is usually ~1.5 × 10⁸ IFU/mL. See Basic protocol 2.
These viruses express sgRNA with red nuclear fluorescent reporters.
Dilute 1 μL of 4 mg/mL polybrene 1:25 in medium to obtain 160 μg/mL polybrene.
Make a master mix of each virus as shown in Table 4. Each bud will be treated in a final volume of 20 μL with 8 μg/mL polybrene in a well of the ultra-low attachment 96-well V-bottom plate. 5 μL carryover volume is assumed for each bud during transfer.
Prepare an ultra-low attachment 96-well V-bottom plate by filling in different amounts of medium using a multichannel pipette as shown in Table 5.
-
In the Pyrex 9-well glass spot plate used for dissection, wash single epithelial buds twice in medium without BSA.
Use 20 μL low-retention tips (cut for larger opening; Rainin, 30389190) to transfer buds.
-
Transfer one bud into each well for virus treatment with 5 μL carryover volume.
These are wells A2-A11 and H2-H11 of the ultra-low attachment 96-well V-bottom plate).
Use 20 μL low-retention tips (cut for larger opening; Rainin, 30389190) to transfer buds.
For each bud, treat with 15 μL virus master mix containing polybrene.
For transduction, incubate the plate in a humidified 37°C incubator for 1–2 hours. The incubator does not need to have CO2.
During the incubation, prepare 2x culture mix as in Table 6.
-
After the incubation, wash off the virus by transferring the bud into the wash wells containing 150 μL medium.
During the incubation, it is normal that viral particles precipitate and form a thin film that appears brownish under the dissecting microscope. Washing off the film requires vigorous pipetting.
Use 20 μL low-retention tips (cut for larger opening; Rainin, 30389190) to transfer buds.
Vigorously pipet using 200 μL low-retention tips (cut for larger opening; Rainin, 30389187) in each well for the wash.
-
After the washes, transfer the bud into the 47 μL medium in the culture wells with 3 μL carryover volume.
Use 20 μL low-retention tips (cut for larger opening; Rainin, 30389190) to transfer buds.
To each culture well, add 50 μL 2x culture mix prepared above.
-
Incubate the plate at 37°C with 5% CO2.
Fluorescence should be readily detectable after 24 hours of culture.
For CRISPR/Cas9-mediated knockout, culture for 2–3 days before analysis of protein expressing and/or phenotype.
Table 4.
Components of master mix of each virus for salivary gland epithelial buds transfection
| Stock | μL for one well | 10.5× (make 0.5 extra) |
|---|---|---|
| virus stock | 10 | 105 |
| 160 μg/mL polybrene | 1 | 10.5 |
| medium | 4 | 42 |
Table 5.
Setup of an ultra-low attachment 96-well V-bottom plate for virus transfection of salivary gland epithelial buds.
| Wells | Usage | μL of medium to fill |
|---|---|---|
| A1-H1 & A12-H12 | edge wells to fill in medium to prevent evaporation | 150 |
| A2-A11 | virus 1 treatment | 0 |
| B2-C11 | virus 1 washes | 150 |
| D2-D11 | culture of virus 1 treated buds | 47 |
| E2-E11 | culture of virus 2 treated buds | 47 |
| F2-G11 | virus 2 washes | 150 |
| H2-H11 | virus 2 treatment | 0 |
Table 6.
Components of culture medium for salivary gland epithelial buds after virus transfection
| Stock | μL for one well | 21× (make one extra) |
|---|---|---|
| Medium | 43 | 903 |
| FGF7 (20 μg/mL, 100×) | 1 | 21 |
| ITS (100×) | 1 | 21 |
| Matrigel (~10 mg/mL) | 5 | 105 |
REAGENTS AND SOLUTIONS:
Complete DMEM medium, 560 mL
50 mL FBS,
5 mL 100x L-Glutamine
5 mL 100x PenStrep
500 mL DMEM
Filter sterilize and store at 4°C. Stable for several months
All reagents should be added in a tissue culture hood.
1% agarose gel, 50 mL
0.5 g electrophoresis-grade agarose
50 ml 1X TAE buffer
2 mg/ml Crystal Violet (20 mg crystal violet dissolved in 10 ml water)
Mix agarose and TAE buffer in a clean glass flask
Place flask in the microwave and heat until just boiling. Swirl to dissolve agarose and continue to heat until the solution is clear. This usually takes less than 1 minute.
Remove from the microwave and allow to cool for 3 minutes.
Add 25 μl 2 mg/ml Crystal Violet (20 mg crystal violet dissolved in 10 ml water) to the agarose solution and swirl to mix. The agarose should be light to medium purple in color.
Agarose gel should be made fresh.
25 mM chloroquine, 20 mL
250 mg chloroquine
19.4 mL PBS
Fully dissolve by vortexing, filter sterilize, divide into 100 μL or 1 mL aliquots and store at −20°C.
Lyophilized Chloroquine is stable at room temperature for 24 months.
Chloroquine in solution is stable at −20°C for 3 months.
0.3 M CaCl2, 200 mL
30 mL 2 M CaCl2 with 170 mL H2O
170 mL H2O (Millipore purified water or Ultrapure water)
Filter sterilize and store at 4°C for several months.
2x HBS, pH 7.10, 200 mL
10 mL 1M HEPES (final concentration: 50mM)
11.2 mL 5M NaCl (final concentration: 280mM)
2 mL 150 mM Na2HPO4 (final concentration: 1.5mM)
H20 176.8 mL (use 150 mL first; adjust pH to 7.10 with NaOH; then adjust volume to 200 mL)
Filter sterilize and keep at 4°C for several months.
Periodically check the pH of 2X HBS using pH paper, since correct pH is the key for efficient transfections.
Na2HPO4-7H2O, MW = 268.07 g/mol
COMMENTARY
Background Information
Before CRISPR, short hairpin RNAs (shRNAs) were used for stably knocking down target gene expressions in cells. These two methods have been compared for efficacy and off-target effects (Boettcher & McManus, 2015). Compared to the DNA level knockout by CRISPR, shRNA targets mRNAs, induce their cleavage and reduce translation, hence the “knockdown”. On one hand, knockdown is not a “clean” experiment and leaves remnant protein expression, which may cause confounding effects. On the other hand, knockdown may be necessary when studying lethal genes, and can be exploited to study gene effects on phenotype by repressing protein to different levels. In terms of specificity and off-target effects, shRNA is associated with high off-target effects due to RNA interference triggered by imperfect-matched sequences. Multiple shRNA should be tested and rescue experiments should be performed before associating phenotypes with knockdown of target genes. The specificity of CRISPR is determined by the sgRNA sequence, and off-target effects can be effectively mitigated by strategic sgRNA design as detailed above.
The two components of CRISPR/Cas9 may be delivered together or separately. In the “all-in-one” lentivirus system, the Cas9 and the sgRNA are encoded on the same plasmid, which approaches the lentiviral packaging limit and results in relatively low viral titers. However, this is not a serious issue for generating knockout cell lines owing to the high transduction efficiency of lentivirus. However, when transfecting ex vivo organ/tissue with high cellular density, a high viral titer is required to ensure most cells are transfected to generate tissue-level phenotypes. As a result, for salivary gland explant studies, we choose to use salivary glands harvested from commercial Cas9 transgenic mice and lentiviruses expressing only sgRNA with a compact fluorescent reporter, whose small size allows for the production of high-titer virus.
Critical Parameters
It is crucial to design proper sgRNAs to maximize on-target editing and minimize off-target effects for the success of CRISPR experiments. The target sequence must be next to the protospacer adjacent motif (PAM) because the Cas nuclease depends on the PAM to bind and cut within the target sequence. The most used Cas9 from Streptococcus pyogenes recognizes a 5’-NGG-3’ PAM sequence, which is abundant in the coding sequences of genes, and often allows designing tens to hundreds of sgRNAs for any target gene with high specificity scores. It’s recommended to prioritize high specificity, and to choose a few sgRNAs for the same target gene. In rare cases when the target gene does not bear an NGG sequence (e.g. very short genes), many other Cas isolated from different bacterial species are available to choose, with each recognizing a different PAM (Jamal et al., 2016).
Lentivirus enables highly efficient transduction and stable expression of sgRNA and Cas9. Here we use calcium phosphate transfection, a traditional, easy and inexpensive method to deliver lentiviral vector, packaging plasmid and envelope plasmid into HEK 293 cells (Graham & van der Eb, 1973). HEK 293 cells should be 50~80% confluent at transfection; if cells are slow growing, consider using early passage stocks. Calcium phosphate co-precipitation is sensitive to slight changes in pH and temperature, so make sure to pre-warm the CaCl2 and pH the HBS before transfection. Other commercial transfection reagents, such as Polyethylenimine (PEI) and lipofectamine 3000 are also highly efficient (Toledo, Prieto, Oramas, & Sánchez, 2009).
[*Copyeditor: An introductory sentence needs to be provided for the Troubleshooting section below. Please ask the authors to provide one]
Troubleshooting:
See Table 7.
Table 7.
Troubleshooting Guide for DNA Blotting and Hybridization Analysis
| Problem | Possible Cause | Solution |
|---|---|---|
| Failure to generate lentivirus or very low virus titers | 1. 293 cells at high passage numbers, or in suboptimal growth condition 2. Transfection failure due to temperature and pH variability. |
1. Use lower-passage number 293 cells (<20). Cells should be between 50~80% confluent at transfection. 2. CaCl2 and HBS should be kept at 4°C and warmed up before use. pH the HBS periodically to 7.1. 3. Use plasmid expressing fluorescent protein as positive control. 293 cells (and phenol red-free medium) should turn to corresponding color if transfection succeed. |
| No knockout or partial knockout | 1. If using antibody-based validation methods (western-blot, immunofluorescence), note that antibody may be non-specific to the target protein. 2. sgRNA not active or does not result in complete gene disruption. |
1. Use different antibodies, especially ones that have been knockout or knockdown validated. Otherwise, use a DNA-based validation approach. 2. Try different sgRNAs. Use multiplex sgRNAs cloned to a single plasmid to enable large fragment deletion (Cong et al., 2013). However, if the target gene is lethal to cell survival, then complete knockout of that gene may not be possible. |
Understanding Results:
Sample immunostaining images of Itga5 knockout in fibroblasts and Itgb1 knockout in mouse salivary epithelial explants following the protocol above are shown in figure 3A and 3B, respectively. Integrin α5 in sg-Control fibroblasts growing on 2D glass surface aggregate on cell membrane and form characteristic fibrillar adhesions towards cell center. sg-Itga5 reduced integrin α5 expression to background level with no fibrillar adhesion forming (figure 3A). Similarly, Integrin β1 in sg-Control salivary epithelial explants is enriched between epithelial cells but was vastly reduced by sg-Itgb1 (Figure 3B).
Figure 3.

Knockout of α5 and β1 integrin in immortalized human foreskin fibroblasts (BJ-5ta) and mouse salivary epithelial explants, respectively. (A) Immunostaining of actin and α5 integrin in sg-Control and sg-Itga5 BJ-5ta cells. (B) Immunostaining of DAPI and β1 integrin in sg-Control and sg-Itgb1 mouse salivary epithelial explants. Scale bars=20 μm.
Time Considerations:
sgRNA design and subsequent synthesis take less than 1 week depending on company turnover time. Cloning the sgRNA plasmid, bacteria transformation and growth, plasmid purification take 1 week. Lentivirus packaging takes 1 week. Lentivirus transduction of cells and mouse salivary glands and antibody selection take 1 week. Ideally, if planned carefully (minimally waiting time for cell growth, materials and reagents to deliver, etc.), a knockout cell pool can be generated in 1 month.
ACKNOWLEDGEMENTS: (mandatory for NIH, optional for all others)
This work was supported by the Intramural Research Program of the NIH, NIDCR, the National Natural Science Foundation of China (grant number: 82100535), the National Natural Science Foundation of Shandong Province, China (grant number: ZR2020QH184) and the China Postdoctoral Science Foundation (grant number: 2020M670044ZX).
Footnotes
CONFLICT OF INTEREST STATEMENT:
The authors declare no conflict of interests.
DATA AVAILABILITY STATEMENT:
The data that support the findings of this study are available from the corresponding author upon reasonable request.
LITERATURE CITED:
- Boettcher M, & McManus MT (2015). Choosing the Right Tool for the Job: RNAi, TALEN, or CRISPR. Mol Cell, 58(4), 575–585. doi: 10.1016/j.molcel.2015.04.028 [DOI] [PMC free article] [PubMed] [Google Scholar]
- Cong L, Ran FA, Cox D, Lin S, Barretto R, Habib N, … Zhang F (2013). Multiplex genome engineering using CRISPR/Cas systems. Science, 339(6121), 819–823. doi: 10.1126/science.1231143 [DOI] [PMC free article] [PubMed] [Google Scholar]
- Graf R, Li X, Chu VT, & Rajewsky K (2019). sgRNA Sequence Motifs Blocking Efficient CRISPR/Cas9-Mediated Gene Editing. Cell Rep, 26(5), 1098–1103 e1093. doi: 10.1016/j.celrep.2019.01.024 [DOI] [PMC free article] [PubMed] [Google Scholar]
- Graham FL, & van der Eb AJ (1973). A new technique for the assay of infectivity of human adenovirus 5 DNA. Virology, 52(2), 456–467. doi: 10.1016/0042-6822(73)90341-3 [DOI] [PubMed] [Google Scholar]
- Hsu PD, Lander ES, & Zhang F (2014). Development and applications of CRISPR-Cas9 for genome engineering. Cell, 157(6), 1262–1278. doi: 10.1016/j.cell.2014.05.010 [DOI] [PMC free article] [PubMed] [Google Scholar]
- Jamal M, Khan FA, Da L, Habib Z, Dai J, & Cao G (2016). Keeping CRISPR/Cas on-Target. Curr Issues Mol Biol, 20, 1–12. [PubMed] [Google Scholar]
- Jinek M, Chylinski K, Fonfara I, Hauer M, Doudna JA, & Charpentier E (2012). A programmable dual-RNA-guided DNA endonuclease in adaptive bacterial immunity. Science, 337(6096), 816–821. doi: 10.1126/science.1225829 [DOI] [PMC free article] [PubMed] [Google Scholar]
- Lino CA, Harper JC, Carney JP, & Timlin JA (2018). Delivering CRISPR: a review of the challenges and approaches. Drug Deliv, 25(1), 1234–1257. doi: 10.1080/10717544.2018.1474964 [DOI] [PMC free article] [PubMed] [Google Scholar]
- Mali P, Yang L, Esvelt KM, Aach J, Guell M, DiCarlo JE, … Church GM (2013). RNA-guided human genome engineering via Cas9. Science, 339(6121), 823–826. doi: 10.1126/science.1232033 [DOI] [PMC free article] [PubMed] [Google Scholar]
- Sekiguchi R, Mehlferber MM, Matsumoto K, & Wang S (2023). Efficient Gene Knockout in Salivary Gland Epithelial Explant Cultures. J Dent Res, 102(2), 197–206. doi: 10.1177/00220345221128201 [DOI] [PMC free article] [PubMed] [Google Scholar]
- Toledo JR, Prieto Y, Oramas N, & Sánchez O (2009). Polyethylenimine-based transfection method as a simple and effective way to produce recombinant lentiviral vectors. Appl Biochem Biotechnol, 157(3), 538–544. doi: 10.1007/s12010-008-8381-2 [DOI] [PubMed] [Google Scholar]
Associated Data
This section collects any data citations, data availability statements, or supplementary materials included in this article.
Data Availability Statement
The data that support the findings of this study are available from the corresponding author upon reasonable request.