Abstract
Additive Manufacturing (AM) has spread significantly in recent years, with relevant applications in many fields of research and engineering. Thanks to its distinctive production methods, AM enables the creation of parts with complex shapes that cannot be fabricated easily by employing traditional subtractive processes. 3D printing, which involves overlapping material layer by layer until the designed part is completed, shows several advantages in terms of limiting material waste, reducing production phases and postprocessing/heat treatments needs, leading to an additional benefit in terms of environmental sustainability. However, there are still limited available data on the influence of the 3D printing process on the mechanical properties of the materials that are commonly used and additional investigations are strongly demanded. So, the purpose of the present paper is to provide a useful contribution in the field of metal additive manufacturing, reporting the results of an experimental campaign carried out on 17-4 P H stainless steel, produced using selective laser melting technology. The effects of different printing orientations and scanning times on the tensile behaviour, impact strength and microhardness features of the 3D-printed products are investigated. Furthermore, the influence of an annealing heat treatment on the material mechanical performance is evaluated.
Keywords: Additive manufacturing, Selective laser melting, 17-4 P H stainless steel, 3D-printing, Process parameters, Mechanical properties
Graphical abstract
Highlights
-
•
Mechanical properties of 17-4 P H stainless steel produced trough SLM are examined.
-
•
The effects of different printing directions and scanning times are investigated.
-
•
Tensile, impact strength and microhardness are evaluated by experimental test.
-
•
The influence of an annealing treatment on the material performance is evaluated.
-
•
Printing orientations and scanning times led to different mechanical behaviour.
1. Introduction
Additive manufacturing (AM), also known as 3D printing, is a process adopted to produce objects by superimposing layers of material according to a shape conceived through a 3D model. The layers are packed by melting the material, which, then, solidifies into the desired geometry. This process is alternative with respect to more traditional and conventional subtractive production methods, in which material is removed from a full solid structure, using techniques such as turning or milling, until the final shape of the workpiece is obtained. The 3D model can be either a CAD design or a 3D scan of a real object. The software that controls 3D printers, necessary for 3D data and build preparation, divides the digital model of the object into overlapping layers and consequently manages the deposition of the material [1,2].
A large plethora of materials of different nature can be used in the AM processes, such as polymers, metals and ceramics, which, also due to the technological evolution, are able to withstand high temperatures and significant mechanical stresses [3,4].
The initial use of 3D printing was provided for complying with the compelling needs of rapid prototyping. Indeed, the first AM methods were proposed in the 1980s [[5], [6], [7]]. Over the following years, several different technologies were developed enabling relevant progresses [8,9]. In particular, AM is becoming always more widespread thanks to its numerous advantages, such as the possibility to produce, in a single part, shapes with complex geometries that, conversely, would require multiple assemblies with traditional systems, the reduction of the amount of both the material used and the processing waste, the opportunity to use alternative and innovative materials, the ease of object customization, the possibility to obtain different parts in the same production batch, without intervention on the machine tooling (part changeover), the significant decrease in ‘time to market’ and the possibility to replace stocks with storing files, which are products ‘on demand’ instead of physical objects [10].
However, only in the last few years, the sensible reduction of the cost of printers and of the production times, also for large sizes objects, combined with the wide range of materials/filaments available, led to a real large scale spread of this technology [3,5,8,11]. Currently, AM systems involve the use of several technologies and different materials [12].
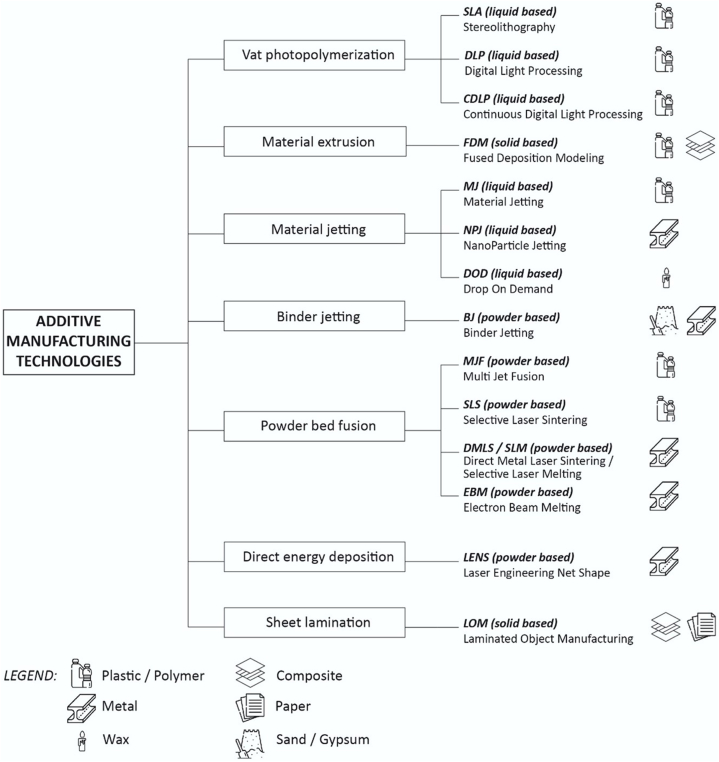
An overview of the main additive manufacturing methods according to the classification proposed by ISO/ASTM Standard 52,900 is given in Fig. 1 [1,3,11,13,14]. The classification defines seven macro-categories of printing techniques, distinguishing them depending on the production technology, the specific materials and the final properties of the printed component. The seven categories comprise Vat Polymerization, Material Extrusion, Material Jetting, Binder Jetting, Powder Bed Fusion, Direct Energy Deposition and Sheet Lamination. Vat polymerization, which includes Stereolithography (SLA) and Digital Light Processing (DLP), is a resin-based technique where a liquid photopolymer contained in a tank (not injected by a nozzle) is selectively polymerized through a heat source [3,[15], [16], [17]]. Material extrusion technology, mainly known as Fused Deposition Modelling (FDM), works with a continuous filament of thermoplastic material. The material, which is preheated, flows out of the extruder nozzle and is deposited on a printing platform, which is heated for higher adhesion [[18], [19], [20]]. Material Jetting (MJ), which include also Drop On Demand (DOD) technique, is similar to the 2D inkjet procedure that prints ink on paper. Droplets of material (photopolymers, metals or wax) are released and deposited on the build platform, where are cured and solidified directly with a source of light or heat [18,20]. Binder Jetting (BJ) uses powdered material and a binding agent. This technology employs nozzles moving over the build plate, dropping a binder in liquid form on top of the previously deposited layer of powder [[21], [22], [23]].
Fig. 1.
Overview of the main AM technologies.
The Sheet Lamination (SL) production technique, also referred to as Laminated Object Manufacturing (LOM), involves the deposition of sheets of solid-state material, provided in roller form, which are glued to one another. The sheets are then laser-cut to adapt to the cross-section of the workpiece and form layer upon layer the object [24,25].
The most popular techniques are those based on Direct Energy Deposition (DED), which produce parts with direct melting of materials and depositing them on the component, layer upon layer, mainly working with powders or wire [18,24]. Among DED technologies, Laser Engineering Net Shape (LENS), Laser Metal Deposition (LMD) and Wire and Arc Additive Manufacturing (WAAM) are the most popular ones. As most DED printers are large industrial machines, they were used to build the first full-scale prototypes in the field of construction. Among them, the MX3D bridge, a pedestrian bridge in Amsterdam, entirely 3D printed using WAAM technology [26,27] is definitely worth of being mentioned. The Powder Bed Fusion (PBF) methods [28], use different energy sources to melt the powder particles layer by layer, producing solid parts. The most common techniques are Selective Laser Melting (SLM). Selective Laser Sintering (SLS) [29], Electron Beam Melting (EBM) and Multi Jet Fusion (MJF) [23,30].
In particular, among the AM processes currently available for metallic materials, Selective Laser Melting (SLM) has attracted increasing attention especially due to its advanced flexibility in production and the numerous potential applications in mechanical, aerospace, automotive and medical fields [6]. In addition, SLM process is able to build workpieces with high levels of accuracy and a finer microstructure if compared to other metal additive manufacturing techniques [23,[31], [32], [33]].
The SLM technique falls within the powder bed fusion (PBF) based methods and uses a high-energy laser power source which fuses the metal particles within an inert environment to create objects or components. Very small metal particles are laid on the building plate, the laser moves layer by layer to fabricate the component by heating and melting the metal to form the desired geometry. After the complete creation of a solid metal layer, the tray containing the 3D part already printed is lowered and the powder is layered upon, then laser sintering is resumed for the production of a new layer. So, the final object is 3D printed layer by layer until completion. In this way, it is possible to reduce, at the same time, waste and costs associated with production [1,11,31,32,34] generating also significant benefits in terms of environmental sustainability. Numerous research studies, on the other hand, have recently explored the environmental impact and the life cycle assessment (LCA) of AM processes [[35], [36], [37], [38]] showing that they enable the production of components with fewer parts but more integrated functions, with a global reduction of materials, human and environmental resources.
In fact, the easier assembly process, made possible by the functional, multi-component design and optimized geometries, leads to a reduction in costs and risk of quality loss during the assembling process. In addition, thanks to a better strength-to-weight ratio, a significant reduction in volume can be achieved, and thus an environmental benefit in terms of end of life discards. Moreover, most of the materials used for AM can be reused, like in the case of metal powders, for which at the end of the process the residual powder in the build chamber is harvested and mostly reused for a new printing process, or recycled, like in the case of plastic filaments, which very often come from already recycled plastic [24].
In light of all these considerations, metal 3D printing is trying to make its way into several sectors of industry, overcoming the limitations of an emerging technology related to cost, small-scale production and lack of knowledge. It is already an established technology in some areas, such as aerospace, automotive and biomedical, while in others, and particularly in the construction industry, the first results have only been achieved in recent years [39]. In fact, the potential offered by additive manufacturing for the production of metal structures, including bridges, construction details and connections, has been evaluated.
Among these, the first example of 3D printing applied to structural engineering is the MX3D pedestrian bridge, opened in Amsterdam in 2021. It was built by robotic arms using the WAAM technique in a single metal piece weighing 4.5 tons [26,27]. Also the MX3D company, in cooperation with Takenaka Corporation, developed a Duplex structural steel connector produced using the WAAM technique, whose highly efficient final shape is the result of optimization processes.
Another example of structural connection is the node developed by ARUP, in which 3D printing and typological optimization processes are combined, rationalizing the starting geometry. For its realization, Selective Laser Sintering with Maraging steel 1.2709 and 316 L stainless steel were used [26,40].
Further applications can be found in the context of steel connections and stiffening elements for metal structures. One solution involved the printing, with the WAAM technique, of a hook directly on the column for the beam-column connection, in order to eliminate bolted connections. Another use concerned the introduction of stiffeners with optimized shapes useful for avoiding buckling phenomena in the flanges, printed directly on the component to be strengthened. Also in the field of metallic connections, another study showed the creation of a beam-beam connection with an end plate, obtained with topological optimization and 3D printed using WAAM [41,42]. In addition, a connection for aluminium profiles using the WAAM technology was also created [43].
In order to fill the gaps in the structural performance of 3D-printed parts, several experimental campaigns for the evaluation of different mechanical properties were conducted on structural members and components. The uncertainty in the knowledge of the behaviour of printed parts can depend on a variety of factors, such as printing direction, printing strategies, dimensional accuracy, and thermal gradients.
In the case of the MX3D bridge, one of the most striking examples to date of the use of additive manufacturing in construction, several experimental and numerical tests were necessary before its installation, as evidenced by the studies of Gardner et al. [27], Wynne et al. [44] and Kyvelou et al. [45].
Further assessments of the mechanical properties of structural elements such as steel plates, shear bolted connections, members and steel bars were carried out by Al-Nabulsi et al. [46], Guo et al. [47], Huang et al. [48,49], Kraus et al. [50] and Silvestru et al. [51]. Finally, Laghi et al. [52] who carried out experimental tests on 308 L steel with the aim of calibrating design values, defining partial safety factors and making comparisons with the normative values provided by Eurocode 3.
These significant experimental campaigns, therefore, are aimed at gaining a deeper knowledge of an innovative technology and the real structural performance it can offer, which is a necessary issue to gain experience for the large-scale use of this new industrial process.
This paper focuses on the 17-4 P H stainless steel printed via SLM, investigating the mechanical properties of this material in order to evaluate its potential use in the field of civil engineering. To this purpose, an extensive experimental campaign is proposed. Tensile tests, dynamic resilience tests, and microhardness tests on the specimens produced from 17-4 P H stainless steel powder through SLM, are discussed, also considering the effect of those specific printing parameters [31] that were deemed to be worthy of investigation. Also, the effects of a heat-treatment of annealing, performed on some selected samples after the AM process [32,53], is dealt with.
2. Materials and testing methods
2.1. The investigated material
The 17-4 P H alloy (AISI 630, ASTM A564, DIN 1.4542) is a Cr–Ni–Cu precipitation-hardened martensitic stainless steel reinforced by the precipitation of copper particles within the martensitic matrix, with outstanding mechanical properties, including high tensile and impact strength and fracture toughness, combined with good corrosion and wear resistance at temperatures up to 320 °C [[54], [55], [56], [57]]. This kind of alloys shows, independently by the manufacturing process in which is involved, high mechanical stress response, good corrosion strength properties, excellent wear and oxidation resistance compared to other stainless steels, even at high temperatures. For these reasons, 17-4 P H stainless steel is collecting great interest in many sectors of industry (chemical, metallurgical, aerospace, petroleum and automotive) and for a wide range of applications such as valves or turbine components, blades, tie rods, propeller shafts, chemical treatment equipment, aircrafts and missile spare parts, pumps, nuclear reactor parts and centrifugal compressor rotors [[58], [59], [60], [61]]. Moreover, the mechanical behaviour and hardness characteristics can be improved through specific heat treatment, in fact 17–4 PH stainless steel achieves the optimum level of corrosion resistance when subjected to heat treatment and, depending on the heating temperature selected, different mechanical properties can be obtained [58]. So, because of its features, this material is attracting great interest also in the field of additive manufacturing [13], further increasing in this way the possible applications in different fields of engineering, in particular in the production of mechanical and structural parts [32]. In particular, in the field of structural engineering, the production of certain elements such as dampers, connections and reinforcements for metal structures using 3D printing technology represents a new stimulating challenge to extend the traditional frontiers in structures [40,41,62,63].
With specific reference to additive manufacturing, 17–4 PH stainless steel is one of the most widely used steel alloys, together with 316 L, 304 and 15-5 P H steels [8,[64], [65], [66], [67]]. The feedstock, provided by SLM Solutions, the producer of the used steel, is in powder form with spherical particles of size 10–45 μm. The nominal chemical composition is given in Table 1 [68].
Table 1.
Nominal chemical composition of 17-4 P H steel raw powder material.
| Fe | Cr | Ni | Cu | Mn | Si | Nb + Ta | C | N | O | P | S |
|---|---|---|---|---|---|---|---|---|---|---|---|
| Balance | 15/17.5 | 3–5 | 3–5 | 1 | 0.07 | 0.15/0.45 | 0.07 | 0.1 | 0.04 | 0.04 | 0.015 |
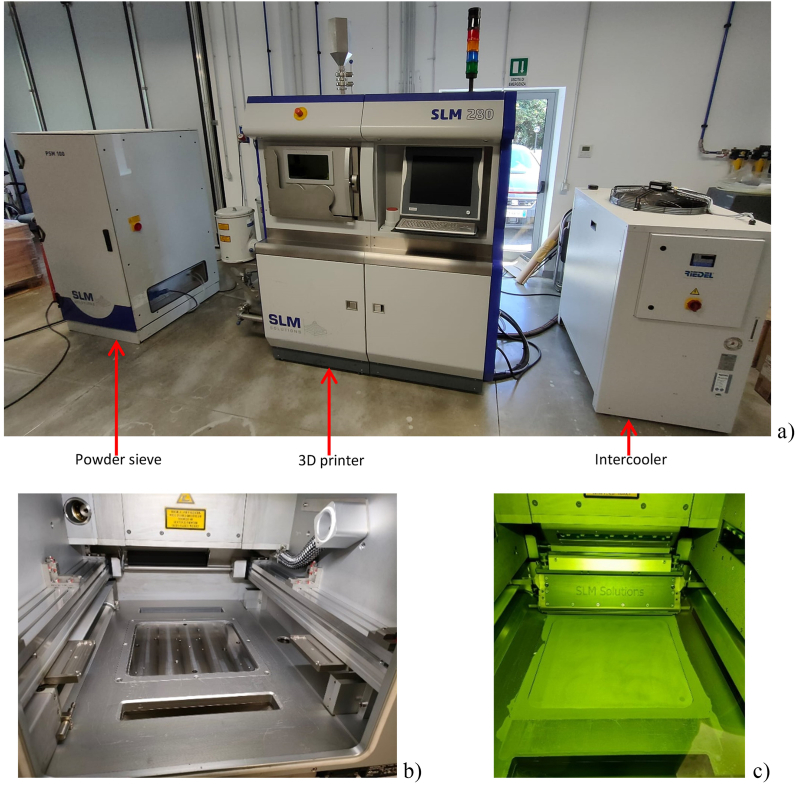
All the samples of the experimental campaign were produced using the SLM 280 industrial 3D printer (Fig. 2), supplied by SLM Solutions GmbH (Lubeck, Germany). The printer, which is designed for the production of medium-sized components with high precision and surface quality, provides a 280 × 280 × 320 mm3 build envelope and works with a laser beam with a maximum power of 400 W. Production of the workpieces takes place in a closed system with an inert gas atmosphere guaranteed by the presence of Argon gas, and a temperature up to 65 °C during the process. The temperature of the building plate, on the other hand, can be raised to 200 °C to mitigate the growth of internal stresses in the parts. During the production phase, the temperature of the building plate is maintained around 100 °C, while the temperature of the chamber varies between room temperature at the early stage and 30–35 °C as the work progresses.
Fig. 2.
SLM 280 industrial 3D printer: a) The printer with all its components; b) The building chamber; c) The building chamber during a job, when the first layer of powder is deposited on the plate.
At the end of the printing process, no surface treatment of the samples is required. The settings of the process parameters applied in the production of the specimens are summarised in Table 2.
Table 2.
3D printer process parameters used for the production of all the specimens.
| Parameter | Setup value |
|---|---|
| Laser beam diameter | 75 μm |
| Laser beam power | 200 W |
| Laser scanning speed | 800 mm/s |
| Laser scanline spacing | 80 μm |
| Layer thickness | 30 μm |
| Hatch distance | 120 μm |
| Minimum scanning time | Variable |
| Scanning pattern | Stripes |
2.2. The annealing treatment
A part of the tested specimens was subjected to a stress-relieving heat treatment consisting in an annealing process performed by maintaining samples in an oven at a temperature of 650 °C for 2 h and then cooling down to room temperature inside the switched-off oven [54,55,57].
Through annealing, the microstructure of the material was modified, causing changes in its properties. The typical result is the removal of defects in the crystalline structure. It can also have the purpose of harmonizing the chemical composition of the steel, in that case the heating is carried out at higher temperatures and for longer times.
2.3. Testing methods
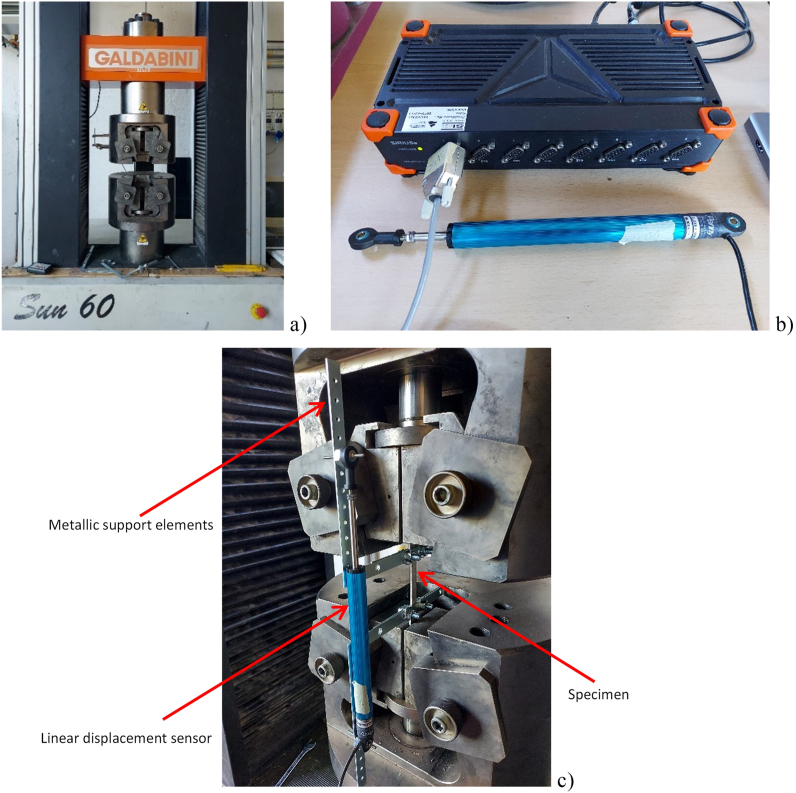
Tensile tests were performed with the aim of appraising how the production process and its parameters affect the mechanical behaviour and how they determine the optimal values of the process parameters [53,57]. A Galdabini Sun60 universal testing machine, with a maximum load capacity of 600 kN, has been used to perform experimental tests. Displacement control tensile tests were carried out at room temperature, with a constant speed of 4 mm/min. The test was set up in compliance with the ASTM A370 – “Standard Test Methods and Definitions for Mechanical Testing of Steel Products” [69].
The axial strength of the sample was measured using the machine load cell, whereas the strains were read using Penny & Giles linear displacement sensors. These devices, coupled with an electronic control unit, are able to monitor stroke lengths of up to 100 mm.
The sensor used for displacement measurement has a virtually infinite tolerance, while the load cell of the test machine used for the force measurement, has a tolerance of 1/1000 of load cell capacity (0.6 kN). These tolerances have been deemed acceptable as they represent an infinitesimal percentage of the yielding displacement and 4.3e−5% of the yielding force.
The test apparatus is illustrated in Fig. 3. Experimental tests were conducted on a total of 36 specimens, the half of the samples was left as-built, whereas the other half was heat-treated.
Fig. 3.
Tensile test system: a) Universal testing machine; b) Electronic control unit with linear displacement sensor; c) Final arrangement of the measuring apparatus with the sensor connected to the specimen via the metallic support elements.
Moreover, Charpy impact tests were carried out on a total of 15 specimens, of which 9 were as-built and 6 were heat-treated, in order to assess the resilience. Impact resilience is one of the most important properties and cost-effective assessments for material manufacturers, both in terms of product evolution and of quality control. Since components may fail at stress levels significantly lower than the critical failure stress, accurate measurement of impact damage propagation is necessary.
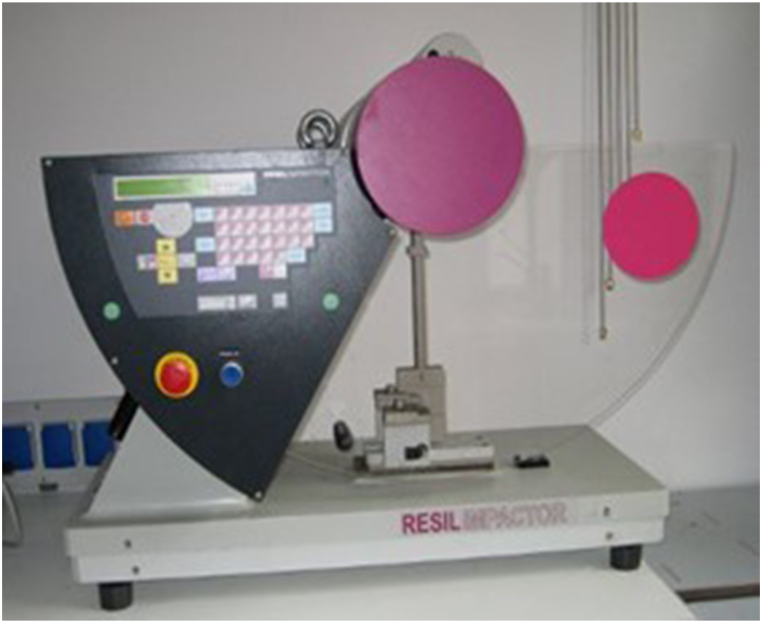
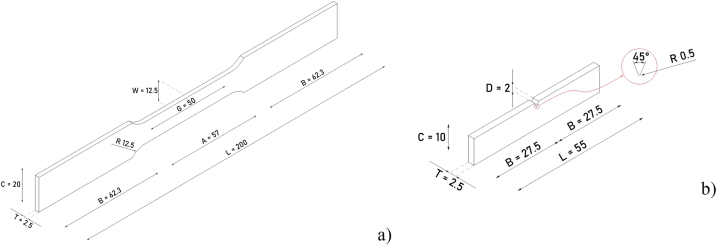
The experimental setup of Charpy impact test consists of a notched specimen, the anvils where the specimen is freely supported and a pendulum with a fixed mass attached to a rotating arm pinned at the machine body. The pendulum falls, drawing a circular trajectory, and hits the test specimen at the middle span length, transferring kinetic energy. The energy transferred to the material can be deduced comparing the difference in the height of the pendulum before and after the impact with the specimen. Impact tests were carried out with a Ceast Resil Impactor pendulum impact test apparatus (Fig. 4), with a maximum measured energy of 50 J. The test was set up in accordance with ASTM A370 - “Standard Test Methods and Definitions for Mechanical Testing of Steel Products” and ASTM E23 - “Standard Test Methods for Notched Bar Impact Testing of Metallic Materials” [69,70]. This kind of test results to be fast and inexpensive and allows to obtain data and information about the material properties that are not deducible from other simple mechanical tests [71,72]. Dimensions and geometries of all the specimens, were chosen following the recommendations of the ASTM A370 - “Standard Test Methods and Definitions for cross-section, an overall length of 55 mm and a V-notch depth of 2 mm.
Fig. 4.
Resilience test system.
The microhardness of the 17-4 P H stainless steel specimens was determined employing a Micro-Vickers Hardness tester CV-400DAT with an indentation load of 0.4916 N [73]. As these are non-destructive tests, the microhardness tests were carried out on the 15 specimens designated for the resilience tests, after testing with the Charpy pendulum. Therefore, the samples have the same characteristics as mentioned above.
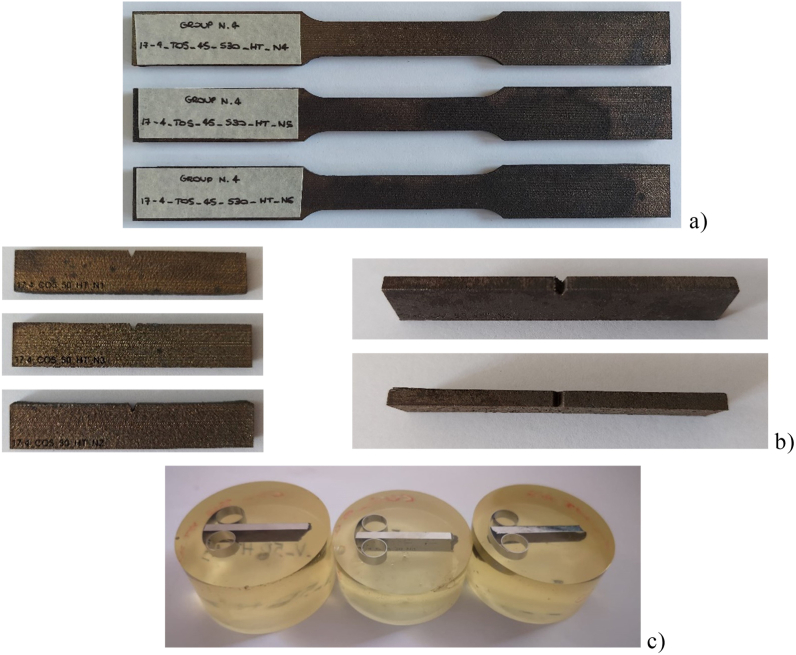
The specimens were embedded in resin as shown in Fig. 6c. Before the test, a preparation phase was carried out, consisting of lapping the samples with abrasive papers of increasing grit size (400–600 - 800–1000) and an applied force F of 15 N, followed by polishing with 9 and 3 μm suspension.
Fig. 6.
Specimens used in the experimental activity for tensile test (a), V-notch Charpy test (b), and microhardness test (c).
The dimensional and geometric features of the specimens produced for the mechanical tests are depicted in Fig. 5. Fig. 6 shows a representative selection of the different kinds of specimens manufactured.
Fig. 5.
Design and dimensions (expressed in mm) of the specimens used in the experimental activity: (a) Tensile test specimens; (b) V-notch Charpy test specimens.
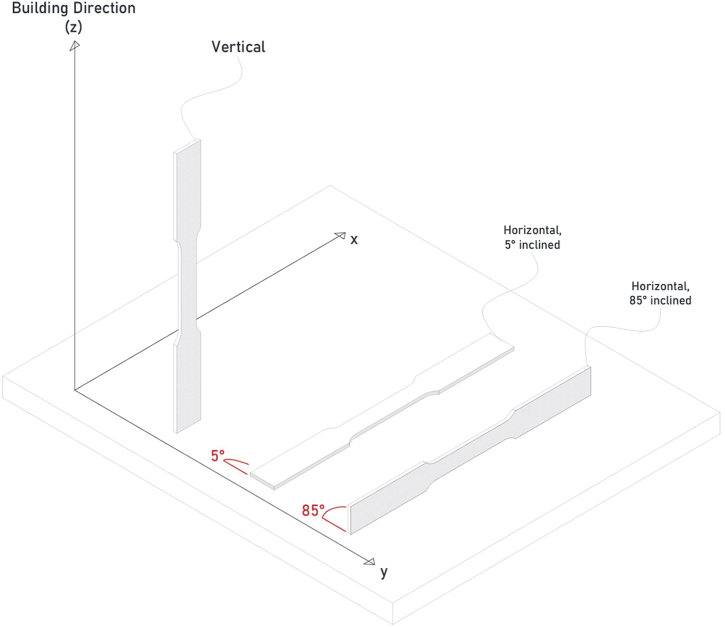
The specimens production was divided into 3 batches. Batch No. 1 and No. 2 include the specimens for tensile testing. In the Batch No. 1, consisting of 18 specimens, the printing direction of the sample was identified as the parameter to be monitored: three different printing directions were considered, i.e. two directions with the longitudinal axis parallel to the x-y plane (horizontal, inclined by 5° and 85°) and one with the longitudinal axis orthogonal to the x-y plane (vertical). A schematic illustration of the printing directions is shown in Fig. 7.
Fig. 7.
Schematic illustration of the three printing directions adopted.
Instead, for the Batch No. 2, comprising 18 specimens, the scanning time was chosen as parameter to be controlled. The scanning time is defined as the time that the laser beam takes to melt a layer of powder [74,75]. Following the completion of one layer of the workpiece, the powder deposition element, called the recoater, returns to its starting position removing the unmelted powder leftover on the plate and the production of the next layer begins [74]. For the horizontally manufactured specimens inclined by 5° (i.e. samples which showed the optimal stress-strain behaviour in terms of stiffness, ultimate and yield strength and ductility, as will be widely discussed in Section “Results”), three different scanning times were applied, namely 45 s, 50 s and 65 s.
Fig. 8 shows an import of the interface of the Materialise Magics software, used to generate the data for printing, where the main components involved in the production process can be identified.
Fig. 8.
Image imported from Materialise Magics software which graphically displays all the elements involved in the additive manufacturing process.
Batch No. 3 consists of 15 specimens for resilience tests.
Specimens were printed in three different directions, i.e. vertical and horizontal inclined by 5° and 85° and, on the basis of the preliminary tensile tests results (for the detailed discussion see section 3.1.2), the scanning time used was 50 s. It must be noted, however, that all the samples were printed with an angle of 5° with respect to the direction considered, with the aim of limiting the negative effects of the additive manufacturing process on the corners by means of this slight inclination to reduce the area overhangs. Indeed, as the powder particles are melted by high-power laser beams, complex physical-chemical phenomena and phase transformations are involved during 3D printing process. In addition, an inappropriate evaluation of these effects could lead to the development of deformation phenomena in the parts, such as shrinkage or warping.
With regard to the scanning pattern, a striped pattern was applied for all samples. Alternatively, the other most frequently employed pattern is the chessboard pattern.
Layer thickness was kept constant for all specimen types and is equal to 30 μm.
3. Results and discussion
A summary of all the samples produced, with all the details of the production parameters and features, is given in Table 3. Each sample type was replicated and tested three times.
Table 3.
Summary of specimens manufactured and their features.
| Specimen ID | Printing direction | Heat treatment | Quantity | Scanning time |
|---|---|---|---|---|
| 17-4_TV_50_S30_N (1,2,3) | Vertical | 3 | 50 s | |
| 17-4_TO5_50_S30_N (1,2,3) | Horizontal, 5° inclined | 3 | 50 s | |
| 17-4_TO85_50_S30_N (1,2,3) | Horizontal, 85° inclined | 3 | 50 s | |
| 17-4_TV_50_S30_HT_N (4,5,6) | Vertical | 3 | 50 s | |
| 17-4_TO5_50_S30_HT_N (4,5,6) | Horizontal, 5° inclined | 3 | 50 s | |
| 17-4_TO85_50_S30_HT_N (4,5,6) | Horizontal, 85° inclined | 3 | 50 s | |
| 17-4_TO5_45_S30_N (1,2,3) | Horizontal, 5° inclined | 3 | 45 s | |
| 17-4_TO5_45_S30_HT_N (4,5,6) | Horizontal, 5° inclined | 3 | 45 s | |
| 17-4_TO5_65_S30_N (1,2,3) | Horizontal, 5° inclined | 3 | 65 s | |
| 17-4_TO5_65_S30_HT_N (4,5,6) | Horizontal, 5° inclined | 3 | 65 s | |
| 17-4_CV_50_S30_N (1,2,3) | Vertical | 3 | 50 s | |
| 17-4_CO5_50_S30_N (1,2,3) | Horizontal, 5° inclined | 3 | 50 s | |
| 17-4_CO85_50_S30_N (1,2,3) | Horizontal, 85° inclined | 3 | 50 s | |
| 17-4_CV_50_S30_HT_N (4,5,6) | Vertical | 3 | 50 s | |
| 17-4_CO5_50_S30_HT_N (4,5,6) | Horizontal, 5° inclined | 3 | 50 s |
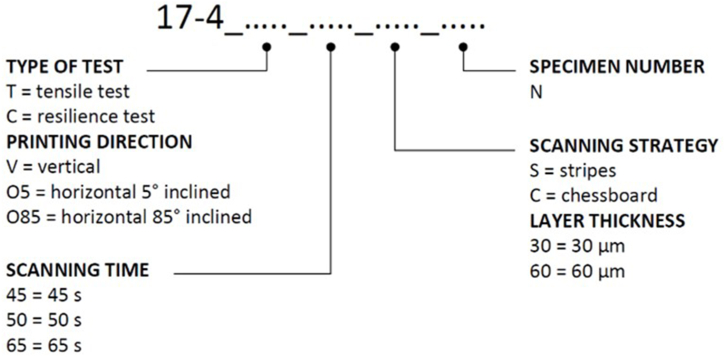
A detailed description of the labels used for the specimen labels is illustrated in Fig. 9. Labels shortly provide all the main features of the samples.
Fig. 9.
Schematization of specimen labels.
3.1. Tensile tests results
The experimental results, also in terms of mean value and standard deviation for the main mechanical properties, i.e. Elastic Modulus E, 0.2% offset yield stress σy,0.2%, ultimate tensile strength σu and failure strain εu, are summarised in Table 4 for Batch No. 1 and Batch No. 2.
Table 4.
Mechanical properties of Batch No. 1 and Batch No. 2 specimens.
| SPECIMEN ID | E [GPa] | AVERAGE VALUE (SD) | σ0.2%[MPa] | AVERAGE VALUE (SD) | σu[MPa] | AVERAGE VALUE (SD) | εu[%] | AVERAGE VALUE (SD) | |
|---|---|---|---|---|---|---|---|---|---|
| Batch No. 1 | 17-4_TO5_50_S30_N1 | 168.68 | 169.60 (±0.93) | 499 | 559 (±60) | 1289 | 1310 (±21) | 12.80 | 16.10 (±1.75) |
| 17-4_TO5_50_S30_N2 | 170.53 | 620 | 1330 | 16.30 | |||||
| 17-4_TO5_50_S30_N3 | FAILED TEST | ||||||||
| 17-4_TO5_50_S30_HT_N4 | 156.25 | 158.15 (±1.63) | 822 | 924 (±137) | 1268 | 1276 (±16) | 15.10 | 12.00 (±2.36) | |
| 17-4_TO5_50_S30_HT_N5 | 157.96 | 832 | 1262 | 11.40 | |||||
| 17-4_TO5_50_S30_HT_N6 | 160.23 | 1117 | 1298 | 9.40 | |||||
| 17-4_TO85_50_S30_N1 | 168.95 | 168.95 (±0.00) | 879 | 879 (±0) | 1230 | 1230 (±0) | 12.55 | 12.60 (±0.00) | |
| 17-4_TO85_50_S30_N2 | FAILED TEST | ||||||||
| 17-4_TO85_50_S30_N3 | FAILED TEST | ||||||||
| 17-4_TO85_50_S30_HT_N4 | 176.69 | 176.21 (±2.05) | 891 | 876 (±91) | 1197 | 1229 (±24) | 12.80 | 15.60 (±2.33) | |
| 17-4_TO85_50_S30_HT_N5 | 173.49 | 759 | 1255 | 18.50 | |||||
| 17-4_TO85_50_S30_HT_N6 | 178.45 | 979 | 1237 | 15.40 | |||||
| 17-4_TV_50_S30_N1 | 156.71 | 155.35 (±1.18) | 503 | 502 (±3) | 1233 | 1233 (±2) | 17.50 | 19.00 (±1.46) | |
| 17-4_TV_50_S30_N2 | 155.49 | 504 | 1231 | 21.00 | |||||
| 17-4_TV_50_S30_N3 | 153.84 | 499 | 1236 | 18.60 | |||||
| 17-4_TV_50_S30_HT_N4 | 181.44 | 182.13 (±0.58) | 769 | 798 (±34) | 1214 | 1217 (±3) | 16.50 | 16.30 (±0.21) | |
| 17-4_TV_50_S30_HT_N5 | 182.12 | 846 | 1216 | 16.00 | |||||
| 17-4_TV_50_S30_HT_N6 | 182.85 | 780 | 1220 | 16.30 | |||||
| Batch No. 2 | 17-4_TO5_45_S30_N1 | 172.46 | 171.42 (±1.04) | 488 | 494 (±5) | 1318 | 1291 (±27) | 25.00 | 24.60 (±0.45) |
| 17-4_TO5_45_S30_N2 | 170.37 | 499 | 1264 | 24.10 | |||||
| 17-4_TO5_45_S30_N3 | FAILED TEST | ||||||||
| 17-4_TO5_45_S30_HT_N4 | 155.41 | 154.41 (±0.76) | 901 | 909 (±55) | 1238 | 1218 (±35) | 11.30 | 10.40 (±0.90) | |
| 17-4_TO5_45_S30_HT_N5 | 154.24 | 846 | 1169 | 9.20 | |||||
| 17-4_TO5_45_S30_HT_N6 | 153.59 | 980 | 1247 | 10.80 | |||||
| 17-4_TO5_65_S30_N1 | 170.39 | 171.01 (±0.62) | 885 | 928 (±43) | 1253 | 1254 (±1) | 17.50 | 15.80 (±1.70) | |
| 17-4_TO5_65_S30_N2 | 171.64 | 970 | 1255 | 14.10 | |||||
| 17-4_TO5_65_S30_N3 | FAILED TEST | ||||||||
| 17-4_TO5_65_S30_HT_N4 | FAILED TEST | ||||||||
| 17-4_TO5_65_S30_HT_N5 | 155.22 | 154.43 (±0.79) | 824 | 857 (±33) | 1272 | 1247 (±24) | 16.50 | 14.70 (±1.80) | |
| 17-4_TO5_65_S30_HT_N6 | 153.65 | 891 | 1223 | 12.90 | |||||
Furthermore, to analytically describe the stress-strain relationship acquired from the experimental tests, models capable of simulating material behaviour are frequently implemented. Power functions, more complex models for representing the material than the more widely used rigid plastic, elasto-perfectly plastic and elasto-plastic with strain hardening models, are particularly appropriate for reproducing the behaviour of metal alloys. Here, Ramberg-Osgood models were applied to all stress-strain curves and the parameters a and n describing the modelling of the material through the power function were reported in Table 5. The Ramberg-Osgood models fitted to all experimental curves can be found in Appendix A.
Table 5.
Ramberg-Osgood modelling parameters.
| SPECIMEN ID | a [−] | n [−] | |
|---|---|---|---|
| Batch No. 1 | TO5_50_N1 | 0.017 | 7.524 |
| TO5_50_N2 | 0.899 | 4.252 | |
| TO5_50_HT_N4 | 0.606 | 7.068 | |
| TO5_50_HT_N5 | 0.477 | 7.663 | |
| TO5_50_HT_N6 | 6.31e−4 | 60.036 | |
| TO5_85_N1 | 0.533 | 8.318 | |
| TO5_85_HT_N4 | 0.254 | 11.113 | |
| TO5_85_HT_N5 | 0.419 | 7.662 | |
| TO5_85_HT_N6 | 0.236 | 15.541 | |
| TV_50_N1 | 0.137 | 6.031 | |
| TV_50_N2 | 0.296 | 5.191 | |
| TV_50_N3 | 0.371 | 4.809 | |
| TV_50_HT_N4 | 0.237 | 9.316 | |
| TV_50_HT_N5 | 0.335 | 10.524 | |
| TV_50_HT_N6 | 0.243 | 9.600 | |
| Batch No. 2 | TO5_45_N1 | 0.118 | 6.342 |
| TO5_45_N2 | 2.989 | 2.805 | |
| TO5_45_HT_N4 | 0.585 | 8.344 | |
| TO5_45_HT_N5 | 0.788 | 8.685 | |
| TO5_45_HT_N6 | 0.476 | 9.505 | |
| TO5_65_N1 | 1.062 | 4.008 | |
| TO5_65_N2 | 0.601 | 12.229 | |
| TO5_65_HT_N5 | 0.310 | 8.941 | |
| TO5_65_HT_N6 | 0.674 | 8.877 |
The basic principle behind power functions is that the stress-strain relationship can be split into an elastic part and a plastic part, as shown below in equation (1):
| (1) |
Expressing the plastic deformation as a function of the elastic deformation gives equation (2):
| (2) |
Ramberg-Osgood functions are derived by normalizing the above-mentioned generic power function (2) by an arbitrary strain ε0 for which the plastic component of the strain εpl has a non-zero value.
The yield strain is usually chosen as the arbitrary strain, transforming equation (2), (3):
| (3) |
By now expressing E∙ε0 as σ0, the equation assumes the final formulation (4):
| (4) |
Thus, to define a Ramberg-Osgood model are needed a, n and ε0. ε0 is easily computed using the 0.2% offset method to determine the yield stress σ0, and consequently ε0 as σ0/E.
The main challenge is to determine the parameters a and n, referred to respectively as strength coefficient and strain hardening coefficient, which best approximate the experimental data. N is the parameter that affects the hardening section of the curve, and as n increases, the curve gradually converges to an elasto-perfectly-plastic curve. A is the parameter that modifies the starting point of the hardening section of the curve on the x-axis of a stress-strain diagram.
Choosing point A as the point on the real curve where σ = σ0, and substituting the known values of point A into equation (4) and defining mA as the slope of the secant joining point A with the origin, the following expression is obtained (5):
| (5) |
Likewise, by selecting a point B sufficiently distant from point A (preferably one of the last points at which an increasing stress is detected), equation (5) becomes (6):
| (6) |
Replacing the parameter a from equation (5) into equation (6) and solving for n, results in equation (7):
| (7) |
After obtaining n, the value of a can be directly calculated from equation (5), and the Ramberg-Osgood function is completely determined. Proceeding in this way, it is possible to obtain the Ramberg-Osgood model that approximates the experimental curve.
For completeness, the measured dimensions for each specimen and the corresponding cross-sectional areas used to determine the stresses, were reported in Table 6.
Table 6.
Measured dimensions for each specimen and relative cross-sectional areas.
| SPECIMEN ID | T [mm] | W [mm] | CROSS-SECTIONAL AREA [mm2] | |
|---|---|---|---|---|
| Batch No. 1 | 17-4_TO5_50_S30_N1 | 2.84 | 12.32 | 34.93 |
| 17-4_TO5_50_S30_N2 | 2.86 | 12.36 | 35.35 | |
| 17-4_TO5_50_S30_N3 | 3.01 | 12.62 | 37.97 | |
| 17-4_TO5_50_S30_HT_N4 | 2.89 | 12.48 | 35.99 | |
| 17-4_TO5_50_S30_HT_N5 | 2.79 | 12.52 | 34.87 | |
| 17-4_TO5_50_S30_HT_N6 | 2.81 | 12.28 | 34.43 | |
| 17-4_TO85_50_S30_N1 | 2.52 | 12.66 | 31.84 | |
| 17-4_TO85_50_S30_N2 | 2.69 | 12.30 | 33.03 | |
| 17-4_TO85_50_S30_N3 | 2.59 | 12.66 | 32.79 | |
| 17-4_TO85_50_S30_HT_N4 | 2.66 | 12.52 | 33.23 | |
| 17-4_TO85_50_S30_HT_N5 | 2.57 | 12.58 | 32.32 | |
| 17-4_TO85_50_S30_HT_N6 | 2.64 | 12.62 | 33.30 | |
| 17-4_TV_50_S30_N1 | 2.55 | 12.26 | 31.25 | |
| 17-4_TV_50_S30_N2 | 2.54 | 12.24 | 31.08 | |
| 17-4_TV_50_S30_N3 | 2.54 | 12.22 | 31.04 | |
| 17-4_TV_50_S30_HT_N4 | 2.51 | 12.28 | 30.76 | |
| 17-4_TV_50_S30_HT_N5 | 2.49 | 12.28 | 30.58 | |
| 17-4_TV_50_S30_HT_N6 | 2.52 | 12.28 | 30.95 | |
| Batch No. 2 | 17-4_TO5_45_S30_N1 | 2.88 | 12.31 | 35.45 |
| 17-4_TO5_45_S30_N2 | 2.88 | 12.46 | 35.87 | |
| 17-4_TO5_45_S30_N3 | 2.95 | 12.69 | 37.37 | |
| 17-4_TO5_45_S30_HT_N4 | 2.76 | 12.51 | 34.47 | |
| 17-4_TO5_45_S30_HT_N5 | 2.83 | 12.57 | 35.51 | |
| 17-4_TO5_45_S30_HT_N6 | 2.97 | 12.50 | 37.11 | |
| 17-4_TO5_65_S30_N1 | 2.80 | 12.18 | 34.04 | |
| 17-4_TO5_65_S30_N2 | 2.84 | 12.27 | 34.77 | |
| 17-4_TO5_65_S30_N3 | 2.99 | 12.53 | 37.40 | |
| 17-4_TO5_65_S30_HT_N4 | 2.69 | 12.53 | 33.63 | |
| 17-4_TO5_65_S30_HT_N5 | 2.83 | 12.30 | 34.79 | |
| 17-4_TO5_65_S30_HT_N6 | 2.80 | 12.35 | 34.58 |
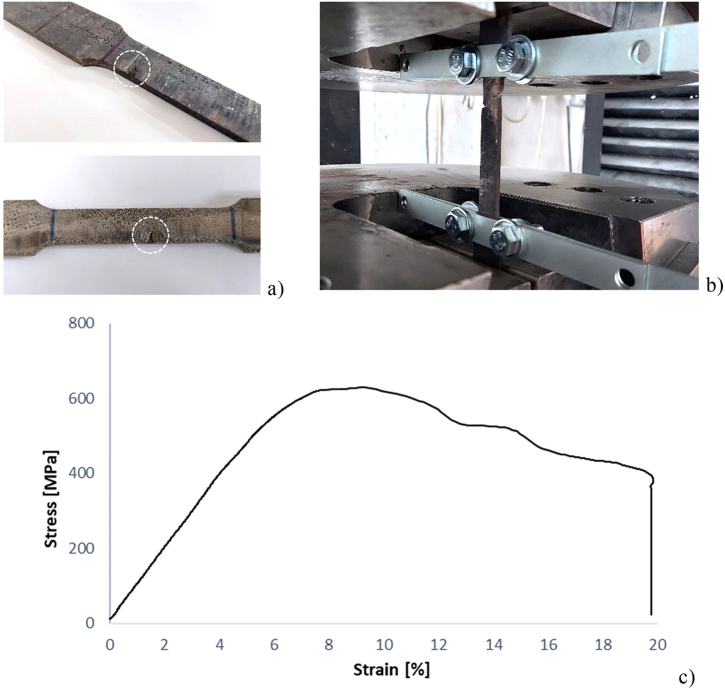
All tests were replicated on sets of three specimens for each type. Some of the tested specimens, due to the presence of defects caused by the removal procedure of the supports, gave back not reliable results and therefore they were discarded (“failed test” in the table). The type of defect can be clearly seen in Fig. 10a, reported for sake of example. In these cases, the failure occurred suddenly and for very low force values, obviously concentrating on the point weakened by the presence of the defect (Fig. 10b). The results of the tensile test for a specimen with defects are also given as an example (Fig. 10c).
Fig. 10.
A) Defects in some of the specimens; b) Premature failure of the specimen during the tensile test at the weakest point; c) Stress-strain curve of a specimen with defect.
3.1.1. Impact of printing direction
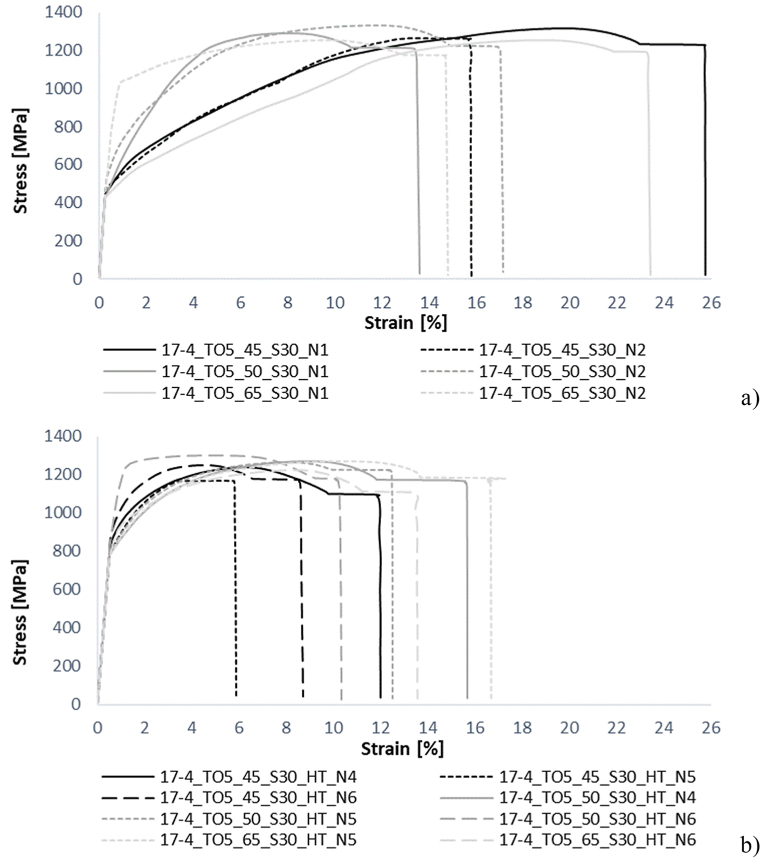
The stress-strain curves of the specimens manufactured with the three different printing directions, in both as-built (AB) and heat-treated (HT) conditions, are shown in Fig. 11.
Fig. 11.
Engineering stress-strain curves of Batch No. 1 of samples: a) As-built specimens; b) Heat-treated specimens.
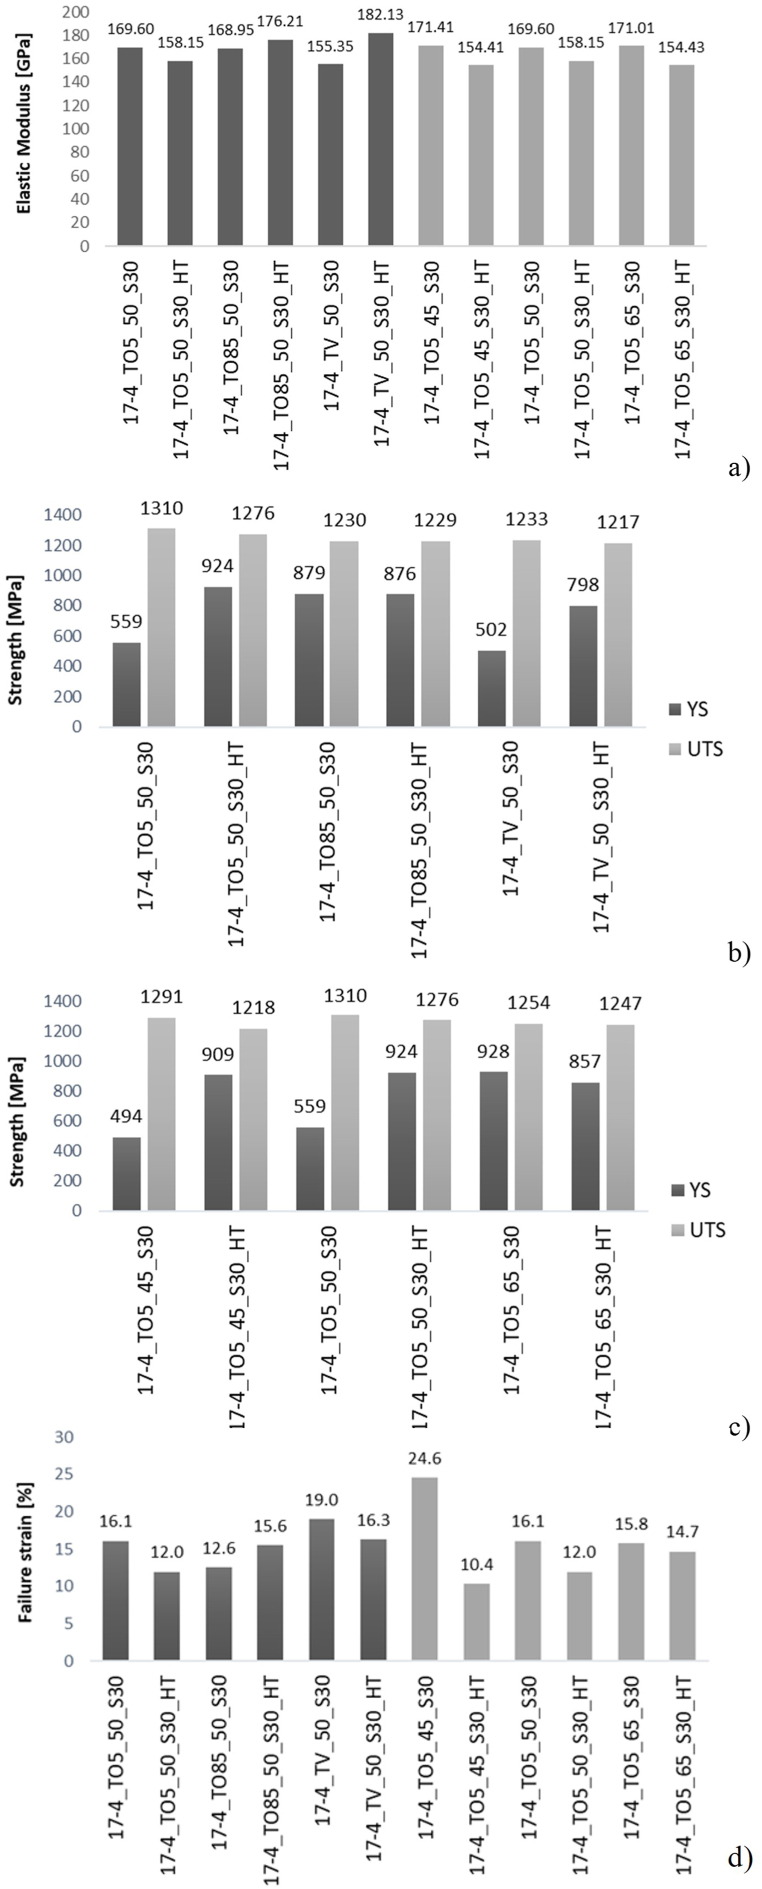
Inspecting Tables 4 and it is possible to outline the following considerations: i) the elastic modulus exhibited mean values of 169.60 GPa, 168.95 GPa and 155.35 GPa respectively for the samples produced horizontally with an inclination of 5° and 85°, and samples produced vertically, respectively; ii) the offset yield stress showed average results of 559 MPa, 879 MPa and 502 MPa for specimens printed horizontally inclined at 5° and 85° and for specimens printed vertically, respectively, with a significantly higher value for horizontally printed specimens inclined at 85°; iii) the ultimate tensile strength did not change significantly between the horizontally inclined 85° and the vertically manufactured specimens, with values of 1230 MPa and 1233 MPa respectively, while the specimen printed horizontally, with an inclination of 5° revealed higher ultimate tensile stress of 1310 MPa.
As far as the failure strain is concerned, the average values recorded were 16.10%, 12.55% and 19.03% for the specimens printed horizontally with inclinations of 5°, of 85° and for the specimens printed in the vertical direction, respectively. Consequently, it is possible to deduce that the latter displayed a higher ductility.
As a result of the statements reported above, it can be concluded that samples printed horizontally, with inclination of 5° showed the optimal stress-strain behaviour in terms of stiffness, tensile and yield strength and ductility.
In order to give a more comprehensive reading of the obtained results, Fig. 12 plots the average values of the Elastic Modulus, tensile strength and failure strain of all specimens, both those printed with different directions (Fig. 12a, b, d) and those printed with different scanning times (Fig. 12a, c, d), comparing the mechanical properties before and after the heat treatment.
Fig. 12.
Graphic overview of the mechanical properties of the produced specimens: a) Elastic Modulus of both Batch of samples; b) Tensile strengths of Batch Nr. 1 samples; c) Tensile strengths of Batch Nr. 2 samples; d) Failure strain values of both Batch of samples.
As expected, because of the type of manufacturing technology, 3D printed metals exhibit anisotropic behaviour [35]. Specimens printed in the vertical direction, which are those with the building plane orthogonal to their longitudinal axis displayed lower strength. In fact, as highlighted in previous studies and for similar steels, the building plane constitutes in all cases the weakest plane [76]. Therefore, results are consistent with other studies which found that tensile properties are in all cases anisotropic and dependent on the specimen orientation during the AM process [7].
The difference in response between the two horizontally produced samples can be attributed to the different time required for cooling and solidification of the layers. Thus, more homogeneous cooling and subsequent solidification is encouraged by smaller melted surfaces, such as that of the horizontally produced specimen inclined by 85° compared to that inclined by 5°. In addition, this causes a different microstructure and thus a different stress behaviour [7,76,77].
In Fig. 13, the mean of the obtained mechanical properties of the printed stainless steel are compared with the nominal ones of other conventionally produced 17-4 P H alloys. As expected, the peculiar microstructure resulting from the AM process lead to different results [31,58,72], because of the high cooling rates resulting from high scanning speeds and high thermal gradients, which lead to finer microstructures, and gas bubbles trapped in the material during solidification [72]. Moreover, the heat flux, generated during printing process, can affect also the growth direction of the grains, resulting in grain growth perpendicular to the previously printed layers. During solidification, single grains grow towards the melt pool center and, when they reach a certain size, their surfaces meet forming grain boundaries. So, if there is an insufficient amount of residual melt between the grains, pores and binding defects, as well as consequent residual stresses, may arise [31,44].
Fig. 13.
Tensile strength (a) and failure strain (b) of the here studied 3D printed stainless steel compared with other conventionally manufactured 17-4 P H alloys, according to Refs. [60,77].
In the light of these considerations, it can be seen that the increase in porosity due to additive manufacturing process causes a reduction in the yield strength and failure strain of the printed material compared with rolled steel. On the contrary, due to the finer grain size, a higher ultimate strength can be achieved with respect to traditionally produced materials [1,78]. However, it can be observed that additive manufactured steels also follow the same behaviour as conventionally produced steels, where in general, strength and ductility are two contrasting requirements (as one increases, the other decreases and vice versa).
3.1.2. Influence of scanning time
The stress-strain curves of the specimens produced with the three different scanning times, in both as-built (AB) and heat-treated (HT) conditions, are shown in Fig. 14.
Fig. 14.
Engineering stress-strain curves of Batch No. 2 of samples: a) As-built specimens; b) Heat-treated specimens.
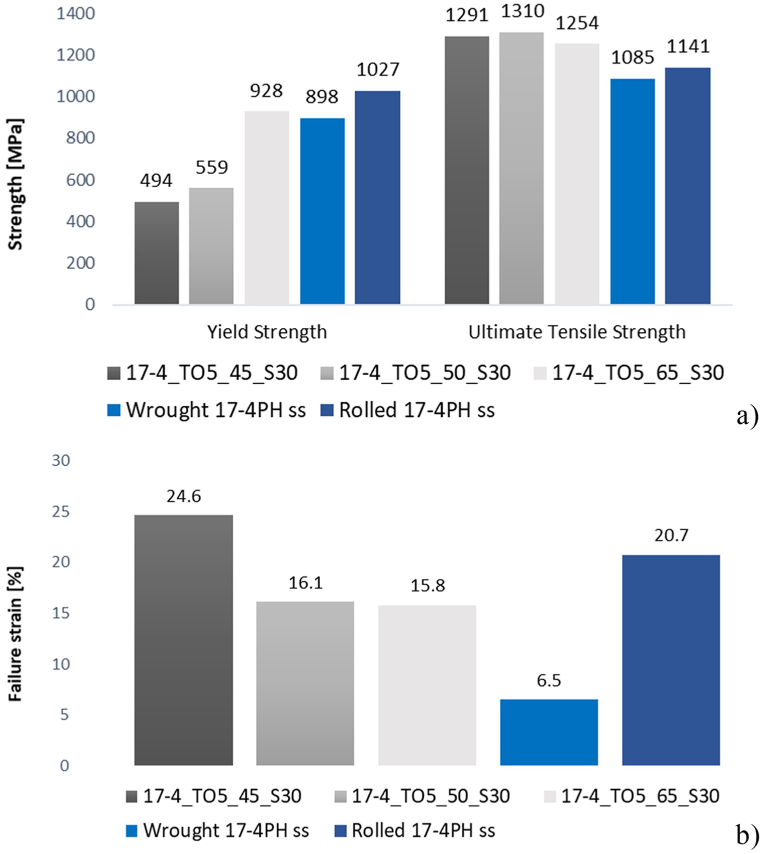
Data reported in Table 4 allow to assess that the elastic modulus did not vary considerably with the scanning time, it being equal to 171.42 GPa, 169.60 GPa, and 171.01 GPa, in terms of obtained mean values, for specimens produced with scanning times of 45 s, 50 s and 65 s, respectively. A different behaviour has been found for the yield stresses which displayed mean values of 494 MPa, 559 MPa, and 928 MPa for specimens manufactured with scanning times of 45 s, 50 s, and 65 s, presenting a significantly higher value for specimens with the longest scanning time. However the peak tensile strength did not change appreciably: the observed average values were 1291 MPa, 1310 MPa and 1254 MPa for specimens with scanning times of 45 s, 50 s and 65 s, respectively.
Considering the failure strain, average results of 24.60%, 16.10% and 15.80% were recorded for samples with scanning times of 45 s, 50 s and 65 s respectively, highlighting a much higher ductility for the shortest time.
The obtained results suggest that different scanning times imply different “thermal histories” during developing during the manufacturing process and, in turn, different mechanical properties. In fact, the microstructure is affected by the thermal stresses that occur during repeated heating and cooling cycles [58]. Results showed that a shorter scanning time, due to the more rapid cooling of the fused powder, can promote the development of defects and internal stress states. Conversely, as the scanning time increases, there is more time for the material to solidify and cool, thus mitigating the negative effects caused by the manufacturing process [72]. Furthermore, it can be observed that increasing the scanning time results in a change of behaviour in terms of ductility, decreasing the failure strain of the material.
In Fig. 15, the mean of the obtained mechanical features of the printed stainless steel are compared with the nominal ones of other conventionally produced 17-4 P H alloys.
Fig. 15.
Comparison of the mechanical properties of specimens produced and those of conventionally manufactured 17-4 P H steel [60,77]: a) tensile strength; b) failure strain.
As highlighted above, many variables can affect the behaviour of metals produced via 3D printing [72].
As discussed previously, for specimens with different printing directions, the increased porosity caused by printing process produces a reduction in the yield strength and failure strain of the additive manufactured steel compared to rolled one. However, the specimen produced with a scanning time of 65 s provides a higher yield strength than the traditionally produced material. In fact, the longer solidification time reduces the presence of porosity. On the other hand, a higher ultimate strength can be achieved compared to traditionally produced materials due to the finer grain size again resulting from printing process [72]. Also in this case, the specimen with a scanning time of 65 s shows a lower ultimate strength than the other printed specimens due to the less refined microstructure [1]. Finally, it can be noted that the material produced with different scanning times also exhibits the same behaviour as steels produced with traditional methods, for which resistance and ductility are generally opposite characteristics (the increase of one decreases the other and vice versa).
3.1.3. Influence of heat treatment on the mechanical behaviour
Comparing the mechanical behaviour of as-built and heat-treated specimens, it was found that heat treatment affects the stress-strain behaviour of the material for all specimens regardless of the printing conditions.
The most representative stress-strain curves of the specimens produced with different printing directions and scanning times, both as-built (AB) and heat-treated (HT), are displayed respectively in Fig. 16, Fig. 17.
Fig. 16.
Comparison of the engineering stress-strain curves of the as-built and heat-treated Batch No. 1 specimens: a) horizontally printed specimen, 5° inclined; b) horizontally printed specimen, 85° inclined; c) vertically printed specimen.
Fig. 17.
Comparison of the engineering stress-strain curves of the as-built and heat-treated Batch No. 2 specimens: a) scanning time of 45 s; b) scanning time of 50 s; c) scanning time of 65 s.
Elastic modulus slightly changed after the heat treatment, as evident from all the curves in Fig. 16, Fig. 17 and also from the data reported in Table 4, except for the vertically printed specimens. In fact, elastic modulus variations are equal to −6.8%, 4.3% and 17.2% respectively for horizontally produced specimens inclined by 5° and 85° and for specimens printed vertically. Similarly, specimens manufactured with scanning times of 45s, 50s and 65s underwent a reduction of 9.9%, 6.8% and 9.7% respectively.
For yield stress values, a different trend can be recorded, in fact, it differs considerably for each printing orientation. In particular, the change is of about +65.1% for specimens horizontally produced with a slope of 5°, of about −0.3% for specimens horizontally produced with a slope of 85° and of about +59.1% for the specimens produced vertically (see Table 4).
Moreover, the annealing treatment caused an increase in yield strength of about 84.1% and 65.1% for specimens printed with scanning times of 45s and 50s. In contrast, this parameter decreases by approximately 7.6% for specimens printed with scanning time of 65s.
Experimental results reported in Table 4 showed also that the changes observed for the ultimate tensile strength, as a consequence of the heat treatment, are not relevant both for the different printing directions and for the different scanning times. Thus, the ultimate strength decreased by approximately 2.6% for specimens processed in the horizontal direction inclined by 5°, about 0.05% for specimens printed in the horizontal direction inclined by 85°, and about 1.3% for specimens produced in the vertical direction. For the different scanning times of 45s, 50s and 65s, the ultimate strength changed by around −5.7%, −2.6% and −0.6% respectively.
The most evident effect deducible from the curves reported in Fig. 16, Fig. 17, is that the heat treatment induced a reduction in failure strain, except for the specimens horizontally inclined at 85°, which revealed an increase in ductility of +24%. A reduction of 25.7% and 14.5% was observed for the specimens printed horizontally inclined by 5° and for the specimens manufactured vertically. Similarly, a decrease in failure strain of 57.7%, 17.5% and 7.0% was recorded for samples with scanning times of 45s, 50s and 65s.
In order to highlight the different mechanical behaviour of samples before and after heat-treatment, the specimens printed vertically after the tensile tests are reported, for the sake of example, in Fig. 18: for the as-built specimens, the 45° inclined fracture surfaces indicate a ductile failure due to plastic deformation, while in heat-treated specimens (Fig. 18b), sharp fracture surfaces perpendicular to the applied stress are indicative of brittle failure. In this case, the failure strain is lower and the collapse suddenly occurs with a less pronounced necking phenomenon.
Fig. 18.
Specimens after tensile tests: a) As-built vertically printed specimens; b) Heat-treated vertically printed specimens.
As already shown in a previous study [79], the mechanical behaviour, after heat treatment, appears to be not consistent with the result that are reported in literature, which usually provides, for annealed steel alloys produced by traditional methods, an increase in ductility and a reduction in strength [58,77]. Nevertheless, besides the experimental data supplied by the company producer of the 3D printer and of the metal powders employed (SLM Solutions) [80], which are in line with the recorded results, there are also several scientific outcomes about steel and nickel-based alloys, manufactured via selective laser melting [68,[81], [82], [83], [84]], that confirm and validate the obtained results. Specifically, precipitation-hardened steels (17-4 P H and 15-5 P H stainless steel), martensite-aging steels (e.g. “maraging” 1.2709 steel) and Inconel 625 and 718 nickel alloys highlighted a decrease in failure strain and a rise in both yield and ultimate tensile strength. Conversely, aluminium and titanium alloys (AlSi10Mg aluminum alloy and Ti6Al4V titanium alloy), processed through additive manufacturing methods, revealed comparable behaviour to the same material produced using conventional processes [75,77,85,86].
3.1.4. X-ray diffraction analysis for the evaluation of residual stresses
X-ray diffraction (XRD) analyses were conducted on both as-built and heat-treated specimens in order to assess the presence of residual stresses. Residual stresses develop during the printing process mainly due to the high cooling and heating rates of the layers and can affect the performance of the finished products.
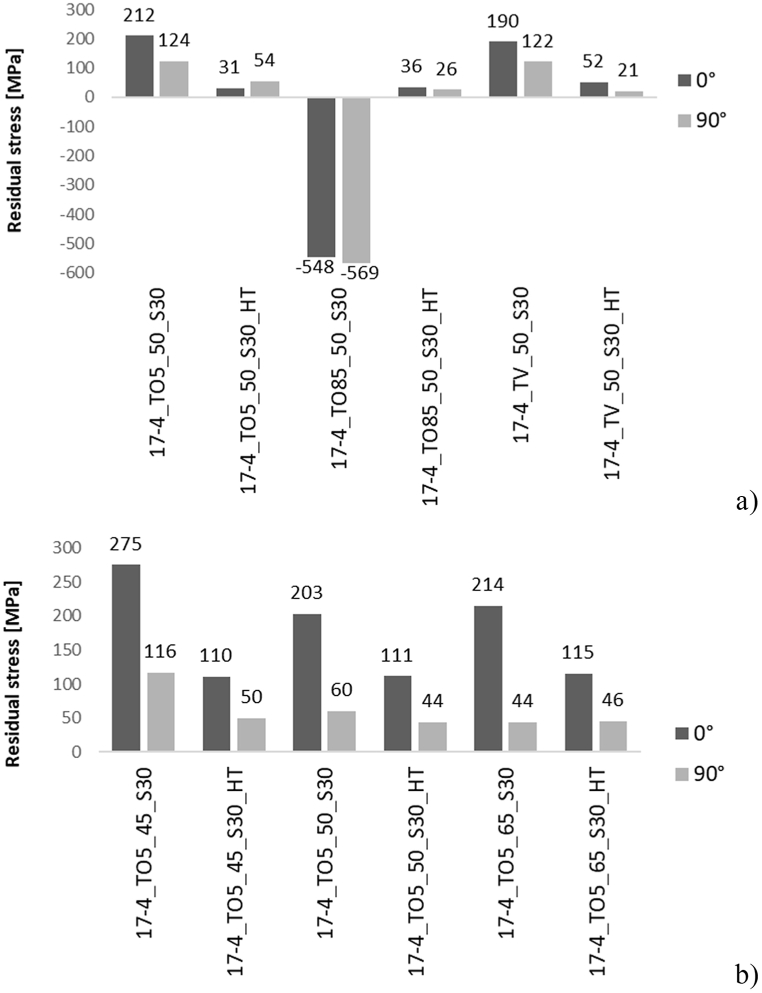
X-ray diffraction analyses were carried out on all sample types to determine the presence of residual stresses (RS). These were measured in either a parallel (90°) or perpendicular (0°) direction to the longitudinal axis of the sample. The charts in Fig. 19 summarised the obtained results.
Fig. 19.
Residual stresses measured with XRD: a) RS of samples produced with different printing directions; b) RS of samples produced with different scanning times.
The different printing strategies resulted in different values of residual stresses. The residual stresses measured for horizontal specimens printed with a slope of 5° and for the specimens printed vertically are comparable in the two measurement directions, i.e. longitudinal and perpendicular to the specimen axis. They exhibit values of 212 MPa and 123 MPa (horizontal specimen inclined 5°), 190 MPa and 121 MPa (vertical specimen), respectively, in the two directions. The only meaningful difference is observed in the horizontal specimen printed with a slope of 85°, which displays negative residual stress values of −548 MPa in the 0° direction and −568 MPa in the other one. The negative values indicate compressive residual stresses.
In contrast, the specimens manufactured with different scanning times did not display any significant discrepancies among the residual stress values. The values recorded are 275 MPa and 116 MPa (scanning time of 45 s), 203 MPa and 60 MPa (scanning time of 50 s), 214 MPa and 44 MPa (scanning time of 65 s), for the parallel and orthogonal directions respectively.
The annealing heat treatment led to a homogenization and decrease in residual stresses, notwithstanding the manufacturing characteristics.
For the group of specimens manufactured in different printing directions, the heat treatment introduce a percentage variation, compared to as-built samples, equal to −85% and −56% (horizontal specimen inclined 5°), −106% and −104% (horizontal specimen inclined 85°), −73% and −83% (vertical specimen), respectively, in the two directions.
For the specimens manufactured with different scanning times, the heat treatment provides less relevant changes. In fact, the percentage variation is −60% and −57% (scanning time of 45 s), −45% and −26% (scanning time of 50 s), −46% and +5% (scanning time of 65 s), for the longitudinal and perpendicular direction respectively.
The results reported are average values resulting from the three samples tested in each category.
3.2. Resilience tests results
The impact test was carried out to provide knowledge about the resistance of a material to abrupt failure when there is a rapid increase in stress or defect within the material. The toughness of the material was determined by measuring the energy absorbed by the specimen when it is struck with a single blow in the middle by a hammer located at the end of a pendulum. The amount of energy absorbed affects the deformation and subsequent failure of the specimen [71,72].
Impact toughness features depend on both strength and ductility, which are usually inversely proportional, as well as grain size and dislocation density. Thus, this property could be influenced by microstructure and defects, which are very important process-related factors in materials produced by 3D printing. The values of the absorbed energy resulting from the dynamic impact tests are presented in Table 7.
Table 7.
Resilience test results for Batch Nr. 3 of specimens.
| SPECIMEN ID | ABSORBED ENERGY [J] | AVERAGE VALUES (SD) |
|---|---|---|
| 17-4_CO85_50_S30_N1 | 23.80 | 24.03 (±0.40) |
| 17-4_CO85_50_S30_N2 | 23.70 | |
| 17-4_CO85_50_S30_N3 | 24.60 | |
| 17-4_CO5_50_S30_N1 | 22.36 | 21.67 (±0.59) |
| 17-4_CO5_50_S30_N2 | 20.92 | |
| 17-4_CO5_50_S30_N3 | 21.72 | |
| 17-4_CO5_50_S30_HT_N4 | 12.14 | 14.25 (±2.11) |
| 17-4_CO5_50_S30_HT_N5 | 16.36 | |
| 17-4_CO5_50_S30_HT_N6 | FAILED TEST | |
| 17-4_CV_50_S30_N1 | 22.60 | 25.62 (±2.15) |
| 17-4_CV_50_S30_N2 | 26.85 | |
| 17-4_CV_50_S30_N3 | 27.41 | |
| 17-4_CV_50_S30_HT_N4 | 17.74 | 17.34 (±1.06) |
| 17-4_CV_50_S30_HT_N5 | 15.89 | |
| 17-4_CV_50_S30_HT_N6 | 18.40 | |
Note: data for heat-treated horizontally printed specimens, 85° inclined, are not available.
The results confirmed the outcomes obtained from tensile tests. As a consequence of the heat treatment, as already discussed in the section concerning the tensile tests, ductility is reduced for all types of specimens, with the exception of horizontally produced specimens inclined at 85°, and on the contrary, the strength increases following the annealing treatment.
Fig. 20 provides a comparison of the Charpy impact test results for the as-built and heat-treated specimens.
Fig. 20.
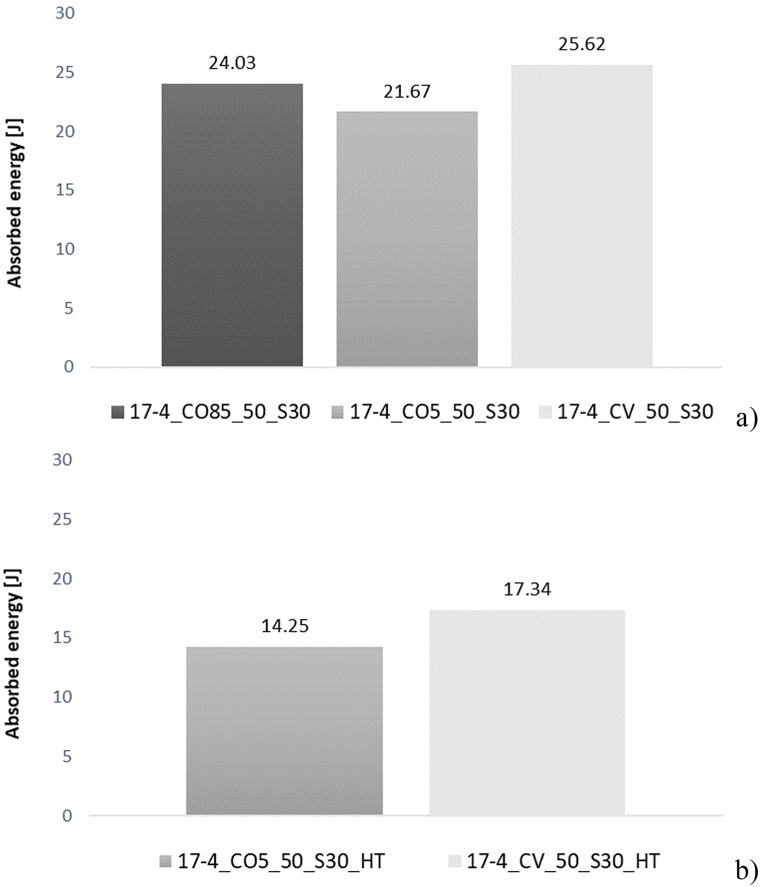
Resilience test average results: a) As-built specimens; b) Heat-treated specimens.
3.2.1. Impact of printing directions
The absorbed energy showed average values of 24.03 J, 21.67 J and 25.62 J respectively for specimens printed horizontally, with a slope of 85°, with a slope of 5° and produced vertically. Therefore, comparing the results obtained from the tests, it can be seen that the highest impact resistance is offered by the specimens manufactured vertically, with average values of absorbed energy +18.3% and +6.6% higher than the horizontally printed specimens inclined by 5° and 85° respectively.
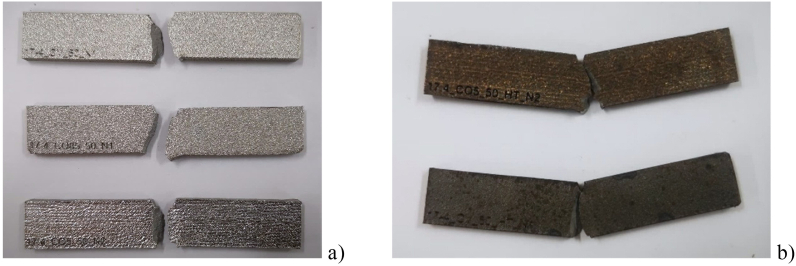
In Fig. 21 are reported some of the specimens after the Charpy pendulum impact test.
Fig. 21.
Specimens after Charpy pendulum impact test: a) As-built specimens; b) Heat-treated specimens.
3.2.2. Influence of heat treatment on material toughness
The comparison of as-built and heat-treated specimens revealed that the annealing heat treatment significantly modifies the material toughness for specimens manufactured in either directions. Vertically printed specimens, in fact, showed a reduction in impact strength equal to 32.32%, while the reduction for specimens printed horizontally and with a slope of 5° resulted slightly higher (equal to 34.24%).
3.3. Microhardness tests results
The Vickers hardness test, which involves the use of a square-based pyramid diamond indenter, expresses the mechanical strength of a surface, i.e. the resistance offered by the material to being penetrated or scratched by another (indenter). It can be performed in both macrohardness and microhardness test modes. In the current study, microhardness measurements were conducted. The evaluation of the hardness of the material is based on the measurement of the area of the indentation left by the indenter. For microhardness tests, the applied loads are usually less than 2 N and the indentation measurement can be done only using a microscope.
The values of the microhardness obtained according to the Vickers scale are presented in Table 8.
Table 8.
Microhardness test results.
| SPECIMEN ID | VICKERS MICROHARDNESS [HV] | AVERAGE VALUES (SD) |
|---|---|---|
| 17-4_CO85_50_S30_N1 | 403 | 400 (±2.72) |
| 17-4_CO85_50_S30_N2 | 398 | |
| 17-4_CO85_50_S30_N3 | 397 | |
| 17-4_CO5_50_S30_N1 | 381 | 384 (±2.58) |
| 17-4_CO5_50_S30_N2 | 384 | |
| 17-4_CO5_50_S30_N3 | 387 | |
| 17-4_CO5_50_S30_HT_N4 | 388 | 390 (±2.82) |
| 17-4_CO5_50_S30_HT_N5 | 388 | |
| 17-4_CO5_50_S30_HT_N6 | 394 | |
| 17-4_CV_50_S30_N1 | 385 | 378 (±5.48) |
| 17-4_CV_50_S30_N2 | 373 | |
| 17-4_CV_50_S30_N3 | 375 | |
| 17-4_CV_50_S30_HT_N4 | 399 | 394 (±4.27) |
| 17-4_CV_50_S30_HT_N5 | 400 | |
| 17-4_CV_50_S30_HT_N6 | 383 |
Note: data for heat-treated horizontally printed specimens, 85° inclined, are not available.
The results demonstrated that the different printing directions do not noticeably affect the microhardness of the material. Furthermore, the heat treatment increased the samples microhardness for all the printing directions investigated.
Fig. 22 presents a comparison of the Vickers microhardness results for the as-built and heat-treated specimens.
Fig. 22.
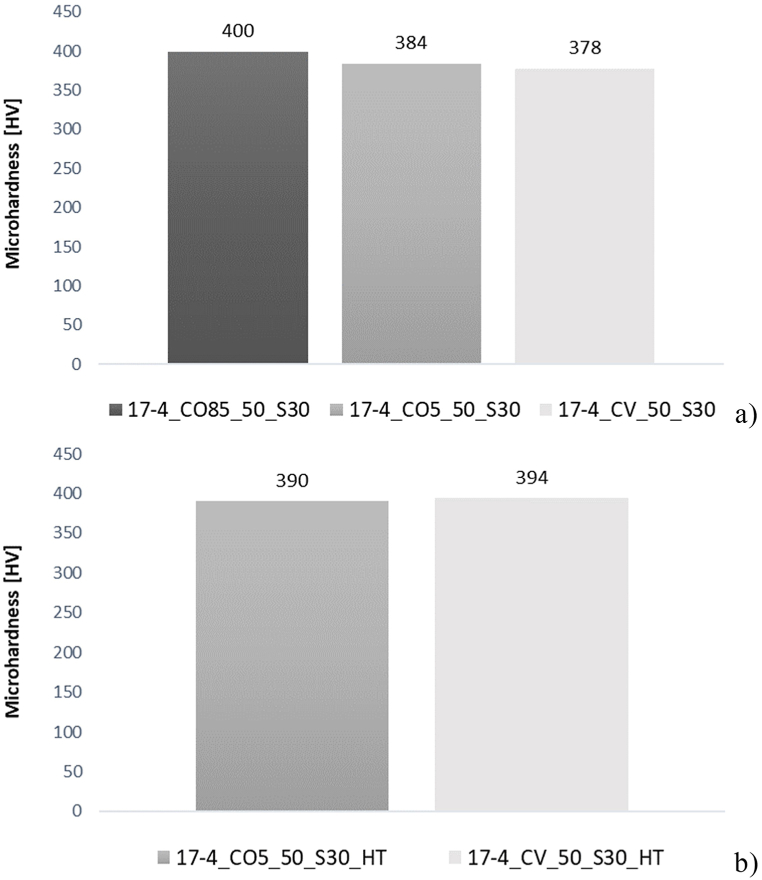
Microhardness tests average results: a) As-built specimens; b) Heat-treated specimens.
3.3.1. Impact of printing directions
The microhardness displayed mean values of 400 H V, 384 H V and 378 H V for the specimens horizontally, inclined by 85° and 5°, and vertically manufactured respectively. Consequently, a comparison of the test results showed that the highest hardness was achieved for the specimens horizontally produced inclined by 85°, with average values of +4.1% and +5.7% higher compared to the horizontally printed specimens inclined by 5° and vertically printed specimens, respectively.
However, it must be noted that the different printing directions do not introduce significant differences in the microhardness characteristics of the material.
3.3.2. Influence of heat treatment on material microhardness
The comparison of as-built and heat-treated specimens revealed that the annealing treatment did not meaningfully change the material microhardness for specimens produced in the printing directions investigated. The heat treatment induced an increase in microhardness of 1.6% and 4.3% for horizontally printed specimens inclined by 5° and vertically produced specimens, respectively.
4. Conclusions
In this paper, the results of an experimental campaign carried out with the aim of investigating the effects of different process parameters on the tensile and impact strength properties, and microhardness characteristics, of 17-4 P H steel specimens manufactured by selective laser melting, are reported. In addition, the influence of an annealing heat treatment on the mechanical behaviour of 3D-printed samples was also studied.
The following conclusions can be drawn from the experimental results.
-
•
Regarding the different printing directions, the highest yield strength was offered by the specimen printed horizontally with a slope of 85° and by the specimen printed horizontally printed with a slope of 5°, for the as-built and heat-treated conditions, respectively. The highest average ultimate tensile strength values, however, were exhibited both for the as-built and heat-treated samples, by the specimen printed horizontally with a slope of 5°;
-
•
Concerning the different scanning times, the greatest yield strength was provided by the sample printed with a scanning time of 65s and by the sample produced with a scanning time of 50s for the as-built and heat-treated conditions, respectively. The highest ultimate tensile strength was given by the samples manufactured with a scanning time of 50s both for the as-built and heat-treated samples;
-
•
As for the failure strain, the highest ductility was given by the specimen printed vertically (either for the as-built and heat-treated condition) and by the sample processed with 45s and 65s of scanning time for the as-built and heat-treated condition, respectively;
-
•
The greatest impact strength was provided by the specimen manufactured vertically for the as-built condition. The heat-treated samples with the highest mean values of impact toughness were those printed horizontally with a slope of 5°;
-
•
The higher microhardness value was achieved by specimens produced horizontally inclined by 85°. After heat treatment, the greatest average microhardness was given by specimens produced in the vertical direction. However, both in the presence and absence of heat treatment, the manufacturing directions do not appreciably affect the hardness of the material;
-
•
The applied heat treatment increases the yield strength, with the exception of the specimens printed horizontally whit a slope of 85°, for which the yield strength decreases; however, in the specimens with 65s of scanning time the increase is considerably less pronounced;
-
•
The tensile strength does not change significantly after heat treatment;
-
•
The heat treatment reduces the failure strain and consequently the ductility for all types of specimens, except for the case of the specimens manufactured horizontally with a slope of 85°. The greatest reduction, however, was given by those specimens made with the lowest scanning time of 45s;
-
•
The annealing heat treatment introduced a decrease in resilience values. This drop is slight for the specimens printed horizontally and much more marked for the specimens printed in the vertical direction;
-
•
Heat treatment produces an increase in the material microhardness for the printing directions investigated.
Funding
This research did not receive any specific grant from funding agencies in the public, commercial, or not-for-profit sectors.
Author contribution statement
Francesca Romana Andreacola: Conceived and designed the experiments; Performed the experiments; Analyzed and interpreted the data; Wrote the paper.
Ilaria Capasso: Conceived and designed the experiments; Analyzed and interpreted the data; Wrote the paper.
Antonio Langella: Performed the experiments; Analyzed and interpreted the data.
Giuseppe Brando: Conceived and designed the experiments; Analyzed and interpreted the data; Contributed reagents, materials, analysis tools or data.
Data availability statement
Data will be made available on request.
Declaration of competing interest
The authors declare that they have no known competing financial interests or personal relationships that could have appeared to influence the work reported in this paper.
Acknowledgements
This research was developed in the framing of the Italian Research Project “3D-DAMPER - Processi di ottimizzazione di dampers metallici innovativi stampati in 3D”, in the meaning of the PON action “Fabbrica Intelligente, Agrifood e Scienza della Vita”, funded by the Italian Ministry for the Economic Development.
The authors wish to acknowledge the support provided by Dr. Ilaria Papa for carrying out microhardness tests.
Footnotes
Supplementary data to this article can be found online at https://doi.org/10.1016/j.heliyon.2023.e17698.
Appendix A. Supplementary data
The following is the Supplementary data to this article.
References
- 1.Cooke S., Ahmadi K., Willerth S., Herring R. Metal additive manufacturing: technology, metallurgy and modelling. J. Manuf. Process. 2020;57:978–1003. doi: 10.1016/j.jmapro.2020.07.025. [DOI] [Google Scholar]
- 2.Abdullah T., Zaman Khan N. 2021. Experimental Study on Mechanical Behaviour of Additively Manufactured 17-4PH Stainless Steel. [DOI] [Google Scholar]
- 3.Wong K.V., Hernandez A. A review of additive manufacturing. ISRN Mech. Eng. 2012;2012:1–10. doi: 10.5402/2012/208760. [DOI] [Google Scholar]
- 4.Narasimharaju S.R., Zeng W., See T.L., Zhu Z., Scott P., Jiang X., Lou S. A comprehensive review on laser powder bed fusion of steels: processing, microstructure, defects and control methods, mechanical properties, current challenges and future trends. J. Manuf. Process. 2022;75:375–414. doi: 10.1016/j.jmapro.2021.12.033. [DOI] [Google Scholar]
- 5.Abdulhameed O., Al-Ahmari A., Ameen W., Mian S.H. Additive manufacturing: challenges, trends, and applications. Adv. Mech. Eng. 2019;11:1–27. doi: 10.1177/1687814018822880. [DOI] [Google Scholar]
- 6.Singh R., Gupta A., Tripathi O., Srivastava S., Singh B., Awasthi A., Rajput S.K., Sonia P., Singhal P., Saxena K.K. Powder bed fusion process in additive manufacturing: an overview. Mater. Today Proc. 2019;26:3058–3070. doi: 10.1016/j.matpr.2020.02.635. [DOI] [Google Scholar]
- 7.Herzog D., Seyda V., Wycisk E., Emmelmann C. Additive manufacturing of metals. Acta Mater. 2016;117:371–392. doi: 10.1016/j.actamat.2016.07.019. [DOI] [Google Scholar]
- 8.Bhatia A., Sehgal A.K. Additive manufacturing materials, methods and applications: a review. Mater. Today Proc. 2021 doi: 10.1016/j.matpr.2021.04.379. [DOI] [Google Scholar]
- 9.Pratheesh Kumar S., Elangovan S., Mohanraj R., Ramakrishna J.R. Review on the evolution and technology of State-of-the-Art metal additive manufacturing processes. Mater. Today Proc. 2021;46:7907–7920. doi: 10.1016/j.matpr.2021.02.567. [DOI] [Google Scholar]
- 10.Coon C., Pretzel B., Lomax T., Strlič M. Preserving rapid prototypes: a review. Herit. Sci. 2016;4:1–17. doi: 10.1186/s40494-016-0097-y. [DOI] [Google Scholar]
- 11.Durai Murugan P., Vijayananth S., Natarajan M.P., Jayabalakrishnan D., Arul K., Jayaseelan V., Elanchezhian J. A current state of metal additive manufacturing methods: a review. Mater. Today Proc. 2021 doi: 10.1016/j.matpr.2021.11.503. [DOI] [Google Scholar]
- 12.Karar G.C., Kumar R., Chattopadhyaya S. Adv. Prod. Ind. Eng. Part Lect. Notes. Mech. Eng. B. Ser.; 2021. An analysis on the advanced research in additive manufacturing; pp. 229–277. [DOI] [Google Scholar]
- 13.Shrinivas Mahale R., Shamanth V., Hemanth K., Nithin S.K., Sharath P.C., Shashanka R., Patil A., Shetty D. Processes and applications of metal additive manufacturing. Mater. Today Proc. 2021:2–7. doi: 10.1016/j.matpr.2021.08.298. [DOI] [Google Scholar]
- 14.ASTM – American society for testing and materials . International Standard; 2015. ISO/ASTM 52900: Additive Manufacturing - General Principles - Terminology. [Google Scholar]
- 15.Wang Y., Chen R., Liu Y. A double mask projection exposure method for stereolithography. Sensors Actuators, A Phys. 2020;314 doi: 10.1016/j.sna.2020.112228. [DOI] [Google Scholar]
- 16.Mazzoli A. Selective laser sintering in biomedical engineering. Med. Biol. Eng. Comput. 2013;51:245–256. doi: 10.1007/s11517-012-1001-x. [DOI] [PubMed] [Google Scholar]
- 17.Zhu H., Wang Z., Muránsky O., Davis J., Yu S., Kent D., Wang G., Dargusch M.S. The characterisation and formation of novel microstructural features in a Ti−Nb−Zr−Mo−Sn alloy manufactured by Laser Engineered Net Shaping (LENS) Addit. Manuf. 2020;37 doi: 10.1016/j.addma.2020.101705. [DOI] [Google Scholar]
- 18.Wang J.C., Dommati H., Hsieh S.J. Review of additive manufacturing methods for high-performance ceramic materials. Int. J. Adv. Manuf. Technol. 2019;103:2627–2647. doi: 10.1007/s00170-019-03669-3. [DOI] [Google Scholar]
- 19.Alafaghani A., Qattawi A., Alrawi B., Guzman A. Experimental optimization of fused deposition modelling processing parameters: a design-for-manufacturing approach. Procedia Manuf. 2017;10:791–803. doi: 10.1016/j.promfg.2017.07.079. [DOI] [Google Scholar]
- 20.Hafsa M.N., Kassim N., Ismail S., Kamaruddin S.A., Hafeez T.M., Ibrahim M., Samsudin Z.H. Study on surface roughness quality of FDM and MJM additive manufacturing model for implementation as investment casting sacrificial pattern. J. Mech. Eng. 2018;5:25–34. [Google Scholar]
- 21.Aramian A., Razavi S.M.J., Sadeghian Z., Berto F. A review of additive manufacturing of cermets. Addit. Manuf. 2020;33 doi: 10.1016/j.addma.2020.101130. [DOI] [Google Scholar]
- 22.Mostafaei A., Elliott A.M., Barnes J.E., Li F., Tan W., Cramer C.L., Nandwana P., Chmielus M. Binder jet 3D printing – process parameters, materials, properties, and challenges. Prog. Mater. Sci. 2020 doi: 10.1016/j.pmatsci.2020.100707. [DOI] [Google Scholar]
- 23.Gokuldoss P.K., Kolla S., Eckert J. Additive manufacturing processes: selective laser melting, electron beam melting and binder jetting-selection guidelines. Materials. 2017;10 doi: 10.3390/ma10060672. [DOI] [PMC free article] [PubMed] [Google Scholar]
- 24.Ngo T.D., Kashani A., Imbalzano G., Nguyen K.T.Q., Hui D. Additive manufacturing (3D printing): a review of materials, methods, applications and challenges. Compos. B Eng. 2018;143:172–196. doi: 10.1016/j.compositesb.2018.02.012. [DOI] [Google Scholar]
- 25.Mueller B., Kochan D. Laminated object manufacturing for rapid tooling and patternmaking in foundry industry. Comput. Ind. 1999;39:47–53. doi: 10.1016/S0166-3615(98)00127-4. [DOI] [Google Scholar]
- 26.Buchanan C., Gardner L. Metal 3D printing in construction: a review of methods, research, applications, opportunities and challenges. Eng. Struct. 2019;180:332–348. doi: 10.1016/j.engstruct.2018.11.045. [DOI] [Google Scholar]
- 27.Gardner L., Kyvelou P., Herbert G., Buchanan C. Testing and initial verification of the world's first metal 3D printed bridge. J. Constr. Steel Res. 2020;172 doi: 10.1016/j.jcsr.2020.106233. [DOI] [Google Scholar]
- 28.Singh R., Gupta A., Tripathi O., Srivastava S., Singh B., Awasthi A., Rajput S.K., Sonia P., Singhal P., Saxena K.K. Powder bed fusion process in additive manufacturing: an overview. Mater. Today Proc. 2019;26:3058–3070. doi: 10.1016/j.matpr.2020.02.635. [DOI] [Google Scholar]
- 29.Rajesh R., Sudheer S., Kulkarni M.V. 2015. Selective Laser Sintering Process – A Review; p. 2. [Google Scholar]
- 30.Murr L.E., Gaytan S.M., Ramirez D.A., Martinez E., Hernandez J., Amato K.N., Shindo P.W., Medina F.R., Wicker R.B. Metal fabrication by additive manufacturing using laser and electron beam melting technologies. J. Mater. Sci. Technol. 2012;28:1–14. doi: 10.1016/S1005-0302(12)60016-4. [DOI] [Google Scholar]
- 31.Song B., Zhao X., Li S., Han C., Wei Q., Wen S., Liu J., Shi Y. Differences in microstructure and properties between selective laser melting and traditional manufacturing for fabrication of metal parts: a review. Front. Mech. Eng. 2015;10:111–125. doi: 10.1007/s11465-015-0341-2. [DOI] [Google Scholar]
- 32.Yap C.Y., Chua C.K., Dong Z.L., Liu Z.H., Zhang D.Q., Loh L.E., Sing S.L. Review of selective laser melting: materials and applications. Appl. Phys. Rev. 2015;2 doi: 10.1063/1.4935926. [DOI] [Google Scholar]
- 33.Fette M., Sander P., Wulfsberg J., Zierk H., Herrmann A., Stoess N. Optimized and cost-efficient compression molds manufactured by selective laser melting for the production of thermoset fiber reinforced plastic aircraft components. Procedia CIRP. 2015;35:25–30. doi: 10.1016/j.procir.2015.08.082. [DOI] [Google Scholar]
- 34.Suryawanshi J., Prashanth K.G., Ramamurty U. Tensile, fracture, and fatigue crack growth properties of a 3D printed maraging steel through selective laser melting. J. Alloys Compd. 2017;725:355–364. doi: 10.1016/j.jallcom.2017.07.177. [DOI] [Google Scholar]
- 35.Kanyilmaz A., Demir A.G., Chierici M., Berto F., Gardner L., Kandukuri S.Y., Kassabian P., Kinoshita T., Laurenti A., Paoletti I., du Plessis A., Razavi S.M.J. Role of metal 3D printing to increase quality and resource-efficiency in the construction sector. Addit. Manuf. 2022;50 doi: 10.1016/j.addma.2021.102541. [DOI] [Google Scholar]
- 36.Dudek P., Zagórski K. Cost, resources, and energy efficiency of additive manufacturing. E3S Web Conf. 2017;14 doi: 10.1051/e3sconf/20171401040. [DOI] [Google Scholar]
- 37.Peng T., Kellens K., Tang R., Chen C., Chen G. Sustainability of additive manufacturing: an overview on its energy demand and environmental impact. Addit. Manuf. 2018;21:694–704. doi: 10.1016/j.addma.2018.04.022. [DOI] [Google Scholar]
- 38.Gao C., Wolff S., Wang S. Eco-friendly additive manufacturing of metals: energy efficiency and life cycle analysis. J. Manuf. Syst. 2021;60:459–472. doi: 10.1016/j.jmsy.2021.06.011. [DOI] [Google Scholar]
- 39.Gardner L. Metal additive manufacturing in structural engineering: review, opportunities and outlook. Structures. 2023;47:2178–2193. doi: 10.1201/9781003348450-1. [DOI] [Google Scholar]
- 40.Galjaard S., Hofman S., Ren S. New opportunities to optimize structural designs in metal by using additive manufacturing. Adv. Archit. Geom. 2014;2015 doi: 10.1007/978-3-319-11418-7. [DOI] [Google Scholar]
- 41.Feucht T., Lange J. 3-d-printing with steel: additive manufacturing of connection elements and beam reinforcements. IABSE Symp. 2019;2019:419–424. doi: 10.1201/9780429426506-75. [DOI] [Google Scholar]
- 42.Lange J., Feucht T., Erven M. 3D printing with steel: additive Manufacturing for connections and structures. Steel Construct. 2020;13:144–153. doi: 10.1002/stco.202000031. [DOI] [Google Scholar]
- 43.Baptista R.J.S., Pragana J.P.M., Bragança I.M.F., Silva C.M.A., Alves L.M., Martins P.A.F. Joining aluminium profiles to composite sheets by additive manufacturing and forming. J. Mater. Process. Technol. 2020;279 doi: 10.1016/j.jmatprotec.2019.116587. [DOI] [Google Scholar]
- 44.Wynne Z., Buchanan C., Kyvelou P., Gardner L., Kromanis R., Stratford T., Reynolds T.P.S. Dynamic testing and analysis of the world's first metal 3D printed bridge. Case Stud. Constr. Mater. 2022;17 doi: 10.1016/j.cscm.2022.e01541. [DOI] [Google Scholar]
- 45.Kyvelou P., Buchanan C., Gardner L. Numerical simulation and evaluation of the world's first metal additively manufactured bridge. Structures. 2022;42:405–416. doi: 10.1016/j.istruc.2022.06.012. [DOI] [Google Scholar]
- 46.Al-Nabulsi Z., Mottram J.T., Gillie M., Kourra N., Williams M.A. Mechanical and X ray computed tomography characterisation of a WAAM 3D printed steel plate for structural engineering applications. Construct. Build. Mater. 2021;274 doi: 10.1016/j.conbuildmat.2020.121700. [DOI] [Google Scholar]
- 47.Guo X., Kyvelou P., Ye J., Teh L.H., Gardner L. Experimental investigation of wire arc additively manufactured steel single-lap shear bolted connections. Thin-Walled Struct. 2022;181 doi: 10.1016/j.tws.2022.110029. [DOI] [Google Scholar]
- 48.Huang C., Kyvelou P., Gardner L. Stress-strain curves for wire arc additively manufactured steels. Eng. Struct. 2023;279 doi: 10.1016/j.engstruct.2023.115628. [DOI] [Google Scholar]
- 49.Huang C., Meng X., Gardner L. Cross-sectional behaviour of wire arc additively manufactured tubular beams. Eng. Struct. 2022;272 doi: 10.1016/j.engstruct.2022.114922. [DOI] [Google Scholar]
- 50.Kraus M., Winkler P., Hammer S., Reimann J., Hildebrand J., Bergmann J.P. Geometric imperfections of additive manufactured members. Eng. Struct. 2022;252 doi: 10.1016/j.engstruct.2021.113596. [DOI] [Google Scholar]
- 51.Silvestru V.A., Ariza I., Vienne J., Michel L., Aguilar Sanchez A.M., Angst U., Rust R., Gramazio F., Kohler M., Taras A. Performance under tensile loading of point-by-point wire and arc additively manufactured steel bars for structural components. Mater. Des. 2021;205 doi: 10.1016/j.matdes.2021.109740. [DOI] [Google Scholar]
- 52.Laghi V., Palermo M., Gasparini G., Veljkovic M., Trombetti T. Assessment of design mechanical parameters and partial safety factors for Wire-and-Arc Additive Manufactured stainless steel. Eng. Struct. 2020;225 doi: 10.1016/j.engstruct.2020.111314. [DOI] [Google Scholar]
- 53.Sufiiarov V.S., Popovich A.A., Borisov E.V., Polozov I.A., Masaylo D.V., Orlov A.V. The effect of layer thickness at selective laser melting. Procedia Eng. 2017;174:126–134. doi: 10.1016/j.proeng.2017.01.179. [DOI] [Google Scholar]
- 54.Rafi H.K., Pal D., Patil N., Starr T.L., Stucker B.E. Microstructure and mechanical behavior of 17-4 precipitation hardenable steel processed by selective laser melting. J. Mater. Eng. Perform. 2014;23:4421–4428. doi: 10.1007/s11665-014-1226-y. [DOI] [Google Scholar]
- 55.Facchini L., Vicente N., Lonardelli I., Magalini E., Robotti P., Alberto M. Metastable austenite in 17-4 precipitation-hardening stainless steel produced by selective laser melting. Adv. Eng. Mater. 2010;12:184–188. doi: 10.1002/adem.200900259. [DOI] [Google Scholar]
- 56.Murr L.E., Martinez E., Hernandez J., Collins S., Amato K.N., Gaytan S.M., Shindo P.W. Microstructures and properties of 17-4 PH stainless steel fabricated by selective laser melting. J. Mater. Res. Technol. 2012;1:167–177. doi: 10.1016/S2238-7854(12)70029-7. [DOI] [Google Scholar]
- 57.Giganto S., Zapico P., Castro-Sastre M.Á., S Martínez-Pellitero, Leo P., Perulli P. Influence of the scanning strategy parameters upon the quality of the SLM parts. Procedia Manuf. 2019;41:698–705. doi: 10.1016/j.promfg.2019.09.060. [DOI] [Google Scholar]
- 58.Eskandari H., Lashgari H.R., Ye L., Eizadjou M., Wang H. Microstructural characterization and mechanical properties of additively manufactured 17–4PH stainless steel. Mater. Today Commun. 2022;30 doi: 10.1016/j.mtcomm.2021.103075. [DOI] [Google Scholar]
- 59.Govindaraj V., Farabi E., Kada S., Hodgson P.D., P Singh R., Rohrer G.S., Beladi H. Effect of manganese on the grain boundary network of lath martensite in precipitation hardenable stainless steels. J. Alloys Compd. 2021;886 doi: 10.1016/j.jallcom.2021.161333. [DOI] [Google Scholar]
- 60.Liu D., Liu D., Zhang X., Ma A., Liu C. Microstructural evolution mechanisms in rolled 17-4PH steel processed by ultrasonic surface rolling process. Mater. Sci. Eng. 2020;773 doi: 10.1016/j.msea.2019.138720. [DOI] [Google Scholar]
- 61.Lee I. Combination of plasma nitriding and nitrocarburizing treatments of AISI 630 martensitic precipitation hardening stainless steel. Surf. Coating. Technol. 2019;376:8–14. doi: 10.1016/j.surfcoat.2018.12.078. [DOI] [Google Scholar]
- 62.Ren S., Galjaard S. Arup, topology optimisation for steel structural design with additive manufacturing. Model. Behav. 2015 doi: 10.1007/978-3-319-24208-8. [DOI] [Google Scholar]
- 63.Galjaard S., Hofman S., Ren S. Optimizing structural building elements in metal by using additive manufacturing. Proc. Int. Assoc. Shell Spat. Struct. 2015;2:1–12. [Google Scholar]
- 64.Rashid R., Masood S.H., Ruan D., Palanisamy S., Rahman Rashid R.A., Brandt M. Effect of scan strategy on density and metallurgical properties of 17-4PH parts printed by Selective Laser Melting (SLM) J. Mater. Process. Technol. 2017;249:502–511. doi: 10.1016/j.jmatprotec.2017.06.023. [DOI] [Google Scholar]
- 65.Carneiro L., Jalalahmadi B., Ashtekar A., Jiang Y. Cyclic deformation and fatigue behavior of additively manufactured 17–4 PH stainless steel. Int. J. Fatig. 2019;123:22–30. doi: 10.1016/j.ijfatigue.2019.02.006. [DOI] [Google Scholar]
- 66.Laghi V., Palermo M., Gasparini G., Girelli V.A., Trombetti T. Experimental results for structural design of Wire-and-Arc Additive Manufactured stainless steel members. J. Constr. Steel Res. 2020;167 doi: 10.1016/j.jcsr.2019.105858. [DOI] [Google Scholar]
- 67.Yu Z., Zheng Y., Chen J., Wu C., Xu J., Lu H., Yu C. Effect of laser remelting processing on microstructure and mechanical properties of 17-4 PH stainless steel during laser direct metal deposition. J. Mater. Process. Technol. 2020;284 doi: 10.1016/j.jmatprotec.2020.116738. [DOI] [Google Scholar]
- 68.SLM Solutions, Material Data Sheet Stainless Steel 17-4PH/1.4542/A564, (n.d.).
- 69.ASTM – American Society for Testing and Materials . ASTM Int.; 2020. Standard Test Methods and Definitions for Mechanical Testing of Steel Products. ASTM A370-20. [DOI] [Google Scholar]
- 70.ASTM – American Society for Testing and Materials, ASTM E23 . 2007. Standard Test Methods for Notched Bar Impact Testing of Metallic Materials; pp. 1–28. [DOI] [Google Scholar]
- 71.Wang J.J., Zhang M., Tan X., Jing W., Liu E.J., Tor S.B., Li H. Impact and fatigue characteristics of additively manufactured steel materials: a review. Proc. Int. Conf. Prog. Addit. Manuf. 2018;2018-May:487–492. doi: 10.25341/D4T881. [DOI] [Google Scholar]
- 72.Yasa E., Deckers J., Kruth J.P., Rombouts M., Luyten J. Charpy impact testing of metallic selective laser melting parts. Virtual Phys. Prototyp. 2010;5:89–98. doi: 10.1080/17452751003703894. [DOI] [Google Scholar]
- 73.Viscusi A., Leitão C., Rodrigues D.M., Scherillo F., Squillace A., Carrino L. Laser beam welded joints of dissimilar heat treatable aluminium alloys. J. Mater. Process. Technol. 2016;236:48–55. doi: 10.1016/j.jmatprotec.2016.05.006. [DOI] [Google Scholar]
- 74.Larimian T., Kannan M., Grzesiak D., AlMangour B., Borkar T. Effect of energy density and scanning strategy on densification, microstructure and mechanical properties of 316L stainless steel processed via selective laser melting. Mater. Sci. Eng. 2020;770 doi: 10.1016/j.msea.2019.138455. [DOI] [Google Scholar]
- 75.Hitzler L., Janousch C., Schanz J., Merkel M., Heine B., Mack F., Hall W., Öchsner A. Direction and location dependency of selective laser melted AlSi10Mg specimens. J. Mater. Process. Technol. 2017;243:48–61. doi: 10.1016/j.jmatprotec.2016.11.029. [DOI] [Google Scholar]
- 76.Buchanan C., Matilainen V.P., Salminen A., Gardner L. Structural performance of additive manufactured metallic material and cross-sections. J. Constr. Steel Res. 2017;136:35–48. doi: 10.1016/j.jcsr.2017.05.002. [DOI] [Google Scholar]
- 77.Mower T.M., Long M.J. Mechanical behavior of additive manufactured, powder-bed laser-fused materials. Mater. Sci. Eng. 2016;651:198–213. doi: 10.1016/j.msea.2015.10.068. [DOI] [Google Scholar]
- 78.Rashid R., Masood S.H., Ruan D., Palanisamy S., Rahman Rashid R.A., Brandt M. Effect of scan strategy on density and metallurgical properties of 17-4PH parts printed by Selective Laser Melting (SLM) J. Mater. Process. Technol. 2017;249:502–511. doi: 10.1016/j.jmatprotec.2017.06.023. [DOI] [Google Scholar]
- 79.Andreacola F.R., Capasso I., Pilotti L., Brando G. Influence of 3D-printing parameters on the mechanical properties of 17-4PH stainless steel produced through Selective Laser Melting. Frat. Ed Intregrità Strutt. 2021;58:282–295. doi: 10.3221/IGF-ESIS.58.21. [DOI] [Google Scholar]
- 80.SLM Solutions, Metal Powder Optimized for Selective Laser Melting, (n.d.).
- 81.Zhang H., Gu D., Ma C., Guo M., Yang J., Wang R. Effect of post heat treatment on microstructure and mechanical properties of Ni-based composites by selective laser melting. Mater. Sci. Eng. 2019;765 doi: 10.1016/j.msea.2019.138294. [DOI] [Google Scholar]
- 82.Sarkar S., Kumar C.S., Nath A.K. Effects of heat treatment and build orientations on the fatigue life of selective laser melted 15-5 PH stainless steel. Mater. Sci. Eng. 2019;755:235–245. doi: 10.1016/j.msea.2019.04.003. [DOI] [Google Scholar]
- 83.Yadollahi A., Shamsaei N., Thompson S.M., Elwany A., Bian L. Effects of building orientation and heat treatment on fatigue behavior of selective laser melted 17-4 PH stainless steel. Int. J. Fatig. 2017;94:218–235. doi: 10.1016/j.ijfatigue.2016.03.014. [DOI] [Google Scholar]
- 84.Moussaoui K., Rubio W., Mousseigne M., Sultan T., Rezai F. Effects of Selective Laser Melting additive manufacturing parameters of Inconel 718 on porosity, microstructure and mechanical properties. Mater. Sci. Eng. 2018;735:182–190. doi: 10.1016/j.msea.2018.08.037. [DOI] [Google Scholar]
- 85.Xu Z.W., Wang Q., Wang X.S., Tan C.H., Guo M.H., Gao P.B. High cycle fatigue performance of AlSi10mg alloy produced by selective laser melting. Mech. Mater. 2020;148 doi: 10.1016/j.mechmat.2020.103499. [DOI] [Google Scholar]
- 86.Masuo H., Tanaka Y., Morokoshi S., Yagura H., Uchida T. Influence of defects , surface roughness and HIP on the fatigue strength of Ti- 6Al-4V manufactured by additive manufacturing. Int. J. Fatig. 2018;117:163–179. doi: 10.1016/j.ijfatigue.2018.07.020. [DOI] [Google Scholar]
Associated Data
This section collects any data citations, data availability statements, or supplementary materials included in this article.
Supplementary Materials
Data Availability Statement
Data will be made available on request.


