

Summary
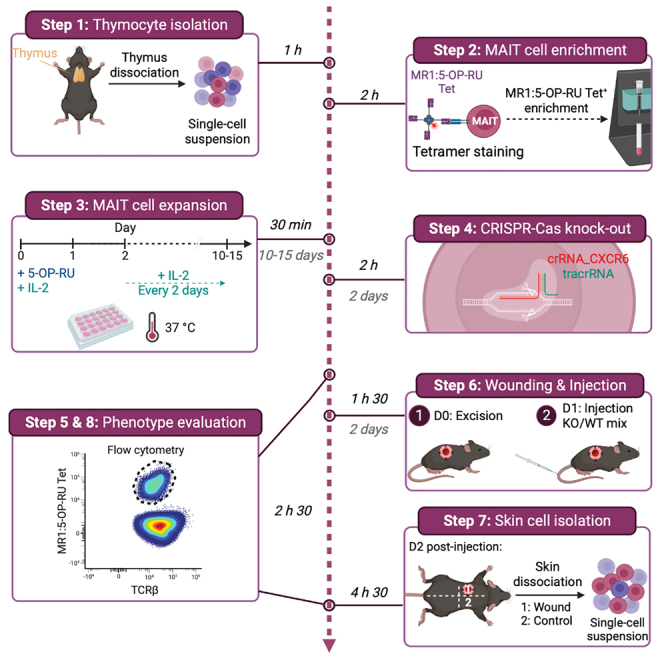
Generating knockout mice for target molecules in specific T cell populations, without subset-specific promoters, is time-consuming and costly. Here, we describe steps for enriching mucosal-associated invariant T cells from the thymus, expanding them in vitro and performing a CRISPR-Cas9 knockout. We then detail procedure for injecting the knockout cells into wounded Cd3ε−/− mice and characterizing them in the skin.
For complete details on the use and execution of this protocol, please refer to du Halgouet et al. (2023).1
Subject areas: Cell culture, Immunology, CRISPR
Graphical abstract
Highlights
-
•
Enrichment and expansion of thymic MAIT cells
-
•
Genetic modification of expanded thymic MAIT cells using CRISPR-Cas knockout
-
•
Full-thickness murine skin excision and injection of expanded thymic MAIT cells
-
•
Phenotypic evaluation of CRISPR-Cas knockout MAIT cells in the skin
Publisher’s note: Undertaking any experimental protocol requires adherence to local institutional guidelines for laboratory safety and ethics.
Generating knockout mice for target molecules in specific T cell populations, without subset-specific promoters, is time-consuming and costly. Here, we describe steps for enriching mucosal-associated invariant T cells from the thymus, expanding them in vitro and performing a CRISPR-Cas9 knockout. We then detail procedure for injecting the knockout cells into wounded Cd3ε−/− mice and characterizing them in the skin.
Before you begin
Institutional permissions
All experiments were conducted in an animal facility accredited by the French Veterinarian Department, following ethical guidelines approved by the relevant ethical committee (APAF1S no. 24245-2020021921558370-v1). Researchers aiming at performing this protocol should acquire permissions from the relevant institutions.
Media and reagent preparation
Timing: 1 h
Unless stated otherwise, the reagents discussed in this section can be prepared and stored before beginning the experiments.
-
1.
Prepare FACS/dissociation buffer according to the materials and equipment section.
-
2.
Prepare complete RPMI media according to the materials and equipment section.
CRITICAL: For better cell viability, cell culture media should be heated at 37°C before use.
-
3.
Supplemented nucleofector solution P3: This buffer can be stored up to 3 weeks. For each condition: 16.4 μL Nucleofector solution P3 + 3.6 μL Supplement 1.
-
4.
Prepare skin digestion buffer according to the materials and equipment section.
Key resources table
| REAGENT or RESOURCE | SOURCE | IDENTIFIER |
|---|---|---|
| Antibodies (each lot of antibody should be titrated to ensure accurate staining) | ||
| CD44 (BV605) | BioLegend | Cat#103047; RRID: AB_2562451 |
| CXCR6 (PETR) | BioLegend | Cat#151117; RRID: AB_2721700 |
| MR1:5-OP-RU tetramer (PE) | NIH Tetramer Core Facility | |
| MR1:6-FP (unlabeled) | NIH Tetramer Core Facility | |
| TCRβ (APC-Cy7) | BioLegend | Cat#109220; RRID: AB_893626 |
| Chemicals, peptides, and recombinant proteins | ||
| Anti-CD16/CD32 (Clone 2.4G2) | Institut Curie, produced in house | |
| 5-OP-RU | Institut Curie, produced in house | 2 |
| Alt-R S.p. HiFi Cas9 Nuclease V3 | IDT | Cat#1081061 |
| Anti-PE microbeads | Miltenyi | Cat#130-048-801 |
| β-mercaptoethanol | Sigma | Cat#M3148 |
| Bovine serum albumin | Sigma | Cat#A7906 |
| Brefeldin A | Sigma | Cat#B6542 |
| CO2 independent medium | Gibco | Cat#18045088 |
| DAPI | Sigma | Cat#MBD0015 |
| Debris removal solution | Miltenyi | Cat#130-109-398 |
| Dispase | Corning | Cat#354235 |
| DNAse 1 | Roche | Cat#10104159001 |
| EDTA | Gibco | Cat#15575-038 |
| Fetal calf serum | Eurobio | Cat#CVFSVF00-01 |
| HEPES | Gibco | Cat#15630-056 |
| Liberase TL | Sigma | Cat#5401020001 |
| Live and dead AQUA | Thermo Fischer Scientific | Cat#L34957 |
| Non-essential amino acid | Thermo Fisher | Cat#11140050 |
| PBS | Eurobio Scientific | Cat#CS1PB501-01 |
| Penicillin/streptomycin | Gibco | Cat#15140-122 |
| RPMI 1640 GlutaMAX | Gibco | Cat#61870036 |
| Sodium Pyruvate (NaPyr) | Thermo Fisher | Cat#11360070 |
| Critical commercial assays | ||
| Solution P3 Primary Cell 4DNucleofector X kit S | Lonza | Cat#VAXP-3032 |
| Experimental models: Organisms/strains | ||
| Cd3ε−/− | Institut Curie | 3 |
| CD45.1/1, CD45.1/2 or CD45.2/2 B6-MAITCAST | Institut Curie | 4,5 |
| Oligonucleotides | ||
| Alt-R CRISPR-Cas9 crRNA : Mm_CXCR6.1_AA : /AltR1/rCrU rGrUrA rCrGrA rUrGrG rGrCrA rCrUrA rCrGrA rGrUrU rUrUrA rGrArG rCrUrA rUrGrC rU/AltR2/ | IDT | N/A |
| Alt-R® CRISPR-Cas9 tracrRNA | IDT | Cat#1072534 |
| Software and algorithms | ||
| Cytoflex software (CytExpert) | Beckman Coulter (V2.4) | https://www.beckman.fr/flow-cytometry/research-flow-cytometers/cytoflex/software |
| FlowJo | BD (V10.8.0) | https://www.flowjo.com/ |
| Other | ||
| Biopsy punch (4Ø) | Stiefel | Cat#600210 |
| Biopsy punch (5Ø) | Stiefel | Cat#600118 |
| Coheban | 3M | Cat# CO1583S |
| Cyanoacrylate adhesive | Sigma-Aldrich | Cat#Z105899 |
| Cytoflex LX | Beckman Coulter | Cat#C00445 |
| Dermal Betadine | Mylan | Cat#852 |
| Hair removal cream | Veet | Cat#EA_3108955 |
| LS columns | Miltenyi | Cat#130-042-401 |
| Silicone sheet (5 mm thick) | Grace Bio-Labs | Cat#GBL664581-5EA |
| TEGADERM film dressing | 3M | Cat#1626W |
| VICRYL 6-0 sutures | Ethicon | Cat#V302H |
Materials and equipment
FACS/dissociation buffer
| Reagent | Stock concentration | Final concentration | Amount |
|---|---|---|---|
| PBS | 10× | 1× | 100 mL |
| BSA | N/A: lyophilized powder | 0.5% | 5 g |
| EDTA | 0.5 M | 2 mM | 4 mL |
| Distilled H20 | N/A | N/A | 896 mL |
| Total | N/A | N/A | 1 L |
Store up to 2 months at 4°C.
Complete cell culture media
| Reagent | Stock concentration | Final concentration | Amount |
|---|---|---|---|
| Penicillin/Streptomycin | 10,000 U/mL | 100 U/mL | 5 mL |
| FCS (Fetal calf serum) | N/A: heat inactivated pure serum | 10% | 50 mL |
| Hepes | 1 M | 10 mM | 5 mL |
| Sodium Pyruvate | 100 mM | 1 mM | 5 mL |
| Non-essential Amino Acid | 100× | 1× | 5 mL |
| β-mercaptoethanol | 0.05 M | 50 μM | 0.5 mL |
| RPMI 1640 GlutaMAX | N/A | N/A | 429.5 mL |
| Total | N/A | N/A | 500 mL |
Store up to 2 months at 4°C.
Skin digestion buffer
| Reagent | Stock concentration | Final concentration | Amount |
|---|---|---|---|
| Penicillin/Streptomycin | 10,000 U/mL | 100 U/mL | 500 μL |
| Hepes | 1 M | 20 mM | 1 mL |
| Sodium Pyruvate | 100 mM | 1 mM | 500 μL |
| Non-essential Amino Acid | 100× | 1× | 500 μL |
| β-mercaptoethanol | 0.05 M | 50 μM | 50 μL |
| Liberase TL | 5 mg/mL | 0.25 mg/mL | 2.5 mL |
| DNAse I | 10 mg/mL | 0.5 mg/mL | 2.5 mL |
| RPMI 1640 GlutaMAX | N/A | N/A | qsp 50 mL |
| Total | N/A | N/A | 50 mL |
Store without liberase TL and DNAse I up to 2 months at 4°C. Liberase TL and DNAse I should be added to the medium the day of the experiment.
Step-by-step method details
Thymocyte isolation
This step describes collection and dissociation of the thymus to obtain a single cell suspension.
-
1.Thymus collection.
-
a.Sacrifice the mice following authorized euthanasia methods.
-
b.Collect the thymus and store it in a collection plate containing CO2 independent media on ice.
-
a.
-
2.Thymus dissociation.
-
a.Place the thymus on a 40 μm nylon-filter lying above a 50 mL falcon (Falcon, Corning).
-
b.Mechanically dissociate the thymus on top of the filter while thoroughly rinsing filter with FACS/dissociation buffer.
-
a.
MAIT cell enrichment
This step describes the enrichment of MR1:5-OP-RU Tet+ cells (MAIT cells) from the single-cell suspension of thymocytes. The MR1:5-OP-RU tetramer is used to specifically label and enrich MAIT cells as MAIT cells recognize 5-(2-oxopropylideneamino)-6-D-ribitylaminouracil (5-OP-RU), a metabolite derived from the riboflavin synthesis pathway presented by the major histocompatibility complex (MHC) class 1-related molecule MR1.
-
3.MAIT cell staining.
-
a.Incubate the thymic suspension with MR1:6FP tetramer to block unspecific staining:
-
i.Centrifuge the 50 mL falcon containing the dissociated thymi (room temperature (RT), 367 g, 5 min) and discard supernatant.
-
ii.Resuspend cell pellet into the remaining volume, which should be about 200 μL (add FACS/dissociation buffer if necessary).
-
iii.Add 6FP:MR1 tetramer to the cell suspension (1/1000 final dilution).
-
iv.Incubate at RT for 20 min.
-
i.
-
b.Second incubation with PE-labeled MR1:5-OP-RU tetramer:
-
i.Without washing, add MR1:5-OP-RU tetramer, labeled with PE at the titrated concentration (usually around 1/800).CRITICAL: For an optimal staining, we follow the guidelines provided by the NIH tetramer facility (https://tetramer.yerkes.emory.edu/support/technical). Briefly, the tetramer is diluted at its final concentration in FACS/dissociation buffer containing 10% Fc Block (2.4G2 antibody) and centrifuged (4°C, 20000 g, 10 min) to spin-down aggregates. The supernatant is then added to the cells.
-
ii.Incubate at RT for 30 min.
-
iii.Transfer to a 15 mL tube.
-
iv.Wash with 14 mL of FACS/dissociation buffer then centrifuge (4°C, 367 g, 5 min).
-
v.Discard supernatant and resuspend cell pellet into the remaining volume, which should be about 200 μL (add FACS/dissociation buffer if necessary).
-
i.
-
a.
-
4.Magnetic labeling and separation: This step follows the manufacturer’s instructions (Miltenyi: https://www.miltenyibiotec.com/upload/assets/IM0001271.PDF).
-
a.Magnetic labeling.
-
i.For 3 pooled thymi: Add 150 μL of anti-PE MicroBeads to the 600 μL of cell suspension.
-
ii.Incubate for 20 min at 4°C.
-
iii.Wash with 14 mL of FACS/dissociation buffer and centrifuge (4°C, 367 g, 5 min).
-
iv.Discard the supernatant and resuspend the pellet in 3 mL FACS/dissociation buffer.
-
i.
-
b.Magnetic separation.
-
i.Place a LS column (1 column for 3 pooled thymi) onto the magnet. Prime column by passing 3 mL of FACS/dissociation buffer through.
-
ii.Add the 3 mL solution containing the stained thymocytes on the column.CRITICAL: Keep the negative fraction to ensure recovery of the cells of interest in case the enrichment fails.
-
iii.Rinse the 15 mL falcon with 3 mL of FACS/dissociation buffer and pass it through the column.
-
iv.Wash the column with 6 mL of FACS/dissociation buffer.
-
v.Remove the column from magnet, place it onto a 15 mL tube, add 5 mL of FACS/dissociation buffer and firmly push the cells out of the column using the plunger.
-
vi.Centrifuge the cells (4°C, 367 g, 5 min) and proceed to the expansion step.CRITICAL: Keep some of the enriched cells to check for enrichment yield by flow-cytometry (Figure 1).
-
i.
-
a.
Figure 1.

Representative plot of percentage of MAIT cells pre-enrichment and in the well at day 0
MAIT cell expansion
The objective of this step is to expand thymic MAIT cells.
-
5.Day 0: Starting the culture.
-
a.Resuspend the MAIT cell-enriched thymocytes in complete culture media.
-
b.Count the cells and plate 2 million cells in 2 mL final of complete culture media solution in a 24-well plate.
-
c.Add recombinant mouse IL-2 and 5-OP-RU in each well to reach concentrations of 5 ng/mL and 150 nM, respectively.CRITICAL: Upon synthesis, the stock solution of 5-OP-RU is resuspended in DMSO, aliquoted and kept at −80°C. Freshly thawed aliquots should be quickly diluted and added to the culture. If using a stock solution of 5-A-RU, condensation with methylglyoxal should be performed right before the addition in the wells.
-
d.Place the plate in a cell culture incubator (37°C, 5% CO2).CRITICAL: It is important to start the culture with the indicated cell density for optimal proliferation, if needed add negative enrichment fraction to compensate for low number of cells in the positive fraction but remain careful about initial quantity of MAIT cells (if using a B6 strain instead of the B6-MAITCAST strain, pool several thymi) (troubleshooting - problem 1).
-
a.
-
6.Every 2 days for 9–10 days: maintaining cells in culture.
-
a.Add 5 ng/mL of fresh IL-2 to the culture.
-
b.Check proliferation and confluence of the cells. When cells start forming clusters (Figure 2, black arrow) and are above 100% confluence (Figure 2), split in half and top-off with 1 mL of new pre-heated media containing fresh IL-2.Tip: If the medium drastically changes color (yellow color for a low acidic pH using phenol red indicator) without reaching above 100% confluence do not split the cells as you may affect expansion but instead replace 1 mL of “old” media with 1 mL “new” pre-heated media containing fresh IL-2.
-
c.Culture at least 9 days to reach 90% of MAIT cells in your cells culture. Check the quantity and purity by flow cytometry.Expected yield following this protocol: between 3 × 10⁶ to 7 × 10⁶ MAIT cells total, starting from three B6-MAITCAST thymi.
-
a.
Figure 2.

Representative picture of cultured cells when splitting is necessary
Black arrow indicates a cluster of proliferation.
CRISPR-Cas9 knock-out
This step describes the method used to generate knock-out MAIT cells using the CRIPR-Cas9 system. Here we targeted CXCR6. For other targets see: troubleshooting - problem 2. The protocol follows the recommendations from Lonza (https://bioscience.lonza.com/lonza_bs/CH/en/Transfection/p/000000000000197184/P3-Primary-Cell-4D-Nucleofector-X-Kit-L).
- 7.
-
8.Cell harvest and plate preparation (step 2 – Figure 3).
-
a.Harvest expanded MAIT cells.
-
i.Collect all desired wells, rinse thoroughly each well with PBS to collect all cells.
-
ii.Count the cells: 2. 106 cells/well in nucleocuvette strip will be required.
-
iii.Centrifuge the cells (RT, 367 g, 5 min). Keep the supernatant for preparing the following culture step. The pellet will be used for electroporation after an extra centrifugation step (see Figure 3 – step 3bB).CRITICAL: Do not forget to keep some cell culture media for the preparation of the plate.CRITICAL: Keep in mind that up to half of the cells will be lost at the electroporation step.
-
i.
-
b.Prepare 48 well plates for the following culture step:
-
i.In each well add 250 μL of cell culture media + 250 μL of fresh media + 5 ng/mL of fresh IL-2.
-
ii.Place the plate in a cell culture incubator (32°C, 5% CO2).
-
i.
-
a.
-
9.CRIPR-Cas9 knock-out (step 3 – Figure 3). For 1 condition (2.106 cells).
-
a.Step 3a – (Figure 3): Mix sgRNA (2 μL) and Cas9 (1 μL), incubate 10 min at RT (no more than 20 min).
-
b.Step 3b – (Figure 3): Centrifuge the tube containing the cell pellet (8. a. iii.) (RT, 367 g, 5 min) and remove as much supernatant as possible using a pipette.
-
c.Step 3c – (Figure 3): Quickly resuspend the pellet in 20 μL supplemented nucleosolution P3 (see media and reagent section).
-
iKnock-out sample: Add 3 μL of the complex sgRNA/Cas9.
-
iiMock sample: Add 2 μL of sgRNA + 1 μL of PBS.CRITICAL: Do not leave the cells in supplemented nucleosolution P3 more than 15 min, proceed directly to the electroporation.
-
i
-
d.Step 3d – (Figure 3): Transfer the cells (≃ 25 μL/well) into nucleocuvette strip (Lonza) and start “DN110” nucleofection program (Lonza).CRITICAL: Never put more than 25 μL in a nucleocuvette well. Avoid bubbles, tap gently on sides of the nucleocuvette strip to remove them if necessary.
-
e.Step 3e – (Figure 3): At the end of the program, immediately add 100 μL of the pre-warmed cell culture media (contained in the plate prepared at step 2) and place nucleocuvette strip in the incubator (32°C, 5% CO2) for 10 min.
- f.
-
g.To evaluate knock-out efficiency (if applicable) proceed to the phenotype evaluation step.
-
a.
Figure 3.

Flowchart depicting steps 1–3 of the CRISPR-Cas9 knock-out protocol
Scheme done using BioRender.
Table 1.
Annealing cycling conditions
| Steps | Temperature | Time | Cycles |
|---|---|---|---|
| Annealing | 95°C | 5 min | 1 |
| Cooling | 25°C | 45 min | 1 |
| Hold | 4°C | Temporary storage possible but we always proceeded to the next steps directly. | |
Phenotype evaluation
This section describes the steps to evaluate MAIT cell purity, absolute numbers, and phenotype by flow cytometry. This protocol is used to assess the quality of the enrichment, of the expansion, and the CRISPR-Cas9 knockout efficiency. Extracellular staining should target the protein of interest (here CXCR6; Figure 4) as well as the markers needed to check the phenotype of your cells (here, CD44 for example). Depending on the protein studied, at least 24 h are needed after the electroporation step to assess the effect of the gene editing.
-
10.Tetramer staining.
-
a.Prepare tetramer mix in FACS/dissociation buffer, by adding titrated MR1:5-OP-RU tetramer (PE), titrated anti-TCRβ and 10% Fc block (2.4G2 antibody). Centrifuge tetramer mix to remove tetramer aggregates (4°C, 20000 g, 10 min), following guidelines provided by the NIH tetramer facility (https://tetramer.yerkes.emory.edu/support/technical).
-
b.Centrifuge 50 μL of cells (RT, 367 g, 5 min), discard supernatant and resuspend in tetramer mix.
-
c.Incubate for 30 min at RT.
-
d.Wash twice: add FACS/dissociation buffer, centrifuge (4°C, 367 g, 5 min), discard supernatant.
-
e.Resuspend pellet in extracellular mix containing titrated antibodies and 10% Fc Block in FACS/dissociation buffer.
-
f.Incubate for 20 min at 4°C.
-
g.Wash twice: add FACS/dissociation buffer, centrifuge (4°C, 367 g, 5 min), discard supernatant.
-
h.Resuspend in FACS/dissociation buffer and proceed to flow-cytometry acquisition.
-
a.
Figure 4.

Representative flow cytometry histograms of expanded MAIT cells (MR1:5-OP-RU tetramer+ CD44hi cells) following CRISPR-Cas9 CXCR6 knock-out protocol (10 days of expansion before CRISPR-Cas9 knock-out, and additional 5 days of culture)
Plots adapted from du Halgouet et al.1
Wounding and injection
This section describes the protocol to perform a human-like full-thickness skin wound in T cell-deficient Cd3ε−/− mice, followed by injection of the previously generated knock-out MAIT cells. The objective of this step was to address the differential migratory properties of CXCR6 knock-out versus wild-type MAIT cells. To easily distinguish between knock-out and wild-type cells by flow-cytometry, we injected thymic expanded cells from mice with distinct congenic markers (i.e., CD45.1/1 and CD45.1/2 B6-MAITCAST).
-
11.One day prior to injection, perform full-thickness skin excision of Cd3ε−/− mice. The steps described below (Figure 5) have been slightly adapted from the protocol published by Dunn and colleagues,6 which should be used as reference.
-
a.Inject anesthetic and analgesic in mice (in accordance with local regulations).
-
b.Shave and depilate (2 min of hair removal cream) upper-back hair.
-
c.Clean and disinfect epilated skin (e.g., Betadine).
-
d.Perform full-thickness wound using a 4 mm diameter biopsy punch on one side (right or left) slightly off the midline of the mouse’s back.CRITICAL: Do not perform skin full thickness wound more than 3 mm from the mouse’s midline as the silicon ring could be lost due to scratching/grooming of the mice. Do not perform skin full thickness wound on the mouse’s midline as it could hamper mouse movements.
-
e.Apply adhesive on one side of a silicone ring.
 Pause point: Silicone rings or “donuts” can be prepared in advance by cutting 1 cm wide circles in a 5 mm thick silicone sheet and punching the center using a biopsy punch (5 mm diameter in this protocol).
 -
f.Center silicone ring over the wound and suture using 6-0 nylon thread: 4 stiches for short term needs (<5 days), 6 stiches for long term needs (up to 14 days).
-
g.Cover the wound:
-
i.Add 1.4 cm piece of non-woven compresses.
-
ii.Overlay with transparent occlusive dressing (e.g., 3M)
-
iii.Wrap mouse with cohesive contention strip (e.g., 3M coheban) of about 2 cm wide and with a length of about 1.2 x the mouse circumference.CRITICAL: Regularly check wound (i.e., every 2/3 days) to assess suture status (troubleshooting - problem 3) and change dressing to avoid infection.
-
i.
-
a.
-
12.Inject the modified expanded MAIT cells one day following the excision.
-
a.Collect the knock-out and wild-type cells in two separate tubes and thoroughly rinse all wells with PBS.
-
b.Stain a fraction of the cells to assess: MAIT cell purity, phenotype and numbers (see phenotype evaluation section).
-
c.Based on cell count obtained by flow-cytometry, prepare a mix of CXCR6-KO and WT MAIT cells at a 1:1 ratio in 100 μL of sterile PBS and inject intravenously. Keep a part of the injected mixture for flow cytometry analysis (repeat step b) as a reference point for further comparison.
-
a.
Figure 5.

Flowchart depicting steps b. to g. of the full-thickness skin excision protocol
Epilated skin is in pink, orange is betadine disinfected skin, wound is in red, silicone ring is purple, the black crosses indicate stitches, and the cohesive contention strip is brown.
Tip: Given the low number of immune cells infiltrating the skin and the dilution of the injected cells in the whole mouse we would recommend injecting around 1 × 10⁶ up to 2.5 × 10⁶ MAIT cells (with 50% of KO and 50% of WT) to ensure subsequent recovery and analysis of the injected cells.
Skin cell isolation
This step describes the protocol for obtaining a single cell suspension from the skin day 2 post-injection. (If low cell yield refer to troubleshooting - problem 4).
-
13.Skin collection.
-
a.Sacrifice the mice following authorized euthanasia method.
-
b.Collect full-thickness skin samples (i.e., dermis and epidermis) in a collection plate containing CO2 independent media on ice:
-
a.
-
14.Preparation of a single-cell suspension from the skin.
-
a.Place the samples (flattened, epidermis side up) at 37°C in a 24 well-plate with 1 mL of 500 CU Dispase (Corning) for 45 min.
-
b.Transfer and chop skin sample in a new well containing 1.5 mL of skin digestion buffer (see materials and equipment section).
-
c.Incubate 1 h 45 min at 37°C in a 5% CO2 incubator.
-
d.Transfer and scratch digested skin samples on ice.
-
i.Scratch using the back end of a syringe plunger on a 40 μm nylon-filter placed on top of a 50 mL tube (Falcon, Corning).
-
ii.Thoroughly wash filter and plunger using FACS/dissociation buffer.
-
iii.Centrifuge cells (4°C, 367 g, 5 min) and discard supernatant.
-
i.
-
e.Remove skin debris using cell debris removal solution (Miltenyi) - steps listed below recapitulate manufacturer’s instructions (http://101.200.202.226/files/prod/manuals/201802/05/1137979001.pdf).
-
i.Resuspend cells in 3.1 mL cold 1× PBS and transfer into a 15 mL tube (Falcon, Corning).
-
ii.Add 900 μL of debris removal solution and gently pipette up and down (5–10 times) to homogenize.
-
iii.Gently overlay with 4 mL cold 1× PBS.
-
iv.Centrifuge cells (4°C, 3000 g, 10 min).
-
v.Aspirate top two phases.CRITICAL: A “white” cloud is usually visible just above the pellet: remove it as much as possible but beware of not aspirating cell pellet.
-
vi.Fill tube with 15 mL cold 1× PBS.
-
vii.Gently invert the tube 3 times.CRITICAL: Do not vortex the tube.
-
viii.Centrifuge cells (4°C, 1000 g, 10 min) and discard supernatant.
-
i.
-
a.
-
15.
Proceed to cell staining following the phenotype evaluation section. (If loss of key surface molecules necessary for immune phenotyping refer to troubleshooting - problem 5)
Expected outcomes
MAIT cells are preset unconventional T cells which promote skin wound healing.1,7,8 We developed this methodology for the study of intrinsic properties of molecules expressed by MAIT cells as the generation of knock-out mice is time-consuming and in the absence of a MAIT cell specific promoter. If the knock-out efficiency for the gene of interest is high, this protocol will also allow to study the function(s) of secreted molecules.
Researchers following this protocol will obtain a highly enriched MAIT cell culture, a complete loss of CXCR6 receptor expression, reproducible human-like wounds1,6 and an optimal cell yield from the collected skin (wound site and contra-lateral control). Figure 6 shows flow cytometry plots obtained following the described methodology.
Figure 6.

Flow cytometry plots of congenic marker (CD45.1/2: CXCR6-KO cells; CD45.2/2: WT cells) expression by MAIT cells in injected mix and post-injection recovered skin
Plots adapted from du Halgouet et al.1
Limitations
As this protocol involves TCR-mediated expansion of MAIT cells, we cannot exclude a long-term impact on MAIT cell features corresponding to an extra stimulation step.
Additionally, in preliminary setup experiments (Figure 7), we noticed that quantity and purity of expanded MAIT cells could be influenced by the initial frequency of MAIT cells in the thymus. To ensure high quantity of thymic MAIT cells, we used MAIT cells from inbred B6-MAITCAST mouse which harbors 5 to 10-fold more MAIT cells than the classical B6 strain.4 We do not exclude that the B6 strain could be used as source of MAIT cells, but researcher may require more mice to obtain high quantity of thymic MAIT cells and purity of the expansion may be affected. Furthermore, MAIT cell numbers can vary between animal facilities (depending on the microbiota) and within the same animal facility between cages,7 once again potentially affecting MAIT cell expansion. Nevertheless, we are confident that this protocol will significantly increase MAIT cell yield ex vivo.
Figure 7.

Flow cytometry plots showing the frequency of MAIT cells at day 0 and after 15 days of culture
For both culture #1 (25 × 103 MAIT cells) and #2 (82 × 103 MAIT cells), 3 thymi of B6-MAITCAST mice were pooled. Both cultures were started the same day using the same reagents.
Troubleshooting
Problem 1
Low MAIT cell numbers following 5-OP-RU and IL-2 expansion.
Example: When using a different mice strain than the B6-MAITCAST used here such as the common laboratory strain B6 (C57BL/6J) (see Figure 8).
Figure 8.

Representative plot of percentage of MAIT cells pre-and post-enrichment for C57BL/6J mice
Potential solution
-
•
Check the quality of the 5-OP-RU used (e.g., checking for activation of human or murine MAIT cells).4
-
•
Check initial frequencies and numbers of MAIT cells obtained following tetramer enrichment. If needed pull more mice to obtain enough MAIT cells to start expansion.
-
•
Do not split cells too early as excessive dilution hampers MAIT cell proliferation.
Problem 2
Using another guide to perform a different knockout than described here.
Potential solution
-
•
Design guides for gene of interest: testing at least 2 guides/target is recommended.
-
•
Perform preliminary experiment to assess guide RNA efficiency using appropriate method (e.g., TIDE assay, flow cytometry, Western blot).
Problem 3
Loss of silicone ring before completion of the experiment (up to 17 days).
Potential solution
-
•
Check wound location: We observed that positioning of the wound and consequently the ring far from mice midline was the most frequent cause of ring-loss (probably the consequence of mouse grooming).
-
•Check wound dressing.
-
•Occlusive dressings have different adhesion durability (3M Tegaderm, ≃ 2days), therefore other brands may be tested if needed.
-
•Mice tend to remove cohesive contention strip. Practice mouse wrapping, application should be as tight as possible without altering mouse’s breathing and movements (Tip: strip should be loose enough to allow passage of the fixed end of small forceps between the strip and thoracic cage).
-
•
Problem 4
Low cell yield from the collected skin.
Potential solution
-
•
Beware of the sex and age of animals: higher yields are usually obtained from females as compared to males and in younger animals (6–8 weeks) as compared to older ones ( 10 weeks).
-
•
Test the skin cell isolation protocol without the step of debris removal, as this step might result in some cell loss.
-
•
The quantity of MAIT cells injected can also be increased above the 2.5 × 10⁶ mark described here, however, this will require using more thymi and increase the risk of cell aggregation associated with higher cell numbers.
Problem 5
Despite being highly efficient in extracting MAIT cells from the skin, our digestion protocol involves the dispase enzyme which has been shown to cleave some surface molecules.9
Potential solution
-
•
Researchers should ensure in preliminary tests that key surface markers necessary for identification or characterization by flow cytometry remain unaffected by the digestion protocol described here.
-
•
If key surface markers are affected, other skin digestion protocols involving neither collagenase nor dispase should be used.
Resource availability
Lead contact
Further information and requests for resources and reagents should be directed to and will be fulfilled by the lead contact, Marion SALOU, marion.salou@curie.fr.
Materials availability
This study did not generate new unique reagents.
Acknowledgments
We thank the animal facility platform of the Institut Curie (V. Dangles-Marie, C. Alberti, C. Daviaud, M. Garcia, and the mouse facility zootechnicians) as well as the flow cytometry platform. We thank the NIH Tetramer Core Facility (Emory University) for providing CD1d and MR1 tetramers. The MR1:5-OP-RU tetramer technology was developed jointly by J. McCluskey, J. Rossjohn, and D. Fairlie, and the material was produced by the NIH Tetramer Core Facility as permitted to be distributed by the University of Melbourne. Finally, we thank H. Bugaut for generating the data of tetramer enrichment in C57BL/6 mouse strain. This study received funding from the following institutions: Institut National de la Santé et de la Recherche Médicale (O.L.), Institut Curie (O.L.), Agence Nationale de la Recherche Grant MAIT ANR-16-CE15-0020-01 (O.L.), Agence Nationale de la Recherche Grant MAITrepair ANR-20-CE15-0028-01 (O.L.), Agence Nationale de la Recherche ANR-10-IDEX-0001-02 PSL (O.L.), European Research Council (ERC-2019-AdG-885435) (O.L.), Fondation pour la Recherche Médicale FDT202106013036 (A.d.H.). Graphical abstract realized using BioRender.
Author contributions
Conceptualization, A.d.P., O.L., M.S.; formal analysis, A.d.P., M.S.; funding acquisition, O.L.; investigation, A.d.P., A.A., A.D.; resources, T.Y., L.C., R.R., O.L.; methodology, A.d.P., O.L., M.S.; project administration, A.d.P.; supervision, O.L., M.S.; visualization, A.d.P.; writing – original draft, A.d.P., M.S., A.D.; writing – review & editing, A.d.P., O.L., M.S.
Declaration of interests
The authors declare no competing interests.
Contributor Information
Olivier Lantz, Email: olivier.lantz@curie.fr.
Marion Salou, Email: marion.salou@curie.fr.
Data and code availability
This study did not generate new data or code.
References
- 1.du Halgouet A., Darbois A., Alkobtawi M., Mestdagh M., Alphonse A., Premel V., Yvorra T., Colombeau L., Rodriguez R., Zaiss D., et al. Role of MR1-driven signals and amphiregulin on the recruitment and repair function of MAIT cells during skin wound healing. Immunity. 2023;56:78–92.e6. doi: 10.1016/j.immuni.2022.12.004. [DOI] [PMC free article] [PubMed] [Google Scholar]
- 2.Soudais C., Samassa F., Sarkis M., Le Bourhis L., Bessoles S., Blanot D., Hervé M., Schmidt F., Mengin-Lecreulx D., Lantz O. In Vitro and In Vivo Analysis of the Gram-Negative Bacteria-Derived Riboflavin Precursor Derivatives Activating Mouse MAIT Cells. J. Immunol. 2015;194:4641–4649. doi: 10.4049/jimmunol.1403224. [DOI] [PubMed] [Google Scholar]
- 3.Malissen M., Gillet A., Ardouin L., Bouvier G., Trucy J., Ferrier P., Vivier E., Malissen B. Altered T cell development in mice with a targeted mutation of the CD3-epsilon gene. EMBO J. 1995;14:4641–4653. doi: 10.1002/j.1460-2075.1995.tb00146.x. [DOI] [PMC free article] [PubMed] [Google Scholar]
- 4.Cui Y., Franciszkiewicz K., Mburu Y.K., Mondot S., Le Bourhis L., Premel V., Martin E., Kachaner A., Duban L., Ingersoll M.A., et al. Mucosal-associated invariant T cell-rich congenic mouse strain allows functional evaluation. J. Clin. Invest. 2015;125:4171–4185. doi: 10.1172/JCI82424. [DOI] [PMC free article] [PubMed] [Google Scholar]
- 5.Treiner E., Duban L., Bahram S., Radosavljevic M., Wanner V., Tilloy F., Affaticati P., Gilfillan S., Lantz O. Selection of evolutionarily conserved mucosal-associated invariant T cells by MR1. Nature. 2003;422:164–169. doi: 10.1038/nature01433. [DOI] [PubMed] [Google Scholar]
- 6.Dunn L., Prosser H.C.G., Tan J.T.M., Vanags L.Z., Ng M.K.C., Bursill C.A. Murine Model of Wound Healing. J. Vis. Exp. 2013:e50265. doi: 10.3791/50265. [DOI] [PMC free article] [PubMed] [Google Scholar]
- 7.Constantinides M.G., Link V.M., Tamoutounour S., Wong A.C., Perez-Chaparro P.J., Han S.-J., Chen Y.E., Li K., Farhat S., Weckel A., et al. MAIT cells are imprinted by the microbiota in early life and promote tissue repair. Science. 2019;366:eaax6624. doi: 10.1126/science.aax6624. [DOI] [PMC free article] [PubMed] [Google Scholar]
- 8.Leng T., Akther H.D., Hackstein C.-P., Powell K., King T., Friedrich M., Christoforidou Z., McCuaig S., Neyazi M., Arancibia-Cárcamo C.V., et al. TCR and Inflammatory Signals Tune Human MAIT Cells to Exert Specific Tissue Repair and Effector Functions. Cell Rep. 2019;28:3077–3091.e5. doi: 10.1016/j.celrep.2019.08.050. [DOI] [PMC free article] [PubMed] [Google Scholar]
- 9.Autengruber A., Gereke M., Hansen G., Hennig C., Bruder D. Impact of enzymatic tissue disintegration on the level of surface molecule expression and immune cell function. Eur. J. Microbiol. Immunol. 2012;2:112–120. doi: 10.1556/EuJMI.2.2012.2.3. [DOI] [PMC free article] [PubMed] [Google Scholar]
Associated Data
This section collects any data citations, data availability statements, or supplementary materials included in this article.
Data Availability Statement
This study did not generate new data or code.