

Abstract
Klebsiella pneumoniae is a clinically significant, Gram-negative pathogen. Production of extracellular polysaccharide is a key virulence factor of K. pneumoniae. Extracellular polysaccharide such as capsule and its related feature, mucoviscosity play a significant role in K. pneumoniae infection. In this article, we have explained several standard protocols used to characterize extracellular polysaccharide of K. pneumoniae. Several of these protocols are modified to be adapted specifically for K. pneumoniae. The included protocols describe methods to purify and quantify the extracellular polysaccharide of K. pneumoniae. Additionally, we have presented a standardized protocol to quantify K. pneumoniae mucoviscosity, which is a unique K. pneumoniae feature related to extracellular polysaccharide. These protocols will help create a uniformity in standard protocols used in K. pneumoniae extracellular polysaccharide studies.
Keywords: Klebsiella pneumoniae, extracellular polysaccharide, capsule, hypermucoviscosity, silver stain
INTRODUCTION:
Klebsiella pneumoniae, a clinically important human pathogen, is globally responsible for a considerable amount of mortality and morbidity (Ikuta et al., 2022). The acquisition of virulence-associated genes and antimicrobial resistance from closely related species has complicated clinical management of K. pneumoniae infections. K. pneumoniae virulence is dependent on various factors such as capsular polysaccharide (K-antigen), mucoviscosity, lipopolysaccharide (O-antigen), siderophores, and fimbriae. Capsular polysaccharide (CPS) is a prominent extracellular polysaccharide (EPS) synthesized by K. pneumoniae. So far, more than 80 capsular types have been identified in K. pneumoniae complex (Pan et al., 2015). Additionally, hypermucoviscosity is a unique virulence feature of K. pneumoniae characterized by sticky bacterial colonies. It is associated with changes in capsule polymer chain length (Ovchinnikova et al., 2023; Khadka and Ring et al., 2023). The capsule protects K. pneumoniae from opsonophagocytosis and complement-mediated killing, while hypermucoviscosity is often associated with increased dissemination in the host (Domenico et al., 1994; Mike et al., 2021). Given the pivotal role of EPS and related features in K. pneumoniae virulence and infection, there is a critical need to establish tools and techniques for studying K. pneumoniae EPS. Although some tools and techniques are available, they either lack standardization or are primarily explained for other bacterial species, requiring adaptation in K. pneumoniae.
In this article, we present an extensive list of protocols that facilitate the characterization of extracellular polysaccharides in K. pneumoniae. These protocols employ routinely available reagents and instruments and have been consistently followed by our research group with excellent reproducibility. We believe that the standardized assays explained here will help form a uniform approach to studying K. pneumoniae EPS.
Basic Protocol 1 describes K. pneumoniae extracellular polysaccharide extraction and purification. Basic Protocol 2 details large-scale purification of extracellular polysaccharide. Basic Protocol 3 explains the use of uronic acid measurement to quantify K. pneumoniae extracellular polysaccharide abundance. Further, Basic Protocol 4 describes a combined Alcian blue-silver stain technique to visualize purified extracellular polysaccharide. Finally, Basic Protocol 5 and Alternate Protocol 5 detail the use of a sedimentation resistance assay to quantify K. pneumoniae mucoviscosity. Support Protocol 5 facilitates in the adapting of the sedimentation assay between 96-well plate and cuvette-based platforms.
CAUTION: K. pneumoniae is a Biosafety Level 2 pathogen. Appropriate biosafety guidelines and regulations on handling pathogenic microorganisms must be followed.
CAUTION: Some of the protocols in this article require handling corrosive and flammable chemical reagents. Appropriate guidelines and regulation of handling hazardous chemicals should be followed. Wear protective personal equipment and handle such reagents in a fume hood.
BASIC PROTOCOL 1. EXTRACELLULAR POLYSACCHARIDE ISOLATION AND PURIFICATION
This protocol describes a method to isolate and purify surface-associated and cell-free (non-attached) extracellular polysaccharide of K. pneumoniae. The protocol is based on a previously reported method and has been well-established for K. pneumoniae (Anderson et al., 2017; Favre-Bonte et al., 1999; Mike et al., 2021). A K. pneumoniae culture is subjected to detergent treatment to release capsular polysaccharides from the bacterial cell surface into the supernatant. Cold ethanol is used to precipitate the extracellular polysaccharides and rehydrated to dissolve. This protocol provides a high-throughput method to obtain purified extracellular polysaccharides from a large number of samples at once for quick quantification and/or staining of the extracellular polysaccharides produced by the bacteria.
Materials:
Isolated colonies of any K. pneumoniae strain on a nutrient agar plate [e.g. K. pneumoniae ATCC 43816 (KPPR1) on Low-salt Luria Bertani (LB) broth (see Reagents and Solutions)
1X phosphate buffered saline (PBS; sterile or non-sterile)
1% Zwittergent 3-14 in 100 mM citric acid (see Reagents and Solutions)
Anhydrous ethanol (Fisher Scientific, Cat # A405P-4)
Ultrapure water
Pipettor and sterile pipette tips (200 μL and 1000 μL)
Pipette controller (e.g. MidSci, Cat #ASMPIP1)
5 or 10 mL sterile serological pipettes (e.g. Genesee Scientific, Cat #12-104)
Sterile applicator sticks (e.g. Fisher Scientific, Cat #22-029-491)
17 x 100 mm sterile aeration culture tubes (or other pertinent culture tube) (e.g. Genesee Scientific, Cat #21-131)
96-well flat bottom plate (sterile or non-sterile) (e.g. Genesee Scientific, Cat #25-104)
37°C shaking incubator (e.g. New Brunswick INNOVA 44/44R)
Vortex Mixer (e.g. Benchmark Scientific, Cat #BV1003)
Centrifuge 24 x 1.5/2 mL, ≥17,000 xg (e.g. Eppendorf Centrifuge 5425)
Refrigerated centrifuge 24 x 1.5/2 mL, ≥17,000 xg (e.g. Eppendorf Centrifuge 5425R)
Heat block set at 50°C (e.g. Eppendorf ThermoMixer C)
1.7 mL sterile microcentrifuge tubes (e.g. Genesee Scientific, Cat #24-282C)
Visible-spectrum microplate reader (e.g. Biotek EPOCH2)
Setting up overnight cultures of KPPR1:
-
1
Label three 17 x 100 mm culture tubes for three biological replicates. Include one additional tube for a negative growth control.
We recommend including three biological replicates per strain or condition for each independent experiment. Include wild type strain as a positive control if isolating and purifying extracellular polysaccharide from a mutant strain.
-
2
Add 3 mL of low-salt LB broth to each tube.
If plasmid maintenance is critical, add plasmid-relevant antibiotic (or other agent) to maintain the selection pressure. However, include appropriate controls to ensure that the added agent does not affect the phenotype under study.
-
3
Use a sterile applicator stick or inoculating loop to introduce one bacterial colony to each tube, except the negative growth control tube.
-
4
Incubate tubes at 37°C and 200 rpm for 16-18 hours in a 37°C shaking incubator.
Incubating the tubes at a 60° angle allows for proper aeration, which can impact experimental outcomes.
[Optional] Measuring overnight culture density:
-
5
Take a 96-well flat bottom plate and transfer 270 μL of 1X PBS into three wells. Transfer 300 μL of 1X PBS to three additional wells for blank correction.
-
6
Briefly vortex the tubes incubated overnight and pipette 30 μL of the culture into a corresponding well containing 270 μL of 1X PBS. Mix well by pipetting up and down 5-6 times.
Hypermucoviscous K. pneumoniae strains do not readily mix. Thus, ensuring that the culture is properly mixed with PBS is important. If inconsistent culture density readings are recorded, mix the culture by pipetting up and down for > 5-6 times.
-
7
Measure the absorbance of the blank controls and bacterial suspensions at 600 nm (OD600) in a 96-well plate reader.
-
8Calculate the overnight OD600 of the culture as described below.
Sample A600: OD600 of overnight sample at 600 nm
Blank A600: OD600 of 300 μL 1X PBS at 600 nm
Dilution factor: Ratio of total volume (culture + PBS) to culture volume used (e.g. 300 μL total sample volume/30 μL bacterial culture = 10 dilution factor)
Plate to cuvette conversion factor: Converts absorbance reading from the pathlength in a 96-well plate to a standard 1 cm pathlength in a cuvette (1.181599). This should be experimentally determined for each microplate spectrophometer. Refer to Support Protocol 5 for conversion factor determination.
Alternatively, a serial dilution of the sample can be plated to determine the colony forming units (CFU) per mL for normalization.
Extracellular polysaccharide purification:
-
9
Use one clean 1.7 mL tube per sample. Transfer 50 μL of 1% Zwittergent 3-14 in 100 mM citric acid, pH 2 to each 1.7 mL tube.
Adding Zwittergent to samples releases extracellular polysaccharide attached to the cell surface thus, purifying total extracellular polysaccharide (total EPS) in the sample [i.e., cell-attached capsular polysaccharide (CPS) and non-attached extracellular polysaccharide (EPS) in the culture supernatant.)
Alternatively, transfer 50 μL of ultrapure water (not Zwittergent) to purify only non-attached EPS (i.e., extracellular polysaccharide presents in the culture supernatant).
-
10
Add 250 μL of well-vortexed overnight culture samples to the Zwittergent-containing tubes and mix well by inverting the tubes multiple times.
To purify non-attached EPS, the water-sample mixture can be left on the bench until the total EPS samples are ready, or immediately proceed to Step 12.
-
11
Incubate the Zwittergent-sample mixture at 50°C for 20 minutes, inverting periodically in a heat block.
-
12
Centrifuge the Zwittergent/water-sample mixture at 17,000 xg for 5 minutes.
Meanwhile, label one clean 1.7 mL tube for each sample and add 400 μL of ice-cold absolute ethanol. Keep the tubes on ice until you are ready to proceed to the next step.
-
13
Carefully transfer 100 μL of the supernatant to the 1.7 mL tube containing 400 μL of absolute ethanol (80% final ethanol concentration) and mix by inverting the tube.
Depending on the polysaccharide amount present in the supernatant, a visible white precipitate of polysaccharide can be observed.
-
14
Incubate the supernatant-ethanol-containing tube on ice for at least 20 minutes.
Tubes can be incubated on ice for longer than 20 minutes. Longer incubation should not affect final capsule purification.
-
15
Centrifuge the tubes at 17,000 xg at 4°C for 5 minutes.
-
16
Decant and discard the supernatant carefully and let the tubes dry at room temperature for 5-10 minutes.
-
17
Add 200 μL ultrapure water to the tubes and vortex for 5-10 seconds.
-
18
Incubate the tubes at 37°C for 30 minutes to solubilize the polysaccharide and vortex again.
-
19
Store the purified, hydrated polysaccharide samples at −20°C or proceed directly to Basic Protocol 3.
BASIC PROTOCOL 2. LARGE-SCALE ISOLATION AND PURIFICATION OF EXTRACELLULAR POLYSACCHARIDE
This protocol is a modification of Basic Protocol 1 and illustrates a method of large-scale extraction and purification of K. pneumoniae extracellular polysaccharide. The process involves extracting polysaccharides from the bacterial cell surface using a detergent which is then precipitated using ethanol. The precipitated polysaccharides are dialyzed over several days while treating with nuclease and proteinase to remove the contaminating nucleic acids and proteins (Alvarez & Cobb, 2019). The polysaccharide sample obtained using the method described below can be used for further chemical analysis such as composition analyses by mass spectrometry or HPLC.
Materials:
Isolated colonies of any K. pneumoniae strain on a nutrient agar plate [e.g. K. pneumoniae ATCC 43816 (KPPR1) on low-salt Luria-Bertani (LB)] (see Reagents and Solutions)
Low-salt LB broth (see Reagents and Solutions)
1% Zwittergent 3-14 in 100 mM citric acid (see Reagents and Solutions)
Ice-cold anhydrous ethanol (Fisher Scientific, Cat #A405P-4)
Ultrapure water
5% (w/v) sodium azide (see Reagents and Solutions)
Ribonuclease A (RNase, Worthington Biochemical Corp., Cat #LS005650)
Deoxyribonuclease I (DNase, Worthington Biochemical Corp., Cat #LS002007)
PRONASE (Millipore, Cat #537088-10KU)
1 M Tris, pH 7.5 (see Reagents and Solutions)
1 M CaCl2 (see Reagents and Solutions)
1 M MgCl2 (see Reagents and Solutions)
Pipettor and sterile pipette tips (200 μL and 1000 μL)
Pipette controller (e.g. MidSci, Cat #ASMPIP1)
5 or 10 mL sterile serological pipettes (e.g. Genesee Scientific, Cat #12-104)
Sterile applicator sticks (e.g. Fisher Scientific, Cat #22-029-491)
17 x 100 mm sterile aeration culture tubes (or other pertinent culture tube) (e.g. Genesee Scientific, Cat #21-131)
37°C shaking incubator (e.g. New Brunswick INNOVA 44/44R)
Plastic bucket, minimum 1 L volume (e.g. Eisco Labs 5000 mL plastic beaker)
Vortex Mixer (e.g. Benchmark Scientific, Cat #BV1003)
2 mL microcentrifuge tubes (e.g. Genesee Scientific, Cat #24-283)
15 mL sterile conical tube (e.g. Griener Bio-One CELLSTAR, Cat #181-271)
50 mL sterile conical tubes (e.g., USA Scientific, Cat #5622-7261)
Centrifuge 24 x 1.5/2 mL, minimum speed 17000 xg (e.g. Eppendorf Centrifuge 5425)
Refrigerated centrifuge, fixed-angle rotors able to fit 50 mL conical tubes, minimum speed 15,000 xg (e.g. Eppendorf Centrifuge 5910Ri)
Heat block set at 50°C (e.g. Eppendorf Thermomixer C)
4°C refrigerator or 4°C cold room
Magnetic stirrer (e.g. Benchmark Scientific, Cat #H4000-HS/H4000-S)
Dialysis membrane, ≤18 mm wide, 25 kD molecular weight cut-off (Spectra/Por 6 Regenerated Cellulose Dialysis Membrane, Repligen, Cat #128218)
Dialysis tubing closures, ≤35 mm (Spectra/Por 6 Closures, Repligen, Cat #132736)
Sterile Syringes, 10 mL (e.g. Fisher Scientific, Cat #14-955-459)
Syringe Filters, 0.2 μm pore size (Fisher Scientific, Cat #13-100-106)
Rotating shaker (e.g. Labline Instruments, Cat #1314)
Clean borosilicate glass vials with screw cap (Vial volume depends on sample volume)
Lyophilizer (e.g. FreeZone 1 Liter Benchtop Freeze Dry System, Labconco Cat #7740020)
Day 1: Inoculation and incubation of KPPR1
-
1
Inoculate the strains of interest into 3 mL of LB broth in a 17 x 100 mm culture tube and incubate at 37°C and 200 rpm for 16-18 hours.
Day 2: Extraction of extracellular polysaccharide (EPS)
-
2
Sub-culture the overnight culture in 1:100 ratio into 3 mL LB and incubate at 37°C with shaking (200 rpm).
-
3
Incubate the culture until it reaches mid-log growth phase.
KPPR1 in LB reaches mid-log growth when OD600 is within the range of 0.4 – 0.6 which takes around 3 hours at 37°C and 200 rpm.
-
4
For each sample, transfer 500 μL of 1% Zwittergent 3-14 in 100 mM citric acid to a clean 2 mL tube.
-
5
Add 1.5 mL of mid-log phase culture to the respective tube containing zwittergent. Mix well by inverting the tube.
-
6
Incubate the tubes at 50°C for 20 minutes.
-
7
Following incubation, centrifuge the tubes at 21,000 xg for 5 minutes.
Meanwhile, for each sample, transfer 6 mL of ice-cold absolute ethanol into a sterile 15 mL conical tube. The final concentration of ethanol will be 80% after mixing with 1.5 mL of Zwittergent-treated bacterial supernatant.
-
8
Carefully transfer 1.5 mL of supernatant to the conical tube containing ethanol. Mix by inverting and incubate on ice for 30 minutes.
A visible precipitate of extracellular polysaccharides (or opaque solution) can be observed upon mixing ethanol and supernatant (Figure 1).
-
9
Centrifuge the conical tube at 15,000 xg for 5 minutes at 4 °C.
-
10
Remove the supernatant carefully and discard. Add 2 mL of ultrapure water. Incubate the tube at room temperature for 30 minutes on a rotator to rehydrate the polysaccharide pellet.
Meanwhile, prepare 1 L of ultrapure water (per sample) in a bucket to use for dialysis.
-
11
Transfer the 2 mL of rehydrated sample to a 25 kD cut-off dialysis membrane and secure with tube closures. Dialyze against 1 L ultrapure water for 1 hour at room temperature with constant stirring.
-
12
After 1 hour, transfer the dialysis tubing to 1 L of fresh ultrapure water containing 0.05% sodium azide (add 10 mL of 5% (w/v) sodium azide per 1 L ultrapure water). Dialyze with constant stirring overnight at 4°C.
Figure 1:
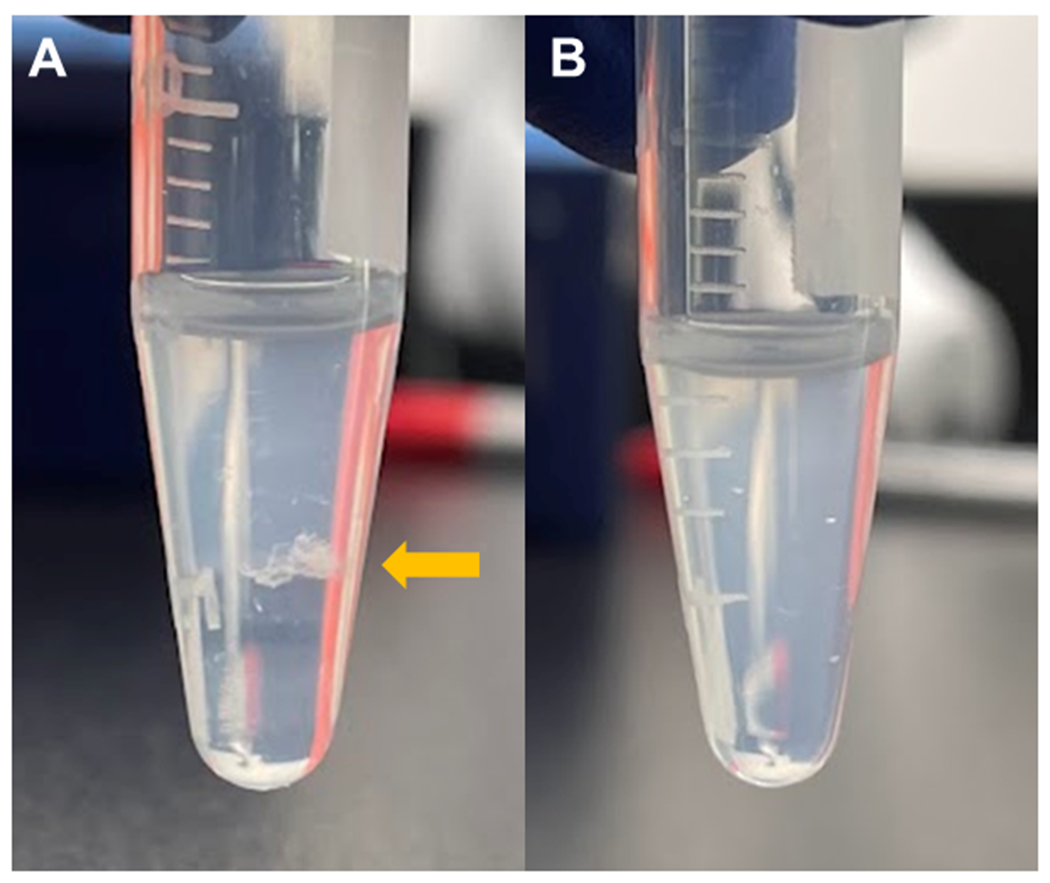
A visible precipitate is formed when supernatant containing capsular material is mixed with ice-cold ethanol. (A) White precipitate (yellow arrow) of capsular material formed with ice-cold ethanol in KPPR1. (B) No visible precipitate is formed by extracted product from the acapsular KPPR1 wza mutant.
Day 3: Nuclease treatment of EPS
-
13
Transfer the dialysis tubing to 1 L of fresh ultrapure water containing 0.05% sodium azide. Dialyze with constant stirring at room temperature for 8-10 hours.
-
14
Prepare 2 mL of nuclease solution by adding 6 mg RNase A and 1.4 mg DNase to 1 mL of 1 M Tris, pH 7.5, 20 μL 1 M CaCl2, 20 μL MgCl2 and 1 mL ultrapure water. Sterilize the solution by filtering through a 0.2 μm syringe filter.
Store the left-over nuclease solution at −20°C for up to one year.
-
15
Remove the sample from the dialysis membrane and transfer it to a clean 15 mL conical tube. Add 20 μL of 5% sodium azide (final concentration 0.05%) and bring the final volume to 2 mL with sterile ultrapure water.
-
16
Add 220 μL of the nuclease solution to the 2 mL sample to achieve a final concentration of 0.3 mg/mL RNase and 0.07 mg/mL DNase in 50 mM Tris, 1 mM CaCl2 and 1mM MgCl2.
-
17
Incubate the nuclease-added sample at 37°C with shaking (200 rpm), overnight.
Day 4: Proteinase treatment of EPS
-
18
Test the pH of the nuclease-treated sample by adding few drops of the solution onto a pH strip. If the pH is not ~7.5, then adjust the pH by slowly adding either weak acid or base.
Proteinase, added in the next step, requires the sample pH to be within the range of 7-8 for optimal activity.
-
19
Prepare 2 mL of proteinase solution by adding 6.6 mg PRONASE to a solution of 100 μL 1M Tris, pH 7.5, 2 μL 1 M CaCl2 and 1880 μL sterile ultrapure water to get a final concentration of 3.3 mg/mL proteinase in 50 mM Tris, pH 7.5 with 1 mM CaCl2. Sterilize the solution using a 0.2 um syringe filter and store at 4°C.
-
20
Add proteinase solution to the nuclease-treated sample at a 1:10 ratio (proteinase:sample). For example, add 240 μL proteinase solution to 2.2 mL nuclease-treated sample. This will achieve a final concentration of 50 mM Tris, 1 mM CaCl2, 0.33 mg/mL proteinase.
Store left-over proteinase solution at 4°C, which is stable for up to six months.
-
21
Add 2.4 μL 5% sodium azide to get a final concentration of 0.05% sodium azide.
The sodium azide added at this step is to account for the volume of proteinase added in the Step 20. Maintaining 0.05% sodium azide ensures that the isolated polysaccharides are not contaminated during the long purification process.
-
22
Incubate the proteinase-containing sample at 37°C overnight with shaking (200 rpm).
The leftover proteinase can be stored at 4 °C for several months for future use.
Day 5: Ethanol precipitation of EPS
-
23
Add in another 260 μL proteinase solution and 2.6 μL 5% sodium azide (0.05% final concentration). Then, incubate at 37°C for 2 hours with shaking (200 rpm).
-
24
Inactivate the proteinase by adding 1 M EDTA, pH 8 to a final concentration of 50 mM EDTA. For example, add 135 μL 1 M EDTA, pH 8 to ~2.6 mL nuclease- and proteinase-treated sample.
-
25
Mix the EDTA-sample solution on a rotating shaker for 30 minutes at 4°C.
-
26
Add 2 M NaCl to a final concentration of 200 mM. For example, add 273 μL 2 M NaCl to ~2.73 mL sample.
-
27
Add pre-chilled absolute ethanol at a 1:4 (sample:ethanol) ratio to get a final ethanol concentration of 80% ethanol. For example, add 12 mL ethanol to ~3 mL sample.
-
28
Leave the sample to precipitate at −20°C overnight.
Sample can be precipitated longer over several days.
Day 6: Rehydrating EPS precipitate
-
29
Centrifuge the ethanol-precipitated sample at 10,000 xg for 1 hour at 4°C.
-
30
Carefully, remove the supernatant. Then, let the sample dry by inverting the tube at a downgrade angle over clean absorbent paper in a biosafety cabinet for 2 hours.
Invert the tube in a slanted position to allow the air to flow within the tube. The cap of the tube can be used as a base to hold the tube in slanted position.
-
31
Resuspend the pellet in 1.5 mL of sterile ultrapure water and incubate at 37°C with shaking (200 rpm) for 1.5 hour to rehydrate the polysaccharides.
-
32
[Optional] Transfer the sample to a 25 kD cut-off dialysis membrane and dialyze against 1 L ultrapure water with 0.05% sodium azide for 1-2 hours at room temperature with constant stirring. Use 1 L ultrapure water per 2-3 mL sample.
-
33
If dialysis was done in the previous step, simply change the water with 0.05% sodium azide and dialyze overnight at 4 °C with constant stirring. Otherwise, transfer the sample from Step 31 to 25 kD cut-off dialysis membrane and dialyze against 1 L ultrapure water with 0.05% sodium azide overnight, at 4°C with constant stirring. Use 1 L ultrapure water per 2-3 mL sample.
Day 7: Freezing of purified EPS
-
34
Dialyze the sample once more against 1 L ultrapure water with 0.05% sodium azide at room temperature for 8 hours.
At this point, take a clean glass vial and record the tare weight of the vial.
-
35
Transfer the sample to a clean glass vial and freeze the sample at −20°C overnight.
Sample can be stored frozen for longer over several days.
Day 8: Lyophilization
-
36
Remove the lid of the tube and wrap the opening with parafilm. Then, poke small holes through the parafilm.
-
37
Freeze-dry the sample in a lyophilizer for 14-18 hours at ~0.1 Torr pressure and collector temperature of −40°C.
Day 9: EPS storage
-
38
Following freeze-drying, take the dry weight of the lyophilized purified polysaccharide and store at −20°C.
Dry weight of purified extracellular polysaccharide = weight of the vial with the sample – weight of the empty vial
BASIC PROTOCOL 3. URONIC ACID QUANTIFICATION OF EXTRACELLULAR POLYSACCHARIDE
This protocol illustrates a method to quantify extracellular polysaccharides produced by K. pneumoniae. Extracellular polysaccharide purified using Basic Protocol 1 is acid hydrolyzed by boiling with sodium tetraborate in sulfuric acid. The quantity of uronic acid present is detected by conjugation of the free hexuronic acids to the 3-phenylphenol chromagen. The change in absorbance before and after the addition of 3-phenylphenol is measured to deduce the concentration of glucuronic acid present in the sample (Blumenkrantz & Asboe-Hansen, 1973). Measuring the glucuronic acid concentration is an indirect way of quantifying total K. pneumoniae extracellular polysaccharide as it does not quantify neutral sugar content (Anderson et al., 2017; Khadka and Ring et al., 2023; Mike et al., 2021). This protocol provides a quantitative method to measure the amount of extracellular polysaccharide produced by K. pneumoniae.
Materials:
Purified extracellular polysaccharides (see Basic Protocol 1)
3-Phenylphenol (Sigma-Aldrich, Cat #262250)
0.125 M Sodium hydroxide (see Reagents and Solutions)
0.0125 M sodium tetraborate in concentrated sulfuric acid (>95%) (see Reagents and Solutions)
Glucuronic acid standards; 100, 50, 25, 12.5, 6.25, 3.125 μg/mL (see Reagents and Solutions)
Ice-filled bucket
Vortex Mixer (e.g. Benchmark Scientific, Cat #BV1003)
Pipettor and sterile pipette tips (10-20 μL)
Multichannel pipettor and filter-tips (1000 μL)
Pipette controller (e.g. MIDSCI, Cat #ASMPIP1)
10 mL Serological pipettes (e.g. Genesee Scientific, Cat #12-104)
Timer
1.7 mL microcentrifuge tubes (e.g. Genesee Cat #24-282C)
1.7 mL tube lid locks
Heat block set to 100°C (e.g. MIDSCI, Cat #ASDRYBATH5)
1.5 mL disposable cuvettes (e.g. Fisher Scientific, Cat #14-955-127)
Visible-spectrum cuvette spectrophotometer (e.g. Thermo Scientific GENESYS 30)
Extracellular polysaccharide purification and preparation:
Refer to Basic Protocol 1 for extracellular polysaccharide purification. Record the culture OD600 or determine the colony forming units per mL (CFU/mL) for each sample for down-stream normalization. Refer to steps 5 through 8 in Basic Protocol 1 to measure culture OD600.
-
Thaw frozen glucuronic acid standards and any stored experimental samples prepared using Basic Protocol 1 at room temperature. In the meantime, prepare 0.3% (3 mg/mL) w/v 3-phenylphenol in 0.125 M NaOH (e.g. 0.003 g 3-phenylphenol in 1 mL of 0.125 M NaOH).
Important! Prepare 3-phenylphenol fresh before the assay. Storage for longer than one day can affect the performance of 3-phenylphenol. An alternative name for 3-phenylphenol is 3-hydroxydiphenyl.
Once completely thawed, transfer 200 μL of each glucuronic acid standard to a new 1.7 mL microcentrifuge tube labelled appropriately. Include 200 μL of ultrapure water in a separate tube as a blank.
-
Vortex the extracellular polysaccharide samples briefly. Then, in a chemical hood, add 1.2 mL of 0.0125 M sodium tetraborate in concentrated sulfuric acid to 200 μL of polysaccharide sample, and each of the glucuronic acid standards and blank.
Caution: Follow appropriate safety measure such as putting on protective eyewear, gloves and lab coat, while handling sulfuric acid.
-
Mix by inverting the tubes then incubate the samples with lid locks at 100°C for 5 minutes in heat block.
Important! Proper mixing of solution in the tube is important for consistency in the absorbance measurement.
Caution: Always use lid locks while incubating at 100°C to avoid accidental opening of tubes during incubation.
-
Cool the samples down to room temperature by incubating the tubes in ice for 5 minutes.
Caution: Do not incubate tubes in ice for too long. Solutions chilled in ice for longer than usual can affect absorbance measurement by producing condensation on the cuvette walls.
Once cooled, transfer the standards and each sample to a labelled cuvette.
Take the absorbance of the standards and samples at 520 nm after measuring the baseline with the ‘blank’ sample.
-
Add 10 μL of 0.3% (3 mg/mL) w/v 3-phenylphenol in 0.5% (0.125 M) NaOH to each cuvette and mix by gently pipetting up and down.
Caution: Use filter-tips to prevent acid fumes from corroding the pipettor.
Using a multichannel pipettor with adjustable tip spacing (e.g. Eppendorf Move It Pipette, Cat #3125000206) can speed up the process and improve absorbance reading consistency. A lag time of 20 minutes or more between the first and the last sample can affect absorbance measurements.
Measure a second round of absorbance at 520 nm for each sample including the ‘blank’.
- Calculate the uronic acid concentration as described below:
- Subtract the first A520 from the second A520 reading to get ΔA520 for every sample including the blank and standards.
- Plot the ΔA520 of each standard and blank on the y-axis and respective uronic acid concentration (in μg/mL) on the x-axis. Calculate the slope and y-intercept from the linear standard curve using y = mx + b, where m is the slope and b is the y-intercept.
- Calculate uronic acid concentration in each sample as:
- Normalize the uronic acid concentration of each sample to its respective overnight OD600 or CFU/mL.
-
Calculate total, cell-attached and non-attached extracellular polysaccharide (EPS) as described below.
Total EPS = Uronic acid in Zwittergent-purified sample
Non-attached EPS = Uronic acid in ultrapure water-purified sample
Cell-attached EPS = Total EPS – non-attached EPS
Wipe all surfaces that came in contact with sodium tetraborate in sulfuric acid using a damp paper towel and dispose of the hazardous waste following institutional guidelines.
BASIC PROTOCOL 4. EXTRACELLULAR POLYSACCHARIDE VISUALIZATION BY SDS-PAGE
This protocol illustrates an optimized method to visualize purified K. pneumoniae extracellular polysaccharide via SDS-PAGE using a combination of Alcian blue and silver stain. The combination staining protocol was adapted to K. pneumoniae extracellular polysaccharide from previously described methods (Khadka and Ring et al., 2023; Ovchinnikova et al., 2023; Tipton & Rather, 2019). Extracellular polysaccharides purified from K. pneumoniae using Basic Protocol 1 are resolved using a gradient SDS-PAGE gel. Polysaccharides are stained with Alcian blue and then enhanced by silver stain. The protocol takes a minimum of two days to complete. This protocol serves as a useful tool to examine extracellular polysaccharide chain length diversity.
Materials:
Isolated colonies of any K. pneumoniae strain on a nutrient agar plate [e.g. K. pneumoniae ATCC 43816 (KPPR1) on low-salt Luria-Bertani (LB) plates] (see Reagents and Solutions)
Low-salt LB broth (see Reagents and Solutions)
1X phosphate buffered saline (PBS; sterile or non-sterile)
1% Zwittergent 3-14 in 100 mM citric acid (see Reagents and Solutions)
Anhydrous ethanol (e.g. Fisher Scientific, Cat #A405P-4)
Ultrapure water
4X SDS-PAGE loading buffer (see Reagents and Solutions)
4-15% Mini-PROTEAN TGX Stain-Free Protein Gel (BioRad, Cat #4568083)
Tris-glycine-SDS gel running buffer (see Reagents and Solutions)
Precision Plus Protein All Blue Prestained Protein Standards (Biorad, Cat #1610373)
0.1% Alcian blue solution (see Reagents and Solutions)
Alcian blue stain base solution (see Reagents and Solutions)
Pierce Silver Stain Kit (ThermoFisher Scientific, Cat #24612)
10% ethanol (see Reagents and Solutions)
Silver stain gel fixing solution (see Reagents and Solutions)
Stop solution (5% Acetic acid solution, see Reagents and Solutions)
Pipettor and pipette tips (200 μL and 1000 μL)
17 x 100 mm sterile aeration culture tubes (or other pertinent culture tube) (e.g. Genesee Scientific, Cat #21-131)
96-well flat bottom plate (sterile or non-sterile) (e.g. Genesee Scientific, Cat #25-104)
37°C shaking incubator (e.g. New Brunswick INNOVA 44/44R)
Vortex Mixer (e.g. Benchmark Scientific, Cat #BV1003)
Centrifuge 24 x 1.5/2 mL, ≥17,000 xg (e.g. Eppendorf Centrifuge 5425)
Refrigerated centrifuge 24 x 1.5/2 mL, ≥17,000 xg (e.g. Eppendorf Centrifuge 5425R)
Heat block set at 50°C (e.g. Eppendorf ThermoMixer C)
Visible-spectrum microplate reader (e.g. BioTek EPOCH2)
1.7 mL and 2 mL sterile microcentrifuge tubes (e.g. Genesee Scientific, Cat #24-282C and Cat #24-283)
Electrophoresis Cell (e.g. Biorad Mini-PROTEAN Tetra Vertical Electrophoresis Cell; Cat #1658004)
Ice-pack able to fit in the electrophoresis cell
Power supply (e.g. Biorad PowerPac Basic Power Supply; Cat #1645050)
Clean staining tray able to fit 8.6 x 6.7 cm gel (glass or plastic)
Benchtop rotator (e.g. Lab-Line, Cat #21580)
Gel imaging system (Syngene G:box Chemi XX6/XX9)
Extracellular polysaccharide purification and preparation:
-
1
Refer to Basic Protocol 1 steps 1 through 8 to setup overnight cultures and measure culture density.
-
2
Take 1.5 OD600 equivalent of culture in a 1.7 mL or 2 mL tube.
For example, KPPR1 grown in LB for 16 hours has an OD600 value of 2.50. The volume of culture equivalent to 1.5 OD600 = 1.5/2.50 = 0.6 mL of sample.
NOTE: If the 1.5 OD600 equivalent culture exceeds 2 mL, consider dividing the sample between two or more 2 mL tubes and proportionately adjust the volume of reagent added to each tube.
-
3
Bring the final volume of each sample equal to the highest sample volume used.
For example, if the volumes equivalent to 1.5 OD600 of Sample A, B and C are 0.9 mL, 0.7 mL and 0.5 mL, then add 0.9 – 0.7 mL = 0.2 mL and 0.9 – 0.5 = 0.4 mL of 1X PBS to Sample B and C, respectively.
Directly go to step 8 if extracting cell-free extracellular polysaccharide. Steps 4 through 7 are required for cell-attached capsular polysaccharide only. These steps wash the cell pellet and remove any extracellular polysaccharide suspended in the supernatant.
-
4
Centrifuge the normalized samples at 21,000 xg for 15 minutes.
-
5
Remove all supernatant except 50 μL and resuspend the pellet in 950 μL 1X PBS.
-
6
Centrifuge at 21,000 xg for 15 minutes.
-
7
Remove 750 μL of the upper supernatant, leaving behind about 250 μL of the pellet and supernatant solution.
-
8
Add 50 μL of 1% Zwittergent 3-14 in 100 mM citric acid, pH 2 to a final ratio of 1:5 (Zwittergent:Sample) and mix well by inverting the tubes.
Adding Zwittergent 3-14 in this step extracts cell-attached capsular polysaccharide. Alternatively, add ultrapure water in 1:5 ratio (water:sample) and go to step 10 directly if extracting cell-free extracellular polysaccharide.
-
9
Incubate the Zwittergent-sample mixture at 50°C for 20 minutes in a heat block.
-
10
Centrifuge the mixture at 17,000 xg for 5 minutes.
Meanwhile, label clean 1.7 mL tubes and add 400 μL of ice-cold absolute ethanol. Keep the tubes on ice until you are ready to proceed to next step.
-
11
Carefully transfer 100 μL of the supernatant to the 1.7 mL tube containing 400 μL absolute ethanol (80% final ethanol concentration) and mix by inverting the tube.
Depending on the polysaccharide amount present in the supernatant, a visible white precipitate of polysaccharides can be observed.
-
12
Incubate the supernatant-ethanol containing tube on ice for 20 minutes.
Tubes can be incubated on ice for longer than 20 minutes. Longer incubation should not affect the polysaccharide purification.
-
13
Centrifuge the tubes at 17,000 xg at 4°C for 5 minutes.
-
14
Decant the supernatant carefully and let the tubes dry at room temperature for 5-10 minutes.
-
15
Add 200 μL ultrapure water to the tubes and vortex for 5-10 seconds.
-
16
Incubate the tubes at 37°C for 30 minutes to solubilize the polysaccharides and vortex again before proceeding to the next step.
-
17
In a new set of tubes containing 25 μL of 4X SDS-PAGE loading buffer, add 75 μL of purified polysaccharide solution and vortex briefly.
Pause Point: At this point, the purified polysaccharide samples and polysaccharide-containing loading buffer samples can be stored at −20°C or immediately advanced to the next step.
SDS-PAGE of purified extracellular polysaccharide:
-
18
Take the tape off the bottom of a pre-cast 4-15% SDS-PAGE gel and fit the gel in a running module. Insert the running module into the electrophoresis cell.
-
19
Add the ice pack in the electrophoresis cell and fill the tank to the top or ‘4 gels’ mark with Tris-Glycine-SDS gel running buffer.
-
20
Clean the gel wells by flushing them with running buffer using a P1000 pipette. Gently pipette up and down the running buffer to clean the wells.
-
21
Load 20 μL of sample into the respective well and include one well with 12-15 μL of Precision Plus Protein All Blue Prestained standards as a molecular weight marker.
-
22
Transfer the gel-fitted electrophoresis cell into a bucket filled with ice. Cover the four sides of the electrophoresis cell with ice to keep it cold.
-
23
Transfer the ice-filled bucket containing the prepared apparatus with electrophoresis cell to a 4 °C refrigerator or cold room.
-
24
Connect the electrophoresis cell to power supply and run the gel at 300 V for 4-5 hours.
Staining of extracellular polysaccharide with Alcian blue:
-
25
Following SDS-PAGE, carefully remove the gel from the cassette and transfer it to a box containing 200 mL of ultrapure water. Wash the gel in ultrapure water for 10 minutes, a total of five times.
-
26
Stain the gel with 25-30 mL of 0.1% Alcian Blue Stain (or volume enough to cover the gel) at room temperature for 1 hour on a shaker.
-
27
Quickly wash the gel with Stain Base Solution to remove excess stain.
-
28
Once excess stain is removed, de-stain with 100-200 mL Stain Base Solution overnight at room temperature on a shaker.
Set the shaking speed at minimum to prevent Stain Base Solution from spilling over.
Staining with Pierce Silver Stain Kit:
-
29
Prepare Gel Fixing Solution, 10% ethanol and Stop Solution in advance.
-
30
Slowly drain the Stain Base Solution used for de-staining the gel and wash the gel in ultrapure water for 5 minutes twice.
-
31
Remove ultrapure water and add Gel Fixing Solution (30% ethanol:10% acetic acid solution) for 15 minutes. Repeat the process a total of two times.
Pause Point: The gel can be kept in the Fixing Solution overnight or immediately advanced to the next step.
In step 33 and the following steps, add a volume of each reagent enough to cover the whole gel. The volume required will depend on the size of the staining tray and size of the gel. Generally, 25 mL of a solution is enough to cover an 8.6 x 6.7 cm gel in a 4.5 x 3.4 x 1.1 in box.
-
32
Wash the gel for a total of two times in 10% ethanol solution.
-
33
Wash the gel in ultrapure water for 5 minutes, a total of two times.
While the gel is being washed, prepare Sensitizer Working Solution. A 25 mL Sensitizer Solution (enough for one mini-PROTEAN gel) is prepared by mixing 50 μL (1 part) Silver Stain Sensitizer and 25 mL (500 parts) ultrapure water.
-
34
Incubate the gel in Sensitizer Working Solution for 1 minute followed by washing twice with ultrapure water for 1 minute.
-
35
Prepare 25 mL of Stain Working Solution per gel by mixing 0.5 mL (1 part) Silver Stain Enhancer with 25 mL (50 parts) Silver Stain.
-
36
Incubate the gel in Stain Working Solution for 30 minutes.
Pause Point: The gel can be left in the Stain Working Solution for 5 minutes to overnight without a significant impact on stain performance.
While the gel is being stained, prepare 25 mL of Developer Working Solution by mixing 0.5 mL Silver Stain Enhancer and 25 mL Silver Stain Developer. Also, make sure that the Stop Solution is prepared.
-
37
Wash the stained gel quickly with ultrapure water two times for 20 seconds each.
-
38
Add Developer Working Solution and incubate with gentle shaking until dark brown bands start to appear.
Bands might start appearing as quickly as 10 seconds. Keeping Stop Solution in close reach will help in immediately stopping the band development further. Add Stop Solution shortly before the bands reach the desired band intensity, as the bands will continue to develop briefly after the Stop Solution is added. After 3 minutes, background signals might reach an undesirable level and mask polysaccharide bands.
-
39
When the desired contrast between polysaccharide bands is reached, discard the Developer Working Solution and immediately wash the gel with Stop Solution.
-
40
Add 25 mL of Stop Solution and incubate the gel for 10 minutes before imaging the developed gel.
Gel imaging:
-
41
Lay the gel on the white reflective plate of a Syngene G:box.
-
42
Select ‘Silver Stain’ imaging program within the ‘Visible Protein Gel’ settings of the Syngene G:box.
-
43
Capture the image.
Once the image is captured, adjust the settings and/or zoom to get the desired image.
BASIC PROTOCOL 5. Klebsiella pneumoniae MUCOVISCOSITY QUANTIFICATION BY SEDIMENTATION RESISTANCE ASSAY
This protocol presents a robust and precise method for quantifying mucoviscosity in K. pneumoniae through a sedimentation resistance assay. Increased mucoidy is speculated to increase the drag forces on the bacteria increasing the sedimentation resistance. However, this hypothesis necessitates experimental validation. The procedure encompasses culturing the bacterium, conducting low-speed centrifugation, and quantifying absorbance at OD600. By adhering to these systematic instructions, researchers can achieve consistent mucoviscosity measurements and discern hypermucoid K. pneumoniae strains with confidence. This assay serves as a valuable tool for characterizing the virulence potential and pathogenicity of different bacterial isolates, aiding in the study of K. pneumoniae infections.
Materials:
Isolated colonies of any K. pneumoniae strain on a nutrient agar plate [e.g. K. pneumoniae ATCC 43816 (KPPR1) on low-salt Luria-Bertani (LB) plates] (see Reagents and Solutions)
Low-salt LB broth (see Reagents and Solutions)
1X phosphate buffered saline (PBS; sterile or nonsterile)
Pipettor and sterile pipette tips (200 μL and 1000 μL)
17 x 100 mm sterile aeration culture tubes (or other pertinent culture tube) (e.g. Genesee Scientific, Cat #21-131)
37°C shaking incubator (e.g. New Brunswick INNOVA 44/44R)
2 mL microcentrifuge tubes (e.g. Genesee Scientific, Cat #24-283)
1.5 mL disposable, 1 cm cuvettes (e.g. Fisher Scientific, Cat #14-955-127)
Visible-spectrum cuvette spectrophotometer (e.g. Thermo Scientific GENESYS 30)
Centrifuge 24 x 1.5/2 mL, ≥17,000 xg (e.g. Eppendorf Centrifuge 5425)
Setting up overnight cultures of KPPR1:
-
1
Inoculate a single colony of KPPR1 into three 17 x 100 mm culture tubes containing 3 mL of low-salt LB broth. Incubate the culture overnight at 37˚C with aeration and continuous shaking (200 rpm) at a 60° angle.
Growing the cultures at a 60° angle produces optimal mucoviscosity production in strain KPPR1.
Measuring overnight culture density:
-
2
Briefly vortex the overnight cultures and transfer 100 μL of sample to a 1.5 mL disposable cuvette filled with 900 μL of PBS. Mix thoroughly by pipetting.
-
3
Measure the culture density (OD600) of the sample. Subtract the blank value and then multiply by 10 to account for the 1:10 dilution. The resulting value is the the OD600 of the overnight culture.
Sedimentation resistance measurement:
-
4
Gently vortex the overnight cultures and transfer 1 OD600 unit of the overnight culture into a 2 mL tube.
For example, a KPPR1 wildtype strain grown in LB for 16 hours has an OD600 value of 2.5. The volume of culture equivalent to 1 OD unit = 1/2.5 = 0.4 mL of sample. Use OD600 measured in step 3 to calculate 1 OD600 unit culture.
-
5
Add 1x PBS to the 2 mL tube for a final volume of 1 mL. Mix the contents thoroughly by vortexing.
Alternatively, if 1 OD600 unit is greater than 1 mL of culture volume, then transfer 0.5 OD600 culture in step 4 and add 1X PBS to get a final volume of 1 mL in step 5. At the final step, calculate the sedimentation resistance as supernatant OD600 per 0.5 OD600 unit.
-
6
Centrifuge the sample at 1,000 xg for 5 minutes to pellet the bacterial cells.
-
7
Transfer 900 μL of the upper supernatant into a cuvette.
It is crucial to handle the tubes with care during pipetting without disturbing the pellet to avoid overestimating the supernatant OD600. To achieve this, maintain the tube at an angle of 40-45°, slightly below the eye level with the corner containing pellet facing upward. This provides optimal separation of the supernatant and pellet, facilitating pipetting. While pipetting, gradually lower the pipette tip from the top to the bottom of the tube, gently drawing up the supernatant following the top surface of supernatant. This prevents inadvertent pipetting of the pellet. See Figure 2 for an illustration of this process.
-
8
Measure the OD600 of the supernatant.
-
9
Calculate the sedimentation resistance by taking the supernatant OD600 and dividing by the total OD600.
Figure 2:

Illustration of optimal handling positions to pipette the supernatant in the sedimentation resistance assay. (A) Tube is held at about 40-45° angle and the pellet-containing side of the tube is facing upwards. (B) Supernatant pipetting is started with the pipette tip just beneath the liquid surface then gradually going down to the tube bottom as the supernatant is pipetted. The pipette tip should always follow the top surface of the supernatant during pipetting.
ALTERNATE PROTOCOL 5. 96-WELL PLATE-BASED K. pneumoniae SEDIMENTATION RESISTANCE ASSAY
This alternate protocol describes the adaptation of the cuvette-based sedimentation resistance assay (Basic Protocol 5) to a 96-well plate-based format. A K. pneumoniae strain of interest is cultured in appropriate liquid growth media overnight. Following incubation, the culture density represented by absorbance at 600 nm is measured in a 96-well plate reader. An equal density of culture is centrifuged at slow speed and the density of cells (OD600) remaining in the supernatant is measured using a 96-well plate reader. This protocol requires following appropriate biosafety measures for working with a biosafety level-2 agent, such as K. pneumoniae. Generally, an increase in mucoviscosity is associated with increased sedimentation resistance. This adaption of Basic Protocol 5 provides an efficient way to measure mucoviscosity for a large number of strains.
Additional Materials:
96-well flat bottom plate (sterile or non-sterile) (e.g. Genesee Scientific, Cat #25-104)
Visible-spectrum microplate reader (e.g. Biotek EPOCH2)
Multichannel pipettor and pipette tips (200 or 300 μL) (e.g. USA Scientific, Cat #7112-3300)
12-well V-bottom reservoir (e.g. USA Scientific, Cat #3823-3412)
Setting up overnight cultures of KPPR1:
-
1
Take three (for triplicate data measurement) 17 x 100 mm culture tubes and label the tubes appropriately. Include one additional tube as a negative growth control.
-
2
Add 3 mL of low-salt LB broth to each tube.
If plasmid maintenance is critical to the strain, add the plasmid-relevant antibiotic (or other agent) to maintain the selection pressure. However, it is important to ensure that the added agent does not affect the phenotype under study using appropriate controls.
-
3
Suspend one colony of KPPR1 in each tube except the negative growth control tube. Place the cap in the venting position to allow for aeration.
-
4
Incubate the tubes at 37°C and 200 rpm for 16-18 hours in a 37°C shaking incubator.
It is critical to incubate the tubes at 60° inclination to allow for aeration. Changes in aeration can affect mucoviscosity.
Measuring overnight culture density:
-
5
Take a 96-well flat bottom plate and transfer 270 μL of 1X PBS into three wells. Transfer 300 μL of 1X PBS to three additional wells for blank correction.
-
6
Briefly vortex the tubes incubated overnight and pipette 30 μL of the culture into the respective wells containing 270 μL 1X PBS. Mix well by pipetting up and down 5-6 times.
Hypermucoviscous K. pneumoniae strains may not readily mix. Thus, ensuring that the culture is properly mixed with PBS is important. If required, mix the culture by pipetting up and down for longer than usual.
-
7
Take the OD600 of the diluted samples in a 96-well plate reader.
-
8Calculate the overnight OD600 of the culture as described below.
Sample OD600: Absorbance of overnight sample at 600 nm
Blank OD600: Absorbance of 300 μL 1X PBS at 600 nm
Dilution factor: Ratio of total volume (culture + PBS) to culture volume used (i.e., 10, if 30 μL sample is mixed with 270 μL 1X PBS)
Plate to cuvette conversion factor: Converts absorbance reading from 96-well plate to 1 cm cuvette absorbance (1.181599). This value should be validated for each plate reader. Refer to Support Protocol 5 for conversion factor determination.
Measuring sedimentation resistance:
-
Transfer 1 OD600 unit of gently vortexed overnight culture into a 2 mL tube and bring the final volume to 1,000 μL with LB or the culture medium used to grow the bacteria.
Use the OD600 calculated in Step 8 to determine the volume of culture equivalent to OD600 = 1. For example, a KPPR1 wildtype strain grown in LB for 16 hours has an OD600 value of 2.327. Volume of culture equivalent to 1.0 OD600 = (1,000 * 1.0)/2.327. Here, 1,000 (μL) is the final volume of culture when mixed with diluent.
For low-yield strains or culture conditions, 0.5 OD600 equivalent of culture volume can be used instead of 1.
-
Centrifuge the tubes at 1,000 xg for 5 minutes.
It is important to be careful while removing tubes from the centrifuge to avoid disturbing the pellet, which can affect the mucoviscosity measurement.
-
Transfer 900 μL of the upper supernatant from the tube to a divided multichannel pipette reservoir. After transferring to the reservoir, pipette the supernatant up and down 5-6 times to mix well.
It is crucial to handle the tubes with care during pipetting without disturbing the pellet to avoid overestimating the supernatant OD600. To achieve this, maintain the tube at an angle of 40-45°, slightly below the eye level with the corner containing pellet facing upward. This provides optimal separation of the supernatant and pellet, facilitating pipetting. While pipetting, gradually lower the pipette tip from the top to the bottom of the tube, gently drawing up the supernatant following the top surface of supernatant. This prevents inadvertent pipetting of the pellet. See Figure 2 for an illustration of this process.
Take a 96-well plate and transfer 300 μL of the well-mixed supernatant from the reservoir to a clean microplate well. Include 300 μL LB (or any other diluent used in Step 9) in three wells each as a blank.
Take the OD600 of the samples in a 96-well plate reader.
-
Calculate the supernatant OD600 of the sample as described below.
Sample OD600: Absorbance of supernatant at 600 nm
Blank OD600: Absorbance of 300 μL LB (or any other diluent used in Step 9) at 600 nm
Plate to cuvette conversion factor: Converts absorbance reading from 96-well plate to 1 cm cuvette absorbance (1.181599). This value should be validated for each plate reader. Refer to Support Protocol 5 for conversion factor determination.
Calculate the average and standard deviation of the triplicate values and plot the mucoviscosity value as ‘supernatant OD600 per 1 OD600 culture’ or ‘supernatant OD600 per 0.5 OD600 culture’ depending on the density of the overnight culture used in Step 9.
SUPPORT PROTOCOL 5
Support Protocols supplement the Basic or Alternate Protocol(s), e.g., to describe the preparation of a complex reagent or to describe steps that may be used in another context.
DETERMINATION OF PLATE TO CUVETTE CONVERSION FACTOR
Introductory paragraph:
This support protocol outlines the method to establish a ‘conversion factor’ that effectively correlates OD600 readings obtained from a 96-well plate and to a 1 cm cuvette. The process involves making a serial dilution of the bacterial culture and measuring the OD600 using both the microplate reader and cuvette spectrophotometer. By comparing the readings from the two instruments across different dilutions, a conversion factor is determined. The protocol involves the use of a biosafety level 2 pathogen, so appropriate biosafety measures must be followed while handling the organism. Altogether, the protocol provides a valuable means of converting OD600 reading between two different systems, thereby enabling the adaptation of cuvette-based lab techniques to a 96-well plate format. This adaptation to 96-well plat format allows assessment of large number of samples at a time.
Additional Materials:
96-well flat bottom plate (sterile or non-sterile) (e.g. Genesee Scientific, Cat #25-104)
Visible-spectrum microplate reader (e.g. BioTek EPOCH2)
Multichannel pipettor and pipette tips (200 or 300 μL) (e.g. USA Scientific, Cat #7112-3300)
12-well V-bottom reservoir (e.g. USA Scientific, Cat #3823-3412)
1.5 mL disposable, 1 cm cuvettes (Fisher Scientific, Cat #14-955-127)
15 mL sterile conical tube (e.g. Griener Bio-One CELLSTAR, Cat #181-271)
Visible-spectrum cuvette spectrophotometer (e.g. Thermo Scientific GENESYS 30)
Conversion of plate OD600 to cuvette OD600
Inoculate a single isolated colony of KPPR1 in 4 mL of LB and incubate at 37°C with shaking (200 rpm), overnight.
-
Transfer 1 mL of well-vortexed overnight culture to a clean cuvette and measure the OD600 in a spectrophotometer; this is what is referred to as ‘100%’.
Let us assume the OD600 of the ‘100%’ sample is 3.
-
Serially dilute down the sample 1:1 with 1X PBS as a diluent 10 times to achieve a dilution range from 100% to 0.1953%. Repeat the step to include three sets of dilutions (set A, B, C; triplicate measurement).
Serial dilution: Transfer 3 mL of ‘100%’ OD600 culture to a 15 mL conical tube. Then, transfer 1.5 mL culture from the ‘100%’ tube to a clean 15 mL tube labelled ‘50%’ containing 1.5 mL 1X PBS and mix well. Similarly, transfer 1.5 mL diluted culture from the ‘50%’ tube to a 15 mL tube containing 1.5 mL 1X PBS labelled ‘25%’. Continue halving the dilution until ‘0.1953%’ is achieved.
-
Transfer 1 mL of each dilution with three replicates to respective, clean 1 cm cuvettes. Then, measure the OD600 in spectrophotometer. Use 1X PBS as a blank.
Suppose the cuvette OD600 of ‘6.25%’ in set A, B and C are 0.172, 0.173 and 0.117, respectively.
-
From each dilution tube, transfer 300 μL to a clean 96-well plate. Then, measure the OD600 in a microplate reader. Include 300 μL of 1X PBS in three wells as a blank measurement.
Suppose the plate OD600 of ‘6.25%’ in set A, B and C are 0.175, 0.173 and 0.139, respectively. Similarly, let us suppose the average plate OD600 of all three blanks is 0.038.
-
Take the average of three sets for each dilution.
Average cuvette OD600 of ‘100%’ = (0.172+ 0.173+ 0.117)/3 = 0.154
Average plate OD600 of ‘100%’ = [(0.175− 0.038) + (0.173− 0.038) + (0.139− 0.038)]/3 = 0.124
-
Plot the % dilution on the x-axis and the cuvette OD600 on the y-axis. Identify the linear range.
Refer to Figure 3 for an example of the plot.
-
Plot the % dilution on the x-axis and the plate OD600 on the y-axis. Identify the linear range.
Refer to Figure 3 for an example of the plot.
-
For each % dilution that falls in the linear range for both cuvette and microplate measurements, calculate the cuvette OD600/plate OD600 ratio.
Cuvette OD600/plate OD600 of ‘6.25%’= 0.154/0.124 = 1.24
-
Calculate the conversion factor using the following equation.
Note: The conversion can then be used for converting 300 μL OD600 readings from the plate reader to standard 1 cm cuvette readings only if the OD600 falls in the linear range of both instruments.
Figure 3:
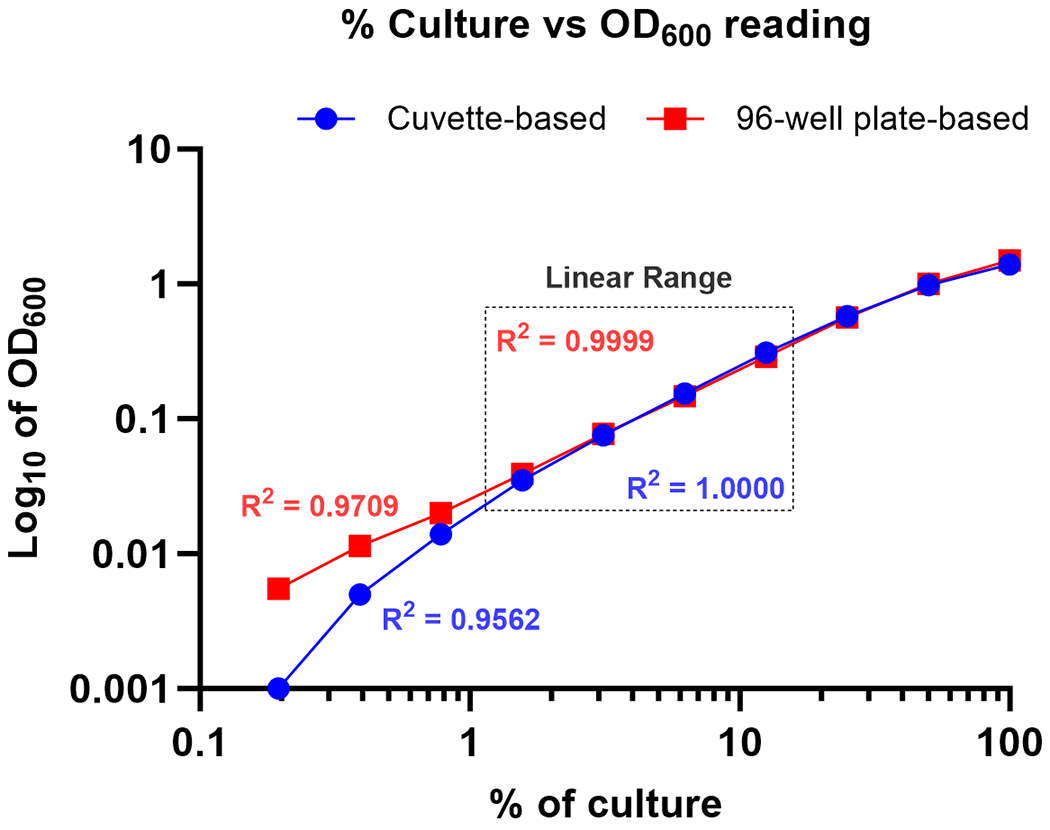
Plot illustrating OD600 of different culture dilutions measured by cuvette spectrophotometer and microplate reader. The gray dotted box represents data points in the linear range with R2 ≥0.9999 used for calculating conversion factor. Red boxes indicate OD600 measured by microplate reader and blue closed circles indicate OD600 measured by cuvette spectrophotometer.
REAGENTS AND SOLUTIONS:
Alcian blue, 0.1%, 100 mL
Alcian blue stain base solution, 100 mL
Alcian Blue 8GX (ThermoFisher Scientific, Cat #J60122.14), 0.1 g
Add 0.1 g of Alcian blue powder to 100 mL stain base solution. Mix thoroughly by using magnetic stirrer. If precipitate appears even after stirring, warm the solution in a 60°C water bath with periodic stirring for 10 minutes. Store the stain in the dark at room temperature for a maximum of one month.
Alcian blue stain base solution, 1 L
20 mM sodium acetate, pH 4.75, 600 mL
Anhydrous ethanol, 400 mL
Ultrapure water
Prepare 20 mM sodium acetate by adding 1.6407 g of sodium acetate to 500 mL ultrapure water. Adjust the pH of the solution to 4.75 by adding 6N HCl and raise the final volume to 600 mL. To 600 mL of 20 mM sodium acetate, add 400 mL of anhydrous ethanol to prepare 1 L of Alcian blue stain base solution. The solution may appear opaque even after mixing. It will not affect the performance. Store the solution at room temperature.
CaCl2, 1 M, sterile, 50 mL
CaCl2 (M.W. 110 g/mol), 5.549 g
Ultrapure water, 50 mL
Dissolve 5.549 g CaCl2 in 40 mL ultrapure water. Mix well by stirring or vortexing and raise the final volume of the solution to 50 mL using ultrapure water. Sterilize the solution using a 0.2 μm filter and store at room temperature.
EDTA, 1 M, pH 8.0, sterile, 100 mL
Anhydrous EDTA (M.W. 584.48 g/mol), 58.4 g
Ultrapure water, 100 mL
Dissolve 58.4 g anhydrous EDTA in 80 mL ultrapure water. Adjust the pH to 8.0 with NaOH pellets with constant stirring. The pH of the solution needs to be 8.0 for EDTA to dissolve. Once completely dissolved, raise the final volume of the solution to 100 mL by adding ultrapure water. Sterilize the solution using a 0.2 μm filter and store at room temperature.
Ethanol, 10%, 500 mL
Anhydrous ethanol, 50 mL
Ultrapure water, 450 mL
Add 50 mL anhydrous ethanol to 450 mL ultrapure water and mix well. Store the solution in a well-sealed container at room temperature.
Glucuronic acid standards (10 mL of each concentration)
Glucuronic acid, 25 g
Ultrapure water, sterile
Add 0.002 g of glucuronic acid in a sterile tube containing 20 mL sterile ultrapure water to make 100 μg/mL glucuronic acid standard. Mix well by vortexing briefly and label the solution as ‘100 μg/mL glucuronic acid’. From 100 μg/mL tube, transfer 10 mL of the standard to a new tube containing 10 mL sterile ultrapure water to make 50 μg/mL standard. Mix well by vortexing briefly and label the solution as ‘50 μg/mL glucuronic acid’. Repeat the serial dilution by halving the concentration in each step until a series of concentration, 100, 50, 25, 12.5, 6.25, 3.125 μg/mL, are achieved. From each tube (100, 50, 25, 12.5, 6.25, 3.125 μg/mL), aliquot the 10 mL stock into 5, 2 mL tubes and store at −20°C.
Low-salt LB agar, 1 liter
5 g Yeast extract
10 g Tryptone
0.5 g Sodium chloride, NaCl
20 g Bacto-agar
Ultrapure water
Weigh all the ingredients and add everything except Bacto-agar to 800 mL of ultrapure water in an autoclavable bottle leaving an equal volume of head space (i.e. 2 L flask or bottle). Mix the solution by using a magnetic stirrer. Once ingredients are fully dissolved, add weighed agar to the mixture and raise the final volume of the broth to 1 liter by using ultrapure water. Heat the solution to boiling until the agar is completely dissolved in the solution. Once dissolved, sterilize the medium by autoclaving at 121°C, 15 psi for 20 minutes in an autoclave bin filled with 1” of tap water; loosen the cap to ensure that steam can vent. Allow the medium to cool to 60°C by stirring the medium on a stir plate or in a hot water bath. Once cooled to 60°C, aseptically pour about 20 mL of medium to a sterile 100 mm Petri dish. Let the agar solidify at room temperature. Store the agar plates at 4°C.
Low-salt LB broth, 1 liter
5 g Yeast extract
10 g Tryptone
0.5 g Sodium chloride, NaCl
Ultrapure water
Weigh all the ingredients and add to 800 mL of ultrapure water in an autoclavable 1 L bottle. Mix the solution by using a magnetic stirrer. Once ingredients are fully dissolved, raise the final volume of the broth to 1 liter by using ultrapure water. Sterilize the medium by autoclaving at 121°C, 15 psi for 20 minutes. Allow the medium to cool before use. Store at room temperature.
MgCl2, 1 M, sterile, 50 mL
MgCl2 (M.W. 95.211 g/mol), 4.76055 g
Ultrapure water, 50 mL
Dissolve 4.76055 g MgCl2 to 40 mL ultrapure water. Mix well by stirring or vortexing and raise the final volume of the solution to 50 mL using ultrapure water. Sterilize the solution using a 0.2 um filter and store at room temperature.
SDS-PAGE loading buffer, 4 X, 50 mL
0.9 M Tris-HCl, pH 6.8, 2.22 mL
SDS, 0.8 g
100% glycerol, 1 mL
0.5 M EDTA, 1 mL
Bromophenol blue, ≤8 mg
14.7 M BME (2-mercaptoethanol), 0.4 mL
Ultrapure water
Add all the ingredients to 40 mL ultrapure water and mix well by stirring. SDS does not readily go into solution. Slightly warming the mixture in a 60°C water bath can facilitate dissolving the ingredients. Once completely dissolved, raise the final volume to 50 mL using ultrapure water. Aliquot 1-2 mL of the loading buffer in microcentrifuge tubes and store at −20°C.
Silver stain gel fixing solution (30% ethanol:10% acetic acid), 500 mL
Anhydrous ethanol, 150 mL
Glacial acetic acid, 50 mL
Ultrapure water, 300 mL
Mix all three solutions in a bottle by stirring and store at room temperature.
Silver stain stop solution (5% acetic acid), 500 mL
Glacial acetic acid, 25 mL
Ultrapure water, 475 mL
Add 25 mL of glacial acetic acid to 475 mL of ultrapure water and mix well by stirring. Store the solution at room temperature.
Sodium azide, 5% (w/v), 500 mL
Sodium azide, 25 g
Ultrapure water, 500 mL
Weigh out 25 g of sodium azide and dissolve it in 400 mL ultrapure water. Mix well by stirring and raise the final volume to 500 mL by adding ultrapure water. Store at room temperature.
Sodium chloride, 2 M, sterile, 100 mL
NaCl (M.W. 58.4 g/mol), 11.68 g
Ultrapure water, 100 mL
Dissolve 11.68 g NaCl in 80 mL ultrapure water. Mix well by stirring or vortexing. Then, raise the final volume to 100 mL using ultrapure water. Sterilize the solution using a 0.2 μm filter and store at room temperature.
Sodium hydroxide, 0.125 M, 50 mL
Sodium hydroxide, 0.2499 g
ultrapure water, 50 mL
Place a magnetic bar into 45 mL of ultrapure water in a beaker with a magnet bar. Add 0.2499 g of sodium hydroxide to 45 mL of ultrapure water and dissolve using the magnetic stirrer. Bring the final volume of the solution to 50 mL using ultrapure water.
Sodium tetraborate, 0.0125 M in sulfuric acid (>95%), 500 mL
Sodium tetraborate, 2.385 g
Concentrated sulfuric acid (>95%), 500 mL
Follow appropriate safety measures related to acid and corrosive hazards. In a fume hood, transfer 500 mL of concentrated sulfuric acid to an acid-resistant glass bottle. Add 2.385 g of sodium tetraborate to the 500 mL sulfuric acid and mix by gently inverting the bottle. If sodium tetraborate crystals are still visible, let the solution sit at room temperature within the fume hood overnight and mix well by inverting before the first use.
Tris, 1 M, pH 7.5, sterile, 100 mL
Tris-base (M.W. 121.1 g/mol), 12.11 g
Tris-HCl (M.W. 157.6 g/mol), 15.76 g
Ultrapure water, 100 mL
Prepare separately 1 M Tris-base (12.11 g of Tris-base in 100 mL ultrapure water) and 1 M Tris-HCl (15.76 g of Tris-HCl in 100 mL ultrapure water). Mix well by stirring. Titrate 100 mL Tris-base with Tris-HCl with constant stirring until the pH reaches 7.5. Sterilize the solution using a 0.2 um filter and store at room temperature.
Tris-glycine-SDS gel running buffer, 4 L
Tris-base, 6.05 g
Glycine, 28.8 g
SDS, 2 g
Ultrapure water
Add all the ingredients to 3.5 L ultrapure water and mix well by stirring. Once completely dissolved, raise the final volume to 4 L with ultrapure water. Store the buffer at room temperature.
1% Zwittergent 3-14 in 100 mM citric acid, 50 mL
Zwittergent 3-14, 0.5 g
100 mM Citric acid, 50 mL
Ultrapure water
Prepare 50 mL of 100 mM citric acid by weighing 0.9606 g of citric acid and adding ultrapure water to 50 mL. Mix well by using a magnetic stirrer. To 50 mL of 100 mM citric acid, add 0.5 g of Zwittergent 3-14 to prepare 1% Zwittergent 3-14 in 100 mM citric acid. Store solution at room temperature.
COMMENTARY:
Background Information:
The Klebsiella pneumoniae species complex is comprised of several Klebsiella sub-species that encode a variety of sequence types, capsule types and LPS types. Different K. pneumoniae sequence types (STs) are prevalent in different geographical regions. Further, more than 80 capsule types have been identified for K. pneumoniae but only a few are associated with hypervirulent isolates. For example, K. pneumoniae ST258 is the prevalent sequence type in the United States (Kitchel et al., 2009). Similarly, K1 and K2 capsule are more frequently associated with hypervirulent K. pneumoniae (Yu et al., 2008). All of these highlight the importance of characterizing K. pneumoniae.
Basic Protocol 1 and 2 describing the extraction and purification of extracellular polysaccharide (EPS) are adapted from Favre-Bonte et al. (1999), Domenico et al. (1989) and Blumenkrantz & Asboe-Hansen (1973). Zwittergent 3-14 is a zwitterionic detergent that solubilizes membrane-bound proteins. This causes release of membrane-associated EPS to the culture supernatant which is then precipitated with 80% ethanol. Basic Protocol 2 uses additional steps of treatment with nuclease and proteinase followed by dialysis to remove contaminating nucleic acid and proteins from the EPS sample. Basic Protocol 2 is advantageous over Basic Protocol 1 because of its use in the large-scale purification of EPS and the increased purity of the final sample compared to that in Basic Protocol 1. Samples prepared by Basic Protocol 2 can directly be used for further analysis by mass spectrometry or other analytical techniques.
Capsular polysaccharide (CPS) is a major EPS produced by K. pneumoniae. These polysaccharides are generally composed of repeating sugar units connected by glycosidic bonds. The difference in repeating sugar units gives rise to various CPS K-types. KPPR1 synthesizes K2-type CPS containing glucose (Glc), mannose (Man), and glucuronic acid (GlcA) in a repeating sugar unit that includes an →3)β-D-Glcp(1 → 4)β-D-Manp(1 → 4)α-D-Glcp(1 → backbone, an α-D-GlcpA(1 → 3)β-D-Manp (1 → 4) side chain, and approximately 70% of the Man residues O-acetylated at position 6 (Geyer et al., 1983; Ovchinnikova et al., 2023). Many biological mucopolysaccharides contain uronic acids, which are monosaccharides oxidized to form a carboxylic acid. Therefore, uronic acid is used as a measure of EPS abundance. To quantify uronic acid content, polysaccharides are hydrolyzed in concentrated sulfuric acid/sodium tetraborate at 100°C and then reacted with 3-phenylphenol to form a chromogenic compound (Blumenkrantz & Asboe-Hansen, 1973). The concentration of uronic acid in unknown samples can be determined using the absorbance of this chromogenic compound at 520 nm when compared with a glucuronic acid standard curve, the concentration of uronic acid in unknown samples can be determined.
Hypermucoviscosity is caused by changes in capsular polysaccharide chain length (Khadka and Ring et al., 2023; Ovchinnikova et al., 2023). Mucoviscosity was conventionally measured by ‘string test’. However, it is a qualitative test and results can vary between individuals and test conditions. Sedimentation resistance is a feature of hypermucoid colonies. The mechanism behind this phenomenon is not fully understood yet. However, this feature of hypermucoid strains forms the basis of quantifying mucoviscosity in K. pneumoniae. At low-speed centrifugation, hypermucoid colonies sediment poorly compared to non-mucoid colonies. The data, presented as the percentage of bacterial culture suspended in the supernatant after centrifugation, provide efficient mucoviscosity quantification. The sedimentation resistance measured by Basic Protocol 5 and Alternate Protocol 5 are similar. Basic Protocol 5 does not require an additional calculation of ‘conversion factor’ and follows a simpler method than Alternate Protocol 5. However, a large number of samples can be assayed more quickly using Alternate Protocol 5.
Polysaccharide staining is a helpful technique to assess the diversity of EPS polymer chains. Long-chain polymers have a higher molecular weight than short-chain polymers. Hence, long-chain polymers run through an SDS-PAGE gel slower and appear at a different band size than short polymers, if sufficient time for band separation is allowed. However, EPS polymers are usually high molecular weight compounds making it difficult to separate on an SDS-PAGE gel. Therefore, the protocol recommends running the electrophoresis for 4-5 hours at 4°C for KPPR1 EPS. Basic Protocol 4 is adapted from Tipton & Rather (2019) and Bonnell et al. (1999). Alcian blue is a blue-colored cationic dye and binds to anionic polysaccharide. However, the signal of Alcian blue bound to a low concentration of polysaccharide is not easily detected. Therefore, an additional step of silver staining intensifies the signal making facilitating the detection of polysaccharide bands. Silver stain works by the binding of silver ions binding to functional groups, including Alcian blue (Corzo et al., 1991).
Critical Parameters and Troubleshooting:
Extracellular polysaccharide isolation and purification
There are several steps within the protocol that require special attention to ensure that the polysaccharide is properly isolated and purified. The bacterial growth conditions can affect the amount of polysaccharide purified. Conditions such as an agent to induce gene expression, antibiotics to maintain the desired plasmid, enough headspace within tubes for aeration and incubation with variable shaking can all affect the amount of polysaccharide produced by the bacteria. The conditions ideal to the strain being tested should be maintained for consistent results. Inadvertently pipetting up pellets while removing the upper 100 μL supernatant can overestimate the purified polysaccharide abundance. Drawing the supernatant slowly is critical to the protocol. Adding ice-cold ethanol and incubating on ice for longer improves polysaccharide precipitation. At the final step, vortexing the sample with ultrapure water before and after incubation at 37°C is important to ensure that the sample is properly mixed and improves rehydration. Unevenly mixed hydrated polysaccharide can affect downstream application such as quantification by uronic acid quantification.
Large-scale isolation and purification of extracellular polysaccharide
The critical parameters described for Basic Protocol 1 are also applicable for this protocol. Furthermore, preventing contamination of the polysaccharide throughout the process is critical. Dialysis buffer used for longer dialysis time such as overnight dialysis can be supplemented with 0.05% sodium azide to prevent contamination. Using filter-sterilized solutions, whenever possible reduces the chances of contamination. Dialysis membrane cutoff size can be optimized for each case, as appropriate. Ensuring that the final concentration of ethanol during polysaccharide precipitation is 80% is important. Additionally, ‘pre-chilled/cold’ ethanol is recommended for better precipitation of the polysaccharide. The starting culture volume can be adjusted as required for the targeted yield of extracellular polysaccharide. It is very important for the sample to be at frozen solid right before placing it in a lyophilizer. So, dipping the glass vial containing sample in liquid nitrogen or methanol-dry ice mix before lyophilization process can ensure the small sample volume stays frozen.
Uronic acid quantification assay for quantification of extracellular polysaccharide
It is recommended that culture conditions permitting optimal extracellular polysaccharide synthesis be used. The extracellular polysaccharide purification process, as explained in Basic Protocol 1, can impact the quantification described in this protocol. Refer to Critical Parameters of ‘Extracellular polysaccharide isolation and purification’ to ensure good sample quality. It is critical to ensure the quality and concentration of glucuronic acid standards used in the assay are reliable, as they are used to generate the standard curve for determining the concentration of unknown samples. Repeated freeze-thawing and long-term storage of standards at −20°C can impact the integrity of the standards. Longer incubation on ice for polysaccharide precipitation, longer incubation at 37°C to hydrate the polysaccharide and avoiding significant delays in A592 measurement between samples can improve assay output; however, cooling the boiled samples on ice should be limited to 5 minutes. Hypermucoviscous and hypercapsule-producing strains can affect OD600 measurement. In such cases, presenting data as ‘μg/mL of uronic acid per CFU/mL’ instead of ‘μg/mL per 1 OD’ may be appropriate.
Extracellular polysaccharide visualization by SDS-PAGE and silver stain
In addition to appropriate culture conditions, there are several other steps requiring special attention in this protocol. Fresh SDS-PAGE gel running buffer must be used for gel electrophoresis. Reused buffers can lead to non-specific bands or smears in the final image. Running buffer must be kept cold during electrophoresis to avoid the gel overheating. We recommend adding icepacks in the electrophoresis cell to prevent overheating. Avoid touching the gels with bare hands or dirty gloves. If possible, use the corner of gel where the sample is not expected to be present as an anchor point to touch the gel while moving it. Impure water and unclean staining trays can add background noise to the final image. So, ultrapure water and clean staining trays are recommended. The final step of gel development is highly time sensitive. Add the Stop Solution a few seconds before the desired band intensity is reached as the bands continue to develop for a few more seconds after adding the stop solution. Depending on the extracellular polysaccharide molecular weight, the electrophoresis run time may have to be optimized. Different strains produce different amount of polysaccharide, so if required, the starting sample volume can be increased to >1.5 OD600, if the desired intensity of polysaccharide bands is not obtained. If the Alcian blue-stained gel gets destained quickly upon adding stain base solution, repeat staining with a freshly prepared Alcian blue. Do not use the Alcian blue solution after it has separated in two layers during storage.
Klebsiella pneumoniae mucoviscosity measurement by sedimentation resistance assay
Several steps within this protocol, if not done properly, can have a significant impact on the assay results. Similar to extracellular polysaccharide purification, culture conditions can affect the mucoviscosity phenotype. Some of the critical agents that require special attention are aeration, salt concentrations and antibiotics in the growth medium. We have observed that higher salt concentrations, lower pH and certain antibiotics (e.g., chloramphenicol) can significantly reduce the mucoviscosity of the strain. Thus, we recommend using low-salt LB broth with a neutral pH for the culture and appropriate controls to assess if culture additives, such as antibiotics, do not impact the mucoviscosity. Pipetting the supernatant for OD600 measurement is the most critical step in the assay. So, special attention must be given to not accidentally siphon the cell pellet, while removing supernatant. Keeping the tube at about 40-45° angle with the pellet facing upwards provides better separation between pellet and the supernatant (Figure 2). If electric automated pipettors are being used, set the pipettor to a minimum drawing speed.
96-well plate-based Klebsiella pneumoniae sedimentation resistance assay
All the critical parameters described for Basic Protocol 5 are also applicable to this protocol. In addition, proper mixing of overnight sample with 1X PBS (or another diluent) is critical. Improperly mixed sample can lead to erroneous overnight OD600 values, which ultimately affects the volume of sample used for 1 OD600 equivalent culture and hence incorrect supernatant OD600.
Determination of plate to cuvette conversion factor
The culture density of sample used is critical for the whole protocol. It is important to use only absorbance values that fall in the linear range of the instrument to calculate the conversion factor. Correspondingly, it is critical that future experimental samples must fall within the linear range of the instrument. In addition, ensuring that samples are well-mixed before use is important for obtaining consistent results. Thus, vortexing or vigorous pipetting to mix is encouraged.
Understanding Results:
Extracellular polysaccharide isolation, purification and quantification by uronic acid assay (Basic Protocols 1 and 3)
Following Basic Protocol 1, one should expect to observe a white precipitate or cloudiness of the solution after adding ice-cold ethanol. However, this observation can be different between various strains as they differ in extracellular polysaccharide abundance. When Basic Protocol 1 and Basic Protocol 3 are paired, we generally obtain 6-10 μg total uronic acid/OD600 from KPPR1 (cell-attached: ~5 μg/OD600 and non-attached: ~3 μg/OD600; Figure 3).
Large-scale isolation and purification of extracellular polysaccharide
Our lab generally obtains ~0.2 mg lyophilized product (total extracellular polysaccharide) per 1.5 mL KPPR1 culture by following Basic Protocol 2. The amount obtained may vary depending on the dialysis membrane pore size. Further, we usually get a small amount of Lipid A and O-antigen contamination when using 25 kDa dialysis membrane. Lipopolysaccharide (LPS) contamination can be visualized by electrophoresis of purified polysaccharide for shorter time (1 hour) and staining with Pierce Glycoprotein Staining Kit (ThermoFisher; Cat. #24562) or Pro-Q Emerald 300 LPS Gel Stain Kit (ThermoFisher; Cat. #P20495).
Extracellular polysaccharide visualization by SDS-PAGE and silver stain
Three distinct smears are expected from KPPR1 upon completing the Basic Protocol 4 (Figure 4). The ‘type A’ band appears as a long smear at the middle of the gel, the ‘type B’ polysaccharides are uniform chain length bands that appear as a single distinct band and ‘type C’ polysaccharides are ultra-high molecular weight band at the top of the gel (Khadka and Ring et al., 2023; Ovchinnikova et al., 2023). Optimal separation of KPPR1 capsular polysaccharide smear is obtained after electrophoresis for 4-5 hours. However, due to differences in the power supply used, slight variations in time may be required. Distinct bands and/or smears should also be anticipated after de-staining with Silver Stain Base Solution. We recommend using KPPR1 wild type strain as a positive control to visualize the three capsule varieties (A, B and C).
Figure 4:

KPPR1 uronic acid content in total extracellular polysaccharide (EPS), cell-attached CPS and cell-free (non-attached) EPS. The assay was done three independent times in triplicate. Error bars represent standard error of mean.
Sedimentation resistance assay (Basic Protocol 5, Alternate Protocol 5 and Support Protocol 5)
After completing either Basic Protocol 5 or Alternate Protocol 5, 0.4 – 0.6 supernatant OD600 per 1 OD600 unit is anticipated for KPPR1 (Figure 5 and Figure 6) [Editor added Fig. 6 callout. Au please approve]. Slight variations are expected because of differences in pipette handling between individuals. Hypermucoid strains are expected to result in cloudy supernatant after low-speed centrifugation compared to non-mucoid strains, which tend to result in clear supernatant. A conversion factor of ~1.18 is anticipated when 300 μL of KPPR1 is assessed using BioTek EPOCH2 plate reader and Thermo Scientific GENESYS 30 Visible Spectrophotomer.
Figure 5:
Alcian blue and silver-stained extracellular polysaccharide of KPPR1. Lane content from left to right: Precision Plus All Blue Protein standard, (I) total EPS, (II) cell-attached CPS and (III) non-attached EPS. 20 μL of 1:3 sample:loading buffer was run through a 4-15% Tris-glycine gel for 4.5 hours at 4°C and sequentially stained with Alcian blue and then Pierce Silver Stain kit. Typically, three classes of polysaccharide chain lengths are observed in KPPR1. Type A is comprised of diverse high molecular weight polysaccharide chains, type B is a uniform high molecular weight band, and type C appears as an ultra-high molecular weight band.
Figure 6:

Sedimentation resistance of KPPR1 as assayed by cuvette-based and 96-well plate-based assays. Wildtype KPPR1 is expected to result in 0.4-0.6 supernatant OD600 per 1 OD600 by either assay. In both assays, the experiment was done once with three replicates. Error bars represent standard error of mean.
Time Considerations:
Basic Protocol 1: Extracellular polysaccharide isolation and purification
Reviving KPPR1 on solid agar media is necessary, which is an overnight process requiring 12 to 15 hours. Preparing overnight cultures of KPPR1 should require only a few minutes. The samples must incubate overnight for 16 to 18 hours in a 37°C shaking incubator to achieve optimal culture density. If measuring the overnight culture density, the time from preparing the 96-well flat bottom plate to measuring the absorbance of the overnight cultures should only require 5 to 10 minutes.
When purifying the extracellular polysaccharide, there are multiple incubation steps that should take a total of 75 to 80 minutes. The addition of 10 minutes of centrifugation result in the protocol taking a total of 1.5 to 2 hours.
Basic Protocol 2: Large-scale isolation and purification of extracellular polysaccharide
The whole protocol takes a minimum of 9 days to complete. Setting up overnight cultures on day 1 takes about 20 minutes if you already have isolated colonies of strains of interest on an agar plate. On day 2, sub-culturing can take several hours based on the strain type and growth conditions. For example, a 1:100 sub-culture of KPPR1 in LB without any antibiotics takes about 3 to 4 hours to reach the desired OD600. Altogether, it will take a minimum of 6 hours on day 2 to extract KPPR1 EPS. On day 3, dialysis and nuclease treatment take a minimum of 10 hours combined. However, the actual hands-on time can be expected to be around 45 minutes only. Proteinase treatment of EPS on day 4 takes about 40 minutes of hands-on time. On day 5, proteinase inactivation takes about 2 hours and ethanol precipitation takes about 30 minutes of hands-on time. On day 6, rehydration takes a minimum of 3.5 hours during the day with actual hands-on time of 30 minutes. Day 7 takes about 30 minutes for dialysis setup. Day 8 and day 9 take about 30 minutes of hands-on time each.
Basic Protocol 3: Uronic acid quantification of extracellular polysaccharide
Refer to Basic Protocol 1 for time considerations regarding extracellular polysaccharide purification. To ensure safety when handling sodium tetraborate in sulfuric acid, it is recommended that the reagent is added slowly to each sample. Nonetheless, this step should require only a few minutes. There is 10 minutes of incubation to consider. To ensure sufficient mixing, adding the 3-phenylphenol in NaOH may take several minutes, depending on the use of a single-or multi-channel pipette. Each round of absorbance readings at 520 nm should take only a couple of minutes. The entire protocol requires a total of 30 to 45 minutes to complete, depending on the number of samples.
Basic Protocol 4: Extracellular polysaccharide visualization by SDS-PAGE and silver stain
Refer to Basic Protocol 1 for time considerations for preparing overnight cultures and measuring overnight culture density. When purifying the extracellular polysaccharide, there are multiple incubation steps that should take a total of 75 to 80 minutes. The addition of 40 minutes of centrifugation results in this part of the protocol taking a total of 2 to 2.5 hours. Preparing the cassette for SDS-PAGE and loading the samples in each well will take several minutes. The gel needs to run for approximately 4 to 5 hours for sufficient separation of the polysaccharides. During Alcian blue staining, the gel must shake at room temperature for 1 hour and de-stain overnight. When staining with the Pierce Silver Stain kit, there is an approximate total of 25 minutes of washing. The gel must be incubated in Pierce Silver Stain kit solutions for an approximate total of 70 minutes. The entire protocol from preparing overnight cultures to imaging the gel will take approximately 24 to 26 hours to complete, which includes an overnight de-staining period.
Basic Protocol 5: Klebsiella pneumoniae mucoviscosity measurement by sedimentation resistance assay
Refer to Basic Protocol 1 for time considerations when preparing overnight cultures. There is a 5-minute centrifugation step when preparing the samples for mucoviscosity measurement, but vortexing and transferring samples should take only a couple of minutes. The entire protocol requires a total of 20 to 30 minutes to complete, depending on the number of samples.
Alternate Protocol 5: 96-well plate-based Klebsiella pneumoniae sedimentation resistance assay
Refer to Basic Protocol 1 for time considerations when preparing overnight cultures and measuring overnight culture density. There is a 5-minute centrifugation step prior to measuring sedimentation resistance. Loading the 96-well plate with samples and blanks should take only a couple of minutes, if using a multichannel pipette. The entire protocol requires a total of 20 to 30 minutes to complete, depending on the number of samples.
Support Protocol 5: Determination of plate to cuvette conversion factor
Refer to Basic Protocol 1 for time considerations when preparing overnight cultures. Performing three sets of serial dilutions in PBS may take 10 to 15 minutes. Transferring each dilution to cuvettes and a 96-well microplate may take 5 to 10 minutes. The absorbance readings will take longer for measuring the cuvettes than with the 96-well microplate, but the total time for both sets of readings should not exceed 10 minutes, especially if done simultaneously. The entire protocol requires a total of 20 to 30 minutes to complete, depending on the number of samples.
Table 1.
Troubleshooting Guide for Uronic Acid Quantification Assay for Quantification of Extracellular Polysaccharide
| Problem | Possible Cause | Solution |
|---|---|---|
| Sample turned black after adding sodium tetraborate in sulfuric acid | Some sugars (e.g. 2-deoxy D-glucose and 2-deoxy D-galactose) dehydrated by concentrated sulfuric acid into a black-colored substance | The change in color after adding 3-phenylphenol in NaOH may still be quantifiable even if the solution has already turned black. If the problematic sugar is not critical for growth, consider preparing media without the problematic sugar. |
| No change in color after adding 3-phenylphenol in NaOH | No quantifiable amount of glucuronic acid in the sample | The strain may not have uronic acid as a component of the capsule repeating unit or the abundance of uronic acids may be too low. Try increasing the input number of cells. |
| Degraded 3-phenylphenol | Consider repeating the assay with a new batch of 3-phenylphenol. | |
| Polysaccharide precipitate lost while removing supernatant ethanol in Basic Protocol 1 | Gently pour off the supernatant ethanol without disturbing the polysaccharide pellet. | |
| Uneven change in color across replicates after adding 3-phenylphenol in NaOH | Improper mixing of samples after adding sodium tetraborate in sulfuric acid | It is critical to mix the samples by inverting the tubes multiple times after adding sodium tetraborate to the sample. |
| Improper mixing of samples after adding 3-phenylphenol | Ensure that the samples are mixed by pipetting up and down multiple times (at least 6 times). | |
| Glucuronic acid standards have an unusual color change | Glucuronic acid degradation after long-term storage or too many freeze-thaw cycles | Prepare a fresh batch of glucuronic acid standards. |
ACKNOWLEDGMENTS:
Support for the authors and development of these methods was provided by the University of Toledo College of Medicine and Life Sciences, American Heart Association 23CDA1056712 (L.A.M.), K22 AI145849 (L.A.M.) and R35 GM150588 (L.A.M.) from the National Institutes of Health. The content is solely the responsibility of the authors and does not necessarily represent the official views of the American Heart Association or the National Institutes of Health.
Footnotes
CONFLICT OF INTEREST STATEMENT:
Authors declare no conflict of interest.
Contributor Information
Saroj Khadka, Department of Medical Microbiology and Immunology, The University of Toledo College of Medicine and Life Sciences.
Brooke E. Ring, Department of Medical Microbiology and Immunology, The University of Toledo College of Medicine and Life Sciences
Drew A. Pariseau, Department of Medicine, The University of Toledo College of Medicine and Life Sciences
Dr. Laura A. Mike, Department of Medical Microbiology and Immunology, The University of Toledo College of Medicine and Life Sciences.
DATA AVAILABILITY STATEMENT:
Data sharing is not applicable to this article as no new data were created or analyzed in this study.
LITERATURE CITED:
- Alvarez CA, & Cobb BA (2019). Purification of capsular polysaccharide complex from Gram-negative bacteria. In Brockhausen I (Ed.), Bacterial Polysaccharides (Vol. 1954, pp. 25–35). Springer; New York. 10.1007/978-1-4939-9154-9_3 [DOI] [PubMed] [Google Scholar]
- Anderson MT, Mitchell LA, Zhao L, & Mobley HLT (2017). Capsule production and glucose metabolism dictate fitness during Serratia marcescens bacteremia. MBio, 8(3), e00740–17. 10.1128/mBio.00740-17 [DOI] [PMC free article] [PubMed] [Google Scholar]
- Blumenkrantz N, & Asboe-Hansen G (1973). New method for quantitative determination of uronic acids. Analytical Biochemistry, 54(2), 484–489. 10.1016/0003-2697(73)90377-1 [DOI] [PubMed] [Google Scholar]
- Bonnell BS, Smith SG, & Hedrick JL (1999). Dichromatic staining of electrophoretically departed extracellular matrix macromolecules. Analytical Biochemistry, 271(1), 91–93. 10.1006/abio.1999.4121 [DOI] [PubMed] [Google Scholar]
- Corzo J, Pérez-Galdona R, León-Barrios M, & Gutiérrez-Navarro AM (1991). Alcian blue fixation allows silver staining of the isolated polysaccharide component of bacterial lipopolysaccharides in polyacrylamide gels. Electrophoresis, 12(6), 439–441. 10.1002/elps.1150120611 [DOI] [PubMed] [Google Scholar]
- Domenico P, Salo RJ, Cross AS, & Cunha BA (1994). Polysaccharide capsule-mediated resistance to opsonophagocytosis in Klebsiella pneumoniae. Infection and Immunity, 62(10), 4495–4499. 10.1128/iai.62.10.4495-4499.1994 [DOI] [PMC free article] [PubMed] [Google Scholar]
- Domenico P, Schwartz S, & Cunha BA (1989). Reduction of capsular polysaccharide production in Klebsiella pneumoniae by sodium salicylate. Infection and Immunity, 57(12), 3778–3782. 10.1128/iai.57.12.3778-3782.1989 [DOI] [PMC free article] [PubMed] [Google Scholar]
- Favre-Bonte S, Joly B, & Forestier C (1999). Consequences of reduction of Klebsiella pneumoniae capsule expression on interactions of this bacterium with epithelial cells. Infection and Immunity, 67(2), 554–561. 10.1128/IAI.67.2.554-561.1999 [DOI] [PMC free article] [PubMed] [Google Scholar]
- Geyer H, Himmelspach K, Kwiatkowski B, Schlecht S, & Stirm S (1983). Degradation of bacterial surface carbohydrates by virus-associated enzymes. Pure and Applied Chemistry, 55(4), 637–653. 10.1351/pac198855040637 [DOI] [Google Scholar]
- Ikuta KS, Swetschinski LR, Robles Aguilar G, Sharara F, Mestrovic T, Gray AP, Davis Weaver N, Wool EE, Han C, Gershberg Hayoon A, Aali A, Abate SM, Abbasi-Kangevari M, Abbasi-Kangevari Z, Abd-Elsalam S, Abebe G, Abedi A, Abhari AP, Abidi H, … Naghavi M (2022). Global mortality associated with 33 bacterial pathogens in 2019: A systematic analysis for the Global Burden of Disease Study 2019. The Lancet, 400(10369), 2221–2248. 10.1016/S0140-6736(22)02185-7 [DOI] [PMC free article] [PubMed] [Google Scholar]
- Khadka S, Ring BE, Walker RS, Krzeminski LR, Pariseau DA, Hathaway M, Mobley HLT, & Mike LA (2023). Urine-mediated suppression of Klebsiella pneumoniae mucoidy is counteracted by spontaneous Wzc variants altering capsule chain length. 10.1128/msphere.00288-23 [DOI] [PMC free article] [PubMed] [Google Scholar]
- Kitchel B, Rasheed JK, Patel JB, Srinivasan A, Navon-Venezia S, Carmeli Y, Brolund A, & Giske CG (2009). Molecular epidemiology of KPC-producing Klebsiella pneumoniae isolates in the United States: Clonal expansion of multilocus sequence type 258. Antimicrobial Agents and Chemotherapy, 53(8), 3365–3370. 10.1128/AAC.00126-09 [DOI] [PMC free article] [PubMed] [Google Scholar]
- Mike LA, Stark AJ, Forsyth VS, Vornhagen J, Smith SN, Bachman MA, & Mobley HLT (2021). A systematic analysis of hypermucoviscosity and capsule reveals distinct and overlapping genes that impact Klebsiella pneumoniae fitness. PLOS Pathogens, 17(3), e1009376. 10.1371/journal.ppat.1009376 [DOI] [PMC free article] [PubMed] [Google Scholar]
- Ovchinnikova OG, Treat LP, Teelucksingh T, Clarke BR, Miner TA, Whitfield C, Walker KA, & Miller VL (2023). Hypermucoviscosity regulator RmpD interacts with Wzc and controls capsular polysaccharide chain length. MBio, 14(3), e00800–23. 10.1128/mbio.00800-23 [DOI] [PMC free article] [PubMed] [Google Scholar]
- Pan YJ, Lin TL, Chen CT, Chen YY, Hsieh PF, Hsu CR, Wu MC, & Wang JT (2015). Genetic analysis of capsular polysaccharide synthesis gene clusters in 79 capsular types of Klebsiella spp. Scientific Reports, 5(1), 15573. 10.1038/srep15573 [DOI] [PMC free article] [PubMed] [Google Scholar]
- Tipton KA, & Rather PN (2019). Extraction and visualization of capsular polysaccharide from Acinetobacter baumannii. In Biswas I & Rather PN (Eds.), Acinetobacter baumannii (Vol. 1946, pp. 227–231). Springer; New York. 10.1007/978-1-4939-9118-1_21 [DOI] [PubMed] [Google Scholar]
- Yu WL, Ko WC, Cheng KC, Lee CC, Lai CC, & Chuang YC (2008). Comparison of prevalence of virulence factors for Klebsiella pneumoniae liver abscesses between isolates with capsular K1/K2 and non-K1/K2 serotypes. Diagnostic Microbiology and Infectious Disease, 62(1), 1–6. 10.1016/j.diagmicrobio.2008.04.007 [DOI] [PubMed] [Google Scholar]
Associated Data
This section collects any data citations, data availability statements, or supplementary materials included in this article.
Data Availability Statement
Data sharing is not applicable to this article as no new data were created or analyzed in this study.