Abstract
When chord face failure occurs, one of the factors, which influence the resistance of the square hollow sections joint is the brace-to-chord width ratio of the joint. This includes the size of the weld connecting the two members. The influence of weld type and weld size on the behaviour of rectangular and square hollow section joints was studied at the Czech Technical University in Prague.
This paper describes an experimental and numerical investigation of square hollow section joints. The welded T-joints were loaded by axial compression. Three different types of welds were investigated - butt welds, fillet welds and a combination of these types. Experimental results for the T-joint together with material characteristics are provided. The paper presents a validation of the numerical model to experimental data. The research-oriented model with shell elements, prepared in RFEM finite element software, represents well the behaviour of square and rectangular hollow section joints. A parametric study with a broader range of sections was performed using the design-oriented shell elements model. Based on the results of the experimental and numerical investigations a modification of the analytical equations used in current prEN1993-1-8:2021 is proposed.
Keywords: Rectangular hollow sections, T-joints, Fillet welds, Experiments, Finite element models, Sensitivity study
1. Introduction
The current design approach for Rectangular Hollow Section (RHS) joints is based on the analytical models and the carried out tests, see EN 1993-1-8:2006 [1]. The resistance criteria for ISO 14346:2013 [2] are based on a 3 % limit for the deformation of the chord face. Both standards are derived for butt welds or fillet welds stronger than the connected brace. The influence of the weld size on the joint behaviour is neglected. The text states that the weld must not be a weak point of the joint. It should have sufficient load-bearing capacity with regards to uneven stress distribution and sufficient deformation capacity to redistribute the bending moments. The weld should be made around the entire circumference of the brace member. Butt welds, fillet welds, or a combination of these types, can be used. The standards do not consider the difference in joint behaviour when different types of welds are used. For the connection of two perpendicular plates or RHS members, it is easier to use a fillet weld, which, unlike a butt weld, does not require machining of the parts that are to be connected. The added mass, if a fillet weld is used, affects the geometry of the connection. This can have a beneficial effect on the resistance of the joint.
The research presented here on the effect of weld size and weld type on RHS T-joint resistance consists of three components: experimental tests, a numerical simulation with validation, and a sensitivity study of the numerical design calculation. The experimental program consists of two series of cold-formed welded RHS T-joints tested in the laboratory. Using these experimental tests, the numerical simulation is validated. A sensitivity study with a broader range of parameters is performed on the numerical simulation shell models. From this data set of results, a modification of the chord-to-brace ratio β used in analytical equations of prEN1993-1-8:2021 [3] is proposed. This modification takes into consideration the size of the fillet weld used for connecting the brace to the chord.
2. Analytical model
Analytical models have been developed to describe the behaviour of the joint in different failure modes. In some failure modes, the behaviour of the joint is so complicated that it was necessary to complement these models with empirical parameters based on test data.
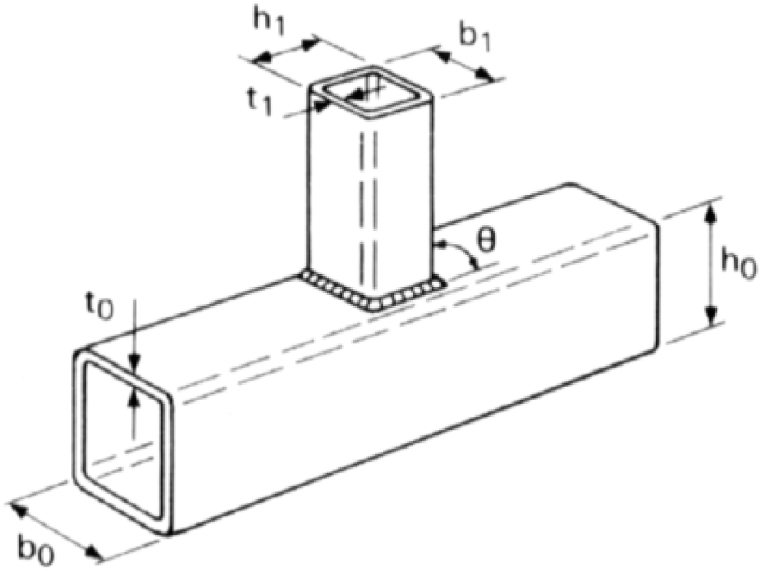
In the case of the chord face failure mode, the Johansen model was adopted to describe the behaviour of the plates. This model, described by Wardenier [4], works well for joints with mean values of parameter β ≤ 0.85, where β = bi/b0, i.e. the ratio of the widths of the connected members, see Fig. 1.
Fig. 1.
Geometrical parameters of an RHS joint.
For very small values of the β parameter, the deformation required to form linear plastic joints is large, and conversely, for large values of β, the load capacity of the contact member rises towards infinity. In fact, the joint starts to fail in a different failure mode, e.g., by failure of the side walls of the web.
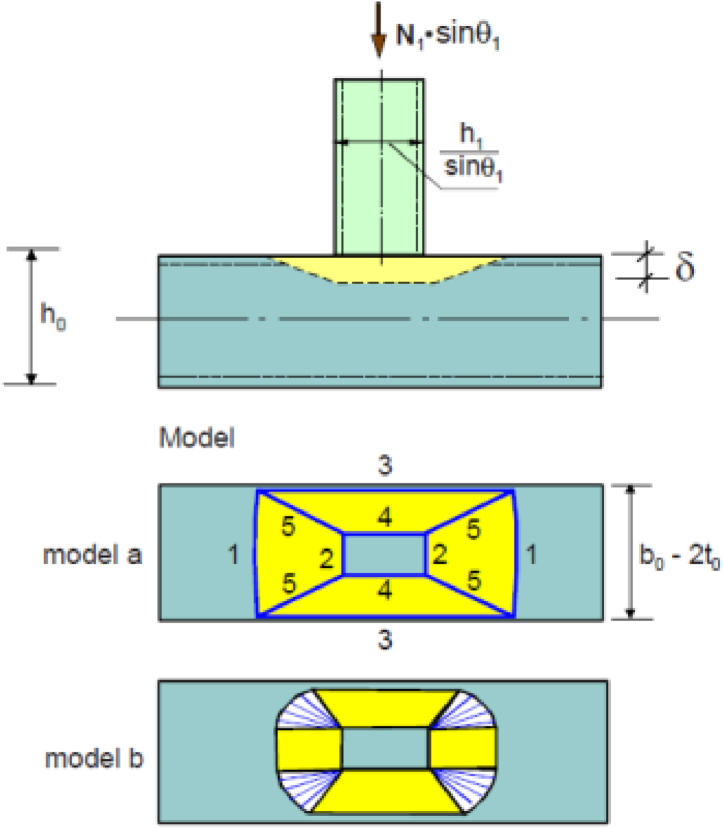
The method for determining the resistance of RHS joints assumes an idealised shape, in which linear plastic joints are formed. To ensure that the least favourable condition is considered, it would be more accurate to consider several possible shapes in which the chord face may plasticise. However, the differences in resistance between the different shapes are not large. Moreover, this method neglects the favourable effect of membrane stresses and does not consider the strengthening of the material after the yield strength is reached. An idealised shape is therefore used for conventional joints. Fig. 2 displays complex and idealised shape of linear plastic joints.
Fig. 2.
Simplified and complex model of RHS joint chord face plasticisation.
According to equation (1), the principle of the analytical method is based on the equality of the work performed by the external load N1 on the deformation δ with the internal energy required to form a line of plastic hinges along the length li at rotation φi.
| (1) |
The minimum occurs in the case from relation (2).
| (2) |
Equations (1), (2) then give the relationship for the analytical resistance of the RHS joint in chord face failure mode (3).
| (3) |
Some simplifications are introduced in this model. The effect of force spreading in the case of different wall thicknesses or the effect of weld size and weld type on the resistance of the joint is not introduced. In addition, if there is an axial force in the chord of the joint under consideration, it is necessary to introduce this influence into the resistance of the joint by a separate function.
3. Weld size
The research carried out by Herion [5] examines the load capacity of fillet welds and their required size. The main outputs of that research are design diagrams for recommended weld sizes for hollow section joints, based on their geometry and on the steel grade that is used. The diagrams depend on formulas that are designed according to the requirements of EN 1993-1-8:2006 [1], so that the plastic design resistance of the connected member is not higher than the resistance of the weld. Based on this inequality, formula (4) for the minimum fillet weld throat thickness is derived.
| (4) |
Where βw is the correlation factor, fy is the yield strength of the steel, fu is tensile strength, γM0 and γM2 are material safety factors, and t1 is the wall thickness of the brace.
The relations given above imply that, especially for higher strength steels, where ratio of yield strength to tensile strength is higher, the required fillet weld thickness increases. Large fillet welds must necessarily affect the load-bearing capacity of the joint, as the weld adds extra material to the joint. The reverse effect of larger welds on the resistance of the joint was not investigated by Herion [5].
The effect of a fillet weld on the resistance capacity of the T-joint loaded by axial force is introduced in the research published by De Matos [6], who investigated the influence of the axial force in the brace on the resistance of a hollow section joint. The size of the fillet weld is adopted into the calculation of the resistance using the brace-to-chord width ratio β. The effective width of the fillet weld considered as 2∙ 0.8aw is added to the cross-section width b1. The effective width of the brace thus corresponds to Eq. (5).
| (5) |
In the recent past, Bronzova [7] published research results containing a numerical parametric study that deals directly with the difference in the resistance and stiffness of hollow section joints depending on the weld that is used. This study compares the resistance and stiffness of the T-joint analysed under in-plane bending. The parameters are the size of the fillet weld aw and two geometric ratios of β and γ Eqs. (6), (7).
| (6) |
| (7) |
The numerical models were validated experimentally. By applying the equivalent width and height of the brace at the joint, the study implemented the influence of the weld that was used into the analytical relations:
| (8) |
| (9) |
The modified analytical formulas show good agreement with the numerical models. The study deals only with joints under in-plane bending.
The research presented above shows that the effect of weld type and weld size on the resistance of RHS joints is not negligible. Although there have been several studies on this topic, there is no generally accepted approach to the introduction of the influence of the weld into the analytical design process. Previously conducted investigations have dealt only with specific joint geometries and loadings.
4. Experiments
To investigate the influence of weld size and weld type and to evaluate the current analytical approach, two series of full-scale welded connection test specimens were fabricated and tested to failure in the laboratory under brace quasi-static compression loading.
4.1. Design of the specimens
The specimens are made of cold-formed hollow sections welded into T-joints. The chord member is a cold-formed square hollow section RHS 200/200/8 or RHS 100/100/8, and the brace member is a square hollow section RHS 150/150/5 or RHS 60/60/6. The specimen material is structural steel grade S355 J0. The specimens differ in the type of weld used in the connection. As Fig. 3 illustrates, there are three types of welds: A - Single-bevel weld, B - Fillet weld, C – A combination of a single-bevel weld and an overlapping fillet weld.
Fig. 3.
Types of welds used for the specimens.
The characteristics of the samples are presented in Table 1. The influence of weld type and weld size on the resistance is implemented into the analytical formulas given in prEN 1993-1-8:2021 [3], using β. The width of the brace b1,w is counted, including the weld size. Other geometric parameters such as the width b0, b1 and the thickness t0, t1 of the connected RHS sections, the differences in the size of the ratio β = b1,w/b0, and the analytical resistance of samples with different types of weld are shown in Table 2.
Table 1.
Characteristics of the specimensfor the axially compressed joints.
| Identification | Chord section | Brace section | Weld |
|---|---|---|---|
| TC.1.A | RHS 200/200/8 | RHS 150/150/5 | Single bevel |
| TC.1.B | RHS 200/200/8 | RHS 150/150/5 | Fillet a = 6 mm |
| TC.1.C | RHS 200/200/8 | RHS 150/150/5 | Single bevel and fillet a = 3 mm |
| TC.2.A | RHS 100/100/8 | RHS 60/60/6 | Single bevel |
| TC.2.B | RHS 100/100/8 | RHS 60/60/6 | Fillet a = 6 mm |
| TC.2.C | RHS 100/100/8 | RHS 60/60/6 | Single bevel and fillet a = 3 mm |
Table 2.
Analytical resistance according to EN 1993-1-8.
| ID | Chord width |
Chord thickness |
Brace width |
Brace thickness |
Weld size |
Brace width weld included |
Ratio |
Resistance |
|---|---|---|---|---|---|---|---|---|
| b0 [mm] | t0 [mm] | b1 [mm] | t1 [mm] | a [mm] | b1,w [mm] | β | NRd [kN] | |
| TC.1.A | 200 | 8.0 | 100 | 5.0 | – | 150 | 0.750 | 318.1 |
| TC.1.B | 200 | 8.0 | 100 | 5.0 | 6.0 | 167 | 0.835 | 453.3 |
| TC.1.C | 200 | 8.0 | 100 | 5.0 | 3.0 | 158 | 0.792 | 372.3 |
| TC.2.A | 100 | 8.0 | 60 | 6.0 | – | 60 | 0.600 | 211.9 |
| TC.2.B | 100 | 8.0 | 60 | 6.0 | 6.0 | 80 | 0.798 | 381.7 |
| TC.2.C | 100 | 8.0 | 60 | 6.0 | 3.0 | 71 | 0.713 | 282.6 |
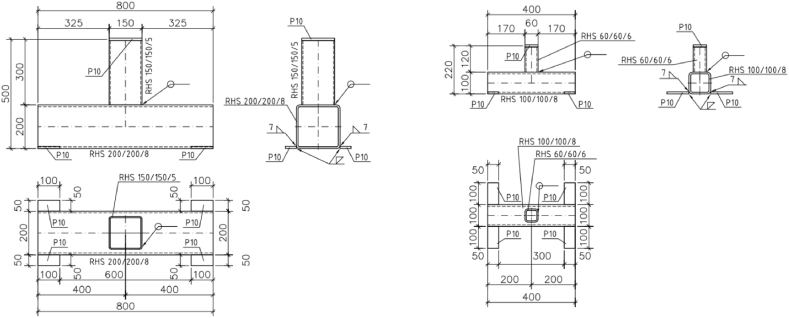
A special code is generated for each specimen. Letter T, at the beginning of the identification of all specimens, indicates that they are joints of T-shape. The second letter characterises the loading, C for axial compression. The point is followed by a digit, 1 for chord section RHS 200/200/8 and brace section RHS 150/150/5, and 2 for chord section RHS 100/100/8 and brace section RHS 60/60/6. The second point is followed by a letter, which represents the weld, A - Single-bevel weld, B - Fillet weld, C – A combination of a single-bevel weld and an overlapping fillet weld. The geometries of the compressed specimens are shown in Fig. 4.
Fig. 4.
Geometry of specimens in compression.
4.2. Experimental results
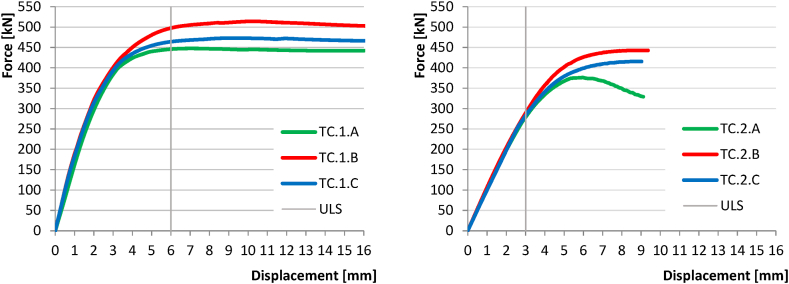
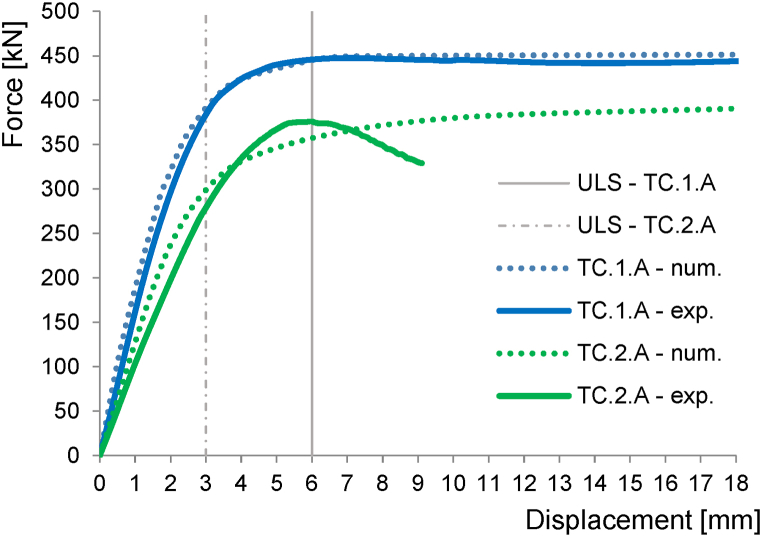
All specimens were tested in an electro-hydraulic press with maximum loading capacity 2000 kN. The specimens were initially loaded with quasi-static axial compression on the top of the brace members. The loading was controlled by deformation. The rate of loading started at 0.5 mm/min until the serviceability limit was reached. This limit was expected at a deformation of the chord face corresponding to 1 % of its width. Then the specimens were unloaded at the same rate to the point where the value of the loading force was about 20 kN. Subsequently, the specimens were again loaded at the same rate until the experimental bearing capacity of the joint was reached. Beyond the resistance of the joint, the loading rate was increased to 3 mm/min. The ultimate resistance limit was expected at a deformation of the chord face corresponding to 3 % of its width. These limits were introduced by Lu [8] for hollow section joints that do not reach a clearly noticeable peak in the force-deformation diagram. Fig. 5 compares force-displacement curves for axially-loaded specimens.
Fig. 5.
Load deformation curve for axially-loaded specimens.
Axially loaded specimens were supported over the entire length of the chord, and were secured in position by clamps. The force was applied on the top surface of the brace, which was closed with a cap. Two linear variable differential transformers (LVDT) were used for each specimen to measure the deformations.
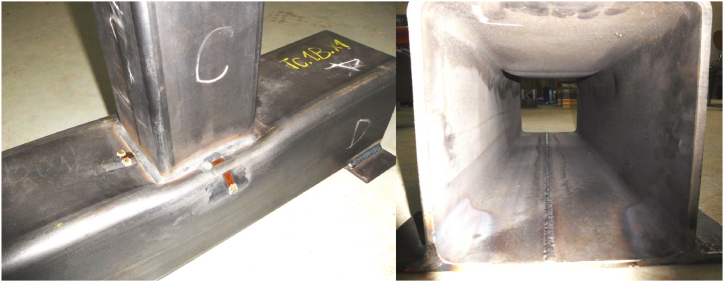
As expected, the specimen failed by chord face plasticisation. To make the deformed shape of the chord face stand out, the loading continued after the load capacity limit was reached. At the post-critical stage, the entire section of the chord was already deformed as shown in Fig. 6.
Fig. 6.
Deformed specimen TC.1.B.
The experimental results confirm the influence of weld type and weld size on the bearing capacity of the joint of RHS sections for chord face plasticisation failure mode. The more the weld exceeds the original chord dimension, the greater the load-carrying capacity of the joint. The difference between the differently welded specimens is more apparent after the start of chord plasticisation than during the elastic part of the loading.
5. Validation
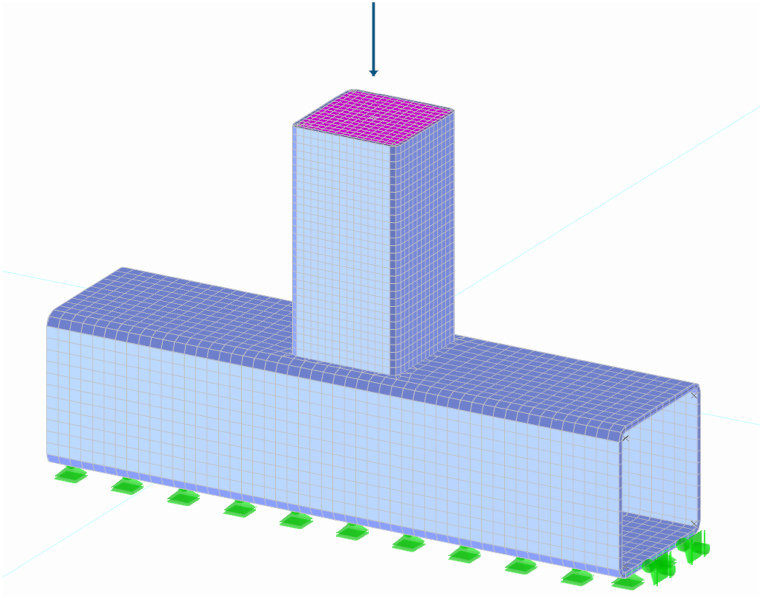
To further investigate and confirm the effect of weld type and weld size, it was necessary to verify the results on a larger variety of samples that would represent different ratios of chord and brace T-joint sizes of RHS sections (see Fig. 7). A research-oriented numerical model was therefore developed, and was validated on the experiments that were performed. Based on this model, a numerical study could be further developed.
Fig. 7.
Load, boundary conditions and mesh of the RHS numerical model of the joint.
5.1. Model
The numerical model is created in RFEM software for structural analysis using the finite element method. The joint is modelled by shell elements (see Fig. 7). Wherever quadrangular elements cannot be used, the mesh generator inserts triangular elements. Based on a mixed interpolation of transversal displacements, cross section rotations, and transversal shear deformations, the MITC4 elements (Mixed Interpolation of Tensorial Components) are used: MITC3+ for triangles, MITC4 for quadrangles. The analysis is carried out by the geometrically nonlinear second order iterative Newton-Raphson method. The maximum number of iterations is set to 100 with 4 load increments. The walls of the RHS members are modelled using shells of corresponding thicknesses that are placed in the centres of the plates. The material model is isotropic plastic with the material diagram obtained from the tensile tests. The von Mises hypothesis is used to determine the stress and strain.
The model is vertically supported on the bottom wall of the chord, and one edge is also supported in the horizontal directions. The brace is terminated on the upper surface of the chord, and is connected by a rigid link. The model is loaded by an axial force at the centroid of the brace section, which is distributed into its walls by a rigid surface.
5.2. Material properties
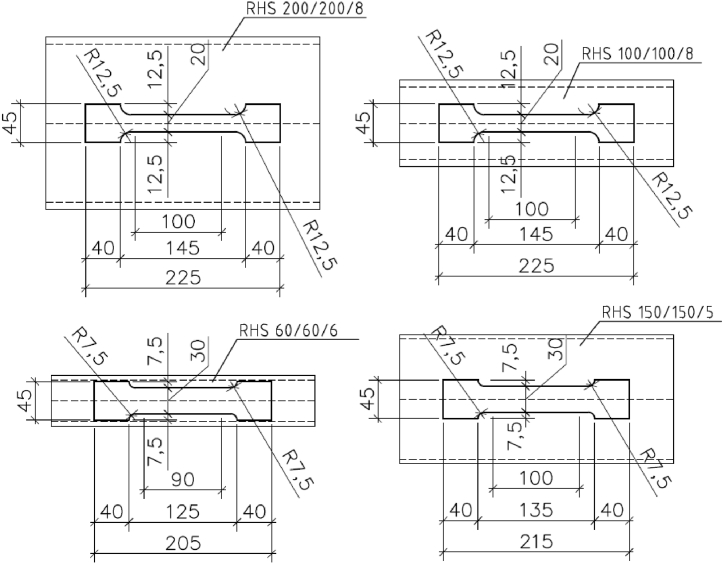
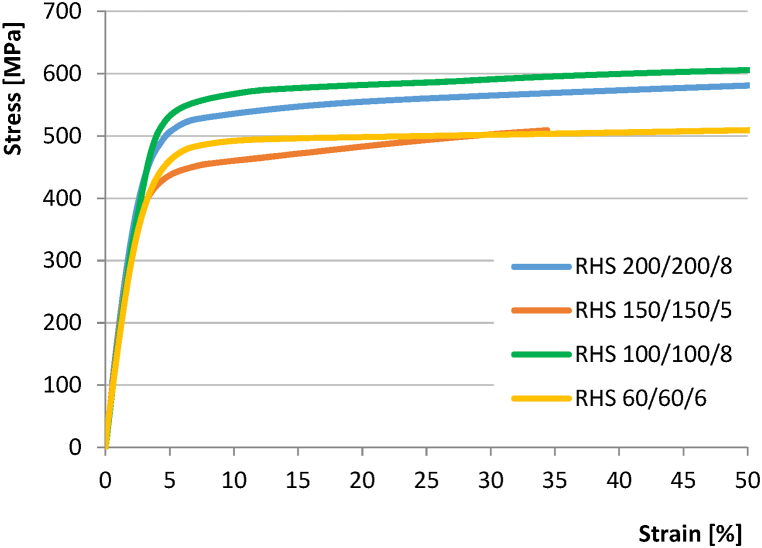
Tensile tests were carried out to determine the material characteristics of the steel elements from which the tested joints were welded. The joints are welded from elements of four different sections; four specimens were cut from each such element for tensile testing. The shape of the test bodies is shown in Fig. 8. The tests were carried out in accordance with EN ISO 6892-1 [9]. The investigated material characteristics were yield strength fy, ultimate strength fu, and modulus of elasticity E. The observed characteristics are summarised in Table 3. True stress – true strain material diagrams are shown in Fig. 9.
Fig. 8.
Dimensions of the tensile coupons.
Table 3.
Material properties of the cold-formed hollow sections.
| fy[MPa] | fu [MPa] | E [GPa] | |
|---|---|---|---|
| RHS 200/200/8 | 429 | 512 | 214 |
| RHS 150/150/5 | 420 | 530 | 205 |
| RHS 100/100/8 | 372 | 516 | 192 |
| RHS 60/60/6 | 434 | 489 | 208 |
Fig. 9.
Stress-strain diagrams of the tensile coupons.
The true stress true strain material diagram is used to convert the tensile test results into a numerical material model using (10), (11).
| (10) |
| (11) |
5.3. Validation
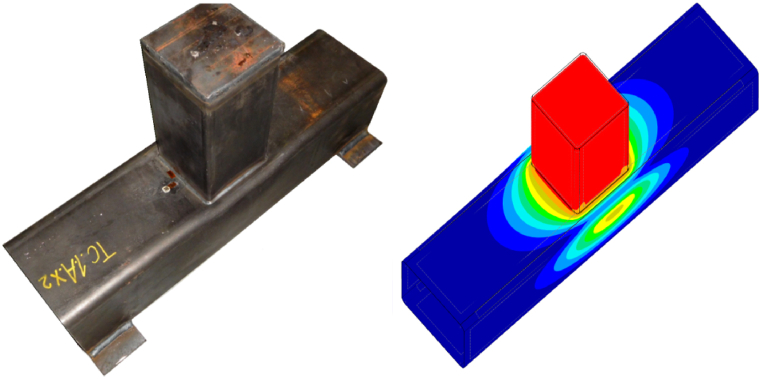
The validation of FE models of the joints is shown in Fig. 10. The solid line shows the dependence of the force on the displacement from the experiments - the dotted line from the numerical models. The resistance limit is shown by the vertical grey line -a solid line for joint TC.1.A and a dashed line for TC.2A. The joints show a very good agreement of the resistance values, the initial stiffness and the deformed shape. The difference between the numerical model and the experimental results for specimen TC.2.A is caused by the asymmetric deformation of the specimen in the post-critical region and is irrelevant to the observed behaviour of the specimen.
Fig. 10.
Validation of the FE model.
Table 4 quantifies the difference between the numerical and experimental models on the resistance limit. For the TC.1.A joint, the difference is negligible. For the TC.2.A joint, the difference is 7.2 %. The visual correspondence of the deformed shape of the joint can be seen in Fig. 11.
Table 4.
Resistance validation of the FE model.
| Numerical[kN] | Experimental[kN] | Difference [%] | |
|---|---|---|---|
| TC.1.A | 445.1 | 445.9 | 0.0 |
| TC.2.A | 298.9 | 278.8 | 7.2 |
Fig. 11.
Validation of the deformed shape of specimen TC.1.A.
5.4. Mesh sensitivity
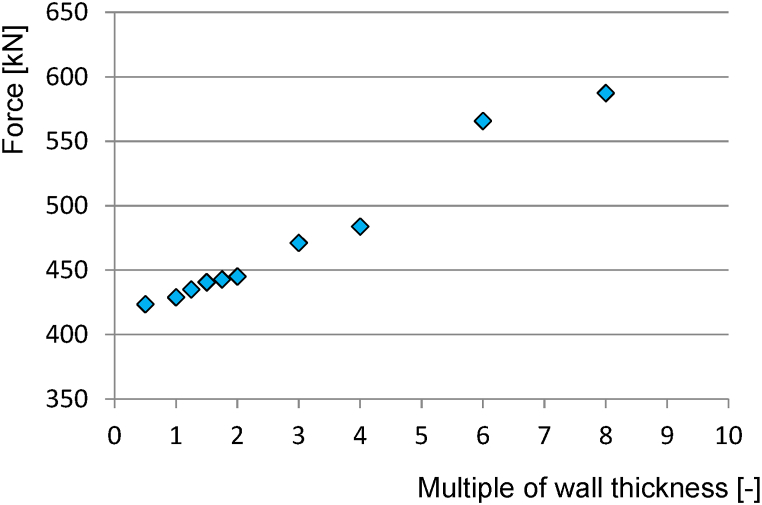
The mesh is composed mainly of square elements supplemented in critical places by triangular elements. The size of the elements is set separately for brace and chord, corresponding to twice the wall thickness of the respective member. In the case of sample TC.1.A, the elements are 16 mm for the chord and 10 mm for the brace. A sensitivity study was carried out to determine the sensitivity of the model to the change in the mesh element size. If the multiple of the wall thickness of the member is raised up to eight times for the calculation of the mesh element, the capacity of the joint increases significantly, while if it is reduced, the capacity decreases. The drop in resistance is not significant - at a multiple of 0.25 it is less than 5 %, as can be seen in Table 5 and Fig. 12.
Table 5.
Mesh sensitivity.
| Element size as multiples of wall thickness [−] | Resistance [kN] | Difference [%] |
|---|---|---|
| 0.50 | 423.5 | −4.9 |
| 1.00 | 428.5 | −3.7 |
| 1.25 | 435.0 | −2.3 |
| 1.50 | 440.6 | −1.0 |
| 1.75 | 442.8 | −0.5 |
| 2.00 | 445.1 | 0.0 |
| 3.00 | 471.1 | 5.8 |
| 4.00 | 483.3 | 8.7 |
| 6.00 | 565.8 | 27.1 |
| 8.00 | 587.4 | 32.0 |
Fig. 12.
Mesh sensitivity.
6. Numerical study
6.1. Model
To determine the sensitivity of the model to changes in geometry, a numerical parametric study was performed. The selected parameter is the ratio of the brace member and chord widths β. This parameter varies from 0.33 to 0.75, so that chord face failure remains the crucial failure mode. Ten different joint geometries with different β ratios were investigated. Three different weld types, a butt weld (denoted by "-") and two fillet welds of different sizes, were applied to nine of these ten geometries.For one selected geometry, fillet welds of six sizes and a butt weld were used to assess the effect of increasing the fillet weld dimension. The geometry of all models is summarised in Table 6.
Table 6.
Geometry of models for the numerical study.
| No. |
b0 |
t0 |
b1 |
t1 |
aw |
β |
|---|---|---|---|---|---|---|
| [mm] | [mm] | [mm] | [mm] | [mm] | [−] | |
| TC1.1 | 200 | 8 | 150 | 5 | – | 0.75 |
| TC1.2 | 200 | 8 | 150 | 5 | 3 | 0.75 |
| TC1.3 | 200 | 8 | 150 | 5 | 6 | 0.75 |
| TC2.1 | 200 | 8 | 120 | 6 | – | 0.60 |
| TC2.2 | 200 | 8 | 120 | 6 | 3 | 0.60 |
| TC2.3 | 200 | 8 | 120 | 6 | 7 | 0.60 |
| TC3.1 | 200 | 8 | 100 | 4 | – | 0.50 |
| TC3.2 | 200 | 8 | 100 | 4 | 3 | 0.50 |
| TC3.3 | 200 | 8 | 100 | 4 | 5 | 0.50 |
| TC4.1 | 200 | 8 | 70 | 4 | – | 0.35 |
| TC4.2 | 200 | 8 | 70 | 4 | 3 | 0.35 |
| TC4.3 | 200 | 8 | 70 | 4 | 5 | 0.35 |
| TC5.1 | 150 | 5 | 100 | 4 | – | 0.67 |
| TC5.2 | 150 | 5 | 100 | 4 | 3 | 0.67 |
| TC5.3 | 150 | 5 | 100 | 4 | 5 | 0.67 |
| TC6.1 | 150 | 5 | 50 | 4 | – | 0.33 |
| TC6.2 | 150 | 5 | 50 | 4 | 3 | 0.33 |
| TC6.3 | 150 | 5 | 50 | 4 | 5 | 0.33 |
| TC7.1 | 120 | 6 | 50 | 4 | – | 0.42 |
| TC7.2 | 120 | 6 | 50 | 4 | 3 | 0.42 |
| TC7.3 | 120 | 6 | 50 | 4 | 5 | 0.42 |
| TC8.1 | 100 | 4 | 50 | 4 | – | 0.50 |
| TC8.2 | 100 | 4 | 50 | 4 | 3 | 0.50 |
| TC8.3 | 100 | 4 | 50 | 4 | 5 | 0.50 |
| TC9.1 | 100 | 4 | 60 | 5 | – | 0.60 |
| TC9.2 | 100 | 4 | 60 | 5 | 3 | 0.60 |
| TC9.3 | 100 | 4 | 60 | 5 | 5 | 0.60 |
| TC10.1 | 120 | 6 | 80 | 5 | – | 0.67 |
| TC10.2 | 120 | 6 | 80 | 5 | 3 | 0.67 |
| TC10.3 | 120 | 6 | 80 | 5 | 4 | 0.67 |
| TC10.4 | 120 | 6 | 80 | 5 | 5 | 0.67 |
| TC10.5 | 120 | 6 | 80 | 5 | 6 | 0.67 |
| TC10.6 | 120 | 6 | 80 | 5 | 7 | 0.67 |
| TC10.7 | 120 | 6 | 80 | 5 | 8 | 0.67 |
The numerical model is created in RFEM code, as described in Chapter 3, except that the material diagram with the yielding plateau for S355 steel, as described in EN 1993-1-5: 2006 [10], was used. The yield strength of the steel was set to 355 MPa and the modulus of elasticity in the plastic part of the diagram was set to 210 MPa.
6.2. Weld modelling
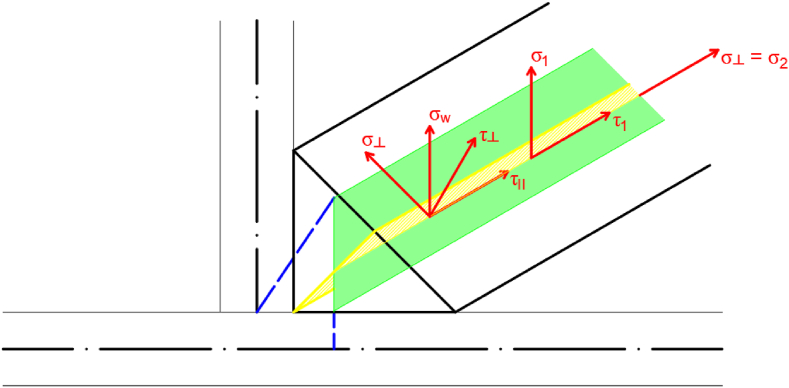
The weld model consists of a substitute shell element and two rigid links that connect it to the shell elements representing the walls of the connected elements. The first rigid link connects the brace face and the substitute weld element, and the second rigid link connects the substitute weld element and the chord face. The substitute weld surface is rotated in the direction of the brace member wall to be joined, so that the stress directions σ1 and τ1 correspond to weld stresses σw and τII, as described in Ref. [1]. The thickness of substitute weld surface corresponds to the fillet weld throat thickness.
The material of the weld surface is plastic, corresponding to the material used for the other surfaces, and orthotropic. The normal stiffness in direction 1 corresponds to the Young's modulus of elasticity for steel of 210 GPa. The shear stiffness in direction 1 corresponds to steel of 80.7 GPa. In the other directions the stiffness is set to zero.
The weld model is shown in Fig. 13.
Fig. 13.
Shell model of the weld.
A numerical study has shown the effect of a fillet weld on the compressive resistance of an RHS T-joint. Depending on the ratio β and the size of the fillet weld, the increase in resistance ranges from 3.0 % to 39.6 %, as shown in Table 7.
Table 7.
Resistance of models for the numerical study.
| No. |
aw |
Resistance NRd,num |
Increase in resistance to butt weld |
|---|---|---|---|
| [mm] | [kN] | [%] | |
| TC1.1 | – | 349.0 | – |
| TC1.2 | 3 | 393.0 | 12.6 |
| TC1.3 | 6 | 429.0 | 22.9 |
| TC2.1 | – | 199.8 | – |
| TC2.2 | 3 | 218.3 | 9.3 |
| TC2.3 | 7 | 244.5 | 22.4 |
| TC3.1 | – | 152.7 | – |
| TC3.2 | 3 | 163.7 | 7.2 |
| TC3.3 | 5 | 164.6 | 7.8 |
| TC4.1 | – | 108.5 | – |
| TC4.2 | 3 | 111.8 | 3.0 |
| TC4.3 | 5 | 113.4 | 4.5 |
| TC5.1 | – | 97.1 | – |
| TC5.2 | 3 | 118.4 | 21.9 |
| TC5.3 | 5 | 121.5 | 25.1 |
| TC6.1 | – | 38.8 | – |
| TC6.2 | 3 | 42.0 | 8.2 |
| TC6.3 | 5 | 44.5 | 14.6 |
| TC7.1 | – | 72.7 | – |
| TC7.2 | 3 | 80.0 | 10.1 |
| TC7.3 | 5 | 83.5 | 14.9 |
| TC8.1 | – | 36.6 | – |
| TC8.2 | 3 | 43.8 | 19.7 |
| TC8.3 | 5 | 48.2 | 31.7 |
| TC9.1 | – | 48.5 | – |
| TC9.2 | 3 | 60.1 | 23.9 |
| TC9.3 | 5 | 67.7 | 39.6 |
| TC10.1 | – | 143.5 | – |
| TC10.2 | 3 | 154.2 | 7.5 |
| TC10.3 | 4 | 170.2 | 18.6 |
| TC10.4 | 5 | 186.0 | 29.6 |
| TC10.5 | 6 | 196.4 | 36.9 |
| TC10.6 | 7 | 206.9 | 44.2 |
| TC10.7 | 8 | 218.2 | 52.1 |
7. Application to design
7.1. Proposed analytical model
The formula given in prEN 1993-1-8:2021 [3], defines the axial resistance of the RHS T-joint, as follows:
| (12) |
Where is the material factor for resistance, is the yield strength of the chord, is the chord wall thickness, is the angle between the connected elements, is a geometrical ratio (), and is a geometrical ratio, defined as:
| (13) |
is the chord stress function, defined as:
| (14) |
where:
| (15) |
and is a partial factor.
To introduce the effect of weld size and type into the analytical resistance formula, it is necessary to modify the calculation of geometric ratio . The size of the fillet weld is considered in the width of the brace:
| (16) |
where is the fillet weld throat thickness, and the geometrical ratio is then defined as:
| (17) |
The axial resistance of the RHS T-joint is included according to the formula given in (12) for chord face failure mode. This failure mode is critical when the geometrical ratio is less then 0.85.
7.2. Verification
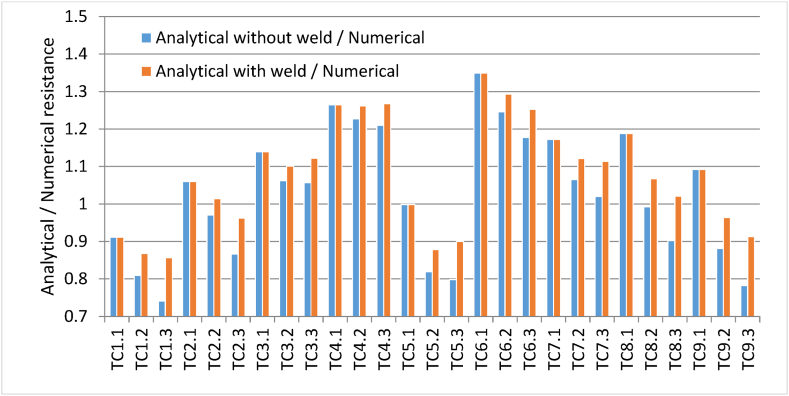
Table 8 shows the load resistances of the axially loaded joints determined numerically by the numerical model NRd,num, the current analytical solution without taking the weld into consideration NRd,EN according to prEN 1993-1-8:2021 [3], and the proposed analytical solution NRd,EN,w with the weld taken into consideration according to Eqs. (16), (17). The first joint in each set is connected by a butt weld, in which case the current analytical resistance NRd,EN corresponds to the proposed analytical solution NRd.EN,w. From the ratios between the above resistances given in Table 8 and Fig. 14, the influence of the fillet weld size on the resistance of the joint is not negligible. Using the proposed analytical formula, the use of a fillet weld can increase the resistance of the joint by 3 %–17 %. For some cases, the numerical results are conservative, in contrast to the analytical solution.
Table 8.
Verification of resistance for different joint sizes.
| No. | Numerical validated model NRd,num |
Analytical in prEN without weld NRd,EN |
Analytical in prEN weld included NRd,EN,w |
NRd,EN/NRd,num |
NRd,EN,w/NRd,num |
|---|---|---|---|---|---|
| [kN] | [kN] | [kN] | [−] | [−] | |
| TC1.1 | 349.0 | 318.1 | 318.1 | 0.91 | 0.91 |
| TC1.2 | 393.0 | 318.1 | 341.0 | 0.81 | 0.87 |
| TC1.3 | 429.0 | 318.1 | 367.8 | 0.74 | 0.86 |
| TC2.1 | 199.8 | 211.9 | 211.9 | 1.06 | 1.06 |
| TC2.2 | 218.3 | 211.9 | 221.3 | 0.97 | 1.01 |
| TC2.3 | 244.5 | 211.9 | 235.4 | 0.87 | 0.96 |
| TC3.1 | 152.7 | 174.0 | 174.0 | 1.14 | 1.14 |
| TC3.2 | 163.7 | 174.0 | 180.2 | 1.06 | 1.10 |
| TC3.3 | 164.6 | 174.0 | 184.7 | 1.06 | 1.12 |
| TC4.1 | 108.5 | 137.2 | 137.2 | 1.26 | 1.26 |
| TC4.2 | 111.8 | 137.2 | 141.1 | 1.23 | 1.26 |
| TC4.3 | 113.4 | 137.2 | 143.8 | 1.21 | 1.27 |
| TC5.1 | 97.1 | 97.0 | 97.0 | 1.00 | 1.00 |
| TC5.2 | 118.4 | 97.0 | 104.0 | 0.82 | 0.88 |
| TC5.3 | 121.5 | 97.0 | 109.4 | 0.80 | 0.90 |
| TC6.1 | 38.8 | 52.4 | 52.4 | 1.35 | 1.35 |
| TC6.2 | 42.0 | 52.4 | 54.3 | 1.25 | 1.29 |
| TC6.3 | 44.5 | 52.4 | 55.7 | 1.18 | 1.25 |
| TC7.1 | 72.7 | 85.2 | 85.2 | 1.17 | 1.17 |
| TC7.2 | 80.0 | 85.2 | 89.7 | 1.06 | 1.12 |
| TC7.3 | 83.5 | 85.2 | 93.0 | 1.02 | 1.11 |
| TC8.1 | 36.6 | 43.5 | 43.5 | 1.19 | 1.19 |
| TC8.2 | 43.8 | 43.5 | 46.7 | 0.99 | 1.07 |
| TC8.3 | 48.2 | 43.5 | 49.2 | 0.90 | 1.02 |
| TC9.1 | 48.5 | 53.0 | 53.0 | 1.09 | 1.09 |
| TC9.2 | 60.1 | 53.0 | 57.9 | 0.88 | 0.96 |
| TC9.3 | 67.7 | 53.0 | 61.8 | 0.78 | 0.91 |
Fig. 14.
Verification of resistance for different weld sizes.
The validity of the proposed modified formula for the axial resistance of the RHS T-joint is verified by numerical models under axial compression. The behaviour of the joints under axial tension should be identical, but no explicit verification of this behaviour has been made.
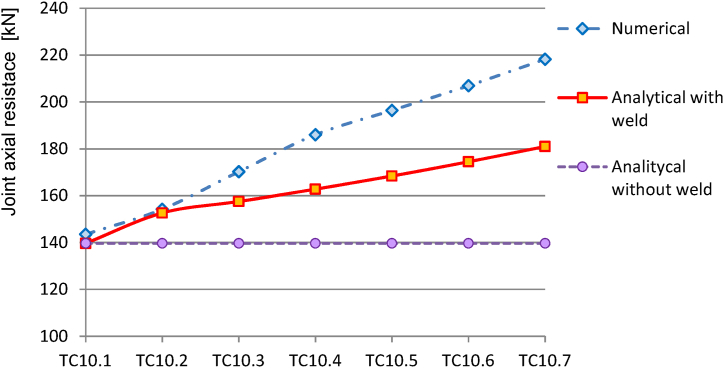
Table 9 and Fig. 15 show the effect of fillet weld size on the resistance of a joint with the same geometry. The resistance determined by the proposed method shows an increase in resistance for larger welds. The rate of the increase is consistent with the resistance determined by the numerical method.
Table 9.
Verification of resistance for increasing fillet weld dimension.
| No. | Numerical validated model NRd,num |
Analytical in prEN without weld NRd,EN |
Analytical in prEN weld included NRd,EN,w |
NRd,EN/NRd,num |
NRd,EN,w/NRd,num |
|---|---|---|---|---|---|
| [kN] | [kN] | [kN] | [−] | [−] | |
| TC10.1 | 143.5 | 139.7 | 139.7 | 0.97 | 0.97 |
| TC10.2 | 154.2 | 139.7 | 152.6 | 0.91 | 0.99 |
| TC10.3 | 170.2 | 139.7 | 157.5 | 0.82 | 0.93 |
| TC10.4 | 186.0 | 139.7 | 162.8 | 0.75 | 0.88 |
| TC10.5 | 196.4 | 139.7 | 168.4 | 0.71 | 0.86 |
| TC10.6 | 206.9 | 139.7 | 174.4 | 0.68 | 0.84 |
| TC10.7 | 218.2 | 139.7 | 181.0 | 0.64 | 0.83 |
Fig. 15.
Verification of resistance for increasing fillet weld dimension.
Summary
The effect of the weld size and weld type on the resistance of an axially loaded RHS T-joint was investigated experimentally and numerically. A numerical study for samples of limiting design geometries with butt and fillet welds of different sizes showed that this effect is not negligible. The effect can be considered in the analytical design formula in prEN 1993-1-8:2021 [3] by taking the fillet weld throat thickness into consideration in the width of the brace.
-
-
The ultimate resistance of RHS joints is increased when larger fillet welds are used.
-
-
The resistance predicted by the failure mode method equations in prEN1993-1-12:2021 is fitted on a filled weld regular size designed for full resistance. In cases with a smaller weld, the resistance is lower, as shown numerically in the study presented here.
-
-
The modification of the design equation prepared in prEN1993-1-12:2021 is proposed in order to take into consideration the type and the size of the weld used to join the brace and the chord.
CRediT authorship contribution statement
Petr Jehlicka: Conceptualization, Formal analysis, Investigation, Methodology, Software, Validation, Visualization, Writing – original draft. Frantisek Wald: Supervision, Writing – review & editing.
Declaration of competing interest
The authors declare that they have no known competing financial interests or personal relationships that could have appeared to influence the work reported in this paper.
Acknowledgments
The support of CTU grant SGS22/141/OHK1/3T/11 Advanced approach to the steel structures design is gratefully acknowledged.
References
- 1.EN 1993-1-8:2006, Eurocode 3. Design of Steel Structures – Part 1.8: Connection Design. European Committee for Standardization; Brussels: 2006. [Google Scholar]
- 2.ISO 14346:2013 (E): Static Design Procedure for Welded Hollow-Section Joints – Recommendations. International Organization for Standardization (ISO); Geneva: 2013. [Google Scholar]
- 3.prEN 1993-1-8:2021 CEN: Eurocode 3. Design of Steel Structures – Part 1.8: Connection Design. European Committee for Standardization; Brussels: 2020. [Google Scholar]
- 4.Wardenier J., Packer J.A. second ed. CIDECT; 2010. Hollow Section in Structural Applications. [Google Scholar]
- 5.Herion S., Fleischer O. KoRoH GmbH - CCTH Kompetenzzentrum Rohre und Hohlprofile; Karlsruhe, Germany: 2011. Reduction of Weld sizes.CIDECT Report 5BY-5/11. [Google Scholar]
- 6.Matos R.M., P de M., Costa-Neves L.F., Lima L.R.O., Vellasco P.C.G.S., Silva J.G.S. Resistance and elastic stiffness of RHS"T" joints: Part I - axial brace loading. Latin American J. of Solids and Structures. 2015;12:2159–2179. [Google Scholar]
- 7.Bronzova M., Garifullin M., Mela K. Research Publishing; Singapore: 2019. Influence of Fillet Welds on Structural Behavior of RHS T Joints, Proceedings of the 17th International Symposium on Tubular Structures; pp. 590–598. [Google Scholar]
- 8.Lu L.H., de Winkel G.D., Yu Y., Wardenier J. A.A. Balkema; Melbourne, Australia: 1994. Deformation Limit for the Ultimate Strength of Hollow Section Joints. Proceedings of the 6th International Symposium on Tubular Structures; pp. 341–347. [Google Scholar]
- 9.Metallic Materials – Tensile Testing – Part 1: Method of Test at Room Temperature. International Organization for Standardization; Geneva: 2019. ISO 6892-1. (ISO) [Google Scholar]
- 10.EN 1993-1-5: 2006 Eurocode 3. Design of Steel Structures – Part 1.5: Plated Structural Elements. Brussels. European Committee for Standardization; 2006. [Google Scholar]


