Abstract
Conventional peripheral nerve probes are primarily fabricated in a cleanroom, requiring the use of multiple expensive and highly specialized tools. This paper presents a cleanroom “light” fabrication process of carbon fiber neural electrode arrays that can be learned quickly by an inexperienced cleanroom user. This carbon fiber electrode array fabrication process requires just one cleanroom tool, a Parylene C deposition machine, that can be learned quickly or outsourced to a commercial processing facility at marginal cost. This fabrication process also includes hand-populating printed circuit boards, insulation, and tip optimization.
The three different tip optimizations explored here (Nd:YAG laser, blowtorch, and UV laser) result in a range of tip geometries and 1 kHz impedances, with blowtorched fibers resulting in the lowest impedance. While previous experiments have proven laser and blowtorch electrode efficacy, this paper also shows that UV laser-cut fibers can record neural signals in vivo. Existing carbon fiber arrays either do not have individuated electrodes in favor of bundles or require cleanroom fabricated guides for population and insulation. The proposed arrays use only tools that can be used at a benchtop for fiber population. This carbon fiber electrode array fabrication process allows for quick customization of bulk array fabrication at a reduced price compared to commercially available probes.
Introduction
Much of neuroscience research relies upon recording neural signals using electrophysiology (ePhys). These neural signals are crucial to understanding the functions of neural networks and novel medical treatments such as brain machine and peripheral nerve interfaces1,2,3,4,5,6. Research surrounding peripheral nerves requires custom-made or commercially available neural recording electrodes. Neural recording electrodes-unique tools with micron-scale dimensions and fragile materials-require a specialized set of skills and equipment to fabricate. A variety of specialized probes have been developed for specific end uses; however, this implies that experiments must be designed around currently available commercial probes, or a laboratory must invest in the development of a specialized probe, which is a lengthy process. Due to the wide variety of neural research in peripheral nerve, there is high demand for a versatile ePhys probe4,7,8. An ideal ePhys probe would feature a small recording site, low impedance9, and a financially realistic price point for implementation in a system3.
Current commercial electrodes tend to either be extraneural or cuff electrodes (Neural Cuff10, MicroProbes Nerve Cuff Electrode11), which sit outside the nerve, or intrafascicular, which penetrate the nerve and sit within the fascicle of interest. However, as cuff electrodes sit further away from the fibers, they pick up more noise from nearby muscles and other fascicles that may not be the target. These probes also tend to constrict the nerve, which can lead to biofouling-a build-up of glial cells and scar tissue-at the electrode interface while the tissue heals. Intrafascicular electrodes (such as LIFE12, TIME13, and Utah Arrays14) add the benefit of fascicle selectivity and have good signal-to-noise ratios, which is important in discriminating signals for machine interfacing. However, these probes do have issues with biocompatibility, with nerves becoming deformed over time3,15,16. When bought commercially, both these probes have static designs with no option for experiment-specific customization and are costly for newer laboratories.
In response to the high cost and biocompatibility issues presented by other probes, carbon fiber electrodes may offer an avenue for neuroscience laboratories to build their own probes without the need for specialized equipment. Carbon fibers are an alternative recording material with a small form factor that allows for low damage insertion. Carbon fibers provide better biocompatibility and considerably lower scar response than silicon17,18,19 without the intensive cleanroom processing5,13,14. Carbon fibers are flexible, durable, easily integrated with other biomaterials19, and can penetrate and record from nerve7,20. Despite the many advantages of carbon fibers, many laboratories find the manual fabrication of these arrays arduous. Some groups21 combine carbon fibers into bundles that collectively result in a larger (~200 μm) diameter; however, to our knowledge, these bundles have not been verified in nerve. Others have fabricated individuated carbon fiber electrode arrays, although their methods require cleanroom-fabricated carbon fiber guides22,23,24 and equipment to populate their arrays17,23,24. To address this, we propose a method of fabricating a carbon fiber array that can be performed at the laboratory benchtop that allows for impromptu modifications. The resulting array maintains individuated electrode tips without specialized fiber populating tools. Additionally, multiple geometries are presented to match the needs of the research experiment. Building from previous work8,17,22,25, this paper provides detailed methodologies to build and modify several styles of arrays manually with minimal cleanroom training time needed.
Protocol
All animal procedures were approved by the University of Michigan Institutional Animal Care and Use Committee.
1. Choosing a carbon fiber array
-
Choose a printed circuit board (PCB) from one of the three designs shown in Figure 1.
NOTE: For this protocol, Flex Arrays will be the focus.
Refer to PCB designs on the Chestek Lab website (https://chestekresearch.engin.umich.edu), free of charge and ready to be sent to and ordered for printing through a PCB printing house.
See Table 1 for a summary of connectors for each board and their specifications to help choose the connector that will work for the specific experimental setup.
Figure 1: Connectors and associated printed circuit boards.
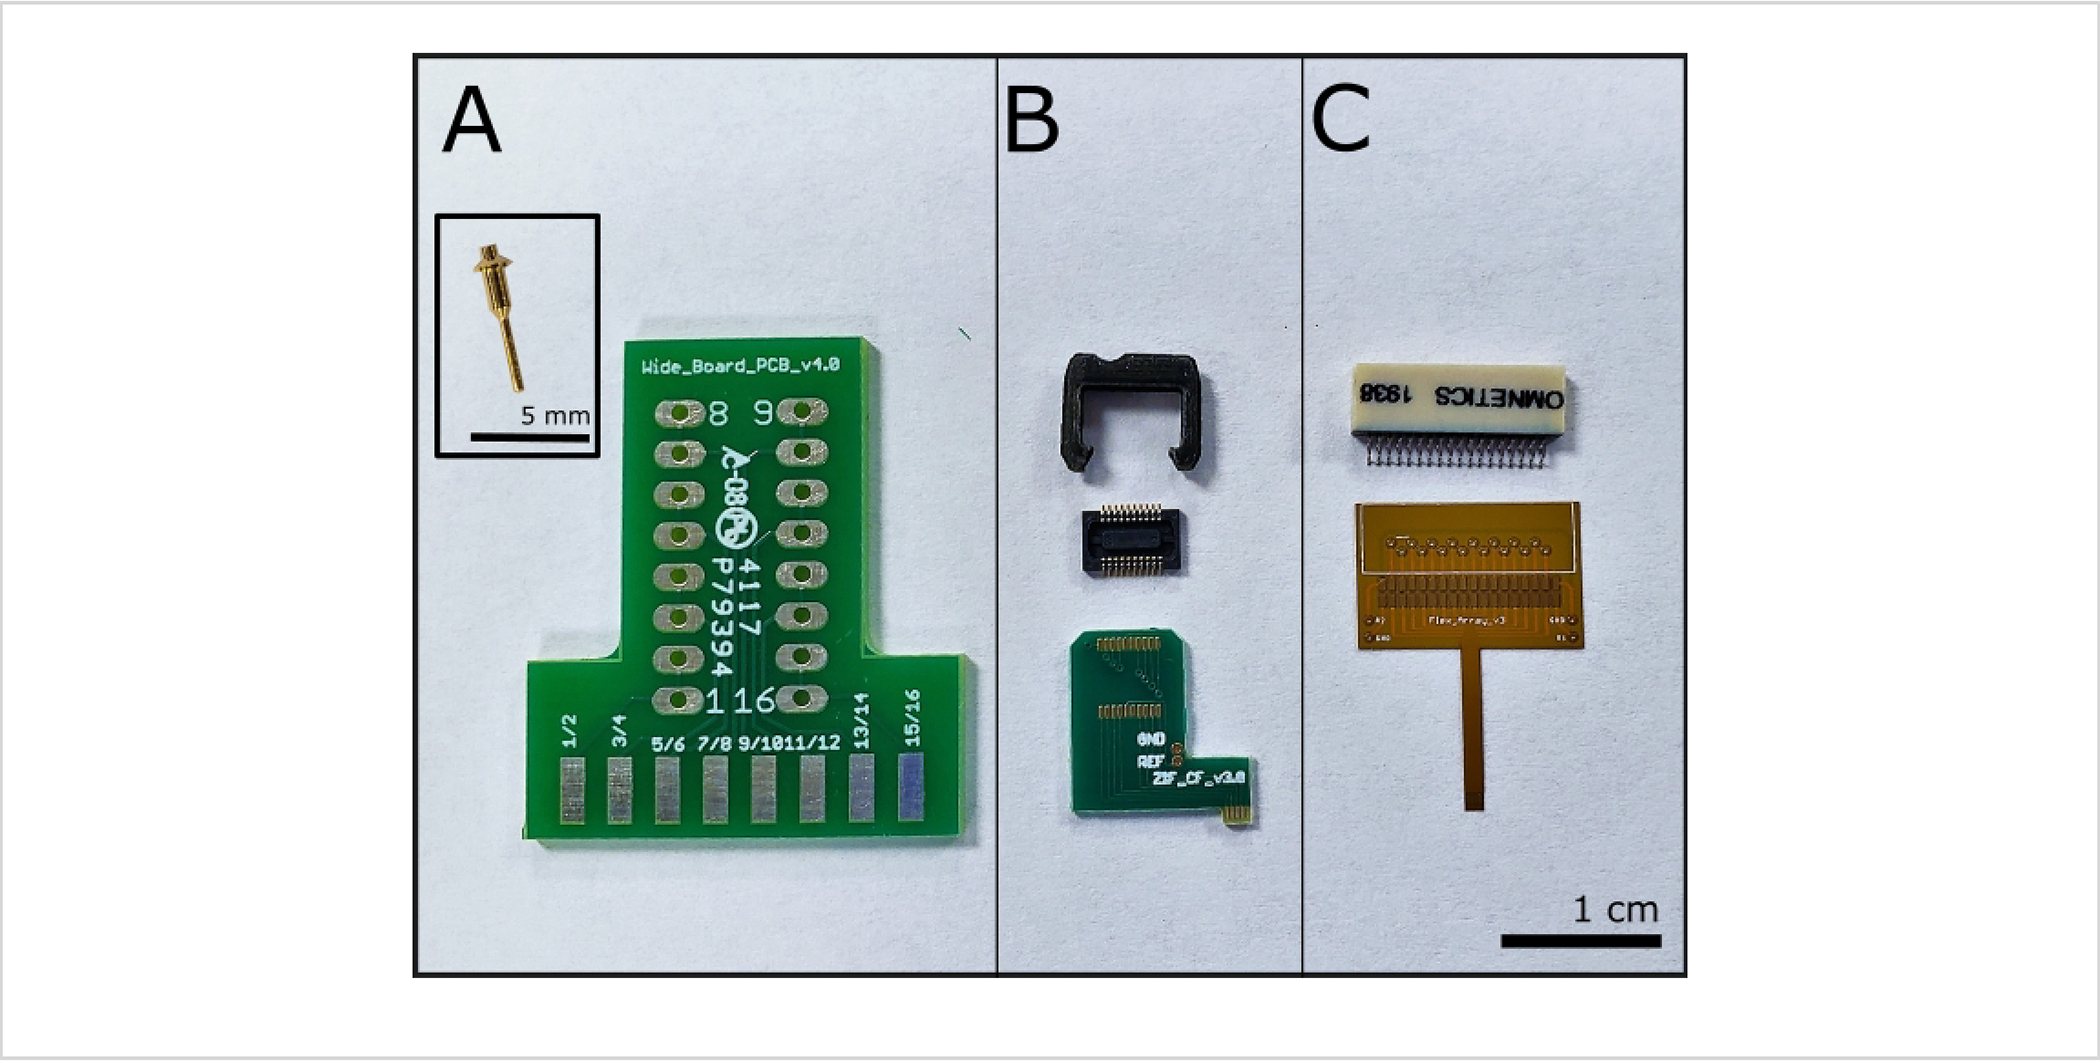
(A) Wide Board with one of sixteen necessary connectors in inset (inset scale bar = 5 mm). (B) ZIF and one of two connectors and one shroud. (C) Flex Array with a 36-pin connector; scale bar = 1 cm.
Table 1:
Each PCB has a different connector and pitch associated with it.
| PCB Name | Connector | Soldering Pad Size (mm) | Exposed Trace Size (mm) | Trace Pitch (μm) | Channels |
|---|---|---|---|---|---|
| Wide Board | Mill-Max 9976-0-00-15-00-00-03-0 | 3.25 x 1.6 | 1.5 x 4.0 | 3000 | 8 |
| ZIF | Hirose DF30FC-20DS-0.4V, | 0.23 x 0.7 | 0.75 x 0.07 | 152.4 | 16 |
| Flex Array | Omnetics A79024–001 | 0.4 x 0.8 | 0.6 x 0.033 | 132 | 16 |
Abbreviation: PCB = printed circuit board.
2. Soldering the connector to the circuit board
Set a soldering iron to 315 °C (600 °F).
-
Apply flux to all soldering pads on the PCB.
NOTE: Flux within a tube can be squeezed across the pads, while flux in a pot can be applied with the wooden end of a cotton-tipped applicator by smearing the flux across all pads liberally.
Form small mounds of solder on the back pads of the Flex Array (Figure 2A).
-
Solder the bottom row of connector pins to the back row of solder pads (Figure 2B).
NOTE: All board designs provided by the Chestek lab were designed so that the connectors would pair precisely with their designated board.
-
To do this, solder the pins on either side of the connector with easy access to the solder mounds. Once secure, gently push the soldering iron tip between the front pins to solder the remaining connections in the back.
NOTE: Once the back row of pins is secure, the rest of the connector will align with each pin above its assigned solder pad.
-
-
Solder the front row of pins to the board by applying a small amount of solder to each pin. Apply an additional layer of flux if soldering is not happening quickly.
Clean excess flux away with 100% isopropyl alcohol (IPA) and a short bristle brush.
-
Encapsulate the soldered connections in delayed set epoxy (Figure 2 C,D) using a 23 G needle and 1 mL syringe placed bevel side down on the pins. Push epoxy through the syringe slowly so that it flows into and along the connections.
-
Leave the board overnight so that the delayed set epoxy can cure.
NOTE: While the product insert for the delayed set epoxy states that it cures in 30 min, leaving it overnight allows a more stable connection to form.
-
-
Secure the backside of the board to the sides of the connector by laying a small line of delayed set epoxy across the back side of the board and pulling that onto the edges of the connector.
-
Leave the board to cure overnight again.
NOTE: At this point, either store the arrays or continue the build. If pausing in the build, store the arrays in a clean, dry box at room temperature.
-
Figure 2: Soldering and insulation steps for the Flex Array.
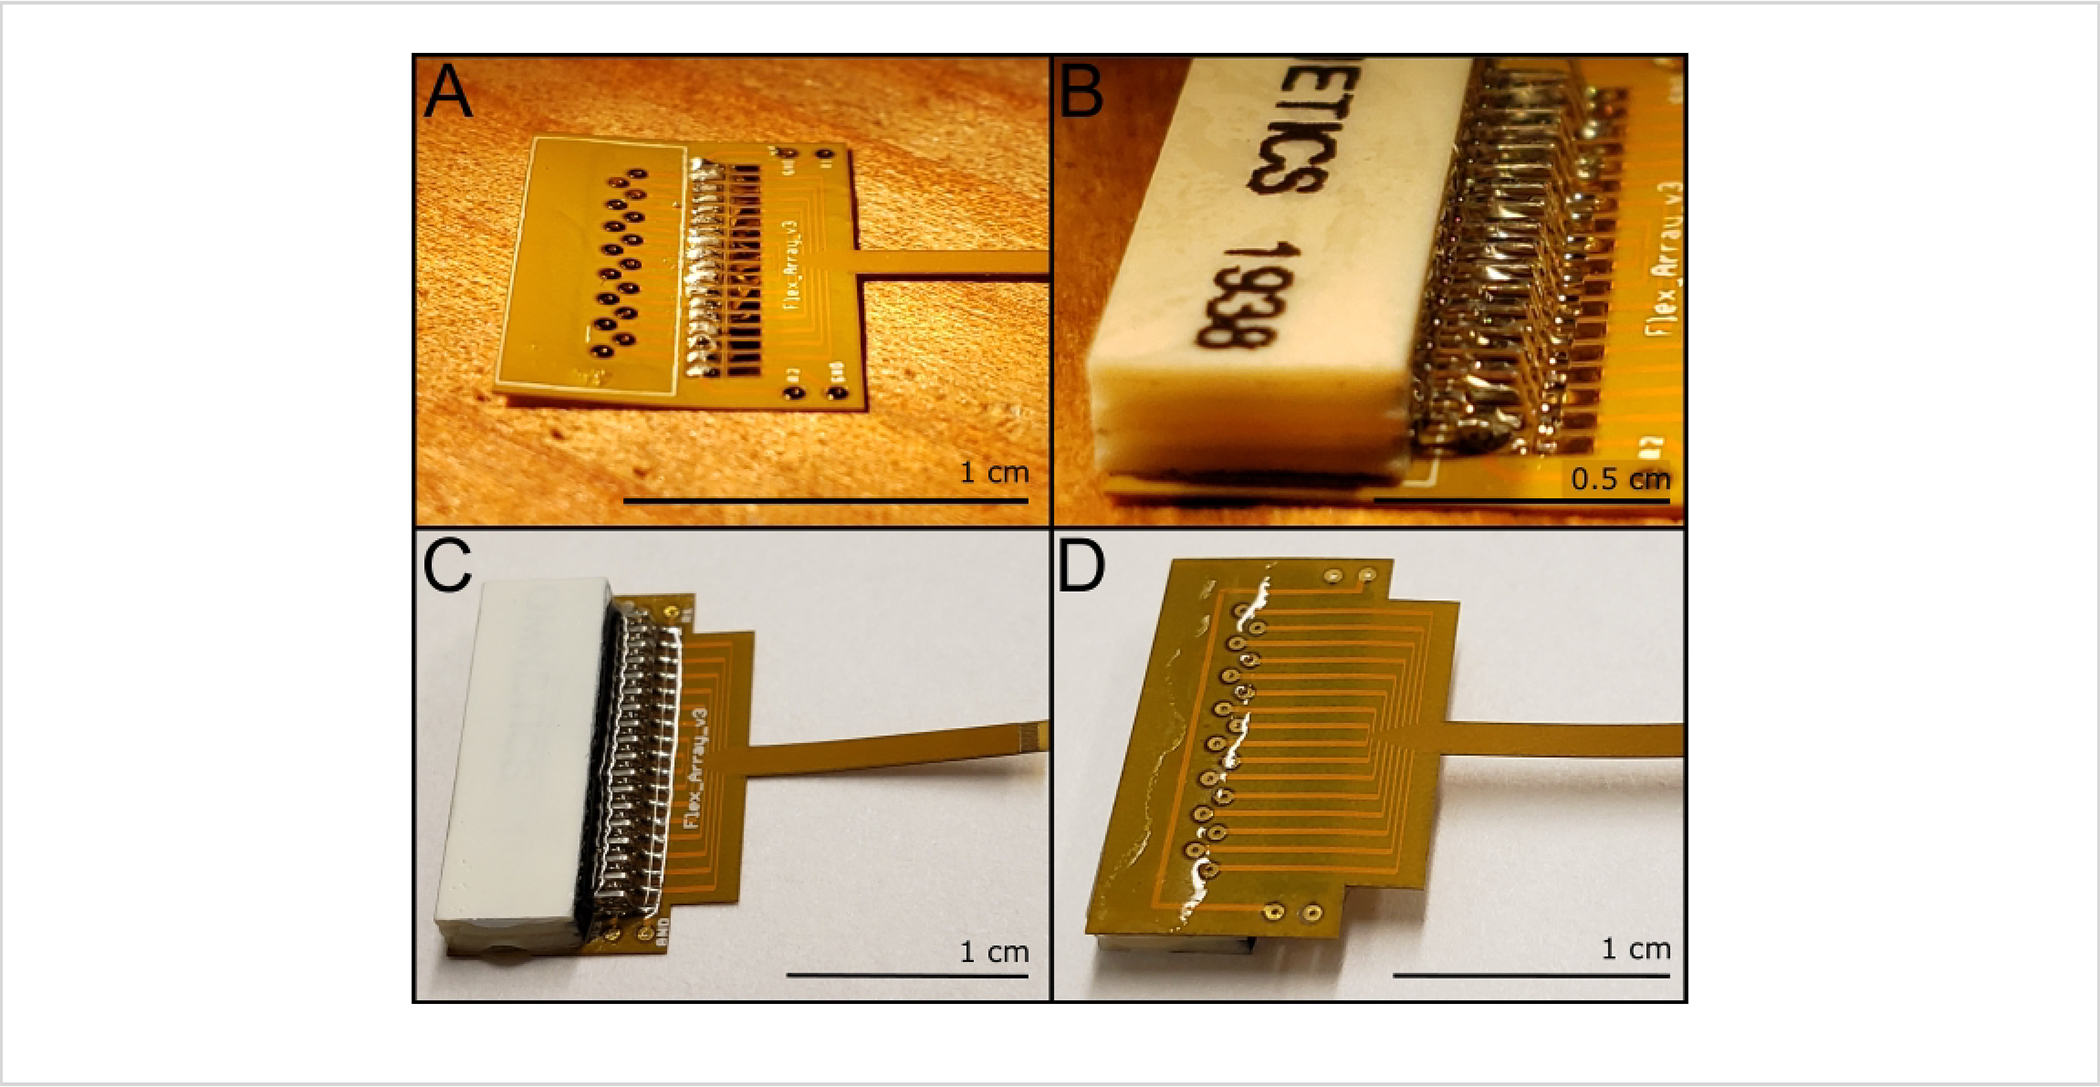
(A) Laying the solder for the bottom connector pins. (B) Back pins secured in place with the front pins ready for soldering. (C) Delayed set epoxy insulated Flex Array; note that the delayed-set epoxy does not cover the reference and ground vias on either side. (D) Backside of the Flex Array with a band of delayed set epoxy across the pad vias (not the ground and reference vias) and wrapped around the side of the board toward the edge of the connector. Scale bar = 0.5 cm (B) and 1 cm (A, C, D).
3. Fiber population
-
Cut a pulled glass capillary so that its tip fits between the traces of the array (Figure 3A).
-
Using a glass puller and filament, make capillaries using the following settings: Heat = 900, Pull = 70, Velocity = 35, Time = 200, Pressure = 900.
NOTE: Numbers are unitless and specific to this device (see the Table of Materials).
-
Use the wooden ends of two cotton-tipped applicators (one per each part of silver epoxy) to scoop a small, ~1:1 ratio of silver epoxy in a plastic dish and mix using the same sticks used to scoop. Discard the applicators after mixing.
-
Cut 2–4 mm off the end of the carbon fiber bundle onto a piece of printer paper using a razor blade. To easily separate the fibers in the bundle, which are difficult to tease apart, pull a laminated piece of paper gently over the top of the bundle.
NOTE: The laminated piece of paper transfers static into the fibers, which will separate by themselves.
-
Apply silver epoxy between every other pair of traces on one side of the board with the glass capillary (Figure 3B).
-
Take a small drop of epoxy onto the end of a pulled capillary. Gently apply between every other trace on the end of the board, filling the gap.
NOTE: The gap should be filled to the top of the two traces without overflowing to touch neighboring traces. Each trace is connected to one channel. This method of epoxy population means that each fiber will have two channels connected to it. This is because two traces allow for better fiber alignment, and redundancy in channel helps ensure electrical connection.
-
Use Teflon-coated tweezers to place one carbon fiber in each epoxy trace (Figure 3C).
Use a clean pulled capillary to adjust the carbon fibers, so they are perpendicular to the end of the Flex Array board and buried beneath the epoxy (Figure 3D).
-
Place the arrays on a wooden block with fibered ends overhanging the edge of the block.
NOTE: The weight of the back end will keep the array on the block.
Bake the wooden block and arrays at 140 °C for 20 min to cure the silver epoxy and lock the fibers into place.
-
Repeat steps 3.4–3.8 for the other side of the board.
NOTE: Arrays can be stored after any baking step; however, static from the storage boxes may cause the fibers to pull away from the board if too little silver epoxy was applied when populating the board.
-
Create a raised adhesive platform within a box so that the bulk of the board can be stuck to the adhesive allowing the fibered ends of the board to be suspended within the box to prevent fiber breakage. Store at room temperature.
NOTE: If fibers pull away from the board during storage, scrape the epoxy out of the traces with a clean pulled glass capillary and repeat steps 3.1–3.8 to replace the fibers. From this point on, arrays must be stored with the fibers suspended in this manner to prevent fiber breakage.
-
Figure 3: Applying silver epoxy and aligning carbon fibers between the traces of the Flex Array.
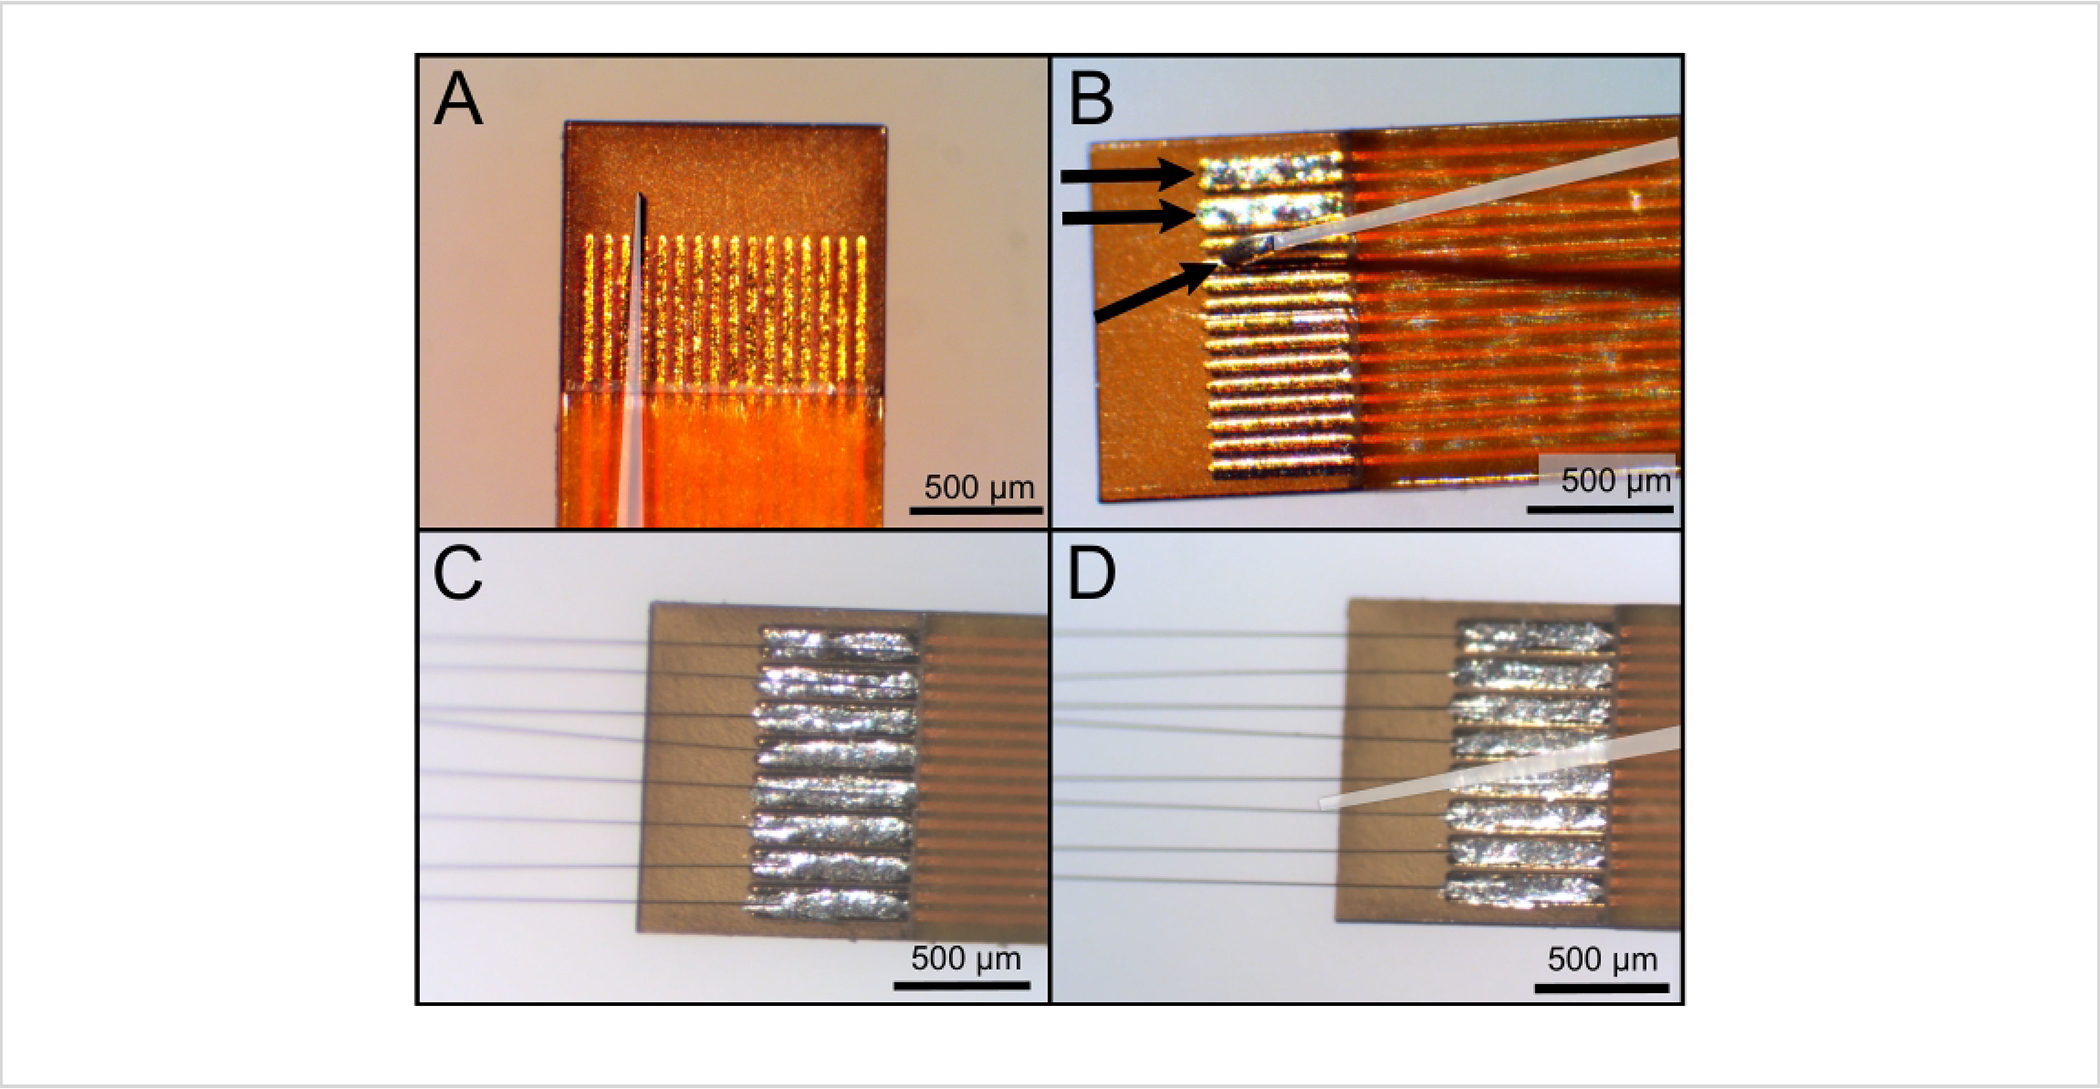
Capillaries have been highlighted with a white overlay. (A) The end of the capillary fits between the traces to get (B) clean silver epoxy (denoted with arrows at the end of the capillary and within the traces) deposition without spillover outside of the trace pairs. (C) Carbon fibers are placed into the epoxy and then (D) straightened with a clean capillary. Scale bars = 500 μm.
Materials.
| Name | Company | Catalog Number | Comments |
|---|---|---|---|
| 3 prong clams | 05-769-6Q | Fisher | Qty: 2 Unit Cost (USD): 20 |
| 3,4-ethylenedioxythiophene (25 g) (PEDOT) | 96618 | Sigma-Aldrich | Qty: 1 Unit Cost (USD): 102 |
| 353ND-T Epoxy (8oz)++ (ZIF and Wide Board Only) | 353ND-T/8OZ | Epoxy Technology | Qty: 1 Unit Cost (USD): 48 |
| Ag/AgCl (3M NaCl) Reference Electrode (pack of 3) | 50-854-570 | Fisher | Qty: 1 Unit Cost (USD): 100 |
| Autolab | PGSTAT12 | Metrohm | |
| Blowtorch | 1WG61 | Grainger | Qty: 1 Unit Cost (USD): 36 |
| Carbon Fibers | T-650/35 3K | Cytec Thornel | Qty: 1 Unit Cost (USD): n/a |
| Carbon tape | NC1784521 | Fisher | Qty: 1 Unit Cost (USD): 27 |
| Cotton Tipped Applicator | WOD1002 | MediChoice | Qty: 1 Unit Cost (USD): 0.57 |
| Delayed Set Epoxy++ | 1FBG8 | Grainger | Qty: 1 Unit Cost (USD): 3 |
| DI Water | n/a | n/a | Qty: n/a Unit Cost (USD): n/a |
| Dumont Tweezers #5 | 50-822-409 | Fisher | Qty: 1 Unit Cost (USD): 73 |
| Flex Array** | n/a | MicroConnex | Qty: 1 Unit Cost (USD): 68 |
| Flux | SMD291ST8CC | DigiKey | Qty: 1 Unit Cost (USD): 13 |
| Glass Capillaries (pack of 350) | 50-821-986 | Fisher | Qty: 1 Unit Cost (USD): 60 |
| Glass Dish | n/a | n/a | Qty: 1 Unit Cost (USD): n/a |
| Hirose Connector (ZIF Only) | H3859CT-ND | DigiKey | Qty: 2 Unit Cost (USD): 2 |
| Light-resistant Glass Bottle | n/a | Fisher | Qty: 1 Unit Cost (USD): n/a |
| Micropipette Heating Filiment | FB315B | Sutter Instrument Co | Qty: 1 Unit Cost (USD): n/a |
| Micropipette Puller | P-97 | Sutter Instrument Co | Qty: 1 Unit Cost (USD): n/a |
| Nitrile Gloves (pack of 200) | 19-041-171C | Fisher | Qty: 1 Unit Cost (USD): 47 |
| Offline Sorter software | n/a | Plexon | Qty: 1 Unit Cost (USD): n/a |
| Omnetics Connector* (Flex Array Only) | A79025–001 | Omnetics Inc | Qty: 1 Unit Cost (USD): 35 |
| Omnetics Connector* (Flex Array Only) | A79024–001 | Omnetics Inc | Qty: 1 Unit Cost (USD): 35 |
| Omnetics to ZIF connector | ZCA-OMN16 | Tucker-Davis Technologies | Qty: 1 Unit Cost (USD): n/a |
| Pin Terminal Connector (Wide Board Only) | ED11523-ND | DigiKey | Qty: 16 Unit Cost (USD): 10 |
| Probe storage box | G2085 | Melmat | Qty: 1 Unit Cost (USD): 2 |
| Razor Blade | 4A807 | Grainger | Qty: 1 Unit Cost (USD): 2 |
| SEM post | 16327 | lnf | Qty: 1 Unit Cost (USD): 3 |
| Silver Epoxy (1oz)++ | H20E/1OZ | Epoxy Technology | Qty: 1 Unit Cost (USD): 125 |
| Silver GND REF wires | 50-822-122 | Fisher | Qty: 1 Unit Cost (USD): 423.2 |
| Sodium p-toulenesulphonate(pTS)-100g | 152536 | Sigma-Aldrich | Qty: 1 Unit Cost (USD): 59 |
| Solder | 24-6337-9703 | DigiKey | Qty: 1 Unit Cost (USD): 60 |
| Soldering Iron Tip | T0054449899N-ND | Digikey | Qty: 1 Unit Cost (USD): 13 |
| Soldering Station | WD1002N-ND | Digikey | Qty: 1 Unit Cost (USD): 374 |
| SpotCure-B UV LED Cure System | n/a | FusionNet LLC | Qty: 1 Unit Cost (USD): 895 |
| Stainless steel rod | n/a | n/a | Qty: 1 Unit Cost (USD): n/a |
| Stir Plate | n/a | Fisher | Qty: 1 Unit Cost (USD): n/a |
| Surgical Scissors | 08-953-1B | Fisher | Qty: 1 Unit Cost (USD): 100 |
| TDT Shroud (ZIF Only) | Z3_ZC16SHRD_RSN | TDT | Qty: 1 Unit Cost (USD): 3.5 |
| Teflon Tweezers | 50-380-043 | Fisher | Qty: 1 Unit Cost (USD): 47 |
| UV & Visible Light Safety Glassees | 92522 | Loctite | Qty: 1 Unit Cost (USD): 45 |
| UV Epoxy (8oz)++ (Flex Array Only) | OG142–87/8OZ | Epoxy Technology | Qty: 1 Unit Cost (USD): 83 |
| UV Laser | n/a | WER | Qty: 1 Unit Cost (USD): 30 |
| Weigh boat (pack of 500) | 08-732-112 | Fisher | Qty: 1 Unit Cost (USD): 58 |
| Wide Board+ | n/a | Advanced Circuits | Qty: 1 Unit Cost (USD): 3 |
| ZIF Active Headstage | ZC16 | Tucker-Davis Technologies | Qty: 1 Unit Cost (USD): 925 |
| ZIF Passive Headstage | ZC16-P | Tucker-Davis Technologies | Qty: 1 Unit Cost (USD): 625 |
| ZIF* | n/a | Coast to Coast Circuits | Qty: 1 Unit Cost (USD): 9 |
4. Applying ultra-violet (UV) epoxy to insulate the carbon fibers
-
Use a clean capillary and apply a small droplet (~0.5 mm in diameter of UV epoxy on the exposed traces on one side of the board (Figure 4A). Continue to add UV epoxy droplets until the traces are completely covered.
NOTE: Do not allow the UV epoxy to get on the carbon fibers past the end of the PCB to ensure a smooth insertion later.
Cure the UV epoxy under a UV pen light for 2 min (Figure 4B).
Repeat steps 4.1–4.2 for the other side of the board.
-
Cut the fibers to 1 mm using a stereoscope reticle and surgical scissors.
NOTE: Arrays can be stored at this point until ready to proceed to the next steps. They should be stored in a box that will elevate the carbon fibers away from the box itself. Arrays can be stored at room temperature indefinitely.
Figure 4: Insulation with UV Epoxy Application.

(A) UV epoxy is applied using a clean capillary and two drops of UV epoxy (marked with white overlays). UV epoxy is applied in droplets of 0.25–0.75 mm diameters until the UV epoxy forms a smooth bubble over the top of the traces. (B) UV epoxy is cured under UV light. The Flex Array is placed in putty on a wooden block for ease of movement and alignment underneath the UV light. The UV light is held with a holder ~1 cm above the end of the Flex Array. Inset (B) shows the side profile of a properly UV epoxy-insulated Flex Array. The UV epoxy bubble on either side of the board is roughly 50 μm in height. Scale bars = 500 μm (A and inset B).
5. Checking electrical connections with 1 kHz impedance scans (Figure 5)
Figure 5: Setup for impedance measurements.
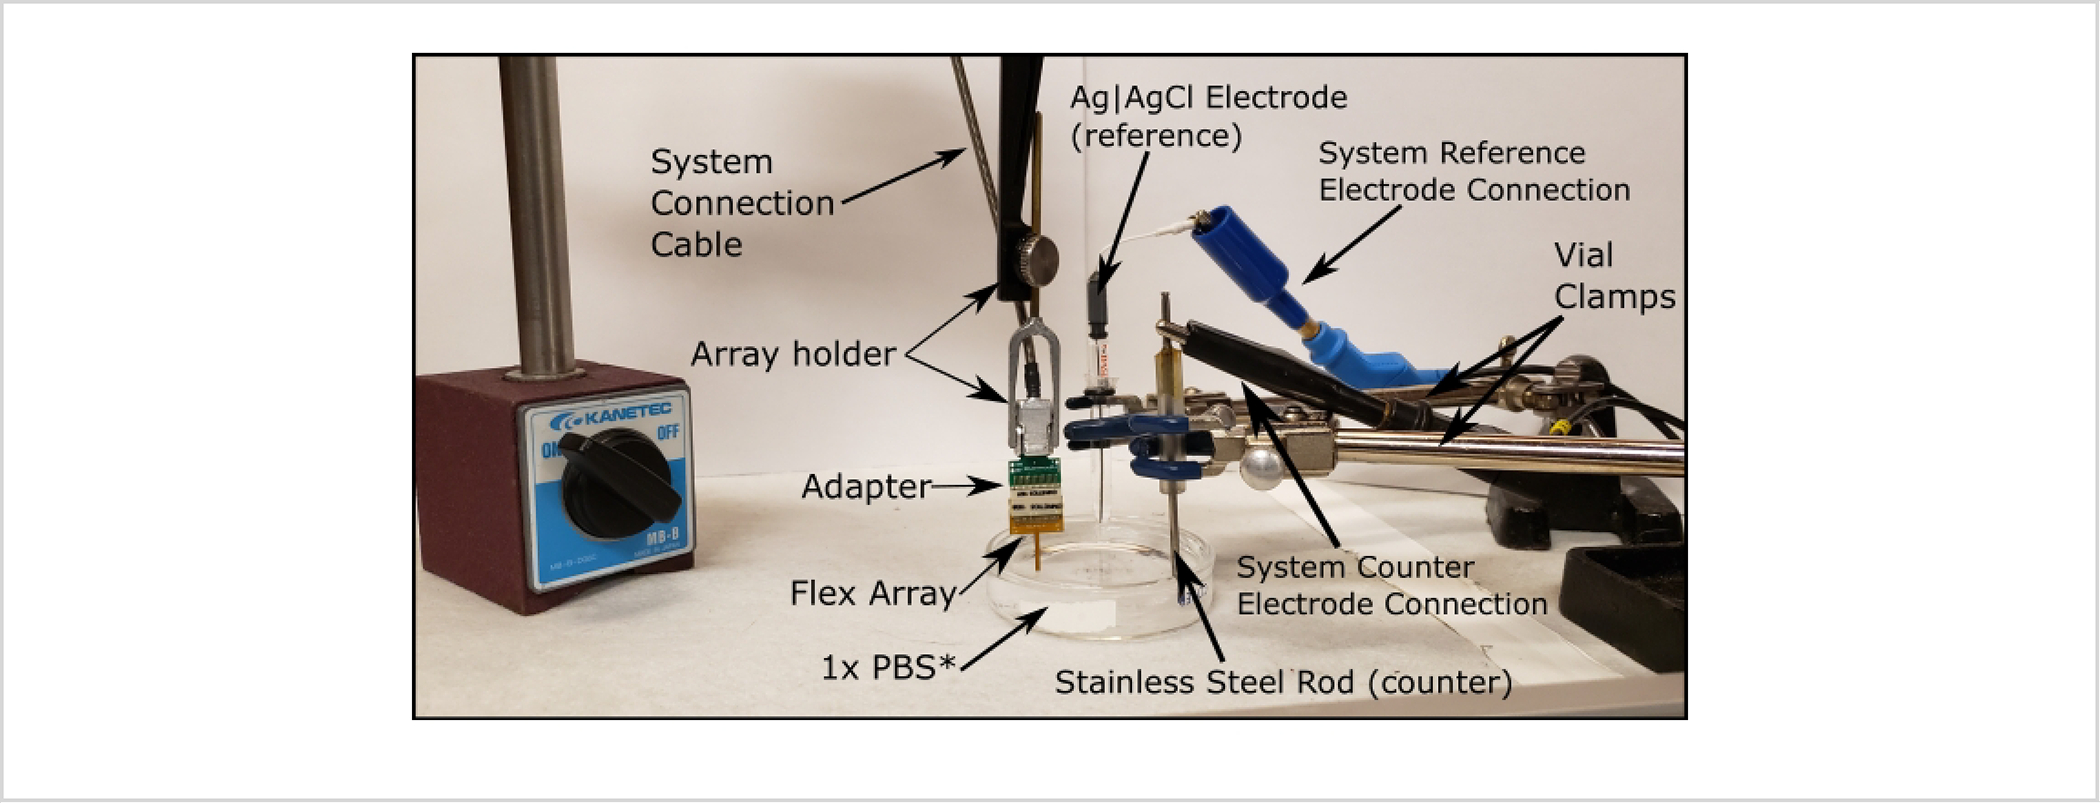
All parts are labeled, and system connectors and adapters are system-dependent. PBS is starred as the solution is swapped for PEDOT:pTS later on in the build; however, the setup is identical otherwise. Abbreviations: PBS = phosphate-buffered saline; PEDOT:pTS = poly(3,4-ethylenedioxythiophene):p-toluenesulfonate.
Submerge carbon fibers 1 mm into 1x phosphate-buffered saline (PBS).
-
To complete the circuit, use a silver-silver chloride (Ag| AgCl) reference electrode and a stainless steel rod (counter electrode).
Using a beaker clamp, suspend the Ag|AgCl electrode in the 1x PBS and connect it to the reference of the impedance system being used.
Using a beaker clamp, suspend the stainless steel rod in the 1x PBS and connect to the counter electrode input of the impedance system being used.
-
Run a 1 kHz impedance scan for each fiber using a potentiostat set to a 1 kHz scan frequency at 0.01 Vrms in a single sine waveform. Set the potentiostat to 0 V at the beginning of each scan for 5 s to stabilize the recorded signal. Record the measurements via the potentiostatassociated software.
NOTE: Measurements can be taken at any point in the build; however, they are only necessary before insulation and during tip preparation. Table 2 lists typical ranges of impedances after each build step at 1 kHz for the user’s reference.
-
Rinse the fibers in deionized (DI) water by dipping them into a small beaker three times and leave them to dry at room temperature.
NOTE: Arrays can be left in storage until the user can continue onto the next step.
Table 2:
Typical range of impedances after each build stage (n = 272).
| Build Step | Expected 1 kHz Impedance (kΩ) |
|---|---|
| Bare Fiber | 150–300 |
| Bare Fiber with UV Insulation | 400–500 |
| Parylene C Insulated Fibers | >50,000 |
| Nd:YAG Laser Cut | <15,000 |
| Blowtorched | 300–400 |
| UV Laser Cut * | 300–500 |
| PEDOT:pTS Coated | <110 |
n = 16. PEDOT:pTS-treated probes above 110 kΩ may still record signals; however, all treated electrodes typically fall under this value. Abbreviations: PEDOT:pTS = poly(3,4-ethylenedioxythiophene):p-toluenesulfonate; Neodymium-doped yttrium aluminum garnet.
6. Parylene C Insulation
NOTE: Parylene C was chosen as the insulation material for the carbon fibers as it can be deposited at room temperature over batches of arrays and provides a highly conformal coating.
Mask the Flex Array connector using the mating connector.
Place a batch of 8–12 arrays into a storage box with a raised adhesive platform so that they can be insulated in one run. Place the arrays so that the connector end of the array is on the adhesive platform with the fibered end of the array overhanging (Figure 6) to prevent the fibers from sticking to the adhesive and pulling off and to ensure a uniform Parylene coating on the fibers.
-
Coat the arrays in a Parylene C deposition system to a thickness of 800 nm in a cleanroom, wearing appropriate personal protection equipment (PPE) as defined by the individual cleanroom being used.
NOTE: Here, PPE was defined as cleanroom shoes, suit, head covering, goggles, mask, and latex gloves. It should be noted that this is standard PPE for entering a cleanroom. This step can be outsourced to a Parylene coating company for a fee; however, a commercial service may be able to coat more arrays at one time. Each Parylene C deposition system may have different safety precautions. Contact the technician before use to ensure user safety.
Remove the mating connector used as a mask from the Flex Array.
Place the arrays into a new box for storage until ready to use.
Figure 6: Flex Array prepared for Parylene C coating.
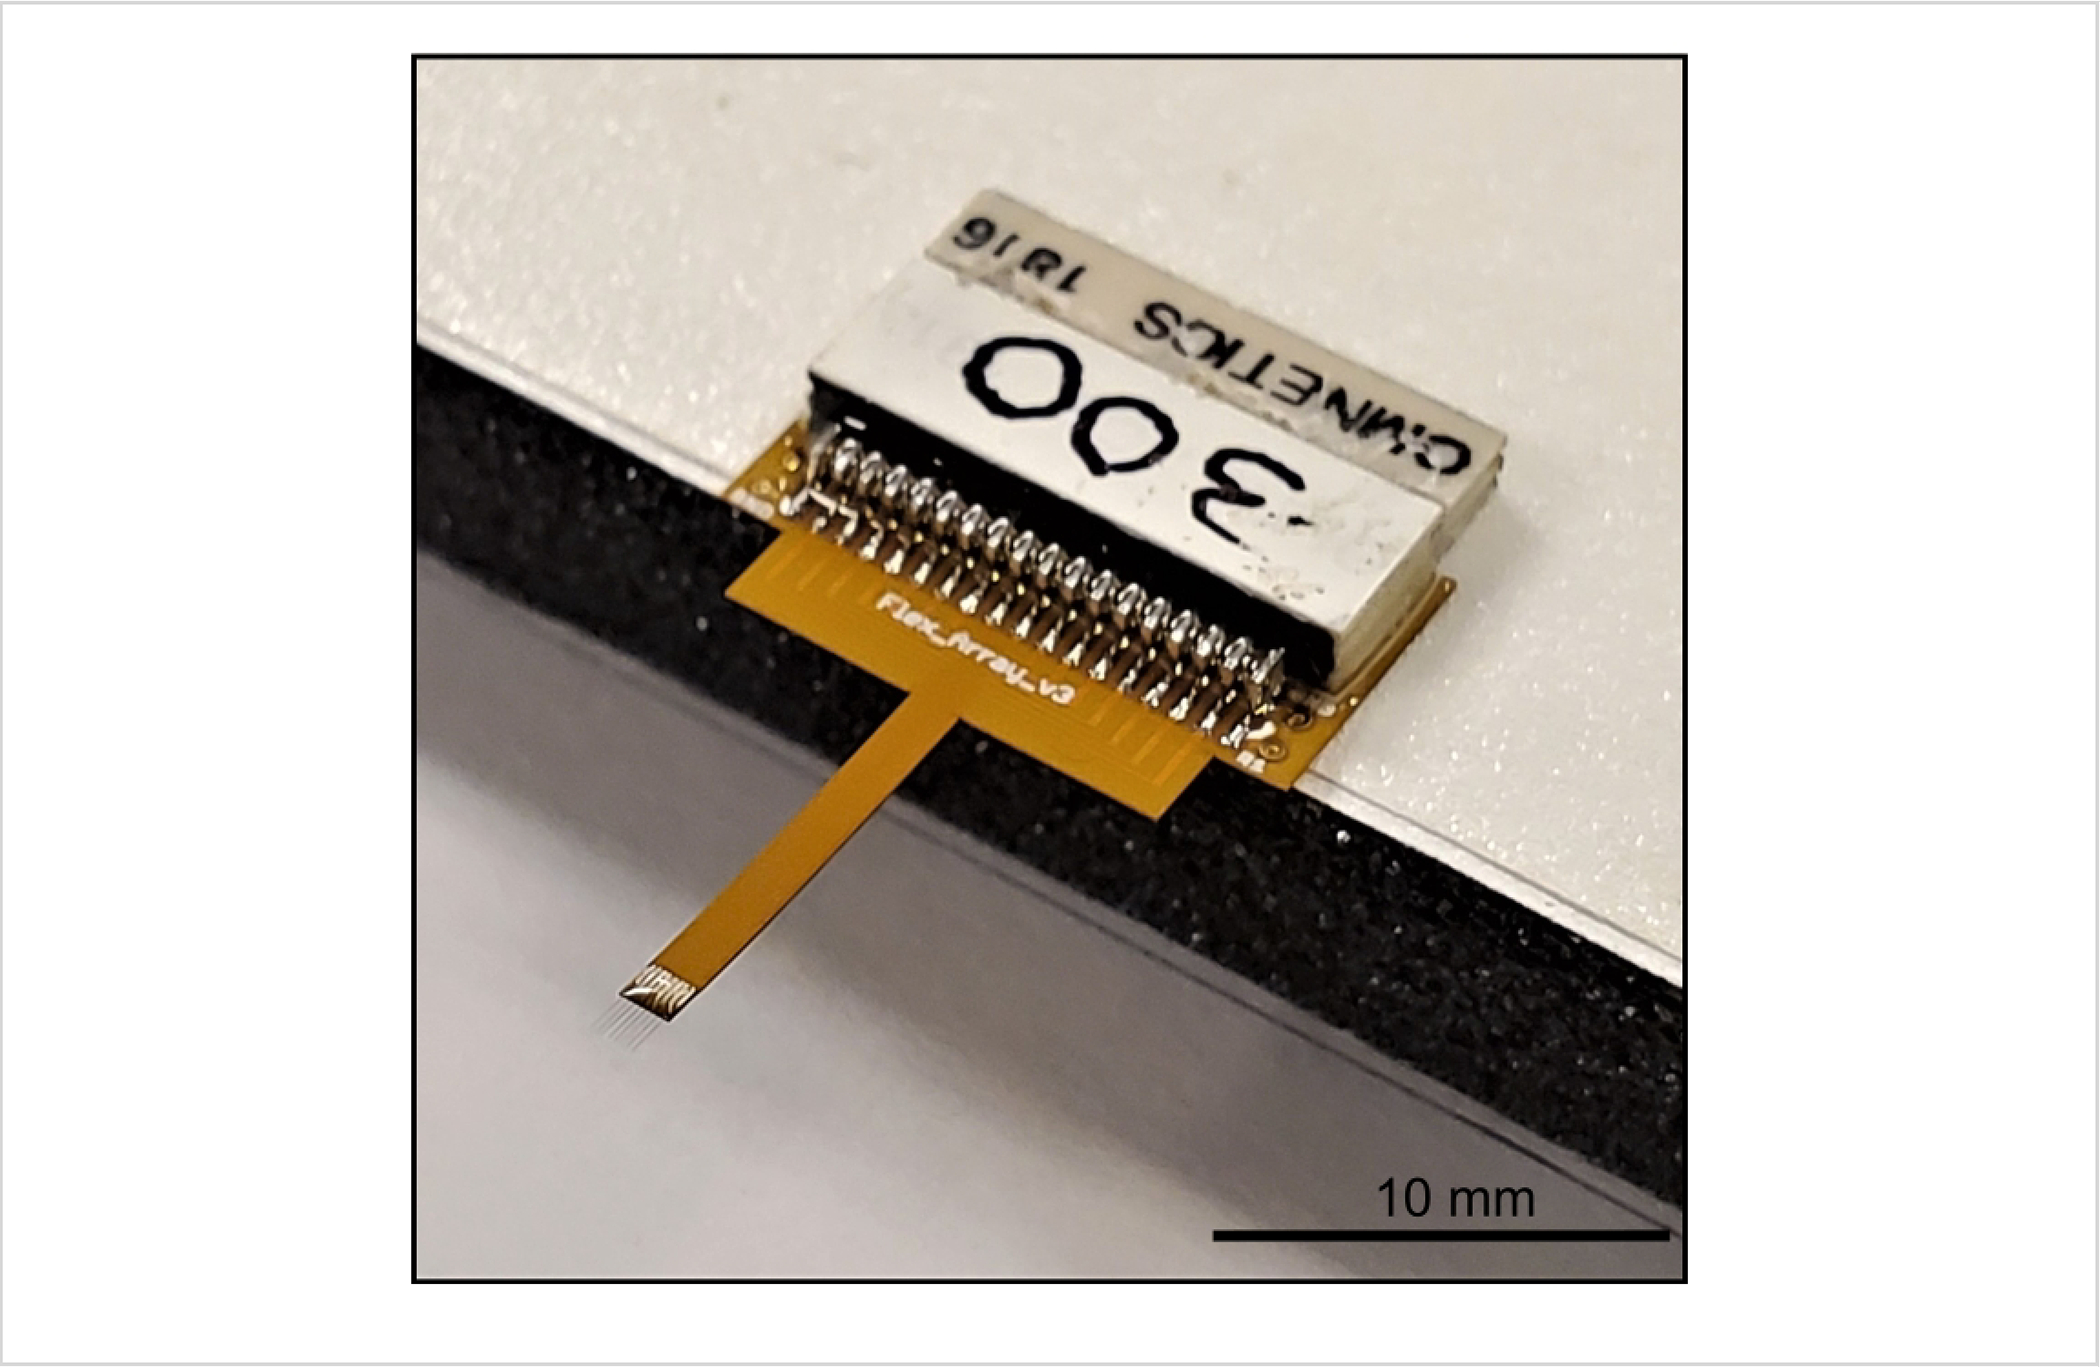
The Flex Array is secured to a raised foam platform with tape, adhesive side up during the coating process. Scale bar =10 mm.
7. Tip preparation methods
NOTE: Two tip preparations in this section use lasers to cut fibers. Proper PPE, such as goggles resistant to the wavelengths used, should always be worn when using the laser, and other lab users in the vicinity of the laser should also be in PPE. Although fiber lengths listed in these steps are recommended lengths, users may try any length that suits their needs. The user must choose one of the following tip preparation methods as scissor cutting alone will not suffice to re-expose the electrode25.
-
Neodymium-doped yttrium aluminum garnet (Nd:YAG) laser cut
Cut the fibers to 550 μm with surgical scissors.
-
Use a 532nm Nd:YAG pulsed laser (5 mJ/pulse, 5 ns duration, 900 mW) to cut 50 μm off the tip of the fibers to re-expose the carbon underneath the Parylene C (usually takes 2–3 pulses).
-
Align the fiber tips using the built-in stereoscope that comes with this laser system.
NOTE: This system allows the user to align a window (here, 50 μm × 20 μm (height × width)) was used to encompass the end of the fiber.
-
Focus the stereoscope on the end of the fiber at 500x magnification for an accurate and precise cut.
NOTE: Parylene C will ablate slightly (<10 μm) from the tip leaving a blunt, cylindrical tip.
-
-
Cut the fibers to 300 μm with surgical scissors.
Submerge the array in a dish of deionized water, connector side down, and secured to the bottom of the dish with a small amount of putty.
Use a pen camera to align the fibers with the surface of the water so that the fibers are just barely touching the surface of the water.
-
Adjust a butane blowtorch flame to 3–5 mm and run it over the top of the fibers in a back-and-forth motion to sharpen fibers.
NOTE: Fiber tips will glow orange when the flame passes over them.
-
Remove the array from the putty and inspect it under a stereoscope for pointed tips under 50x magnification.
NOTE: If pointed tips are observed, then no further blowtorching is necessary. If tips appear blunt, repeat steps 7.2.2–7.2.5.
-
UV laser cut28
NOTE: UV Laser can only be used on zero insertion force (ZIF) and Wide Board designs at present due to the large focal point of the UV Laser used being larger than the pitch of the Flex Array carbon fibers.
Cut the carbon fibers to 1 mm with surgical scissors.
-
Affix a UV laser to three orthogonally configured motorized stages.
NOTE: The UV laser is a multimode Indium Gallium Nitride (InGaN) semiconductor with 1.5 W output power and 405 nm wavelength.
Ensure that the laser has a continuous beam for fast and effective alignment and cutting.
Secure the array in place to keep a still, level plane of electrodes for the laser to pass over. Ensure that array is held at an appropriate distance from the laser so that the fibers will be in light with the laser’s focal point. To do this, provide a lower power to the laser and adjust the distance to best focus on the fiber28.
-
Move the UV laser focal point across the fiber plane at a speed of 25 μm/s to cut the fibers to the desired length (here, all fibers are cut to 500 μm).
NOTE: Fibers will emit a bright light before being cut. Store the fibers after treatment until they are ready to be coated with a conductive polymer.
8. Poly(3,4-ethylenedioxythiophene):p-toluenesulfonate (PEDOT:pTS) conductive coating for lowered impedance
-
Mix solutions of 0.01 M 3,4-ethylenedioxythiophene and 0.1 M sodium p-toluenesulfonate in 50 mL of DI water and stir overnight on a stir plate (~450 rpm) or until no particulates can be observed in the solution.
NOTE: Store the solution in a light-resistant container. Refrigerate the solution after mixing to keep the solution useable for up to 30 days.
Run a 1 kHz impedance scan using the same parameters as before (steps 5.2–5.3) in 1x PBS. Note which fibers have a good connection (<1 MΩ, typically 14–16 of 16 fibers).
-
Electroplate with PEDOT:pTS to lower the impedance of the electrodes.
Submerge the fiber tips in PEDOT:pTS solution.
Follow the steps outlaid in step 5.2, switching the 1x PBS solution out for PEDOT:pTS and short all connections to the board to the applied current channel.
Apply 600 pA per good fiber for 600 s using a potentiostat.
Turn the cell off and allow it to rest for 5 s at the end of the run.
Remove the fibers from the solution and rinse them in DI water.
-
Retake 1 kHz impedances to check that the fibers were successfully coated (use the same parameters listed in steps 5.2–5.3).
NOTE: Good fibers are designated as any fiber having an impedance of less than 110 kΩ.
9. Connecting ground and reference wires
-
Gently scrape away Parylene C from the ground and reference vias on the board using tweezers. Short the ground and reference vias together in pairs on this board design.
NOTE: Ground and reference vias can be found near the connector on the Flex array and are the four small gold circles near the connectors. Users will only need to remove Parylene C from the vias closest to the carbon fibers for measurements.
Cut two 5 cm lengths of insulated silver wire with a razor blade. Deinsulate the ends of the wires 2–3 mm from one end to be attached to the Flex Array and ~10 mm from the opposite ends to allow for easier grounding and referencing during surgery.
Heat the soldering iron back to 600 °F. Apply a small amount of flux to the vias.
Insert one wire (2–3 mm exposed end) into each of the ePhys vias on the board. Apply solder to the top of the vias (Figure 7A). Allow the probe to cool, then flip it over to apply a small amount of solder to the backside of the via (Figure 7A).
Using surgical scissors, snip off any exposed wire sticking out of the back solder mound as this helps reduce noise seen in recording (Figure 7B).
Place the arrays back into the storage box, bending the wires back and away from the fiber. Secure the wires on the adhesive tape to prevent potential fiber-wire interactions (Figure 7C).
Figure 7: Ground and reference wires attached to the finalized Flex Array.
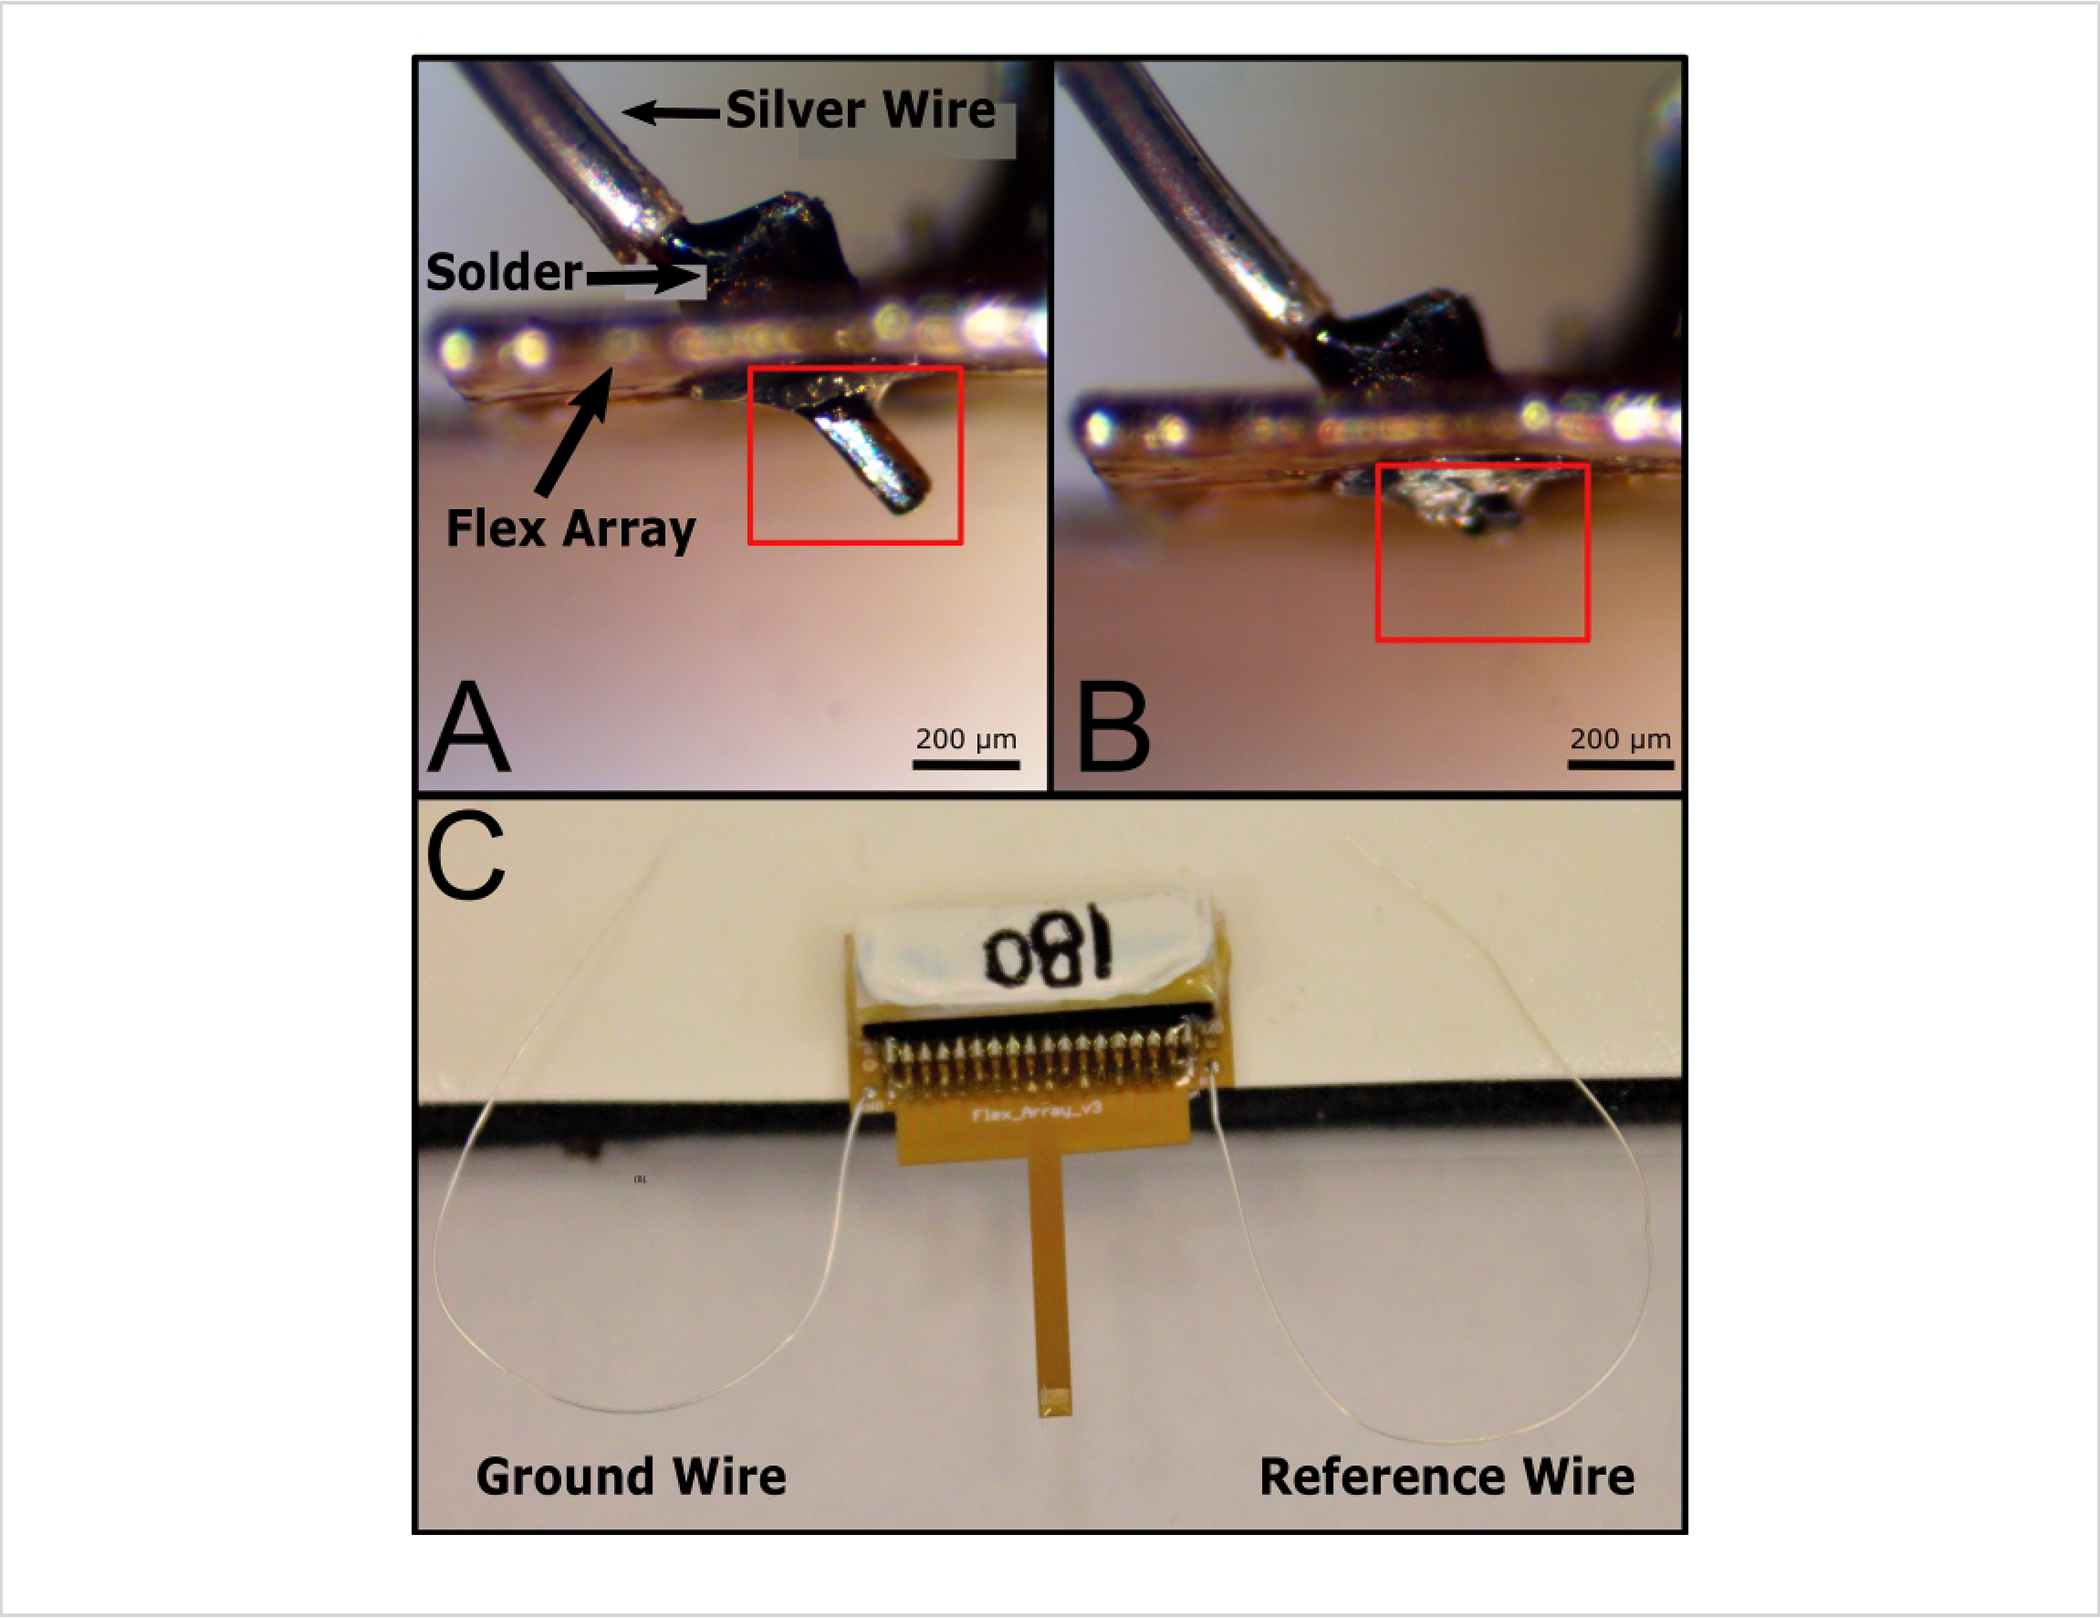
Solder was applied to each side of the via on either side of the board (A) to create a secure bond. ePhys vias are labeled on the board as GND and Ref and paired on opposite sides of the board from one another. There are two additional vias also labeled GND and Ref2. Both GND vias are shorted together. Ref2 is meant to be used in electrochemical experiments. Excess wire in (A) is denoted with a red box and is removed (B) from the backside of the probe (red box shows where wire used to be) to help with noise reduction and handling the probe. (C) Final Flex Array stored for future use. Note that the paired GND and Ref vias on this board make it designated for ePhys recordings. Scale bars = 200 μm (A, B). Abbreviations: ePhys = electrophysiology; GND = ground; Ref = reference.
10. Surgical procedure
NOTE: Rat cortex was used to test the efficacy of the UV Laser-prepared fibers as this has been described previously7,20. These probes will work in nerve due to their similar geometry and impedance levels to blowtorch prepared fibers. This surgery was performed with an abundance of caution to validate that the UV laser did not change the response of the electrodes.
Anesthetize an adult male Long Evans rat using a combination of ketamine (90 mg/kg) and xylazine (10 mg/kg). Confirm anesthesia with a toe pinch test. Apply ointment to the eyes to prevent the rat’s eyes from drying out during the surgery.
Create a 2 mm × 2 mm craniotomy above the right hemisphere’s motor cortex. Identify the lower left corner of the craniotomy by measuring 1 mm anterior of bregma and 1 mm lateral of midline.
Mount the array into a stereotaxic instrument, and zero the stereotaxic instrument at the dura by gently lowering the fibers until they touch the dura’s surface. Raise the array away from the surgical site and move it to the side until it is ready for insertion.
Resect the dura by gently pulling a needle with a barbed end over the surface of the tissue. Once a portion of the dura opens to the brain, use a pair of fine forceps to further assist in pulling away the dura.
Insert the fibers into the craniotomy and 1.2 mm into the brain using a stereotaxic instrument, lowering slowly by hand.
-
Record ePhys data for 10 min with an ePhys-specific headstage and preamplifier.
-
Set the preamplifier high-pass filter to process the signal at 2.2 Hz, antialias at 7.5 kHz, and sample at 25 kHz.
NOTE: For these measurements, only spontaneous activity is recorded. No stimulus is applied.
-
-
Euthanasia
Place the rat under isoflurane at 5% under 1 L/min of oxygen until signs of life have ceased (20–30 min). Confirm euthanasia with decapitation.
11. Spike sorting
Use spike-sorting software to sort and analyze the data using previously reported methods8.
-
Use a high-pass filter on all channels (250 Hz corner, 4th order Butterworth), and set the waveform detection level to −3.5 × RMS threshold.
Use a Gaussian model to cluster and spikes with similar characteristics. Combine and average clusters of at least 10 waveforms to include in further analysis.
Eliminate or delete all waveforms that are not spikes from the data set.
Export data once all channels have been sorted and use analysis software to plot and further analyze the waveforms.
12. Scanning electron microscopic (SEM) imaging
NOTE: This step will render arrays unusable and should be used only to inspect tip treatment results to check that the arrays are being properly processed. This step does not need to be done to build a successful array. Summarized below is a general outline of the SEM process; however, users who have not previously used SEM should receive help from a trained user.
Snip off the fibered end of the PCB and mount it on a carbon tape-masked SEM stub. Place the arrays on a small platform of stacked carbon tape (4–5 layers) to prevent the carbon fibers from sticking to the SEM stub.
Sputter-coat the arrays with gold (100–300 Å) following procedures outlined by the manufacturer of the gold sputter coater.
-
To inspect the tip treatment effects, image the arrays in an SEM at a working distance of 15 mm and 20 kV beam strength.
NOTE: Arrays can be imaged without sputter-coating under a low vacuum, as shown in Figure 8D for UV laser-cut fibers. For this setup, it is recommended to have a working distance of 11–12 mm and a 4 kV beam strength.
Figure 8: SEM images of fibers with different tip-cutting techniques.
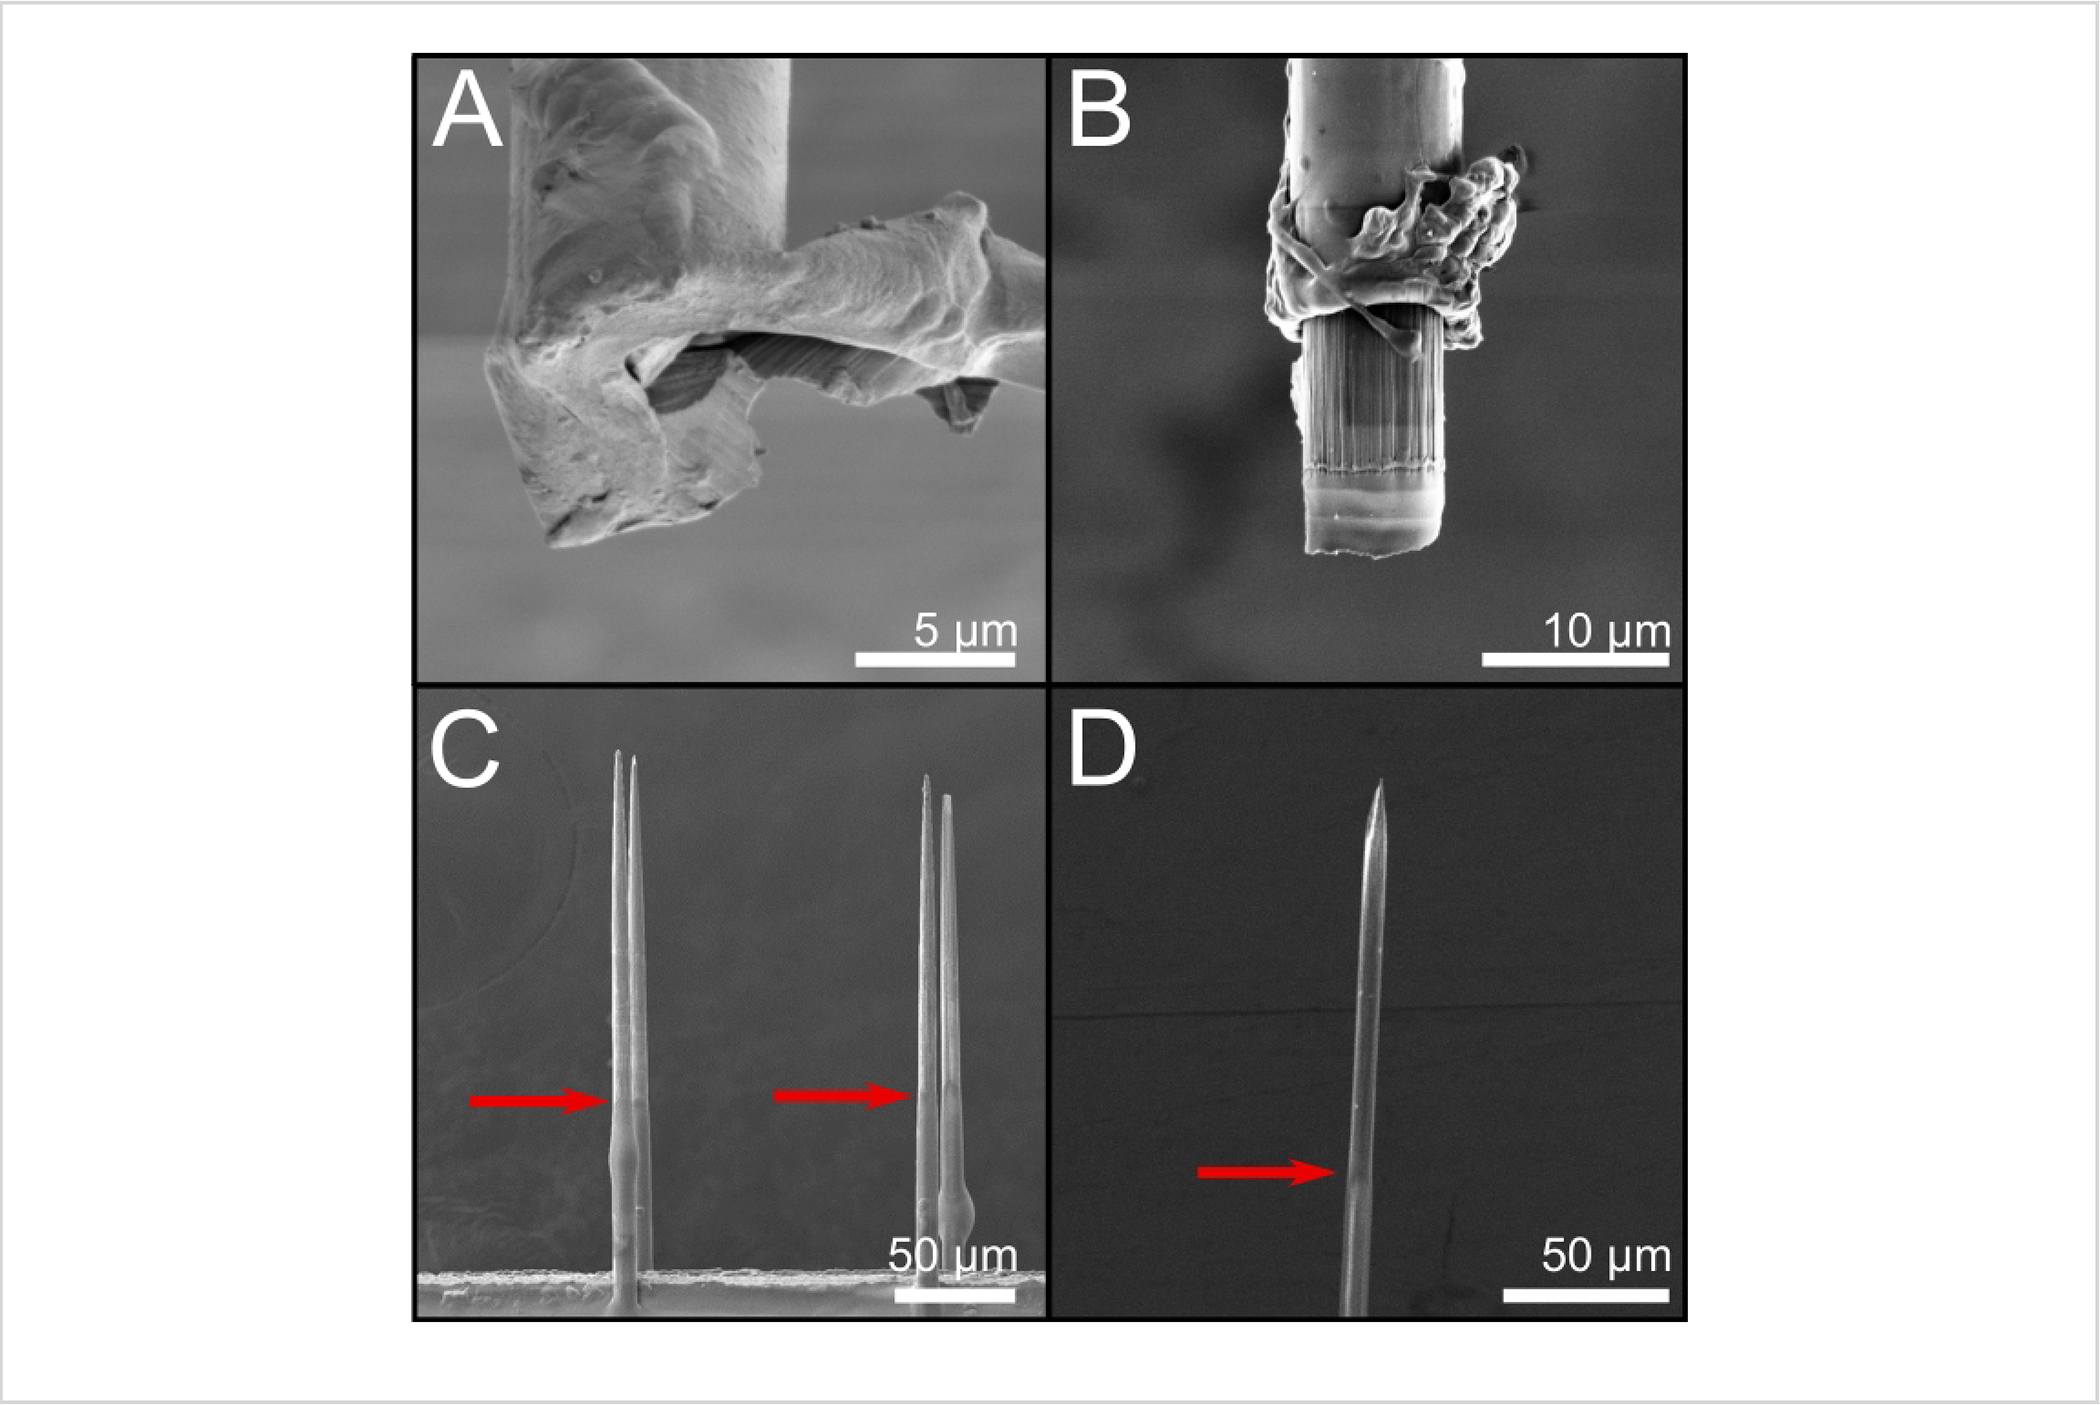
(A) Scissor-cut fiber with very little exposed carbon. (B) Nd:YAG laser cut. (C) Blowtorched fiber with ~140 mm of carbon exposed from the tip. (D) UV laser-cut fibers with ~120 mm of carbon exposed from the tip. Red arrows indicate the transition area between Parylene C and bare carbon fiber. Scale bars = 5 μm (A), 10 μm (B), 50 μm (C, D). Abbreviations: SEM = scanning electron microscopic; Nd:YAG = Neodymium-doped yttrium aluminum garnet.
Representative Results
Tip validation: SEM images
Previous work20 showed that scissor cutting resulted in unreliable impedances as Parylene C folded across the recording site. Scissor cutting is used here only to cut fibers to the desired length before processing with an additional finish cutting method. SEM images of the tips were used to determine the exposed carbon length and tip geometry (Figure 8).
Scissor and Nd:YAG laser-cut fibers were previously reviewed17,20. Scissor-cut fibers (Figure 8A) have inconsistent tip geometries, with Parylene C folding over the end when cut20. The Nd:YAG laser-cut fibers remain consistent in the recording site area, shape, and impedance (Figure 8B). Blowtorched fibers20 lead to the largest electrode size and shape variability and a sharpened tip, allowing for insertion into tough tissue. On average, 140 μm of carbon was re-exposed, with a smooth transition area between the carbon and Parylene C insulation (Figure 8C). UV laser-cut fibers were similar to blowtorched fibers, showing 120 μm of carbon exposed from the tip (Figure 8D). Impedances indicated that either the UV laser or blowtorch tip cutting methods are suitable for ePhys and are viable solutions for laboratories without access to an Nd:YAG laser.
Tip validation: electrical recording
Figure 9 shows the resulting impedances from each preparation method using Flex Arrays. The resultant values are within an appropriate range for ePhys recording. Nd:YAG laser-cut fibers resulted in the smallest surface area but the highest impedances, even with the PEDOT:pTS coating (bare carbon: 4138 ± 110 kΩ; with PEDOT:pTS: 27 ± 1.15 kΩ; n = 262). This is followed by the inverse relationship in blowtorched (bare carbon: 308 ± 7 kΩ; with PEDOT:pTS: 16 ± 0.81 kΩ; n = 262) and UV laser-cut (bare carbon: 468 ± 85.7 kΩ; with PEDOT:pTS: 27 ± 2.83 kΩ; n = 7) fibers that have a large surface area and low impedances. However, in all cases, the PEDOT:pTS-coated fibers fall under the 110 kΩ threshold set previously to indicate a good, low impedance electrode.
Figure 9: Impedance differences between only applying the treatment (bare carbon exposed) and with the addition of PEDOT:pTS.
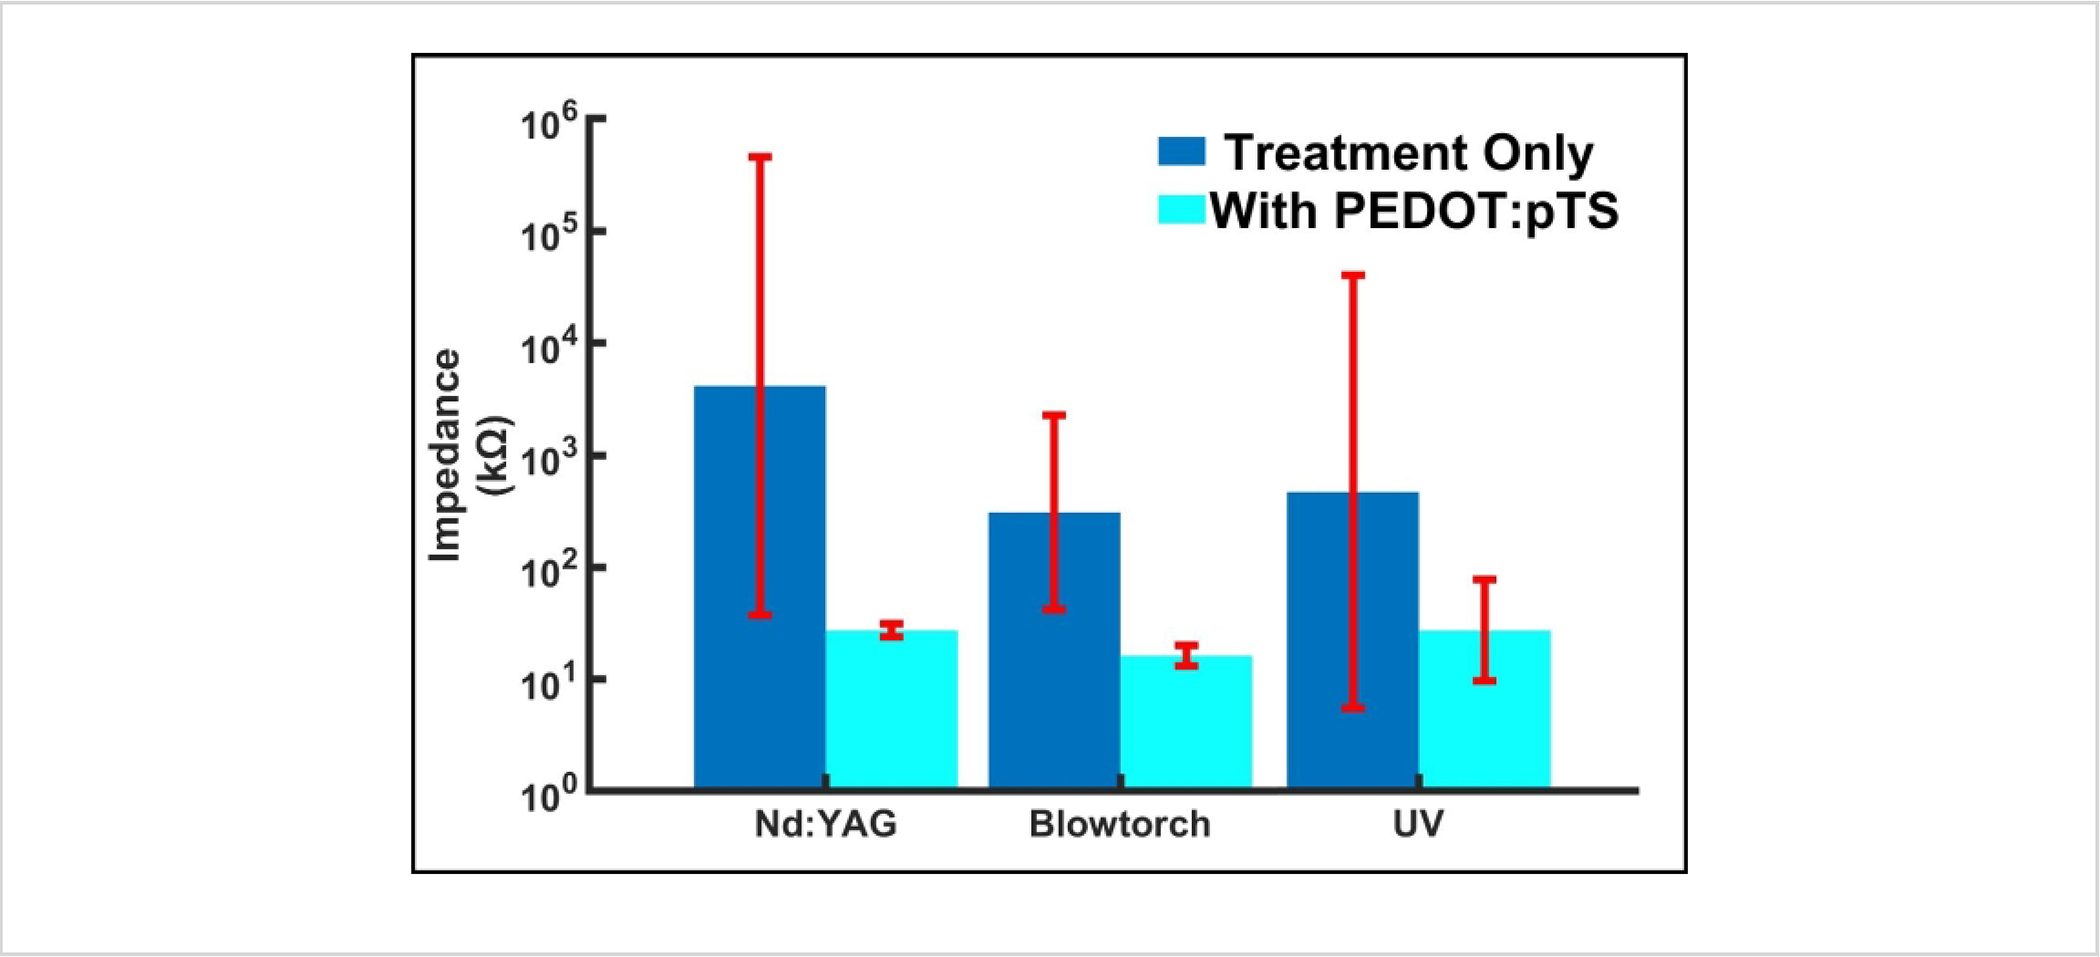
In all cases, the addition of PEDOT:pTS decreases the impedance by an order of magnitude. Sample size: Nd:YAG = 262, Blowtorch = 262, UV = 7. UV sample size difference is due to the novelty of the preparation method; however, it shows a similar range to blowtorch, as expected. Impedance data are expressed as mean ± standard error. Abbreviations: PEDOT:pTS = poly(3,4-ethylenedioxythiophene):p-toluenesulfonate; Neodymium-doped yttrium aluminum garnet.
Acute ePhys recordings were taken from a Long Evans rat acutely implanted with a ZIF array with UV laser-cut and PEDOT:pTS-treated fibers to demonstrate the viability of this method. ePhys has previously been tested and proven with scissor-cut20 and Nd:YAG-17 and blowtorch-treated fibers7,8 and so was not revalidated in this text. Acute recordings from four UV laser treatment fibers (2 mm in length) that were simultaneously implanted in rat motor cortex (n = 1) are presented in Figure 10. Three units were found across all fibers, suggesting that the treatment of the fibers with the inexpensive UV laser is similar to other cutting methods that enable the carbon fiber to record neural units, as would be expected by the SEMs and impedances. While carbon fiber arrays are easily built and modified to suit the user’s needs, it should be noted that additional validation is necessary for some builds (Table 3), while others are less suitable for certain end tasks.
Figure 10:
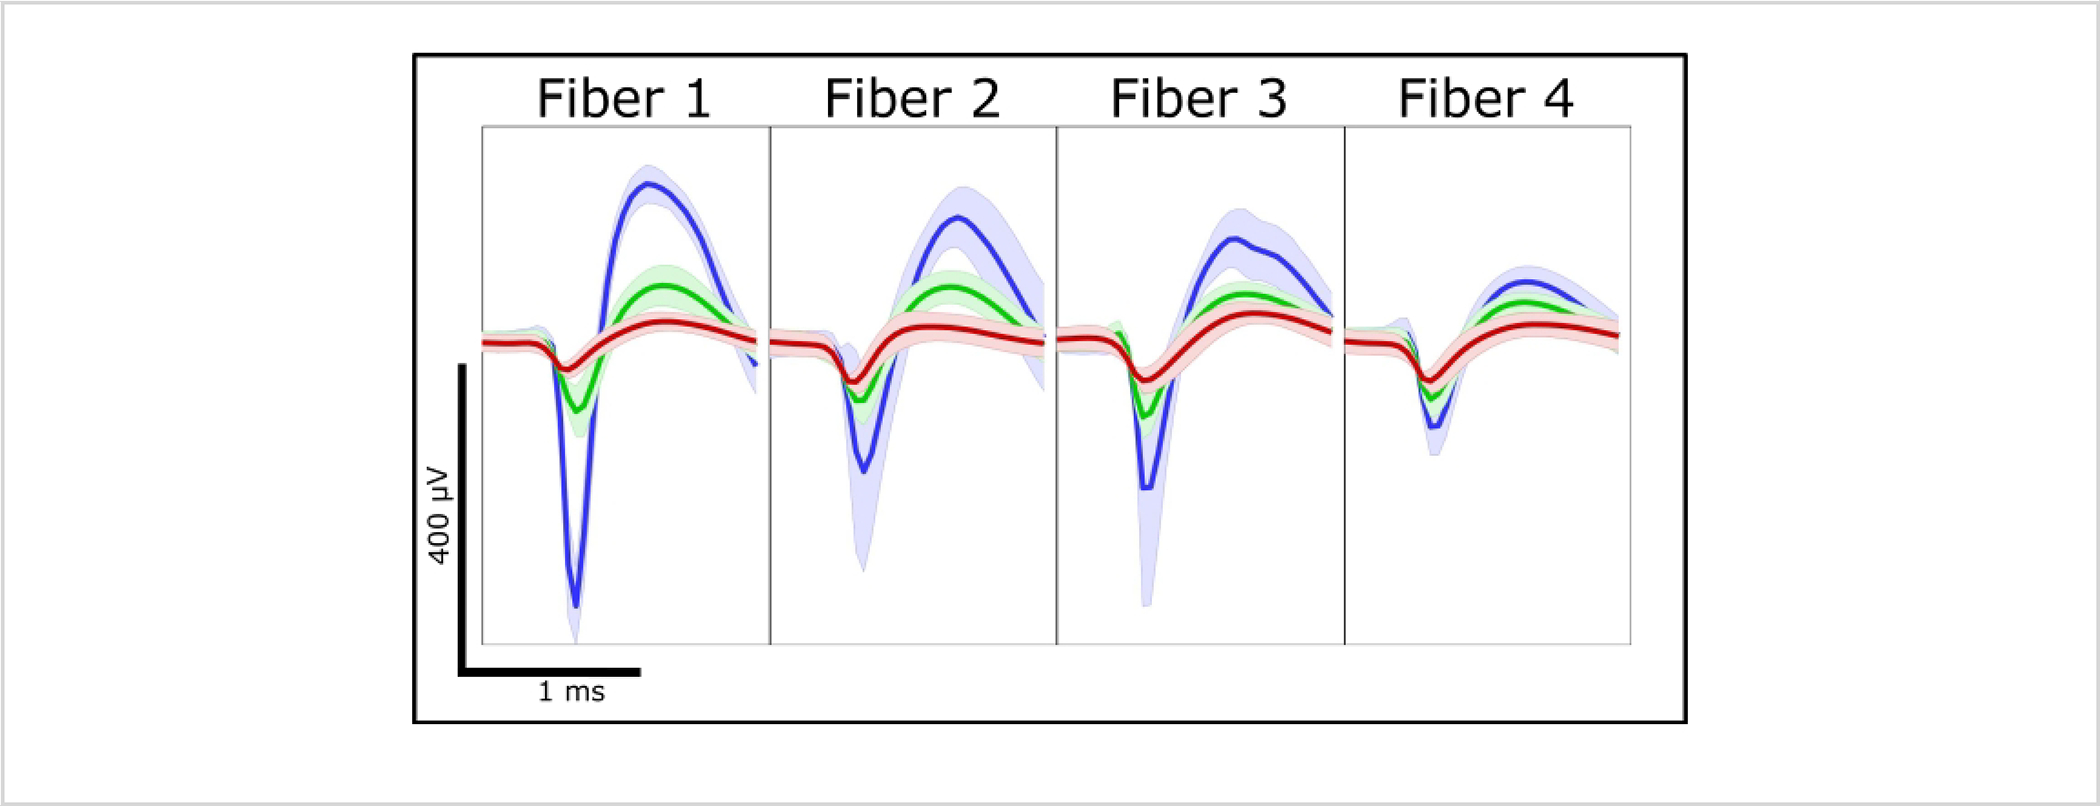
Acute electrophysiological spiking data from four UV laser-cut electrodes.
Table 3:
Validated uses of each board with the cutting methods described.
| Preparation Method | Wide Board | ZIF | Flex Array |
|---|---|---|---|
| Nd:YAG | Impedance, SEM, acute ePhys | Impedance, SEM, acute/chronic ePhys | Impedance, SEM, acute/chronic ePhys |
| Blowtorch | Impedance, SEM, acute ePhys | Impedance, SEM, acute/chronic ePhys | Impedance, SEM, acute/chronic ePhys |
| UV Laser | Not yet validated | Impedance, SEM, acute/chronic ePhys | Not Viable |
All cutting methods included electrodeposition of PEDOT:pTS. ‘Not Viable’ indicates that a form factor of the design prevents this tip treatment from being tested at this time (i.e., fiber pitch). Abbreviations: Neodymium-doped yttrium aluminum garnet; SEM = scanning electron microscopy; ePhys = electrophysiology; ZIF = zero insertion force.
Commercial Parylene C
Commercially coated arrays were determined to have a Parylene C thickness of 710 nm by the vendor, well within the target range of insulation. The arrays were prepared for ePhys recordings using the blowtorch tip preparation. Impedances were taken after the preparation of the tips and compared to existing data. A blowtorched and PEDOT:pTS-coated probe had an average of 14.5 ± 1.3 kΩ impedance across 16 fibers. SEM images were taken of the tip and shank to compare Parylene C deposition (Figure 11 A,B, respectively). These results show that the use of a commercial vendor did not change the expected impedance values, suggesting that this will be an equally viable substitution to deposition in the university cleanroom.
Figure 11: Commercial Parylene C-coated arrays.
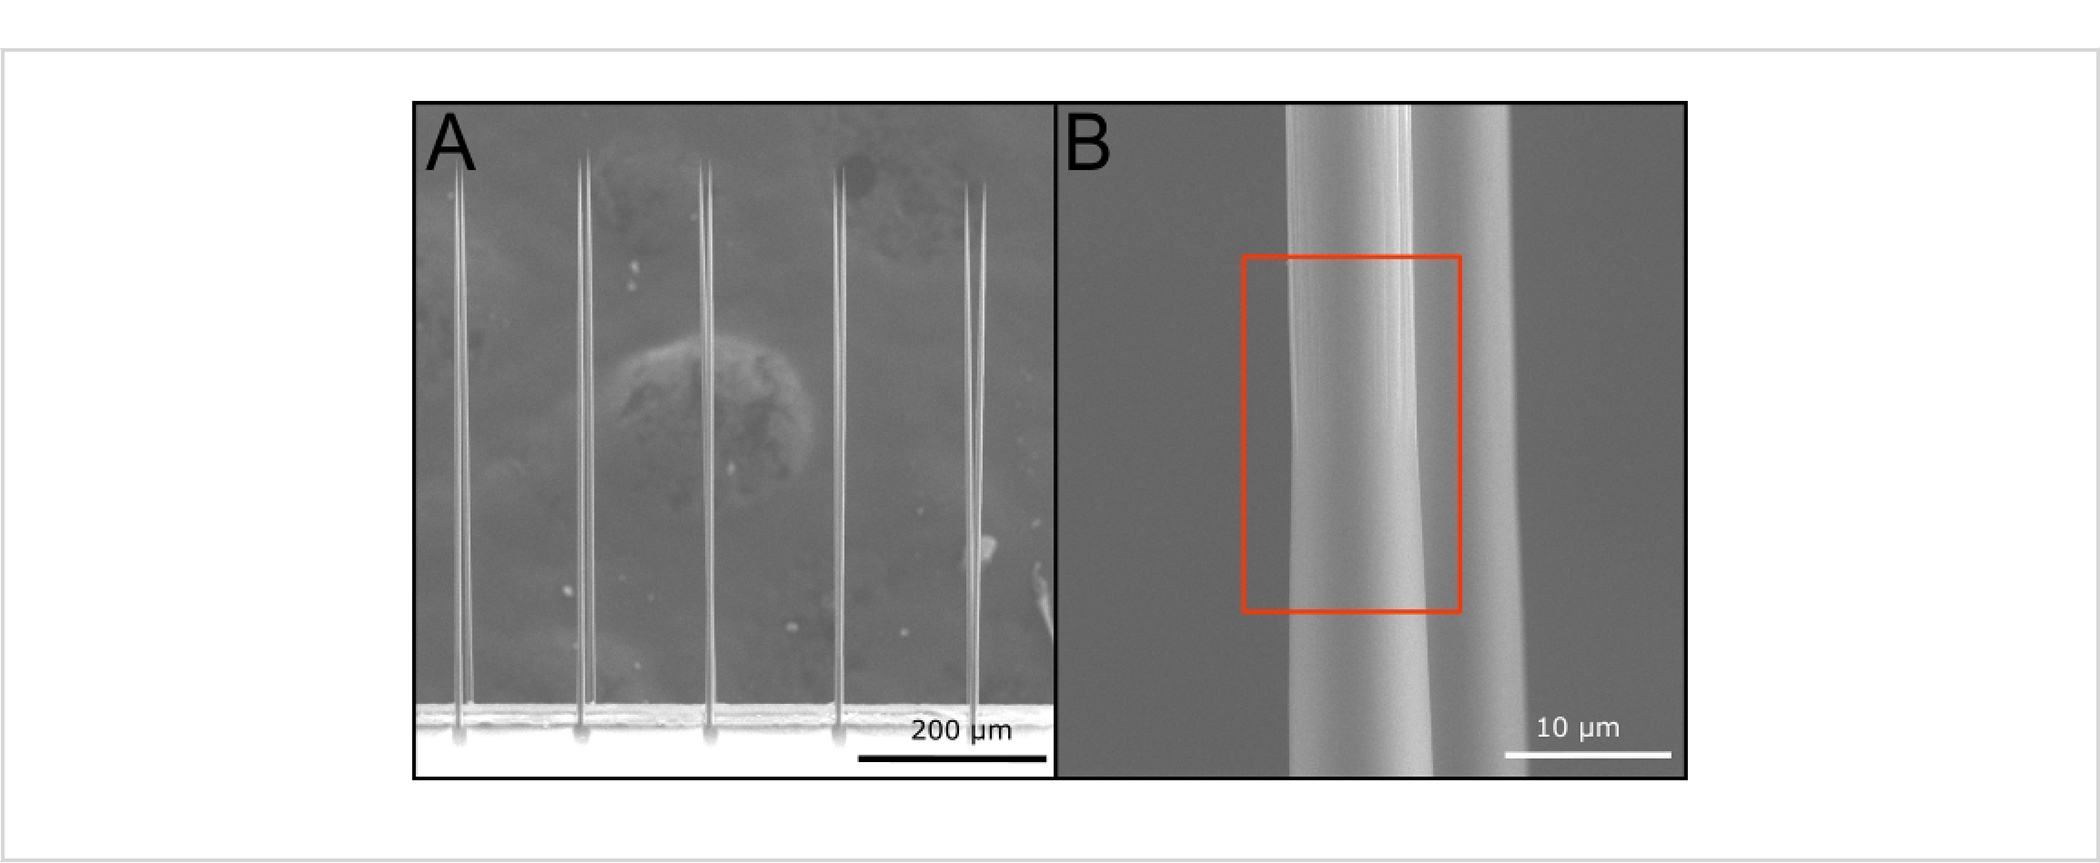
(A) The sharpened array shows uniform sharpening across all fibers indicating that there are no drawbacks to commercial coating. (B) After blowtorching, the transition (red box) between bare carbon fiber and Parylene C shows no discernable difference between arrays coated in a cleanroom facility. Scale bars = 200 μm (A) and 10 μm (B).
Device cost analysis
Provided all tools and bulk materials (e.g., epoxies, solder) are accessible to the researcher, a Parylene C user fee of $41, and a batch of 8 probes, the total materials cost is $1168 ($146 per probe). Personnel effort (Table 4) is ~25 h for the batch. If using a substituted fabrication step, the cost of the probes will vary based on commercial Parylene C coating cost ($500–800 quoted). The time for the build steps (Table 4) is grouped for all instances of a repeated task for simplicity. Build times for designs with a larger pitch (Wide Board and ZIF) are dramatically reduced as the manually intensive steps (e.g., carbon fiber placement) are easier and faster to complete.
Table 4:
Time required for each step of a fabrication process.
| Activity | Time for 8 Devices (h) |
|---|---|
| All Soldering | 5 |
| Insulating Omnetics | 1 |
| Populating Carbon Fibers | 10 |
| Insulating Traces with UV Epoxy | 0.5 |
| Parylene C Deposition | 1.5 |
| Nd:YAG Laser Cutting | 1 |
| Blowtorching | 1 |
| UV Laser Cutting | 1.5 |
| All Impedance Testing | 4.5 |
| PEDOT:pTS Deposition | 1.5 |
| Recipe Used | Total Hours |
| Nd:YAG Laser Cut | 25 |
| Blowtorch | 25 |
| UV Laser Cut | 25.5 |
Soldering of the connector and ground and reference wires have been combined here to simplify the activity list. Abbreviations: PEDOT:pTS = poly(3,4-ethylenedioxythiophene):p-toluenesulfonate; Neodymium-doped yttrium aluminum garnet.
Discussion
Material substitutions
While all materials used are summarized in the Table of Materials, very few of the materials are required to come from specific vendors. The Flex Array board must come from the listed vendor as they are the only company that can print the flexible board. The Flex Array connector must also be ordered from the vendor listed as it is a proprietary connector. Parylene C is highly recommended as the insulation material for the fibers as it provides a conformal coating at room temperature in a reliable manner that can then withstand the in vivo environment. The polyimide board and epoxies on the board cannot tolerate the high temperatures required for other insulation techniques. All other materials can be purchased from other vendors or be swapped out for alternatives at the users’ discretion. This build is meant to be flexible and customizable to fit the end user’s experiment. However, it should be noted that any changes from the materials or vendors listed must be validated by the end user.
Troubleshooting build issues
Silver epoxy deposition tends to fail for several reasons: the width of the capillary is too wide to fit between traces, the width of the capillary is too thin to pick up and deposit epoxy, or an excess of epoxy is on the capillary. The first two problems can be solved by cutting a new capillary of a more appropriate size; the latter by dipping the capillary into the epoxy with a lighter hand or removing a portion of the epoxy blob by gently dabbing the capillary onto a spare nitrile glove.
Deciding how to prepare the electrode is often a difficult decision for many users. However, determining what is needed for the experiment will help illuminate the decision. For acute surgeries, blunt tips can be used if the site size of the electrode is important; however, they will only insert into softer tissue (brain) and only at sub-500 μm target depths.
Going into deeper brain structures is possible using a glass cannula22; however, this can cause scarring and associated unreliability in ePhys recordings. Fibers must be less than 300 μm when sharpened to be able to penetrate harder tissues (nerve) as the shorter length provides a stiffer backbone for insertion7,8. Sharpened fibers have also recently been observed to penetrate to 1 mm depths in the brain8.
While the arrays discussed in this paper are an excellent starting point for many labs, newer probes using carbon fibers have also been developed to chronically target deeper areas in brain21,22,29. In nerve, electrodes of low invasiveness and high selectivity are an ongoing research topic5,8,30. Jiman et al.7 were able to detect multiunit activity within the nerve with minimal invasiveness and increased selectivity using a carbon fiber silicone array8, which mirrors the design of the Flex Array presented here.
Parylene C accessibility
Parylene C is a method of conformal coating at room temperature that has been used as a biocompatible insulator in many implanted devices. The technique requires a specialized tool in a cleanroom and takes about an hour to learn. A cursory survey of institutions that have previously requested carbon fiber arrays from our group was conducted to determine Parylene C deposition accessibility. We found that out of 17 institutes, 41% had access to Parylene C-coating systems on their campus. For universities without access to a Parylene C-coating system, commercial coating services are a viable alternative, as demonstrated here. Alternatively, outsourcing to a nearby university cleanroom may also be of interest to laboratories with no direct access to a Parylene C deposition system. To reduce the cost per device, we advise sending out larger batches of arrays as commercial systems can often accommodate larger samples.
Optimizing tip preparations
Additional tip preparations need to be investigated for these fibers as the current tip preparations require the end user to choose between penetrating ability and a small recording site. While the Nd:YAG laser-cut fibers provide a small site size20, the ability to penetrate stiffer tissue (muscle, nerve) is almost non-existent, and access to a laser setup capable of this cutting technique can be difficult and expensive. While blowtorching allows for a quick and economical way to get sharpened tips that can penetrate many tissues7, the tip geometry is large and may be inconsistent from fiber to fiber20. UV laser cutting also provides low impedances and large surface areas but with the added benefit of more consistent exposure. The UV laser is more accessible than the Nd:YAG laser; however, laboratories would need to engineer a way to align the laser with fibers and would not be able to use the Flex Array due to the pitch of the fibers being smaller than the laser’s focal point diameter. Previous work showed the fabrication of small, sharpened fibers via etching31,32. This approach could result in a small, reliable electrode geometry and preserve the sharpened tip necessary for penetrating nerve and muscle.
Our current tip coating, PEDOT:pTS, may also need to be replaced as it tends to degrade over time, which is an undesirable trait for a chronic probe17,25,33. A lack of PEDOT:pTS longevity leads to higher impedances and, therefore, lower signal quality, in part due to increased background noise. To increase longevity in these fiber tips, investigation into the feasibility of platinum-iridium coatings is being conducted. Platinum-iridium would allow for a greater surface area25,34 concentrated on the tip of the electrode, keeping a low impedance34,35,36 and allow for longer, chronic stability34,36. Other coatings, such as PEDOT/graphene oxide37 and gold38, have been utilized to lower carbon fiber electrode impedances, although these coatings are typically used for chemical-sensing probes rather than for ePhys recordings. Due to the inherent properties of carbon fibers39, the carbon fiber array presented here can be converted from a probe optimized for ePhys to a chemical-sensing device with a simple change of tip preparation22,40.
Acknowledgments
This work was financially supported by the National Institutes of Neurological Disorders and Stroke (UF1NS107659 and UF1NS115817) and the National Science Foundation (1707316). The authors acknowledge financial support from the University of Michigan College of Engineering and technical support from the Michigan Center for Materials Characterization and the Van Vlack Undergraduate Laboratory. The authors thank Dr. Khalil Najafi for the use of his Nd:YAG laser and the Lurie Nanofabrication Facility for the use of their Parylene C deposition machine. We would also like to thank Specialty Coating Systems (Indianapolis, IN) for their help in the commercial coating comparison study.
Footnotes
A complete version of this article that includes the video component is available at http://dx.doi.org/10.3791/63099.
Disclosures
The authors declare that they have no competing financial interests.
References
- 1.Szostak KM, Grand L, Constandinou TG Neural interfaces for intracortical recording: Requirements, fabrication methods, and characteristics. Frontiers in Neuroscience. 11, 665 (2017). [DOI] [PMC free article] [PubMed] [Google Scholar]
- 2.Cunningham JP et al. A closed-loop human simulator for investigating the role of feedback control in brain-machine interfaces. Journal of Neurophysiology. 105 (4), 1932–1949 (2011). [DOI] [PMC free article] [PubMed] [Google Scholar]
- 3.Yoshida K, Bertram MJ, Hunter Cox TG, Riso RR Peripheral nerve recording electrodes and techniques. In Neuroprosthetics: Theory and Practice. Horch K, Kipke D (Eds), World Scientific, 377–466 (2017). [Google Scholar]
- 4.Dweiri YM, Stone MA, Tyler DJ, McCallum GA, Durand DM Fabrication of high contact-density, flat-interface nerve electrodes for recording and stimulation applications. Journal of Visualized Experiments: JoVE. (116), 54388 (2016). [DOI] [PMC free article] [PubMed] [Google Scholar]
- 5.Kim H et al. Cuff and sieve electrode (CASE): The combination of neural electrodes for bi-directional peripheral nerve interfacing. Journal of Neuroscience Methods. 336, 108602 (2020). [DOI] [PubMed] [Google Scholar]
- 6.Ciancio AL et al. Control of prosthetic hands via the peripheral nervous system. Frontiers in Neuroscience. 10, 116 (2016). [DOI] [PMC free article] [PubMed] [Google Scholar]
- 7.Jiman AA et al. Multi-channel intraneural vagus nerve recordings with a novel high-density carbon fiber microelectrode array. Scientific Reports. 10 (1), 15501 (2020). [DOI] [PMC free article] [PubMed] [Google Scholar]
- 8.Welle EJ et al. Sharpened and mechanically robust carbon fiber electrode arrays for neural interfacing. IEEE Transactions on Neural Systems and Rehabilitation Engineering. 29, 993–1003 (2021). [DOI] [PMC free article] [PubMed] [Google Scholar]
- 9.Moffitt MA, McIntyre CC Model-based analysis of cortical recording with silicon microelectrodes. Clinical Neurophysiology. 116 (9), 2240–2250 (2005). [DOI] [PubMed] [Google Scholar]
- 10.Ardiem Medical. Neural cuff. http://www.ardiemmedical.com/neural-cuff/ (2021).
- 11.Micro-Leads Neuro. Nerve-cuff electrodes. https://www.microleadsneuro.com/research-products/?jumpto=nerve-cuff (2021).
- 12.Mortimer JT et al. Perspectives on new electrode technology for stimulating peripheral nerves with implantable motor prostheses. IEEE Transactions on Rehabilitation Engineering. 3 (2), 145–154 (1995). [Google Scholar]
- 13.Boretius T et al. A transverse intrafascicular multichannel electrode (TIME) to interface with the peripheral nerve. Biosensors & Bioelectronics. 26 (1), 62–69 (2010). [DOI] [PubMed] [Google Scholar]
- 14.Grill WM, Norman SE, Bellamkonda RV Implanted neural interfaces : biochallenges and engineered solutions. Annual Review of Biomedical Engineering. 11, 1–24 (2009). [DOI] [PubMed] [Google Scholar]
- 15.Larson CE, Meng E A review for the peripheral nerve interface designer. Journal of Neuroscience Methods. 332, 108523 (2020). [DOI] [PubMed] [Google Scholar]
- 16.Christensen MB et al. The foreign body response to the Utah Slant Electrode Array in the cat sciatic nerve. Acta Biomaterialia. 10 (11), 4650–4660 (2014). [DOI] [PubMed] [Google Scholar]
- 17.Patel PR et al. Chronic in vivo stability assessment of carbon fiber microelectrode arrays. Journal of Neural Engineering. 13 (6), 066002 (2016). [DOI] [PMC free article] [PubMed] [Google Scholar]
- 18.Yoshida Kozai TD et al. Ultrasmall implantable composite microelectrodes with bioactive surfaces for chronic neural interfaces. Nature Materials. 11 (12), 1065–1073 (2012). [DOI] [PMC free article] [PubMed] [Google Scholar]
- 19.Saito N et al. Application of carbon fibers to biomaterials: A new era of nano-level control of carbon fibers after 30-years of development. Chemical Society Reviews. 40 (7), 3824–3834 (2011). [DOI] [PubMed] [Google Scholar]
- 20.Welle EJ et al. Fabrication and characterization of a carbon fiber peripheral nerve electrode appropriate for chronic recording. FASEB Journal. 34 (S1), 1–1 (2020). [Google Scholar]
- 21.Guitchounts G, Cox D 64-Channel carbon fiber electrode arrays for chronic electrophysiology. Scientific Reports. 10 (1), 3830 (2020). [DOI] [PMC free article] [PubMed] [Google Scholar]
- 22.Patel PR et al. High density carbon fiber arrays for chronic electrophysiology, fast scan cyclic voltammetry, and correlative anatomy. Journal of Neural Engineering. 17 (5), 056029 (2020). [DOI] [PubMed] [Google Scholar]
- 23.Massey TL et al. Open-source automated system for assembling a high-density microwire neural recording array. 2016 International Conference on Manipulation, Automation and Robotics at Small Scales (MARSS). 1–7 (2016). [Google Scholar]
- 24.Schwerdt HN et al. Subcellular probes for neurochemical recording from multiple brain sites. Lab Chip. 17, 1104–1115 (2017). [DOI] [PMC free article] [PubMed] [Google Scholar]
- 25.Welle EJ et al. Ultra-small carbon fiber electrode recording site optimization and improved in vivo chronic recording yield. Journal of Neural Engineering. 17 (2), 026037 (2020). [DOI] [PMC free article] [PubMed] [Google Scholar]
- 26.Guitchounts G, Markowitz JE, Liberti WA, Gardner TJ A carbon-fiber electrode array for long-term neural recording. Journal of Neural Engineering. 10 (4), 046016 (2013). [DOI] [PMC free article] [PubMed] [Google Scholar]
- 27.Gillis WF et al. Carbon fiber on polyimide ultra-micro electrodes. Journal of Neural Engineering. 15 (1), 016010 (2018). [DOI] [PMC free article] [PubMed] [Google Scholar]
- 28.Dong T, Chen L, Shih A Laser sharpening of carbon fiber microelectrode arrays for brain recording. Journal of Micro and Nano-Manufacturing. 8 (4), 041013 (2020). [DOI] [PMC free article] [PubMed] [Google Scholar]
- 29.Massey TL et al. A high-density carbon fiber neural recording array technology. Journal of Neural Engineering. 16 (1), 016024 (2019). [DOI] [PubMed] [Google Scholar]
- 30.Romeni S, Valle G, Mazzoni A, Micera S Tutorial: a computational framework for the design and optimization of peripheral neural interfaces. Nature Protocols. 15 (10), 3129–3153 (2020). [DOI] [PubMed] [Google Scholar]
- 31.Khani H, Wipf DO Fabrication of tip-protected polymer-coated carbon-fiber ultramicroelectrodes and pH ultramicroelectrodes. Journal of The Electrochemical Society. 166 (8), B673–B679 (2019). [Google Scholar]
- 32.El-Giar EEDM, Wipf DO Preparation of tip-protected poly(oxyphenylene) coated carbon-fiber ultramicroelectrodes. Electroanalysis. 18 (23), 2281–2289 (2006). [Google Scholar]
- 33.Venkatraman S et al. In vitro and in vivo evaluation of PEDOT microelectrodes for neural stimulation and recording. IEEE Transactions on Neural Systems and Rehabilitation Engineering. 19 (3), 307–316 (2011). [DOI] [PubMed] [Google Scholar]
- 34.Petrossians A et al. Electrodeposition and Characterization of Thin-Film Platinum-Iridium Alloys for Biological Interfaces. Journal of the Electrochemical Society. 158 (6), D269–D276 (2011). [Google Scholar]
- 35.Lee CD, Hudak EM, Whalen JJ, Petrossians A, Weiland JD Low-impedance, high surface area Pt-Ir electrodeposited on cochlear implant electrodes. Journal of The Electrochemical Society. 165 (12), G3015–G3017 (2018). [Google Scholar]
- 36.Cassar IR et al. Electrodeposited platinum-iridium coating improves in vivo recording performance of chronically implanted microelectrode arrays. Biomaterials. 205, 120–132 (2019). [DOI] [PMC free article] [PubMed] [Google Scholar]
- 37.Taylor IM et al. Enhanced dopamine detection sensitivity by PEDOT/graphene oxide coating on in vivo carbon fiber electrodes. Biosensors and Bioelectronics. 89 (Pt 1), 400–410 (2017). [DOI] [PMC free article] [PubMed] [Google Scholar]
- 38.Mohanaraj S et al. Gold nanoparticle modified carbon fiber microelectrodes for enhanced neurochemical detection. Journal of Visualized Experiments: JoVE. 2019 (147), 59552 (2019). [DOI] [PMC free article] [PubMed] [Google Scholar]
- 39.Pusch J, Wohlmann B Chapter 2 - Carbon fibers. In Inorganic and composite fibers. Production, properties, and applications. Woodhead Publishing, 31–51 (2019). [Google Scholar]
- 40.Budai D, Hernádi I, Mészáros B, Bali ZK, Gulya K Electrochemical responses of carbon fiber microelectrodes to dopamine in vitro and in vivo. Acta Biologica Szegediensis. 54 (2), 155–160 (2010). [Google Scholar]


