Abstract
As sports-related injuries are becoming more common among children, there has been an increased need for knee arthroscopies in the pediatric population. Nevertheless, pediatric knee arthroscopy exposure is varied among orthopaedic surgeons, especially during residency training. There is a considerable difference in knee arthroscopy case volume between the adult and the pediatric population among orthopaedic residents. Although the fundamentals of adult knee arthroscopy have been well delineated, there is a paucity of literature surrounding basic pediatric knee arthroscopy. Our goal is to further explain the fundamentals needed to perform successful arthroscopic surgery in the pediatric knee. Through discussing proper patient positioning, instrumentation, including the utility of the 1.9-mm small-bore needle arthroscope (NanoScope; Arthrex, Naples, FL), subtle tips and tricks, as well as advantages and disadvantages of arthroscopy in children, this Technical Note along with the corresponding video are designed to help elucidate the intricacies of the pediatric knee. It will serve as educational material targeted to the resident trainee or any orthopaedic practitioner interested in gaining an introductory foundation to pediatric knee arthroscopy.
Technique Video
This is a narrated instructional video outlining the perioperative management of pediatric knee arthroscopy. This video includes patient positioning and preoperative setup, portal placement, various instrumentation options, intraoperative maneuvers, as well as tips and tricks that can help both experienced and novice arthroscopists improve their pediatric knee arthroscopy.
Exposure to pediatric knee arthroscopy is varied among orthopaedic surgeons, especially during residency training. There is a vast difference in reported case volume of pediatric knee arthroscopies compared with adult knee arthroscopies among resident physicians.1,2 This disparity raises concern, especially as we see more children participating in sports, resulting in a concomitant increase in both pediatric knee injuries and subsequent arthroscopies.3, 4, 5, 6, 7 Although the fundamentals of knee arthroscopy in the adult population are well documented, there is a paucity of literature surrounding basic pediatric knee arthroscopy, leading to potential complications and poor outcomes.8, 9, 10 Our goal is to further explain the fundamentals needed to perform successful arthroscopic surgery in the pediatric knee. The tips and tricks described in this Technical Note will help further elucidate the intricacies of the pediatric knee.
Surgical Technique (With Video Illustration)
Video 1 outlines the approach and technique of pediatric arthroscopy.
Preoperative Preparation and Positioning
In the preoperative holding area, the operative extremity is confirmed with child/caretaker and is fully exposed and marked by the operative surgeon. A thigh-high thromboembolic deterrent hose (T.E.D.; Cardinal Health, Dublin, OH) is then placed on the nonoperative extremity, which aids in surgical-site verification and thromboprophylaxis during surgery (Fig 1).
Fig 1.
Shown is our standard positioning for the supine patient. In this image, the patient has a thigh high thromboembolic deterrent hose (T.E.D.; Cardinal Health) placed on the nonoperative extremity and the extremity is well padded to prevent pressure injury. The operative extremity is fully exposed and marked. A well-placed tourniquet has been placed over the Webril (Covidien) on the most proximal portion of the operative thigh. (Caud., caudal; Ceph., cephalad; L, left; R, right.)
After transport to the operative suite, the child is positioned supine on a standard operative table. Tip: We prefer that the patient’s contralateral leg be placed centered on the bed to help facilitate access to the operative knee in the figure of 4 position (Figs 2 and 3). Manipulation of the extremity should be done before prepping/draping to ensure adequate range of motion, confirmatory examination, adequate operating space, and height of table by the primary surgeon (Figs 3 and 4). Next, Webril (Covidien, Mansfield, MA) is wrapped around the most proximal aspect of the thigh. An appropriately sized nonsterile tourniquet (Stryker, Kalamazoo, MI) is then placed on top of the Webril, and a lateral post is placed around the level of the tourniquet (Fig 4). The nonoperative extremity is well-padded and secured down to prevent pressure injury (Fig 5). The child is then prepped and draped in the standard fashion. Our protocol is a down sheet, followed by an impervious U-drape (3M, Saint Paul, MN), followed by a lower-extremity drape (Cardinal Health). A stockinette secured by Coban (3M) is placed over the operative extremity up to mid-shin (Fig 6).
Fig 2.
Shown is a child supine in the preferred table position, with the nonoperative extremity centered on the operating table. This allows for sufficient mobility of the operative extremity during the figure of 4 position, where the operative knee is flexed and externally rotated, and the foot is placed on top of the non-operative extremity. (Caud., caudal; Ceph., cephalad; L, left; R, right.)
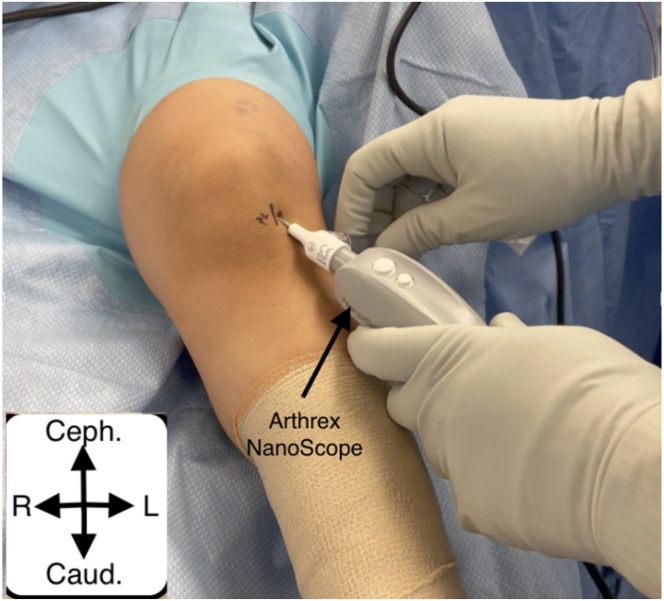
Fig 3.
Our supine patient is show supine in the preferred position during the figure of 4 maneuver allowing for greater varus lever arm with the knee freely hanging over the side of the operating table. Abbreviations: (Caud., caudal; Ceph., cephalad; L, left; R, right.)
Fig 4.
Shown is our preferred location of the tourniquet and the lateral post, allowing for optimal valgus lever arm and ease of access into the medial compartment with wide hip abduction to allow space for the surgeon. This is helpful if medial open work is to be done and can prevent an internal rotation moment through the thigh and hip that deceases valgus opening of the medial joint space. Slight knee flexion is preferred. (Caud., caudal; Ceph., cephalad; L, left; R, right.)
Fig 5.
The child is shown in a supine position with the nonoperative extremity secured with blankets and silk tape whereas the operative extremity is free and ready to for standard sterile preparation. (Caud., caudal; Ceph., cephalad; L, left; R, right.)
Fig 6.
Final set-up of the extremity after final preparation with a stockinette secured by Coban (3M), extremity drape, mayo stand above the patient, and viewing screens with arthroscopy tower on the contralateral side of the patient. (Caud., caudal; Ceph., cephalad.)
Before the Incision
If ligamentous or open work is expected, the limb is exsanguinated with an Esmarch bandage (3M) and the tourniquet is inflated to a pressure of 200 mm Hg with the knee in flexion to take tension off the extensor mechanism. Otherwise, the tourniquet may be unnecessary and potentially avoided to decrease postoperative narcotic need.11 The arthroscopic inflow (Arthrex, Naples, FL) is typically set to 30 mm Hg. This differs from adults usually by approximately 45 to 55 mm Hg due to the volume expansion of the adult versus pediatric knee.12 Options for entry and arthroscope sizes depend on the age of the patient and availability. Larger arthroscopes can be used as necessary but can potentially lead to greater risk of iatrogenic injury. Fig 7, Fig 8, Fig 9 demonstrate our institutional preferences. Tip: If you do not have the nano- or low-file instruments available, you can supplement with an elbow or ankle arthroscopy tray.
Fig 7.
Shown are the arthroscope cameras from left to right: 1.9-mm 0° small-bore needle arthroscope (NanoScope; Arthrex), 2.4-mm 30° and 70° arthroscopes with trocar (Arthrex), 2.7-mm 30° arthroscope with trocar (Arthrex), and finally 4.0-mm 30° and 70° arthroscopes with trocar (Arthrex). The standard option is 2.4 mm for most pediatric knee arthroscopies.
Fig 8.
Shown from left to right: arthroscopic shaver (Arthrex) with a 3.5-mm torpedo attachment (can use 3.0 dissector as well or curved options), blunt probe (Arthrex), 18-gauge spinal needle, 11 blade scalpel, 1.9 mm 0° small bore needle arthroscope (Arthrex), saline for joint distention, and assorted low-profile/nano baskets (Arthrex), graspers, and knives (Arthrex) for meniscal work.
Fig 9.
Shown is a 15° up NanoBiter (Arthrex) on the left, and a NanoGrasper (Arthrex) on the right. These can be used for pediatric patients with smaller anatomy. Other Nano instruments include: straight NanoBiter, NanoScissors, and NanoProbe.
Surgical Incision and Portal Placement
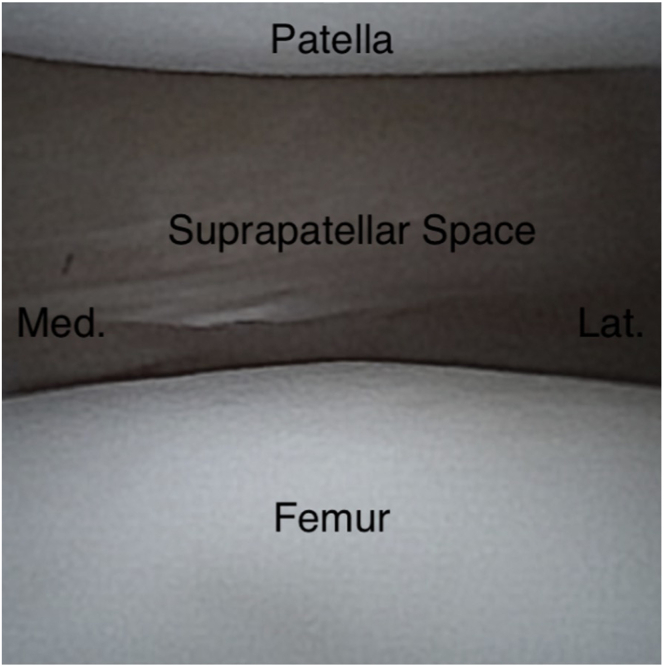
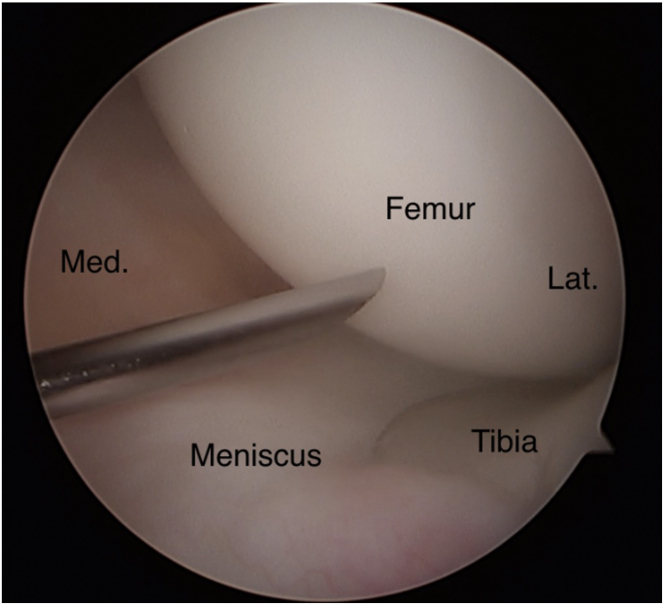
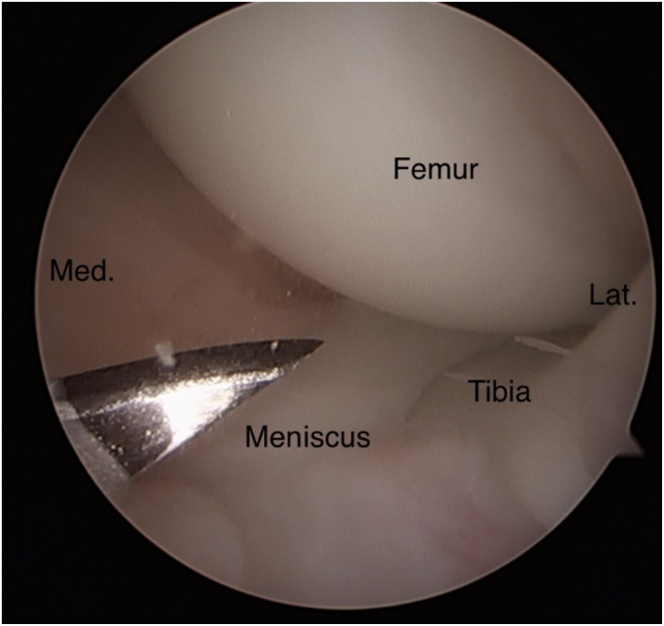
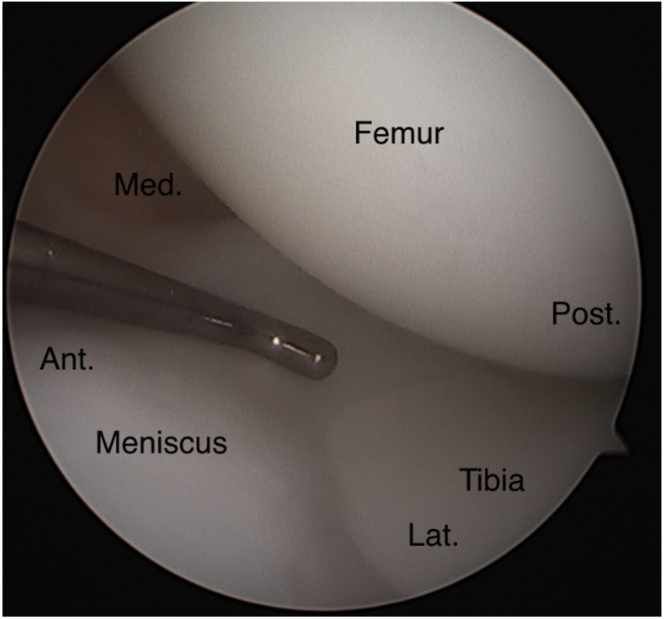
It is our preference to start with the anterolateral portal first, then add the superomedial inflow portal, then lastly the anteromedial portal under direct visualization from the anterolateral portal. To identify the anterolateral portal, the patella, patellar tendon, tibial tubercle, and lateral tibial plateau are identified in the flexed knee position and marked accordingly. Our preference is that the anterolateral portal is placed one-half finger breadth lateral to patellar tendon and one finger breadth superiorly from the edge of the lateral tibial plateau (Fig 10, Fig 11, Fig 12). The joint is then insufflated in extension with about 30 cubic centimeters (cc) of sterile saline to allow adequate visualization before insertion of the camera and to help prevent iatrogenic injury to the knee (Fig 13). The knee is then returned to flexion, where a vertical incision is made through the skin with an 11-blade scalpel about the lateral portal marking. The arthroscope is then introduced into the joint aimed at the femoral notch, and the knee is slowly extended as the trocar is inserted into the patellofemoral space (Fig 14). The trocar is removed, and the arthroscope is introduced into the knee to visualize the patellofemoral joint (Fig 15). The superomedial inflow portal is then placed one finger breadth superior and one finger breadth medial to the superomedial border of the patella under visual guidance (Figs 16 and 17). A standard diagnostic knee arthroscopy is performed with visualization of the suprapatellar pouch, patellofemoral joint space, and medial and lateral gutters (Fig 18). The anteromedial portal is created under direct visualization with the operative extremity on the hip of the surgeon creating slight knee flexion and valgus force (Fig 19, Fig 20, Fig 21). The medial compartment is then inspected (Fig 22). The knee is then allowed to hang off the operating table to inspect the femoral notch and cruciate ligaments (Fig 23, Fig 24, Fig 25). Subsequently, the knee is brought into the figure of 4 position to allow visualization and inspection of the lateral compartment (Fig 26).
Fig 10.
Shown is preparation for marking of the landmarks after final sterile setup is complete. Palpation is used to feel all the bony and soft-tissue landmarks. (Caud., caudal; Ceph., cephalad; L, left; R, right.)
Fig 11.
Shown is the location of the anterolateral portal one finger breadth above the lateral tibial plateau and one-half finger breadth lateral to the patellar ligament as shown. (Caud., caudal; Ceph., cephalad; L, left; R, right.)
Fig 12.
Use a sterile ruler to mark out 1.5 cm superior to the tibia and 1 cm lateral to the lateral aspect of the patellar ligament just below the inferior tip of the patella. (Caud., caudal; Ceph., cephalad; L, left; R, right.)
Fig 13.
Shown is sterile saline being used to insufflate the knee before the start of the procedure. Our preference is to use a superolateral patellar entry to inject the sterile saline, usually about 30 to 50 cc. (Caud., caudal; Ceph., cephalad; L, left; R, right.)
Fig 14.
The NeedleScope (NanoScope; Arthrex) trocar introducer is placed into the anterolateral portal. The knee is flexed first, the trocar/introducer is then placed aiming at the femoral notch under the patella, and the knee is slowly brought into extension sliding the introducer under the patella into the suprapatellar pouch, with care taken to not cause any iatrogenic damage. (Caud., caudal; Ceph., cephalad; L, left; R, right.)
Fig 15.
Shown is the NeedleScope (NanoScope; Arthrex) after it has been placed in the introducer in the suprapatellar pouch. It is at this point that the joint is insufflated with sterile saline. (Caud., caudal; Ceph., cephalad; L, left; R, right.)
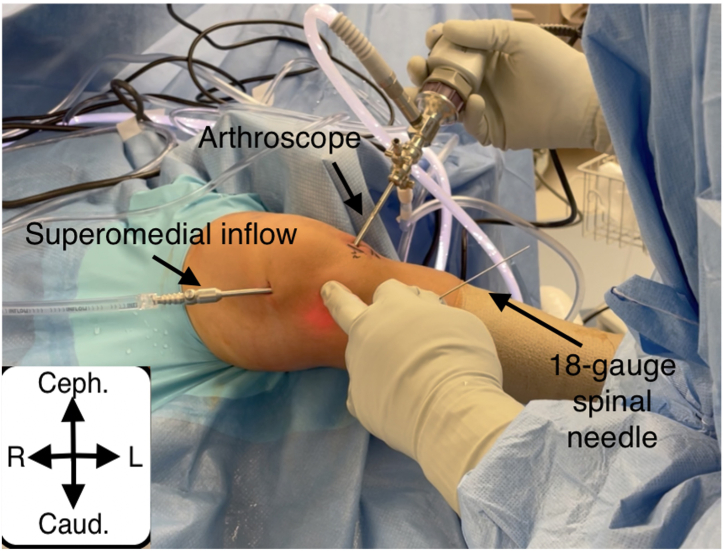
Fig 16.
Shown is the entry of an 18-gauge spinal needle into the superomedial aspect of the knee joint under direct visualization. This spinal needle is coming from about 1 cm medial and superior to the superior aspect of the patella. (Lat., lateral; Med., medial.)
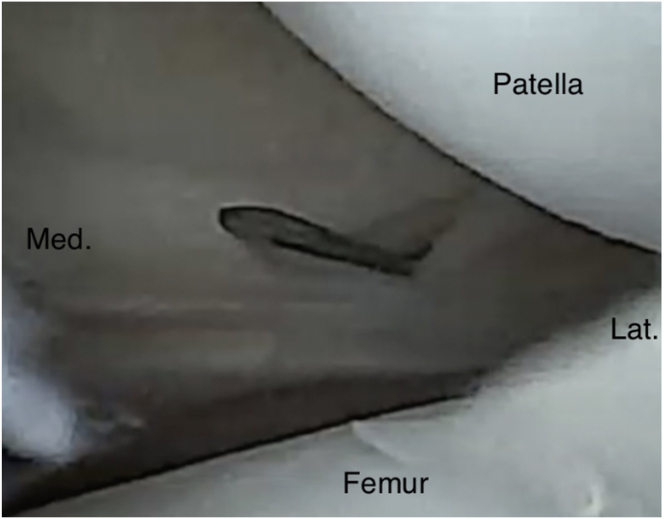
Fig 17.
Shown is the 11-blade scalpel making a small incision into the superomedial aspect of the knee joint to allow placement of a superomedial inflow portal. This is done under direct visualization to negate iatrogenic damage. (Lat., lateral; Med., medial.)
Fig 18.
Shown is the correct position of the anteromedial portal, the already-placed superomedial inflow portal, and the visual assistance of the arthroscope from the anterolateral portal. The surgeon has placed the patient’s extremity on his hip to allow for increased valgus moment arm on the knee. Slight flexion and external rotation are preferred. The surgeon palpates the proposed anteromedial portal placement, then places an 18-gauge spinal needle using triangulation. If visualization is limited, an 18-gauge spinal needle can be used to pie-crust the medial collateral ligament to increase the medial joint space. (Caud., caudal; Ceph., cephalad; L, left; R, right.)
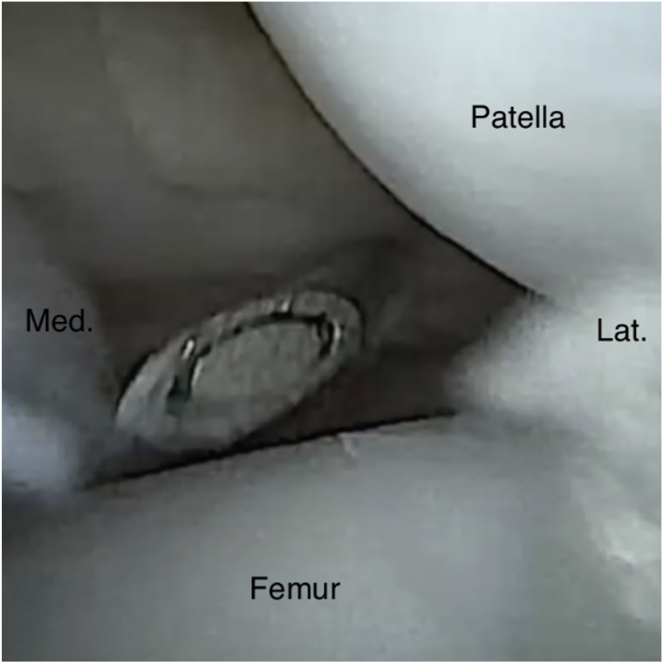
Fig 19.
Shown is the start of the diagnostic arthroscopy, looking at the patellofemoral joint and the suprapatellar pouch. This is followed by the lateral gutter, then the medial gutter, and then the medial joint space. (Lat., lateral; Med., medial.)
Fig 20.
depicts the 18-gauge spinal needle being introduced into the medial joint space through the proposed anteromedial portal under direct visualization. Care is taken to be just above the meniscus to facilitate ease of access to the posterior aspect of the knee under the femoral condyles. (Lat., lateral; Med., medial.)
Fig 21.
Shown is the 11-blade scalpel being slowly introduced into the knee joint under direct visualization with the blade pointing upwards to prevent iatrogenic injury to the meniscus. Once again, care is being taken to stay just superior to the meniscus to allow for ease of access to the posterior elements of the knee. (Lat., lateral; Med., medial.)
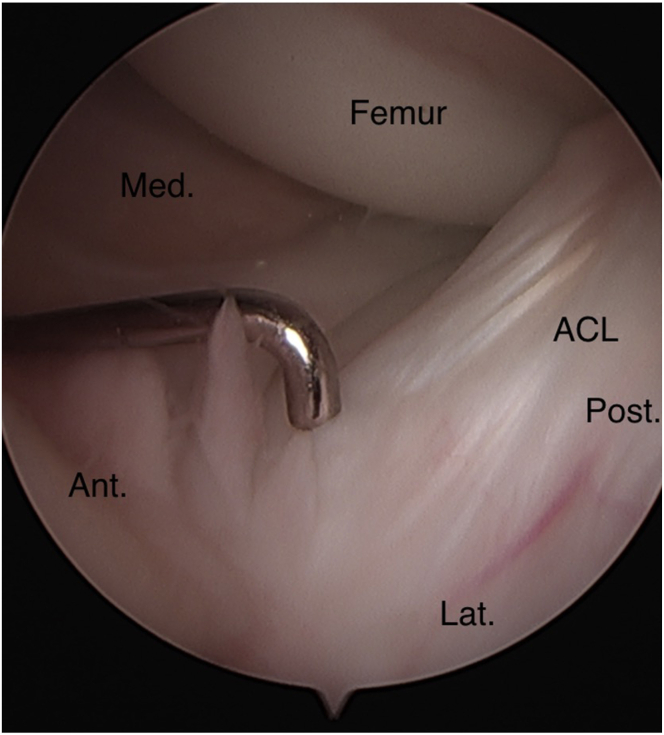
Fig 22.
Shown is the probe in the medial joint space inspecting the medial meniscus as whole including the meniscus root, the chondral surface of the medial femoral condyle, and the chondral surface of the medial tibial plateau. (Ant., anterior; Lat., lateral; Med., medial; Post., posterior.)
Fig 23.
Shown is the probe lightly inspecting the insertion of the ACL, the anterior medial meniscus, and the intermeniscal ligament. It is at this time that the surgeon would let the operative extremity hang off the side of the bed to allow approximately 90° of knee flexion while inspecting the elements in the femoral notch. (ACL, anterior cruciate ligament; Ant., anterior; Lat., lateral; Med., medial; Post., posterior.)
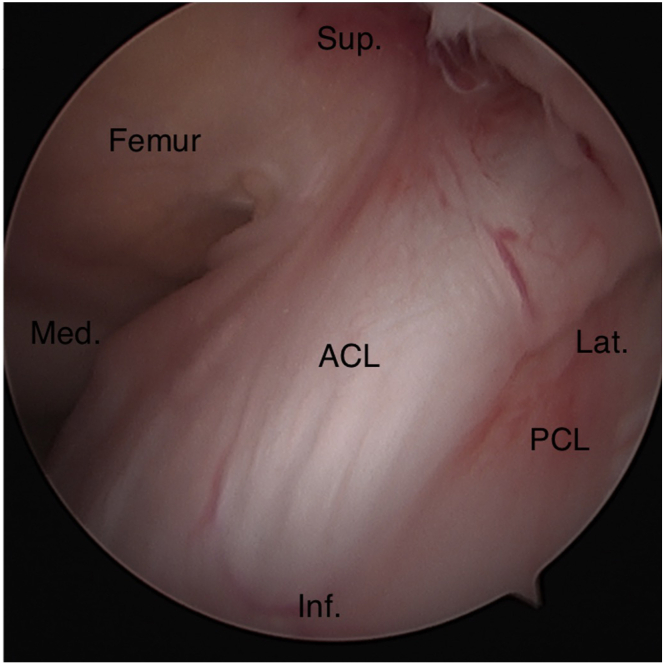
Fig 24.
Shown is the notch view of the knee to inspect the ACL and the posterior cruciate ligament. A light touch is used with the arthroscopic probe. (ACL, anterior cruciate ligament; Inf., inferior; Lat., lateral; Med., medial; PCL, posterior cruciate ligament; Sup., superior.)
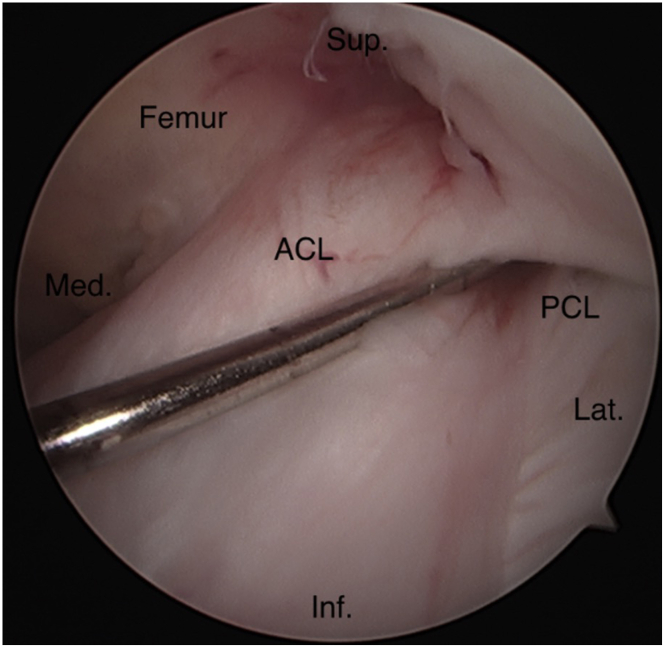
Fig 25.
Shown is the probe inspecting the origin of the anterior cruciate ligament along with the posterior cruciate ligament to ensure these are both intact to light touch. (ACL, anterior cruciate ligament; Inf., inferior; Lat., lateral; Med., medial; PCL, posterior cruciate ligament; Sup., superior.)
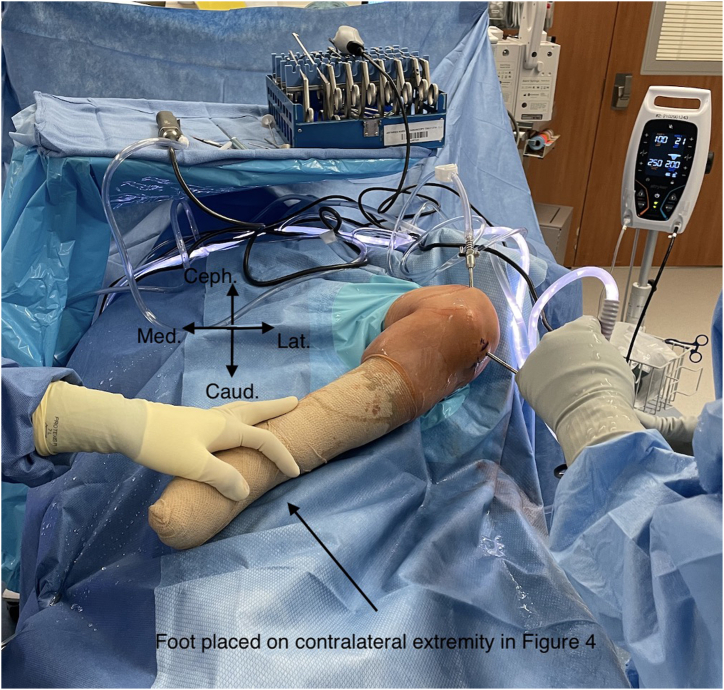
Fig 26.
Shown is the figure of 4 position of the operative extremity with the knee flexed and the foot placed onto the contralateral extremity. The assistant maintains this position to allow a varus moment arm onto the lateral joint space as the arthroscope is situated in the lateral joint space to view the lateral compartment. A sterile bump can be placed under the foot to maximize varus moment and increase the lateral joint space visualization. (Caud., caudal; Ceph., cephalad; Lat., lateral; Med., medial.)
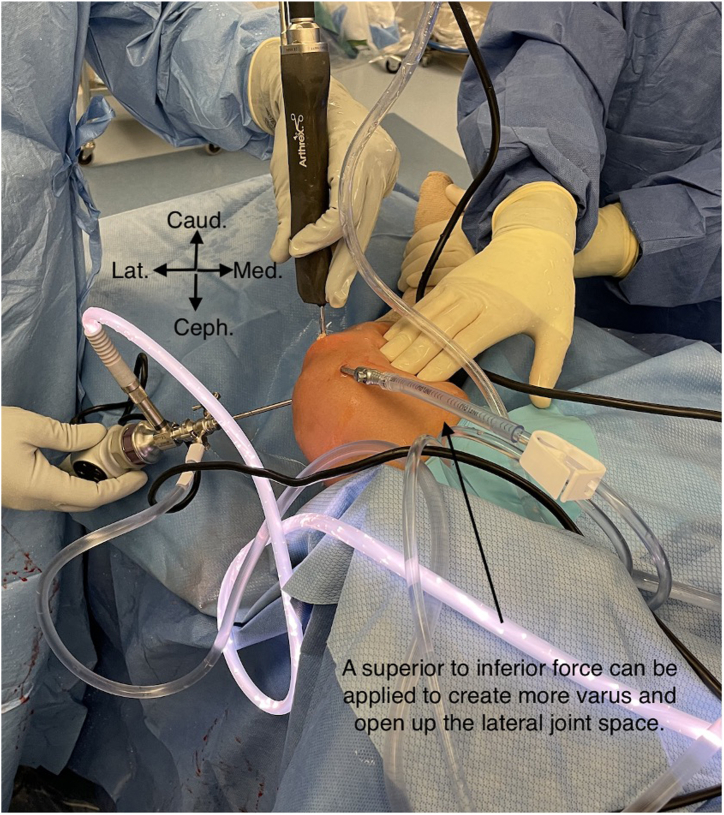
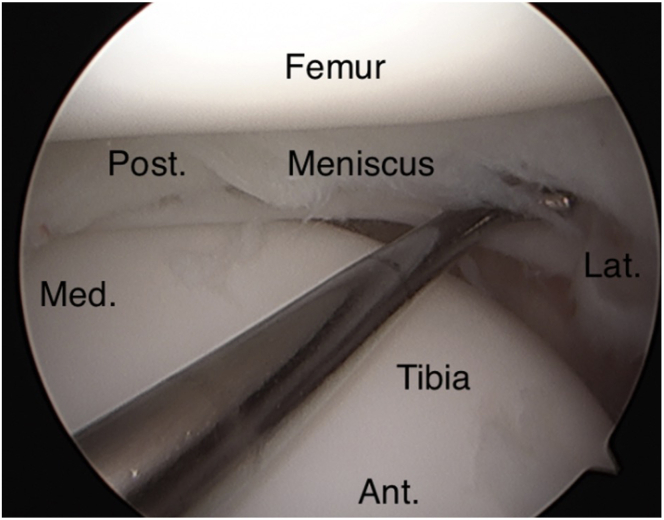
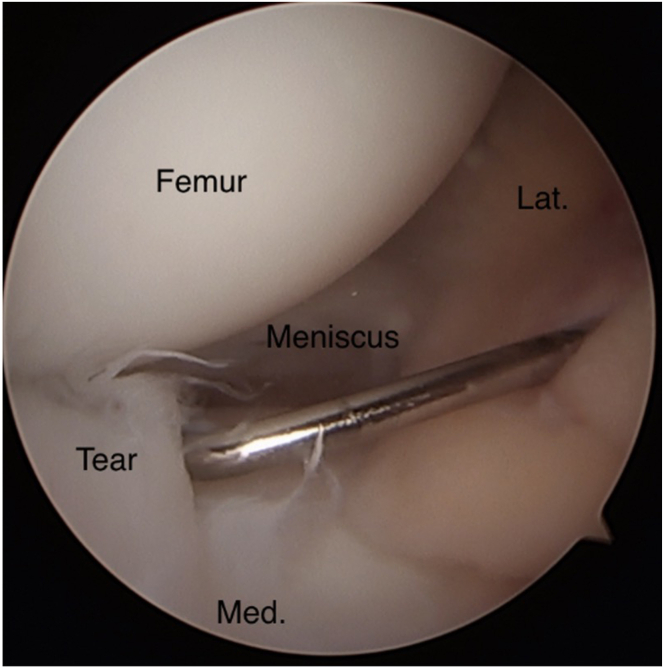
A varus force can then be placed on the knee to aid in visualization of the lateral compartment (Figs 27 and 28). Tip: Adding a sterile bump under the operative foot can increase visualization of lateral compartment during figure of 4 positioning. To gain a different perspective, the arthroscope can be switched from the lateral to medial portal to inspect the lateral compartment (Figs 29 and 30). Any soft-tissue work can then be completed. After completion, the joint is then expelled of fluid, wound closure is performed with 3-0 MONOCRYL (Ethicon, Raritan, NJ) and Steri-Strips (3M). Postoperative anesthesia and analgesia administered per institutional protocols.
Fig 27.
Shown is the same figure of 4 position but viewed from above, now with the assistant giving a superior to inferior force on the medial aspect of the operative extremity to increase the varus moment arm and increase visualization of the lateral joint space. (Caud., caudal; Ceph., cephalad; Lat., lateral; Med., medial.)
Fig 28.
Shown is the probe inspecting the lateral joint space including the lateral meniscus as a whole including the meniscus root, the lateral femoral chondral surface, the lateral tibial plateau chondral surface, and the popliteal tendon. In this case, a discoid lateral meniscus with anterior rim instability and tearing was identified. (Ant., anterior; Lat., lateral; Med., medial; Post., posterior.)
Fig 29.
Shown is the optional medial viewing from the anteromedial portal. This allows complete visualization of the lateral structures anteriorly. A probe is used to inspect the tear. The surgeon can switch back and forth between portals for ease of viewing and working. (Lat., lateral; Med., medial.)
Fig 30.
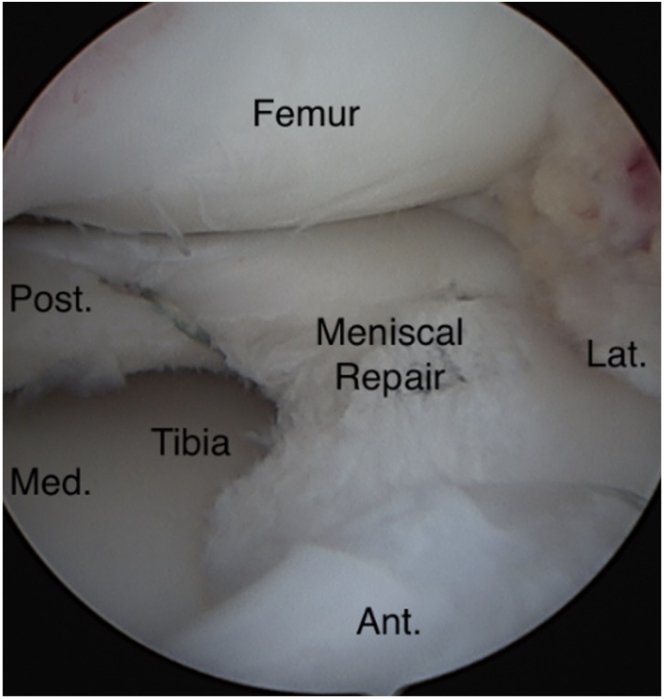
Repair of the lateral meniscus viewed from the anterolateral portal. A suture was used in an inside-out fashion for repair. (Ant., anterior; Lat., lateral; Med., medial; Post., posterior.)
Postoperative Management
Most pediatric knee arthroscopies will be weight-bearing as tolerated in a locked range of motion brace if repair/reconstruction is performed. Immediate full range of motion is encouraged, and the brace should be removed for home range of motion exercises. Pain is generally well controlled with over-the-counter acetaminophen and nonsteroidal anti-inflammatories. Physical therapy, continuous passive movement, and other postoperative therapies are used as needed. The child will be followed postoperatively for between 3 and 24 months depending on the surgery.
Discussion
Knee arthroscopy is a valuable skill acquired during residency training in orthopedic surgery. As the pediatric population continues to push the boundaries of athletics, a corresponding rise in sports-related injuries is being observed, with a corresponding increase in pediatric knee arthroscopies.3, 4, 5, 6, 7 Despite this increase, knee arthroscopy case volume often depends on the residency and available cases.1,2 In addition, subjective reporting by residents revealed that a majority lacked confidence in performing arthroscopies compared with open procedures.13
Table 1 outlines advantages and disadvantages of this guide to pediatric arthroscopy, whereas Table 2 describes common pearls and pitfalls relating to pediatric arthroscopy. This combined with the associated video provide a brief, yet informative, summary.
Table 1.
Strengths and Limitations of the Pediatric Knee Arthroscopy Survival Guide
| Strengths | Limitations |
|---|---|
| Be well prepared for a pediatric knee arthroscope | One author’s preferred technique |
| Aid in resident/novice training | Poor resolution and visualization with 1.9-mm 0° small-bore needle arthroscope, need to maneuver the arthroscope more than usual |
| Discusses smaller arthroscopes tailored to pediatric knees | Need repetition to master skillset |
| Decreased risk of iatrogenic injury with smaller instruments and knowledge of arthroscopy | Smaller joint space with a theoretical increased risk of iatrogenic injury, especially with novice arthroscopist |
| Smaller incisions for the smaller instruments, with less theoretical infection burden | Although numbers are increasing, pediatric knee arthroscopes are far less common than in adults |
NOTE. Table 1 outlines the strengths and limitations of this pediatric knee arthroscopy survival guide.
Table 2.
Pearls and Pitfalls of Pediatric Knee Arthroscopy
| Pearls | Pitfalls |
|---|---|
| Lower tourniquet pressure (∼200 mm Hg) to decrease postoperative pain medication need | Too high of tourniquet pressure leads to tourniquet pain |
| Position in center of the bed for increased varus moment arm | Poor positioning and setup leading to difficulties during procedures |
| Sterile towels under foot in figure 4 for even greater varus moment arm | Not using small-enough instruments to prevent iatrogenic injuries |
| Lower pump pressure (∼30 mm Hg) due to smaller volume in pediatric knees | Poor portal placement, leading to difficulties with soft-tissue work and arthroscopic visualization |
| Can use wrist or ankle instruments as substitute if do not have access to 1.9-mm small-bore needle arthroscope | Poor follow-up and rehabilitation, leading to poor outcomes |
NOTE. Table 2 denotes the common pearls and pitfalls of pediatric arthroscopy.
Arthroscopy, although a quintessential orthopaedic tool, is technically challenging and may require more cases than other standard orthopaedic skills to reach proficiency.14 Knee arthroscopy is not benign and comes with complications even in the pediatric population.8, 9, 10 With variability in training exposure to arthroscopy, this guide is intended to help prepare novice arthroscopists for success in pediatric knee arthroscopy.
In conclusion, this guide is intended to aid in creating a solid foundation to build on when it comes to successful pediatric knee arthroscopy. Although general and/or adult orthopaedists may not have to make use of pediatric knee arthroscopy due to fellowship-trained specialists in the community, we hope this technique guide will provide insight for residents/trainees, practitioners without specialist support, or anyone eager to further their skill repertoire.
Footnotes
The authors report the following potential conflicts of interest or sources of funding: J.S. reports paid speaker for Arthrex. All other authors declare that they have no known competing financial interests or personal relationships that could have appeared to influence the work reported in this paper. Full ICMJE author disclosure forms are available for this article online, as supplementary material.
Supplementary Data
This is a narrated instructional video outlining the perioperative management of pediatric knee arthroscopy. This video includes patient positioning and preoperative setup, portal placement, various instrumentation options, intraoperative maneuvers, as well as tips and tricks that can help both experienced and novice arthroscopists improve their pediatric knee arthroscopy.
References
- 1.Sudah S.Y., Constantinescu D.S., Nasra M.H., et al. Wide variability of pediatric knee arthroscopy case volume in orthopaedic surgery residency. Arthrosc Sports Med Rehabil. 2021;3:e1769–e1773. doi: 10.1016/j.asmr.2021.08.005. [DOI] [PMC free article] [PubMed] [Google Scholar]
- 2.Hinds R.M., Phillips D., Egol K.A., Capo J.T. Variation in pediatric orthopedic case volume among residents: An assessment of Accreditation Council for Graduate Medical Education case logs. J Pediatr Orthop B. 2018;27:358–361. doi: 10.1097/BPB.0000000000000401. [DOI] [PubMed] [Google Scholar]
- 3.Tepolt F.A., Feldman L., Kocher M.S. Trends in pediatric ACL reconstruction from the PHIS Database. J Pediatr Orthop. 2018;38:e490–e494. doi: 10.1097/BPO.0000000000001222. [DOI] [PubMed] [Google Scholar]
- 4.Kooy C.E.V.W., Jakobsen R.B., Fenstad A.M., et al. Major increase in incidence of pediatric ACL reconstructions from 2005 to 2021: A study from the Norwegian Knee Ligament Register. Am J Sports Med. 2023;51:2891–2899. doi: 10.1177/03635465231185742. [DOI] [PMC free article] [PubMed] [Google Scholar]
- 5.Nissen C.W., Albright J.C., Anderson C.N., et al. Descriptive epidemiology from the Research in Osteochondritis Dissecans of the Knee (ROCK) prospective cohort. Am J Sports Med. 2022;50:118–127. doi: 10.1177/03635465211057103. [DOI] [PubMed] [Google Scholar]
- 6.Butler L.S., Janosky J.J., Sugimoto D. Pediatric and adolescent knee injuries: Risk factors and preventive strategies. Clin Sports Med. 2022;41:799–820. doi: 10.1016/j.csm.2022.05.011. [DOI] [PubMed] [Google Scholar]
- 7.Edison B.R., Pandya N., Patel N.M., Carter C.W. Sex and gender differences in pediatric knee injuries. Clin Sports Med. 2022;41:769–787. doi: 10.1016/j.csm.2022.06.002. [DOI] [PubMed] [Google Scholar]
- 8.Gaal B.T., Knapik D.M., Gilmore A. Patient-reported outcome measures following surgical intervention for pediatric sports-related injuries to the knee: A systematic review. Curr Rev Musculoskelet Med. 2022;15:187–193. doi: 10.1007/s12178-022-09756-5. [DOI] [PMC free article] [PubMed] [Google Scholar]
- 9.Ashraf A., Luo T.D., Christophersen C., Hunter L.R., Dahm D.L., McIntosh A.L. Acute and subacute complications of pediatric and adolescent knee arthroscopy. Arthroscopy. 2014;30:710–714. doi: 10.1016/j.arthro.2014.02.028. [DOI] [PubMed] [Google Scholar]
- 10.Shi B., Stinson Z., Nault M.L., Brey J., Beck J. Meniscus repair in pediatric athletes. Clin Sports Med. 2022;41:749–767. doi: 10.1016/j.csm.2022.05.010. [DOI] [PubMed] [Google Scholar]
- 11.Reilly C.W., McEwen J.A., Leveille L., Perdios A., Mulpuri K. Minimizing tourniquet pressure in pediatric anterior cruciate ligament reconstructive surgery: A blinded, prospective randomized controlled trial. J Pediatr Orthop. 2009;29:275–280. doi: 10.1097/BPO.0b013e31819bcd14. [DOI] [PubMed] [Google Scholar]
- 12.Ewing J.W., Noe D.A., Kitaoka H.B., Askew M.J. Intra-articular pressures during arthroscopic knee surgery. Arthroscopy. 1986;2:264–269. doi: 10.1016/s0749-8063(86)80083-4. [DOI] [PubMed] [Google Scholar]
- 13.Hall M.P., Kaplan K.M., Gorczynski C.T., Zuckerman J.D., Rosen J.E. Assessment of arthroscopic training in U.S. orthopedic surgery residency programs—a resident self-assessment. Bull NYU Hosp Jt Dis. 2010;68:5–10. [PubMed] [Google Scholar]
- 14.Hodgins J.L., Veillette C., Biau D., Sonnadara R. The knee arthroscopy learning curve: Quantitative assessment of surgical skills. Arthroscopy. 2014;30:613–621. doi: 10.1016/j.arthro.2014.02.021. [DOI] [PubMed] [Google Scholar]
Associated Data
This section collects any data citations, data availability statements, or supplementary materials included in this article.
Supplementary Materials
This is a narrated instructional video outlining the perioperative management of pediatric knee arthroscopy. This video includes patient positioning and preoperative setup, portal placement, various instrumentation options, intraoperative maneuvers, as well as tips and tricks that can help both experienced and novice arthroscopists improve their pediatric knee arthroscopy.
This is a narrated instructional video outlining the perioperative management of pediatric knee arthroscopy. This video includes patient positioning and preoperative setup, portal placement, various instrumentation options, intraoperative maneuvers, as well as tips and tricks that can help both experienced and novice arthroscopists improve their pediatric knee arthroscopy.


