Abstract
This study, it was aimed to examine the dry sliding wear properties of the tempering and over-tempering heat treatments of 25CrMo4 steel, which is used in the manufacture of parts such as axle shafts, axle sleeves, turbine parts, and turbine blades in the automotive industry Oil-quenched 25CrMo4 steels could be subjected to high temperatures where they are used and may undergo over-tempering period. In this case, there may be changes in many mechanical properties such as wear. For this purpose, microstructural examination, hardness, and dry sliding wear tests were performed on the materials. As a result of the tests, it was observed that the sample, on which we applied the tempering and over-tempering heat treatment, had a martensitic microstructure. The hardness values of the tempered and over-tempered samples increased compared to the raw material and as expected, partially decreased in the over-tempered sample. Dry sliding wear losses decreased significantly in oil-quenched and over-tempered samples compared to the raw material. Even though the hardness decreased in the over-tempered sample, the wear loss was low. The variation between wear losses increased further with the increase in friction forces. While the maximum friction coefficient was highest in the oil-quenched sample, it was lowest in the raw sample.
Keywords: 25CrMo4 steel, Dry sliding wear, Friction, Quenching, Tempering, Over-tempering
1. Introduction
Medium and low-carbon alloyed steels are widely used in industry. These steels find primary application in the fabrication of shafts, axles, gears, crankshafts, couplings, and forgings [1]. The reasons for the wide use of these steels are that they can meet the desired mechanical strength and are suitable for development. Heat treatment plays a significant role in shaping the mechanical properties of these steels. Commonly applied methods such as annealing, quenching, and tempering are strategically designed to achieve a microstructure that imparts desired properties, including high strength, toughness, and surface quality. Importantly, these processes are planned with the aim of ensuring minimal dimensional changes in the material.
Wear is defined as the gradual removal of material from solid surfaces, a process that can result in the malfunction of industrial components [2]. Many studies on wear patterns have been carried out by many researchers for many years [[3], [4], [5]]. Wear mechanisms and wear rate regimes are highly dependent on chemical composition, microstructure, load level, and surface properties of materials [6,7].
A. Bahrami and colleagues explored the impact of traditional heat treatment on the wear resistance of AISI H13 tool steel. Wear behavior was analyzed using a pin-on-disc configuration at a speed of 0.07 m/s, employing two loads of 29.4 N and 98 N. To comprehend the wear mechanisms, scanning electron microscopy and X-ray methods were employed to examine wear tracks and deposits. Furthermore, the depth and friction behavior of the strain-hardened zone beneath the wear tracks of AISI H13 tool steel were assessed [8].
Helene Bultel et al. studied 4130 steels in their raw state following a heat treatment at elevated temperatures (approximately 1000 °C) and gradual cooling in a tranquil air environment, the microstructure underwent a transformation from bainite to ferrite-perlite. Fatigue assessments were conducted under total strain control at 450 °C, with strain amplitude of 1.5 %. Notably, the ferrite-pearlitic steel exhibited both primary and secondary hardening, whereas the bainitic steel displayed greater stability following the initial hardening phase [9].
K.M. Rajan and collaborators present findings from their investigation into the influence of heat treatment on the preform material on the mechanical properties of the flow-formed part. The study also assesses the accuracy of employing empirical relations to predict the properties of flow-formed components. In addition, the strength coefficient K of the σ = Kεn equation and the strain hardening exponent n were determined by stress-strain curves for AISI 4130 steel under different heat treatment conditions. It has been determined that preforms processed by hardening and tempering give better performance [10].
Raquel Alvim and colleagues discovered that 25CrMo4 steel plates experienced cracking when welded with a laser beam at room temperature (RT). To address this issue, the study suggests employing high-temperature (HT) laser welding to reduce residual stresses and promote a bainitic structure rather than a martensitic one. A conventional post-weld heat treatment (PWHT) was used for comparison with HT. The centerline crack appeared to disappear after both (HT) heat treatment and oven treatment (PWHT) for 10 min at 500 °C. Finite element analysis revealed a significant reduction in residual stress from 163.70 MPa to 3.72 MPa in the fusion zone (FZ) of the welds when transitioning from RT to HT. The study concludes that the hardness in the FZ is influenced by the microstructure resulting from the thermal cycle, with values of 400 HV for martensite (RT), 340 HV for tempered martensite (PWHT), and 250 HV for bainite (HT) [11].
Martensitic steels subjected to quenching and tempering (Q&T) find extensive application across various manufacturing sectors [12]. The carefully chosen optimal reheating and hardening temperature for austenitizing the plate before quenching is pivotal in achieving an appropriate prior austenite grain size. This parameter directly impacts both hardenability and toughness [13].
Quenched and tempered steel falls into two main categories: low alloy conventional grades, featuring a carbon content ranging from 0.15 % to 0.40 %, and tool steels with a higher carbon content, reaching up to 2 %. The latter is alloyed with robust carbide-forming elements like Cr, V, Mo, etc., within the 1–12 % range. In both instances, these steels are utilized in hardened/quenched and tempered conditions or auto-tempered conditions to enhance toughness, strength, and wear resistance. The optimization of carbon content and tempering temperature is crucial and tailored to the specific application requirements. Nevertheless, the simultaneous achievement of high strength/hardness and sufficient toughness poses a notable challenge in the metallurgical context [14].
The traditional strategy for enhancing the resistance to wear and penetration of quenched and tempered steels involves elevating the hardness of the obtained martensitic phase post-quenching [[15], [16], [17]]. The common practice in using these traditional wear-resistant steels involves either employing them in their quenched state with auto-tempering or subjecting them to low-temperature tempering conditions within the range of 150–250 °C. This preference for low-temperature tempering is rooted in the fact that it induces minimal reduction in hardness or strength, ensuring the retention of high hardness essential for effective wear resistance against abrasion [18].
Saha et al. conducted a study on the microstructure of a fully martensitic steel with a thickness of 1.20 mm, containing 0.24 % C, 0.4 % Mn, and 0.2 % Si [18]. Various techniques were employed, including tempering in a muffle furnace at 500 °C for 1 h and a Gleeble heat treatment (GHT) involving a heating rate of 100 °C/s, a temperature of 495 °C, and a duration of 1 s. Additionally, two other samples underwent tempering using the sub-critical heat-affected zone (HAZ) of a diode and fiber laser-welded procedure. For the diode laser-welded (DLW) sample, micrographs revealed a heavily tempered structure characterized by highly decomposed martensite with spheroidized carbides at lath boundaries. In contrast, the GHT sample displayed a comparatively less tempered structure. The sample subjected to furnace heat treatment (FHT), tempered in a furnace at 500 °C for 1 h, displayed analogous morphologies featuring spheroidized carbides, accompanied by smaller intra-lath carbides. This observation suggests a low dislocation density, as intra-lath carbides predominantly precipitated at dislocation cell structures [19].
In this study, the effects of the effects on the microstructural and mechanical properties of the steel after the oil-quenching and over-tempering heat treatment applied to 25CrMo4 grade steel, which is used in the production of important parts in the automotive industry such as engine parts, forgings, crankshaft, connecting rod, ball joint, axle, wheel bolts, were experimentally studied. In cases where temperatures increase while using hardened 25CrMo4 steel, as in these examples, the material may enter an over-tempering process. In this case, many mechanical properties such as wear may change. For this purpose, microstructural examinations, hardness measurements, and wear tests were carried out on tempering conditions of the 25CrMo4 steel.
2. Material and method
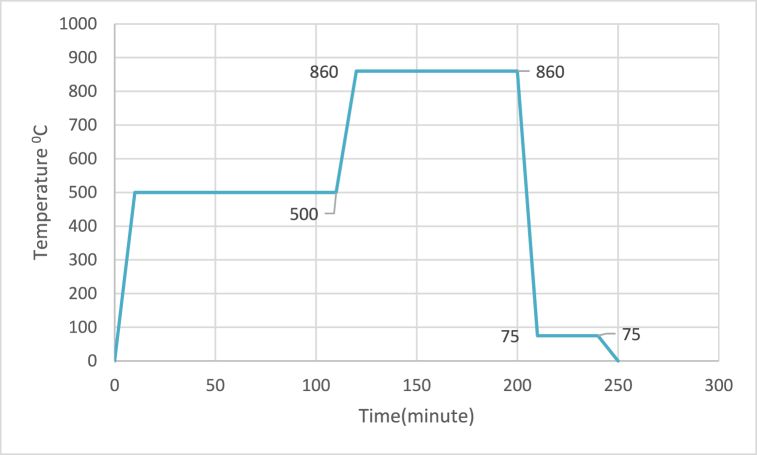
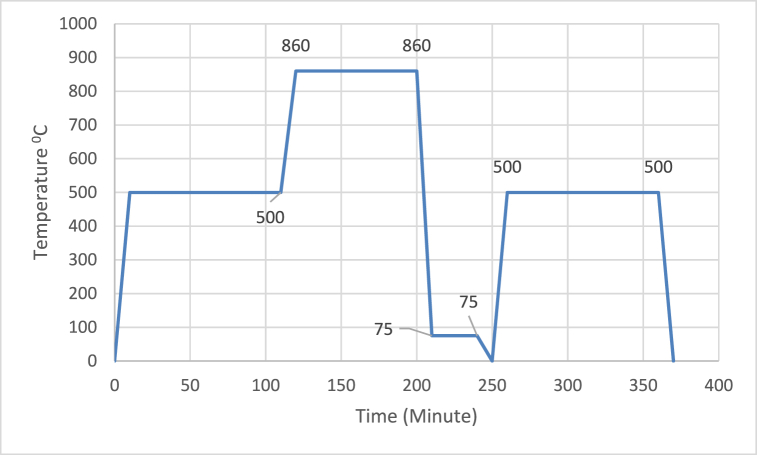
The chemical composition of the 25CrMo4 grade steel used in the experiments is given in Table 1. 3 pieces of steel with a diameter of Ø22 mm and a length of 1000 mm were provided. Tempering and over-tempering heat treatments were carried out on the samples prepared from 25CrMo4 steel for use in experimental studies, the graphs of which are given in Fig. 1, Fig. 2, respectively.
Table 1.
Chemical composition of 25CrMo4 Steel (%wt).
| C | Mn | P | S | Si | Cr | Mo |
|---|---|---|---|---|---|---|
| 0.31 | 0.53 | 0.035 | 0.039 | 0.19 | 0.97 | 0.21 |
Fig. 1.
Oil-qiuenching heat treatment cycles.
Fig. 2.
Over tempering heat treatment cycles.
For the oil quenching heat treatment, 25CrMo4 samples were firstly preheated at 500 °C for 90 min. After preheating treatment, the samples were kept at 860 °C for 90 min, and the austenite phase was formed in the sample. The martensitic transformation was formed by oil-quenching at 75 °C (Fig. 1).
For overtempering of samples, in addition to the above oil-quenching process, the quenched martensitic samples were tempered at 500 °C (Fig. 2). By this process, it was aimed that the density of the martensite phase in the material is reduced, and the ductility is increased by reducing the brittleness by losing some hardness.
To examine the friction and wear behavior of the samples obtained as a result of the applied hardening heat treatments, pin-on-disc dry wear tests according to ASTM G99 standards were carried out under laboratory conditions. The tests were carried out on hardened steel discs having 55 HRC hardness values with software that collects friction coefficient information Wear test parameters given in Table 2 were used for all wear tests.
Table 2.
Dry friction wears test parameters.
| Load (F) | 5-10-15 N |
|---|---|
| Rotational Speed (W) | 238 rpm |
| Slinding diameter (D) | 80 mm |
| Sliding distance | 1000 m |
| Sliding speed | 1.00 m/s |
| Test duration | 16.7 min |
| Data sampling | 5 Hz |
The Brinell hardness measurement tests were carried out for all samples. The Brinell hardness values of the samples were determined by applying an indentation load of 187.5 kg in the Emco Test Duravision 2000 hardness measuring device. At least three measurements were repeated for each sample.
The samples were etched in 2 % Nital solution after conventional sanding and polishing processes to reveal the microstructures. Leica DMI 5000 M brand optical metal microscope was used for microstructure images. X-ray diffraction (XRD) analysis was performed utilizing a Bruker D8 Advanced device equipped with a CuKα (λ = 0.154 nm) target and a step size of 0.06°/s. The objective of this analysis was to identify retained and potential carbide phases that precipitated after the heat treatment. The worn surface examinations were performed using the JEOL JSM-6060LV Scanning Electron Microscopy (SEM) in backscatter image modes to obtain detailed images of the surface characteristics.
3. Conclusions and discussion
Average hardness values with standart deviations of the samples are given in Table 3.
Table 3.
Hardness results of raw and heat-treated samples.
| Sapmles | Surface Hardness (Brinell) | Core Hardness (Brinell) |
|---|---|---|
| Raw | 225 | 222 |
| Oil-quenching | 427 | 420 |
| Over tempering | 330 | 315 |
When the hardness values given in Table 3 are examined, it has been determined that there is no hardness difference between the core and the surface in the raw samples, but a certain difference occurs in the heat-treated samples.
As a requirement of the improvement process, at the last stage, the sample was cooled in an oil environment at a temperature of 75 °C, and the transformation of the martensitic phase was achieved. As a result, the highest hardness values were obtained in the samples.
In the sample after which oil-quenching heat treatment was applied, on the other hand, by decreasing the density of the martensite phase, it lost some hardness, reducing the brittleness and increasing the ductility. The hardness value was lowered, but higher values were obtained from the raw sample.
A. Bahrami and co-authors observed that the hardness of AISI H13 tool steel is impacted by tempering time [8]. This characteristic behavior in hot work tool steels is associated with the formation of various carbide precipitates during annealing [20,21].
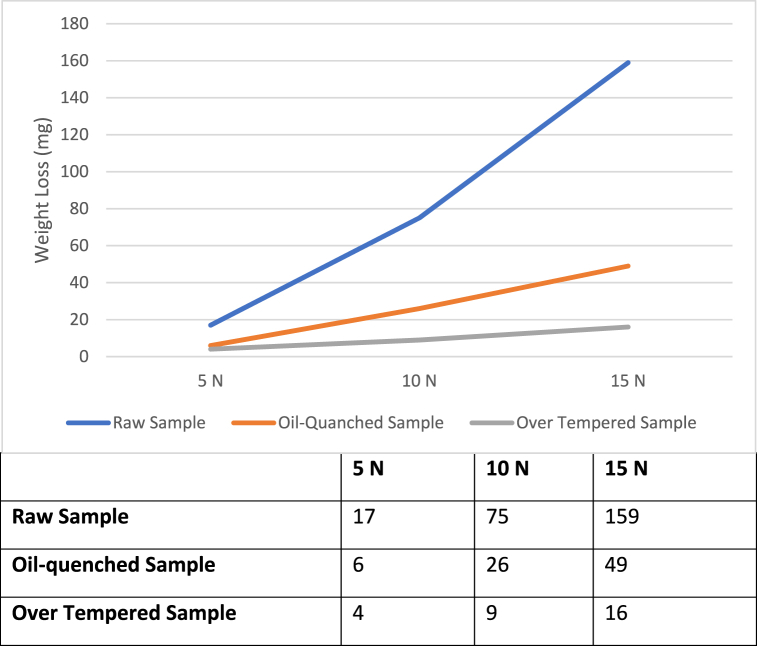
Dry sliding wear was applied under loads of 5, 10, and 15 N at a sliding speed of 1 mm/s, at a sliding distance of 1000 m. 3 wear tests were applied for each sample and the average weight losses obtained are given in Fig. 3.
| 5 N | 10 N | 15 N | |
|---|---|---|---|
| Raw Sample | 17 | 75 | 159 |
| Oil-quenched Sample | 6 | 26 | 49 |
| Over Tempered Sample | 4 | 9 | 16 |
Fig. 3.
Graph of wear test weight loss of samples. Wear loss of samples depending on the applied load.
When the wear loss graph of the samples is examined (Fig. 3), it is seen that the applied load differences and the heat treatment types are quite effective in the weight loss mechanism. With the applied load increase, weight loss increased in all samples. It was determined that the heat treatments applied to the samples were effective on the weight losses and greatly reduced the weight losses. With oil-quenching heat treatment, weight losses were reduced by approximately 65 % at each load, compared to the raw sample, while it was found to decrease by an additional 25 % after the treatment process.
As the load increases, in situ surface tempering occurs due to high local pressure and temperature. This annealing presumably transforms these samples into the secondary hardening state that exhibits the highest wear resistance. This is exactly why the martensitic quenched structure turns into a soft tempered structure with the highest weight loss [22].
It has been determined that the applied heat treatments are quite effective on the wear resistance. There was a difference in the hardness values of the samples with the applied heat treatments. The martensite structure formed in the sample with the treatment heat treatment increased the abrasion resistance considerably and the lowest abrasion losses were obtained.
With the oil-quenching heat treatment, the brittleness due to the martensitic structure left its place to ductility. Thus, the strength decreased a little and the wear loss values increased. In the raw sample, on the other hand, the lowest strength was obtained due to the highest wear loss values.
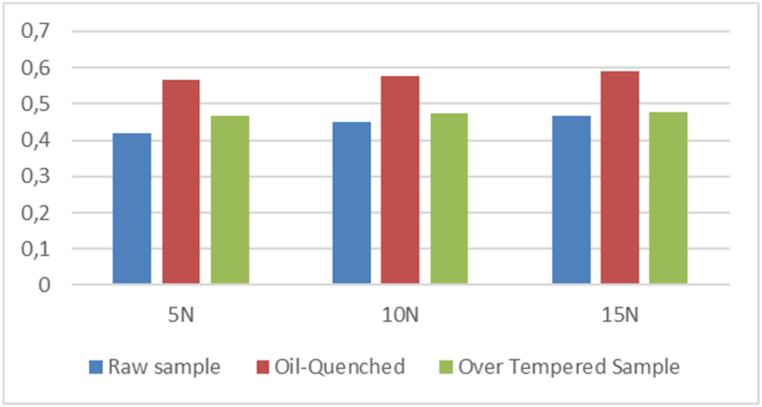
This difference also emerges in the coefficients of friction (Fig. 4). While the highest friction coefficients were obtained in the hardest and most durable treated samples, the lowest friction coefficients were obtained in the raw samples with the lowest strength and lowest hardness values.
Fig. 4.
Average friction coefficients of the samples.
Raphael Jose and co-authors employed laser-hardening on low alloy SAE 4130 steel to investigate microstructure, hardness, and wear characteristics. They achieved an almost entirely martensitic layer with a depth of approximately 0.5 mm. Optimal results were obtained at a laser power of 600 W, a beam defocus of 50 mm, and a speed of 8 or 10 mm/s, leading to a maximum hardness of 390 HV compared to the base material's 220 HV. The laser-treated surfaces displayed a combination of oxides and exhibited significantly enhanced wear resistance compared to the untreated surface. Samples with a higher mean coefficient of friction maximum and standard deviation outperformed raw samples in comparison to laser-treated conditions. Ultimately, the wear rate was found to be three times higher in non-laser-treated and non-hardened specimens than in laser-treated and surface-hardened counterparts [23].
In microstructure studies, optical microstructure images were taken from each sample. Then, SEM images were taken to examine the wear surfaces obtained as a result of each load applied to each sample. Obtained data and comments are given together.
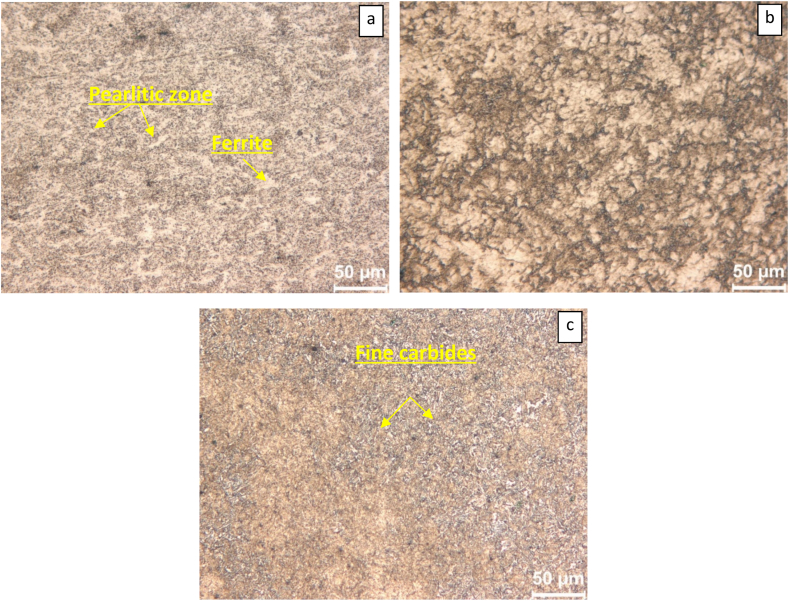
When the SEM microstructure photographs are examined in Fig. 5, the light-colored areas in the raw sample consist of ferrite and the dark areas consist of fine pearlitic microstructure (Fig. 5a). The microstructure was transformed into typical tempered martensite by oil-quenching heat treatment (Fig. 5b), and then partial precipitates were formed by decomposing the martensite by over-tempering at 500 °C (Fig. 5c). A. Bahrami and colleagues reported that the hardness of AISI H13 tool steel is influenced by the tempering time [8]. This observed behavior in hot work tool steels is attributed to the formation of various carbide precipitates during annealing [8].
Fig. 5.
Optical microstructure images of the. (a) The raw sample, (b) Oil-quenched sample, (c) Over-tempered sample.
The presence of retained austenites with the formation of brittle martensite phases of high hardness in direct quenching processes in alloy and/or high carbon steels can cause serious damage to some mechanical properties. For this reason, it is necessary to carry out the improvement process in alloys that carry this risk. However, as in this study, after the improvement of the samples.
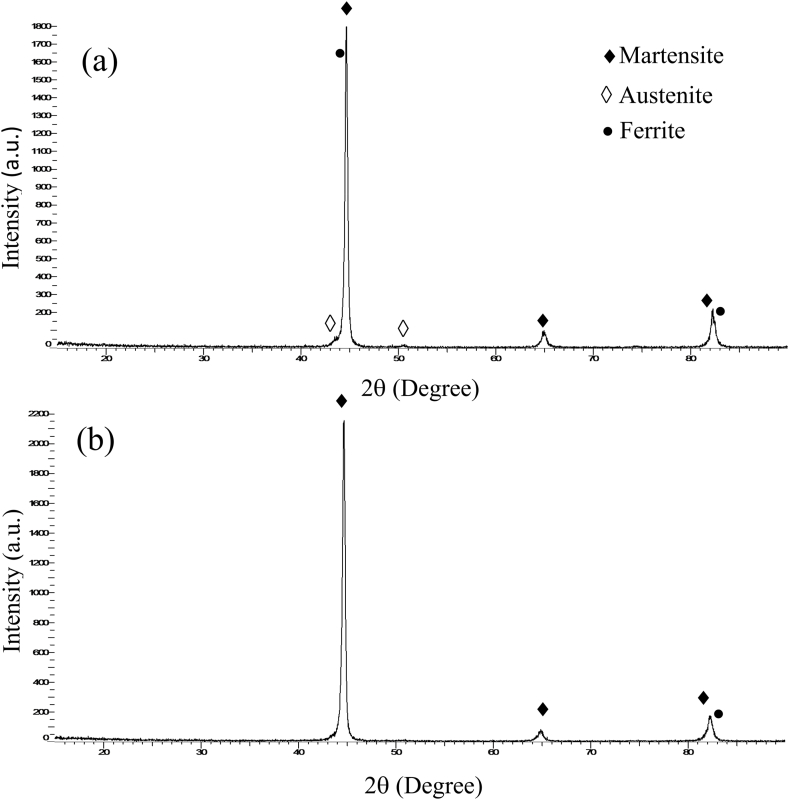
The presence of martensitic phases and retained austenites was also determined by XRD analysis (Fig. 6a). These austenitic micro-formations can make the harder and brittle microstructure even more brittle due to secondary hardening with partial temperature increase and deformation effect during dry friction wear and conversion to martensite phase or alloy carbides. This may cause deterioration of wear performances in later stages. Because austenites that have not completed their transformation between martensite plates during quenching are unprofitable and have high free energy micro formations. They may find the opportunity to transform the surrounding martensite into martensite, which can cause secondary hardening during dormancy. In this case, the presence of retained austenite is undesirable as it may cause some negativities due to mechanical effects such as abrasion [[24], [25], [26], [27]]. It is recommended to reduce the amount of retained austenites by deep cryogenic processes to improve wear properties [28]. As seen in Fig. 6 (b), the presence of retained austenites was eliminated by over-tempering of the samples. However, there was a serious decrease in hardness with over-over-tempering of martensite in the samples.
Fig. 6.
XRD analysis patterns of (a) Oil-quenched and (b) over-tempered samples.
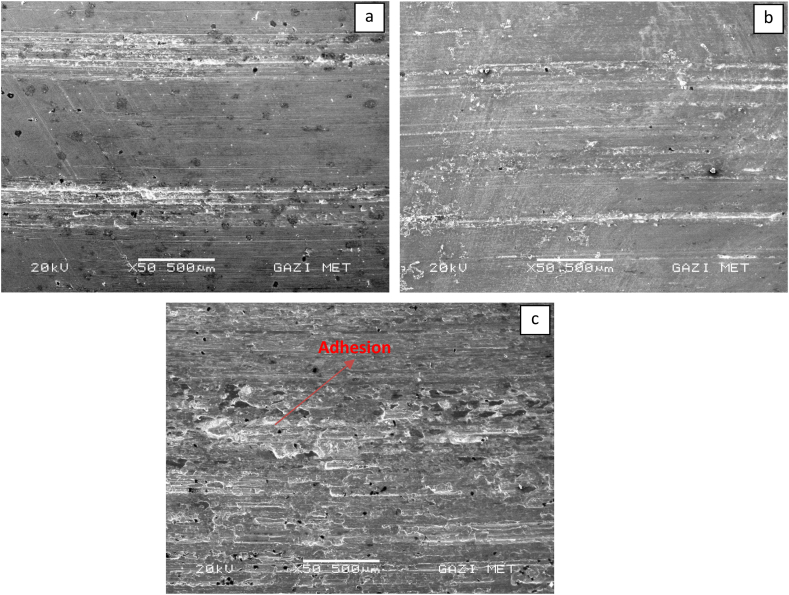
SEM images of the wear surface of the raw sample are given in Fig. 7. When the wear surface SEM images of the raw sample were examined, it was determined that the wear tracks increased with the increase in the applied load. It has been determined that these scars are narrow and localized under a 5 N load, but with the increase of the load, the wear becomes sticky localized and spreads to the whole region under a 15 N load (Fig. 7 a and c). At low wear loads, the trench tracks are shallower and thinner (Fig. 7 a and b). Possibly, fine chips broken off from the surface during dry sliding on the disc of the specimens may have formed fine wear tracks on the specimen surface by entering the specimen-disc interface.
Fig. 7.
SEM images of the worn surfaces of the raw sample under (a) 5 N, (b) 10 N, (c) 15 N load.
Fine wear chips (debris) that enter between the disc and the sample and can cause an abrasive effect can break off by hardening with local microplastic deformation on the surface at low loads in soft materials, or they can be exposed to possible repetitive loads during sliding and can go above the fatigue limits on the sample surface and form wear wastes in the form of fine chips. This can leave traces of wear on the sample surface as it leaves the interface. Low wear marks on the samples appeared mostly as abrasive wear tracks. As in Fig. 7c, when the wear load is increased, the disc/sample interface contact is increased, thus increasing the effectiveness of the sample's adhesion to the surface. In addition, it increases the possibility of adhesive wear with the increase in friction coefficient and possibly with the increase in temperature. In this case, the sample can also cause more mass loss and create deeper and wider wear tracks.
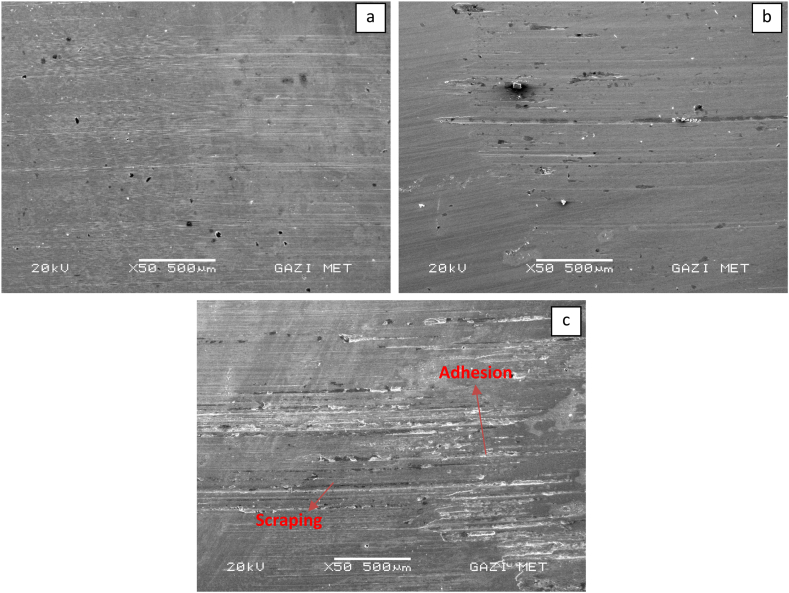
SEM images of the wear surface of the oil-quenched samples are given in Fig. 8. When the wear images of the oil-quenched sample are examined, it is seen that the wear tracks are very few due to the martensitic structure it has (Fig. 8 a-b). It is seen that the most wear occurs under 15 N load and this wear is in the form of sticking in some places and scraping in places (Fig. 8c). Due to the high hardness in these samples, the wear tracks were less than the raw sample. However, high hardness in samples may not always be compatible with the improvement of wear resistance. Because, with the breaking of phases or structures in micro and macrostructures with high hardness, wear losses can accelerate. A balanced and homogeneous microstructure may be needed to maintain the wear rate of high-hardness material. As in this study, it has been observed that the wear loss can be reduced up to 15 N load since a very stable martensitic hard microstructure is provided in the material with the reclamation heat treatment. This is supported by the reduction of abrasive wear tracks on unworn surfaces. Even at wear loads of 5 and 10 N, there is hardly any evidence of wear leading to loss of wear.
Fig. 8.
SEM images of the worn surfaces of the oil-quenched samples under (a) 5 N, (b) 10 N, (c) 15 N load.
This feature also affected the wear tracks. In this sample, where the most wear occurred after the raw sample, it was determined that the wear track marks were mostly in the form of regional adhesion, especially under 15 N load, and in some regions, the wear was in the form of rupture with the decrease in hardness.
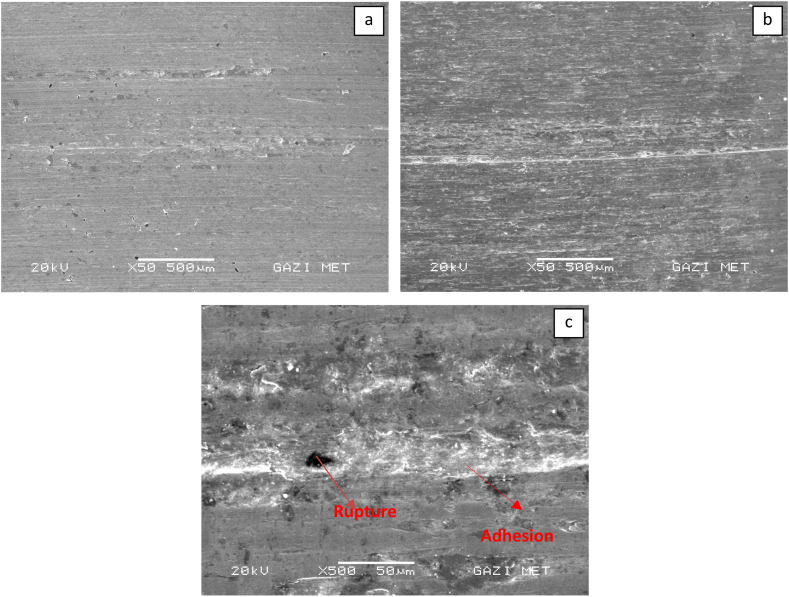
The wear surface SEM images of the over-tempered sample after the improvement are given in Fig. 9. In these samples, both abrasive and adhesive wear traces are observed at 10 and 15 N wear loads due to the fact that the hardness values are considerably lowered by the over-tempering process compared to the curing process (Fig. 9 b and c). These wear traces are less visible under 5 N load due to low load (Fig. 9a). Although there is less evidence of wear compared to the raw sample, the over-tempering process in the microstructure causes heterogeneous distribution in the microstructure and there is abrasive wear due to the breakage of the carbides precipitated from the balanced martensite by over-tempering, while the soft ferritic main phase is carburized back into the adhesive wear at high wear load. It can be seen from Fig. 7c.
Fig. 9.
SEM images of the worn surfaces of the over-tempered sample under (a) 5 N, (b) 10 N, (c) 15 N load.
4. Results
As a result of the experimental studies and the findings obtained, the following results were obtained.
-
-
The martensitic matrix structure was obtained with the Improvement heat treatment, while the structure turned into a tempered martensite structure by the oil-quenching treatments
-
-
In the hardness measurements made on all samples, the lowest hardness value was obtained in the raw sample, while the highest hardness values were obtained in the reclamation heat treatment, and medium hardness values were obtained after the oil-quenching heat treatment.
-
-
When the wear tests were examined, it was determined that the highest strength due to the lowest weight loss was obtained in the samples with the over-tempering heat treatment, while the lowest strength was obtained in the raw samples with the highest weight loss.
-
-
Depending on the wear resistance, it is seen that the highest friction coefficient is obtained in the treated heat-treated sample, and the lowest friction coefficient is obtained in the raw sample. It has been determined that the wear losses increase as the applied load increases in all samples. As the loads increase in the raw sample, the rate of increase in wear loss increases, but the rate of increase in the heat-treated samples is quite low.
-
-
It has been observed that the general structure of the wear surfaces is adhesion-type wear due to adhesive wear. In the raw sample, where the lowest strength is obtained, we can talk about the existence of large adhesion-type abrasions on the entire surface, especially under a 15 N load. However, in the sample, that was applied to the curing heat treatment with the highest strength, it was observed that there were very few traces of wear, very small adhesion abrasions, and scraping occurred in some regions due to its hardness.
CRediT authorship contribution statement
Uğur Arabacı: Writing – review & editing, Writing – original draft, Visualization, Validation, Methodology, Investigation, Conceptualization.
Declaration of competing interest
The authors declare that they have no known competing financial interests or personal relationships that could have appeared to influence the work reported in this paper.
References
- 1.Singh Ramesh. Chapter 6 - Classification of Steels. second ed. Butterworth-Heinemann; 2016. Applied welding Engineering; pp. 57–64. [DOI] [Google Scholar]
- 2.Holmberg K., Matthews A. 2009. Coatings Tribology: Properties, Mechanisms, Techniques, and Applications in Surface Engineering. [Google Scholar]
- 3.So H., Yu D.S., Chuang C.Y. Formation and wear mechanism of tribo-oxides and the regime of oxidational wear of steel. Wear. 2002;253(9–10):1004–1015. doi: 10.1016/S0043-1648(02)00230-2. [DOI] [Google Scholar]
- 4.Straffelini G., Trabucco D., Molinari A. Oxidative wear of heat-treated steels. Wear. 2001;250(1–12):485–491. doi: 10.1016/S0043-1648(01)00661-5. [DOI] [Google Scholar]
- 5.Quinn T.F.J., Sullivan J.L., Rowson D.M. Origins and development of oxidational wear at low ambient temperatures. Wear. 1984;94(2):175–191. doi: 10.1016/0043-1648(84)90053-X. [DOI] [Google Scholar]
- 6.Ueda M., Uchino K., Kobayashi A. Effects of carbon content on wear property in pearlitic steels. Wear. 2002;253(1–2):107–113. doi: 10.1016/S0043-1648(02)00089-3. [DOI] [Google Scholar]
- 7.Goto H., Amamoto Y. Effect of varying load on wear resistance of carbon steel under unlubricated conditions. Wear. 2003;254(12):1256–1266. doi: 10.1016/S0043-1648(03)00222-9. [DOI] [Google Scholar]
- 8.Bahrami A., Mousavi Anijdan S.H., Golozar M.A., Shamanian M., Varahram N. Effects of conventional heat treatment on wear resistance of AISI H13 tool steel. Wear. 2005;258(5):6. doi: 10.1016/j.wear.2004.09.008. [DOI] [Google Scholar]
- 9.Bultel Hélène, Vogt Jean-Bernard. Influence of heat treatment on fatigue behavior of 4130 AISI steel. Procedia Eng. 2010;2(1) doi: 10.1016/j.proeng.2010.03.099. [DOI] [Google Scholar]
- 10.Rajan K.M., Deshpande P.U., Narasimhan K. Effect of heat treatment of preform on the mechanical properties of flow formed AISI 4130 Steel Tubes—a theoretical and experimental assessment. J. Mater. Process. Technol. 2002;125(126):503–511. doi: 10.1016/S0924-0136(02)00305-9. ISSN 0924-0136. [DOI] [Google Scholar]
- 11.Mansur R.A. de F., Ferreira C.C. de A., Atílio I., Carvalho S. M. de, Braga V., Siqueira R.H. de M., Lima M. S. F. de. A comparative study of Abbreviated heat treatments for SAE 4130 steel after laser welding. Mat. Res. 2020;23(4) doi: 10.1590/1980-5373-MR-2020-0162. [DOI] [Google Scholar]
- 12.Valtonen K., Ojala N., Haiko O., Kuokkala V. Comparison of various high-stress wear conditions and wear performance of martensitic steels. Wear. 2019;426(427):3–13. [Google Scholar]
- 13.Mani E., Udhayakumar T. Effect of prior austenitic grain size and tempering temperature on the energy absorption characteristics of low alloy quenched and tempered steels. Mat. Sci. Eng. A. 2018;716:92–98. [Google Scholar]
- 14.Gadadhar S., Krishna K.S., Vinod K. Quenched and tempered high strength steel: a review. J. Metals Mat. Min. 2020;30(4):19–29. [Google Scholar]
- 15.Litwlnchuk A., Kayser F.X., Baker H. The Rockwell C hardness of quenched high-purity Fe-C alloys containing 0.09 to 1.91% C. J. Mater. Sci. 1976;11:1200–1206. [Google Scholar]
- 16.Gore G.J., Gates J.D. Effect of hardness on three very different forms of wear. Wear. 1997;203–204:544–563. [Google Scholar]
- 17.Krauss G. ASM; Metals Park, OH: 1980. Principles of Heat Treatment of Steel; p. 52. [Google Scholar]
- 18.Valtonen O. Haiko K., Kaijalainen A., Hannula S. Uusikallio J., Liimatainen T., Kömi J. Effect of tempering on the impact-abrasive and abrasive wear resistance of ultra-high-strength steels. Wear. 2019;440–441 [Google Scholar]
- 19.Saha D.C., Biro E., Gerlich A.P., Zhou Y. Effects of tempering mode on the structural changes of martensite. Mater. Sci. Eng. 2016;A673:467–475. [Google Scholar]
- 20.Smith W.F. vol. 512. McGraw-Hill Book Co.; xiv+: 1981. p. 23. (Structure and Properties of Engineering Alloys). x 16 cm, illustrated (16. 95) [Google Scholar]
- 21.Mohan S., Prakash V., Pathak J.P. Wear characteristics of HSLA steel. Wear. 2002;252(1–2):16–25. [Google Scholar]
- 22.Lin Y.C., Wang S.W., Chen T.M. A study on the wear behavior of hardened medium carbon steel. J. Mater. Process. Technol. 2002;120(1–3):126–132. [Google Scholar]
- 23.Raphael Jose Bambirra De Oliveira, Rafael Humberto Mota De Siqueira and Milton Sergio Fernandes De Lima Microstructure and wear behavior of laser hardened SAE 4130 steels. Int. J. Surf. Sci. Eng. 2018;12(2) doi: 10.1504/IJSURFSE.2018.091231. [DOI] [Google Scholar]
- 24.Roy Sougata, Sundararajan Sriram. The effect of heat treatment routes on the retained austenite and Tribomechanical properties of carburized AISI 8620 steel. Surf. Coating. Technol. 2016;308:236–243. doi: 10.1016/j.surfcoat.2016.06.095. ISSN 0257-8972. [DOI] [Google Scholar]
- 25.Kim Hyung-Jun, Kweon Young-Gak. The effects of retained austenite on dry sliding wear behavior of carburized steels. Wear. 1996;193(1):8–15. doi: 10.1016/0043-1648(95)06634-9. ISSN 0043-1648. [DOI] [Google Scholar]
- 26.Zhang Haidong, Yan Xianguo, Chen Zhi, Zhao Minna, Tang Liang, Gao Yuan, Fan Li, Huang Yao, Li Junji. Effect of cryogenic treatment on wear resistance and microstructure of 42CrMo steel. Arch. Metall. Mater. 2022;67(1):127–135. doi: 10.24425/amm.2022.137481. [DOI] [Google Scholar]
- 27.Zhang Haidong, Yan Xianguo, Hou Qiang, Chen Zhi. Effect of cyclic cryogenic treatment on wear resistance, impact toughness, and microstructure of 42CrMo steel and its optimization. Adv. Mater. Sci. Eng. 2021;2021 doi: 10.1155/2021/8870282. Article ID 8870282, 13 pages. [DOI] [Google Scholar]
- 28.Senthilkumar D., Rajendran I. Optimization of deep cryogenic treatment to reduce wear loss of 4140 steel. Mater. Manuf. Process. 2012;27(5):567–572. doi: 10.1080/10426914.2011.593237. [DOI] [Google Scholar]


