

Abstract
Cardiac fibroblasts (CF) are an essential cell type in cardiac physiology, playing a diverse role in maintaining structural integrity, extracellular matrix (ECM) synthesis, and tissue repair. Under normal conditions, these cells reside in the interstitium in a quiescent state poised to sense and respond to injury by synthesizing and secreting collagen, vimentin, hyaluronan, and other ECM components. In response to mechanical and chemical stimuli, these “resident” fibroblasts can undergo a transformation through a continuum of activation states into the commonly known “myofibroblast”, a process critical for injury response. Despite progress in understanding the contribution of fibroblasts to cardiac health and disease, much remains unknown about the signaling mediating this activation, in part owed to technical challenges in evaluating CF function and activation status in vitro. Given their role in monitoring the ECM, CFs are acutely sensitive to stiffness/pressure. High basal activation of isolated CFs is common due to the super-physiologic stiffness of traditional cell culture substrates, making assays dependent on quiescent cells challenging. To overcome this, cell culture parameters must be tightly controlled, and utilization of dishes coated with biocompatible reduced-stiffness substrates, such as 8 kPa polydimethylsiloxane (PDMS), have shown promise in reducing basal activation of fibroblasts. Here, we describe cell culture protocol to maintain CF quiescence in vitro to enable a dynamic range for assessment of activation status in response to fibrogenic stimuli using PDMS-coated coverslips. Our protocol provides a cost-effective tool to study fibroblast signaling and activity, allowing researchers to better understand the underlying mechanisms involved in cardiac fibrosis.
Basic Protocol 1: Generation of 8 kPa Polydimethylsiloxane (PDMS)/ Gelatin-coated Coverslips for Cardiac Fibroblast Cell Culture
Basic Protocol 2: Adult Cardiac Fibroblast Isolation and Plating onto PDMS Coverslips
Basic Protocol 3: Assessment of Cardiac Fibroblast Activation by αSMA (alpha Smooth Muscle Actin) Immunocytochemistry
Keywords: cardiac fibroblasts, activation, PDMS, cell culture, myofibroblast, TGFβ, fibrosis
Introduction
Cardiac fibroblasts have gained recognition as crucial cellular regulators that contribute to both normal cardiac function and disease progression (Fu et al., 2018; Ivey & Tallquist, 2016; Kanisicak et al., 2016; Tallquist & Molkentin, 2017). Traditionally considered support cells involved in the maintenance of the extracellular matrix (ECM), it is now well-established that cardiac fibroblasts play multifaceted roles in the heart (Tallquist, 2020). From regulating ECM homeostasis and providing structural integrity, CFs also actively participate in tissue repair, remodeling, and the inflammatory response (Tallquist, 2020). However, the complex interactions and signaling cascades responsible for modulating these cellular behaviors remain incompletely understood.
Recently, significant efforts have been made to elucidate the molecular mechanisms that underlie the different phenotypic states of cardiac fibroblasts (Fu et al., 2020; Kanisicak et al., 2016; Umbarkar et al., 2021). While normally in a quiescent state, CFs undergo a transformation known as activation during pathological conditions, such as in response to myocardial injury or chronic pressure overload (Bretherton et al., 2020). Cardiac fibroblast activation is a complex process that involves the transition from a quiescent state to the canonical “myofibroblast” phenotype, characterized by increased proliferation, migration, release of inflammatory cytokines, and synthesis of ECM proteins such as collagens (Alter et al., 2023; Gibb et al., 2020; Khalil et al., 2019). This phenotypic and morphological transformation is triggered by a variety of stimuli, including pro-inflammatory cytokines and peptide hormones released from surrounding cells, as well as physical stimuli such as mechanical stress (Bertaud et al., 2023; Herum, Lunde, et al., 2017). The dysregulated activation of myofibroblasts underlies the development and progression of maladaptive scar formation in the heart called cardiac fibrosis, a hallmark feature of ischemic heart disease as well as many inherited and acquired cardiomyopathies, and heart failure (Kanisicak et al., 2016; Teuber et al., 2022). Elucidating the intricate signaling networks involved in cardiac fibroblast activation could potentially reveal novel therapeutic targets for preventing or reversing cardiac fibrosis. Therefore, there is an urgent need for comprehensive investigations aimed at unraveling mechanisms that drive cardiac fibroblast activation.
In vitro assays are indispensable tools for studying cardiac fibroblast activation under controlled conditions, however, cardiac fibroblast researchers have encountered a number of technical challenges associated with traditional cell culture. Due to their role in sensing and modifying the properties of the cardiac microenvironment, cardiac fibroblasts are highly responsive to the stiffness of surrounding tissue (Childers et al., 2021; Meagher et al., 2021). The use of common 2-D cell culture methods utilizing glass or plastic substrates thus poses limitations arising from their non-physiologic stiffness that can trigger a spontaneous increase in fibroblast activation (Herum, Choppe, et al., 2017). As a result, the relative magnitude of induction of fibroblast activation observed when using pro-fibrotic agonists like transforming growth factor β1 (TGFβ1) becomes less significant, as the activation relative to the “unstimulated” control condition is blunted. This confounding factor compromises the ability to study the specific mechanisms underlying the transition from quiescent to activated cardiac fibroblasts, as well as their responsiveness to external stimuli.
To overcome these challenges, researchers have begun to optimize 2-D cell culture conditions for maintaining quiescent populations of cardiac fibroblasts. Previous work in the field has established highly variable fibroblast responses as a result of differences in the composition of media and serum, time in culture, and plate stiffness (Landry et al., 2019; Santiago et al., 2010). However, even with consistent cell density and culture conditions, high plate stiffness will still likely result in a highly activated fibroblast population in vitro, even when all other variables are tightly controlled. Efforts to address this have focused on generating substrates with physiologic stiffness ratings to be used as an alternative to traditional cell culture plastic. Polydimethylsiloxane (PDMS) substrates have become widely utilized for cell culture due to their tunable mechanical properties and compatibility with a wide range of assays (Palchesko et al., 2012; Yeh et al., 2017). By adjusting the formulation and curing process of PDMS, researchers can tailor the substrate stiffness to better mimic the mechanical properties of native tissue, including more appropriately mimicking the physiologic stiffness of the myocardium. This enables the creation of a more physiologically-relevant microenvironment for studying cardiac fibroblast behavior and activation.
The use of soft substrates has become increasingly common in fibroblast in vitro experimentation due to attenuation of the mechanosensitive activation observed with traditional cell culture, allowing for a better representation of the physiological behavior of these cells (Cheng et al., 2021; Landry et al., 2019; Morningstar et al., 2021; Shiraishi et al., 2023; Wang et al., 2021). Further, the utilization of “soft” substrates has been demonstrated to reduce cardiac fibroblast activation and promote a more quiescent phenotype (Landry et al., 2019). Consequently, the use of soft substrates at physiological stiffness provides researchers with a valuable tool for studying the underlying mechanisms of cardiac fibroblast activation and their responses to various stimuli. However, commercially available options for cell culture plates with physiological stiffness ratings can be prohibitively expensive, stressing the need for a more cost-effective alternative.
Here, we developed a cost-effective protocol for culturing cardiac fibroblasts at physiologic stiffness on PDMS-coated coverslips to address the limitations associated with traditional cardiac fibroblast activation assays. These PDMS-coated coverslips generated in-house provide an affordable and accessible alternative that yield a comparable level of baseline cardiac fibroblast quiescence compared to commercially available cell culture soft substrates (Landry et al., 2019). Additionally, we present a comprehensive cell culture experimental timeline for assessing cardiac fibroblast activation from quiescent cells cultured on PDMS-coated coverslips. This protocol will enable investigation of the cellular and molecular mechanisms governing cardiac fibroblast activation using an in vitro system that more accurately models the physiologic stiffness of the myocardium.
Basic Protocol 1: Generation of 8 kPa Polydimethylsiloxane (PDMS)/ Gelatin-coated Coverslips for Cardiac Fibroblast Cell Culture
This protocol describes a detailed procedure for the generation of 8 kPa PDMS (Palchesko et al., 2012), and the steps for coating this PDMS solution on cell culture coverslips for use in in vitro fibroblast assays. First, commercially available PDMS solutions of various stiffness ratings are mixed to generate an 8 kPa polymer that more closely replicates the endogenous pressure of the cardiac fibroblast environment. A thin layer of this polymer is then applied to coverslips and cured. After sterilizing, the PDMS coated coverslips can then be additionally coated with gelatin to increase cell adherence prior to use in downstream applications.
Materials
24-well plates (Fisherbrand, FB012929)
12 mm glass coverslips (Electron Microscopy Sciences, #72230-01)
Plastic Dixie cups (Krayden Dow, #NC9285739)
Sylgard 184 and curing agent (Krayden Dow, #NC9285739)
Disposable Plastic Cell Scrapers (Santa Cruz, #sc-395251)
Sylgard 527 A and B (Krayden Dow, #NC1208196)
5 mL serological pipettes (Falcon, #357543)
10 mL serological pipettes (Falcon, 357551)
50 mL conical tubes (Fisherbrand, #05-539-7) and tube holder
P10 pipette tips (TipOne, #1110-3700)
P200 pipette tips (TipOne, #1111-1706)
P20 filter pipette tips (SureOne, #02-707-432)
1 mL syringe (Becton Dickinson, #309659)
PrecisionGlide 1.5 in, 21 gauge needle (Becton Dickinson, #305167)
Porcine skin gelatin aliquots (See Reagents and Solutions)
Phosphate buffered saline (Corning, #21-040-CV)
1 mL serological pipettes (Falcon, #357506)
Equipment
Fine tip straight forceps (WPI, #14099) or equivalent
Precision balance
Serological pipette controller
Vacuum desiccator
P10, P20 & P200 pipettes
Vortex mixer
Tabletop centrifuge
50°C oven
Class II biological safety cabinet
Vacuum aspirator
37°C water bath
37°C 5% CO2 incubator
Note: PDMS is difficult to remove from surfaces with normal solvents. Cover any workspaces during the creation of the PDMS mixture to ensure ease of clean-up in the event of a spill.
PDMS Creation/Coverslip Coating
For this protocol, 10 g of 8 kPa PDMS solution will be made by mixing two different Sylgard solutions together at the appropriate ratio.
-
1
Carefully place one 12 mm coverslip into each well of a 24-well plate with forceps.
This protocol generates between 6–8 full 24-well plates of coverslips but can be scaled up or down accordingly.
-
2Separately, form two different Sylgard mixtures.
-
Sylgard 184: Place an empty disposable plastic cup onto a precision balance. To it, add exactly 10 g of Sylgard 184 base with a 10 mL serological pipette (tip can be cut off to improve pipetting efficiency), followed by exactly 1 g of Sylgard 184 curing agent with a 5 mL serological pipette. Remove the cup from the balance, and using a plastic cell scraper, mix vigorously for 5 minutes. Place the cup with mixed components into the vacuum desiccator to remove bubbles.Due to the fact that PDMS is highly viscous and does not readily dissolve in common solvents, disposable containers such as the cups described in this protocol are recommended for ease of handling/cleaning.
- Sylgard 527: Again, place an empty disposable plastic cup onto a precision balance. With a 10 mL serological pipette, add exactly 6 g Sylgard 527 Part A to the disposable cup. Then, with a new 10 mL serological pipette, add exactly 6 g Sylgard 527 Part B to the cup for a total mass of 12 g. Mix vigorously in the cup with a plastic cell scraper for 5 minutes. Bubbles will likely not be present in this solution (does not require vacuum desiccation).
-
-
3Combine the Sylgard 184 and 527 at the precise ratio (0.102:9.90) to obtain an 8 kPa PDMS solution.
- Place an empty 50 mL conical tube into a small tube holder that fits on the precision balance. Place tube/holder onto the balance and tare the balance. Using a P10 pipette tip, without depressing the pipette, dip the P10 tip into the Sylgard 184 mixture. Once the solution has adhered to the tip, move the tip over to the 50 mL conical tube on the balance and allow it to drip off without depressing the pipette. Repeat until exactly 102 mg has been added to the conical tube. Be careful to achieve this mass as closely as possible. When 102 mg is reached, tare the balance.
-
Using a 5 mL serological pipette, add 9.90 g of Sylgard 527 to the tube containing the 102 mg of Sylgard 184. It is recommended to use the serological pipette for the majority of the mass being added, and then use a P200 tip to add the Sylgard 527 drop wise in a similar fashion to Step 3a at the end to reach exactly 9.90 g.PDMS specific gravity is .918. The main reason we use the weighing method is because due to the high viscosity of the PDMS; it is very difficult to accurately and reproducibly measure volumes. [
-
4Mix the two PDMS solutions very thoroughly.
- Secure the lid on the conical tube and vortex the tube on high for ~10 seconds, before orbitally tilting the tube and rolling the Sylgard mixture around the interior surface for another ~10 seconds. Repeat vortexing/mixing 5 times to ensure an extremely well-mixed, homogenous solution.
- Centrifuge the mixture at room temperature at 3,200 × g for 3 min to get the PDMS to the bottom of the conical tube.
- Vortex again for several seconds, while tilting the tube in different directions.
-
5Pipette the PDMS solution onto coverslips.
-
Load a P20 pipette with a 20 μL filter tip, then cut off the tip of the pipette (approximately 2–3 mm). Set the volume on the pipette to 14 μL and pipette the thoroughly mixed PDMS solution up and down into the tip slowly 3 times to coat the inside of the pipette and reduce the formation of bubbles.The repeated pipetting is only necessary upon first introduction of the solution to the tip, prior to first coverslip loading.
-
Eject all of the 14 μL of mixed PDMS onto the direct center of each coverslip within each well of the 24-well plate. To achieve consistent volumes, after pulling the PDMS into the pipette, drag the tip along the inside of the tube to ‘brush off’ extra PDMS that coats the outside of the pipette tip (it is highly viscous) before pipetting onto the coverslip.Once the PDMS has been applied, it will slowly begin to spread out to the edges of the coverslip. It is normal for the PDMS to not be completely spread out prior to curing in the oven and will likely be uniformly distributed following the overnight incubation in the 50°C oven.Any unused PDMS solution remaining following coverslip coating should be discarded, as it will solidify. A fresh PDMS solution should be prepared for each subsequent batch of coverslips at later dates.
-
-
6
Place the lids on the 24-well plates and place plates with coated coverslips into the vacuum desiccator for 30–45 min.
-
7
Transfer the plates to the 50°C oven and cure PDMS overnight.
-
8
Remove plastic plates containing the cured coverslips from the oven. Coverslips can be stored at room temperature indefinitely in the plastic plates that they were cured in until ready for experiments. Only proceed to gelatin coating (Step 9–13) when ready to perform experiments, as once gelatin coated is performed, it is recommended that the coverslips be used immediately.
The PDMS in most cases will diffuse across the coverslip evenly. Some coverslips may have small sections at the periphery that are not covered, these coverslips are still usable for most applications as long as the majority of the surface area is covered. Some coverslips (<10%) may become attached to the 24-well dish used in coverslip preparation due to the PDMS leaking over the side of the coverslip and bonding with the plastic. When ready for experimentation, only the unattached coverslips should be moved to a new 24-well plate to be used.
Preparation, Sterilization and Gelatin Coating of Coverslips
-
9Load new 24-well experimental plates with unattached PDMS-coated coverslips from the plastic plates in which they were cured.
-
Using the forceps and bent needle/syringe lifting tool (see Figure 1), lift the unattached, freely moving PDMS-coated coverslips from the preparation plate, and transfer the desired number to a new experimental 24-well plate.When transferring coverslips, use the forceps pointed down towards the bottom of the well to push each coverslip sideways gently against the plastic well with one hand and gingerly lift up, just enough to break the surface tension between the coverslip and the plastic. Simultaneously with the other hand, using the bent needle lifting tool, position the needle under the coverslip that is being barely lifted with the forceps. Once the needle is under the coverslip, the forceps can be released. While elevating the coverslip with the bent needle lifting tool, grip the edge of the coverslip with the forceps as minimally as possible so as not to disturb the PDMS coating, and lift, then transfer the coverslip to the desired location. When releasing the coverslip from the forceps, the PDMS-coated side may stick to the forceps. When this happens, the bent needle tool can be used to gently scrape the attachment point of the forceps to the PDMS to release it.For the remainder of the protocol, steps will take place in a Class II biological safety cabinet (BSC). Coverslip PDMS coating takes place in a non-sterile environment, whereas experimental plates must be properly sterilized to prevent contamination. It is assumed that all steps in the BSC and the transfer of materials into and out of the BSC will be done with the proper aseptic techniques.Preparation, Sterilization and Gelatin Coating of Coverslips steps 10–13 adapted from (Landry et al., 2021).The process to coat the PDMS coverslips with gelatin requires an overnight incubation. While PDMS coated coverslips can be stored indefinitely, it is recommended that once the gelatin coating is performed that the coverslips be used for experimentation immediately. Thus, Steps 10 through 12 should be performed the day prior to planned cardiac fibroblast isolation to ensure that they are ready for plating.
-
-
10
Place the plate in the BSC, remove the lid and flip it so that the outer surface of the lid rests on the cabinet surface. Liberally spray the PDMS-coated coverslips and rest of the plastic plate, including the overturned lid, with 70% ethanol, effectively soaking them. Ethanol should cover the coverslip entirely. Close the cabinet sash, turn on the UV light and allow coverslips to sit in ethanol/UV for 20–30 minutes. Place a bottle of sterile PBS and an aliquot of porcine skin gelatin stock (See Reagents and Solutions) in a 37°C water bath in the meantime.
-
11
Thoroughly aspirate the ethanol covering each coverslip by pointing the 1 mL serological pipette towards the sides of the well to avoid direct contact with the coverslips. Additionally, aspirate the lid of the plastic dish. Once the majority of the ethanol has been removed, allow the remainder to air dry in the cabinet for ~20–30 min until dry. Coverslips are now ready for downstream applications.
Do not try to directly aspirate small droplets of ethanol from the coverslips, as this may damage the coating. Any remaining ethanol of the coverslips after aspiration will be removed from the air-drying process.
-
12
Dilute porcine skin gelatin stock in sterile, warm PBS to make a sufficient volume of porcine skin gelatin working solution (10–100 μg/mL, concentration can be adjusted depending on cell adherence) (Adapted from Landry et al., 2021). Each coverslip requires 500 μL of working solution. To make enough 100 μg/mL solution to coat one 24-well dish (12 mL), use a serological pipette to add 15 mL pre-warmed PBS into a 50 mL conical tube. Then add 150 μL porcine skin gelatin stock solution from the pre-warmed aliquot to the PBS. Mix by pipetting up and down with the serological pipette. Pipette 500 μL of the porcine skin gelatin working solution onto each PDMS-coated coverslip, ensuring that each coverslip is completely submerged in the solution. Cover the plate with the lid and place the plate in the 37°C 5% CO2 incubator overnight.
-
13
The next day when ready for cell plating, move the plates from the 37°C 5% CO2 incubator back into the BSC. Remove plate lids as before, aspirate using a 1 mL serological pipette to remove the gelatin solution from each well and allow the coverslips to air dry in the BSC for ~10 min. Coverslips are now ready for cell plating (see Basic Protocol 2, Step 22).
Figure 1:

Coverslip lifting tool for coverslip transfer. Image of coverslip lifting tool generated by bending the tip (~ 3 mm) of a 1.5 inch, 21-gauge needle. Forceps are used in tandem with the bent-needle tool to transfer coverslips between dishes.
Basic Protocol 2: Adult Cardiac Fibroblast Isolation and Plating onto PDMS-Coated Coverslips
This protocol describes the isolation of primary murine adult cardiac fibroblasts for use in in vitro fibroblast assays adapted from (Kanisicak et al., 2016), in addition to their direct plating onto PDMS-coated coverslips. First, mouse hearts are enzymatically digested to separate myocardial tissue into its cellular components. The cell suspension is then plated onto PDMS/gelatin-coated coverslips to allow for preferential adherence of fibroblasts. This process maintains the fibroblasts on a physiologically relevant substrate for the duration of the experiment and removes any alterations to the fibroblasts associated with passaging primary cardiac fibroblasts prior to experimental assays.
Note: All experiments involving animals should abide by institutional protocols governing animal use and care (IACUC) and governmental agency guidelines, and protocols should be reviewed and approved prior to conducting any experimental procedures.
Note: ACFs are most commonly isolated and cultured from 8–12 weeks old mice of the C57/Bl6 strain but can be isolated from adult mice of any strain or genetic background.
Materials
Dulbecco’s Modified Eagle’s Medium (DMEM, Corning, #10-013-CV)
FBS aliquot (See Reagents and Solutions)
Pen/Strep (P/S, Corning, #30-002-CV)
Dispase buffer (See Reagents and Solutions)
Enzymatic digestion buffer (See Reagents and Solutions)
15 mL conical tubes (Basix, #14-955-237)
50 mL conical tubes (Fisherbrand, #05-539-12)
10 cm culture dishes (Fisherbrand, #FB012924)
10 mL serological pipettes (Falcon, 357551)
C57BL/6 mice, aged 8–12 weeks
Razor blades
40 μm mesh strainer (Fisherbrand, #22-363-547)
P1000 pipette tips (TipOne, #1112-1720)
10% FBS 1% P/S DMEM (See Reagents and Solutions)
1 mL serological pipettes (Falcon, #357506)
PDMS/gelatin coated coverslips (See Basic Protocol 1)
Equipment
37°C water bath
Ice bucket
Gyromini Nutator (Labnet, #S0500) or equivalent
Class II Biosafety Cabinet
37°C 5% CO2 incubator
Serological pipette controller
Fine tip straight forceps (WPI, #14099) or equivalent (2)
Surgical scissors
P1000 pipette
Tabletop centrifuge
Vacuum aspirator
Inverted bright-field tissue culture microscope
Note: This section of the protocol explains the procedure for isolating primary adult mouse cardiac fibroblasts. For an alternative isolation protocol, see Isolation of Adult Mouse Cardiac Fibroblasts (Almazloum & Khalil, 2023).
Before beginning, place DMEM, and one (or more depending on number of hearts being isolated) FBS aliquot (refer to Reagents and Solutions) into the 37°C water bath. Warm P/S and Dispase buffer (See Reagents and Solutions) to room temperature, prepare an ice bucket, and place nutator in the 37°C 5% CO2 incubator.
-
Determine the number of hearts to be isolated and prepare enzymatic digestion buffer (See Reagents and Solutions) accordingly. Store in water bath at 37°C until ready to use.
As one mouse heart will be digested with 6 mL enzymatic digestion buffer, the protocol details the proportional volumes of each buffer component to generate 6 mL total. If additional hearts are to be isolated, the total volume of enzymatic digestion buffer needed will increase accordingly to achieve 6 mL per heart. In this protocol, there are 3 rounds of digestion/sedimentation. Each round, 2 mL of enzymatic digestion buffer is used, for a total of 6 mL used to digest each heart.
-
Pre-label three conical tubes per sample.
For each sample condition (i.e. different genotypes/biological replicates, etc.), there will be 3 tubes: 1. A 15 mL conical tube with 5–10 mL serum-free DMEM that will receive whole hearts upon isolation for transfer back to the biosafety cabinet, 2. an empty 15 mL or 50 mL conical tube (depending on how many hearts are being digested) to receive the minced heart tissue to be digested, and 3. an empty 50 mL conical tube to collect digested cell suspension supernatant and placed on ice. For tube no.2, use a 15 mL conical tube when isolating up to 5 pooled hearts, and a 50 mL conical tube when digesting from 6 to 20 pooled hearts.
When DMEM is warm and enzymatic digestion buffer is ready, pipette 5–10 mL of serum-free DMEM into 1st set of pre-labeled 15 mL conical tubes with a 10 mL serological pipette. Then, pipette 10 mL of serum-free DMEM into 1 or multiple 10 cm culture dishes with a 10 mL serological pipette, one for each sample condition. Bring the 10 cm dish(es) and 15 mL conical(s) with media to location of animal sacrifice/heart isolation. Prepare the benchtop ahead of time to contain relevant euthanasia and sterile surgical tools (forceps, scissors) necessary to remove and dissect the heart after sacrifice.
Isolate heart(s). Following sacrifice of animal in accordance with respective approved animal protocols, use surgical scissors to open the thoracic cavity and expose the heart. Using two sets of forceps, with one grip the aorta and extracardiac tissue superior to the ventricles and with the other forceps gently grip and pull the ventricles away from chest cavity to isolate the heart.
-
Place the isolated heart into the 10 cm dish containing pre-warmed DMEM and squeeze the heart repeatedly with forceps in pre-warmed DMEM to remove remaining blood cells. Move each heart with the forceps to the respective pre-labeled 15 mL conical tube containing 5–10 mL serum-free DMEM and bring the tubes containing the heart(s) to the BSC.
For the remainder of the protocol, steps will take place in a Class II BSC and a 37°C 5% CO2 incubator.
-
Using the P1000 pipette with filter tips, pipette 2 mL per heart of fresh enzymatic digestion buffer into a pre-labeled empty 15 or 50 mL conical tube (See Step 3 note).
Return 50 mL conical containing enzymatic digestion buffer to the 37°C water bath during each incubation period to ensure it stays warm through the three stages of the isolation.
Remove the lid from a sterile 10 cm dish, then place the internal side of the lid facing up. Pour out the 15 mL conical containing the media/isolated hearts into the 10 cm dish base, then transfer (using forceps or lifting up with razor blades) each heart from the media in the 10 cm dish to the dry lid that was set facing up. Pinch the heart with the forceps and use a razor blade to make a transverse cut of roughly the “top” 1mm of the heart to remove atria/vasculature above the ventricles, while maintaining as much of the ventricles as possible (see Figure 2). Then, mince ventricles using a razor blade and or surgical scissors, forming approximately 1–2 mm3 pieces (~8–10 pieces per heart) and transfer minced ventricular tissue from one or more pooled heart(s) into the 15 or 50 mL conical tube containing the enzymatic digestion buffer for that sample.
When all samples are in their corresponding tubes, cap tubes and then transfer and secure the tubes in a nutator inside the 37°C 5% CO2 incubator to provide gentle agitation. Incubate tissues in a 37°C 5% CO2 incubator for 20 min.
Remove the tubes from the nutator, transfer the tubes back to the BSC and for each tube perform manual trituration 12–15 times with a 5 mL serological pipette until all tissue pieces are able to travel through the pipette without resistance.
Settle the tissue by sedimentation (~30 sec-1 min), and carefully collect the supernatant using a P1000 filter pipette tip without disturbing the tissue at the bottom of the tube.
-
Using the P1000 pipette, pass the supernatant through a 40 μm mesh strainer into its corresponding pre-labeled 50 mL conical and store immediately on ice.
Following the filter step, filters can be placed in a separate 50 mL conical to be reused for the following two filter steps, however, this only applies during smaller preps (1–3 hearts). In larger preps, due to the volume of enzymatic digestion buffer flowing through the filter from multiple hearts, the filters may become clogged and will not filter properly during the 2nd and 3rd filter steps. If running bulk preps with 5–10 pooled hearts per condition, a new filter can be used at each filtration step. Ensure that re-used filters are always placed in the proper collection 50 mL conical so that samples are not inadvertently contaminated.
Using the P1000, add 2 mL fresh enzymatic digestion buffer per heart to the previously sedimented ventricular tissue (not the digested supernatant on ice) in its existing tube and place back on the nutator in the 37°C 5% CO2 incubator for 20 min.
Remove the tubes from the nutator, transfer the tubes back to the BSC and for each tube perform manual trituration 12–15 times with a P1000 pipette tip until there is not resistance.
Settle the tissue by sedimentation (~30 sec-1 min), and carefully collect the supernatant using a P1000 without disturbing the tissue at the bottom of the tube.
Using the P1000, pipette the supernatant through a 40 μm mesh strainer (either reused from the same sample or a new filter if doing bulk preps and the previous filter is clogged) into the same corresponding 50 mL collection tube that was on ice and return the tube(s) to the ice bucket.
Using the P1000, add the final 2 mL fresh enzymatic digestion buffer per heart to the previously sedimented tissue in its existing tube and place on the nutator in the 37°C 5% CO2 incubator for the final 20 min digestion. Add pre-made 10% FBS 1% P/S DMEM (See Reagents and Solutions) to the 37°C water bath, and pre-cool the tabletop centrifuge to 4°C.
Remove the tubes from the 37°C 5% CO2 incubator, transfer to the BSC and perform manual trituration 12–15 times through a P1000 pipette tip.
Settle the tissue by sedimentation (~30 sec-1 min), and carefully collect the supernatant using a P1000 pipette tip without disturbing the tissue at the bottom of the tube.
Using the P1000, pipette the supernatant through a 40 μm mesh strainer (either reused from the same sample or a new filter if doing bulk preps and the previous filter is clogged) into the corresponding 50 mL collection tube.
-
Centrifuge the pooled sample supernatant from the 3 digestions (6 mL total per heart per tube) in the 50 mL collection tube(s) at 350 × g for 20 min at 4°C using a fixed angle rotor.
Swinging bucket rotors may result in lower yield as the cell pellet will be more dispersed along the side of the conical tube and more likely to be disturbed when removing supernatant.
During the spin, remove PDMS/gelatin-coated coverslips from the 37°C 5% CO2 incubator, and aspirate gelatin solution to prepare for cell plating (See Step 13, Basic Protocol 1).
Carefully remove tube(s) from centrifuge to not disturb the pelleted cells. Gently pour off supernatant from each tube and discard, with the pellet facing “up” in such a way that the supernatant is not flowing over the cell pellet as it leaves the tube.
-
Resuspend the cell pellet in 6.5 mL per heart of fresh pre-warmed 10% FBS 1% P/S DMEM (See Reagents and Solutions) using a 10 mL serological pipette.
For this protocol, one mouse heart should generate enough fibroblasts to optimally grow on ~12 PDMS-coated coverslips. This is considering the growth rate of adult cardiac fibroblasts over the course of a 5-day experimental time course that ideally should not become over-confluent at the end of the experimental assay, while still achieving sufficient density for healthy cells at the time of plating. Dilution ratio can be modified as needed to account for differences in isolation efficiency of viable fibroblasts and achieve the desired plating density for the experimental conditions.
-
Pipette 500 μL of the cell suspension/media onto each PDMS/gelatin coated- coverslip, so that the coverslip is submerged in the solution. Place lid on 24-well plate. Transfer the plates to the 37°C 5% CO2 incubator to allow the fibroblasts to adhere to the coverslips for 2 hours (See Figure 3).
Given the hydrophobic properties of PDMS, the solution may not completely cover the coverslip upon initially dispensing into the well. The plate can be gently manually rocked back and forth to allow cells and media to completely cover the surface of the coverslip, or the cell suspension can be re-pipetted directly onto the coverslip until the coverslip is uniformly submerged in cell suspension media for plating.
-
Warm an FBS aliquot and P/S to room temp, and warm SF DMEM in the 37°C water bath. Following 2 hr incubation, transfer the plates to the BSC and gently wash the cell solution (read non-fibroblast cells, fibroblasts have attached to coverslips) from the coverslips. Aspirate media/cell suspension from the plate ~4 wells at a time using a 1 mL serological pipette. Then, using the P1000, immediately cover each coverslip again in fresh media by gently pipetting 500 μL warm serum free (SF) DMEM onto the side of each well to avoid disturbing attached cells. Repeat until all wells in the dish have been washed once, and then repeat the washing process until the majority of the free floating/dead cells have been removed (~3 washes per coverslip total).
If aspiration with the serological pipette is resulting in loss of cells, wash steps can also be performed using P1000 for introduction and removal of media.
Attached fibroblasts will initially appear as small dark circles under the inverted bright-field tissue culture microscope, and should be able to be seen after about two washes. Canonical spindle morphology will appear ~2 days following plating.
-
Following the final wash, the incubation medium composition/volume will depend on downstream assay requirements. If no transduction is required, use a P1000 to replace wash media with 500 μL of freshly made 1% FBS 1% P/S DMEM using the pre-warmed components from Step 28. Incubate for 48-hours before proceeding to Basic Protocol 3, Step 3. If transduction is required, immediately following the isolation washing step, use the P1000 to pipette 250 μL 1% FBS DMEM (no P/S) into each well and proceed to Basic Protocol 3, Step 1.
Given the hydrophobic properties of PDMS, the DMEM may not completely cover the coverslip upon initial administration, especially at such a low volume (250 μL) if performing a transduction. The plate can be gently manually rocked back and forth to allow cells and media to completely cover the surface of the coverslip, or the cell suspension can be re-pipetted directly onto the coverslip until the coverslip is uniformly submerged in cell suspension media for plating. Note that these steps should be performed with caution as excess force can free attached fibroblasts from the PDMS substrate.
Figure 2:

Schematic of murine heart dissection for fibroblast isolation. Diagram illustrating use of razor blade to remove atria/vessels from dissected heart, allowing for digestion of ventricular tissue for fibroblast isolation. Created with BioRender.com
Figure 3:
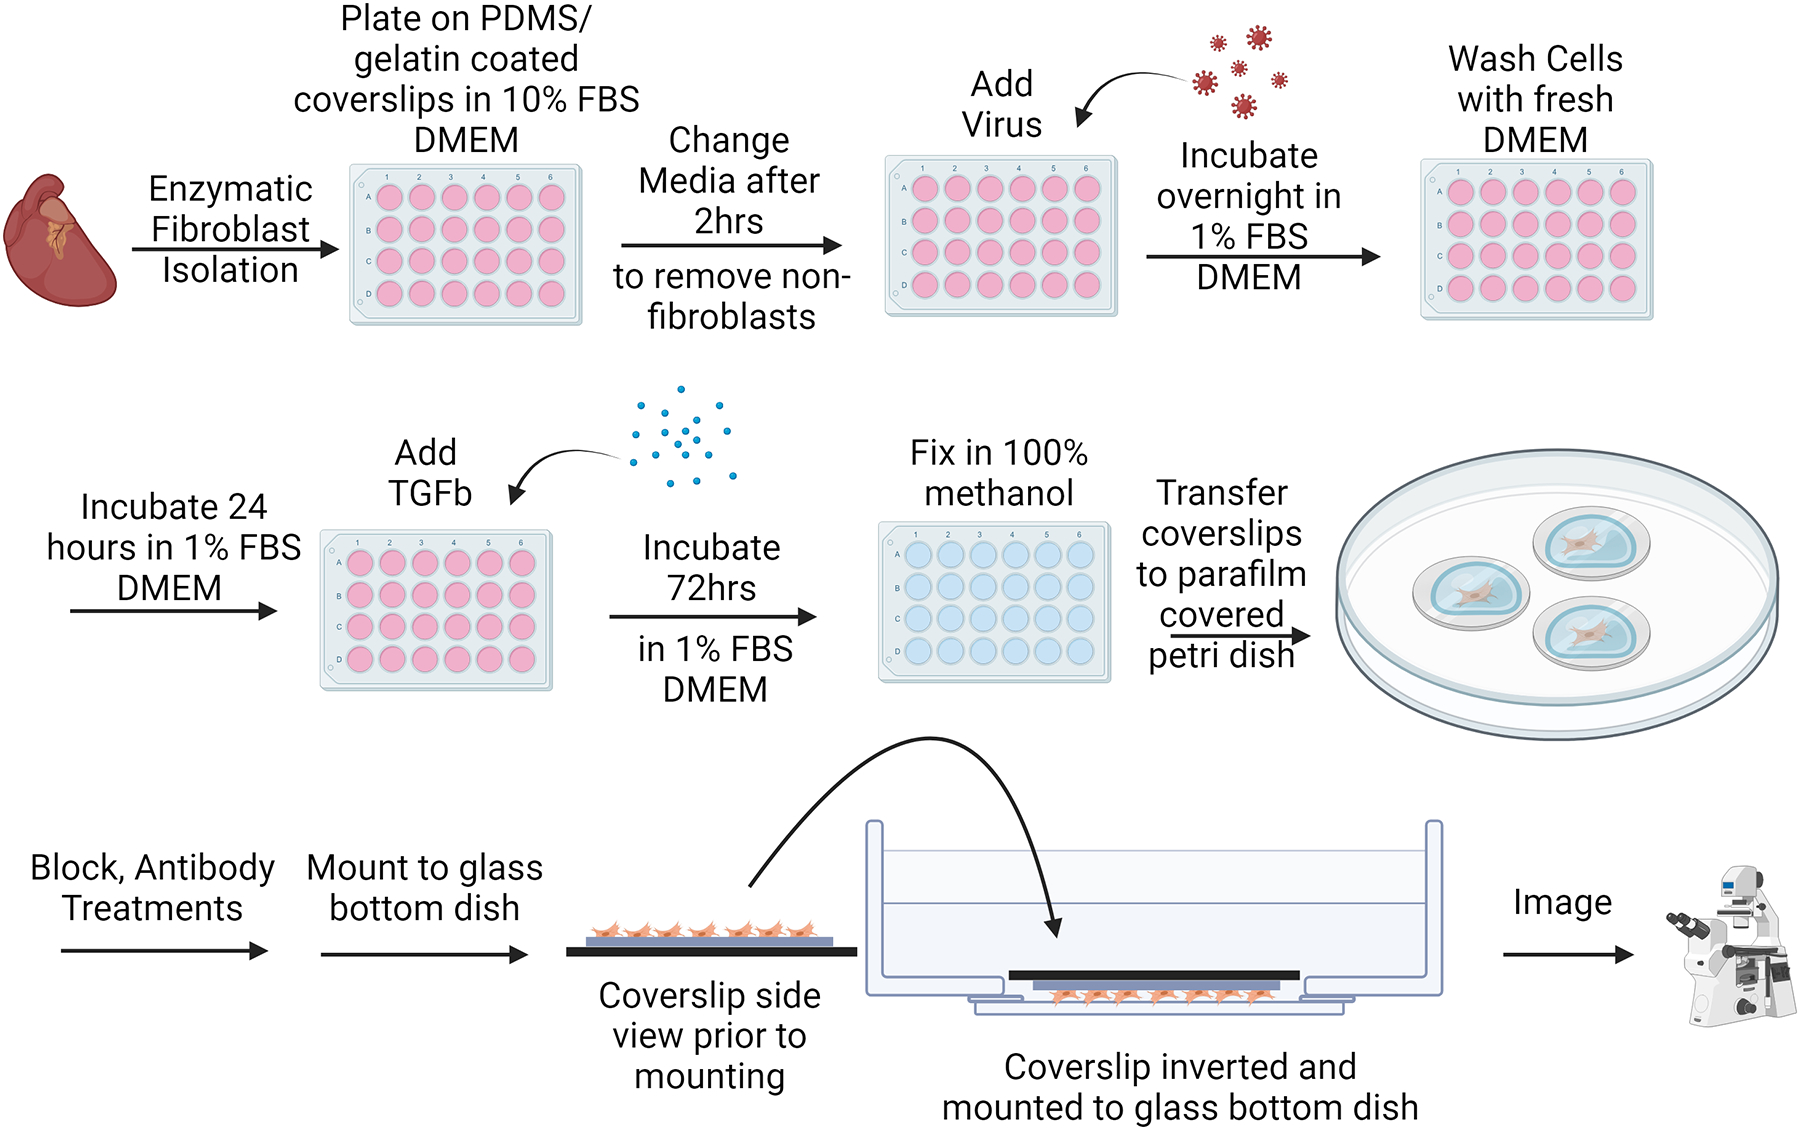
Adult cardiac fibroblast (ACF) activation assay protocol experimental workflow. Following fibroblast isolation, plating, and washing steps, fibroblasts can be immediately transduced for genetic manipulation if desired. ACFs can then be treated with a pro-fibrotic agonist (TGFβ1) to induce αSMA stress fiber formation. 72-hours later, cells are methanol-fixed and immunocytochemistry steps are performed prior to mounting and imaging. Created with BioRender.com
Basic Protocol 3: Assessment of Cardiac Fibroblast Activation by αSMA (alpha Smooth Muscle Actin) Immunocytochemistry
This protocol describes the process of performing an immunocytochemical assay using primary adult cardiac fibroblasts to assess their transformation into activated myofibroblasts. Parameters have been optimized for reduced background activation, efficient transduction in vitro (if applicable), and successful induction of activation using a profibrotic agonist. Following cell culture, fibroblasts on PDMS-coated coverslips are then fixed and prepared for downstream immunocytochemistry for α-smooth muscle actin (αSMA).
Materials
Adenovirus (if applicable)
P10 filter tips (SureOne, #02-707-001)
P20 filter pipette tips (SureOne, #02-707-432)
P1000 filter tips (VWR, #76322-156)
Dulbecco’s Modified Eagle’s Medium (Corning, #10-013-CV)
Fetal Bovine Serum (FBS, Corning, #35-010-CV)
Pen/Strep (P/S, Corning, #30-002-CV)
TGF-β1 Aliquots (See Reagents and Solutions)
Phosphate buffered saline (PBS, Corning, #21-040-CV)
Methanol (Sigma, #179337)
Parafilm (Fisher Scientific, #S37440)
15 cm plastic dishes (Fisherbrand, #FB012925)
Blocking solution (See Reagents and Solutions)
anti-αSMA primary antibody (Sigma, #A5228)
P200 pipette tips (TipOne, #1111-1706)
Paper towels (Scott, #01510)
Goat Anti-mouse AlexaFlour 488 secondary antibody (Invitrogen, #A-11029)
Prolong Gold with DAPI Mounting Solution (Cell Signaling, #8961)
35 mm Glass-bottom dishes (Cellvis, D35-28-1.5-N)
Equipment
Class II biosafety cabinet (BSC)
P10, P20, P200, P1000 pipettes
37°C water bath
37°C 5% CO2 incubator
Gyromini Nutator (Labnet, #S0500) or equivalent
Fine tip straight forceps (WPI, #14099) or equivalent
Bent needle lifting tool (See Figure 1)
Vacuum aspirator
4°C refrigerator
Confocal or epifluorescence microscope compatible with imaging of 35 mm dishes
-
If the assay requires a transduction step, thaw adenovirus and using a P10 with filter tips, pipette respective volume of virus into each experimental well of the 24-well plate in a BSC (See Figure 3). Incubate overnight.
Cardiac fibroblasts can be highly resistant to transduction. The amount of virus necessary for transduction can vary, and volume to load will depend on individual viral titers. An excess of 100+ multiplicity of infection (MOI) may be required for efficient transduction of murine adult cardiac fibroblasts.
-
Following overnight incubation, gently aspirate virus-containing media from the coverslips. Remove media from the plate ~4 wells at a time using a P1000 with filter tips, and immediately cover each coverslip again in fresh media using the P1000 to gently pipette 500 μL warm SF DMEM into each well. Repeat until all the wells have been washed once, and then repeat twice more, adding warm 500 μL freshly made 1% FBS 1% P/S DMEM following the final wash. Incubate for 24 hours.
Pipetting gently on the side of the well is recommended for all media changes/wash steps to prevent displacing cells from the coverslip.
Following the post-isolation 48-hour incubation with or without virus, prepare treatment solutions (See Figure 3). Calculate for 500 μL per well to determine appropriate volumes of media and saline/TGFβ1 treatments. Briefly thaw frozen TGFβ1 (transforming growth factor β1) aliquot(s) (see Reagents and Solutions) at room temperature. Prepare pre-warmed 1% FBS 1% P/S DMEM media, and in separate 15 mL conical tubes, pipette 1 μL of TGFβ1 or saline per mL of media for a 1:1000 dilution (to achieve a final concentration of 10 ng/mL TGFβ1). Mix the solutions by placing them on the nutator inside the 37°C 5% CO2 incubator for 5 minutes.
To begin treatments, remove media from the wells ~4 wells at a time using P1000 with filter tips, then immediately cover each coverslip again in fresh media by gently pipetting 500 μL of treatment solutions of 1% FBS 1% P/S DMEM with saline or 10 ng/mL TGFβ1. Incubate inside the 37°C 5% CO2 incubator for 72 hours.
-
Remove media from the wells ~4 wells at a time using P1000 with filter tips, then using the P1000 gently pipette 500 μL PBS onto each coverslip. Repeat so that all coverslips have been PBS-washed twice.
Continue to perform all washes gently to reduce loss of cells.
Following the second wash, remove PBS with P1000 filter tips. Then, with the P1000 pipette, add 500 μL ice cold methanol onto each coverslip. Incubate for 15 min at 4°C.
-
Remove methanol from each coverslip with P1000 filter tips, and gently wash twice with PBS with P1000 filter tips.
For the remainder of the protocol, a sterile environment is not necessary and can be performed at a conventional lab bench.
-
Immunocytochemistry is performed as described (Brody et al., 2012; Essandoh et al., 2023) and adapted for detection and imaging of αSMA stress fibers in adult cardiac fibroblasts cultured on PDMS-coated coverslips. Coat a 15 cm non-sterile petri dish with one layer of parafilm to create an incubation chamber for immunostaining. Using the forceps and bent needle lifting tool (see Figure 1), remove each coverslip from its well and place onto the parafilm layer with the cells facing up. Immediately cover each coverslip with ~70 μL PBS using the P200. PBS should form a meniscus on the coverslip.
Additional PBS volume is okay for the washing steps if 70 μL is not sufficient to fully cover the surface the coverslip.
-
When all coverslips have been placed on the parafilm, aspirate PBS with 1 mL serological pipette, and use a P200 pipette to add ~70 μL blocking solution (see Reagents and Solutions) to each coverslip, enough to sufficiently cover the whole surface. Incubate for 1 hr at room temp.
Due to the hydrophobicity of the PDMS, solutions will not as easily spread across the surface of the coverslips. If there are sections where the coverslip is not covered by solution, the bent needle tool (Figure 1) or a pipette tip can be used to gently drag the solution across the surface of the coverslip without directly touching the coverslip/adhered fibroblasts to ensure all cells on the coverslip are covered and incubated in blocking solution.
-
Following blocking, incubate the coverslips with anti-αSMA primary antibody diluted 1:1000 in blocking buffer. Prepare primary antibody dilution (e.g. 1 μL of primary antibody in 1 mL blocking buffer). Aspirate the blocking buffer from each coverslip using a 1 mL serological pipette, and using P200 pipette, add ~70 μL of the primary antibody diluted in blocking buffer onto each coverslip.
αSMA protein expression and incorporation into stress fibers is a hallmark of fibroblast activation.
Wet small pieces of paper towels, fold, and place on the sides of the 15 cm dish away from the coverslips to create a humidity chamber, then place the lid on to prevent coverslips from drying out. Move to a cold room or refrigerator to incubate overnight at 4°C.
The following day, wash each coverslip three times with PBS. Following the washes, incubate at room temperature for 1 hr in blocking buffer containing goat anti-mouse AlexaFlour 488 secondary antibody diluted 1:1000 in PBS.
Wash each coverslip three times with PBS in a similar fashion as previous washing steps. Coverslips are now ready for mounting.
-
Mount coverslips onto 35 mm glass-bottom dishes for imaging. 3 coverslips can be mounted on each 35 mm dish. Label 35 mm dishes to appropriately identify coverslips before mounting. Using a P20 filter tip, apply three small drops of Prolong Gold with DAPI mounting solution to each glass-bottom dish in a triangular pattern (See Figure 4).
Conventional mounting procedures are not recommended as the PDMS coating increases the distance between the bottom edge of the coverslip and the focal plane of the cells. This can make resolving the cells difficult with normal mounting procedures. To overcome this, the coverslips should instead be mounted on an image compatible surface (35 mm glass bottom dishes), allowing for images to be taken without the PDMS distorting the light or decreasing the resolution. Each glass bottom dish will fit three coverslips in a triangular arrangement.
-
Lift each coverslip from the parafilm and flip it with the forceps so that the cell-side makes contact with the drop of mounting solution and gently lay it over the drop of mounting solution on the 35 mm glass bottom dish (See Figure 4). Coverslips can be left to dry at room temperature and are ready for imaging.
The mounting solution will not cover the PDMS coated coverslips as quickly as an uncoated glass coverslip. If it appears to be mounting slowly, do NOT manually push the coverslip down onto the glass bottom dish to even out the seal, as this will potentially damage the cells.
Coverslips can now be imaged using fluorescence microscopy (see Figure 5). Images can be taken with lower magnification (10X) to achieve fields-of-view (FOV) with an ample number of cells (50+ ACFs per FOV) to be representative during quantification steps.
-
Differences in αSMA response can be quantified using ImageJ.
Differences in αSMA signal in response to pro-fibrotic agonists are most commonly reported as the percent of cells positive for αSMA divided by the total number of cells (Davis et al., 2015). In some situations, αSMA signal can also be reported as differences in whole FOV signal intensity between treatment groups. Immunofluorescence data can be complemented by Western blotting for αSMA protein levels. Due to the high baseline αSMA protein levels often seen in fibroblast culture, the % αSMA positivity method of quantification is often more sensitive.
Figure 4:

Mounting configuration of PDMS-coated coverslips onto 35-mm glass bottom dishes. Three dots of mounting solution can be applied to each 35-mm glass bottom dish (bottom left) and PDMS-coated coverslips mounted face down onto the 35-mm dish such that the cells are mounted against the glass bottom dish (bottom right), allowing for imaging of the cells on an inverted microscope without negative effects associated with imaging through the PDMS layer.
Figure 5:

Adult cardiac fibroblast (ACF) activation assay on PDMS-coated coverslips. Immunocytochemistry for a-smooth muscle actin (aSMA, green) in ACFs cultured on PDMS-coated coverslips treated with saline or TGFβ1 (10 ng/mL) for three days as outlined in Fig 3. Under these conditions, a quiescent population of fibroblasts can be achieved (left), allowing for greater relative induction of myofibroblast transformation in response to profibrotic stimuli such as TGFβ1 (right). Nuclei were stained blue with DAPI.
Reagents and Solutions
Dispase Buffer
For 300 mL Stock Solution:
- On a precision balance, weigh:
- 3.57 g HEPES (Fisher BioReagents, #BP310)
-
2.63 g NaCl (Fisher BioReagents, #BP358)Add weighed solids into a 500 mL glass beaker with approximately 280 mL ddH20.
Calibrate pH meter. Stir solution. Add KOH dropwise until the solution reaches pH 7.4.
Transfer solution to a graduated cylinder and bring solution to final volume of 300 mL with ddH2O. Sterilize solution with 0.2 μm filter flasks (Fisherbrand, #FB12566500) and create six 50 mL conical aliquots to store at 4°C until use. Aliquots should be used within 6 months.
Porcine Skin Gelatin Aliquots
1% w/v porcine skin gelatin aliquots for coating the coverslips can be made as previously described (Landry et al., 2021).
In a glass autoclave bottle, add 100 mL ddH20, cap the bottle, and incubate in 37°C water bath.
When warm, add 1 g Porcine Gelatin Type A (Sigma-Aldrich, #G1980). Allow solution to dissolve.
Following dissolution, autoclave the solution at 121 °C, 15 psi, for 30 min to ensure sterility.
Carefully remove the solution from the autoclave, and aliquot in the BSC while the solution is still warm (~50 °C). Aliquots can then be stored indefinitely at 4 °C.
FBS Aliquots
Thaw frozen FBS (Corning, #35-010-CV), pipette up and down with serological pipette until solution is mixed.
Aliquot small volumes of FBS into 1.5 mL microfuge tubes, in amounts sufficient for isolating cells from a few hearts with some extra. Example: For an aliquot for a 5-heart isolation, 5 × 120 μL FBS per heart is 600 μL, plus 20 μL extra for a total of 620 μL per aliquot.
Store at −20°C until ready for use. Always use a fresh aliquot for each isolation, do not use FBS that has been freeze/thawed.
Enzymatic Digestion Buffer
The steps listed here will yield 6 mL enzymatic digestion buffer, enough for one heart.
All listed amounts need only be multiplied by the number of hearts being isolated to generate larger amounts of enzymatic digestion buffer.
Pre-warm serum-free DMEM in the 37°C water bath. Incubate dispase buffer (see Reagents and Solutions), an FBS aliquot (See Reagents and Solutions), and P/S at room temperature.
Using the precision balance weigh out 14 mg of Dispase II (Sigma, #D4693) and 11 mg of Collagenase IV (Worthington, #LS004188). Bring weighed solids to the biosafety cabinet.
Using a serological pipette, add 1.5 mL room temperature Dispase Buffer to a 50 mL conical tube. Carefully pour in the 14 mg Dispase II. Invert the tube manually and gently swirl to dissolve the solid.
Using a serological pipette, add 4.1 mL of serum-free warm DMEM to the 50 mL conical tube.
Using a pipette, add 300 μL P/S and 120 μL FBS to the tube.
Carefully pour in the 11 mg collagenase IV to the tube, cap and again manually invert the tube to ensure a mixed solution. Place the tube in the 37°C water bath until ready to use.
10% FBS 1% P/S DMEM
Open a fresh 500 mL bottle of DMEM. Using a serological pipette, remove 55 mL of media and discard.
Using a new serological pipette, add 50 mL FBS (Corning, #35-010-CV).
Using a new serological pipette, add 5 mL P/S (Corning, #30-002-CV).
Cap bottle and store at 4°C. Use within ~2 months.
TGFβ1 Aliquots
Reconstitute lyophilized TGFβ1 (Peprotech, #100-21) according to manufacturer’s instructions. For Peprotech recombinant Human TGFβ1, reconstitute in sterile filtered 10 mM citric acid (Sigma, #251275) (in ddH2O), pH 3.0, at a concentration of 20 μg/mL. Incubate at 4°C for 10 minutes.
Further dilute 1:1 by adding an equal volume of 0.2% bovine serum albumin (BSA, Sigma Aldrich, #A9647) (in PBS) solution to the TGFβ1/citric acid solution to achieve a final stock concentration of 10 μg/mL TGFβ1, 0.1% BSA.
Aliquot the final TGFβ1 solution into 0.2 mL PCR tubes (VWR, #93001-118) by pipetting 10 μL into each tube. Aliquots can be stored at −20°C for up to 1 year.
Blocking Solution
- Generate 1 L of 10X phosphate buffered saline solution
NaCl 80g (Fisher BioReagents, #BP358) KCl 2g (Sigma, #P9541) Na2HPO4 14.4g (Sigma, #S9763) KH2PO4 2.4g (Sigma, #P5655) pH to 7.4 Dilute 10X PBS 1:10 in ddH20 to generate 1X PBS.
-
Generate blocking solution with 1X PBS.
1X Phosphate Buffered Saline
5% Goat serum (Sigma Aldrich, #G6767)
1% BSA (Sigma Aldrich, #A9647)
1% Glycine (Thermo Scientific, #AAA138160E)
0.2% Triton X-100 (Fisher BioReagents, #BP151-500)
Commentary
Background Information
Recent exploration into the mechanisms underlying cardiac fibroblast activity and phenotypic transformation to elicit ECM remodeling and cardiac fibrosis in many forms of heart disease is an exciting frontier for cardiac biology. Given the sensitivity of cardiac fibroblasts to their environment, 2D cell culture experimentation can represent a significant technical challenge. Towards solving this problem, researchers have adopted new strategies including the use of substrates like polydimethylsiloxane (PDMS), a silicon-based organic polymer that is widely used in the fields of cell biology and bioengineering for this application due to its unique biocompatibility, transparency, and tunable elasticity (Palchesko et al., 2012). Coverslips coated with PDMS provide a simple yet robust method to model a variety of in vivo environments in vitro with a range of practical applications spanning cell and tissue culture, biomechanical studies, and high-resolution imaging applications. In the context of fibroblast research, it has been demonstrated that fibroblasts plated and maintained on 8 kPa soft substrate-coated plates exhibit reduced baseline activation compared to standard plastic plates used for in vitro studies (Landry et al., 2019). Here we provide a straightforward and cost-effective protocol for assessment of cardiac fibroblast activation.
Critical Parameters
Cardiac fibroblasts are particularly sensitive to a variety of cell culture conditions that can influence experimental results, and attention to small details throughout the course of preparation, from coverslip generation to the activation treatments, is necessary for these assays. Carefully mixing the PDMS reagents at the proper ratios when generating batches of coverslips is critical for consistent results between experiments. Coverslips must be cured at the same temperature and length of time in order to achieve the proper stiffness rating; curing for too long or too short may result in variation in the performance of the substrate. The gelatin coating step is additionally important to ensure that the fibroblasts properly attach to the PDMS substrate during the cell plating step. Ensure that the filtered supernatants are kept on ice for the duration of the isolation process, including pre-cooling the centrifuge. After spinning the cells down, the cell pellet should appear red at the center of the pellet (red blood cells), with the larger white/pale portion of the cell pellet containing the fibroblasts. When pouring off the media to resuspend the pellet, hold the tube in such a way that the media does not travel over the pellet as it is being poured to reduce loss of fibroblasts in this step. During plating, achieving the proper confluency of fibroblasts is critical for the success of the 5-day activation experiment and may need to be adjusted to accommodate different experimental time courses. Overly confluent (>~40–50%) cells on the coverslips in the beginning of the experiment will lead to high baseline activation, as after 5 days of growth the monolayer will be overly confluent. Conversely, fibroblast populations that are under confluent (<~15%) at the beginning of the experiment will not grow properly and there will not be enough cells to analyze at the conclusion of the assay. Ideally, the confluency should be kept between 20–80% confluent throughout the 5-day time course. In all washing steps following plating, the amount of time that the cells are not covered in media should be reduced as much as possible. The hydrophobicity of the PDMS can lead to the cells drying out much faster than on standard coverslips, and thus it is critical to swiftly re-introduce fresh media. When pipetting media into the dishes, it should be pipetted gently into the side of the well in order to reduce cells being washed away. Fibroblasts generally attach well to their plates, however, on the PDMS they are more easily dislodged. If using a virus in the experiment, the transduction process will need to take place as early as possible so as to reduce the total amount of time in culture for the experimental time course. Generally, 48 hours after transduction provides sufficient time for robust expression of the desired constructs before beginning the activation assay. Additionally, the amount of virus needed to successfully transduce cardiac fibroblasts will likely be far greater than that needed for other cell types. Since fibroblasts exhibit increased activation with higher concentrations of FBS (10–20%), the TGFβ induction of activation will be less effective at these FBS concentrations. Thus, 1% FBS DMEM should be used for all culture steps aside from the initial isolation and plating steps.
Troubleshooting
For a list of possible problems, causes and solutions, see Table 1.
Table 1.
Troubleshooting
| Problem | Possible Cause | Solution |
|---|---|---|
| PDMS-coated coverslips consistently stuck to bottom of loading plate | Overloading coverslips with PDMS, pipetting not centered | Reduce loading volume, optimal range is between 12–14 uL per coverslip |
| Low Fibroblast Isolation Yield | Not completing overnight gelatin coating Losing cells in washing step |
Make sure to coat wells overnight in gelatin solution Add media very gently during washing steps, and make sure the amount of time without media is reduced as much as possible during each wash (only aspirate ~4 wells at a time). |
| Non-fibroblasts present in plates | Extended plating duration | Reduce plating time before wash |
| Fibroblasts are overly confluent | Insufficient dilution when plating | Increase dilution prior to plating |
| Cells exhibit high baseline activation without stimulation | Errors during PDMS generation Cells become over confluent by time of fixing |
Remake solution/coverslips Increase dilution to reduce endpoint confluency (ideally <80% at day 5) |
| Low transduction efficiency | Insufficient viral load Insufficient transduction time |
Increase viral load (300–500 MOI) Transduce with viruses overnight |
| Cells are not activated with agonist | Insufficient treatment time course FBS concentration too high |
Treat with TGFβ for full 72 hours Use 1% FBS DMEM |
| Cells appear damaged when imaging | Pushing down on coverslips during mounting | Allow the mounting solution to fully seal the coverslip without disturbing it manually |
| Cells are contaminated | Insufficient ethanol coverage/UV treatment in sterilization step Media/aliquot sterility not carefully maintained |
Make sure ethanol covers coverslip, and time course in ethanol/UV is carried out Maintain strict adherence to sterile technique, use sterile filter flasks when applicable |
Understanding Results
Carrying out this protocol will allow for the maintenance of a quiescent population of primary murine cardiac fibroblasts for a 5-day time-course. One of the most common ways in which cardiac fibroblasts are classified as activated is through their expression of αSMA. Successful completion of this protocol is simply interpreted through evaluation of immunocytochemical detection of αSMA expression in the cytoskeleton of the fibroblasts. Quiescent cells will predominantly be absent of this activated fibroblast marker (~20% positive for αSMA), as seen in Figure 5 in the left panel. Induction of activation with TGFβ1 treatment leads to a significant upregulation of αSMA expression, seen in the right panel of Figure 5 (~50–60% positive for αSMA). Due to the extreme sensitivity of these cells to substrate stiffness, false negatives of αSMA expression are not to be expected, thus a population of cells that is predominantly absent of αSMA for 3–5 days in culture would be considered quiescent.
Time Considerations
Coverslip Preparation: PDMS-coating
Making the PDMS-coated coverslips will take ~ 2 hours of work followed by an overnight incubation. This step can produce between 150–200 coverslips at a time which can be used discretionarily over the course of many experiments. PDMS-coated coverslips (without gelatin coating) can be stored at room temperature indefinitely.
Coverslip Preparation: Gelatin-coating
Coating the coverslips with gelatin (beginning the day prior to fibroblast isolation) takes about 15 min of work followed by an overnight incubation. Once the gelatin coating is performed on the PDMS-coated coverslips, it is recommended that they be used immediately.
Cardiac Fibroblast Isolation
The cardiac fibroblast isolation takes about 2 hours of work, followed by a 2-hour incubation period while the fibroblasts attach to the coverslip, then a ~15 min washing process. The process in its entirety will span ~4.5 hours, though there is only about 2.5 hours of this process that involve active work.
Cell Culture/Activation Assay
The activation assay takes 5 full days, beginning at the washing step following fibroblast isolation and plating. The first 24–48 hours are used for desired experimental genetic manipulations (viral transduction and expression of engineered constructs). 72-hours is needed for TGFβ1 treatment to induce sufficient activation in the fibroblasts.
Acknowledgements
This work was supported by grants from the American Heart Association (825996) to RSG and the National Institute of Health (R00HL136695 and R01HL166274) to MJB.
Footnotes
Conflict of Interest
The authors declare no conflict of interest.
Data Availability Statement
No new data generated.
Literature Cited
- Almazloum A, & Khalil H (2023, Jul). Isolation of Adult Mouse Cardiac Fibroblasts. Curr Protoc, 3(7), e840. 10.1002/cpz1.840 [DOI] [PubMed] [Google Scholar]
- Alter C, Henseler AS, Owenier C, Hesse J, Ding Z, Lautwein T, Bahr J, Hayat S, Kramann R, Kostenis E, Scheller J, & Schrader J (2023, Jun 1). IL-6 in the infarcted heart is preferentially formed by fibroblasts and modulated by purinergic signaling. J Clin Invest, 133(11). 10.1172/JCI163799 [DOI] [PMC free article] [PubMed] [Google Scholar]
- Bertaud A, Joshkon A, Heim X, Bachelier R, Bardin N, Leroyer AS, & Blot-Chabaud M (2023, Jan 16). Signaling Pathways and Potential Therapeutic Strategies in Cardiac Fibrosis. Int J Mol Sci, 24(2). 10.3390/ijms24021756 [DOI] [PMC free article] [PubMed] [Google Scholar]
- Bretherton R, Bugg D, Olszewski E, & Davis J (2020, Sep). Regulators of cardiac fibroblast cell state. Matrix Biol, 91–92, 117–135. 10.1016/j.matbio.2020.04.002 [DOI] [PMC free article] [PubMed] [Google Scholar]
- Brody MJ, Hacker TA, Patel JR, Feng L, Sadoshima J, Tevosian SG, Balijepalli RC, Moss RL, & Lee Y (2012). Ablation of the cardiac-specific gene leucine-rich repeat containing 10 (Lrrc10) results in dilated cardiomyopathy. PLoS One, 7(12), e51621. 10.1371/journal.pone.0051621 [DOI] [PMC free article] [PubMed] [Google Scholar]
- Cheng X, Wang L, Wen X, Gao L, Li G, Chang G, Qin S, & Zhang D (2021, May). TNAP is a novel regulator of cardiac fibrosis after myocardial infarction by mediating TGF-β/Smads and ERK1/2 signaling pathways. EBioMedicine, 67, 103370. 10.1016/j.ebiom.2021.103370 [DOI] [PMC free article] [PubMed] [Google Scholar]
- Childers RC, Lucchesi PA, & Gooch KJ (2021, Jun 9). Decreased Substrate Stiffness Promotes a Hypofibrotic Phenotype in Cardiac Fibroblasts. Int J Mol Sci, 22(12). 10.3390/ijms22126231 [DOI] [PMC free article] [PubMed] [Google Scholar]
- Davis J, Salomonis N, Ghearing N, Lin SC, Kwong JQ, Mohan A, Swanson MS, & Molkentin JD (2015, Dec 16). MBNL1-mediated regulation of differentiation RNAs promotes myofibroblast transformation and the fibrotic response. Nat Commun, 6, 10084. 10.1038/ncomms10084 [DOI] [PMC free article] [PubMed] [Google Scholar]
- Essandoh K, Subramani A, Ferro OA, Teuber JP, Koripella S, & Brody MJ (2023, May). zDHHC9 Regulates Cardiomyocyte Rab3a Activity and Atrial Natriuretic Peptide Secretion Through Palmitoylation of Rab3gap1. JACC Basic Transl Sci, 8(5), 518–542. 10.1016/j.jacbts.2022.11.003 [DOI] [PMC free article] [PubMed] [Google Scholar]
- Fu X, Khalil H, Kanisicak O, Boyer JG, Vagnozzi RJ, Maliken BD, Sargent MA, Prasad V, Valiente-Alandi I, Blaxall BC, & Molkentin JD (2018, May 1). Specialized fibroblast differentiated states underlie scar formation in the infarcted mouse heart. J Clin Invest, 128(5), 2127–2143. 10.1172/jci98215 [DOI] [PMC free article] [PubMed] [Google Scholar]
- Fu X, Liu Q, Li C, Li Y, & Wang L (2020). Cardiac Fibrosis and Cardiac Fibroblast Lineage-Tracing: Recent Advances. Front Physiol, 11, 416. 10.3389/fphys.2020.00416 [DOI] [PMC free article] [PubMed] [Google Scholar]
- Gibb AA, Lazaropoulos MP, & Elrod JW (2020, Jul 17). Myofibroblasts and Fibrosis: Mitochondrial and Metabolic Control of Cellular Differentiation. Circ Res, 127(3), 427–447. 10.1161/circresaha.120.316958 [DOI] [PMC free article] [PubMed] [Google Scholar]
- Herum KM, Choppe J, Kumar A, Engler AJ, & McCulloch AD (2017, Jul 7). Mechanical regulation of cardiac fibroblast profibrotic phenotypes. Mol Biol Cell, 28(14), 1871–1882. 10.1091/mbc.E17-01-0014 [DOI] [PMC free article] [PubMed] [Google Scholar]
- Herum KM, Lunde IG, McCulloch AD, & Christensen G (2017, May 19). The Soft- and Hard-Heartedness of Cardiac Fibroblasts: Mechanotransduction Signaling Pathways in Fibrosis of the Heart. J Clin Med, 6(5). 10.3390/jcm6050053 [DOI] [PMC free article] [PubMed] [Google Scholar]
- Ivey MJ, & Tallquist MD (2016, Oct 25). Defining the Cardiac Fibroblast. Circ J, 80(11), 2269–2276. 10.1253/circj.CJ-16-1003 [DOI] [PMC free article] [PubMed] [Google Scholar]
- Kanisicak O, Khalil H, Ivey MJ, Karch J, Maliken BD, Correll RN, Brody MJ, SC JL, Aronow BJ, Tallquist MD, & Molkentin JD (2016, Jul 22). Genetic lineage tracing defines myofibroblast origin and function in the injured heart. Nat Commun, 7, 12260. 10.1038/ncomms12260 [DOI] [PMC free article] [PubMed] [Google Scholar]
- Khalil H, Kanisicak O, Vagnozzi RJ, Johansen AK, Maliken BD, Prasad V, Boyer JG, Brody MJ, Schips T, Kilian KK, Correll RN, Kawasaki K, Nagata K, & Molkentin JD (2019, Aug 8). Cell-specific ablation of Hsp47 defines the collagen-producing cells in the injured heart. JCI Insight, 4(15), e128722. 10.1172/jci.insight.128722 [DOI] [PMC free article] [PubMed] [Google Scholar]
- Landry NM, Rattan SG, & Dixon IMC (2019, Sep 9). An Improved Method of Maintaining Primary Murine Cardiac Fibroblasts in Two-Dimensional Cell Culture. Sci Rep, 9(1), 12889. 10.1038/s41598-019-49285-9 [DOI] [PMC free article] [PubMed] [Google Scholar]
- Landry NM, Rattan SG, & Dixon IMC (2021). Soft Substrate Culture to Mechanically Control Cardiac Myofibroblast Activation. Methods Mol Biol, 2299, 171–179. 10.1007/978-1-0716-1382-5_13 [DOI] [PubMed] [Google Scholar]
- Meagher PB, Lee XA, Lee J, Visram A, Friedberg MK, & Connelly KA (2021, Mar 31). Cardiac Fibrosis: Key Role of Integrins in Cardiac Homeostasis and Remodeling. Cells, 10(4). 10.3390/cells10040770 [DOI] [PMC free article] [PubMed] [Google Scholar]
- Morningstar JE, Gensemer C, Moore R, Fulmer D, Beck TC, Wang C, Moore K, Guo L, Sieg F, Nagata Y, Bertrand P, Spampinato RA, Glover J, Poelzing S, Gourdie RG, Watts K, Richardson WJ, Levine RA, Borger MA, & Norris RA (2021, Dec 21). Mitral Valve Prolapse Induces Regionalized Myocardial Fibrosis. J Am Heart Assoc, 10(24), e022332. 10.1161/jaha.121.022332 [DOI] [PMC free article] [PubMed] [Google Scholar]
- Palchesko RN, Zhang L, Sun Y, & Feinberg AW (2012). Development of polydimethylsiloxane substrates with tunable elastic modulus to study cell mechanobiology in muscle and nerve. PLoS One, 7(12), e51499. 10.1371/journal.pone.0051499 [DOI] [PMC free article] [PubMed] [Google Scholar]
- Santiago JJ, Dangerfield AL, Rattan SG, Bathe KL, Cunnington RH, Raizman JE, Bedosky KM, Freed DH, Kardami E, & Dixon IM (2010, Jun). Cardiac fibroblast to myofibroblast differentiation in vivo and in vitro: expression of focal adhesion components in neonatal and adult rat ventricular myofibroblasts. Dev Dyn, 239(6), 1573–1584. 10.1002/dvdy.22280 [DOI] [PubMed] [Google Scholar]
- Shiraishi M, Suzuki K, & Yamaguchi A (2023, Apr). Effect of mechanical tension on fibroblast transcriptome profile and regulatory mechanisms of myocardial collagen turnover. Faseb j, 37(4), e22841. 10.1096/fj.202201899R [DOI] [PubMed] [Google Scholar]
- Tallquist MD (2020, Feb 10). Cardiac Fibroblast Diversity. Annu Rev Physiol, 82, 63–78. 10.1146/annurev-physiol-021119-034527 [DOI] [PMC free article] [PubMed] [Google Scholar]
- Tallquist MD, & Molkentin JD (2017, Aug). Redefining the identity of cardiac fibroblasts. Nat Rev Cardiol, 14(8), 484–491. 10.1038/nrcardio.2017.57 [DOI] [PMC free article] [PubMed] [Google Scholar]
- Teuber JP, Essandoh K, Hummel SL, Madamanchi NR, & Brody MJ (2022, Sep 16). NADPH Oxidases in Diastolic Dysfunction and Heart Failure with Preserved Ejection Fraction. Antioxidants (Basel), 11(9). 10.3390/antiox11091822 [DOI] [PMC free article] [PubMed] [Google Scholar]
- Umbarkar P, Ejantkar S, Tousif S, & Lal H (2021, Sep 14). Mechanisms of Fibroblast Activation and Myocardial Fibrosis: Lessons Learned from FB-Specific Conditional Mouse Models. Cells, 10(9). 10.3390/cells10092412 [DOI] [PMC free article] [PubMed] [Google Scholar]
- Wang A, Cao S, Stowe JC, & Valdez-Jasso D (2021, Apr 23). Substrate Stiffness and Stretch Regulate Profibrotic Mechanosignaling in Pulmonary Arterial Adventitial Fibroblasts. Cells, 10(5). 10.3390/cells10051000 [DOI] [PMC free article] [PubMed] [Google Scholar]
- Yeh YC, Corbin EA, Caliari SR, Ouyang L, Vega SL, Truitt R, Han L, Margulies KB, & Burdick JA (2017, Nov). Mechanically dynamic PDMS substrates to investigate changing cell environments. Biomaterials, 145, 23–32. 10.1016/j.biomaterials.2017.08.033 [DOI] [PMC free article] [PubMed] [Google Scholar]
Associated Data
This section collects any data citations, data availability statements, or supplementary materials included in this article.
Data Availability Statement
No new data generated.