Abstract
Practical relevance Cats often present with distal limb shearing injuries as a result of road traffic accidents (RTAs). Many apparently unsalvageable limbs can be saved through intensive and appropriate early treatment if the basic principles of good wound management are followed.
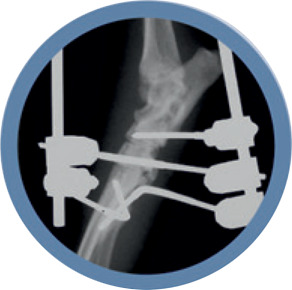
Clinical challenges When a limb is crushed under the wheel of a car, the skin, soft tissues and bone can be injured in a variety of ways, and the wounds are invariably heavily contaminated. Management of such cases is intensive, extensive and expensive. As well as the client's financial constraints, the ethics of prolonged treatment versus the alternative of amputation should be carefully considered. This article reviews the priorities for managing these cases, and presents a logical approach for achieving optimal outcomes.
Patient group Any cat allowed access to the outdoors is potentially at risk of sustaining RTA injuries, young cats particularly so.
Evidence base Many textbooks and original articles have been published on aspects of managing soft tissue injuries and skin grafting. To the author's knowledge, only two peer-reviewed papers have dealt specifically with shearing injuries, both presenting a retrospective analysis of cases in dogs.
The prognosis is rarely determined by the extent of superficial skin loss, but rather by the underlying soft tissue and bone damage.

Cats and cars don't mix!
Cats have recently overtaken dogs as the most popular pet in the UK. Many cats are allowed some access to the outdoors and, as a result, can be involved in road traffic accidents (RTAs), which are reportedly the fourth most common cause of death. 1 Young cats (less than 2 years old) are particularly at risk. 2 Of cats that survive, many will have sustained trauma to multiple body systems including the musculoskeletal system.
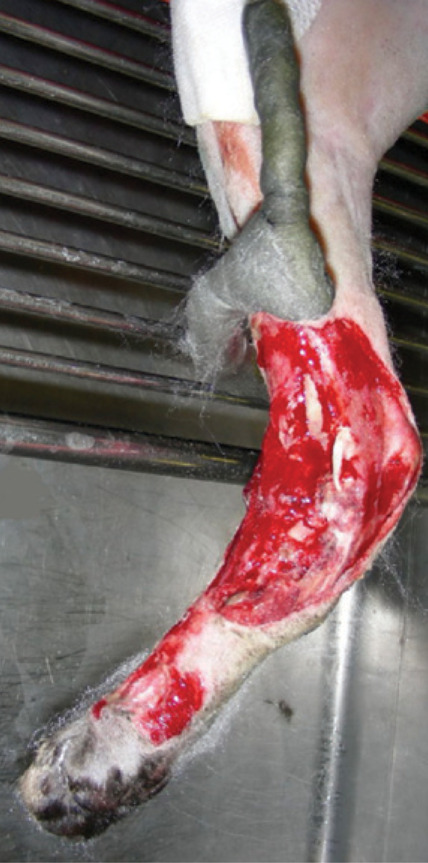
A limb that has been crushed under the wheel of a car may have degloving injuries or more severe shearing injuries. Degloving injuries involve the skin being avulsed from its subdermal attachments; the resulting damage to the vascular supply leads to tissue necrosis (Fig 1). Shearing injuries have a similar aetiology, but typically involve more extensive damage to the soft tissue layers, and usually also involve the underlying bone (Fig 2). In 66–78 per cent of cases, shearing injuries affect the medial aspect of the hindlimb,3,4 with variable involvement of the malleoli, talus and metatarsals. Shearing injuries of the forelimb are considerably less common, and are touched only briefly in this article as the basic principles of management are similar.
FIG 1.
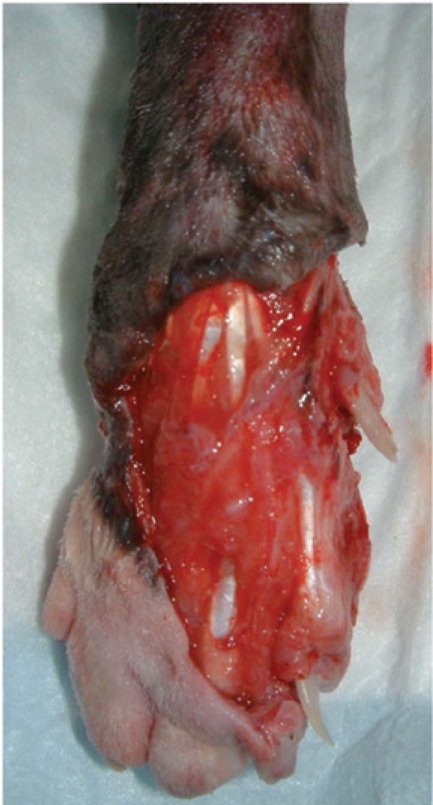
Typical degloving injury
FIG 2.
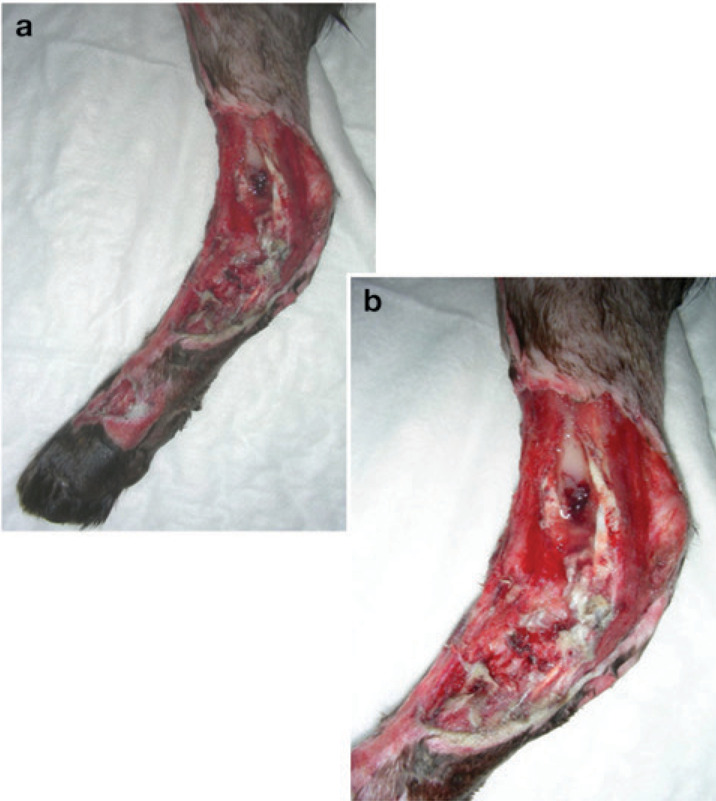
(a,b) Typical shearing injury
Initial triage
To the author's knowledge, no reviews of shearing injuries in cats have been published. The reported incidence of concurrent injuries in dogs (see right) reinforces the basic principle of good clinical practice: a full multisystem assessment is always mandatory. The affected limb(s) should be temporarily covered by a sterile bandage while the cat is otherwise assessed and stabilised, as necessary.
Concurrent injuries.
Two retrospective analyses of cases in dogs have been published, in which concurrent injuries were identified in 15/203 and 69/984 dogs. The most common concurrent injuries reported in each study, respectively, were other skin lesions (7 and 29), pulmonary injuries (5 and 15), and fractures (5 and 20), with luxations (2 and 0), ocular injuries (0 and 2) and neurological injuries (1 and 3) also reported.
Assessing the limb(s)
The affected limb(s) should be assessed for:
Vascularity;
Neurological damage;
Integrity of the periarticular ligaments;
Involvement of bone(s) and joints;
Extent of skin loss.
Although the loss of skin and superficial tissue is often extensive, this rarely determines the prognosis. The prognosis is ultimately determined by the extent of damage to the deeper tissues: the vascular supply, periarticular ligaments and bones of the joint. Neurological damage is rare.
Vascular supply
Severe vascular compromise to the distal limb is surprisingly rare with shearing injuries, as the major peripheral branches of the saphenous artery and vein lie quite deeply, adjacent to the medial aspect of the calcaneus. Vascular compromise can occur with joint luxation, however, through kinking and occlusion of the vessels, and reduction should therefore be performed as soon as possible.
An avascular distal limb will appear pale and feel cold, with no palpable metatarsal pulse. Doppler ultrasound is the most sensitive way of detecting blood supply. If a pulse cannot be detected and Doppler is unavailable, a sterile hypodermic needle can be used to prick the digital pads; alternatively one or more nails can be clipped short. Although animals in shock will often have very poor digital pulses, if the nail beds or pads do not bleed, the limb cannot be salvaged and amputation is the only option.
Neurological deficits
Neurological deficits are rare with shearing injuries as the tibial nerve runs deep, along with the saphenous vessels, medial to the calcaneus. Injury that is severe enough to damage the tibial nerve is likely also to irreversibly compromise the blood supply. The main feature of a loss of tibial nerve function would be inability to extend the hock, with the cat showing a plantigrade stance.
Periarticular ligament integrity
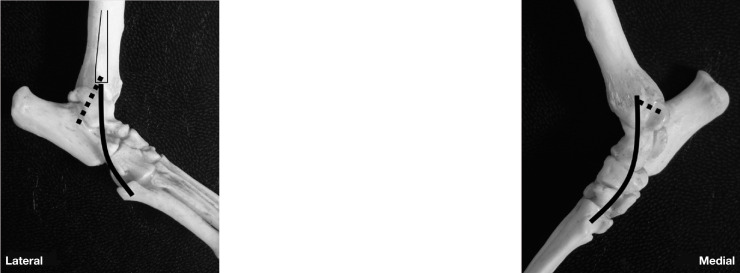
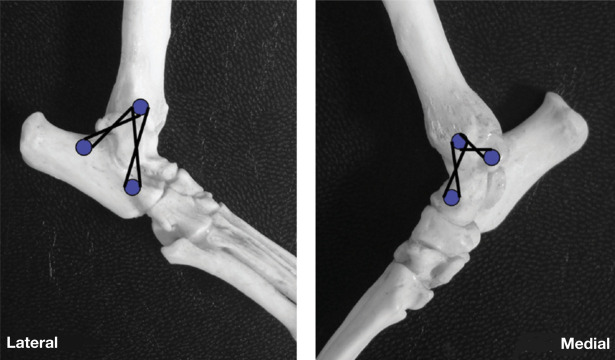
The hock is supported by medial and lateral collateral ligaments, consisting of both long and short components, which are under variable tension throughout the range of motion of the joint (Fig 3). When the hock is flexed, the short components are taut and the long components relaxed; the opposite occurs when the joint is extended.
FIG 3.
Collateral ligaments of the hock joint. The short collaterals are shown as a broken line, the long collaterals as a solid line. The fibula has been removed but is indicated in outline on the lateral view
To assess the lateral collateral ligament: the hock should be flexed and the paw internally rotated (this tests the short component); the hock is then extended and a varus stress applied (to test the long component).
To assess the medial collateral ligament: the hock should be flexed and a valgus stress applied (this tests the short component); the hock is then extended and a valgus stress applied (to test the long component).
Bone and joint involvement
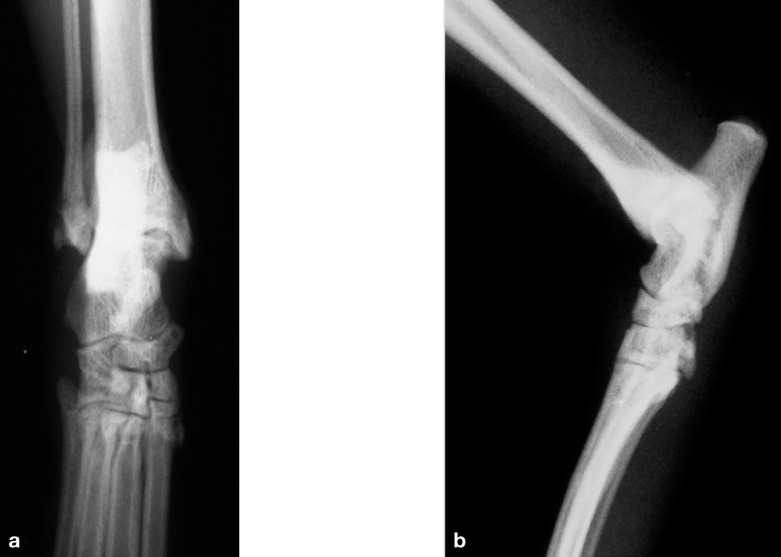
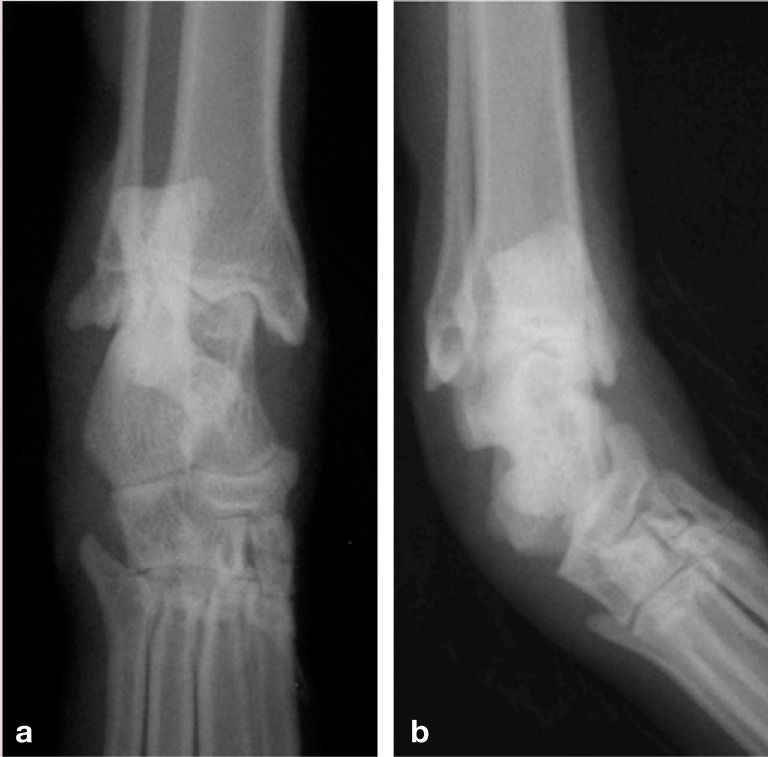
In some cases, bone, cartilage or even joint fluid will be evident on visual inspection of the limb. Irrespective, the affected limb(s) should be always be radiographed to fully evaluate the damage. The limb should be wrapped in a sterile bandage to prevent further contamination, and straight dorsoplantar and mediolateral radiographic views obtained to assess the malleoli and joint spaces (Fig 4). Subsequently, mediolateral stressed views should be taken to assess for joint instability (Fig 5).
FIG 4.
(a,b) Dorsoplantar and lateral radiographs of a normal feline hock
FIG 5.
(a,b) Dorsoplantar neutral and mediolateral stressed views of a feline hock demonstrating lateral instability (allowing varus deviation). Marked soft tissue swelling is evident on both radiographs
Joint instability.
Instability resulting from malleolar fracture is simple to address. However, loss of the malleolus (and therefore the associated collateral ligaments) is more problematic. The extent of damage to the talocrural joint is of most significance in terms of subsequent joint function; if the damage is severe, arthrodesis may be the only option.
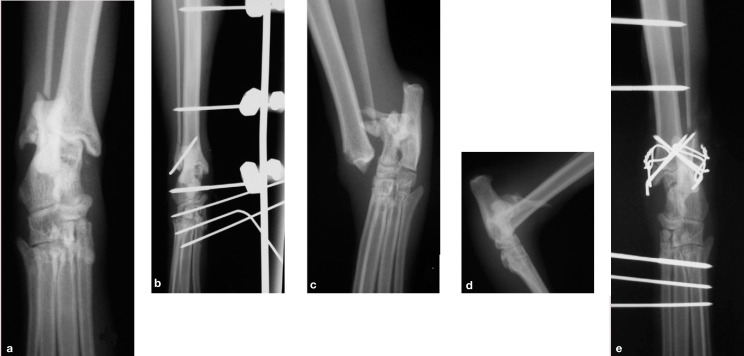
The timing of definitive treatment of the bony injuries is determined by the extent of the soft tissue injuries. If soft tissue loss is minimal and the fractures are simple and closed (eg, a medial malleolar fracture with intact collateral ligaments), it may be appropriate to reduce and stabilise the fracture at the same time as the initial management of the skin wounds. This can be achieved using a combination of K-wires and a figure-of-eight tension band wire, or K-wires alone, protected by a temporary transarticular external skeletal fixator (ESF) (Fig 6).
FIG 6.
(a,b) Lateral malleolar fracture repaired with a single K-wire and protected by a temporary type I transarticular external skeletal fixator (ESF). (c-e) Bilateral malleolar fractures repaired using K-wires and figure-of-eight tension band wires, with a temporary type I ESF
With most shearing injuries, however, extensive soft tissue loss necessitates temporary fixation to support the hock while the soft tissue injuries are addressed.
Definitive orthopaedic repair is performed when wound closure has occurred through contraction and epithelialisation, or after placement of a skin graft.
With most shearing injuries, extensive soft tissue loss necessitates temporary fixation to support the hock while the soft tissue injuries are addressed.
Definitive orthopaedic repair is performed when wound closure has occurred through contraction and epithelialisation, or after placement of a skin graft.
At this stage, having examined the cat for other injuries, assessed the damage to the soft tissues, the integrity of the supporting ligaments and the damage to the underlying joint and individual bones, the treatment and prognosis should be discussed with the owner, including the likely duration and costs.
Temporary stabilisation of the hock using a transarticular ESF
Placement of a temporary transarticular ESF is an effective way of stabilising the hock joint while allowing easy access to manage the associated soft tissue injuries. While a detailed description of how to place an ESF is beyond the scope of this article, and further reading is recommended,5,6 the important principles can be summarised as follows:
In most cats, the small Kirschner-Ehmer or mini Imex systems are appropriate.
Implant sizes should be determined from the radiographs; transfixation pins must not exceed 25–30% of the bone diameter (see right).
Ideally, end-threaded pins, which offer increased resistance to pull-out, should be used.
Wherever possible, pins should be placed through normal skin, and not through wounds.
The most proximal pin in the metatarsal bones may seat in all four bones; however, the more distal pins are likely only to catch one or two bones.
If all the pins are on the same side of the limb, they can be connected by a bent stainless steel bar; alternatively, acrylic or epoxy putty may be used to form a connecting bar that crosses between the medial and lateral sides.
Transfixation pin sizes.
As a guide, the following pin sizes are usually appropriate in cats:
Metatarsals/metacarpals: 0.9–1.2 mm
Tibial diaphysis: 2 mm
Radius: mediolateral pins ≤1.2 mm
The type of frame will, to some extent, be determined by the type of injury. Frames constructed using a single full pin in the tibia linked on both sides to a single full pin in the proximal metatarsals have been described. 7 These frames can be strengthened by placing a second full pin in the distal tibia, linked to a full pin in the calcaneus, or by placing additional pins in the metatarsals.
With severe shearing injuries, where the frame may have to function for 4–6 weeks, the author prefers to place three proximal half pins in the tibial diaphysis, and an additional pin either across the talus or through the calcaneus; then three or four additional pins are placed into the metatarsal bones. The frame is normally placed on the medial aspect of the limb, which has least soft tissue coverage. If necessary for ease of wound management, however, the proximal pins can be placed on the medial aspect of the tibia, and the distal part of the frame brought round to the lateral aspect of the hock and metatarsals, and joined by epoxy putty (Fig 7).
FIG 7.
An epoxy putty ESF. The proximal part of the frame has been applied to the medial aspect of the tibia. It then curves cranially onto the lateral aspect of the limb distally
The most important factors in determining whether immediate wound closure is appropriate are the level of contamination and the likelihood of ischaemia. If there is any doubt, it is best not to close the wound.
Wound management: the theory …
Dr Mike Pavletic, an international veterinary authority on plastic and reconstructive surgery, defines the six basic steps of wound management as being: 10
Prevention of further wound contamination;
Removal of foreign debris and contaminants;
Debridement of dead and dying tissue;
Provision of adequate wound drainage;
Provision of a viable vascular bed;
Selection of the appropriate method of closure.
The most important factors to consider in determining whether immediate wound closure is appropriate are the level of contamination and the likelihood of ischaemia. If there is any doubt, it is always better not to close the wound.
Most shearing injuries constitute either contaminated (=foreign material present) or dirty (=infected) wounds, and therefore primary closure immediately on presentation is rarely indicated. The theory that appropriate intervention within a 6 h ‘golden period’ will prevent a contaminated wound becoming infected has been superseded by the understanding that it is not the time elapsed, but the degree of contamination, and extent of tissue injury and vascular compromise that are the primary determinants of whether infection becomes established. The textbook definition that >105 organisms per gram of tissue is the critical level of contamination required for bacteria to infect a wound10,11 is of limited help in the clinical situation!
In most cases, initial lavage and debridement is performed and repeated until healthy tissue is present. If the wound becomes ‘clean’ before granulation tissue develops (usually after 3–5 days) delayed primary closure can be undertaken, but care must be taken to do so without creating circumferential tension on the extremity (this can be assessed simply by pushing the skin edges around the wound together). When granulation tissue has developed (after 5–10 days), secondary closure can be performed (± resection of the granulation tissue), but, again, lack of mobile skin on the extremities usually precludes this. Continued conservative management will facilitate second intention healing by granulation, contraction and epithelialisation.
Wound healing.
Wound healing is a continuous process that is considered to have three main overlapping phases: 8
Inflammatory phase Increased vascular permeability, release of cytokines and growth factors, and cell activation (macrophages, lymphocytes, neutrophils and fibroblasts) act in concert to deal with microorganisms and promote removal of damaged and necrotic tissue.
Proliferative phase The acute inflammatory reaction subsides within 3–5 days and early repair commences: angiogenesis occurs and fibroblasts migrate into the wound from adjacent viable tissues. This is the phase of granulation tissue formation. Collagen synthesis and deposition increases for 4–5 weeks post-injury, but the number of capillaries and fibroblasts starts to decline.
Maturation phase Collagen remodels for up to a year, reducing in quantity but becoming structurally superior, giving the wound its tensile strength. By 3 weeks, a wound has 20% of its final strength, increasing to a reported maximum of 89% of the strength of the original skin by 3 months, 9 with no increase thereafter.
Although leaving a wound to heal in this fashion is often practical, the outcome may be disappointing, with poor cosmesis and a fragile epithelial scar. More significantly, excessive scarring and contracture adjacent to a joint can significantly limit the range of joint motion. With most extensive shearing injuries, therefore, the wound is managed until healthy granulation tissue develops, and then a free skin graft is placed or a flap created to close the wound.
… and the practice
Ideally, the patient should be anaesthetised to facilitate thorough lavage and debridement of the wounds. Gross contamination should be removed, and the wound packed with sterile saline-soaked swabs or water-soluble jelly before performing a wide clip of the affected area. The swabs or gel should then be removed from the wound, prior to preparing the clipped area with a suitable antiseptic such as povidone-iodine antiseptic solution (not scrub) diluted 1:50; note that alcohol and detergent-based solutions will delay healing.
Adopting an aseptic technique (the surgeon gowned and gloved, and water-impermeable drapes placed around the limb), copious lavage is performed — with surgical debridement and further lavage, if indicated — and then swabs are taken for bacteriological culture and sensitivity testing.
It is important that swabs are always taken following lavage to identify residual bacteria, and not before, as the original contaminants are of little significance.
Swabs should always be taken following lavage to identify residual bacteria, and not before, as the original contaminants are of little significance.
Lavage
The volume of fluid used to lavage a wound will determine how successfully contaminants are diluted and eliminated. The type of fluid used is of secondary importance. For a typical shearing injury to the medial aspect of a feline hock, at least 1–2 1 of fluid should be used, depending on the extent of contamination. Equally, it is important that the fluid is applied with adequate (but not excessive) pressure, otherwise contaminants may be forced deeper into tissues. A 20 ml syringe attached to a three-way tap will produce an appropriate pressure of approximately 8 pounds per square inch (psi). 12
Avoid tap water!
Normal tap water is cytotoxic to fibroblasts due to its alkaline pH, hypotonicity and presence of various trace elements. 12 It is not, therefore, recommended unless adequate volumes of sterile fluids are not available.
Sterile isotonic solutions such as Hartmann's or normal saline are the most appropriate choices for lavaging wounds — studies suggest Hartmann's may be preferable, as saline can be cytotoxic due to lack of a buffering system and acid pH. 12 For heavily contaminated wounds, a 1:40 (0.05%) solution of chlorhexidine diacetate is also useful for reducing superficial bacterial populations, as povidone-iodine (at 0.1 or 1%) has less residual activity in the presence of organic material.10,12
Antibiotics
The use of antibiotics to ‘cover’ when wound management is suboptimal is a strategy that is doomed to fail. Equally, there is no benefit in adding antibiotics to the lavage fluid or otherwise applying them topically.
The use of antibiotics for wounds that are contaminated, but not infected, is controversial. If deeper tissues are exposed, it is reasonable to give broad-spectrum bactericidal antibiotics that are effective against likely contaminants (eg, coagulase-positive staphylococ-ci, Escherichia coli and Pasteurella species), while awaiting results of bacteriological culture and sensitivity testing. Useful antibiotics that can be administered intravenously include cephalosporins (Zinacef; GlaxoSmithKline, 20 mg/kg IV q8h), clindamycin (11 mg/kg IV q12h) or clavulanic acid-potentiated amoxicillin (Augmentin; GlaxoSmithKline, 20 mg/kg IV q8h).
Following initial intravenous administration, antibiotics can be continued orally until bacteriology results are available. In one of the above-mentioned studies of shearing injuries in dogs, however, there was reportedly no difference in clinical outcome between animals that received antibiotics and those that did not. 3 The fact that persistent use of ‘prophylactic’ antibiotics for contaminated wounds, particularly within hospital environments, predisposes to resistant nosocomial infections must also be considered.
Granulation tissue has a zone of granulocytes and macrophages on its outer surface, making it highly resistant to infection. 9 Antibiotics should therefore be stopped when a complete layer of healthy granulation tissue covers the wound.
Debridement
Inadequate debridement is the most common reason for persistent wound infection and delayed healing. Obviously necrotic tissue should be surgically resected en bloc, followed by more careful, layered debridement using a scalpel (scissors crush tissue) to identify and preserve viable tissue. Further copious lavage is carried out following debridement. Surgical debridement may be repeated over several days, or continued using specific dressings, such as wet-to-dry dressings (see page 753), which are an excellent way of debriding the superficial tissue layer while allowing deeper tissue viability to become evident.
Skin closure options
With appropriate management, most wounds will have a complete covering of healthy granulation tissue within 5–10 days (Fig 8). At this stage, closure using simple tension-relieving techniques and releasing incisions remains an unlikely option due to the lack of freely mobile skin on the extremities. The wound may be much smaller than it was originally, however, and the decision may be made to leave it to heal by contraction and epithelialisation, despite the risk of contracture restricting subsequent joint function. (Note that wound ‘contraction’ refers to approximation of the wound edges, while ‘contracture’ is shortening of the scar itself. 9 )
FIG 8.
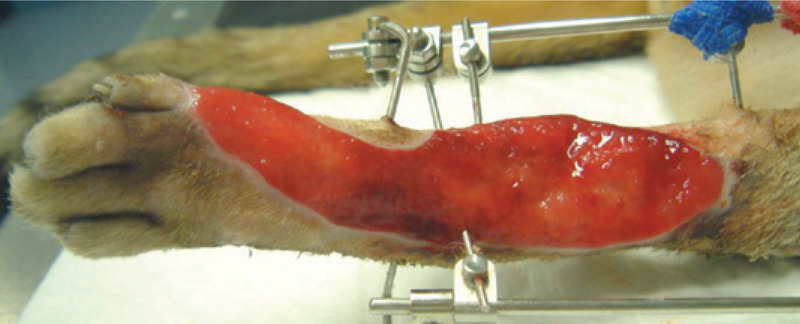
A covering of healthy granulation tissue with good epithelialisation around the perimeter
The use of antibiotics to ‘cover’ when wound management is suboptimal is a strategy that is doomed to fail. Equally, there is no benefit in adding antibiotics to the lavage fluid or otherwise applying them topically.
Dressing.
Debridement phase
The contact (primary) layer must be adherent to debride the wound, and must allow excessive exudate to pass through to an absorbent secondary layer to avoid tissue maceration.
Three types of primary layer are commonly used: wet-to-dry dressings, dry-to-dry dressings and hydrogels.
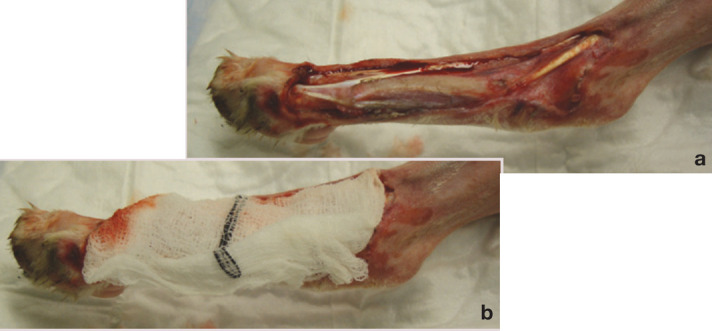
(a,b) Wet-to-dry dressing. Courtesy of Mickey Tivers
Wet-to-dry dressings are indicated for the typical shearing injury with necrotic tissue and viscous exudate. Sterile gauze swabs are soaked in sterile Hartmann's or saline solution and then squeezed out; the remaining solution dilutes the exudate, which is then absorbed, and the debris and necrotic material adhere to the dressing as it dries out.
Dry-to-dry dressings are indicated for wounds that are producing large volumes of low-viscosity exudate. This scenario is less common. These dressings can be painful to remove, and may be made less so by wetting with local anaesthetic prior to removal.
Hydrogels (eg, Intrasite; Smith & Nephew) are insoluble polymers that absorb and retain large volumes of water from wound exudate, rehydrating necrotic tissue and allowing normal autolytic processes to debride the wound.
Dressings should be changed daily until healthy granulation tissue becomes established, at which stage a non-adherent contact layer is indicated.
Granulation tissue can be slow to cover areas of exposed bone within a wound. Bone protruding above the wound should be trimmed back where possible, and small holes (forage) can be drilled into the vascular medullary canal of the bone to encourage development of granulation tissue by allowing access to fibroblasts, white blood cells and capillaries. 9 Larger areas of exposed bone can be covered using axial pattern skin flaps or muscle flaps.
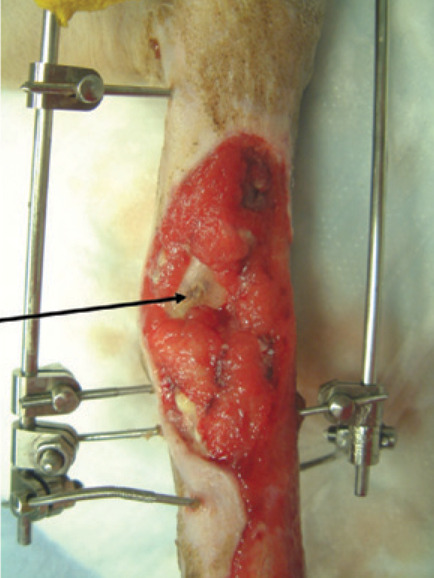
Granulation tissue can be slow to cover areas of exposed bone in a wound. The arrow indicates the medial aspect of the distal tibia (the malleolus has been sheared off)
The ideal wound environment is moist but not wet, with an optimum temperature of 35–37°C and pH maintained at around 6 to inhibit bacterial multiplication. 12
Granulation phase
When granulation tissue becomes established, a dry, non-adherent, absorptive contact layer should be used until epithelialisation is complete. Bandages should be changed every 24–48 h, depending on the level of exudate. Petroleum jelly-impregnated gauze should not be used as the jelly reduces oxygen tension in the wound and therefore delays epithelialisation. Suitable non-adherent dressings are either semiocclusive or occlusive.
Semiocclusive dressings include, for example, polyurethane foam dressings with a large absorptive capacity such as Allevyn (Smith & Nephew).
Occlusive dressings include hydrocolloids (eg, Granuflex; ConvaTec), hydrogel and calcium alginate, which are ‘active’ dressings that retain fluid to keep the wound environment moist. They achieve gentle debridement through rehydration of necrotic tissue, which can then be easily removed.
While the appropriate primary (contact) layer changes depending on the stage of wound healing, the secondary and tertiary layers do not. The secondary (intermediate) layer must absorb exudate and protect the wound, and so should be thick and have good capillarity; cotton wool is ideal. The tertiary (outer) layer holding everything in place must allow evaporation without absorbing external fluids; typically a self-adhesive dressing such as Vetrap (3M Animal Care) is used.
What determines how much a wound will contract?
Wound contraction starts almost immediately following injury and is believed to occur as a result of the action of specialised fibroblasts. These so-called myofibroblasts contain the contractile protein actin, and attach to the underlying dermis of the bordering skin margins and underlying fascia or panniculus muscle layer. 8 Normal fibroblast locomotion is also thought to contribute. Contraction continues for 2–3 weeks, although scarring or tension in adjacent skin can create counter-traction, which may neutralise the myofibroblast function. 9 In such cases, wound contraction will be incomplete, and further healing is by epithelialisation, or may require surgical intervention.
Why mesh?
Meshing a graft produces several benefits:
The holes allow drainage, preventing build up of fluid between the graft and recipient bed
A small graft can be expanded to cover a greater area
The graft is more flexible, and so will conform better to the irregular surface of the distal limb
The process of epithelialisation involves proliferation and migration of marginal basal cells from adjacent skin borders. 8 The intense cellular activity that produces epithelial cells and makes them ready for migration occurs within 2–5 mm of the wound margin. 9 Optimal epithelial repair occurs in a moist, well oxygenated environment, and adherent dressings must be avoided at this stage. The quality of the epithelium can be variable, however, and a suboptimal thin, fragile, hairless scar may result. 8
Alternative options for closing residual wounds
Free skin grafts These are usually the simplest and most appropriate technique. They can require more intensive dressing management, however, and as a consequence may be more costly than performing a flap.
Axial pattern flaps These are full-thickness skin flaps containing a direct cutaneous artery at their base. A caudal superficial epigastric flap can be extended to cover the proximal metatarsus; a reverse saphenous flap is also appropriate for the hindlimb. In the forelimb, a thoracodorsal flap will cover the proximal carpus.
Pedicled muscle flaps These provide vascularised soft tissue coverage.
Microvascular free tissue transfer Discussion of flaps is outwith the scope of this article, and further reading is recom-mended.13–15
Free skin grafts
A free skin graft is a piece of skin that is completely detached from its vascular supply and used to cover the defect, as described on page 755. The graft can be harvested as a full-or split-thickness graft, depending on the amount of dermis that is included. Although splitthickness grafts ‘take’ more readily, they lack durability, proper hair growth is impeded, they are more susceptible to contraction and are very difficult to harvest in the cat. For these reasons, full-thickness grafts are preferred for distal limb shearing injuries. The graft can be applied as a sheet, or cut into various patterns to produce a meshed graft.
For the graft to survive the first 48 h it must adhere and absorb fluid from the recipient bed by capillary action (plasmatic imbibition). During this period, capillaries in the recipient bed begin to unite with those in the graft to re-establish circulation (inosculation), with the process of revascularisation through new capillaries growing into the graft taking 1–2 weeks to complete.
Within the first 48 h the graft should become pinkish (a cyanotic hue suggests a degree of venous obstruction). Any movement or accumulation of fluid between the graft and recipient bed, or infection, will delay vascularisation and may result in graft necrosis. A graft that is becoming necrotic will appear white or black.
Definitive management of orthopaedic injuries
Having achieved closure of the skin wounds, definitive management of the orthopaedic injuries should be undertaken, if this has not already been done. The ESF will usually have been in place for 3–4 weeks, allowing adequate time for management of most soft tissue injuries without overly compromising subsequent joint function as a result of the effects of prolonged immobilisation on cartilage health and periarticular fibrosis.
The transarticular ESF is loosened to assess the stability of the hock, and radiographs are taken to reassess the bony structures. Depending on the original bony injuries, a number of different scenarios might be expected at this stage. With minimal damage to the collateral ligaments and extensive fibrous peri-articular scarring, sufficient stability may have been regained to produce a functional limb without further intervention. If this appears to be the case, the ESF can be removed, and a light bandage applied for 10 days. It is always sensible to advise the owner that the apparent stability may be a result of the weeks of joint immobilisation by the ESF, and that instability may gradually recur over the ensuing 7–10 days as the cat begins to use the limb without support. If the joint is clearly unstable, further surgical intervention is required.
Performing a free skin graft.
The recipient bed This must be free of chronic granulation tissue, which is a pale, collagen-rich tissue with a poor vascular supply. Applying wet-to-dry dressings for a few days before grafting will address this, where necessary, and is preferable to scraping away the top layer at the time of surgery, which would increase bleeding beneath the graft.
The donor site The graft should be harvested from an area where sufficient freely mobile skin exists to close the defect without problems. The skin should be thick, and so regions such as the ventral abdomen should be avoided. Matching the coat colour is of secondary concern.
Collecting the free skin graft A template is pressed on the recipient bed to outline the size and shape of graft required (the sterile paper from a glove packet makes useful template material). 16 The paper template is then cut out and placed on the prepared donor site, taking into consideration the direction of hair growth. A rectangle with margins approximately 1 cm greater than the template is outlined using a sterile marker, and the graft excised. Creating a rectangular defect simplifies closure of the donor site.
Preparing the graft All hypodermal tissues (subcutaneous fat and panniculus muscle) must be carefully removed from the graft, leaving the underside with a ‘cobblestone’ appearance with the hair follicles being seen as dark flecks within the dermis. This ‘defatting’ can be done during collection by careful scalpel dissection or subsequent to collection, with the graft secured over a sterile bowl or clipped to a towel. It is essential that the graft is kept moist at all times, and preferable that placement of the graft takes priority over closure of the donor site, unless two surgeons are available to work simultaneously.
Meshing the graft Although mesh graft expansion devices are available, it is simple to mesh the graft by hand. The graft should be placed on a sterile, firm, flat surface, and a new sharp scalpel blade used to make multiple incisions (approximately 1 cm long, 2 cm apart) in staggered parallel rows (enabling the graft to be expanded in one direction).
Placing the graft The graft is placed on the recipient site so as to slightly (by ~ 1 cm) overlap the skin edges, and attached along one border using simple interrupted nylon sutures or skin staples. The graft is then gently stretched to open the holes by just a few millimetres, 16 and secured around the other borders. The border of graft overlapping the skin will die and peel off as the sutures are removed.
Postoperative bandaging A non-adherent, absorbent contact layer is applied (eg, Allevyn), with a well padded secondary layer and standard tertiary layer. The bandage should not be changed for 3–5 days to avoid disturbing the graft at a critical phase. Early bandage changes should be performed under general anaesthesia, and care must be taken when removing the contact layer, which may have become adherent due to clots in the mesh holes — loosen these with warm sterile saline or Hartmann's solution.
With each bandage change, it is important to assess for evidence of elevation from the graft bed, infection or necrosis, but not to assume the worst. The graft will change through various hues (pale, lavender, pinkish) in the first 4–5 days-only white or black colouration is indicative of failure. Subsequent bandage changes are recommended every 2–3 days for 2 weeks, depending on the appearance of the graft, and the same care must be taken every time. Within a week, the meshed holes will usually have contracted and epithelialised.
Strict asepsis at all stages is critical to success.
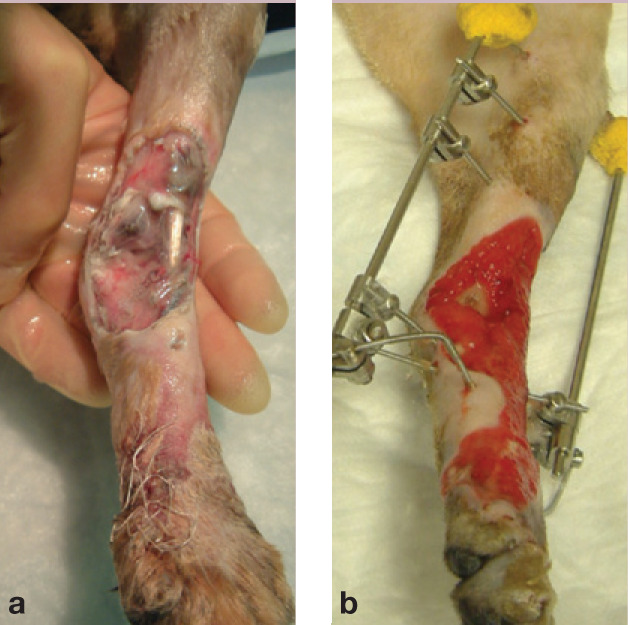
(a) Bengal cat at presentation 48 h after being seen by the referring vet and (b) following 14 days of wound management and application of a temporary transarticular ESF
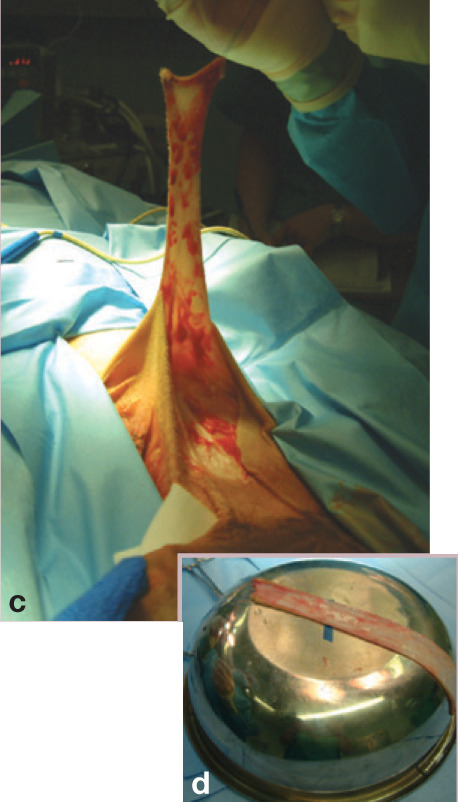
(c) Free skin graft being harvested from the mid-to ventral flank of a cat. Stay sutures are used to manipulate the graft without damaging the edges. (d) The graft is placed on a bowl to enable the hypodermal tissues (subcutaneous fat and panniculus muscle) to be removed
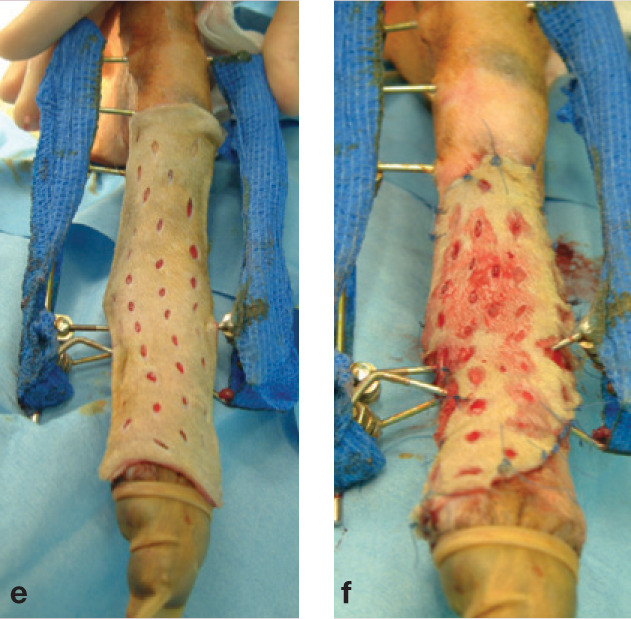
(e) The free skin graft has been meshed and is placed over the recipient site. (f) Excess tissue has been trimmed to allow a few millimetres overlap around the edges, and the graft stretched slightly to open the holes and facilitate drainage
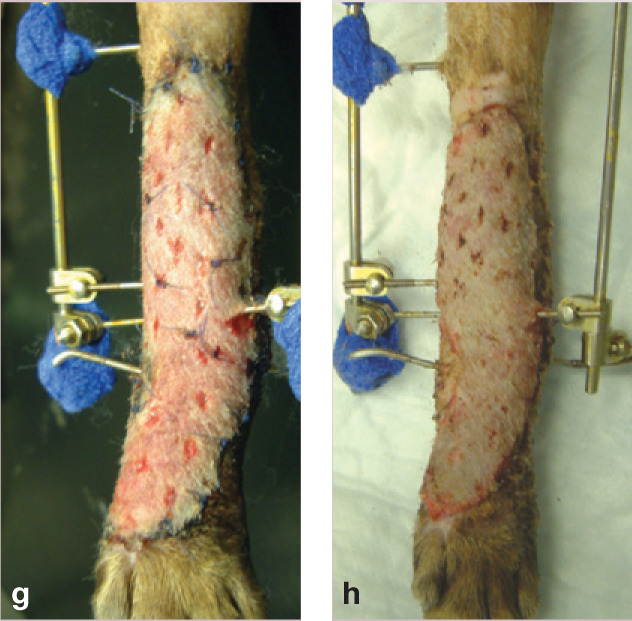
(g) By day 5, the graft is pink and healthy. (h) The successful graft on day 9: the sutures have been removed, and the overlapping edges trimmed
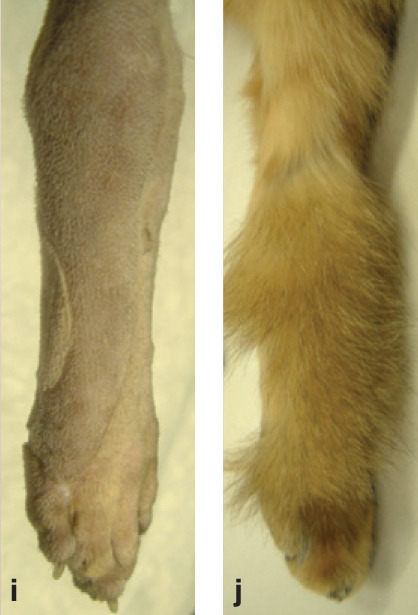
(i,j) successful (furry) result!
Stabilisation using prosthetic ligaments
Prosthetic ligaments may be an option if the damage to the bones of the talocrural joint is minimal. The choice of suture material is controversial, as braided polyester, monofilament nylon and stainless steel have all been associated with complications. There is a greater risk of infection becoming established in the presence of braided sutures, and wire tends to fatigue and fragment. The author's preference is, therefore, to use monofilament nylon leader line (60 lb breaking strain).
In order to replicate the anatomy of the long and short components:
The prosthetic medial collateral ligament should originate on the medial malleolus and insert on the head of the talus and the body of the talus;
The prosthetic lateral collateral ligament should originate on the lateral malleolus and insert on the dorsal aspect of the base of the calcaneus and the coracoid process of the calcaneus.
A proximal anchor point can be created on either side using a bone screw and washer. The distal points, particularly the insertion point of the short collateral on the abaxial aspect of the medial trochelar ridge, may catch on the medial malleolus, and so a suture anchor (Imex) is recommended, rather than a screw, or else the screw must be buried. 17 Nylon sutures are placed in a figure-of-eight fashion between the appropriate points (Fig 9), and the short ‘ligaments’ tied with the hock in flexion, while the long ones are tied with the hock in extension. The repair should then be supported for 4 weeks either in a cast, or by replacing a transarticular ESF. Following removal of the external support, exercise should be restricted for a further 4 weeks.
FIG 9.
Placement of prosthetic sutures in a figure-of-eight pattern around screws, to replicate the long and short collateral ligaments
KEY POINTS.
The prognosis for cats with distal limb shearing injuries is rarely determined by the extent of superficial skin loss, but rather by the underlying soft tissue and bone damage.
It is not the time elapsed, but the degree of contamination, and extent of tissue injury and vascular compromise that are the primary determinants of whether infection becomes established.
Copious lavage and repeated debridement in the early stages is critical to enable a bed of healthy granulation tissue to develop.
Granulation tissue is resistant to infection (=no need for antibiotics).
A temporary transarticular ESF is the most effective way to stabilise an unstable hock joint during management of the soft tissue wounds.
Pantarsal arthrodesis
If there has been more extensive bone loss and involvement of the joint surfaces, then a pantarsal arthrodesis may be required to restore pain-free limb function. Arthrodesis can be performed using either a bone plate, or transarticular fixator and cross K-wire combination. While readers are directed to an appropriate orthopaedic text for an in-depth discussion of arthrodesis,7,18 the essential principles of the technique are to:
Remove all articular cartilage down to bleeding subchondral bone;
Pack the joint spaces with autogenous cancellous bone graft;
Ensure rigid stabilisation, ideally with compression;
Arthrodese the joint at a weightbearing angle (determine this by measuring the contralateral hindlimb).
Shearing injuries of the forelimb
Shearing injuries of the carpus are far less common than those of the hindlimb, but typically also affect the medial aspect of the joint. The principles of managing the soft tissue injuries are as described for the hindlimb.
Orthopaedic management
Prosthetic ligaments can be created to replace damaged collateral ligaments. A hole is drilled in a dorsal-to-ventral direction through the medial or lateral styloid process, and a similar hole drilled through the radial or ulnar carpal bone. Monofilament nylon is threaded through the holes and tied in a figure-of-eight pattern. Depending on the extent of the associated soft tissue injury, external coaptation or a temporary ESF is used to support the repair.
Arthrodesis may be required for severe bony injury; typically a small dorsal plate or cross pins and an ESF are used.
Case notes.
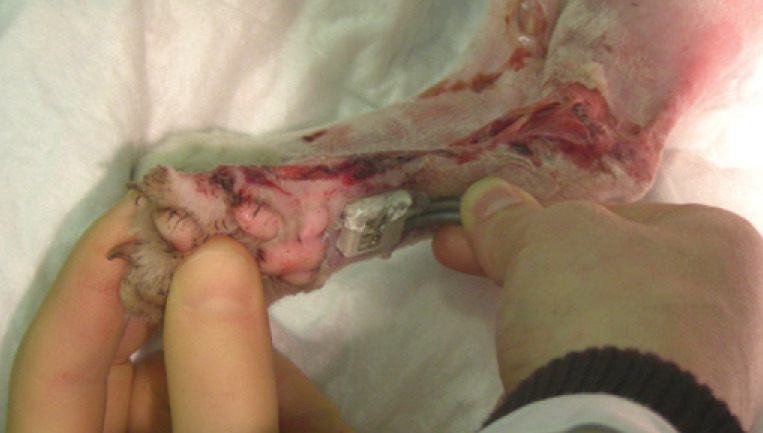
(a) What technique is being used here, and what is being assessed? What other techniques could be used?
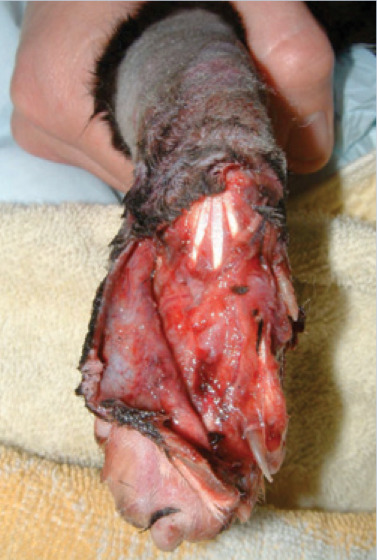
(b) Which approach would be most appropriate for managing this wound, and why?
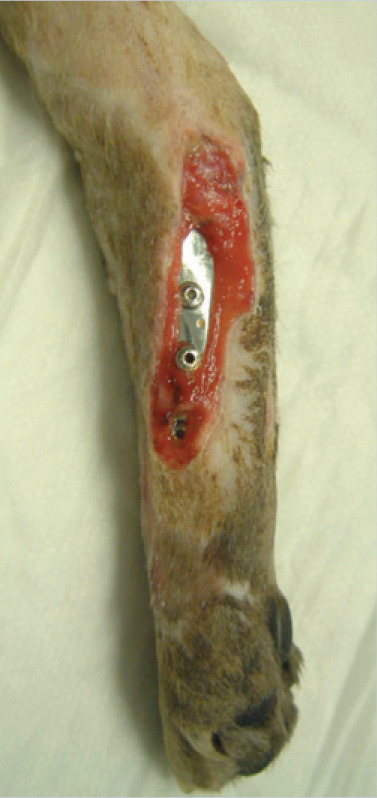
(c) This cat has had a pantarsal arthrodesis performed using a bone plate, and subsequently suffered a wound breakdown and MRSA infection. How should this case be managed? Are antibiotics indicated?
Answers and discussion (a) Doppler ultrasound to assess blood flow to the paw. Alternative ways of assessing: clinical (feel temperature, feel for pulse), pin prick to digital pads, cut nail back to nail bed.
(b) Initially treat as a contaminated wound — copious lavage followed by gentle debridement using wet-to-dry dressings for several days. If skin flap remains vital after 3–4 days, delayed primary closure may be attempted. If skin flap becomes necrotic, continue to manage as an open wound and apply free skin graft when healthy granulation bed has established.
(c) Lavage the site and swab for bacteriological culture and sensitivity testing. Apply a wet-to-dry dressing to the wound initially (24–48 h), then change to non-adhesive absorbent dressings until granulation tissue forms. Administer appropriate antibiotics based on culture and sensitivity results, and stop when the wound is covered with granulation tissue. Alternatively a silver dressing could be used initially to help inhibit bacterial multiplication. Keep the wound warm and moist to promote epithelialisation. In this case, the wound closed by epithelialisation within 7 days. If infection was to persist, the plate may eventually have to be removed, but only after arthrodesis was complete.
References
- 1.Rochlitz I, De Wit T, Broom DM. A pilot study on the longevity and causes of death of cats in Britain. BSAVA congress clinical research abstracts. Gloucester, UK: BSAVA, 2001: p 528. [Google Scholar]
- 2.Rochlitz I. The effects of road traffic accidents on domestic cats and their owners. Anim Welf 2004; 13: 51–5. [Google Scholar]
- 3.Diamond DW, Besso J, Boudrieau RJ. Evaluation of joint stabilisation for treatment of shearing injuries of the tarsus in 20 dogs. J Am Anim Hosp Assoc 1999; 35: 147–53. [DOI] [PubMed] [Google Scholar]
- 4.Beardsley SL, Schrader SC. Treatment of dogs with wounds of the limbs caused by shearing forces: 98 cases (1975–1993). J Am Vet Med Assoc 1995; 207: 1071–75. [PubMed] [Google Scholar]
- 5.Corr SA. A practical guide to linear skeletal external fixation. In Pract 2004; 27: 76–85. [Google Scholar]
- 6.Kraus KH, Toombs JP, Ness MG. External fixation in small animal practice. Oxford: Blackwell Science, 2003. [Google Scholar]
- 7.Piermattei DL, Flo GL, DeCamp CE. Fractures and other orthopedic injuries of the tarsus, metatarsus, and phalanges. In: Brinker, Piermattei and Flo's handbook of small animal orthopedics and fracture repair. 4th edn. St Louis, Missouri: Saunders Elsevier, 2006: 661–731. [Google Scholar]
- 8.Pavletic MM. Basic principles of wound healing. In: Pavletic MM, ed. Atlas of small animal reconstructive surgery. 2nd edn. Philadelphia: WB Saunders, 1999: 11–20. [Google Scholar]
- 9.Gregory CR. Wound healing and influencing factors. In: Fowler D, Williams J, eds. BSAVA manual of canine and feline wound management and reconstruction. Gloucester, UK: BSAVA, 1999: pp 13–24. [Google Scholar]
- 10.Pavletic MM. Basic principles of wound management. In: Pavletic MM, ed. Atlas of small animal reconstructive surgery. 2nd edn. Philadelphia: WB Saunders, 1999: 21–40. [Google Scholar]
- 11.Dunning D. Surgical wound infection and the use of antimicrobials. In: Slatter D. Textbook of small animal surgery. 3rd edn. Philadelphia: Elsevier Science, 2002: 113–21. [Google Scholar]
- 12.Williams JM. Open wound management. In: Fowler D, Williams J, eds. BSAVA manual of canine and feline wound management and reconstruction. Gloucester, UK: BSAVA, 1999: 37–46. [Google Scholar]
- 13.Anderson D. Practical approach to reconstruction of wounds in small animal practice, Part 1. In Pract 1997; 19: 463–71. [Google Scholar]
- 14.Anderson D. Practical approach to reconstruction of wounds in small animal practice, Part 2. In Pract 1997; 19: 537–45. [Google Scholar]
- 15.Williams JM, Moores A. BSAVA manual of canine and feline wound management and reconstruction. 2nd edn. Gloucester, UK: BSAVA, 2009. [Google Scholar]
- 16.Pavletic MM. Free grafts. In: Pavletic MM. Atlas of small animal reconstructive surgery. 2nd edn. Philadelphia: WB Saunders, 1999: 275–96. [Google Scholar]
- 17.Miller A, Hulse D. The tarsus. In: Houlton JEF, Cook JL, Innes JF, Langley-Hobbs SJ, eds. BSAVA manual of canine and feline musculoskeletal disorders. Gloucester, UK: BSAVA, 2006: 396–417. [Google Scholar]
- 18.Lesser AS. Arthrodesis. In: Slatter D. Textbook of small animal surgery. 3rd edn. Philadelphia: Saunders Elsevier, 2002: 2170–79. [Google Scholar]


