

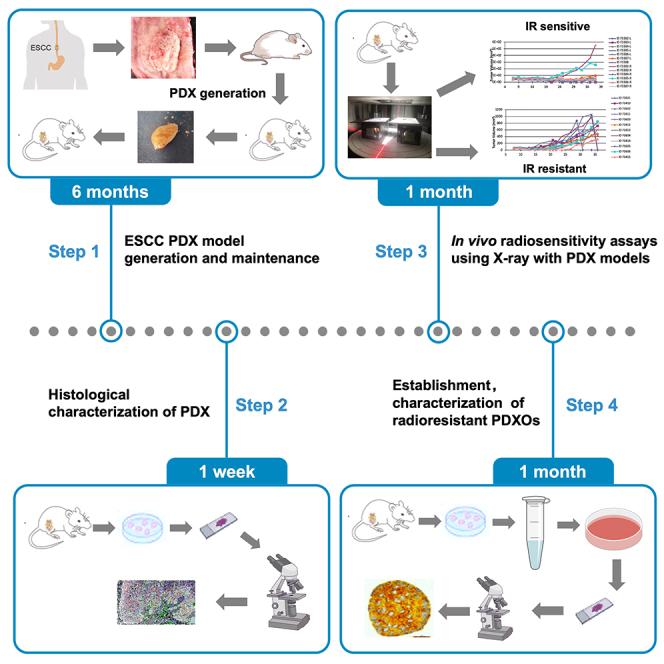
Summary
Patient-derived xenograft (PDX) and organoids derived from PDX (PDXOs) are ideal pre-clinical models, which recapitulate the tumor heterogeneity. We provide the steps to establish PDX and PDXOs from patients with esophageal squamous cell carcinoma (ESCC) and their utility in examining radiotherapy. We describe steps for generating ESCC-PDXs, four cycles of ionizing radiation treatments using X-ray on PDX, and evaluating radiosensitivity of PDXs. We then detail procedures for establishing and characterizing radioresistant organoids derived from PDX.
For complete details on the use and execution of this protocol, please refer to Liu et al.,1 Yang et al.,2 and Chen et al.3
Subject areas: Cancer, Health Sciences, Organoids
Graphical abstract
Highlights
-
•
Guide to ESCC PDX model construction, characteristic, and maintenance
-
•
Steps for using X-ray on PDX to perform four cycles of ionizing radiation treatments
-
•
Instructions for evaluating PDX radiosensitivity by RTV and tumor growth inhibition
-
•
Procedures to establish and characterize PDXOs derived from PDX
Publisher’s note: Undertaking any experimental protocol requires adherence to local institutional guidelines for laboratory safety and ethics.
Patient-derived xenograft (PDX) and organoids derived from PDX (PDXOs) are ideal pre-clinical models, which recapitulate the tumor heterogeneity. We provide the steps to establish PDX and PDXOs from patients with esophageal squamous cell carcinoma (ESCC) and their utility in examining radiotherapy. We describe steps for generating ESCC-PDXs, four cycles of ionizing radiation treatments using X-ray on PDX, and evaluating radiosensitivity of PDXs. We then detail procedures for establishing and characterizing radioresistant organoids derived from PDX.
Before you begin
Please take care of the following preparations.
-
1.
Prepare viable tumor tissues from ESCC patients without chemotherapy/radiotherapy and confirmed histopathologically.
-
2.
This protocol requires NSG mice (6–10 weeks of age), which should be purchased in advance.
-
3.
Perform the entire protocol under sterile conditions. And PDX passages and tumor implantation should be performed in the animal facility.
-
4.
Prepare the tools and materials before starting each one of the steps, specified in the “key resources table” and “materials and equipment” paragraph.
Our step-by-step protocol includes the whole process of establishing ESCC PDX and in vivo radiotherapy, and the establishment and characterization of in-depth radioresistant PDXO derived from PDX. Limitations and potential troubleshooting are also introduced. Specifically, we introduce the procedure of establishing, maintaining and validating ESCC PDX model; conduct ionizing radiation treatments using X-ray on PDX in vivo; evaluate radiosensitivity of PDX tumors; establish and characterize the radioresistant PDXOs derived from PDXs. Our protocol will be powerful tools for researchers with an interest in using PDXs and PDXOs to study tumor radioresistance, which is important for improving radiotherapy in cancer treatments.
Institutional permissions
Clinical sample collection should be after ethical approvals. Patients need informed consent. All human samples specified in this protocol were obtained following institutional guidelines approved by Chinese Academy of Medical Sciences Cancer Hospital. All animal studies require an approval by the Ethical Committee for the Use of Experimental Animals. Animal work in this protocol was performed according to protocols approved by the Ethical Committee for the Use of Experimental Animals at Chinese Academy of Medical Sciences Cancer Hospital.
Preparation of surgical instruments
Timing: 2 h
CRITICAL: Surgical instruments and materials must be sterile.
-
5.
Prepare dissecting scissors and tweezers, two sets each.
-
6.
Sterilize the surgical instruments in the autoclave.
-
7.
Sterilize gloves and equipment with 70% ethanol before use.
Commercial matrigel
-
8.
Thaw Matrigel matrix overnight (approximately 12 h) in a 4°C refrigerator before use.
-
9.
Prior to usage, mix the Matrigel by gently swirling the Matrigel bottle.
Note: Avoid introducing air bubbles.
-
10.
Keep Matrigel at 4°C and use within 1 week.
Note: Matrigel should be shipped with dry ice, store at −80°C until use.
Key resources table
| REAGENT or RESOURCE | SOURCE | IDENTIFIER |
|---|---|---|
| Antibodies | ||
| Rabbit polyclonal anti-KRT6A, dilution 1:1,000 | Proteintech | 10590-1-AP |
| Anti-GAPDH, dilution 1:1,000 | Abcam | Ab181602 |
| Anti-wide spectrum cytokeratin antibody, dilution 1:1,000 | Abcam | Ab9377 |
| Anti-Ki67, dilution 1:1,000 | Abcam | Ab15580 |
| Anti-human ANXA1, dilution 1:1,000 | Abcam | Ab214486 |
| Anti-cleaved-caspase 3 (Asp175) antibody, dilution 1:1,000 | CST | 9661 |
| Anti-mouse IgG, HRP-linked antibody, dilution 1:1,000 | CST | 7076 |
| Anti-rabbit IgG, HRP-linked antibody, dilution 1:1,000 | CST | 7074 |
| Biological samples | ||
| ESCC tumor samples | Linzhou Cancer Hospital | N/A |
| Chemicals, peptides, and recombinant proteins | ||
| Fetal bovine serum | CELL Technologies | 30070 |
| DMEM | Corning | 10-013-CV |
| G418 | Sigma | Cat# A1720 |
| Hygromycin B | Sigma | Cat# 400050 |
| Penicillin-Streptomycin | Gibco | Cat# 15140122 |
| Advanced DMEM/F12 | Gibco | 12634028 |
| RIPA lysis buffer | Beyotime | P0013D |
| Phosphate-buffered saline (PBS) | TransGen Biotech | FG701 |
| Penicillin/Streptomycin (10,000 U/mL) | TransGen Biotech | FG101 |
| 10% Paraformaldehyde fix solution | Beyotime | P0099 |
| Protease and phosphatase inhibitor cocktail | NCM Biotech | P002 |
| Collagenase IV | Gibco | 17104019 |
| Hyaluronidase | Sigma-Aldrich | H1115000 |
| DAPI | ZSGB-Bio | ZLI-9557 |
| EDTA | Amresco | 97061-022 |
| Matrigel | Corning | 356234 |
| DMSO | Sigma | D2650 |
| Hematoxylin | Amresco | 0701 |
| Eosin | Amresco | 0109 |
| Cryopreservation medium | New Cell & Molecular Biotech | C40100 |
| CryoStor CS10 | STEMCELL | 07930 |
| Critical commercial assays | ||
| PV-9000 immunohistochemistry kit | ZSGB-Bio | PV-9000 |
| DAB chromogenic kit | ZSGB-Bio | ZLI-9017 |
| PANO Multiplex IHC kit (7-color TSA-RM-24259) | PANOVUE | 10004100100 |
| Experimental models: Cell lines | ||
| L-WRN | ATCC | CRL-3276 |
| Experimental models: Organisms/strains | ||
| NSG mouse (female, 6 weeks of age) | IDMO | MPIdKO |
| Software and algorithms | ||
| Prism 8.0 | GraphPad Software | http://www.graphpad.com/ |
| ImageJ | NIH | https://imagej.nih.gov/ij/ |
| Other | ||
| X-ray irradiation system | Faxitron | MultiRad 225 |
| Falcon 40 μm cell strainer | Corning | 352340 |
| 50 mL centrifuge tube | Life Sciences | 430829 |
| 15 mL centrifuge tube | Life Sciences | 430791 |
| Dissecting scissors | Sigma-Aldrich | Z265969 |
| 12-well cell culture plate | Corning | 3512 |
| Primary tissue storage solution | BioGenous | K601005 |
| Surgical suture needles with thread | Beyotime | FS249 |
| Blocking solution | Beyotime | P0102 |
Materials and equipment
RIPA cell lysis buffer
Add 100 μL PMSF and 200 μL Protease and Phosphatase Inhibitor Cocktail into 10 mL 1× RIPA lysis buffer. Stored at −20°C for up to one month and at 4°C for up to one week.
Cryopreservation medium
Add 1 mL of DMSO to 9 mL of Fetal Bovine Serum. Use it right after it was ready.
Antigen retrieval solution
Take 12.11 g Tris and 3.72 g EDTA into deionized water, constant volume to one liter with deionized water after mix well and dissolve. Dilute ten-fold with ddH2O when using.
L-WRN conditioned medium
Culture L-WRN cells in 10 cm plate with DMEM culture medium, including 0.5 mg/mL G418, 0.5 mg/mL hygromycin B, 1% penicillin/streptomycin, and 10% FBS. Subculture L-WRN cells in culture medium without G418 and hygromycin B. When the cell density reaches 80%, remove the medium and add 10 mL fresh medium. After incubating the plates for 24 h, collect the medium and centrifuged at 1000 × g for 4 min. Filter the medium with 0.22-μm sterile filter, and stored at 4°C. Collect, centrifuge and filter the second and third batches of conditioned medium. Mix them with the first batch of medium and stored at −20°C.4
Esophageal Organoid Culture medium
| Reagent | Final concentration | Amount | Identifier |
|---|---|---|---|
| Advanced DMEM/F12 | 92% | 459.3 mL | Gibco, Cat# 12634028 |
| Glutamax (100×) | 1× | 5 mL | Gibco, Cat# 35050061 |
| HEPES (1 M) | 10 mM | 5 mL | Gibco, Cat# 15630080 |
| B27 supplement (50×) | 1× | 10 mL | Gibco, Cat# 17504044 |
| N2 supplement (100×) | 1× | 5 mL | Gibco, Cat# 17502048 |
| L-WRN conditioned medium | 3% | 15 mL | N/A |
| EGF (50 μg/mL) | 50 ng/mL | 500 μL | Gibco, Cat# PMG8043 |
| Nicotinamide (100 μM) | 10 nM | 50 μL | Sigma, Cat# 72340 |
| A83–01 (500 mM) | 500 μM | 50 μL | Tocris Bioscience, Cat# 2939 |
| SB202190 (100 μM) | 10 nM | 50 μL | Sigma, Cat# S7067 |
| Y27632 (50 μM) | 10 nM | 50 μL | Selleck Chemicals Cat# S1049 |
| Total | N/A | 500 mL |
Store at 4°C for up to two months.
Step-by-step method details
ESCC PDX model generation and maintenance
The step describes the process how to generate and expand PDXs from tumor samples of ESCC. PDX model generation and expand should be performed as described in Liu et al.,1 Yang et al.,2 and Chen et al.3
-
1.Collect the ESCC tumor tissue from surgery with pathology.
-
a.Accurately collect tissue containing only the tumor with sterile scalpel blade.Note: Avoid tumor tissues explore to air for too long.Note: Avoid environmental pollution and tissue cross-contamination.
-
b.Preserve primary tissue samples with pre-chilled primary tissue storage solution (2°C–8°C) for storage or transport.Note: The sample needs to be completely covered by the primary tissue transport preservation solution.CRITICAL: To preserve cell viability, tumor samples should be processed as soon as possible (i.e. within 4 h).Note: Team work between clinicians and researchers is crucial to make sure the samples in the best possible conditions.
-
a.
-
2.
Before entering the mouse facility, personal protective equipment should be put on, including sterile gown, hair net, mask and double gloves.
PDX tumor implantation
-
3.Subcutaneously implant surgically removed fresh patient tumor samples (F0 tumors) into the dorsal side of NSG mice for tumor expansion (F1 tumors).
-
a.Take three tumor tissues in different positions and fix them with formalin.
-
b.Cut the tumor into 3 mm × 3 mm x N (N less than 1.5 cm and more than 3 mm) strips for transplantation.
-
c.Remove necrotic tissue from inside the tumor with scissors and tweezers. Visual observation of the tumor section can preliminarily determine whether there is necrotic tissue. Necrotic tissue is usually grayish-white or dark in color, soft in texture, and distinctly distinguishable from surrounding normal tissue.
-
d.Organize the tumor strip.
-
e.Cut the tumor strips into 3 mm × 3 mm × 3 mm for transplantation.Note: Tumor tissue to be inoculated should not be too large, as it will lead to insufficient blood supply. Tumor tissue should not be shredded, as it will cause the inoculated tumor composition to be uneven.
- f.
-
g.For mice orthotopically implantation of ESCC tumor pieces, these steps should be followed.
-
i.Check the mouse and make sure the mice are normal (steady weight gain, lively movement and exploratory behavior, no obvious clinical symptoms).
-
ii.Spray alcohol for disinfection.
-
iii.Intraperitoneally injecting the ketamine-xylazine mix to anesthetize the female mouse.
-
iv.Shave the ventral area of the mouse.
-
v.Expose the 2 mm incision on the upper right back of the mice’s body with forceps.Note: Sterilized and PBS infiltrated with forceps. Once poked into the right posterior blood supply area, a channel was opened when the forceps were removed.
-
vi.Gently clamp the divided 3 mm × 3 mm × 3 mm tumor into the channel, pull out the tweezers, and gently push forward with the back of the tweezers.6Note: Do not crush the tumor. Make sure the scissors are in good condition, and ensure that the operators are meticulous and technically experienced.
-
vii.Close the wound using surgical absorbable suture.
-
viii.Stud earrings are marked and checked on the PDX registration form.
-
i.
-
a.
-
4.
Measure the volume of the PDX with calipers once a week to monitor tumor growth and using the formula as following: 0.5 × length (in mm) × width (in mm)2 (Figure 1).
-
5.After the F1 generation tumor reaches a volume of about 800 mm3, the mouse cervical vertebra is dislocated and the subcutaneous tumor is peeled off for next-generation PDX passage or cryopreservation (Figure 2).
-
a.Mice should be euthanized and be soaked in 70% alcohol.
-
b.Cut the skin on the bladder with one scissor and push open the skin of the chest and abdomen.
-
c.Use another scissor to dissect the skin around the tumor, cut off the fascia and take the tumor.
-
d.Remove the necrotic tissue from the tumor.
-
e.Follow step 3 to implant them again.
-
a.
Optional: Save the rest of the excised tumor pieces that are not implanted into new mice using cryopreservation media (containing FBS with 10% dimethylsulfoxide) followed gradient cooling. Cryopreserved tumor tissue can provide the original biological characteristics and molecular genetic information for future analytical experiments and comparative studies.
-
6.
Monitor tumor growth for approximately 60 days followed as step 4.
-
7.
Follow step 5 to passage/maintain PDX tumor.
Figure 1.

Tumor volume measurement of ESCC PDXs
(A) LZE6_A740, (B) LZE6_A741, (C) LXY-1, (D) LXY-2 PDX tumor volume.
Figure 2.

Patient-derived Xenograft Tumor
(A) Tumor-bearing F1 generation PDX mice.
(B) F1 generation tumor.
PDX histology characterization
Histology is useful to characterize PDX tumors and organoid morphology, as well as analyze protein expression in tumors and organoids. We characterize PDX tumor by hematoxylin-eosin staining. Protein expression and localization can be analyzed by immunohistochemistry and multiplex immunofluorescence.
Paraffin-embedded sections of PDX tumor
-
8.
Strip subcutaneous tumors of PDX mice.
-
9.
Identify the necrotic tissue that needs to be removed. This tissue is typically dry, blackened, or non-viable. Use sterile scissors to carefully cut away the necrotic tissue along the demarcation line between healthy and necrotic tissue.
-
10.
Fix tumor tissue overnight in 4% formaldehyde solution at 25°C.
-
11.Dehydration and embedding of tumor tissue.
-
a.Rinse tumor tissue with running water.
-
b.Immerse in gradient alcohol from low concentration to high concentration (30%–50% −70%–80% - 95%–100%) to dehydrate for 30 min each.
-
c.Place in xylene transparent for 30 min
-
d.Soaked in wax and buried.
-
a.
-
12.
Continuously cut a 4 μm thick thin section using the microtome, and carefully attach it to the glass slide.7
Note: Paraffin-embedded sections should be stored at room temperature.
Hematoxylin-eosin staining of PDX tumor
-
13.Dewaxing and hydration of tumor tissue.
-
a.Bake the sheets at 55°C for 3 h
-
b.Place them in xylene, soak them for 10 min and repeat three times.
-
c.Immerse in gradient alcohol (absolute ethanol - absolute ethanol - 95% ethanol - 80% ethanol - 70% ethanol) for 5 min each.
-
d.Rinse under running water for 5 min.
-
a.
-
14.Hematoxylin-eosin staining of tumor.
-
a.Put the slides in hematoxylin staining solution, stand for 5 min.
-
b.Rinse with running water.
-
c.Place the slides in 0.5% hydrochloride ethanol for 5 s, wash with running water.
-
d.Return to blue with ammonia for 3 min.
-
e.Rinse with running water.
-
f.Observe under the microscope to confirm normal coloration.
-
a.
-
15.Dehydration and mounting.
-
a.Soak in 70% and 80% ethanol for 5 min, respectively.
-
b.Put the slides in 95% ethanol eosin staining solution for 2 min.
-
c.Finally put it in absolute ethanol and let it stand for 5 min.
-
d.After dehydration, place in xylene for 1 min to make the sections transparent.
-
e.Add neutral gum dropwise to the glass slide and cover with a coverslip to mount.
-
f.After the gum is slightly dried, the name of the tissue is marked, observed under the microscope, and photographed and recorded (Figure 3).
-
a.
Figure 3.

H&E staining and multiplex immunofluorescence in the PDX tumor biopsies
(A) H&E staining.
(B) Merge image of biopsies staining pan-CK, Ki67, KRT6A and ANXA1.
(C) pan-CK staining.
(D) Ki67 staining.
(E) KRT6A staining.
(F) ANXA1 staining. Scale bar represents 100 μm.
Immunohistochemistry analysis of PDX tumor
-
16.
Get the paraffin-embedded sections of PDX tumor ready. Follow step 13 to perform dewaxing and hydration.
-
17.Elimination of endogenous peroxidases.
-
a.After tissue sections are hydrated, rinse 1 time with distilled water and 3 times with PBS for 5 min each.
-
b.Add 3% hydrogen peroxide dropwise to evenly coat the tissue sections, incubate them at room temperature for 30 min
-
c.Rinse with distilled water 1 time, and wash with PBS 3 times for 5 min each.
-
a.
-
18.Use high-pressure repair to retrieve antigen.
-
a.Pour the antigen retrieval solution (pH 9.0 EDTA antigen buffer) into the pressure cooker and heat over medium-high heat until boiling.
-
b.Place the slides in the repair solution and close the pressure cooker lid.
-
c.When the air pressure in the pot rises and the gas valve rotates, timer for 3 min.
-
d.Turn off the heat and open the air valve. When the pressure in the pot drops to normal, open the lid and cool naturally at room temperature.
-
a.
-
19.
Rinse 1 time with distilled water and 3 times with PBS for 5 min each.
-
20.
Add the blocking with 5% bovine serum working solution, incubate at room temperature for 30 min, and pour off the liquid.
-
21.Antigen-antibody reactions.
-
a.Add a certain dilution of primary antibody dropwise. Incubate overnight at 4°C.
-
b.Wash 3 times in PBS for 5 min each.
-
c.Incubation of secondary antibodies was performed using the PV-9000 immunohistochemistry kit (ZSGB-BIO).
-
d.The polymer adjuvant was added dropwise, incubated at room temperature for 20 min.
-
e.Wash in PBS 3 times for 5 min each time.
-
f.The horseradish enzyme-labeled anti-IgG polymer working solution was then incubated for 20 min at room temperature.
-
g.Wash 3 times in PBS for 5 min each.
-
a.
-
22.Color development was performed using the ZLI-9017 DAB chromogenic kit (ZSGB-BIO).
-
a.Prepare the chromogenic solution, add 1 drop of DAB concentrate to 1 mL of DAB substrate solution, mix evenly, protect from light, and store for later use.
-
b.The DAB working solution was evenly coated on the glass slide, the color development was closely observed.
-
c.The slide was rinsed with running water immediately after the color development was sufficient to stop the reaction.
-
a.
Note: Do not stain with DAB more than 10 min to avoid false positives, the reaction could also be tracked by using a microscope.
-
23.
Hematoxylin counterstained for 1 min.
-
24.
Enter the slides into the gradient alcohol (70% ethanol-80% ethanol-95% ethanol-100% ethanol I.-100% ethanol II) for 5 min each.
-
25.
After natural drying, neutral gum mounts.
-
26.
Observe under a microscope and take photos to record the results.
-
27.
Dehydrate 95% ethanol quickly for 2–3 s, and dehydrate absolute ethanol 3 times for 5–10 s each.
-
28.
Xylene is transparent 3 times for 1–2 min each time.
-
29.
The mount is mounted with a neutral resin.
-
30.
Observe under a microscope and take photographs of the results.
Multiplex immunofluorescence analysis of PDX tumor
Based on tyramide signal amplification technology and fluorescence covalent labeling, multiplex immunofluorescence can realize 3 to 6 colors of superimposed staining on the same tissue section through multiple rounds of iterative antibody "staining-elution" cycle.
-
31.
Get the paraffin-embedded sections of PDX tumor ready.
-
32.Dewaxing and hydration of slides.
-
a.Bake the slices in a 60°C oven for 2 h.
-
b.Place the slices in fresh xylene, soak for 5 min, and repeat 3 times.
-
c.Immerse in gradient alcohol (absolute ethanol - absolute ethanol - 95% ethanol - 80% ethanol - 70% ethanol) for 5 min each.
-
d.Sterilize the slices in water for 1 min. Repeat 3 times.
-
e.Dip slices in 10% neutral formalin for 10 min to prevent delamination.
-
f.Sterilize the slices in water for 1 min. Repeat 3 times.
-
g.Incubate sections with 1%–3% hydrogen peroxide for 5–10 min at room temperature to eliminate the activity of endogenous peroxidase.
-
h.Sterilize the slices in water for 1 min. Repeat 3 times.
-
a.
-
33.Use microwave method to repair antigen.
-
a.Place the deparaffinized hydrated sections in an antigen retrieval cassette and add a sufficient amount of 1× EDTA antigen retrieval buffer (pH 9.0).
-
b.Heat the antigen retrieval cassette in the microwave over high heat until it boils.
-
c.After boiling, adjust the low heat and maintain it for 10–15 min.Note: Replenish the antigen retrieval solution to prevent excessive evaporation and dry tablets.
-
d.Remove the antigen retrieval cassette and let it cool naturally to room temperature.
-
a.
-
34.
Sections are soaked with 1× TBST solution for 2 min and repeated 3 times.
-
35.
Remove any remaining lotion from the sections.
-
36.
Use a histochemistry pen to circle the sample area on the slide and add blocking solution dropwise to cover the sample area. Incubate for 10–30 min at room temperature with a slight shaking of moisture.
-
37.
Immerse the sections in 1× TBST solution for 2 min and remove the blocking solution from the sections.
-
38.
Add an appropriate amount of primary antibody solution dropwise to submerge the sample area. Incubate for 1 h at room temperature with a slight shaking or overnight at 4°C.
-
39.
Dip the sections with 1× TBST solution for 2 min and repeat 3 times.
-
40.
Remove any remaining TBST wash from the sections.
-
41.
Immerse the sample area with an appropriate amount of HRP conjugated anti-mouse and rabbit mixed secondary antibody solution dropwise. Incubate for 10–30 min at room temperature with a slight shaking of moisture.
-
42.
Dip the sections with 1× TBST solution for 2 min and repeat 3 times.
-
43.Fluorescent staining amplifies the signal.
-
a.Remove any remaining TBST wash from the sections.
-
b.Directly add an appropriate amount of prepared dye working solution (TSA fluorescent dye PPD520) dropwise to submerge the sample area.
-
c.Moisturize at room temperature and incubate for 10–15 min with slight shaking.
-
d.Dip the sections with 1× TBST solution for 2 min and repeat 3 times.
-
a.
-
44.Microwave repair noise reduction.
-
a.Microwave retrieval antigens followed as step 24.
-
b.Wash the slides with sterilized water 1 time.
-
c.Soak the sections in 1 × TBST solution for 2 min.
-
d.After the single staining is completed, additional staining is added.
-
a.
-
45.Stain the slides with DAPI.
-
a.Remove any remaining TBST wash from the sections.
-
b.Add an appropriate amount of prepared DAPI dye working solution dropwise and submerge the sample area.
-
c.Incubate for 10–20 min at room temperature with a slight shake.
-
d.Wash the sections with 1 × TBST solution for 3 min and 2 min in sterilized water.
-
a.
-
46.
To be sliced slightly dry, add 10–30 μL of enhanced antifade mounting medium dropwise.
-
47.
Add a coverslip and use a sealant to seal the edge to prevent the sample from drying out.
-
48.
Stained tissue sections are imaged in a fluorescence imaging device, observed, and interpreted (Figure 3).
In vivo radiosensitivity assays using X-ray with PDX models
This section describes the steps of precise X-ray irradiation on PDX models. The sensitivity of PDX mice to radiotherapy was judged by recording the tumor volume. Then the radiotherapy ineffective/ resistant group and effective/sensitive group were judged.
-
49.
PDX mice of F2-F3 generation weighing more than 20 g were selected, and the condition of the mice and tumor volume are observed and measured daily.
-
50.Radiation therapy is initiated when the xenograft grows to about 250 mm3 (Figure 4).
-
a.Six PDX mice corresponding to each patient sample are randomly divided into two groups.
-
b.MultiRad225 (Faxitron) X-ray irradiation is used with a total dose of 6 Gy and a dose rate of 3.5 Gy/min. Irradiated every other day for a total of 4 times.
-
c.Tumor size is measured and recorded every 2 or 3 days using vernier calipers, while mouse body weight is recorded.
-
d.Mice are sacrificed when tumor volumes reach 2000 mm3 or when the experimental endpoint is reached (day 30 counted from the start of radiotherapy).
-
e.Tumor volumes are measured with calipers and using the formula: 0.5 × length (in mm) x width (in mm).2
-
f.The subcutaneous tumor is peeled off and the dead tissue is removed.
-
g.Half of the tissue was frozen in a −80°C ultra-low temperature freezer in cryovials, and half was fixed with formalin to prepare paraffin sections.
-
a.
-
51.
Tumor growth curve and weight change curve are drawn after the radiation treatment, and corresponding statistical analysis was carried out.
Note: The radiosensitivity of PDXs is defined in terms of relative tumor volume (RTV) between the radio-treatment and vehicle-treated groups and the percentage of tumor growth inhibition (TGI [%]) at the end point. RTV is calculated as the mean of V1/V0 for mice in the radiotherapy group of each patient sample. V0 is defined as the volume at the beginning of radiotherapy, and V1 is the volume at the end of the treatment. RTV < 1 is defined as the answering group, and RTV > 1 is the no answering group. Tumor growth inhibition (TGI (%)) is used to evaluate responsiveness, which compares the change of tumor volume under different treatment conditions. TGI is calculated following the formula: TGI (%) = (RTVcontrol−RTVtreatment)/(RTVcontrol−RTVinitial) × 100. Specifically, RTVcontrol represents the RTV of the control group animals at the endpoint. RTVtreatment represents the RTV of the radio treatment group at the endpoint time. RTVinitial represents the initial RTV at the start time.
Figure 4.

MultiRad225 (Faxitron) X-ray irradiation on PDXs
(A) Flow chart of radiation therapy.
(B) Transient fixation of PDX mice.
(C) PDX mice are protected from infection with a customized sterile box.
(D and E) PDX mice are shielded from scattered X-rays by covering with a perforated lead sheet for protecting normal organs.
(F) Guiding the irradiation position targeting grafts on mice according to the light from the perforation.
Establishment and characterization of radioresistant PDXOs derived from PDXs
The section describes the steps that establishing PDXOs derived from PDXs according to radiotherapy sensibility. PDXOs can be used to perform in vitro experiments, including drug screening against PDXOs, genetic modification.
Separate cells from tumor tissues
-
52.
Harvest PDX tumor and remove necrotic area under aseptic conditions following step 5.
-
53.
The tumors are placed in 50 mL centrifuge tube with PBS. Wash upside down for 10 s.
-
54.
The tumor tissue is rinsed 20 times using RPMI 1640 medium.
-
55.
Cut the tissue into mud and transfer to a 100 mL conical tube.
-
56.Add tumor dissociation enzymes to 100 mL conical tube.
-
a.200 mg Collagenase IV.
-
b.50 mg Hyaluronidase.
-
c.100 mL advanced MEM/F12 medium.
-
a.
-
57.
Tumor tissue is digested for 30 min in a 37°C water bath.
-
58.
Cell suspension is subsequently filtered through a 40-μm cell strainer, and transfer tumor cells to 15 mL centrifuge tube.
-
59.
Centrifuge (3 min, 300 × g, 20°C) to pellet cells. Carefully aspirate supernatant.
-
60.
Wash twice with PBS.
-
61.
The cells are resuspended in warm PDXO culture medium and prepare 20,000 cells in a new 1.5 mL centrifuge tube.
Establishment of PDXOs and semi-floating culture of organoids
-
62.Inoculate organoid suspension into 12-well plate.
-
a.Place the 12-well plate for semi-floating culture and sterile 1,000 μL and 200 μL tips at 4°C for at least 10 min. Melting 1000 μL Matrigel on ice.
-
b.To inoculate 1 well, add 100 μL of thawed Matrigel and 900 μL of pre-chilled organoid growth medium to a centrifuge tube using a pre-chilled pipette tip, mix well and place on ice.
-
c.The cooled 12-well plate is placed on ice and add a mixture of 950 μL of Matrigel and Organoid Growth Medium to each well for seeding.
-
d.A mixture of 50 μL Matrigel and 50 μL pre-chilled organoid growth medium is added to 20,000 cells.
-
e.Blow up and down 5–8 times and mix gently to avoid bubbles.
-
f.Transfer the entire suspension to 1 well of 12-well plate containing a mixture of 950 μL of Matrigel and Organoid Growth Medium, stirring the mixture gently.
-
g.All other well follows steps c–e.
-
h.Cover the plate and place the 12-well plate on a shaker in a 5% CO2, 37°C incubator at 80 rpm.
-
a.
-
63.
Ten min after inoculation, the images are observed with a microscope (day 0 image). Then carefully place the Petri dish back into the incubator.
-
64.
Take photos of the culture wells every other day or at the desired time point to monitor the growth of the organoids (Figure 5). Carefully remove the old medium and replace it with an equal amount of new medium every 3 days. Organoids were split once every 5–10 days (Figure 6).
-
65.Maintaining and passaging PDXOs.
-
a.Collect Matrigel droplets from the well plate using pre-chilled medium on ice. The mechanical force is repeatedly pipetted many times for dissociation (Figure 7).Optional: You can also choose to use the Cell recovery solution to digest the Matrigel, so that the Matrigel is dissolved. The Matrigel in the supernatant is removed by centrifugation, and the Cell recovery solution has no obvious effect on the digestion of cell pellets.Note: Matrigel will become very soft at 4°C, and Matrigel can be dispersed after pipetting.
-
b.Centrifuge at 4°C to remove the Matrigel in the supernatant.
-
c.For passaging, organoids were collected from the plate and dissociated by incubation in TrypLE for 15 min at 37°C for subsequently passaging. The trypsinization process disrupted the spherical organoids into single cells.
-
d.After cell counting, single esophageal epithelial cells were seeded into fresh Matrigel at suitable ratios (1:3 to 1:10) to allow efficient outgrowth of new organoids.
-
e.Single esophageal epithelial cells (4000 cells/aliquot tube) were suspended in 500 μL CryoStor CS10 for Cryopreserving.
-
a.
-
66.Histomorphologic characterization of PDXOs.
-
a.Remove the culture medium carefully.
-
b.Add 500 μL pre-chilled medium into each well. Pipet up and down 3 times with a 1000 μL pipettor to disrupt the Matrigel mechanically.
-
c.Centrifuge at 4°C to remove the Matrigel in the supernatant and retain organoid precipitation.
-
d.Add 500 μL of 4% PFA to fix the pellet. Incubate overnight at 4°C.
-
e.Centrifuge at 3000 rpm for 10 min to remove the PFA.
-
f.Prepare 5 mL 5% embedding agarose. Liquefy embedding gel with boiling water.8
-
g.Resuspend the organoid pellet in 50 μL liquefied agarose and shake the tube to mix well.
-
h.Let stand at room temperature until the agarose is fully set.
-
i.Remove organoid blocks and cut into suitable cubes into the dewatering box.
-
j.Soaked in wax and buried.
-
k.Continuously cut a 4 μm thick thin section using the microtome, and carefully attach it to the glass slide.
-
l.Perform hematoxylin-eosin staining and immunohistochemistry analysis follow steps 13–30 (Figure 6).
-
a.
Figure 5.

The growth of the organoids
Tracking the growth of the organoids of Day 2, Day 4 and Day 6. Scale bar represents 50 μm.
Figure 6.

Histomorphologic characterization of ESCC PDXOs
(A and B) ESCC PDXOs image under phase contrast microscope. Scale bar represents 1 mm (A). Scale bar represents 100 μm (B).
(C) Histologic characterization of PDXOs by Hematoxylin-Eosin (H&E) staining. Scale bar represents 100 μm.
(D) ESCC PDXOs comprise differentiated squamous cell carcinoma cells featuring by expression of ANXA1 (immunohistochemistry), a marker of squamous cell differentiation. Scale bar represents 100 μm.
(E) ESCC PDXOs comprise poorly differentiated squamous cell carcinoma cells featuring by expression of Ki67 (immunohistochemistry), a marker of cell proliferation. Scale bar represents 100 μm.
(F) ESCC PDXOs featuring by expression of KRT6A (immunohistochemistry), a marker of squamous cell carcinoma cells. Scale bar represents 100 μm.
Figure 7.

Schematic diagram of collecting Matrigel droplets
Once cornified pearls form approximately 70%–80% of the organoids under microscope, remove the medium by gentle aspiration, then add pre-cooled passage buffer in the well to melt Matrigel, blow forcefully to disperse Matrigel droplets, and collect the mixture in a new 15 mL centrifuge tube for 5 min at 400 g at 4°C, then remove the supernatant by gentle aspiration.
Expected outcomes
This protocol is expected to establish Esophageal Squamous Cell Carcinoma Patient-Derived Xenografts and PDXOs for preclinical evaluation of radiosensitivity. PDX and PDXO models can simulate the tumor growth environment and characteristics in patients. These models can be used to evaluate the efficacy of different radiotherapy regimens on tumors, so as to optimize treatment strategies and improve treatment success. Drug susceptibility and resistance can be assessed by the models. By testing different radiotherapy drugs or combination treatment regimens, it is possible to screen out the drug combination with better efficacy for esophageal squamous cell carcinoma, which can provide a basis for personalized treatment. By observing the growth and response of tumors in the model, the pathogenesis, drug resistance mechanisms, and biological processes associated with radiotherapy can be studied in depth [1, 2, 3]. This helps to uncover the intrinsic nature of the disease, providing clues for the development of new therapeutics and targeted drugs.
Furthermore, our protocol can be used as an important tool before clinical trials to help evaluate the safety and efficacy of new treatment options and accelerate the clinical research process of new drugs. Based on the study and evaluation of the model, a more personalized treatment plan can be provided for each patient. By understanding the resistance of tumors to radiotherapy, treatment strategies can be adjusted to improve the treatment effect and survival rate of patients.
Limitations
There are several potential limitations to this protocol. First, good surgical skills are required for orthotopic implantations. Our protocol provides detailed steps to ensure that non-experts can acquire the mastery of surgical orthotopic implantation. However, basic surgical kills to suture and anatomize mice still should be learned before starting the protocol. In addition, none of immune system in NSG mice. Immune cells such as fibroblasts and syngeneic tissue infiltrating lymphocytes can be added into organoid medium to recapitulate the microenvironment. These coculture systems will enable the complex full diversity and physical architecture of the microenvironment.
Troubleshooting
Problem 1
Bleeding during the tumor transplantation. Related to PDX tumor implantation (during step 3).
Potential solution
Make sure bloodless during implantation. Avoid cut muscle to from pockets by using curved forceps for blunt dissection. Use cotton swab to put pressure on the blood vessel when bleeding occurs. To stop the bleeding, hold the pressure for at least 2 min for venous bleeding and at least 5 min for arterial bleeding.
Problem 2
No tumors formed. Related to the establishment of PDX (during steps 1–7).
Potential solution
Cut the tumors into pieces at 3 × 3 mm. And the tumor tissue must be fresh. Eliminate the necrotic part of tumor tissue.
Problem 3
The amounts of active PDXOs are limited. A large number of necrotic tissue debris are present (during steps 53–66).
Potential solution
First, the original PDX tumor quality should be guaranteed. Necrotic tissue from PDX tumor should not be cultivated. The organoid medium should be within its validity period. Organoids with high quality can be collected to passage subsequently in fresh Matrigel. The digestion time should not be too long.
Problem 4
No PDXO formation, related to the maintenance and passaging of PDXOs (during steps 66).
Potential solution
The PDX tumors need be fresh and well quality. Increased amounts of PDX tumor cell suspension can be collected to repeat the organoids development. Also, the poor quality of culture medium can impair PDXO growth. Optimized esophageal organoid medium (as detailed in materials and equipment setup) is used for the establishment of PDXOs. Proper storage conditions of components should be ensured. What’s more, the supplements should be added directly before usage.
Problem 5
PDXO pellet is cloudy and floating, related to the establishment of PDXO (during steps 53–65).
Potential solution
Incomplete Matrigel digestion may cause this problem. One approach is to prolong the digestion time. Another approach is to loosen organoids from residual Matrigel by resuspending the organoid pellets aggressively. Microbial contamination can also cause to the problem. Make sure the media and materials during the steps are sterile.
Resource availability
Lead contact
Further information and requests should be directed to the lead contact, Caihong Wang (wangch15@tsinghua.org.cn).
Technical contact
Questions about the technical specifics of performing the protocol should be directed to and will be answered by the technical contact, Shaosen Zhang (zhangss14@tsinghua.org.cn).
Materials availability
This study did not generate new unique reagents.
Data and code availability
This study did not generate a dataset or code.
Acknowledgments
This work was supported by the National Natural Science Foundation of China (no. 82203156 to S.Z. and no. 82103071 to C.W.), National Key Research and Development Program of China (2023YFC3503200 to S.Z.), and Beijing Hospitals Authority Youth Program (QML20230105 to C.W.).
Author contributions
S.Z. and C.W. wrote the manuscript and S.Z. made the figures. S.Z. and C.W. developed protocols. S.Z. designed and performed the experiments and analyzed the data.
Declaration of interests
The authors declare no competing interests.
References
- 1.Liu W., Miao C., Zhang S., Liu Y., Niu X., Xi Y., Guo W., Chu J., Lin A., Liu H., et al. VAV2 is required for DNA repair and implicated in cancer radiotherapy resistance. Signal Transduct. Target. Ther. 2021;6:322. doi: 10.1038/s41392-021-00735-9. [DOI] [PMC free article] [PubMed] [Google Scholar]
- 2.Yang X., Chen X., Zhang S., Fan W., Zhong C., Liu T., Cheng G., Zhu L., Liu Q., Xi Y., et al. Collagen 1-mediated CXCL1 secretion in tumor cells activates fibroblasts to promote radioresistance of esophageal cancer. Cell Rep. 2023;42 doi: 10.1016/j.celrep.2023.113270. [DOI] [PubMed] [Google Scholar]
- 3.Chen X., Cheng G., Zhu L., Liu T., Yang X., Liu R., Ou Z., Zhang S., Tan W., Lin D., Wu C. Alarmin S100A8 imparts chemoresistance of esophageal cancer by reprogramming cancer-associated fibroblasts. Cell Rep. Med. 2024;5 doi: 10.1016/j.xcrm.2024.101576. [DOI] [PMC free article] [PubMed] [Google Scholar]
- 4.Miyoshi H., Stappenbeck T.S. In vitro expansion and genetic modification of gastrointestinal stem cells in spheroid culture. Nat. Protoc. 2013;8:2471–2482. doi: 10.1038/nprot.2013.153. [DOI] [PMC free article] [PubMed] [Google Scholar]
- 5.William D., Mullins C.S., Schneider B., Orthmann A., Lamp N., Krohn M., Hoffmann A., Classen C.F., Linnebacher M. Optimized creation of glioblastoma patient derived xenografts for use in preclinical studies. J. Transl. Med. 2017;15:27. doi: 10.1186/s12967-017-1128-5. [DOI] [PMC free article] [PubMed] [Google Scholar]
- 6.Fischer S., Creytens D., Gijsels S., Descamps B., Lapeire L., Hendrix A., Sys G., De Wever O. Generation of post-surgical minimal residual disease models to investigate metastasis in soft tissue sarcoma patient-derived orthotopic xenografts. STAR Protoc. 2024;5 doi: 10.1016/j.xpro.2024.102863. [DOI] [PMC free article] [PubMed] [Google Scholar]
- 7.Bafna A., Lau P., Banks G., Nolan P.M. Harvesting mouse suprachiasmatic nucleus by vibrating microtome for diurnal transcriptome analysis. STAR Protoc. 2023;4 doi: 10.1016/j.xpro.2023.102618. [DOI] [PMC free article] [PubMed] [Google Scholar]
- 8.Karakasheva T.A., Kijima T., Shimonosono M., Maekawa H., Sahu V., Gabre J.T., Cruz-Acuña R., Giroux V., Sangwan V., Whelan K.A., et al. Generation and Characterization of Patient-Derived Head and Neck, Oral, and Esophageal Cancer Organoids. Curr. Protoc. Stem Cell Biol. 2020;53:e109. doi: 10.1002/cpsc.109. [DOI] [PMC free article] [PubMed] [Google Scholar]
Associated Data
This section collects any data citations, data availability statements, or supplementary materials included in this article.
Data Availability Statement
This study did not generate a dataset or code.