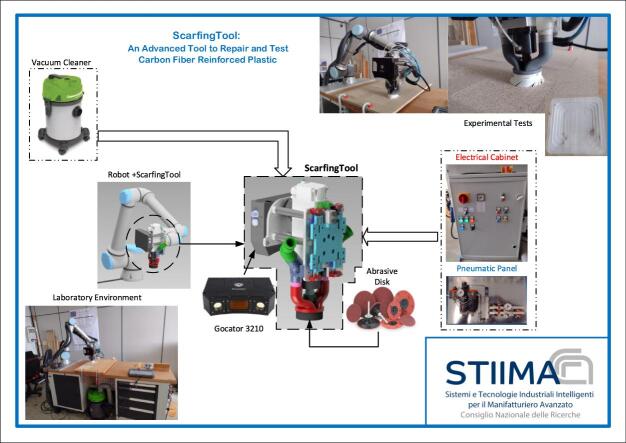
Graphical abstract
Keywords: Carbon Fiber Reinforced Plastic Repair, Scarfing Repair, Robotic Grinding, Robotic Sanding, Robotic Polishing
Abstract
Carbon Fiber Reinforced Plastic (CFRP) is going to assume more and more importance in mechanical and aerospace engineering in the near future. This is due to its intrinsic high lightness and resistance, if compared to traditional metallic materials. CFRP is characterized by a proper production and repair technology. The tool showed in this paper is conceived to repair and verify the restoration of such kind of material. Its application is limited to the first part of the repair process: in jargon the scarfing operation, otherwise called “defect removal”. This operation is similar to a high-speed grinding.
For this reason, the designed tool can be easily applied to other contexts, such as sanding, polishing or deburring.
Basically, the ScarfingTool is composed by a high-speed electro-spindle and a 3D smart snapshot sensor. This tool is conceived to be as light as possible to be installed on a light collaborative robot. Moreover, its specific design assures great compliance that, as needed, can be regulated. A high efficiency suction inlet completes the tool and guarantees a clean environment during operation. The scarfing process has already been dealt with in [1] to which the interested reader is addressed.
This work is licensed under CC BY-SA 4.0. (https://creativecommons.org/licenses/by-sa/4.0)
Specifications table
| Hardware name | ScarfingTool: Advanced Tool to Repair and Test CFRP |
|---|---|
| Subject area | Engineering and materials science |
| Hardware type | Mechanical engineering and materials science |
| Closest commercial analog | ATI's AOV-10 Axially-Compliant Orbital Sander [2]FerRobotics Easy Finishing Kit [3] |
| Open source license | Creative Commons Attribution-ShareAlike 4.0 International. To view a copy of this license, visit https://creativecommons.org/licenses/by-sa/4.0 |
| Cost of hardware | 18,180.20 € |
| Source file repository | https://doi.org/10.17632/h2zrpfx3pf.1 |
1. Hardware in context
The tool illustrated in this work deals with the repair process of CFRP. In particular the ScarfingTool focuses on the defect removal and the quality testing of aeronautical components. The interested reader can find useful information about the CFRP repair process in [4] and [5]. For our purpose the defect removal (i.e., the scarfing) can be compared to a light milling or, better, to a grinding operation.
This process has been addressed in different ways around the world. The Japan Aerospace Exploration Agency (JAXA) has been working with Shinmei Industry Co. to develop an Automated Scarf Sanding Device [6]. The device is attached to the composite airframe with ten “legs” and conducts the scarf sanding automatically by a grinding wheel. Nonetheless, the operation mode is quite similar to that of a mobile machine tool instead of a robot. The high precision of the operation is guaranteed by the increased stiffness of the machine and its intrinsic accuracy, so no quality testing system is required.
Lufthansa Technik created a mobile scarf joining robot during the “CAIRE” research project [7], [8].
In this case a big industrial robot is equipped with an electro-spindle and it acts as a milling machine. The robotic system is able to scan the surface to machine, to represent it in a 3D environment and to execute on it the scarfing by an end mill.
None of these are open hardware tools. Moreover, the issue is faced using huge and stiff hardware in both cases.
This work, starting from the same issue, deals with it differently. The proposed tool is collaborative, light, and damped to simulate a human arm. It is designed to operate in a laboratory or a workshop and can be adapted to be used in other situations. In addition to scarfing operation, it can perform polishing, cleaning, brushing, deburring, and finishing.
Due to its intrinsic compliance the tool trajectory (and thus the machined surface) does not have the same accuracy of that of the automatic machines described in [6], [7]. For this reason, the tool is equipped with a 3D snapshot sensor, to measure and evaluate the quality of the worked surface.
From this point of view, the ScarfingTool introduced here is more similar to the tools described in [2] (by ATI −Industrial Automation) or [3] (by Ferrobotics). However, they do not address the CFRP repair. Moreover, they are not open hardware tools, and they do not execute any measure or control quality test on the machined surface.
For all these reasons, the ScarfingTool is an innovative tool to execute light machining and testing on various materials in a laboratory environment.
A research article about this tool was published at the International Conference “SPIE Optical Metrology 2023”. See [9] for more details.
2. Hardware description
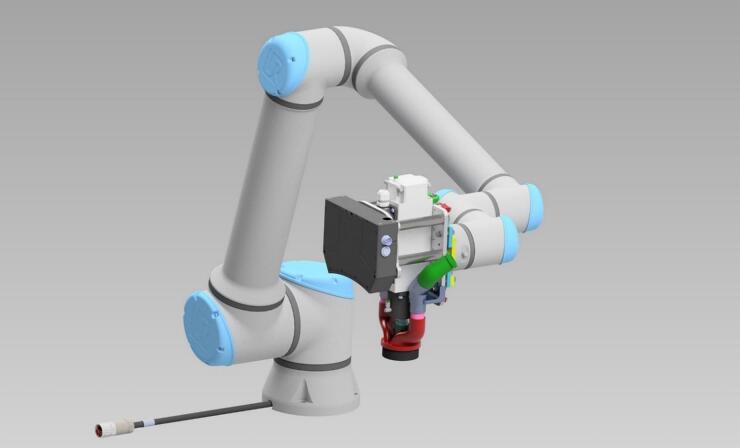
Fig. 1 illustrates a collaborative robot equipped with the ScarfingTool. The idea at the core of the ScarfingTool design is to implement a tool that would have been intrinsically “human friendly”; so the choice of a robot that is “collaborative” has been a direct result of this requirement. Under this assumption it is possible to share the robot workspace with a human operator. The ScarfingTool is designed to be as light as possible so that it can be installed on a light robotic arm as the UR10e [10]. The UR10e has been chosen because it has all the features required for the project, but any other collaborative robot can be used. The most stringent requirement is the payload, that must be at least 10 kg.
Fig. 1.
A Collaborative Robot (UR10e) equipped with the ScarfingTool.
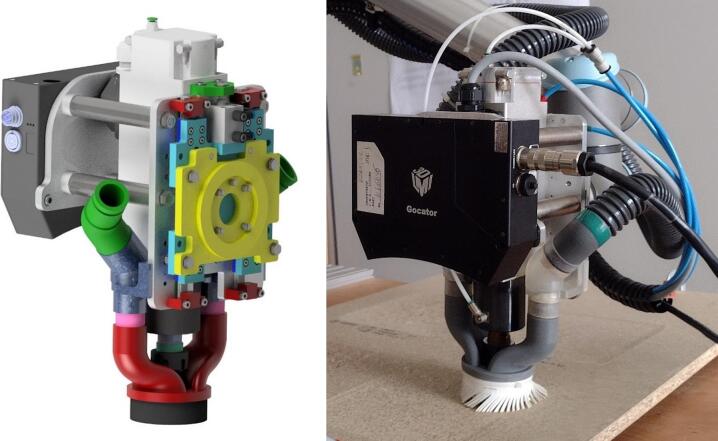
In Fig. 2 there is a close-up view of the ScarfingTool.
Fig. 2.
The ScarfingTool: CAD model (on the left) and real prototype (on the right).
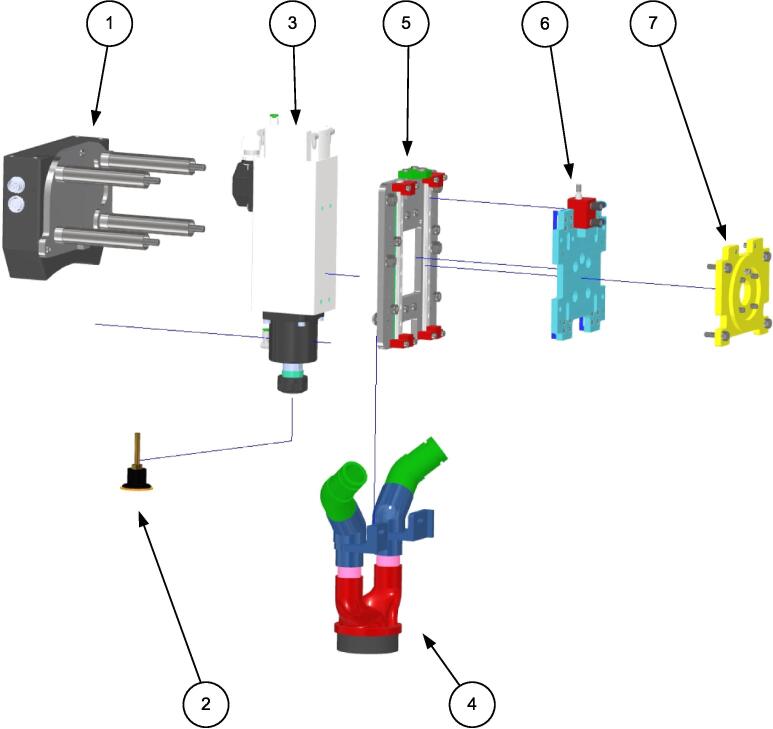
To better understand its operation, the ScarfingTool is disassembled in functional unities in Fig. 3. Table 1 lists them along with their functionalities.
Fig. 3.
ScarfingTool’s Functional Unities.
Table 1.
Functional Unities of the ScarfingTool.
| Number | Unity Name | Function |
|---|---|---|
| 1 | 3D Snapshot Sensor | Tool to test the final working |
| 2 | Backing pad with abrasive disk | Tool to remove material |
| 3 | Electro-Spindle | Main tool |
| 4 | Vacuum Inlet | Vacuuming of the process dust |
| 5 | PlateSpindle | Support for the electro-spindle |
| 6 | PlateUR10-Floating | Damping System |
| 7 | PlateUR10 | Connection to the robot flange |
These Functional Units are graphically represented in Fig. 3. See it for more details.
The ScarfingTool is characterized mainly by two items: the 3D Snapshot Sensor (1) and the Main Tool (3). These are the fundamental tools to machine and test.
The Main Tool drives the Backing Pad (2) to remove the material and the 3D Snapshot Sensor checks the surface quality at the end of the operation. Due to the large amount of dust during working, the Vacuum Inlet (4) vacuums it as near as possible to the abrasive disk: this guarantees a high efficiency in dust removal.
The plates 5 and 6 are connected each other by an air cylinder that ensures the correct damping force.
Plate 5 gets the rails, while plate 6 carries the carriages. So, plate 5 can slide towards plate 6, realizing an auxiliary axis with a stroke of 12 mm. This feature assures to work with a constant force acting along the tool axis (conventionally said as “Z” axis) even if the working surface has small variations in its height. These variations must be less than the auxiliary axis stroke. The constant force is guarantee by a low friction mechanical design of the auxiliary axis, exploiting the force supplied by compressed air action inside the pneumatic cylinder.
A significant added value in designing the tool is the capability of working with a constant force while compensating for height variations. This functionality simulates the behavior of the human arm in terms of flexibility and adaptability. In general, a scarfing solution cannot be developed without this feature and this issue would have been dealt with a solution like those in [6] or [8]. The damping system is a key factor to success in similar applications.
In fact, till now, the scarfing operation on CFRP has been performed manually by skilled workers. The ScarfingTool is an attempt to join humans and collaborative robots to execute a critical job simultaneously exploiting the precision and the resistance to fatigue typical of robots with the manual ability of human workers. The goal of the tool is to machine and reconstruct the machined surface. To this last aim, the ScarfingTool is equipped with a 3D snapshot sensor. The 3D sensor is not intended to increase the tool’s stiffness and accuracy, but to reconstruct the machined surface by a 3D digital model.
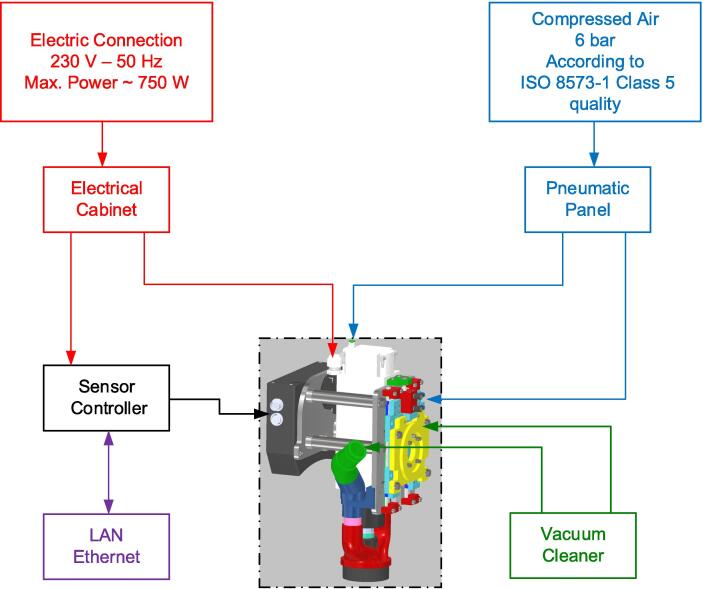
Fig. 4 illustrates the general structure of the ScarfingTool and its connections to the external supplies. To work with it some connections are needed:
-
•
An electrical supply, 230 V − 50 Hz;
-
•
An air pressure source, 6 bar, according the standard ISO 8573–1 Class 5 quality;
-
•
A vacuum cleaner or a connection to a centralized suction system;
-
•
A router to connect it to a LAN Ethernet.
Fig. 4.
Block Diagram of the ScarfingTool and its connections to external supplies.
The general requirements of the scarfing tool are summarized in Table 2:
Table 2.
Requirements for the ScarfingTool.
| N° | Requirements | Value |
|---|---|---|
| 1 | Rotating Speed | 3,000 ÷ 24,000 rpm |
| 2 | Base Speed | 12,000 rpm |
| 3 | Tool | Backing pad with abrasive disk |
| 4 | Tool diameter | 38 mm |
| 5 | Electrical supply | 230 V – 50 Hz |
| 6 | Pneumatic supply | 6 bar − ISO 8573–1 Class 5 |
| 7 | Field of view | 71.0 x 98.0 – 100.0 x 154.0 mm |
| 8 | Scan Rate | 4 Hz |
| 9 | Resolution (XY) | 0.060 mm |
| 10 | Repeatability (Z) | 55 µm |
| 11 | Total weight | < 10 kg |
Lines from 1 to 4 are mechanical specifications;
Lines 5 and 6 are specifications for connections to the mains;
Lines from 7 to 10 are specifications for the 3D Snapshot Sensor.
Line 11 specifies the weight, that is very important to install the ScarfingTool on a light collaborative robot.
As an open source hardware, the ScarfingTool design can be easily modified by simple edits on the 3D models supplied in this paper. Other changes are possible on its specifications.
For example, it is possible to exchange the electro-spindle power, or to choose another 3D sensor: for some application a Laser Line Profile Sensor could be better than a Snapshot Sensor.
To recap, the open source ScarfingTool provides the following advantages:
-
•
To face various light mechanical machining (scarfing, deburring, polishing, grinding…) on several different materials (CFRP, glass fiber, wood, particle board, metals…);
-
•
To be as light as possible to be installed on a light collaborative robot;
-
•
To be as compliant as possible to mechanically compensate the irregularities of the surface where it is working;
-
•
To perform machining, measuring and quality test at the same time and by only one tool.
In conclusion, because of the complexity involved, the scarfing operation on CFRP is still done manually in most cases: the ScarfingTool is an attempt to automate it by exploiting human–robot cooperation.
3. Design files summary
The table below summarizes all the design files. For what concern the mechanical design the classification follows this rule:
-
•
Prefix 0: The main assembly, i.e., the ScarfingTool;
-
•
Prefix with one digit (1-…): The sub-assemblies as illustrated in Fig. 3 (the numbers in the balloon are the same as the prefix);
-
•
Prefix with two digits separated by_(1_1-…): The parts. The prefix in the filename is the same as the ID in the Bill of Material Summary.
The mechanical design is done by Autodesk® Inventor® Professional 2022.
All the design files are supplied by Inventor files (.ipt,.iam).
The machined parts are supplied as STEP files (.stp) and the 3D printed components are supplied as STL files.
All the other files (Build and Operational Instructions, Hardware Descriptions, Electrical and Pneumatical diagrams…) are provided as Visio files (.vsdx).
| N° | Design file nameID | File type | Open source license | Location of the file |
|---|---|---|---|---|
| 1 | 0-ScarfTool7-Disk38 | CAD file(.iam,.STEP) | CC BY-SA 4.0 | https://doi.org/10.17632/h2zrpfx3pf.1 |
| 2 | 1-PlateGocator2 | CAD file(.iam,.STEP) | CC BY-SA 4.0 | https://doi.org/10.17632/h2zrpfx3pf.1 |
| 3 | 2-NortonDisk38 | CAD file(.ipt,.STEP) | CC BY-SA 4.0 | https://doi.org/10.17632/h2zrpfx3pf.1 |
| 4 | 3-TeknomotorSpindle-Disk38 | CAD file(.iam,.STEP) | CC BY-SA 4.0 | https://doi.org/10.17632/h2zrpfx3pf.1 |
| 5 | 4-VacuumDust7-Disk38 | CAD file(.iam,.STEP) | CC BY-SA 4.0 | https://doi.org/10.17632/h2zrpfx3pf.1 |
| 6 | 5-PlateSpindle3 | CAD file(.iam,.STEP) | CC BY-SA 4.0 | https://doi.org/10.17632/h2zrpfx3pf.1 |
| 7 | 6-PlateUR10-Floating1 | CAD file(.iam,.STEP) | CC BY-SA 4.0 | https://doi.org/10.17632/h2zrpfx3pf.1 |
| 8 | 7-PlateUR10-4 | CAD file(.iam,.STEP) | CC BY-SA 4.0 | https://doi.org/10.17632/h2zrpfx3pf.1 |
| 9 | 1_1-PlateGocator3 | CAD file(.ipt,.STEP) | CC BY-SA 4.0 | https://doi.org/10.17632/h2zrpfx3pf.1 |
| 10 | 1_2-BarUp1 | CAD file(.ipt,.STEP) | CC BY-SA 4.0 | https://doi.org/10.17632/h2zrpfx3pf.1 |
| 11 | 1_3-TubeBar2 | CAD file(.ipt,.STEP) | CC BY-SA 4.0 | https://doi.org/10.17632/h2zrpfx3pf.1 |
| 12 | 4_1-Curve45 | CAD file(.ipt,.STL) | CC BY-SA 4.0 | https://doi.org/10.17632/h2zrpfx3pf.1 |
| 13 | 4_2-BracketTube4 | CAD file(.ipt,.STL) | CC BY-SA 4.0 | https://doi.org/10.17632/h2zrpfx3pf.1 |
| 14 | 4_2b-BracketTube4_MIR | CAD file(.ipt,.STL) | CC BY-SA 4.0 | https://doi.org/10.17632/h2zrpfx3pf.1 |
| 15 | 4_3-Tube28-2 | CAD file(.ipt,.STL) | CC BY-SA 4.0 | https://doi.org/10.17632/h2zrpfx3pf.1 |
| 16 | 4_4-Vacuum Skirt38-Rev3 | CAD file(.ipt,.STL) | CC BY-SA 4.0 | https://doi.org/10.17632/h2zrpfx3pf.1 |
| 17 | 5_1-PlateSpindle4-NSK | CAD file(.ipt,.STEP) | CC BY-SA 4.0 | https://doi.org/10.17632/h2zrpfx3pf.1 |
| 18 | 5_5-Stop1 | CAD file(.ipt,.STL) | CC BY-SA 4.0 | https://doi.org/10.17632/h2zrpfx3pf.1 |
| 19 | 5_7-CylJig1 | CAD file(.ipt,.STEP) | CC BY-SA 4.0 | https://doi.org/10.17632/h2zrpfx3pf.1 |
| 20 | 6_2-PlateUR10-Floating1 | CAD file(.ipt,.STEP) | CC BY-SA 4.0 | https://doi.org/10.17632/h2zrpfx3pf.1 |
| 21 | 7_1-PlateUR10-4 | CAD file(.ipt,.STEP) | CC BY-SA 4.0 | https://doi.org/10.17632/h2zrpfx3pf.1 |
| 22 | Build Instructions – Rev1 | Visio file(.vsdx) | CC BY-SA 4.0 | https://doi.org/10.17632/h2zrpfx3pf.1 |
| 23 | Cabinet Drawings | Visio file(.vsdx) | CC BY-SA 4.0 | https://doi.org/10.17632/h2zrpfx3pf.1 |
| 24 | Electrical Diagram – Rev7 − EN | Visio file(.vsdx) | CC BY-SA 4.0 | https://doi.org/10.17632/h2zrpfx3pf.1 |
| 25 | Hardware Description | Visio file(.vsdx) | CC BY-SA 4.0 | https://doi.org/10.17632/h2zrpfx3pf.1 |
| 26 | Operational Instructions – Rev2 | Visio file(.vsdx) | CC BY-SA 4.0 | https://doi.org/10.17632/h2zrpfx3pf.1 |
| 27 | Pneumatic Diagram – Rev3 − EN | Visio file(.vsdx) | CC BY-SA 4.0 | https://doi.org/10.17632/h2zrpfx3pf.1 |
Legend:
Line 1 is the main assembly of the ScarfingTool (Prefix 0);
Lines from 2 to 8 represents the sub-assemblies (Prefix with one digit);
Lines from 9 to 21 are the single parts of each sub-assembly (Prefix with two digit separated by_);
Lines from 22 to 27 are diagrams illustrating the electrical and pneumatic systems, the build and operational instructions.
The paragraph below describes each design file. The first section is related to the mechanical design, while the second one describes the other issues.
| 0-ScarfTool7-Disk38: | Mechanical Design of the whole ScarfingTool; |
| 1-PlateGocator2: | Sub-assembly to install the 3D sensor, see Fig. 3; |
| 2-NortonDisk38: | Abrasive Disk with Backing Pad, see Fig. 3; |
| 3-TeknomotorSpindle-Disk38: | Electro-Spindle, see Fig. 3; |
| 4-VacuumDust7-Disk38: | Sub-assembly of the cuff to vacuum the process dust, see Fig. 3; |
| 5-PlateSpindle3: | Sub-assembly of the plate to install the Electro-Spindle; see Fig. 3; |
| 6-PlateUR10-Floating1: | Sub-assembly of the plate with the carriages, see Fig. 3; |
| 7-PlateUR10-4: | Sub-assembly of the plate for the flange of the robot, see Fig. 3. |
| 1_1-PlateGocator3 | Plate for the 3D sensor (machined part); |
| 1_2-BarUp1 | Threaded Bar; |
| 1_3-TubeBar2 | Spacer; |
| 4_1-Curve45 | Vacuum hose, 45° deg, 3D printed; |
| 4_2-BracketTube4 | Holder for the vacuum hose, 45° deg, 3D printed; |
| 4_2b-BracketTube4_MIR | Holder for the vacuum hose, 45° deg, mirrored, 3D printed; |
| 4_3-Tube28-2 | Coupling for the vacuum hose, 3D printed; |
| 4_4-Vacuum Skirt38-Rev3 | Cuff to vacuum the process dust, 3D printed; |
| 5_1-PlateSpindle4-NSK | Plate to install the ElectroSpindle, machined; |
| 5_5-Stop1 | End stroke stop that acts as a bumper, 3D printed; |
| 5_7-CylJig1 | Coupling for the cylinder rod, machined; |
| 6_2-PlateUR10-Floating1 | Plate with the carriages, machined; |
| 7_1-PlateUR10-4 | Plate for the flange of the robot, machined. |
Build Instructions: File Visio illustrating the mechanical constructions of the ScarfingTool. The same figures are reported in the paper, in the section “Build Instructions”. It is composed of 12 sheets.
Cabinet Drawings: File Visio with the mechanical design of the electrical cabinet. It represents the disposition of all the electrical components: external (switches, push-buttons) and internal (contactor, terminal blocks, drive…) It is composed of 4 sheets.
Electrical Diagram – Rev7 – EN: It is the electrical diagram to follow to wiring the whole system: either the electrical cabinet, either the connections between the devices. It is composed of 10 sheets.
Hardware Description: Schematic representation of the whole system and its internal and external connections. It is composed of 3 sheets with figures reported in the section: “Hardware Description”.
Operational Instructions – Rev2: File Visio that resumes the safety issues and other points about the operation of the ScarfingTool. The same figures are reported in the section: “Operation Instructions”.
Pneumatic Diagram – Rev3 − EN: It is the pneumatic diagram of the machine. It is composed of 3 sheets. It is useful to install the pneumatic system and it is related, in some points, with the electrical diagram.
3.1. Bill of materials
The General Bill of Material summary (BOM) is supplied as an Annex in the form of an Excel spreadsheet:
-
•
General_BoM-Rev2-EN.xlsx
The BOM is divided in 6 sheet: Mechanical, Electrical, Main_Cable, 3D Sensor, Pneumatics, Vacuum Cleaner. The General_BoM-Rev2-EN is uploaded on the Mendeley Data Repository.
4. Bill of materials summary
The Table below includes all the components necessary to build the mechanical part of the ScarfingTool, as described in Section 5.1. It is filled following the build instructions. So there are some rows that can include the same component more than once.
| N° | ID | Component | Quantity | Cost per unit – (€) | Total cost − (€) | Source of materials | Material type |
|---|---|---|---|---|---|---|---|
| 1 | 1.1 | PlateGocator3 | 1 | 170.00 | 170.00 | Metal (Machined) | |
| 2 | 1.2 | BarUp1 | 4 | 3.00 | 12.00 | Metal | |
| 3 | 1.3 | TubeBar2 | 4 | 10.00 | 40.00 | Metal (Machined) | |
| 4 | 1.4 | ISO 4032 M8 | 4 | smallware | Metal | ||
| 5 | 1.5 | ISO 4762 − M6x16 | 3 | smallware | Metal | ||
| 6 | 1.6 | Gocator 3210 | 1 | 16,000.00 | 16,000.00 | LMI Technologieshttps://lmi3d.com/ | 3D Sensor |
| 7 | 3.1 | ElectroSpindleTeknomotorCOM31400305Model: 3140-C-DBL-P-ER20-PR-AC-RH | 1 | 739.00 | 739.00 | https://www.teknomotor.com | Other |
| 8 | 5.1 | PlateSpindle4-NSK | 1 | 220.00 | 220.00 | Metal (Machined) | |
| 9 | 5.2 | ISO 4762 − M6x12 | 4 | smallware | Metal | ||
| 10 | 5.3 | NSK rail – PU series195 x 9 mm | 2 | 64.17 | 128.34 | https://it.rs-online.comRS Code:619–2414 | Other |
| 11 | 5.4 | ISO 4762 – M3x10 | 20 | smallware | Metal | ||
| 12 | 5.5 | Stop1 | 4 | 5.00 | 20.00 | Flexible 80A Resin by Formlabshttps://formlabs.com | 3D Printed Elastomer |
| 13 | 5.6 | ISO 4762 – M4x25 | 8 | smallware | Metal | ||
| 14 | 5.7 | CylJig1 | 1 | 25.00 | 25.00 | Metal (Machined) | |
| 15 | 5.8 | ISO 4762 – M5x20 | 2 | smallware | Metal | ||
| 16 | 6.1 | NSK carriage 30x20x9 | 4 | 60.34 | 241.36 | https://it.rs-online.comRS Code:619–2442 | Other |
| 17 | 6.2 | PlateUR10-Floating | 1 | 190.00 | 190.00 | Metal (Machined) | |
| 18 | 6.3 | Air Cylinder | 1 | 47.50 | 47.50 | https://www.festo.com/it ADVC-16–15-A-P | Other |
| 19 | 6.4 | Pneumatic Connector | 2 | 5.90 | 12.00 | https://www.festo.com/itQSMLV-M5-4-I | Other |
| 20 | 6.5 | ISO 4762 – M4x40 | 2 | smallware | Metal | ||
| 21 | 6.6 | ISO 4762 – M3x8 | 16 | smallware | Metal | ||
| 22 | 6.7 | ISO 7089 6 | 1 | smallware | Metal | ||
| 23 | 6.8 | ISO 4035 M6 | 1 | smallware | Metal | ||
| 24 | 0.1 | ISO 7089 8 | 4 | smallware | Metal | ||
| 25 | 0.2 | ISO 4032 M8 | 4 | smallware | Metal | ||
| 26 | 4.1 | Curve45 | 2 | 20.00 | 40.00 | Grey Resin V4by Formlabshttps://formlabs.com | 3D Printed Polymer |
| 27 | 4.2 | BracketTube4 | 1 | 20.00 | 20.00 | Grey Resin V4by Formlabshttps://formlabs.com | 3D Printed Polymer |
| 28 | 4.2b | BracketTube4_MIR | 1 | 20.00 | 20.00 | Grey Resin V4by Formlabshttps://formlabs.com | 3D Printed Polymer |
| 29 | 4.3 | Tube28-2 | 2 | 15.00 | 30.00 | Grey Resin V4by Formlabshttps://formlabs.com | 3D Printed Polymer |
| 30 | 4.4 | VacuumSkirt38-rev3 | 1 | 40.00 | 40.00 | Grey Resin V4by Formlabshttps://formlabs.com | 3D Printed Polymer |
| 31 | 4.5 | Skirt38 | 1 | 15.00 | 15.00 | Silicone Rubber | |
| 32 | 4.6 | O-Ring ø28x3 | 4 | smallware | Elastomer | ||
| 33 | 4.7 | O-Ring ø22x3 | 4 | smallware | Elastomer | ||
| 34 | 0.3 | ISO 7093 A ST 5 | 2 | smallware | Metal | ||
| 35 | 0.4 | ISO 4017 M5x16 | 2 | smallware | Metal | ||
| 36 | 7.1 | PlateUR10-4 | 1 | 130.00 | 130.00 | Metal (Machined) | |
| 37 | 7.2 | ISO 4762 – M6x12 | 4 | smallware | Metal | ||
| 38 | 7.3 | ISO 4017 – M6x25 | 4 | smallware | Metal | ||
| 39 | 7.4 | ISO2338 – 6 h8x14 | 3 | smallware | Metal | ||
| 40 | Total Smallware | 40.00 | smallware | Metal | |||
| Total Cost | 18,180.20 | ||||||
Legend:
Lines from 1 to 6 describe the components for the 3D Snapshot Sensor;
Line 7 is the Electro-Spindle (Main Tool).
Lines from 8 to 15 describe the support for the electro-spindle;
Lines from 16 to 23 refer to the damping system;
Lines 24 and 25 are smallware to connect the 3D Snapshot Sensor to the whole system;
Lines from 26 to 33 refer to the vacuum inlet;
Lines 34 and 35 are smallware to connect the vacuum inlet to the whole system;
Lines from 36 to 39 describe the connection to the robot flange.
The cost of smallware (blank fields in the table) is neglected. It is estimated in about 20.00 ÷ 40.00 €.
The “Stop1” bumper (5.5) is made by additive manufacturing using the Flexible 80 A Resin.
All the costs of additive manufactured parts are an estimate.
All the parts indicated as “Metal (Machined)” are machined in a mechanical workshop.
5. Build instructions
Build instructions are separated in two main sections: 5.1) mechanical instructions and 5.2) electrical instructions.
5.1. Mechanical Build instructions
The sequence for the mechanical assembly follows the main sub-assemblies’ diagram in Fig. 3. The numbers in balloons are used to identify the sub-assemblies in the whole procedure: they are referred to by round brackets. For example (1) refers to the 3D sensor. Number (0) refers to a component in the main assembly.
The sequence is organized as follow:
-
1.
The 3D sensor (1) is assembled;
-
2.
The Electro-Spindle (3) is attached to the PlateSpindle (5);
-
3.
The PlateSpindle (5) is assembled with the rails and the other accessories;
-
4.
The four carriages are inserted on the rail by sliding;
-
5.
The air cylinder is screwed on the PlateUR10-Floating (6);
-
6.
PlateUR10-Floating (6) is assembled on the carriages;
-
7.
The 3D sensor (1) is screwed on the PlateSpindle (5);
-
8.
The Vacuum Inlet (4) is installed on the PlateSpindle (5);
-
9.
PlateUR10 (7) is screwed on the robot’s flange;
-
10.
At this time, the whole assembled tool can be fixed, by screws, on the PlateUR10 (7).
As appear from the previous instructions, the PlateSpindle (5) plays an important role in the ScarfingTool working: it is the core where all the elements are attached.
5.1.1. Assembly of the 3D sensor
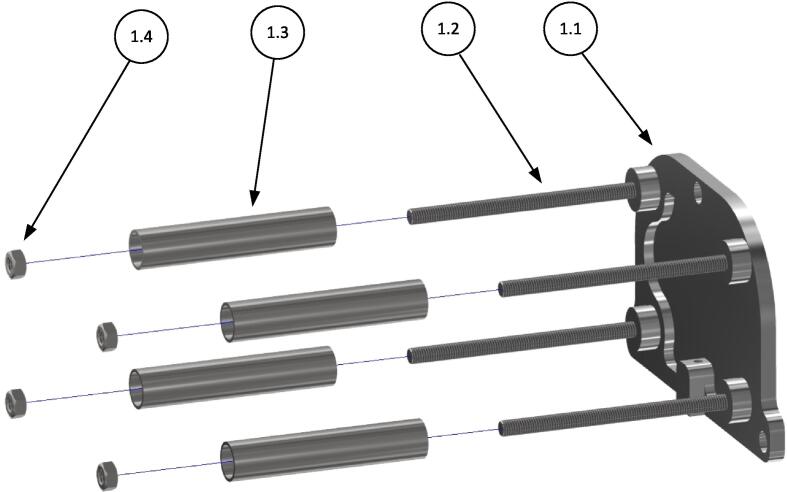
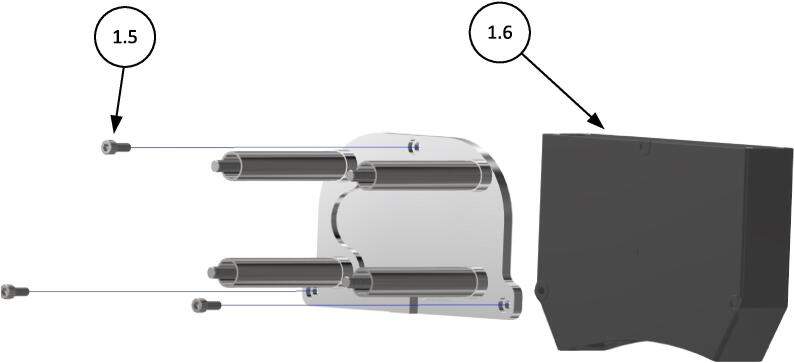
This step is split in two sub-steps. First, the support for the 3D sensor is assembled as in Fig. 5 and then the 3D sensor is installed on its support as in Fig. 6
Fig. 5.
Assembly the support for the 3D sensor.
Fig. 6.
The sensor is installed on its support.
Screw the four M8 bars (1.2) in the corresponding threaded holes in plate (1.1). Fix them by the locknut (1.4). The tubes (1.3) are used as spacers in the final assembly of the sensor to the ScarfingTool (see section 5.1.7 and Fig. 14).
Fig. 14.
The 3D sensor sub-assembly is installed on PlateSpindle.
Install the 3D sensor (1.6) on plate (1.1) by the three socket cap screws (1.5), see Fig. 6.
Design variant:
The procedure illustrated in the second sub-step is also useful to install another 3D sensor. In fact, with a small modification on the holes in plate (1.1) the 3D Snapshot Sensor can be substituted with another sensor: i.e., a 3D Line Profiler to scan a surface.
5.1.2. − assembly of the Electro-Spindle
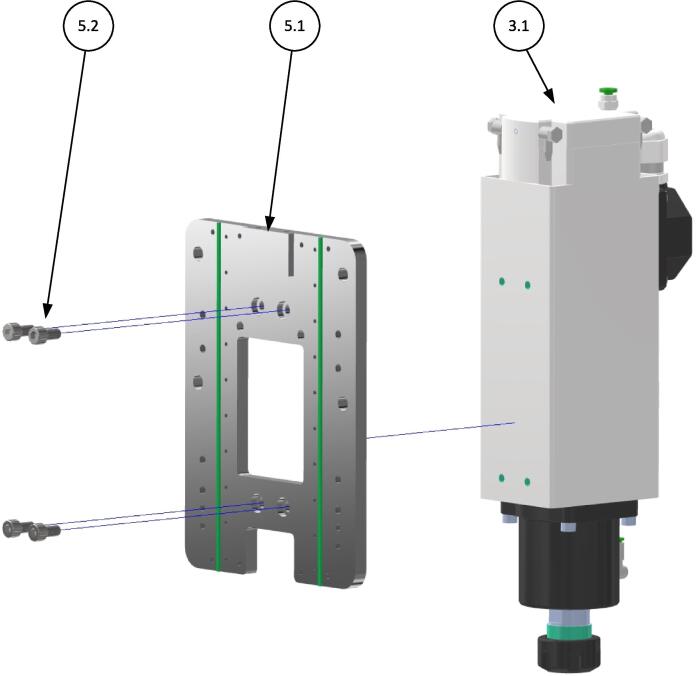
The Electro-Spindle (3.1) is installed on its plate (5.1) by socket cap screws (5.2), see Fig. 7.
Fig. 7.
The Electro-Spindle is assembled on its plate.
Pay attention to read the Electro-Spindle User’s Manual. In particular, at this time, avoid to install the tool on the spindle. The tool is the last component to be installed.
5.1.3. Assembly of the PlateSpindle with the rails
This step installs the rails, the bumpers and the cylinder attachment.
Please follow the instructions in sequence.
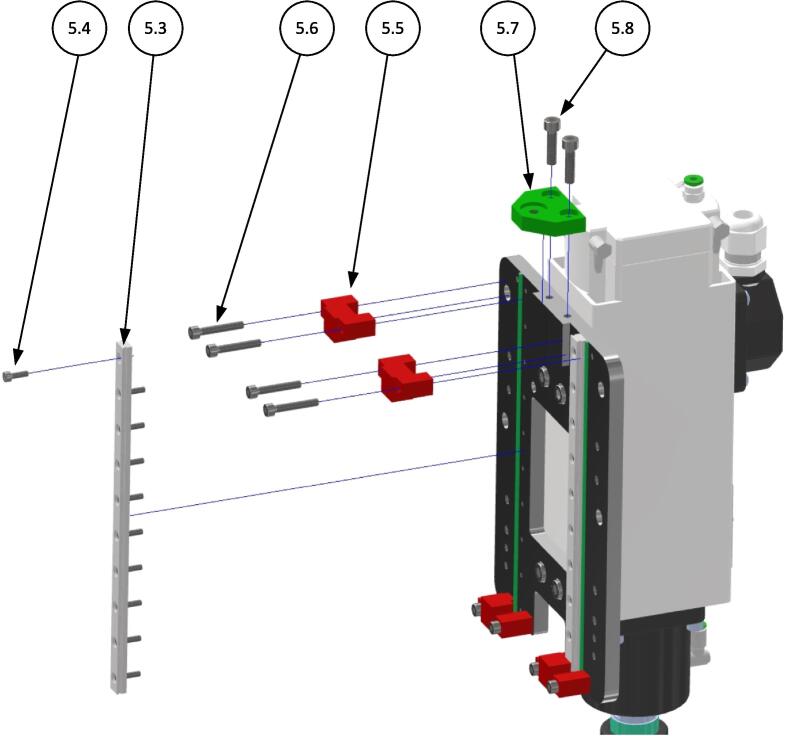
First install one rail (5.3) by socket cap screws (5.4) on plate (5.1). The mechanical guide (green in Fig. 8) is useful to guarantee a correct alignment. Then install the other one, in the same way.
Fig. 8.
Installations of rails and bumpers on PlateSpindle.
Caution:
Pay attention that at the end of rails installations, could be necessary to regulate one of them in terms of parallelism. It depends on the construction tolerances of plate (5.1). If tolerances of plate (5.1) (flatness and parallelism) are not so good, some adjustment are necessary.
Once installed the rails, the bumpers (5.5) can be installed by socket cap screws (5.6). At this time install only two bumpers, because the other side must be free to enter carriages.
At last, the attachment (5.7) is screwed by socket cap screws (5.8).
5.1.4. installation of the carriages
The rails and the carriages are a critical component for this application: a correct choice and installation are important to guarantee the lowest friction in the movement. The choice falls on NSK:
-
•
Cod. P1U090195SKN-PCT is the rail;
-
•
Cod. PAU09TRS is the carriage.
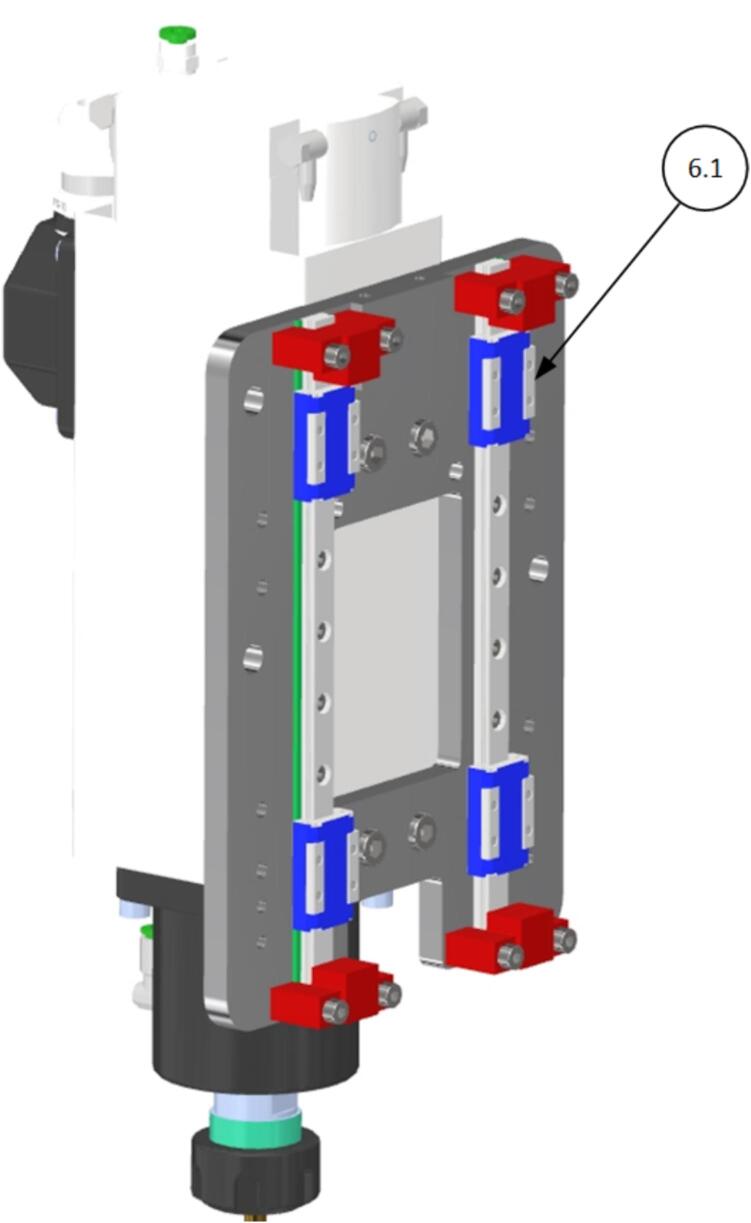
The four carriages (6.1) are inserted on their rails: two on the left and two on the right.
The carriage is supplied inserted on its fake (plastic) rail: see Fig. 9.
Fig. 9.
Rail and Carriage to be installed on PlateSpindle.
The insertion of the carriages on the real rail requires attention, because it is mandatory to align them with the rails using the plastic rail. Once the alignment occurs, slide them from the plastic rail to the real rail. The result is represented in Fig. 10.
Fig. 10.
Installation of the four carriages.
Fig. 11 illustrates the ScarfingTool and its main components at this level of integration.
Fig. 11.
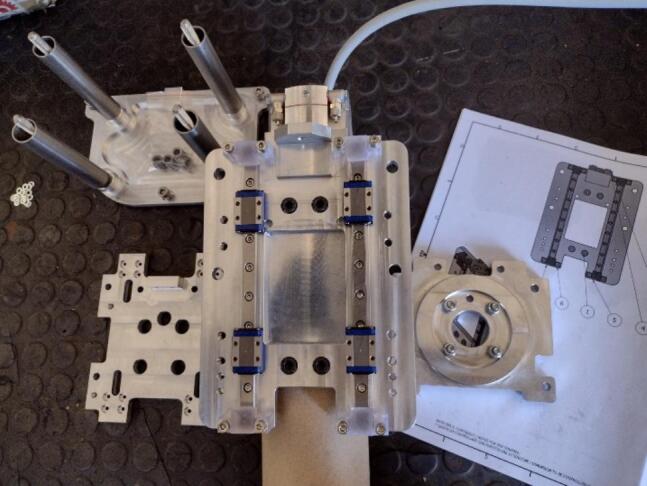
The ScarfingTool and its main components. The central piece is the PlateSpindle with the four carriages.
5.1.5. installation of the pneumatic cylinder
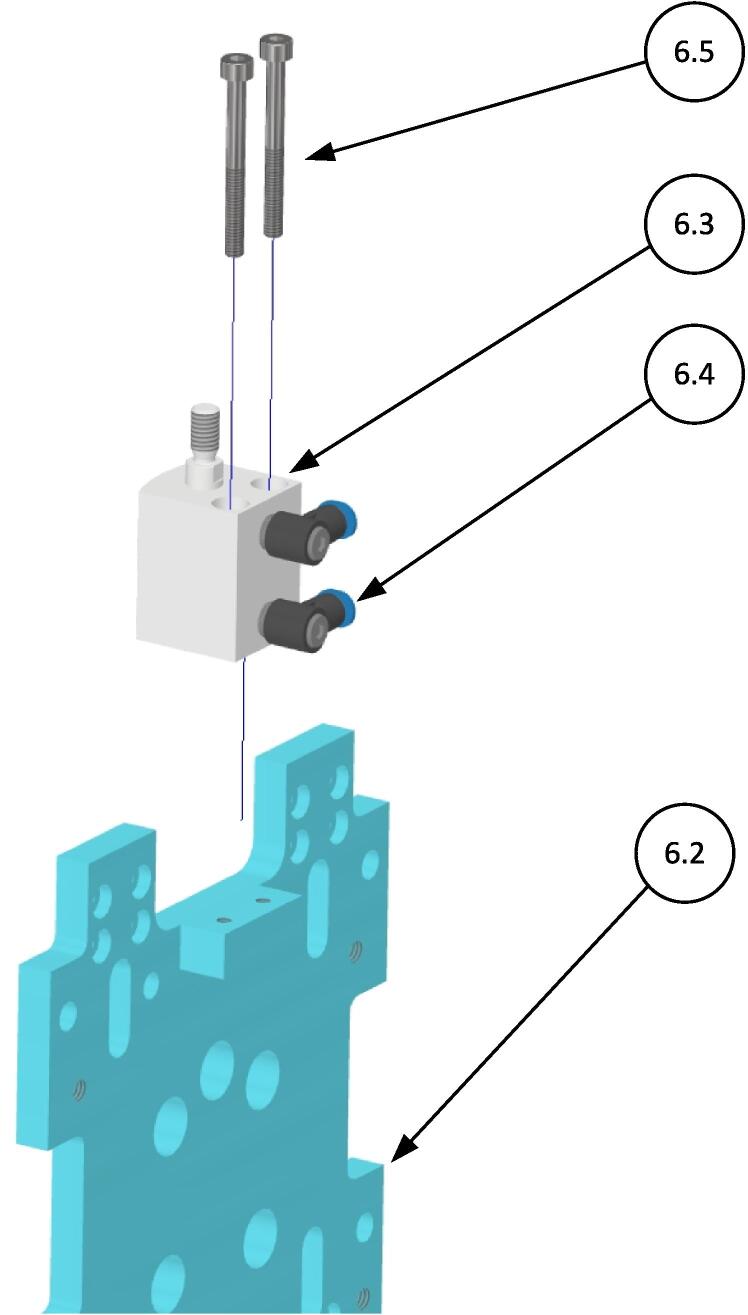
Now the cylinder (6.3) is installed on plate (6.2) by socket cap screws (6.5). Then two air connectors (6.4) are applied. Later these connectors will be connected to ø 6 mm air hoses. See Fig. 12.
Fig. 12.
Cylinder installation on PlateUR10-Floating.
5.1.6. PlateUR10-Floating – Installations on carriages
At this time, we get two main sub-assemblies (for reference see Fig. 3):
-
•
the PlateSpindle (5) with the electro-spindle and the rails installed;
-
•
the PlateUR10 (6) with the carriages and the air cylinder.
The next step it to install (6) on (5) as illustrated in Fig. 13.
Fig. 13.
The PlateUR10-Floating is installed on the four carriages.
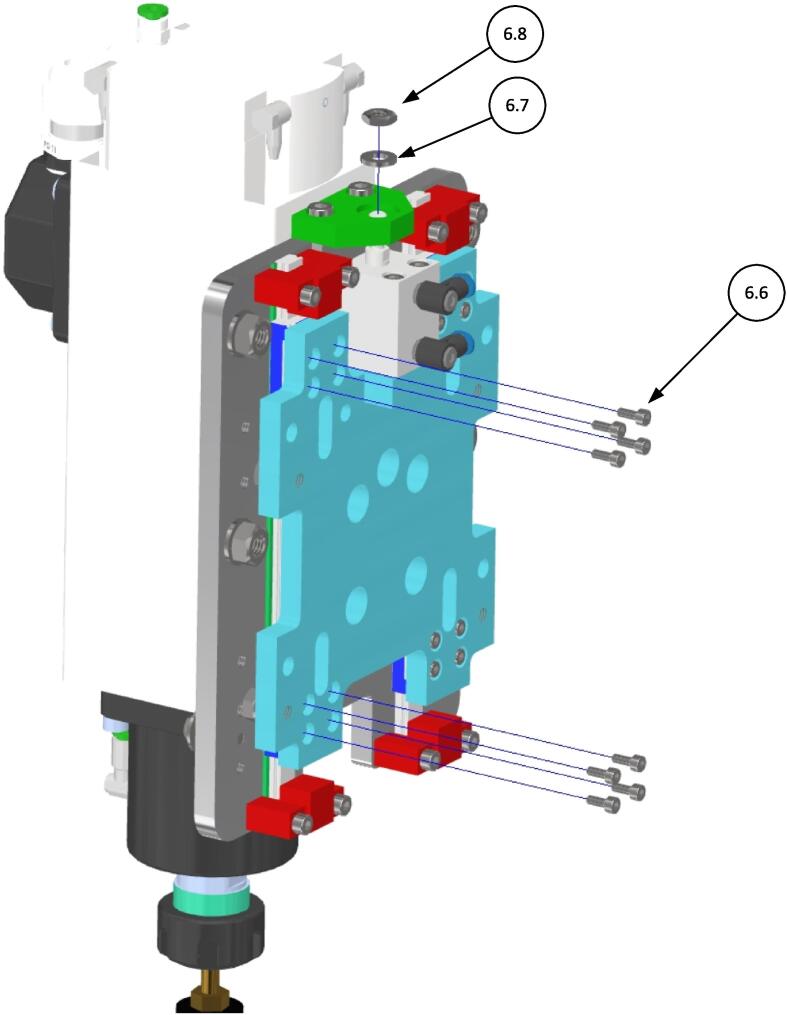
To do this connect first the piston rod to the cylinder attachment by washer (6.7) and nut (6.8). For now don’t tighten the nut, to allow some clearance to the rod. This clearance is good to align the carriages.
Then insert the socket cap screws (6.6) in their holes, to fix the carriages.
Tighten four screws a time (one carriage) and then verify the sliding of plate 6 with respect plate 5.
If the friction is too high (you feel it as the balls inside the carriages that scrape) try to unscrew a little bit the screws (6.6). This is due to a misalignment of the carriages with respect the rails.
If necessary don’t tighten enough the screws (6.6) and lock them by the threadlocker (i.e., Loctite Blue 243).
The sensibility of the operator is important in this regulation process.
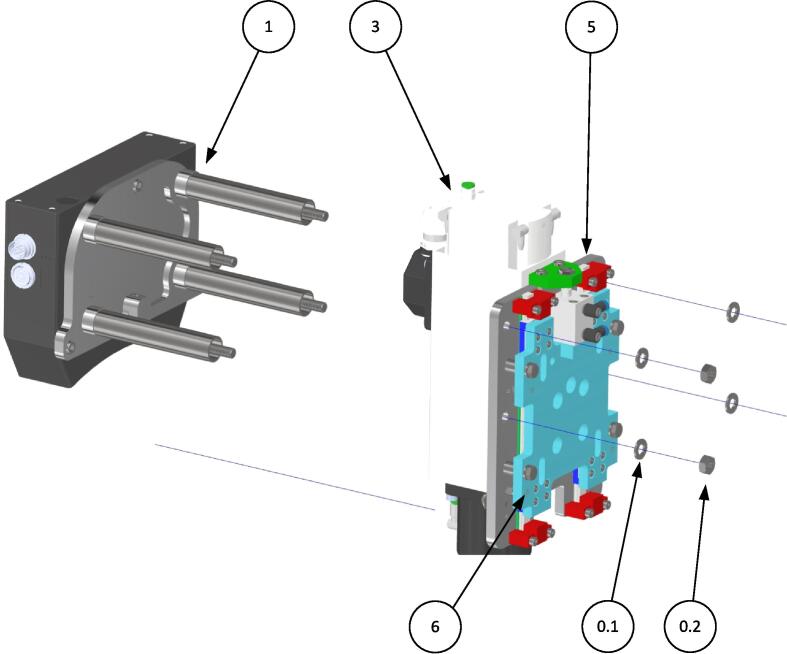
5.1.7. installation of the 3D sensor Sub-Assembly on the Electro-Spindle plate
Now it is the time to install the 3D sensor sub-assembly (1) on PlateSpindle (5). See Fig. 14.
To do this use washer (0.1) and nut (0.2). The four TubeBar2 (1.3) act as spacers.
5.1.8. Assembly of the vacuum Inlet
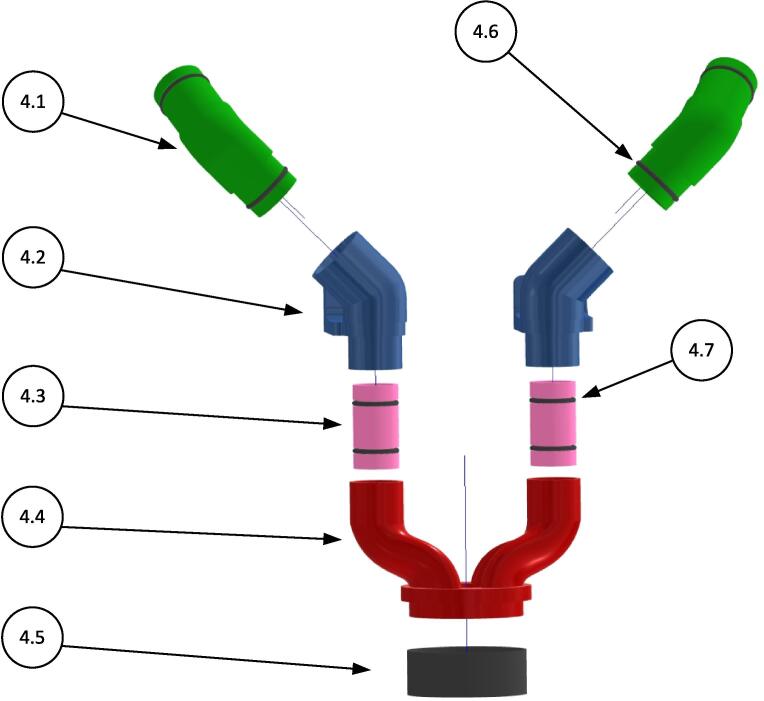
The exploded view of the vacuum system is represented in Fig. 15. A very efficient vacuum system is important in this kind of applications, because it guarantees a clean working environment.
Fig. 15.
Vacuum Inlet Assembly.
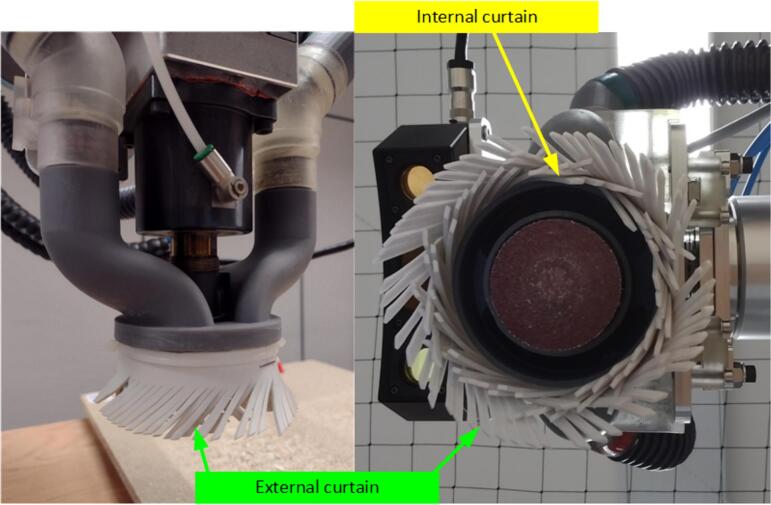
To achieve this goal the most important feature is to vacuum the dust as close as possible to the abrasive disk. With this concept in mind a skirt is included, in the form of its support, called VacuumSkirt38 (4.4) and two counter wrapped curtains (called Skirt38), represented by block (4.5) in Fig. 15. They are made by a strip of silicone rubber with a lot of 45°degrees fringe. To assure the maximum efficiency the fringes of one curtain are oriented on the left, the others on the right. This part is handmade, cutting the strips from a sheet of silicone rubber (thickness 1,5 mm), and then realizing all the fringes by scissors.
All the components in Fig. 15 are plug-in. The sealing is assured by the O-Rings (4.6) and (4.7).
The skirt is placed in its seat by a staple.
In Fig. 16 (on the right) the two curtains are clearly identifiable.
Fig. 16.
A close-up view of the vacuum skirt.
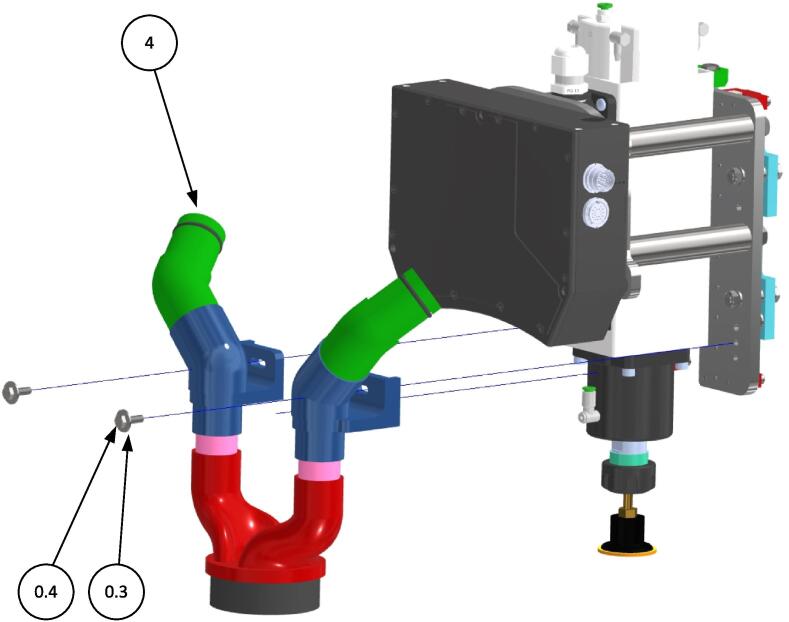
In Fig. 17 the vacuum system is installed on PlateSpindle (5) by washer (0.3) and screw (0.4).
Fig. 17.
The vacuum system is installed on PlateSpindle.
5.1.9. Installation of the PlateUR10 (7) on the robot’s flange
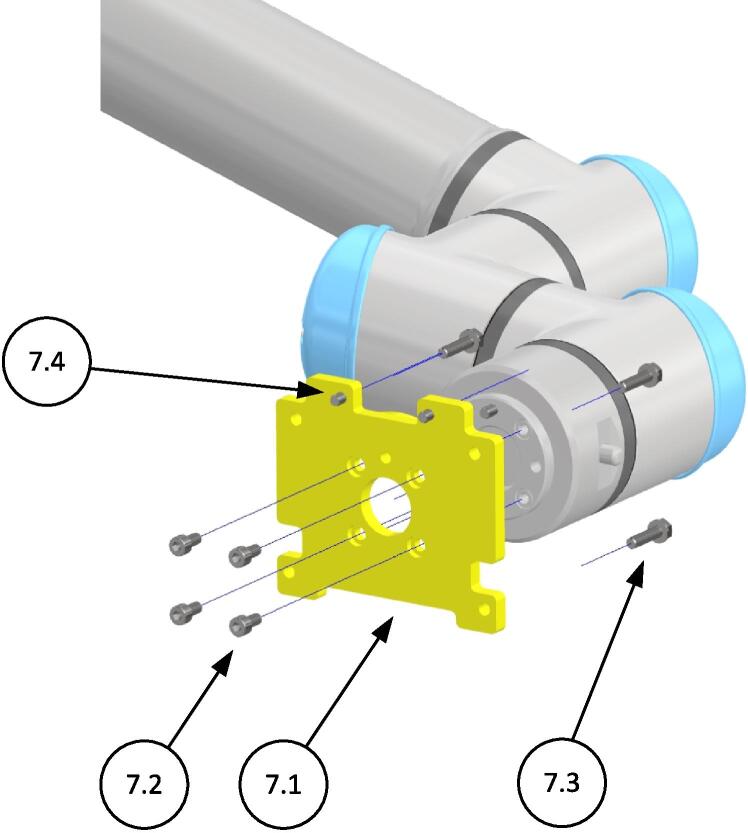
Now the ScarfingTool is assembled. The remaining steps aims to install it on the robot. To get this, first the connecting plate (7.1) is installed on the robot’s flange and then the ScarfingTool is screwed to it.
Fig. 18 illustrates how to install PlateUR10 (7.1) to the robot’s flange. It is centered by pins (7.4) and fastened by screws (7.2).
Fig. 18.
The PlateUR10 is installed on the robot wrist.
Screws (7.3) connect the ScarfingTool.
Design variant: Here PlateUR10 (7.1), as the name suggests, is customized on the UR10e robot by Universal Robot [10]. Editing the design of this plate it is possible to install the ScarfingTool on another robot, without modifying any other component.
5.1.10. The ScarfingTool is installed on the robot
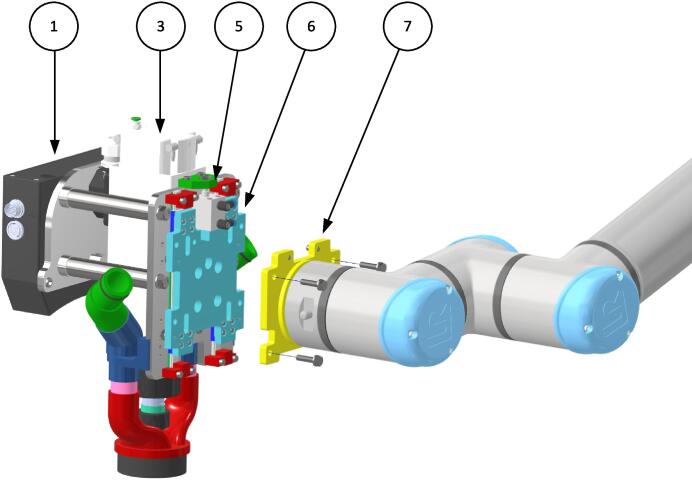
The ScarfingTool is finally installed on the robot in Fig. 19. The four bolts (7.3) fix it to the robot’s flange.
Fig. 19.
Final assembly of the ScarfingTool: Plate 7 is the interface to customize the tool on a specific robot.
The aim of the figure is to show that this is the main interface to assemble the ScarfingTool on the robot.
5.2. Electrical Build instructions
For what concern the assembly of the electrical parts refer to the Electrical Diagrams:
-
•
Electrical Diagram-Rev7.vsdx (Visio File)
-
•
Electrical Diagram-Rev7.pdf (the same file, in pdf format)
-
•
Cabinet Drawings.vsdx (Visio File)
-
•
Cabinet Drawings.pdf (the same file, in pdf format)
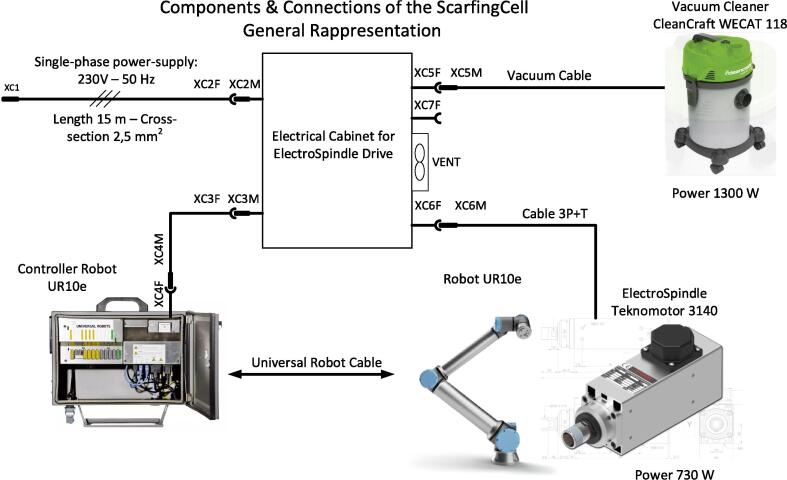
Fig. 20 represents the general diagram of the Scarfing Tool, with the Electrical Cabinet, the Robot and its Control System, the vacuum Cleaner and all the connectors and connections between them.
Fig. 20.
General Diagram of the ScarfingTool.
For a more detailed representation the annexed file Electrical Diagram-Rev7.pdf illustrates the electrical diagram.
In particular:
-
•
Page 1 is the diagram of the power circuits, with contactors, plugs for external tools, EMI filter and the Inverter for the Electro-Spindle;
-
•
Page 2 and Page 3 are the diagram of the auxiliary circuits, with the low voltage power supply and the safety relay by Pilz;
-
•
Page 4 represents the connections of the Inverter;
-
•
Page 5 is a Table for the speed selection of the ElectroSpindle by manual push-buttons, using the multistep functionality;
-
•
Page 6 represents the cable connecting the Electrical Cabinet to the Robot Controller;
-
•
Page 7 illustrates the connection of the electro-valve and the air pressure switch.
Fig. 22 and Fig. 21 represent the external views of the Electrical Cabinet. They illustrate the placement of the electrical components: switches, plugs and connectors. The reported label is the same as that reported in the electrical drawings.
Fig. 22.
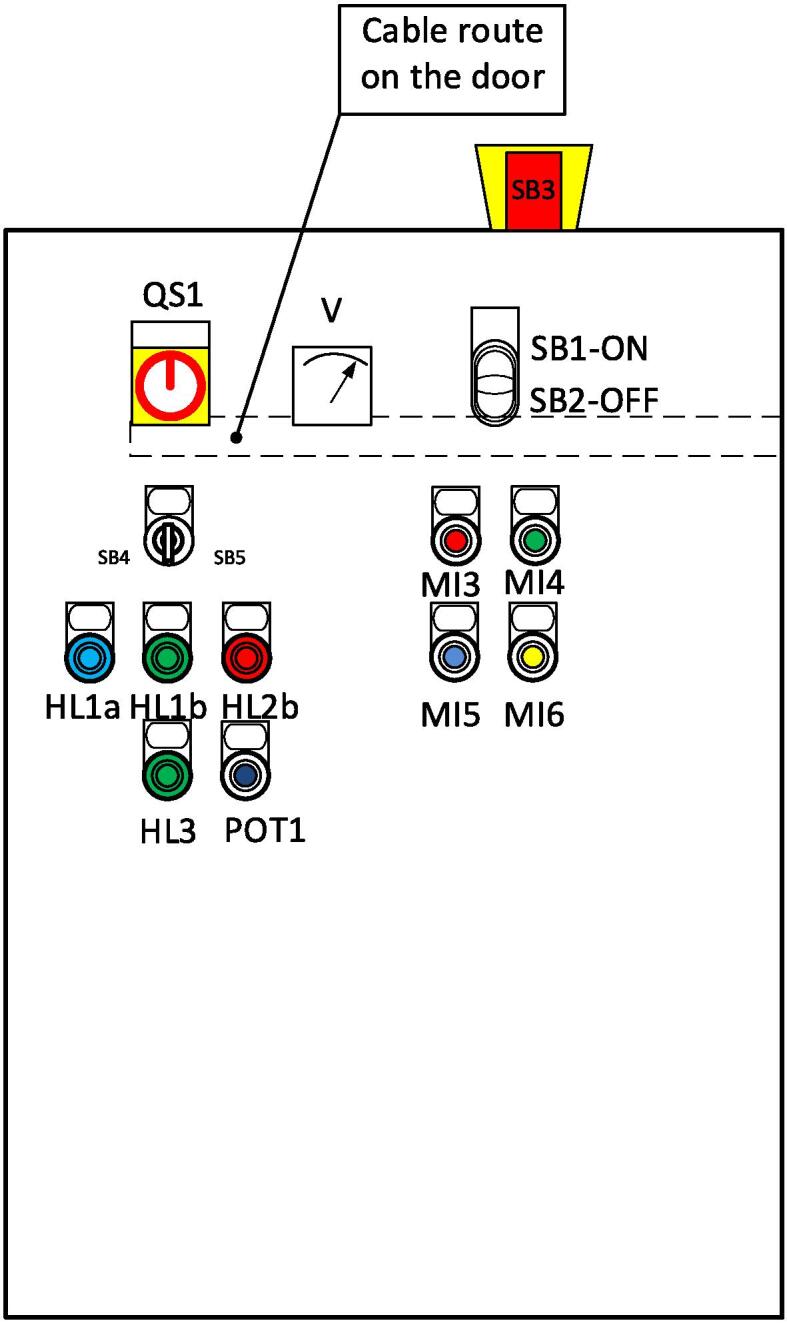
External view of the Electrical Cabinet – Front View.
Fig. 21.
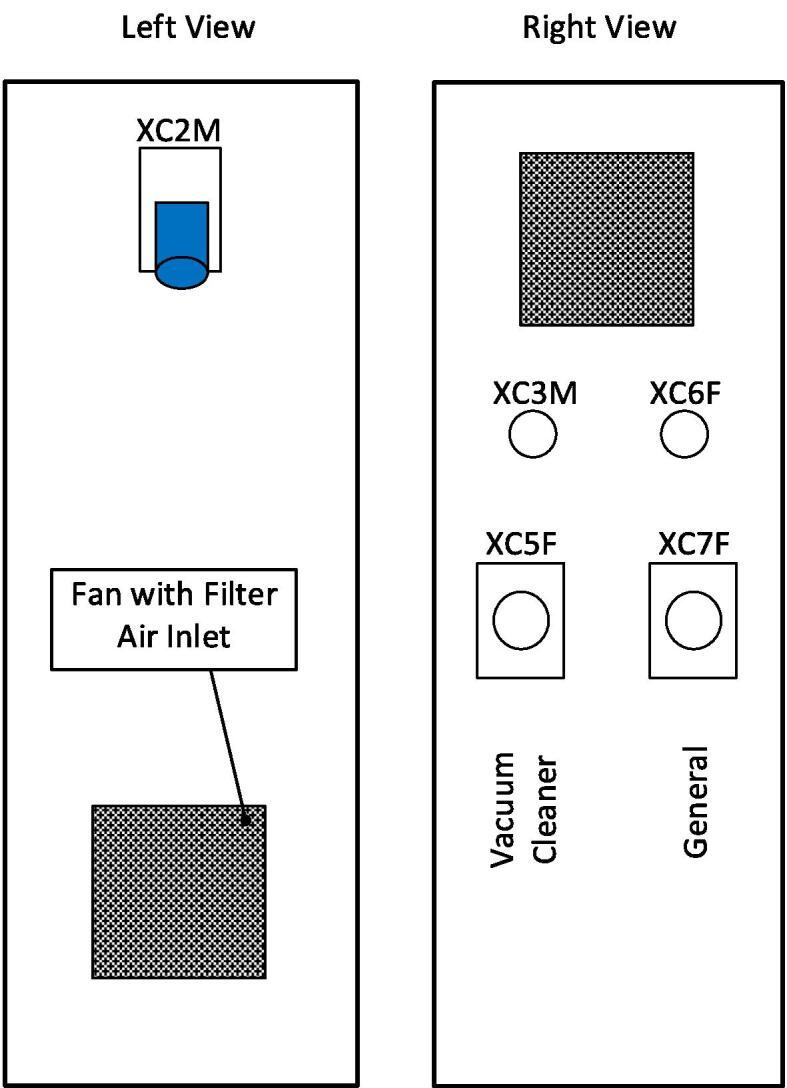
External view of the Electrical Cabinet – Left and Right View.
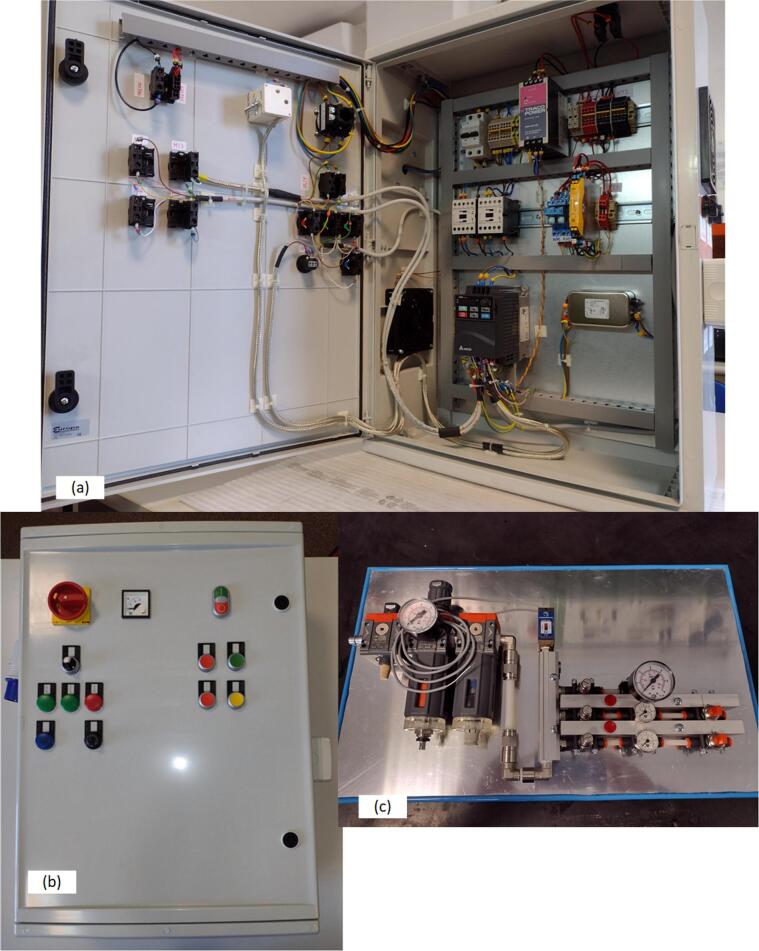
Fig. 23a illustrates the internal view of the electrical cabinet after wiring. In the door, it is possible to see the analog signal cables covered by a braiding sleeve of copper to protect the analog signals from electro-magnetic interference (EMI). Another precaution used in the wiring process to guarantee a right electro-magnetic compatibility is to separate signal cables from power cables. Moreover, the cross between them is realized at 90° deg.
Fig. 23.
Picture of the Internal View of the Electrical Cabinet (a), External Front View (b) and the Pneumatic Panel (c).
Fig. 23b is the embodiment of the drawing in Fig. 22.
Fig. 23c represents the Pneumatic Panel, as drawn in the pneumatic diagram.
6. Operation instructions
The ScarfingTool has been designed with the idea to be used in a robotized application. The manual operation is not allowed. So, it must be installed on a robot, as indicated in Section 5. Then all the connections illustrated in Fig. 4 are necessary: Electric Power, LAN, Air pressure and vacuum must be supplied.
Start-Up.
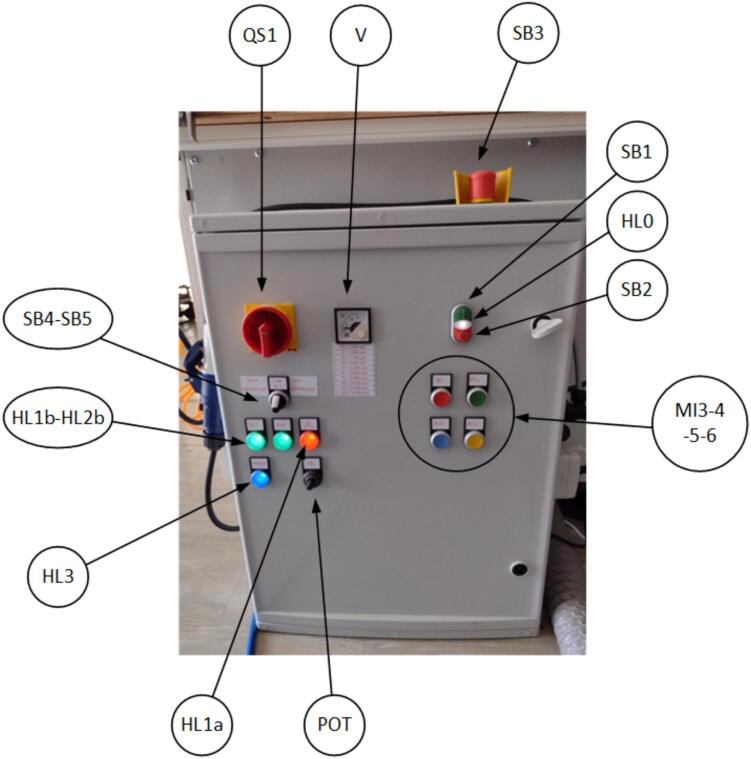
After having done all the indicated connections, the steps to operate the ScarfingTool are (see Fig. 24):
-
1.
Open the shut-off valve of the air pressure;
-
2.
Turn ON the Main Isolator Switch QS1; after this the light HL0 is ON;
-
3.
Turn ON the Robot: so doing it is possible to give power to the drive (by relay KA1);
-
4.
Push SB1 to give power to the spindle drive. Now the ScarfingTool is ready to rotate; this condition is indicated by light HL1b and HL2b (green);
-
5.
By SB4 you can rotate the spindle without vacuuming, while by SB5 the spindle rotates and the vacuuming is ON; in both cases the light HL3 is ON (blue);
-
6.
Now it is possible to regulate the speed of the spindle. Two possibilities are given: by the potentiometer POT or by push-buttons MI3-MI4-MI5-MI6 (multistep method). The speed is reported in the Table 3 and Table 4.
Fig. 24.
Switches and Push-Buttons to operate the ScarfingTool.
Table 3.
Speed selection: multistep method.
| MI6 = 4 | MI5 = 3 | MI4 = 2 | MI3 = 1 | ||||
|---|---|---|---|---|---|---|---|
| N° | rpm | Hz | Master Frequency | OFF | OFF | OFF | OFF |
| 1 | 3,000 | Par 05.00 = 50 | 1st speed | OFF | OFF | OFF | ON |
| 2 | 6,000 | Par 05.01 = 100 | 2nd speed | OFF | OFF | ON | OFF |
| 3 | 9,000 | Par 05.02 = 150 | 3rd speed | OFF | OFF | ON | ON |
| 4 | 12,000 | Par 05.03 = 200 | 4th speed | OFF | ON | OFF | OFF |
| 5 | 15,000 | Par 05.04 = 250 | 5th speed | OFF | ON | OFF | ON |
| 6 | 18,000 | Par 05.05 = 300 | 6th speed | OFF | ON | ON | OFF |
| 7 | 21,000 | Par 05.06 = 350 | 7th speed | OFF | ON | ON | ON |
| 8 | 24,000 | Par 05.07 = 400 | 8th speed | ON | OFF | OFF | OFF |
| 9 | 9th speed | ON | OFF | OFF | ON | ||
| 10 | 10th speed | ON | OFF | ON | OFF | ||
| 11 | 11th speed | ON | OFF | ON | ON | ||
| 12 | 12th speed | ON | ON | OFF | OFF | ||
| 13 | 13th speed | ON | ON | OFF | ON | ||
| 14 | 14th speed | ON | ON | ON | OFF | ||
| 15 | 1,500 | Par 05.14 = 25 | 15th speed | ON | ON | ON | ON |
Lines from 1 to 8 set the electro-spindle speed with a step of 3,000 rpm. The speed selection is done by push-buttons MI3, MI4, MI5, MI6;
Lines from 9 to 14 are not assigned and are reserved to future developments;
Line 15 is a low speed running mode (only for test purpose).
Table 4.
Speed selection: potentiometer method.
| 1 | 1 V=2,400 rpm |
| 2 | 2 V=4,800 rpm |
| 3 | 3 V=7,200 rpm |
| 4 | 4 V=9,600 rpm |
| 5 | 5 V=12,000 rpm |
| 6 | 6 V=14,400 rpm |
| 7 | 7 V=16,800 rpm |
| 8 | 8 V=19,200 rpm |
| 9 | 9 V=21,600 rpm |
| 10 | 10 V=24,000 rpm |
Conversion between Volt and rpm scale.
Alternatively, it is possible to turn ON and OFF the spindle by the robot’s teach pendant. This condition is revealed by the light HL1a (red).
To do this, and referring to the UR10e robot controller, the connection to the output C01 must be execute.
See the Electrical Diagram – page 4 for more information.
The electro-spindle speed can be set by an analogue value between 0 and 10 V. The analog value is the output of the potentiometer “POT1” in Fig. 21. All the speed between 2,400 and 24,000 rpm are possible.
Shut-Down.
To shut-down the spindle simply turn the rotating switch SB4-SB5 in its central position. Now the light HL3 is OFF.
If a safety condition is needed the drive must be de-energized: to do that push the button SB2. As a consequence, the lights HL1b and HL2b are OFF. In this condition and only in this condition the spindle is safety stopped and service operations can be performed on it.
When the job has finished remember to turn OFF the robot and then the main switch QS1. DO NOT reverse this sequence because it would cause a wrong robot stop (also the robot is supplied by QS1).
At last close the shut off valve of the compressed air.
Emergency Stop.
If something goes wrong push the emergency stop SB3. Now the spindle’s drive is stopped according the International standard EN/ISO 13,850 Stop Category 0. This condition is confirmed by the switching off of lights HL3, HL1b and HL2b.
According the electrical diagram supplied also the robot executes a safety stop.
Safety Issues.
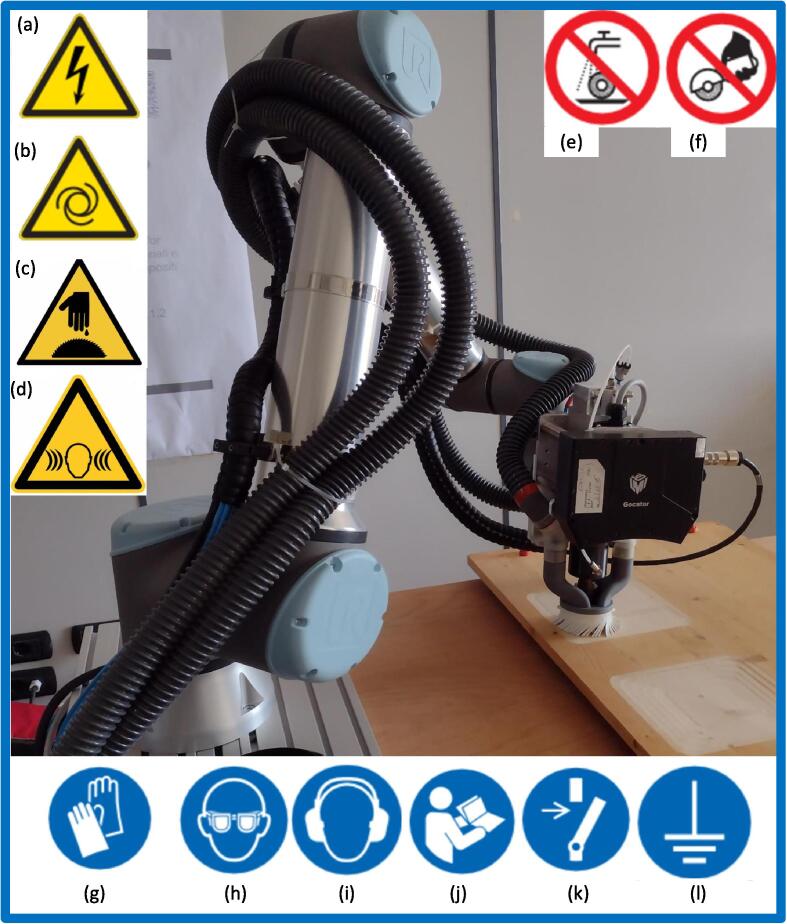
Safety concerns are illustrated in Fig. 25.
Fig. 25.
Safety issues about the ScarfingTool.
The main hazards are:
a) Dangerous Voltage.
The robot and the ScarfingTool are supplied by a dangerous voltage of 230 V – 50 Hz. All the common safety rules about electrical equipment must be implemented when working with the ScarfingTool.
b) Automatic Starting.
Due to its intrinsic nature the robot starts working automatically. Consider this circumstance when working with it.
c) Risk of cutting injury.
The abrasive disk spins at high speed. It can reach about 24,000 rpm with the selected electro-spindle. Pay attention to don’t approach it when active. There is the possibility of serious injuries.
d) Dangerous Noise.
Noise is generated, due to the outflow of compressed air. Wear protection for your ears.
The main prohibitions are:
e) Do not execute wet machining.
The tool is not conceived to work in wet conditions, especially for the presence of the 3D sensor. If it is the case of wet machining supplementary precautions must be adopted.
f) Do not use the electro-spindle by hand.
The ScarfingTool is designed to work installed on a robot. Due to its mass and to the process reaction forces it is not suitable to be operated by hand.
The Personal Protective Equipment (PPE) required are:
g) Protective gloves to handle CFRP panels and to operate on abrasive disks;
h) Safety glasses must always be worn when the ScafingTool is working; there could be splinters emission during material removal. There is also the risk that the abrasive disk detaches from the backing pad.
i) Earmuffs are needed due to the noise generated by compressed air and vacuuming.
For service operations:
j) Always read the operating instruction of each component of the ScarfingTool;
k) Disconnect the machine from the mains.
Always:
Due to the presence of a dangerous voltage, verify the connection of the electrical cabinet and the robot to ground.
Fig. 25 illustrates all the safety concerns.
Trajectory Planning.
At this point, it is needed to program the robot to execute a job with the ScarfingTool.
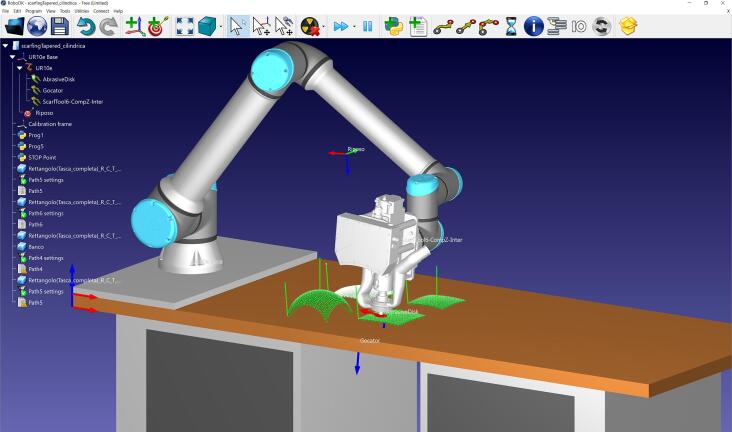
This activity goes beyond the aim of this paper, because it is strictly related to the specific machining task. The suggestion is to use a dedicated software environment as RoboDK [11]. RoboDK (see Fig. 26) is a powerful and cost-effective simulator for industrial robots and robot programming. RoboDK has an extensive library with a lot of industrial robot arms; it is not limited to the UR10e.
Fig. 26.
Trajectory Planning into RoboDK environment.
Another good alternative to simplify the robot programming along 3D surfaces is SprutCAM X Robot [12].
Calibration
To reconstruct and to visualize the machined surface the 3D Snapshot Sensor need to be calibrated.
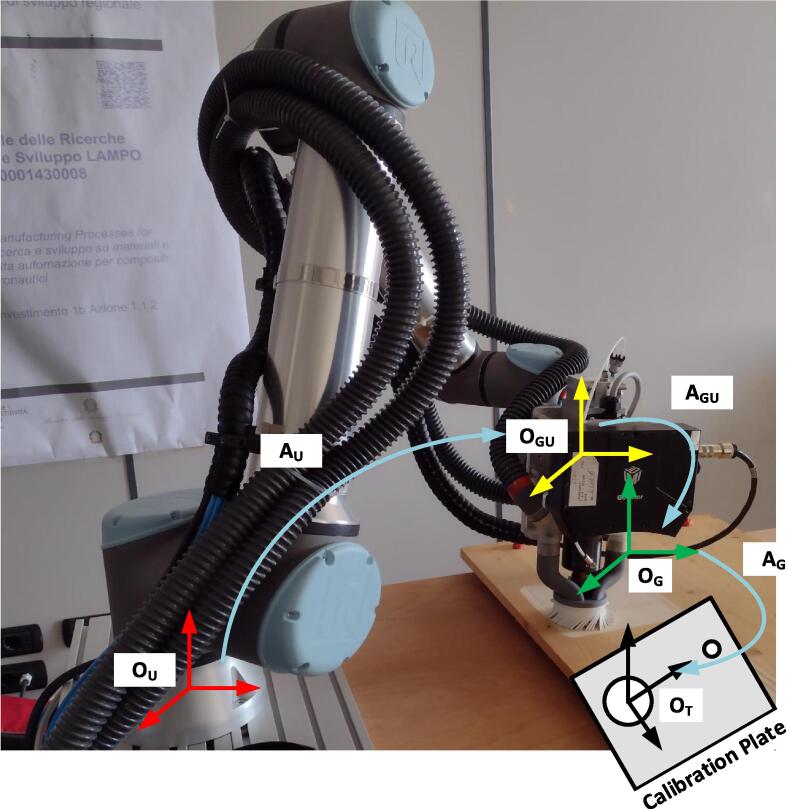
Fig. 27 shows the reference frames and the transformation matrices to calibrate the system. In detail:
-
•
OU is the UR10e base frame;
-
•
OGU is the Gocator-UR10e end-effector frame;
-
•
OG is the Gocator frame;
-
•
OT is the target frame.
Fig. 27.
Reference frames and transformation for 3D sensor calibration.
The transformation matrices involved are:
-
•
AGU fixed transformation matrix from the Gocator uncalibrated frame OG to the end effector of the UR10e robotic arm OGU. This transformation is the unknown and it is computed along the whole kinematic chain, from the UR10e base to the calibration plate;
-
•
AG that expresses the fixed transformation between and OT and OG;
-
•
AU which maps the frame OGU in the frame OU;
The last two transformation matrices are known during the calibration process and are exploited to compute AGU by solving an optimization problem.
The calibration processes is extensively described in [13] to which the interested reader is addressed.
7. Validation and characterization
The ScarfingTool has been designed to deal with the repair of CFRP.
The validation has been tested on a particle board for safety reasons. It is worth noting that CFRP processing implies realizing containment measures for the processed dust that are not present in our laboratory yet. CFRP dust is toxic and electrically conductive: measures for safeguarding human beings and all the electrical and electronic equipments are mandatory. To validate the ScarfingTool properly on CFRP a glovebox (safety cabin with gloves for the operator) must be built around the robot and the workpiece.
Since ScarfingTool is a general purpose tool, as explained in the Abstract and in the “Hardware in Context” section, validation has been conducted on materials with less stringent safety requirements.
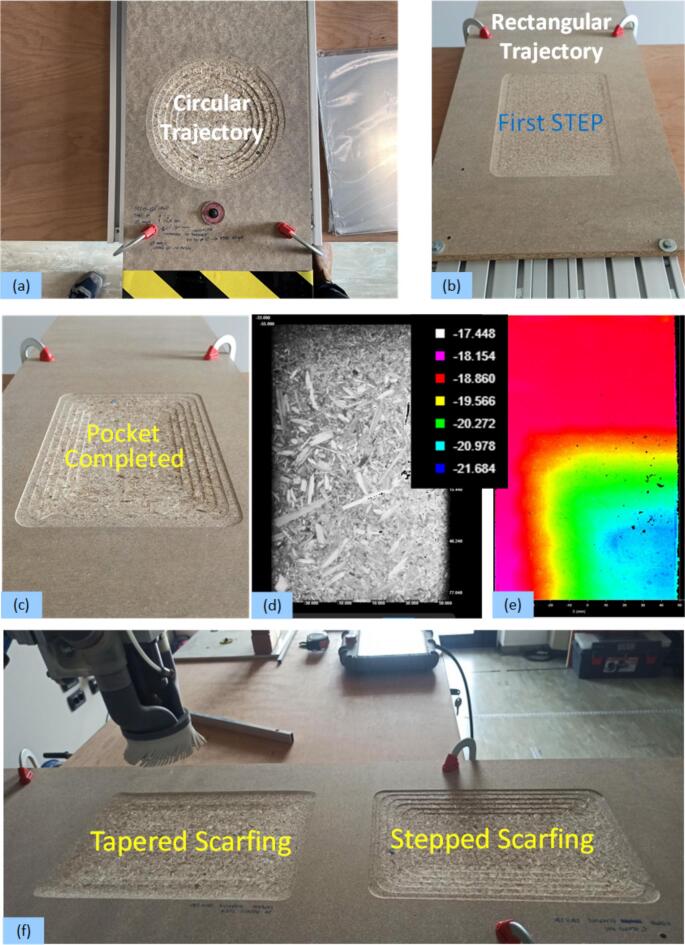
Fig. 28(a) shows a circular pocket machined by the ScarfingTool. The steps are clearly visible. In our intention each step reflects the single ply of CFRP.
Fig. 28.
Machining and measurements executed by the ScarfingTool: Circular pocket machined by the ScarfingTool, the steps are clearly visible (a); Rectangular pocket after the machining of the first step (b); The pocket in (b) is completed with six steps in (c); Example of an image acquired by the 3D sensor (Gocator 3210) (d); Image visualized by the Gocator’s Software (e). It illustrates a corner of Fig. 28c; Comparison of two different scarfing method: tapered and stepped scarfing (f).
The process is detailed in Fig. 28(b) that represents a rectangular pocket after the machining of the first step. It is completed in Fig. 28(c) where six steps are realized.
Fig. 28(d) is the image acquired by the 3D sensor (Gocator 3210) while Fig. 28(e) is an elaboration executed in a corner on the pocket in Fig. 28(c). With the standard software supplied by the sensor it is possible to do measures on the part: the depth of the pocket is represented by colors in Fig. 28(e). For what concern the repeatability of the measure two contributes must be taken into account: the repeatability of the sensor and the repeatability of the robot. The overall repeatability of the system (in the worst case) is given by the sum of these contributes. The repeatability of the sensor is 5 µm, while the repeatability of the robot is 50 µm so the total repeatability is 55 µm.
At last, in Fig. 28(f) there is the comparison of two different pockets: on the left a tapered scarfing procedure is simulated and it is compared with the stepped scarfing on the right.
In conclusion, the requirements listed in Table 2 are met, and the tool shown here has been approved by people skilled in CFRP repair for these main features:
-
•
It executes the scarfing process by an abrasive disk and not by an end mill, avoiding damaging the CFRP by the cutting forces typical of a milling process.
-
•
It is a semi-automatic collaborative robotic cell. This implies that the operator can program a trajectory, test it, measure the work done and decide if to continue the job or modify one or more parameters.
-
•
The human-robot cooperation at the core of the ScarfingTool design enables the human operator to manually adjust for possible inaccuracies (by a pneumatic angle die grinder, as in the traditional CFRP repair).
-
•
The presence of a 3D sensor gives the possibility to build a 3D model of the pocket to make a perfect patch.
CRediT authorship contribution statement
Simone Pio Negri: Writing – original draft, Methodology, Investigation, Conceptualization. Massimiliano Nitti: Writing – review & editing, Validation, Investigation. Nicola Mosca: Writing – review & editing, Validation, Methodology. Vito Renò: Writing – review & editing, Validation, Methodology. Ettore Stella: Writing – review & editing, Supervision, Funding acquisition.
Declaration of competing interest
The authors declare that they have no known competing financial interests or personal relationships that could have appeared to influence the work reported in this paper.
Acknowledgments
This work is within the research project LAMPO - Leonardo Automated Manufacturing Processes for cOmposites, Programma di Sviluppo Industriale ai sensi dell'art. 9 del Decreto del Ministro dello Sviluppo Economico del 09.12.2014, nell'ambito del Contratto Istituzionale di Sviluppo (CIS) per l'area di Foggia, denominato “CIS Capitanata” istituito con DPCM 20.02.2019. Soggetto gestore INVITALIA S.p.A., codice progetto n. CDS000750; Determina LDO/DGE/A/0046328/20.
The authors thank Mr. Michele Attolico for his precious collaboration during the setup of the experiments.
Biographies

Simone Pio Negri received his Laurea in Electrical Engineering from the Politecnico of Milano, Italy in 1998. After the degree he works in the field of Industrial Automation & Robotics for the Institute of Industrial Technologies and Automation (ITIA), National Research Council (CNR), Milano, Italy. Since 2001 he gets a full time permanent contract with ITIA, where he works on several projects. In particular his first works were in the field of parallel kinematics machines (PKMs) as innovative structures to realize industrial machines and robots for assembly, pick and place and machining. Since 2003 until 2010 he moves in Bari (Italy), and he works for Sintesi SCpA, a CNR spin-off, where he combines scientific research, industrial experience and project management. During this period he mainly designs and develops automatic robot for the biomedical field and liquid handling laboratory. After that, one of his major jobs is the management of the Smoov Asrv Project (http://www.smoov-asrv.eu/). For this society, he was the technical manager of the “Prototype Development Laboratory” too. He is author of several papers for conference and journals. His main research interests are mechatronic design and mechanical simulation of industrial and service robotics, mobile robotics, modular robotics, robotics for aeronautic industry, robotics for work in confined space.

Massimiliano Nitti was born in Bari, Italy, in 1968. Graduated in Computer Science from the University of Bari, he worked from 1996 to 2000 in the research and development department of Mermec spa where he developed railway diagnostic systems. From 2000 to 2007 he worked at IESI-CNR as a research technician and since 2007 as a researcher at STIIMA-CNR. His research activity concerns image processing, robotics, 3D reconstruction from images. He develops image acquisition and processing systems from both a hardware and software point of view. He thus gained direct experience in the railway, sports, industrial, medical and agricultural sectors. He has experience in parallel and distributed computing, fast code execution using different tools, both with the use of SSE2, SSE3 processor instructions and through the use of GPU or FPGA. He is responsible for numerous collaborations between STIIMA-CNR and industries for the development of pre-competitive systems.

Nicola Mosca received the computer science degree (summa cum laude) from the University of Bari, Bari, Italy, in 2004. He has been a Contract Researcher with the Institute of Intelligent Systems for Automation in Bari, Italy from 2004 to 2009. He applied for a contest organized by the Italian Apulia Region, winning a scholarship for attending a master by research in 2009. He was awarded a master by research in Transport Systems Engineering from the University of South Australia in 2012. He is a researcher at CNR since 2014. His research interests include human computer interaction, 3-D visualization of sport events, video analysis, and computer vision for quality control, video surveillance and intelligent transportation systems.

Vito Renò was born in Bari, Italy, in 1988. He received the Master Degree in Computer Engineering with honors from Politecnico di Bari in 2011, defending a thesis about computer vision and robust background modeling. He also received his PhD degree in Electrical and Information Engineering from the same University in 2017, defending the thesis “3D modeling, reconstruction and analysis of environments assisted by multi-sensorial data processing”. He currently is a researcher at CNR STIIMA and is involved in research activities in the fields of computer vision and pattern recognition. He is co-author of 70+ scientific papers and one international patent. Deeply curious and enthusiast about artificial intelligence, with a pinch of multi-disciplinary and synergic applications.

Ettore Stella was born in Bari, Italy, in 1960. He received the Laurea degree in computer science from the University of Bari Aldo Moro, Italy, in 1984. His professional experiences are on computer vision, robotics, industrial automation, and high-perfomance computing. He has been working for the National Research Council of Italy, Bari, since 1987, where he has been a Research Director, since 2010. He was a Contract Professor with the University of Basilicata, Italy, for the telecommunications engineering faculty in the period 2004–2009. He is the coauthor of more than 150 articles on international journals, on book chapter, and on proceedings of international conferences. He was the coauthor of international patents.
References
- 1.Negri S.P., Basile V., Valori M., Gambino B., Fassi I., Molinari Tosatti L. A modular mobile robotic architecture for defects detection and repair in narrow tunnels of CFRP aeronautic components. Robotics and Computer Integrated Manufacturing. 2019;55:109–128. [Google Scholar]
- 2.ATI Industrial Automation, https://www.ati-ia.com/company/NewsArticle2.aspx?id=670887249 (accessed November 10th, 2023).
- 3.Ferrobotics, - https://www.ferrobotics.com/en/services/products/active-contact-flange-kit/ (accessed November 10th, 2023).
- 4.Armstrong K.B., Cole W., Bevan G. SAE International; London: 2005. Care and repair of advanced composites. [Google Scholar]
- 5.Boisse P. Advances in Composites Manufacturing and Process Design. Elsevier. 2015 [Google Scholar]
- 6.Japan Aerospace Exploration Agency (JAXA) - Automated Scarf Sanding Device https://www.aero.jaxa.jp/eng/research/basic/structure-composite/scarfsanding/ (accessed November 10th, 2023).
- 7.Aviator, newsroom for the latest airline market intelligence, online journal - https://newsroom.aviator.aero/caire-robot-enables-upside-down-repairs/ (accessed November 13rd, 2023).
- 8.Lufthansa Technik Group – Official Youtube Channel - https://www.youtube.com/watch?v=mNUu1NbYWUg (accessed November 10th, 2023).
- 9.S. P. Negri, G. Lastilla, C. A. Ardito, M. di Summa, M. Nitti, V. Renò - An Integrated Tool for Semi-Automatic repair of CFRP laminates and non-destructive quality control, in SPIE Optical Metrology 2023, Munich, Germany, June 26th-29th, 2023.
- 10.Universal Robot - https://www.universal-robots.com (accessed November 15th, 2023).
- 11.RoboDK, Software Environment for Industrial Robot Simulation and Programming - https://robodk.com/ - (accessed November 17rd, 2023).
- 12.SprutCAM X Robot, innovative all-in-one CAD/CAM/OLP for robots - https://sprutcam.com/sprutcam-x-robot/ (accessed November 17rd, 2023).
- 13.P. Dibari, M. Nitti, C. Patruno, G. Pernisco, M. di Summa, N. Mosca, V. Renò, An accurate hardware calibration and 3D point cloud stitching towards automatic quality control in aerospace manufacturing, in IEEE 9th International Workshop on Metrology for AeroSpace (MetroAeroSpace), 978-1-6654-1076-2/22/ 2022 IEEE, pagg. 265 - 269.


