ABSTRACT
The skills necessary to connect ultrasmall vessels and neural structures successfully require commitment and practice to refine. The techniques require only a few specialized instruments and a high-quality microscope. Several exercises can simulate real-life anatomical situations using a rubber sheet, chicken vessels, or the rat femoral artery model. A series of graduated drills can help develop proficiency and confidence.
Keywords: Microsurgical technique, anastomosis, microsurgical instruments
Although many surgeons use the operative microscope every day, the techniques for suturing very small vascular and neural structures are substantially more complex and unfamiliar than the routine. Mastery of microsurgical technique is both rewarding and transferable to other aspects of surgery. Practice is the key and requires dedication of time and effort.1
BASIC INSTRUMENTS
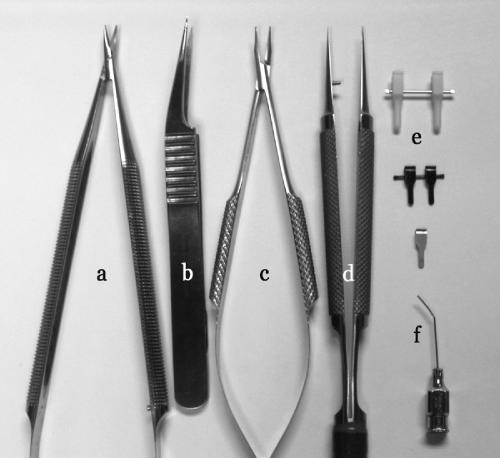
The tools necessary to perform the microvascular anastomosis are few in number but highly specialized in nature (Fig. 1). It is best to reserve a special set of instruments that will not be used for routine surgery. This will ensure that they are in good shape and reliable when they are needed. It is important to select tools that are comfortable to hold and employ without excessive effort. Several factors must be considered when selecting your tools. First, the shape of the portion of the tool that is held by your fingertips affects your ability to manipulate the tool without losing control. The most common shapes are either flat (like a typical forceps) or rounded. Some instruments have a knurled pattern cut into the metal surface to increase the friction and grip. The choice of handle shape and grip pattern is a matter of personal preference.2
Figure 1.
Microsurgical instruments (a) scissors, (b) vessel-dilating forceps, (c) needle applier, (d) forceps, (e) temporary vessel clamps, (f) irrigation tip.
The tension of spring-loaded instruments (scissors and needle appliers) is also an important consideration. If the tension is too weak, it will be difficult to secure the tool between your fingertips without closing it excessively or dropping it from your grip. If the tension is too strong, it will require excessive effort that, over repeated use, will prompt premature fatigue. To test for correct tension, place the instrument between your fingers and close the tips part way. Then, turn your hand over while holding this position. If the instrument tip rotates out of position, then the spring tension is too weak. Testing for excessive tension is more difficult; the level of hand muscle fatigue after an interval of prolonged use is generally the best indication. Hold the instrument in a partially closed position. The longer you can maintain this position without developing pain in the intrinsic muscles of the hand, the longer you will be able to use the tool in surgery without fatigue.
The weight of the instrument also determines its usability. Instruments are typically made of either stainless steel or titanium. Stainless steel is heavier than titanium and, to some, has a more substantial feel between the fingertips.
Finally, the length of the instrument handle determines comfortable working distance. Regardless of the depth of the tissue, it is critical that you be able to stabilize your hands by touching your small fingers to the working surface. During training exercises, it is easy to adjust the distance from the anastomosis because you will be working primarily on a flat surface. Fortunately, the most common anatomical location for microvascular anastomosis (the superficial temporal artery to middle cerebral artery) lies on the brain surface and the surrounding skull edge creates a nearly planar surface on which to stabilize one's hands. As the focus of surgery becomes deeper within the tissue and a longer working distance is required, bayonetted instruments may be necessary.
Scissors
A straight pair of microscissors with sharp narrow tips and a spring-loaded handle are an absolute requirement (see (a) in Fig. 1). For most situations, tissue depth is not excessive. Therefore, it is best to develop skills with a straight-handled instrument of ∼6cm in length and progress to longer tools as you gain experience. Bayonetted instruments will add complexity because of their increased length and the angled handle.
Forceps
A pair of straight, fine-pointed forceps are essential (see (d) in Fig. 1). The tips should taper gradually and close precisely so they can capture tissue and suture without scissoring. Typical jeweler's forceps are usually adequate. A variation of the standard forceps has a flat platform along the inner surface of the tip, called a tying stage. This style of tip is designed to facilitate grasping suture because the approximating surface area is much greater than that of forceps that taper to a point. Angled-tip forceps can also be useful for reaching the undersurface of a vessel, but these are not a necessity.
Vessel Dilators
Vessel dilators are a special-purpose, spring-loaded forceps with a highly tapered smooth tip that has a rounded outer surface. The shape of the tip allows it to be inserted into the cut end of a vascular structure (see (b) in Fig. 1). The instrument can then be opened passively using the spring tension to dilate the vessel orifice gently.
Needle Applier
The needle applier is perhaps the most crucial instrument. The jaws should be gently curved and the handle should have optimal spring tension without a locking mechanism (see (c) in Fig. 1). It is also important that the jaws approximate over their entire length and close in a parallel fashion. This allows needles and suture to be grasped securely over the entire length of the jaw.
Vessel Clamp
Vessel clamps are used to interrupt blood flow temporarily until the anastomosis is complete. Most vessel clamps have a broad flat blade and a relatively weak spring tension to occlude vessels gently without causing permanent damage (see (e) in Fig. 1). A tandem clamp assembly with a sliding approximator can be helpful when learning to perform an end-to-end anastomosis. Single clamps are also useful for advanced techniques. During live surgery, temporary mini aneurysm clips (low spring tension) will suffice and are likely to be more readily available.
MICROSCOPE
Magnification and illumination are essential when working with delicate tissues and fine suture material. A good-quality microscope should be used for both practice and surgery. Familiarity with the operative microscope will minimize the struggle to achieve optimal visualization. The microscope should be positioned to provide a comfortable neutral neck position and a relaxed posture of the arms as they rest on the operative surface. These adjustments prevent fatigue and tension in the neck and arms, which can amplify a native tremor.
The microscope should be fitted with 10× to 15× eyepieces and a 200- to 300-mm focal length objective lens. For most exercises, a maximum magnification of 25× should suffice. If you are tall, you may prefer a longer focal length.
It is helpful to use a foot switch to control the zoom and focus of the microscope. This will free your hands to concentrate on suture placement and tying rather than microscope adjustments. You should practice placing suture at higher magnification and zooming out to tie and trim sutures. This maneuver expands the visual field and depth of field so that the entire suture strand can be seen. You will quickly develop the coordination with your feet to optimize the zoom and focus automatically.
SUTURE MATERIALS
Needles
The ideal needle has a tapered, noncutting point and a flat body with a range of curvatures. The tapered tip prevents laceration of the vessel edge during suture placement and the flat body forces the needle to align properly and hold securely when grasped with the needle applier. The degree of curvature varies according to the depth and confines of the surgical field and the mobility of the tissues being approximated. Narrower and deeper exposures are better suited to needles with a tighter curvature.
Suture
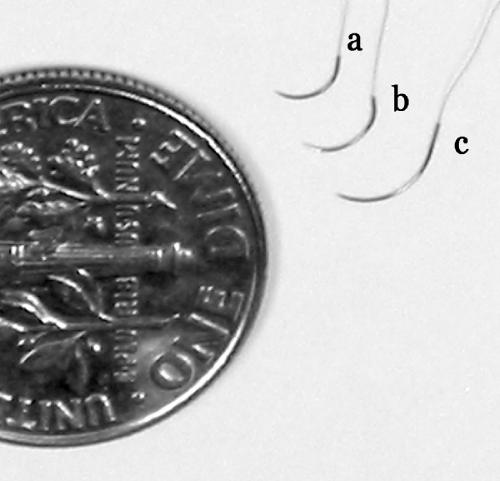
Most microvascular anastomosis techniques should be completed with either 9–0 or 10–0 monofilament nylon suture. For practice purposes, multipack sutures are available. As you master suture-tying techniques, you will need less and less suture for each knot. A single suture can suffice for an entire anastomosis. Because these sutures are small, they are difficult and unfortunately costly to manufacture. Ethilon 10–0 black monofilament nylon (Ethicon, Inc., Somerville, NJ) is a good general-purpose suture that is available with a variety of needles. The tapered BV-130–3, BV-130–4, and BV-130–5 offer a good range of needle sizes and curvatures for most applications (Fig. 2).
Figure 2.
Comparison of 10–0 monofilament suture with (a) BV-130–3, (b) BV-130–4, and (c) BV-130–5 needles (Ethicon, Inc., Somerville, NJ).
PRACTICE ADVICE
The value of your practice time can be maximized if you eliminate distractions and free your mind from other concerns. Try to focus only on the task at hand and avoid struggle. If you are having problems, a root cause usually can be identified and modified. At first, you will fatigue easily. Plan to work in brief sessions and rest frequently. The following exercises will help you get started.
Tremor
Tremor is the enemy of microsurgery. Everyone has some degree of tremor. Involuntary tremor can be exacerbated by several external, yet modifiable factors. Avoid smoking, sleep deprivation, strenuous exertion, and coffee and other stimulants.3 You can learn to conquer your tremor with a comfortable position, relaxed hands, and a peaceful mind. Familiarity with the microscope and the instruments will develop with practice and will also help control tremor.
EXERCISES
Basic Techniques
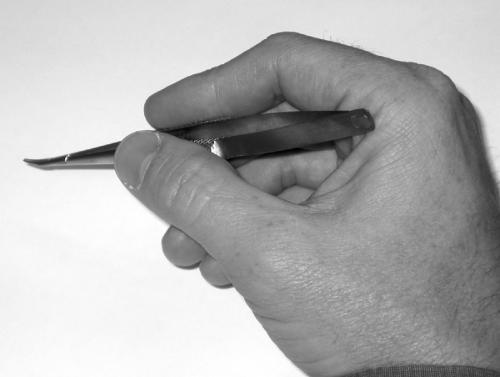
Microsurgical proficiency begins with a foundation of sound fundamental skills. The first step is to learn to hold the instruments properly. Microsurgery is performed almost entirely with the fingertips with only small input from the wrists. The instruments must be held between the fingertips in such a way as to provide comfort and control. Begin by placing the tool in your hand as you would hold a pencil. Apply pressure between your thumb and index finger and then bring your middle finger underneath the tool to establish three points of contact (Fig. 3). The instrument will be stable in your grasp and every subtle movement of your fingertips will be transmitted to the tip. The grip is identical for each hand and is suitable for all of the necessary instruments.
Figure 3.
Basic position for holding the instrument. The thumb and index finger grasp the tool while the middle finger supports it from behind.
For the right-handed surgeon, the forceps is primarily a left-handed instrument. The scissors and needle applier are used in the right hand and intermittently exchanged for tying and cutting purposes. Although not always practical in the laboratory environment, it is helpful to have an assistant to pass instruments to your right hand so that you do not have to look away from the microscope repeatedly. Frequently looking away from the microscope not only wastes time but also increases neck and shoulder fatigue and eye strain.
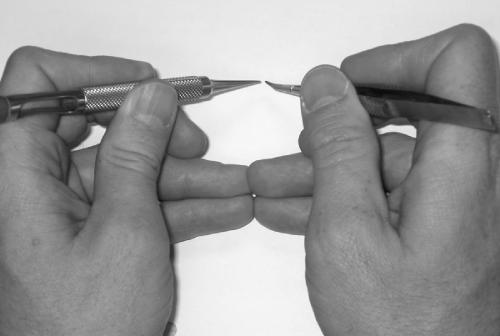
With a forceps in the left hand and a needle applier in the right, bring the tips together and rest your hands on the table surface. Only the hypothenar aspect of the palm should touch the table. For additional stability, bring the tips of the fourth and fifth digits of each hand together until they just touch (Fig. 4). This creates three points of contact between your hands and the table. Practice making small inputs with your fingertips and notice the magnitude of movement and range of motion of the instrument tips. It is possible to turn the needle applier through enough curve to place a needle with only a slight twisting of the fingertips and partial pronation of the hand.
Figure 4.
The grip for each hand is identical. Additional support comes from touching the tips of the small fingers.
RUBBER
Rubber provides a good substrate for learning the basic skills of microsurgery.4 A practice platform can be fashioned by stretching a rubber glove over a Petri dish. Avoid stretching the rubber too tight or else the edges of your practice incision will not come together without tension during suture tying. This assembly can then be positioned under the microscope and rotated to mimic the circumstances of a true anatomic situation. It is easiest to begin with a linear incision in the rubber and orient the incision at a 45-degree angle sloping from your left to right. Begin your first stitches at the distal aspect of the incision and work toward yourself. Placing interrupted stitches and tying them one at a time will emphasize the sequence of movements. It can also be helpful to start with larger suture material, such as a 6–0 or 7–0 monofilament. This material is more easily visualized and manipulated and therefore requires lower power magnification on the microscope. The mechanics of manipulating the suture and tying knots can be ingrained more easily and transferred to smaller material with experience.
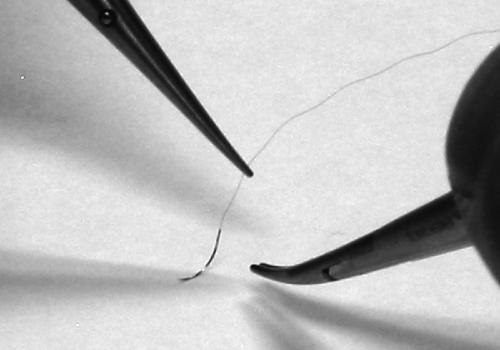
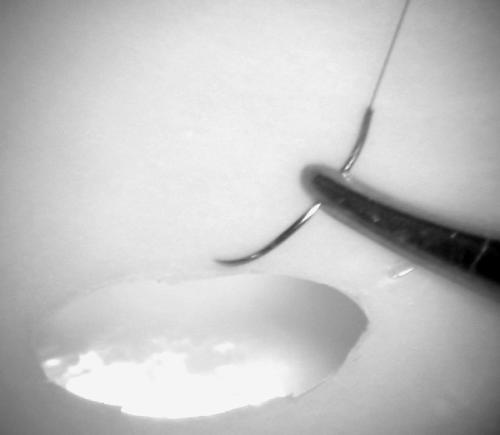
Choose the suture material that you intend to start with and begin by placing the needle in the needle holder. Grasp the suture material with the forceps held in your left hand a few centimeters distal to the shank of the needle. Lift the needle gently from the surface until it dangles with its tip just touching the table (Fig. 5). This will facilitate rotating and orienting the needle appropriately for pickup with the needle applier. Place the needle in the needle applier just past the halfway point along its curvature (Fig. 6). If you grab the needle too close to the tip, the tip will point downward. Conversely, if you grab it too close to the shank, the tip will point too far upward. Optimal placement of the needle within the applier will facilitate not only puncturing the tissue but also rotating the needle through the necessary curvature to engage both edges of the tissue in one smooth movement. Also, pay attention to the angle of the needle within the applier. Initially, it should be placed at a right angle to the jaws. In the anatomic situation, particularly with deeper structures, an angled vector of the needle may be required but avoid this complexity during the practice phase.
Figure 5.
The suture is lifted until the needle tip just touches the surface below. This enables proper grasping of the needle.
Figure 6.
Grab the needle just past the halfway point toward the shank.
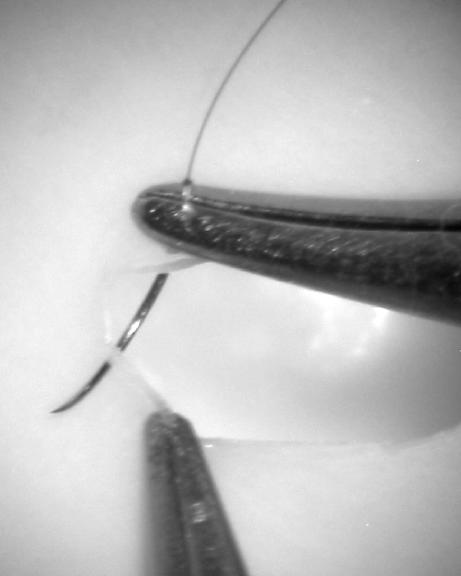
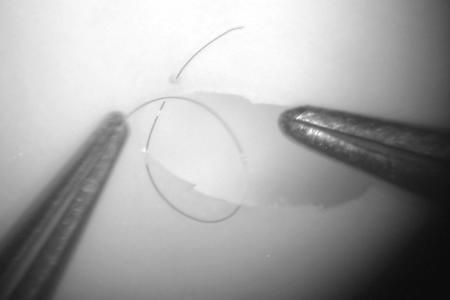
With the needle adjusted properly in the needle applier, use the forceps in your left hand to grasp the far edge of the incision. Insert the needle through the rubber precisely and at a right angle so as not to skive the edge. Use the forceps to apply gentle counterpressure as you drive the needle through the edge. Next, use the forceps to grasp and slightly evert the near edge of the rubber and complete the passage of the needle through this surface (Fig. 7). Zoom out with the microscope and gently pull the redundant suture through until there is ∼5 to 8 mm of suture material extending through the far side puncture site. Estimate a length of suture material approximately twice the amount extending from the far side of the suture and pick up the suture material with the forceps in your left hand from the near side. Be sure that the suture material emerges from the upper surface of the forceps (the surface facing you). By simply moving the tips of the forceps toward the puncture site, you will notice that the suture material automatically forms a loop (Fig. 8). The suture material has an intrinsic memory, which is related to its natural stiffness. This maneuver will force the suture to form a loop and will markedly facilitate tying. Reach through the loop and grasp the distal end of the far suture strand and pull it through the loop by bringing the needle applier directly toward you and pulling the forceps directly away from yourself. As the knot tightens, this suture will stretch slightly and the suture strands will remain in the orientation they were in during the tightening. No light should be visible through the coils of the knot. Without letting go of the long suture strand with your left hand, repeat the maneuver in reverse by bringing the forceps tips back to the incision line passing the needle applier through the loop and grasping the end of the short suture segment. Three throws are all that are required to form a secured knot, but during the practice phases, it is a good habit to place four knots in alternating direction. If you remember to grasp the long strand at the correct length before initiating your tie, do not let go of the long strand, and always maintain the needle applier within the inside surface of the loop during tying, you will minimize effort and time delay related to tying. Each time you drop a suture you waste time and increase frustration, which ultimately affects the quality of your results.
Figure 7.
Pass the needle through the far edge and gently evert the near edge as you drive the needle.
Figure 8.
Adjust the suture length until ∼5 mm of material extends from the far edge. Pick up the near side at ∼10 mm from the edge. Note the position of the suture as it emerges from the top surface of the forceps. Moving the tips of the forceps toward the puncture site will automatically cause the suture to form a loop.
Once you are comfortable with the basic skills required for needle placement and suture tying, you can begin to manipulate the orientation of the rubber incision or use a trimmed cardboard tube to mimic a deeper anatomic situation.
CHICKEN VESSEL
Chicken vessels provide an excellent model for practicing microsurgical techniques.5 They are inexpensive and easily obtained, they are comparable in size to small vessels encountered during real microsurgery, they have similar characteristics to native tissues, and they can be frozen and stored for convenient use. Using chicken vessels is obviously less complicated than using a live rat model and does not require an elaborate laboratory situation. These vessels can be used for any of the basic exercises described below and they can be pressurized with fluid to test the integrity of a completed anastomosis.
RAT FEMORAL ARTERY/VEIN
The rat model provides a physiologic training environment with intact coagulation.6 Neither of the aforementioned models allows for assessment of delayed patency in this context. Normally, the endothelial lining protects the inner surface of the vessel. Indiscreet manipulation of the vessel or its inner surface can compromise the endothelium and expose its highly thrombogenic undersurface. An adequate connection between two vessels can be undermined quickly by thrombotic occlusion if the endothelial surface is damaged.
The rat model mimics the relationship of time and blood pressure to a successful anastomosis. Ideally, temporary blood flow interruption should be limited to 15 minutes. Once blood flow is restored, the rat model provides important feedback for suture line leakage under physiologic blood pressure ranges.
Rat Model Preparation
In general, the rat femoral artery model can only be used in a properly equipped vivarium. Five-hundred-gram adult Wistar or Sprague-Dawley rats are a good size for the basic anastomosis exercises. Once the animal is appropriately anesthetized, the groin area should be shaved and the animal should be placed in a supine position with the extremities secured to the corners of a dissection board. This way, the entire board can be repositioned under the microscope to achieve an optimal angle of approach. For the right-handed surgeon, it is best to begin with the left groin. This will allow you to dissect the left femoral artery in a distal-to-proximal fashion. The skin is incised along the groin crease. Use your thumbs to spread the edges of the incision and expose the fat pad overlying the femoral neurovascular bundle. The fat pad can be incised circumferentially, beginning at the 2:00 position of an imagined clock face, near the edge, and ending at approximately the 11:00 position, and then reflected superiorly. This will expose the neurovascular bundle between the quadriceps and the hamstrings group and preserve the fat pedicle. Along the medial edge of the exposure, the abdominal wall musculature can be visualized. Once again, use your thumb to reflect the tissue until the inguinal ligament is visualized. This ligament is a dense white fibrous band that marks the limit of the proximal arterial exposure. A paper clip and rubber band can be fashioned into the shape of a J retractor to hold back the abdominal wall and inguinal ligament.
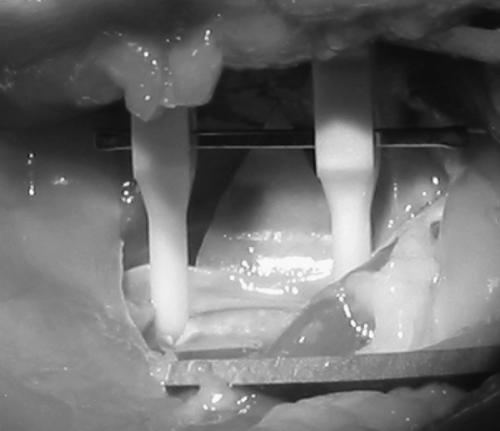
The microscope is then used at low power to prepare the vessels. Working distally, the adventitia overlying the artery and vein is grasped with the forceps in the left hand and the microscissors are used in the right hand to sharply open the adventitial sleeve and expose the vessels. At approximately the midpoint of the artery, along its back wall, lies a small arterial branch known as the Murphy's artery. This vessel must be sacrificed to provide mobility to the artery. The vessel can either be ligated with 10–0 suture and divided or, alternatively, coagulated with a disposable coagulation unit. Heparinized saline should be used liberally to irrigate the vessel surface and prevent it from desiccating under the heat of the microscope lamp. Cotton swabs are helpful to blot blood and fluid away from the vessel surface. Topical papaverine is useful to reverse signs of vasospasm after manipulation. At this stage, the vessels are ready for the basic anastomosis exercises (Fig. 9).
Figure 9.
The vessel is prepared for the anastomosis exercises by exposing a segment of artery. A background is placed behind the vessel and a tandem temporary clamp assembly is applied.
END-TO-END ANASTOMOSIS (ARTERIAL)
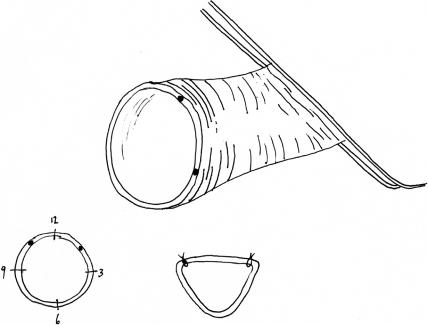
The end-to-end arterial anastomosis is a versatile technique that illustrates most of the essential microsurgical skills.7,8,9,10 Begin by focusing the microscope at low power over the center of the exposed femoral artery. Using the forceps, elevate the artery by its adventitia away from the vein. Place a small piece of rubber glove or other colored plastic material to serve as a background underneath the artery. A tandem temporary clip approximator should then be applied to the artery with the clip assembly facing away. The microscissors are then used to divide the artery perpendicular to its long axis. A small segment of the artery including the origin of the Murphy's branch can be removed. The vessel dilator is then inserted into each end of the divided vessel and gently opened to expand the arterial orifice. Heparinized saline and a 30-gauge blunt needle are used to flush residual blood from the lumen (see (f) in Fig. 1). At higher power, the adventitia is further trimmed near the edge of the arterial opening to prevent incorporation in the suture line. The tandem temporary clips are then gently adjusted until the cut ends of the artery are approximated. This will allow the anastomosis to be performed without tension. The initial sutures should be placed on the dorsal surface at approximately the 10:00 and 2:00 positions (Fig. 10). If the initial sutures are placed opposing each other at the 9:00 and 3:00 positions, the dorsal and ventral surfaces of the vessel will coapt, which will make it difficult to place the needle through the vessel edge and seek its lumen without stabbing or catching the back wall (Fig. 11).
Figure 10.
The first two stitches are placed at the 10:00 and 2:00 positions to avoid coaptation of the lumen of the vessel. The dots indicate the ideal position relative to the temporary clamp.
Figure 11.
The first stitch is placed in the 10:00 position.
Zoom in with the microscope to pass the needle through the arterial edge. Avoid grasping the edge of the artery with the forceps. Try to pick up the adventitia if you must move the vessel. Place the forceps gently within the vessel lumen and slightly spread the tips to provide counterpressure as the needle punctures the tissue. Zoom out to trim the suture and tie the knot. Once the initial two sutures are in place, the temporary clip approximator is then rotated 180 degrees. This will cause the vessel to twist and will bring the ventral surface of the anastomosis into view. The correct placement of the initial sutures will cause the orifice of the anastomosis to gape. The third suture is placed at the 6:00 position. The remaining sutures are then placed at equal intervals between the initial sutures.
Before removing the temporary clips and restoring flow, the anastomosis should be inspected for any obvious gaps in the suture line. If none are present, begin by removing the distal temporary clip. The backpressure in the femoral artery should fill the vessel to the proximal temporary clip and demonstrate any deficiencies in the suture line. Removal of the proximal clip will restore antegrade flow and pressure. Occasionally, transient leakage from the needle puncture sites along the anastomosis will occur. Bleeding can be managed easily by folding the femoral fat pad against the anastomosis and applying gentle pressure. The fat tissue contains intrinsic tissue factors that rapidly promote clotting. After a few moments, the anastomosis should be inspected for patency. Under medium-power magnification, the anastomosis site should appear pulsatile and should subtly dilate with each systole. If the vessel appears to oscillate in a longitudinal direction, this usually suggests an obstruction to antegrade arterial flow. The lift test is a more reliable method for determining patency. Using closed forceps beneath the artery proximal to the anastomosis, the vessel is elevated until flow is obstructed. The artery will appear to blanch over the surface of the forceps. The forceps are then passed distally under the vessel across the anastomosis. The lumen should appear to refill briskly both proximally and distally to the forceps.
END-TO-SIDE ANASTOMOSIS (ARTERIAL)
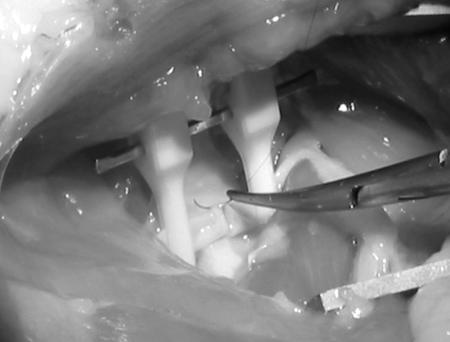
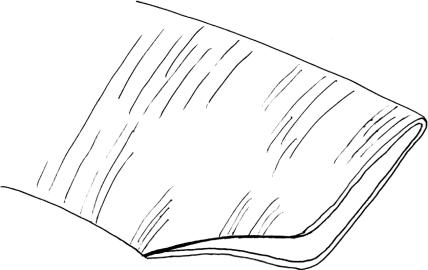
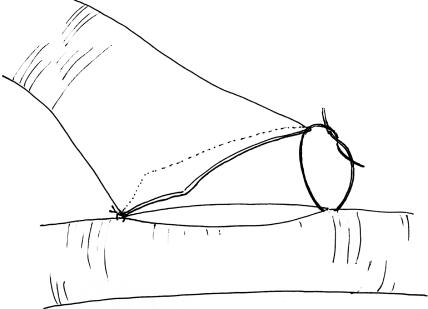
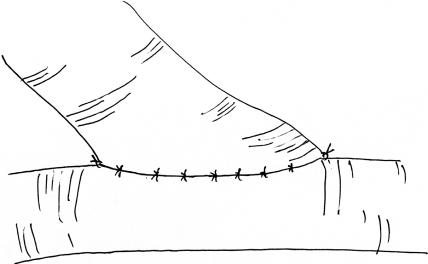
The end-to-side arterial anastomosis exercise is most like the technique used for superficial temporal artery-to-middle cerebral artery anastomosis. Unfortunately, it is difficult to perform this exercise using the femoral artery. This exercise can, however, be simulated using the rat carotid arteries. For this exercise, both carotid arteries must be exposed through a midline linear submandibular incision. Once both vessels are cleaned of their loose adventitial attachments, one vessel is selected as the donor and the other as the recipient. The donor vessel is temporarily occluded and divided at the base of the skull and rotated across the midline. The distal end of the donor vessel is spatulated (Fig. 12).10 The vessel is first trimmed at an oblique angle and then opened further along one side with microscissors. This will facilitate a broad connection between the donor and recipient vessel that should be at least two times the vessel caliber. Backing material is placed behind the recipient vessel, which is then temporarily occluded above and below to the prospective anastomosis site. A linear enterotomy is then initiated in the recipient vessel with a 27-gauge needle and elongated with microscissors. The lumen is then flushed with heparinized saline. Using the microscope at high power, place your initial stitch through the heel of the donor vessel and the proximal end of the recipient vessel enterotomy. Double-arm 9–0 monofilament suture allows for passage of the needle from the luminal surface of both the donor and recipient vessels. This maneuver prevents creation of an intimal flap at the needle puncture site. The second tacking stitch is placed in similar fashion and is used to secure the toe of the donor vessel to the distal aspect of the recipient arteriotomy (Fig. 13). The next phase of this anastomosis involves placing interrupted 10–0 monofilament sutures along each side (Fig. 14). Typically, the surface facing away from the surgeon will be most difficult, because it requires reaching over the donor pedicle to place the sutures. Working from left to right, the initial sutures will be fairly uncomplicated but as the heel is approached, the donor pedicle will become more obtrusive. Reorienting the microscope and changing your body position relative to the operative field can overcome the impediment of the donor pedicle. Prior to closure of the near side of the anastomosis, the lumen is inspected and flushed with heparinized saline. Once again, interrupted 10–0 monofilament sutures are placed working from left to right until the anastomosis is complete. Before securing the final suture, the temporary occlusion clips are sequentially opened to flush air and debris from the lumen prior to restoration of flow.
Figure 12.
The end of the donor vessel is prepared by trimming it at an oblique angle and then incising the vessel along one edge. This will create a funnel-shaped anastomosis.
Figure 13.
The heel stitch is applied first, followed by the toe stitch.
Figure 14.
Interrupted stitches are placed at equal intervals along the edge of the donor and recipient vessels.
END-TO-SIDE ANASTOMOSIS (ARTERIOVENOUS FISTULA)
The femoral artery and vein can be used to create an arterial to venous fistula.10 The technique for this exercise is identical to that described for the end-to-side arterial anastomosis above except the femoral artery (donor) is connected to the femoral vein (recipient). Venous tissue is substantially more friable than the arterial tissue and, consequently, much more prone to damage with indelicate manipulation. The vein must be handled carefully during dissection and needle placement and passage must be meticulous to avoid enlargement of the puncture sites.
ADVANCED TECHNIQUES
Once the basic end-to-end and end-to-side techniques have been mastered, various advanced techniques can be attempted to increase the degree of difficulty. Thus far, only interrupted suture techniques have been described. An interrupted anastomosis is suitable for most applications and has the advantage that over time, the point of connection can expand. A running closure technique is useful in many situations and has the advantage of being faster but it will tend to remain the same size over time.10 The running technique is probably not ideal for the end-to-end anastomosis because the suture line has a tendency to act as a purse string when the sutures are tightened. In the end-to-side anastomosis, this tendency can be avoided by running the suture line loosely and then tightening each loop. After placing the fixation stitch at the corners of the donor and recipient vessel, the first loop of the suture line is passed. With each subsequent stitch, the redundant suture is pulled through until a small loop remains. The diameter of each subsequent loop should be slightly smaller than the last. After all of the stitches are placed, a right-angled, ball-tipped probe and the forceps are used to tighten each loop sequentially. Once the final loop is snug, the suture is tied to the proximal fixation stitch. The lumen is then inspected and the remaining side is closed. Because this technique does not involve the exchange of instruments for tying and cutting between each stitch, it can be performed much more rapidly than an interrupted technique.
A side-to-side anastomosis is a worthwhile exercise because it can be used to create a wide connection between parallel vessels.11,12 Two linear enterotomies of equal length are required along the opposing surfaces of the vessels. Proximal and distal fixation stitches are placed using double-arm suture at the extremes of the enterotomy. The complexity of this exercise lies in the necessity to close the ventral side of the anastomosis by using a running technique from within the lumen. One of the arms of the distal tacking suture is passed between the two vessels to the ventral surface of the vessels and then used to puncture the vessel edge from outside in. The remainder of the ventral portion of the anastomosis is then closed in a running fashion by working the needle from the luminal side. The dorsal surface of the anastomosis is a straightforward closure.
Small segments of artery or vein can be used as substrate for interposition techniques. The main difficulty lies in completing two anastomoses without introducing a twist in the recipient vessel. Twisting will lead to obstruction of flow and subsequently, thrombotic occlusion.
Any of the aforementioned exercises can be performed using either chicken vessels or the rat model. Deep-seated anatomical structures can be simulated using a cardboard tube positioned over the operative field. The length of the cardboard tube can be adjusted to vary the depth of the surgical objective.
Finally, it is worthwhile to reverse the roles of your hands once you have mastered each of the techniques. Learning to use your nondominant hand for suture placement and knot tying will extend your capabilities, particularly in close anatomic quarters.
CONCLUSIONS
The skills learned through practicing microsurgical anastomosis techniques can extend your surgical range. Microvascular surgery is both demanding and rewarding. The ability to create a patent vascular anastomosis repeatedly will instill an additional level of confidence for even routine surgical procedures.
ACKNOWLEDGMENTS
The author wishes to thank Kristin Kraus for her editorial assistance and Michael Simmons for assistance with preparation of the figures. The author also gratefully appreciates the assistance of Lori Lindgren with manuscript preparation.
REFERENCES
- Derman G H, Schenck R R. Microsurgical technique—fundamentals of the microsurgical laboratory. Orthop Clin North Am. 1977;8:229–248. [PubMed] [Google Scholar]
- Yasargil M G. In: Yasargil MG, editor. Microsurgery Applied to Neurosurgery. Stuttgart, Germany: Georg Thieme Verlag; 1969. Instruments for microsurgery. pp. 32–50.
- Murbe D, Huttenbrink K B, Zahnert T, et al. Tremor in otosurgery: influence of physical strain on hand steadiness. Otol Neurotol. 2001;22:672–677. doi: 10.1097/00129492-200109000-00019. [DOI] [PubMed] [Google Scholar]
- Lahiri A, Lim A Y, Qifen Z, Lim B H. Microsurgical skills training: a new concept for simulation of vessel-wall suturing. Microsurgery. 2005;25:21–24. doi: 10.1002/micr.20074. [DOI] [PubMed] [Google Scholar]
- Hino A. Training in microvascular surgery using a chicken wing artery. Neurosurgery. 2003;52:1495–1497. discussion 1497–1498. doi: 10.1227/01.neu.0000065174.83840.62. [DOI] [PubMed] [Google Scholar]
- Yasargil M G. In: Yasargil MG, editor. Microsurgery Applied to Neurosurgery. Stuttgart, Germany: Georg Thieme Verlag; 1969. Experimental microsurgical operations in animals. pp. 60–81.
- Buncke H J, Jr, Schultz W P. In: Peardon Donaghy RM, Yasargil MG, editor. Micro-vascular Surgery. St. Louis, MO: CV Mosby Co; 1967. The suture repair of one-millimeter vessels. pp. 24–35.
- Jacobson J H, Suarez E L. Microsurgery in anastomosis of small vessels. Surg Forum. 1960;11:243–245. [Google Scholar]
- Jacobson J H. In: Cooper P, editor. Craft of Surgery. Boston, MA: Little Brown & Co; 1964. Microsurgical technique. pp. 799–819.
- Acland R D. Practice Manual for Microvascular Surgery. St. Louis, MO: CV Mosby; 1989.
- Matsumura N, Endo S, Hamada H, et al. An experimental model for side-to-side microvascular anastomosis. J Reconstr Microsurg. 1999;15:581–583. doi: 10.1055/s-2007-1000141. [DOI] [PubMed] [Google Scholar]
- Matsumura N, Hamada H, Yamatani K, et al. Side-to-side arterial anastomosis model in the rat internal and external carotid arteries. J Reconstr Microsurg. 2001;17:263–266. doi: 10.1055/s-2001-14518. [DOI] [PubMed] [Google Scholar]


