

Abstract
In pediatric orthopaedic surgery, the choice between splinting and casting plays a crucial role in early fracture management, postoperative care, and soft tissue injury stabilization. Impeccable application technique ensures that the immobilization serves its purpose without causing additional injury.
Splints provide crucial advantages over casts in acute situations, particularly in cases with significant swelling, evolving injuries, soft tissue damage, or the necessity for frequent reassessment. Unlike circumferential casts, which can heighten the risk of compartment syndrome or pressure-related complications, splints deliver stability while accommodating soft tissue expansion and preserving structural support. Their adjustable, removable, and reapplicable nature makes splints a preferred choice during the early stages of fracture healing and postoperative recovery, particularly for younger patients with high remodeling potential.
The Bulky Jones dressing is an essential tool in orthopaedics, providing compression, controlling edema, and offering mild immobilization. This enhances patient comfort and promotes tissue healing.
Key Concepts
-
(1)
Splints provide effective preoperative stabilization, definitive treatment of stable fractures, and management of soft tissue injuries while allowing for swelling accommodation and periodic reassessment.
-
(2)
Splinting minimizes complications associated with circumferential casting.
-
(3)
Proper technique and padding are essential for effective splint application.
Keywords: Short leg splint, Long leg splint, Bulky Jones
Introduction
Immobilization is a cornerstone of pediatric orthopaedic care, ensuring proper healing of fractures, soft tissue injuries, and postoperative wounds. While both splints and casts serve this purpose, splinting has distinct advantages in specific clinical scenarios, particularly in the acute setting. Unlike circumferential casts, splints provide stability while allowing for swelling, thereby minimizing pressure-related complications (e.g., skin breakdown, necrosis, and compartment syndrome) and enabling periodic reassessment [1]. Splints may be static to prevent motion or dynamic to permit controlled motion, especially in the upper extremity. This makes splinting an essential tool for pediatric orthopaedic surgeons managing fractures, soft tissue injuries, and postoperative recovery.
In children, the choice between splinting and casting is especially crucial due to their unique anatomical and physiological characteristics. Pediatric bones possess greater remodeling potential, and their periosteum is thicker and more vascular, which facilitates rapid healing [2]. However, these advantages also bring challenges, such as the risk of growth disturbances and the necessity for immobilization techniques that promote recovery without inducing stiffness or discomfort. Splints, with their noncircumferential design and ease of application, provide a safer alternative in situations where swelling is anticipated or when frequent monitoring is essential [3].
Bulky Jones dressing is a crucial tool in pediatric orthopaedics, particularly for fractures with significant soft tissue swelling, such as tibial and calcaneal fractures. Its multilayered design provides compressive support to reduce edema, minimize hematoma formation, and protect the injured area. Used for acute injuries and postsurgical care, it helps relieve pain and control swelling, ensuring a safer transition to definitive treatments like casting or splinting. A study by Doski et al. found it to be a noninferior alternative to casting for stable distal radius fractures in children, although casting still remains the gold standard [4]. Additionally, it can be combined with a splint for enhanced stability, reducing the need for frequent adjustments. Its role in acute injury management makes it a valuable tool for optimizing patient comfort and recovery.
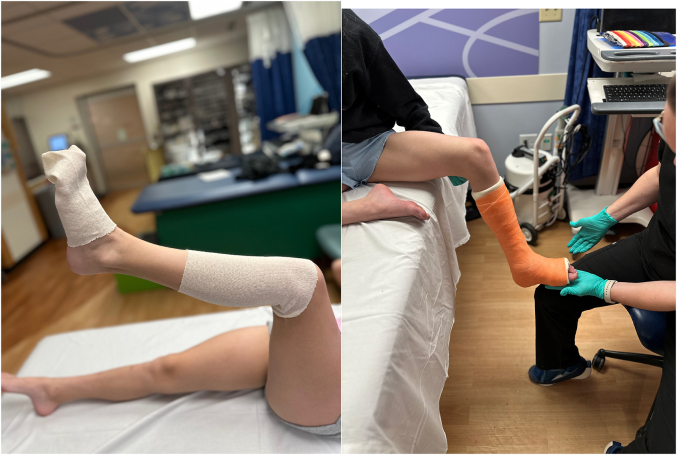
Short leg splint (below-knee splint)
Indications
In the setting of acute fractures, a short leg splint serves as an effective tool for the temporary immobilization of fractures and dislocations, as well as for the definitive treatment of soft tissue injuries. Additionally, they can be utilized for brief immobilization of nontraumatic musculoskeletal disorders, such as inflammatory disorders, infections, and burns. Common indications for using a short leg splint in trauma include the following [1,2,5]:
-
•
Ankle fractures and severe sprains
-
•
Foot fractures (tarsal, metatarsal, and toe fractures)
-
•
Soft tissue injuries (e.g., tendon injuries, ligament injuries, cellulitis, and fracture blisters)
-
•
Postoperative care after foot and ankle surgery
-
•
Nonverbal or nonambulatory patients who require inspection of the body parts periodically, permitting relief of compression or areas of localized pressure.
Method
-
•Materials:
-
○Cast padding (Webril)
-
○Cast material: plaster of Paris or synthetic fiberglass cast rolls. These are typically 4 to 6 inches wide for plaster of Paris rolls or 4 to 5 inches wide for fiberglass rolls.
-
○Elastic bandage; All Cotton Elastic (ACE) bandage
-
○A bucket with water (room temperature, ideally between 22° and 25 °C)
-
○Stockinette (optional)
-
○Reston foam (optional)
-
○Silk tape (optional)
-
○

-
•Technique
-
○Patient position:
-
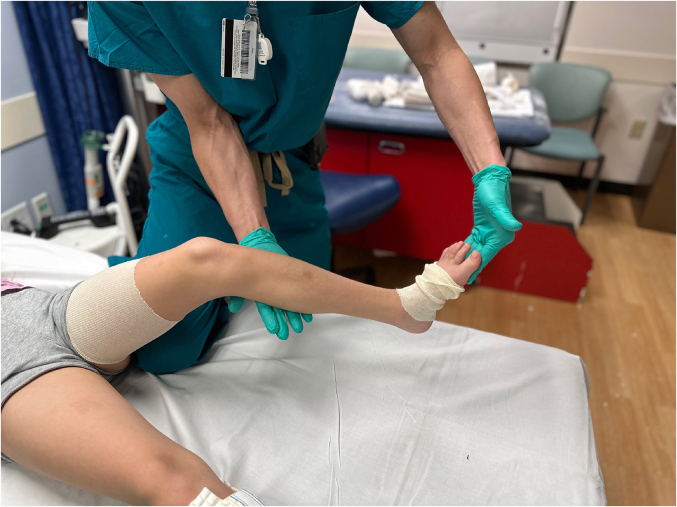
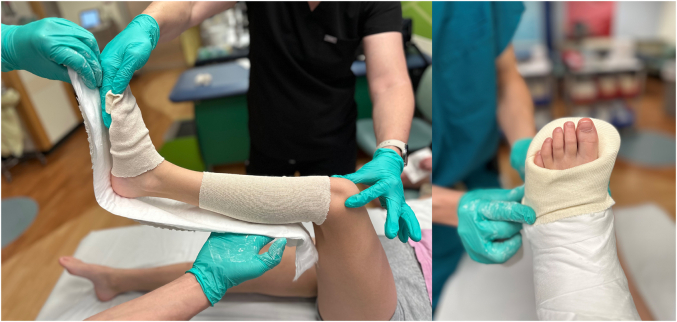
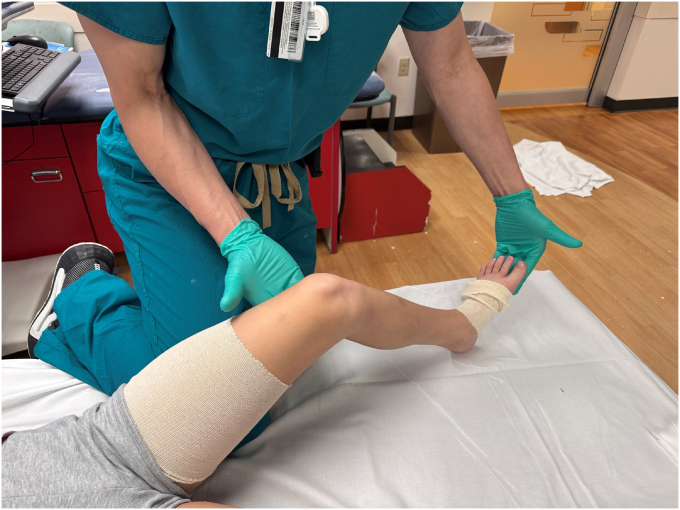
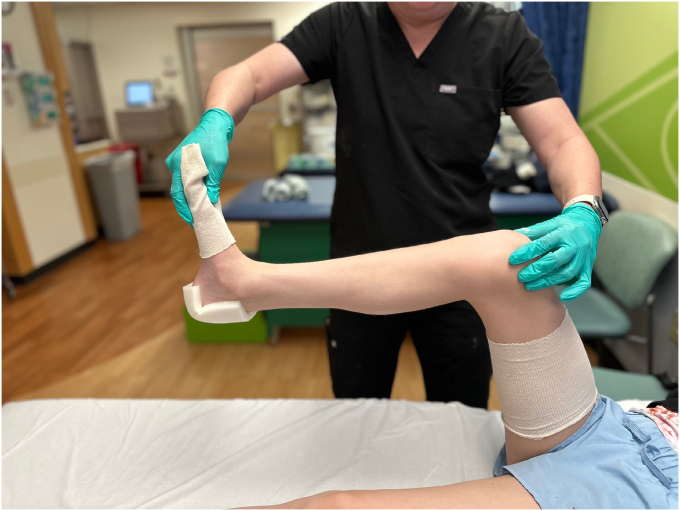
▪Position the patient either supine on the stretcher with an assistant holding the limb in the desired position or seated with the leg off the edge of the stretcher and the patient's foot resting on your thigh while you're sitting on a stool.
-
▪
-
○

-
▪Alternatively, in the supine position, a large bump or bolster can be placed under the patient's thigh, while an assistant provides support for the knee and hip in flexion. In the photo, the assistant's knee is being used as a bump under the patient's thigh.
-
▪An assistant is typically required to stabilize the splint while the ACE wrap is applied.
-
▪Once secured, the assistant's role shifts to supporting hip and knee flexion, while you maintain the ankle in the desired position as the splint sets.

-
○
Splint preparation:
-
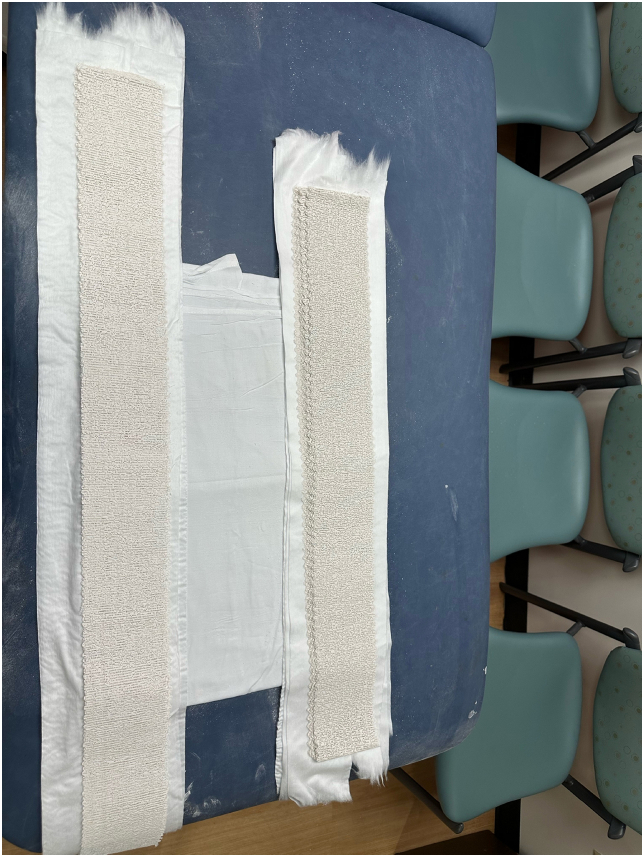
▪Measure the splint length using the plaster itself, extending from just below the popliteal fossa to the proximal phalanges just distal to the metatarsophalangeal (MTP) joint. Mark the length with a small notch in the plaster. Alternatively, cast padding can be used for measurement.

-
▪
Unroll the plaster to create a posterior splint approximately 10 to 12 layers thick. The contralateral limb may be used for reference.
-
▪
For toe fractures, ensure the splint extends beyond the toes and adjust the measurement accordingly.
-
▪When applying an Arbeitsgemeinschaft für Osteosynthesefragen (AO) splint, measure the U-slab laterally from the proximal fibula going to the corresponding medial side.
-
○
Padding:
-
▪
In the acute trauma setting, prepadding the splint is preferred.
-
▪
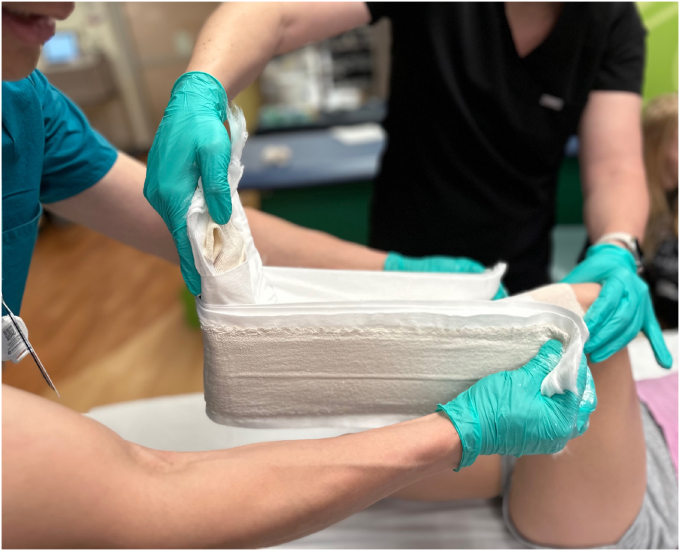
On a flat surface, unroll four layers of cast padding, ensuring it extends beyond the length and width of the anticipated plaster slab.
-
▪Position the correct-length plaster slabs (10-12 layers) at the center of the padding and add another layer or two of padding over the plaster to make a “sandwich.”

-
▪For postoperative splinting, circumferential padding is an alternative. In this case, it is essential to apply the padding in the intended final splint position and remove the anterior ankle padding after application.

-
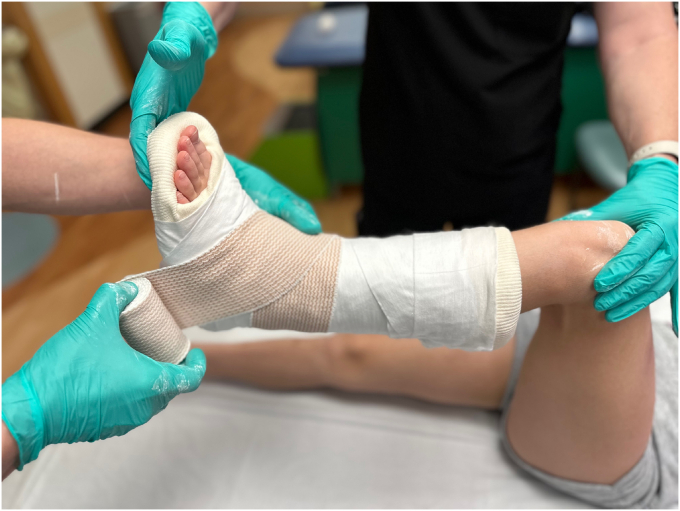
▪Applying two short stockinettes that extend a few centimeters beyond the splint's end allows for rolling them over before securing with an ACE wrap, effectively creating a neatly cuffed edge.
-
▪Apply extra padding over bony prominences, including the heel pad (consider using a small rectangle- or donut-shaped Reston foam), tibial crest, fibular head, and malleoli. Ensure that the edges of the splint are adequately padded to prevent pressure sores.

-
▪
If applying an AO splint, use the same padding technique for the U-slab, as described earlier.
-
○
Splint application:
-
▪Soak the splint in room-temperature water until the bubbling stops. Remove any excess moisture and expel air bubbles by sliding the splint between two fingers several times; this will expel excess water and facilitate the incorporation of the plaster and the fibers.

-
▪
Position the slab on the prepared padding, ensuring to laminate it with your hand. Roll the edges of the padding over the slab, making sure all of the wet plaster is covered with cast padding.
-
▪
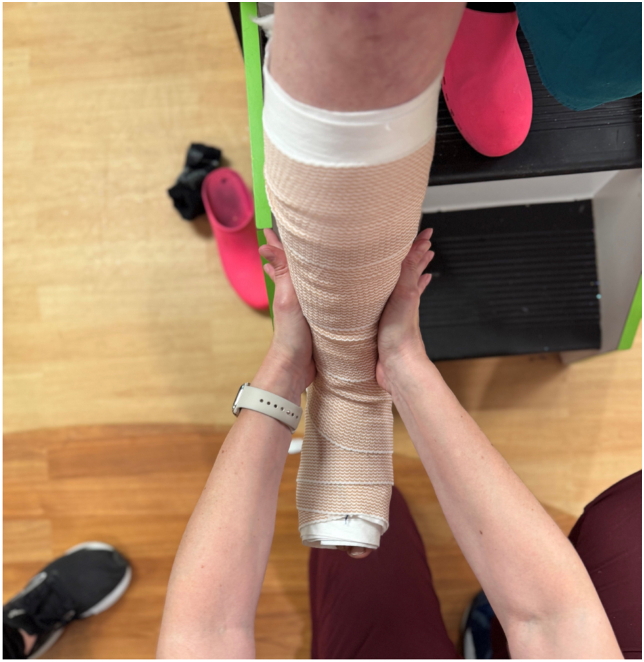
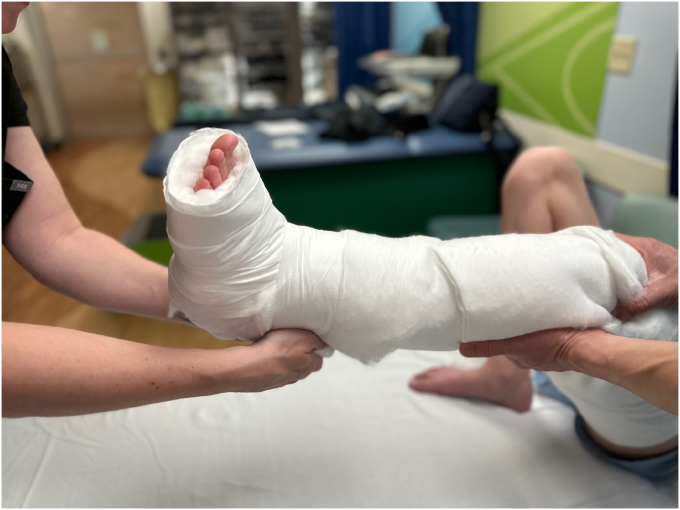
Apply the posterior splint from the base of the metatarsal heads to the proximal fibula. If the splint is too long, it is better to trim it to the appropriate size rather than folding it. Secure the splint tightly with an ACE wrap, fastening the ends with either Velcro or silk tape.
-
▪
For an AO splint, particularly when immobilizing an ankle fracture/sprain, it is advisable to add a U-slab (stirrup) to provide medial and lateral support. This should extend from the level of the proximal fibula to the corresponding medial side.
-
○
Molding:
-
▪For an AO splint, a supramalleolar mold is recommended, achieved by applying pressure with the palm of your hand just above the medial and lateral malleoli, allowing the splint to match the contours of the ankle. Unstable bimalleolar and trimalleolar ankle fractures in adolescents can be maintained in a reduced position by molding the splint as well; typically, with one palm above the medial malleolus and one palm over the lateral ankle to hold the talus in the mortise.
-
▪
Settle the splint with the ankle in plantigrade position.


Pearls and pitfalls
-
•
Maintaining a plantigrade position is preferable, but unlike adults, children experience less ankle stiffness. The advantage of having a plantigrade foot is that it makes it easier to lift the foot off the floor while using crutches or a walker.
-
•
Swelling worsens after 2 to 3 days; if you are concerned about the swelling, bulky padding or a Bulky Jones may be applied under the slabs to accommodate it. Keep in mind that the more padding applied, the less support you will have at the injury site.
-
•Ensure the U-slab is applied slightly posteriorly to prevent them from joining anteriorly, which is equivalent to a circumferential cast construct.


-
•
Use cooler water when preparing an AO splint or when no assistant is available as this gives you more time to apply the splint until the plaster hardens.
-
•
When measuring the splint, remember that plaster shrinks by approximately 5% when wet. Therefore, always add 1 to 2 cm to the measured length of the slabs.
-
•
A biomechanical study conducted by Walley et al. showed that removing anterior ankle padding following the final splint application in a neutral position reduced anterior contact forces at the ankle by 46% to 59%. It is imperative to apply padding in the intended final splint position and to remove anterior padding after splint application [6].
Complications [7,8]
-
•Thermal injury:
-
○Plaster poses a greater risk of thermal injury than fiberglass. When mixed with water, plaster undergoes an exothermic reaction that produces gypsum. The risk of thermal injury significantly increases with the use of fast-setting plaster, excessive splint thickness (particularly beyond 24 layers), and high water temperatures (>50 °C) [8]. Most manufacturers recommend using water temperatures between 21 °C and 24 °C to reduce this risk.
-
○
-
•Pressure sores:
-
○Pressure sores can arise from wrinkled stockinette or padding, underpadded bony prominences, irregular splint ends, and from indentations caused by deep finger imprints that lead to pressure points.

-
○

-
•Dermatitis and wound infection:
-
○These are ypically secondary to a wet cast or splint that remains in contact with the skin and causes irritation.
-
○Bacterial or fungal infections can occur under a splint, and they are more common in the presence of an open wound. A moist, warm environment increases the risk of infection.
-
○
-
•Joint stiffness and muscle contractures:
-
○These are rare in children and typically associated with temporary immobilization.
-
○
-
•Compartment syndrome:
-
○The most concerning complication of circumferential casts, although the risk decreases with splinting, is that Webril or ACE wrap can still cause significant constriction.
-
○To reduce the likelihood of compartment syndrome, we prefer using prepadded splints (rather than circumferential cast padding under the plaster splints), placing the U-slab slightly posterior to prevent them from adjoining anteriorly and to avoid pulling the ACE wrap too tightly during application.
-
○A patient with pain under a splint needs to be clinically evaluated and not prescribed opioids over the phone.
-
○
-
•
Loss of reduction
-
•Peroneal nerve palsy:
-
○Avoid ending the U-slab at the level of the fibular neck or head; it should end just below the fibular neck.
-
○
Master's Method.
Dr. Charles T. Mehlman: The keys to successful splinting are avoiding undue heel pressure and preventing splint breakdown at the ankle junction. Ortho-Glass is commonly used in urgent care clinics and in emergency rooms (ERs) without experienced cast technicians. Some of the worst sores we have encountered are due to these splints. If there is no other option, the goal should be to remove the Ortho-Glass splint as soon as possible and switch to a custom splint or cast.
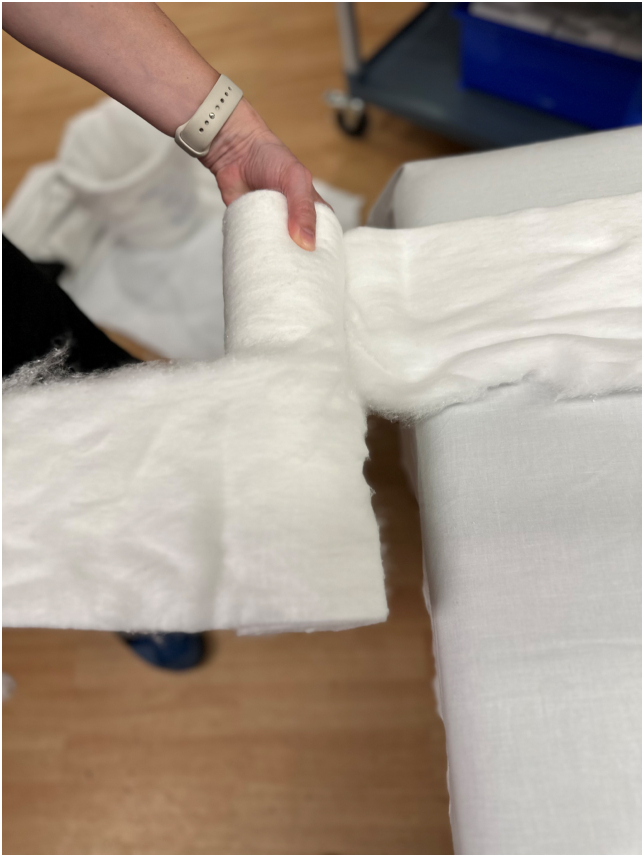
Excessive heel pressure can be avoided with extra heel padding and by properly applying wet plaster. This is different from using partially set plaster and gradually wrapping it with an ACE wrap (either distal first or proximal first) while leveraging it across the right angle of the ankle joint. That technique almost guarantees unwanted heel pressure. Hsu et al. [Orthopaedics 2013] published a clever technique aimed at completely eliminating heel pressure [9]. Shown in the images are two rolls of cotton padding placed behind the heel between the cast padding and posterior slab of plaster. After the splint hardens, these rolls are removed, allowing the heel to float without friction.

Master's Method.
Dr. Robert J. Bielski: ∗Always position the extremity as intended for splinting. This patient was padded with the foot in equinus. When the foot is adjusted to a neutral position, you can see that all the cotton bunches, which can often lead to pressure sores inside the splint or cast.

∗ Whenever you cross a joint with cotton (ankle in this case), always cover the joint first, overlap 50% distally, cover the joint again, and then overlap 50% proximally.

Long leg splint (above-knee splint)
Indications
In many emergency departments, the long leg splint has been virtually replaced by a knee immobilizer for mild to moderate injuries of the knee, but the splint is still a good tool for temporary immobilization of injuries that require operative treatment, in the treatment of unstable/angulated fractures, and for patients whose extremities are too large or conical for a knee immobilizer to fit well.
Common indications in trauma to use a long leg splint are as follows [1,2,5]:
-
•
Tibial shaft fractures
-
•
Distal femur fractures
-
•
Tibial tubercle fractures
-
•
Proximal tibial fractures
-
•
Soft tissue injuries (e.g., knee ligament injuries, tendon injuries, cellulitis, and fracture blisters)
-
•
Patellar fractures and dislocations
-
•
Postoperative knee and tibial surgery immobilization
Method
-
•Materials:
-
○Cast padding (Webril)
-
○Cast material: plaster of Paris or synthetic fiberglass cast rolls. These are typically 4 to 6 inches wide for plaster of Paris rolls or 4 to 5 inches wide for fiberglass rolls.
-
○Elastic bandage; ACE bandage
-
○A bucket with water (room temperature, ideally between 22° and 25 °C)
-
○Stockinette (optional)
-
○Reston foam (optional)
-
○Silk tape (optional)

-
○

-
•Technique
-
○Patient position:
-
▪Position the patient lying on their back on the stretcher. An assistant is crucial for providing traction and helping with the reduction to apply this splint.
-
▪The assistant may apply manual traction through the ankle while the splint is being applied or place one hand on the heel or metatarsal heads and the other just below the popliteal fossa for stability and traction. Elevating the knee on the stretcher can function as a thigh bump to support the upper leg. It is crucial to maintain the knee in at least 20° to 30° of flexion and the ankle in a plantigrade position while applying the splint.
-
▪
-
○

-
○
Splint preparation:
-
▪
Use the contralateral uninjured side for measurement.
-
▪For the posterior slab, measure from just below the gluteal fold to the metatarsal heads. Mark the length with a small notch in the plaster. Alternatively, you can use cast padding for measurement.

-
▪
For the U-slab, measure from the proximal thigh on both sides, extending around the ankle and across to the opposite side of the proximal thigh. For the posterior slab, roll out 12 to 15 layers of plaster, and for the U-slab, roll out 10 to 12 layers.
-
○
Padding:
-
▪
Two short stockinette pieces are placed proximally and distally, extending a few centimeters beyond the ends of the splint to allow for rolling over before wrapping with the ACE wrap.
-
▪
On a flat surface, unroll four layers of cast padding, making sure it extends beyond the length and width of the expected plaster slab.
-
▪Position the appropriately sized plaster slabs (12-15 layers) at the center of the padding, and place one or two additional layers of padding over the plaster to create a "sandwich."
-
▪
Circumferential padding is an alternative for cases with a low risk of swelling concerns.
-
▪
If using circumferential padding, apply the padding in the intended final splint position and remove the anterior ankle padding after application.
-
▪Add extra padding to bony prominences, including the heel pad (consider using a piece of Reston foam), patella, tibial crest, fibular head, and malleoli. Ensure that splint edges are padded sufficiently to avoid pressure sores.
-
▪
If applying an AO splint, use the same padding technique as described earlier.
-
○
Splint application:
-
▪
Soak the splint in room-temperature water until the bubbling stops. Remove any excess moisture from the plaster and squeeze out any air bubbles by running the slab repeatedly between two fingers.
-
▪
Apply the padding to the slab as discussed earlier and make sure to laminate the slab with your hand to make it one piece.
-
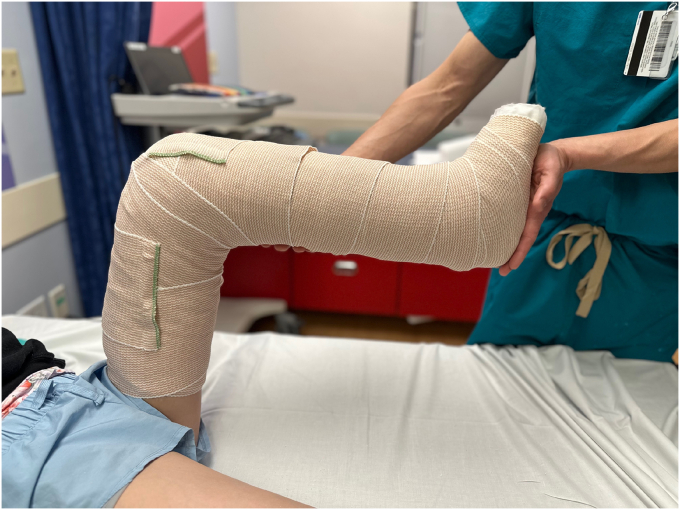
▪Apply the posterior splint from the base of the metatarsal heads to the proximal thigh and secure it with one layer of cast padding.

-
▪Then apply the U-slab and secure it definitively with an ACE wrap and secure the end with either Velcro or silk tape.

-
○
Molding:
-
▪
While the plaster is drying, it is essential to apply a supracondylar mold, supramalleolar mold, or both. Avoid placing deep imprints over bony prominences; use only the palm of your hand.


Pearls and pitfalls
-
•
A plantigrade position is preferable; however, ankle stiffness is less common in children than in adults. The advantage of having a plantigrade foot is that it facilitates easier foot clearance from the floor while using crutches or a walker.
-
•
Swelling decreases after 2 to 3 days. If you are concerned about the swelling, you may apply bulky padding or a Bulky Jones splint under the slabs to accommodate it. Keep in mind that the more padding you apply, the less support you will have at the injury site.
-
•
Make sure to apply the U-slab slightly posterior to prevent it from joining anterior to prevent a circumferential cast construct.
-
•
Consider a padded slab of plaster over the anterior knee if there is concern that the posterior-only support of the knee is not enough.
-
•
Use cooler water when preparing an AO splint if no assistant is available; this allows more time to prepare before the plaster hardens.
-
•
When measuring the splint, keep in mind that plaster shrinks by about 5% when wet. Therefore, always add 1 to 2 cm to the measured length of the slabs.
-
•
A biomechanical study conducted by Walley et al. showed that removing anterior ankle padding following the final splint application in a neutral position reduced anterior contact forces at the ankle by 46% to 59%. It is imperative to apply padding in the intended final splint position and to remove anterior padding after splint application.
Complications [7,8]
-
•Hyperextension of the knee:
-
○Placing the knee in extension may excessively strain the posterior neurovascular structures.
-
○
-
•Thermal injury:
-
○Plaster poses a greater risk of thermal injury than fiberglass. When mixed with water, plaster undergoes an exothermic reaction that produces gypsum. The risk of thermal injury significantly increases with the use of fast-setting plaster, excessive splint thickness (particularly beyond 24 layers), and high water temperatures (>50 °C) [8]. Most manufacturers recommend using water temperatures between 21 °C and 24 °C to reduce this risk.
-
○
-
•Pressure sores:
-
○Pressure sores can arise from wrinkled stockinette or padding, under-padded bony prominences, irregular splint ends, and from indentations caused by deep finger imprints that lead to pressure points.
-
○
-
•Dermatitis and wound infection:
-
○These are usually secondary to a wet cast/splint that stays in contact with the skin and causes irritation.
-
○Bacterial or fungal infections can occur under a splint, particularly in the presence of an open wound. A moist and warm environment serves as an excellent nidus for infection.
-
○
-
•Joint stiffness and muscle contractures:
-
○These are rare in children and typically associated with temporary immobilization.
-
○
-
•Compartment syndrome:
-
○The most concerning complication of cylindrical casts is that, although the risk is reduced with splinting, a Webril or an ACE wrap can still lead to significant constriction.
-
○To reduce the likelihood of compartment syndrome, we prefer using prepadded splints, positioning the U-slab slightly posterior to prevent them from adjoining anteriorly and to avoid tightening the ACE wrap too much during application.
-
○A patient with pain under a splint needs to be clinically evaluated and not prescribed opioids over the phone.
-
○
-
•
Loss of reduction
Master's Method.
Dr. Junichi Tamai: Some pearls for application of long leg splint include the following:
-
•
When wringing out excess water from the long plaster slab for the posterior long leg splint, place the water bucket on the floor on a towel, dip the plaster, and then wring it out into the bucket between your fingers (rather than trying to perform this task with the bucket on a table).
-
•
If you use a stockinette at the bottom of the splint, you can fold it back and make sure all the toes are visible.
-
•
To provide extra stability at the knee (and prevent too much flexion or extension), you can add diagonal reinforcement slabs of plaster.
-
•For very small patients, to prevent the splint from falling off, flex the knee to 90° and then wrap the elastic bandage around the bottom of the foot and up around the flexed knee, followed by wrapping the bandage as usual.


Bulky Jones (Robert Jones bandage)
Indications
Robert Jones dressing is thought to reduce blood loss and soft tissue edema, especially in the postoperative period, by increasing the intratissular pressure, thereby helping lower limb venous reflux [10].
It is typically used for short-term immobilization of soft tissue injuries, postoperative immobilization, or in cases of acute trauma such as [11]:
-
•
Proximal tibia and fibular fractures
-
•
Calcaneal fractures
-
•
Foot and ankle fractures with significant soft tissue injuries, including fracture blisters
-
•
Soft tissue injuries around the ankle and knee. (e.g., ligamentous injuries, tendon injuries, and blisters)
Methods
-
•Materials:
-
○Red Cross cotton
-
○ACE bandage
-
○Silk tape (optional)

-
○

-
•Technique:
-
○Patient position:
-
▪The patient is positioned supine on the stretcher. Depending on the injury, either the patient lifts his extremity or an assistant helps lift it for the application of the Bulky Jones splint.
-
▪
-
○Application:
-
▪Wrap Red Cross cotton around the extremity, starting a few inches above the malleoli and extending to the groin. Use a 50% overlap between each layer to achieve two or three layers of Red Cross cotton around the limb, including the foot and ankle as necessary.

-
▪
-
○

-
▪Wrap the Red Cross cotton with regular cotton padding (Webril) to create the essential compression layer with constriction.
-
▪Finish the dressing by wrapping an ACE bandage or bias-cut cotton around the Red Cross cotton and securing it with either Velcro or silk tape.
-
▪If you need extra support, you may place plaster slabs over the Webril layer and then apply another layer of Webril and ACE wrap on top.


Pearls and pitfalls
-
•Layering is key
-
○Proper sequential application of padding, compression, and outer layers guarantees even pressure distribution without causing excessive constriction.
-
○
-
•Monitor neurovascular status
-
○Evaluate distal pulses, capillary refill, sensation, and motor function to identify early signs of vascular compromise or compartment syndrome.
-
○
-
•Avoid wrinkles and folds
-
○Smoothly applying the layers prevents pressure points and skin irritation. If the Red Cross cotton roll is too wide for a smaller leg, you can split it longitudinally to make it easier to maneuver around joints like the ankle.
-
○

-
•Adjust compression based on swelling
-
○The dressing should accommodate natural postinjury swelling without causing excessive constriction.
-
○
-
•Educate patients and caregivers
-
○Provide clear guidance on monitoring for pain, numbness, or cold extremities, and when to seek medical attention.
-
○
-
•Short-term use preferred
-
○It is ideal for temporary immobilization and controlling swelling, but it should be frequently reassessed for fit and effectiveness.
-
○
Complications
-
•Compartment syndrome
-
○If applied too tightly, the dressing can elevate intracompartmental pressure, resulting in ischemia and damage to nerves and muscles.
-
○
-
•Skin breakdown and pressure ulcers
-
○Extended use or inadequate padding can cause skin maceration, blistering, or pressure sores.
-
○
-
•Vascular compromise
-
○Excessive compression may lead to distal ischemia, as indicated by pallor, delayed capillary refill, or absent pulses.
-
○
-
•Loss of immobilization
-
○If applied too loosely, the dressing might not offer sufficient support, diminishing its ability to control swelling and stabilize the limb.
-
○
-
•Infection
-
○If moisture builds up under the dressing or if the wound is not properly managed, the risk of infection rises.
-
○
Master's Method.
Dr. Charles T. Mehlman: Robert Jones had a significant impact on orthopaedic practice on both sides of the Atlantic. The earliest versions of the Robert Jones pressure bandage were focused on knee injuries and were constructed solely from soft materials (i.e., without the incorporation of rigid splints). Commonly accepted synonyms for the Robert Jones bandage include Bulky Jones and AO splints, with plaster U-splints and posterior plaster splints almost always added for fracture stabilization. Several recipes exist, but key components include an initial, substantially thick cotton cast padding layer (the so-called Robert Jones cotton is not always available) designed to accommodate swelling, followed by gently compressive layers that may feature Kerlix or Kling and ACE bandages. Any plaster splints are typically applied directly to the cotton layer and then secured with Kerlix or Kling (if available), followed by ACE bandages.
Summary
The application of lower extremity splints is a crucial skill in orthopaedic practice, playing a vital role in the acute management of fractures, soft tissue injuries, and postoperative care. Proper splinting technique is essential for ensuring adequate immobilization, pain control, and preventing complications such as pressure ulcers, compartment syndrome, and neurovascular compromise. This paper offers a comprehensive overview of the principles of lower extremity splinting, including indications, material selection, step-by-step application, and potential complications. By following best practices and evidence-based techniques, clinicians can optimize patient outcomes, enhance comfort, and facilitate the healing process.
Test your knowledge
Review questions and answers for the JPOSNA® Primer on Cast and Splint Application can be found through the links below. View the questions View the answers
Author contributions
Wasim Shihab: Conceptualization, Investigation, Writing – original draft. Jaime Denning: Conceptualization, Supervision, Writing – review & editing.
Additional links
Ethics approval and consent
The authors declare that no patient consent was necessary as no images or identifying information are included in the article.
Funding
None.
Declaration of competing interests
The authors declare that they have no known competing financial interests or personal relationships that could have appeared to influence the work reported in this paper.
Acknowledgments
We thank our consultant cast masters Charles T. Mehlman, DO, MPH; Robert J. Bielski, MD; and Junichi Tamai, MD.
Footnotes
This article is part of a special issue entitled: JPOSNA® Primer on Cast and Splint Application published in Journal of the Pediatric Orthopaedic Society of North America.
Supplementary material to this article can be found online at https://doi.org/10.1016/j.jposna.2025.100248.
Appendix A. Supplementary material
The following are the Supplementary material to this article:
References
- 1.Thompson S.R. 2nd ed. Elsevier; Philadelphia, Pennsylvania: 2023. Manual of splinting and casting. [2023] ©2024. [Google Scholar]
- 2.Beaty James H., Kasser James R., editors. Rockwood and Wilkins; fractures in children. 6th ed. Lippincott Williams & Wilkins; Philadelphia: 2006. [2006] ©2006. [Google Scholar]
- 3.Boyd A.S., Benjamin H.J., Asplund C. Principles of casting and splinting. Am Fam Physician. 2009;79(1):16–22. [PubMed] [Google Scholar]
- 4.Doski J., Shaikhan R. Robert Jones bandage versus cast in the treatment of distal radius fracture in children: a randomized controlled trial. Chin J Traumatol (Engl Ed) 2023;26(4):217–222. doi: 10.1016/j.cjtee.2023.04.001. [DOI] [PMC free article] [PubMed] [Google Scholar]
- 5.Campbells Operative Orthopaedics . Elsevier; Philadelphia, PA: 2020. Fourteenth edition. 2020. Elsevier, [2021] ©2021. [Google Scholar]
- 6.Walley K.C., Farrar N., Shams K., Anastasio AT, Gong D, Mell K, et al. Surface pressures in lower extremity splints: a biomechanical study. Foot Ankle Orthop. 2023;8(1) doi: 10.1177/24730114231160115. Published 2023 Mar 13. [DOI] [PMC free article] [PubMed] [Google Scholar]
- 7.Halanski M., Noonan K.J. Cast and splint immobilization: complications. J Am Acad Orthop Surg. 2008;16(1):30–40. doi: 10.5435/00124635-200801000-00005. [DOI] [PubMed] [Google Scholar]
- 8.Ahmed S.S., Carmichael K.D. Plaster and synthetic cast temperatures in a clinical setting: an in vivo study. Orthopedics. 2011;34:99. doi: 10.3928/01477447-20101221-11. 99. [DOI] [PubMed] [Google Scholar]
- 9.Hsu R.Y., Lareau C.R., Born C.T. Novel posterior splinting technique to avoid heel ulcers. Orthopedics. 2013;36(1):31–32. doi: 10.3928/01477447-20121217-03. [DOI] [PubMed] [Google Scholar]
- 10.Brodell J., Axon D., Evarts C. The Robert Jones bandage. J Bone Joint Surg Br. 1986;68-B(5):776–779. doi: 10.1302/0301-620X.68B5.3782244. [DOI] [PubMed] [Google Scholar]
- 11.Chudnofsky C.R., Chudnofsky A.S. In: Roberts and hedges' clinical procedures in emergency medicine and acute care. 7th ed. James R.R., editor. Elsevier; Amsterdam: 2019. Chapter 50: splinting techniques. [Google Scholar]
Associated Data
This section collects any data citations, data availability statements, or supplementary materials included in this article.