

Abstract
We provide a protocol that describes an explant system that allows the dynamics of motor axons to be imaged. This method is based on nerve–muscle explants prepared from the triangularis sterni muscle of mice, a thin muscle that covers the inside of the thorax. These explants, which can be maintained alive for several hours, contain long stretches of peripheral motor axons including their terminal arborizations and neuromuscular junctions. Explants can be prepared from transgenic mouse lines that express fluorescent proteins in neurons or glial cells, which enables direct visualization of their cellular and subcellular morphology by fluorescence microscopy. Time-lapse imaging then provides a convenient and reliable approach to follow the dynamic behavior of motor axons, their surrounding glial cells and their intracellular organelles with high temporal and spatial resolution. Triangularis sterni explants can be prepared in 15 min, imaged ex vivo for several hours and processed for immunohistochemistry in about 2 h.
Introduction
In this protocol, we describe an imaging technique to study motor axons over time in an acute nerve–muscle explant of the triangularis sterni muscle (the ‘triangularis sterni explant’). The triangularis sterni muscle originates from the inside of the sternum and inserts on the internal rib cage. It is innervated by branches of the upper intercostal nerves, which extend superficially through the muscle and form an endplate band that is typically localized along the craniocaudal axis parallel to the border of the sternum (Fig. 1)1. The triangularis sterni explant thus contains distal motor axons, their intramuscular arborizations, neuromuscular synapses and the innervated muscle fibers. A variant of the triangularis sterni explant was first described by McArdle et al.1 and has been used previously to study neuromuscular physiology and pathophysiology2–5. We describe a simplified preparation here, on the basis of methods published by our lab6,7. This muscle provides a number of advantages for imaging experiments. First, it is a particularly thin muscle that consists only of a few (<5) layers of muscle fibers. As a consequence, the innervating motor axons and their branches run superficially and can be followed along their entire course up to their presynaptic terminals on neuromuscular endplates. Second, the triangularis sterni has basically no sensory innervation, so all neurites branching into the muscle are motor axons8. Third, as the muscle originates and inserts on bony components of the rib cage, it can be easily dissected without damaging the muscle. This allows the muscle to be isolated at very young ages (as early as embryonic day 13, when neuromuscular junctions first form). Fourth, the triangularis sterni explant contains the entire arborizations and all endplates of the intercostal motor axons entering the muscle. This allows the reconstruction of motor units, e.g., by using transgenic mouse lines, which express fluorescent proteins in a subset of motor axons9 or which show combinatorial expression of spectrally different fluorescent proteins in individual neurons10. Finally, the muscle is multisegmental and, as a consequence, it is innervated by axons derived from different intercostal nerves, which anastomose only once they reach the endplate band. This anatomical pattern allows selective stimulation or partial denervation experiments, in which some inputs are stimulated or transected and the compensatory response of the remaining axons is analyzed.
Figure 1.
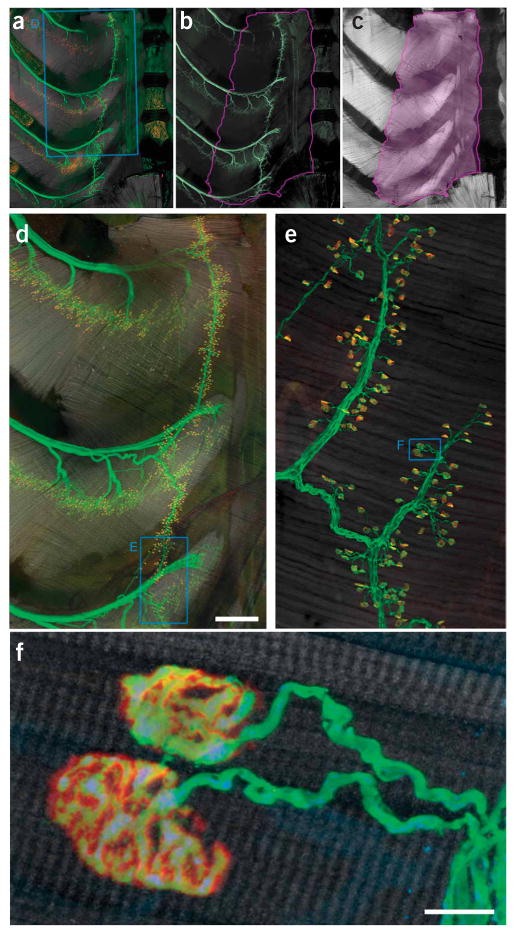
Innervation pattern of the triangularis sterni muscle. (a–c) Triangularis sterni muscle and its innervation in a thy1–YFP16 mouse with YFP-labeled axons18. (a) Combined labeling of axons (green), synapses (red) and muscle (gray scale). (b) Axonal labeling. (c) Muscle stain. The violet line in b and c outlines the triangularis sterni muscle between the inner surface of the sternum to the proximal rib cage. (d) Confocal reconstruction of the area boxed in a, showing the multisegmental innervation of the triangularis sterni muscle. (e) High-power confocal reconstruction of a part of the endplate band (boxed area in d). (f) Confocal image showing two individual neuromuscular junctions boxed in e. Accumulations of mitochondria can be found in presynaptic terminals. YFP (axonal cytoplasm), green; BTX (acetylcholine receptors), red; phalloidin (muscle), gray scale. Scale bars, 500 μm in d and 10 μm in f.
Clearly, there are also certain limitations of this explant system, which need to be considered (for details, see TROUBLESHOOTING table). One obvious limitation is that, during preparation of the explant, the intercostal nerves, which innervate the triangularis sterni muscle, are separated from their neuronal cell bodies. As a result, the axotomized axons start to undergo Wallerian degeneration between 12–24 h after preparation. This limits the lifespan of the explant and thus the time period over which axonal changes can be imaged. Our studies indicate, however, that axonal morphology and even intracellular processes like the rate of transported mitochondria (i.e., the number of mitochondria that cross a fiduciary mark) remain unchanged compared with the in vivo situation for at least the first 2 h after preparation6,7. Further studies using muscles derived from mutant mice (WLDS mice), in which Wallerian degeneration is delayed, indicate a way by which the lifetime of the preparation can be extended in some experimental paradigms that are not impacted by the WLDS mutation11. Obviously, changes related to the absence of neural activity (such as the internalization of acetylcholine receptors; see Fig. 2f) can occur, but introducing external stimulation is easy. Although the triangularis system can provide valuable insight into acute axonal physiology or pathology, it cannot replace in vivo approaches for the study of chronic axonal changes that require repetitive monitoring over several days, such as in vivo imaging of the sternomastoid muscle12–14. For in vivo imaging, the anatomical location of the triangularis sterni muscle on the inside of the thorax is prohibitive, preventing a direct in vivo–ex vivo comparison using this muscle.
Figure 2.
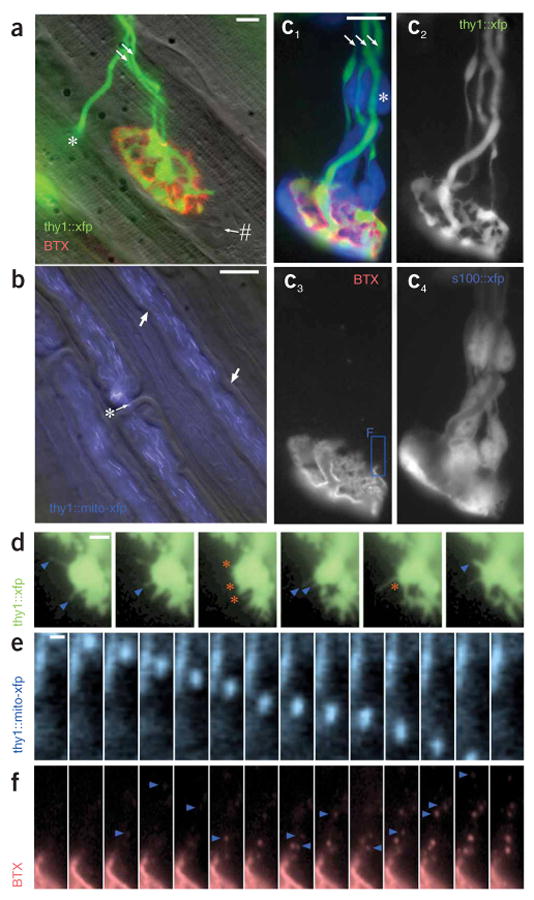
High-resolution images from living triangularis sterni explants prepared as described in this protocol. (a) Developing neuromuscular junction with two axonal inputs (arrows) during synapse elimination at postnatal day (P) 9. Fluorescently tagged BTX (red) highlights postsynaptic acteylcholine receptors, axons are transgenically labeled with YFP (green; thy1-YFP-16 mouse), and muscle is revealed by oblique illumination (gray scale). #, myonucleus; *, motor axon that exits the focal plane to innervate a deeper synapse on the left. (b) Superficial axons in the intercostal nerve. Myelin sheaths are visualized by oblique illumination (gray scale), whereas axonal mitochondria are transgenically labeled with CFP (blue) in a thy1-mitoCFP-S mouse7. Arrows, Schmidt–Lantermann incisures; *, node of Ranvier. (c) Developing neuromuscular junction (c1 merge; c3, BTX, red) innervated by three axons (arrows) (c2, CFP, green) sheathed by Schwann cells (c4, GFP, cyan) in a P10 thy1-CFP5 × s100-GFPKosmos double transgenic mouse21. *, Schwann cell nucleus. The boxed area in c3 is shown at higher magnification in f. (d–f) Time-lapse series of cellular and subcellular axonal dynamics in explants. (d) Transgenically labeled axonal filopodia (YFP, green) that extend (blue arrowheads) and retract (orange asterisks) from a developing (P11) neuromuscular junction imaged for approximately 20 min. (e) Transgenically labeled mitochondrion (CFP, blue) that is transported inside an axon (frame rate, 1–2 Hz). (f) Postsynaptic acetylcholine receptors (BTX, red) that are endocytosed by the muscle fiber over a period of ∼1 h (note that this fast turnover likely results from the absence of neurotransmission in this unstimulated explant). Scale bars, 10 μm in a and b; 5 μm in c; 2.5 μm in d; 0.5 μm in e.
The main application of the triangularis sterni explant is thus short-term, high-resolution imaging of peripheral motor axons, their synapses and their surrounding glial cells. Motor axons are ideally suited for imaging studies because their large diameter allows the visualization of intra-axonal processes. Furthermore, neuromuscular junctions between motor axons and muscle fibers are among the biggest and most readily accessible synapses in the mammalian nervous system15. Finally, excellent fluorescent probes and transgenic animals that highlight components of the neuromuscular system are available16, which can easily be used in combination with this explant system (see Experimental design). Many aspects of motor axon physiology and pathology that have previously been addressed in fixed tissue can now be analyzed in a time-resolved fashion. One example is provided by our recent study of axonal transport, which made use of new transgenic mice with labeled neuronal mitochondria7. In this study, we have shown that axonal transport rates in the acute explants were in a similar range as those measured in the sciatic nerves of living mice. However, 2 h after excision of muscle and nerves, axonal transport rates began to decline, possibly because no new mitochondria were provided by the disconnected cell bodies.
Another application of the triangularis sterni explant is the study of neuromuscular development. The neuromuscular junction has long been used as a model to study synapse elimination in the developing nervous system17. Key aspects of synapse elimination can be followed ex vivo in triangularis sterni explants derived from early postnatal mice. In one study, we used a combination of in vivo microscopy, ex vivo imaging and serial electron microscopy to understand how axons are lost during synapse elimination6. Time-lapse imaging revealed that axons retreat from synapses by shedding part of their material as small ‘axosomes’. The dynamic characteristics of axosome shedding became apparent only because we were able to image retreating axons with high temporal and spatial resolution in the explant.
Finally, imaging studies using the triangularis sterni explant can help to explore the pathogenesis of important neurological diseases. Motor axons are affected in a number of human diseases, which include degenerative conditions, such as amyotrophic lateral sclerosis or hereditary polyneuropathies, but also traumatic lesions and inflammatory diseases of the peripheral nerve (such as the Guillian-Barré syndrome). In many cases, isolated motor neurons in cell culture provide an unsatisfying model, as interactions of motor axons with surrounding glial cells and invading immune cells are crucial aspects of the disease process. Such interactions can, however, be followed in acute nerve–muscle explants, which preserve the local milieu of nerve and muscle. In addition to motor axons, neuromuscular junctions as well as the postsynaptic muscle fibers are targeted by diseases, such as myasthenia gravis or the various inflammatory, metabolic and degenerative myopathies, which can also be studied using the triangularis sterni explant depending on the availability of mouse models.
In summary, we provide a protocol that allows imaging of motor axons in a living explant of the triangularis sterni muscle. Owing to the particular advantages of this preparation, a number of aspects of axonal morphology and physiology can be studied with high temporal and spatial resolution. Initial studies already illustrate how this approach can provide novel insights into the dynamic behavior of motor axons in development, health and disease6,7.
Experimental design
Imaging system
To image motor axons and their synapses in the triangularis sterni explant, we use a wide-field epifluorescence microscopy system. The triangularis sterni muscle is a flat and superficial muscle with most axons running parallel to the surface and many synapses located directly below the parietal pleura that covers the preparation (Fig. 1). These anatomical characteristics make it possible to use wide-field epifluorescence microscopy (Fig. 3) without the need to resort to more expensive techniques that allow deep-tissue penetration, such as two-photon microscopy. However, if the experimental design requires more sophisticated imaging, either a confocal or two-photon microscopy system can be used.
Figure 3.
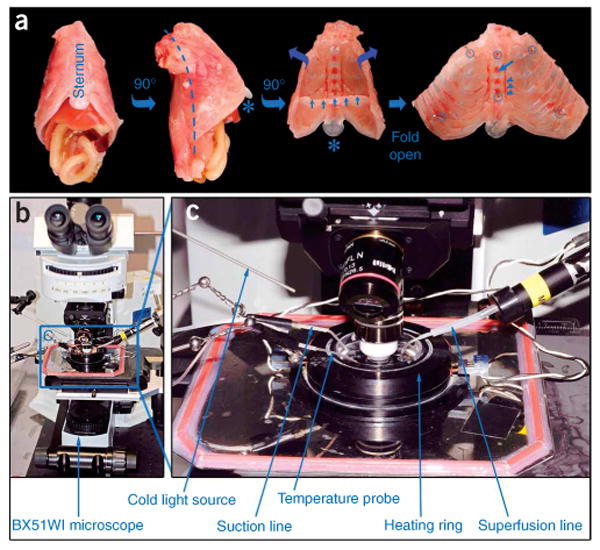
The preparation of the triangularis sterni explant. (a) Left two images show the intact thorax that is dissected after killing the mouse (first image from left, frontal view; second image, lateral view from right side after 90° rotation). Third image shows an inside view of the thorax wall after removal of the thoracic viscera (small blue arrows, remnant of diaphragm; *, xiphoid cartilage). Dashed line in second image shows paravertebral cut (a symmetrical cut is done on the left side). In the fourth image, the thorax wall is shown folded open and pinned down into a dish. Suitable positions for minuten pins are indicated by blue circles. Blue arrow points to bony part of the sternum; arrowheads indicate right internal mammary vessels. (b) Epifluorescence microscopy setup used for imaging triangularis sterni explants. (c) Close-up view of microscope stage with imaging chamber (boxed in b).
Transgenic mouse lines
Imaging of motor axons and their synapses is based on the use of transgenic mice, in which all or a subset of the motor neurons are labeled with fluorescent proteins18. Many such mouse lines are now available that differ in labeling densities (i.e., the percentage of axons labeled), spectral characteristics of the expressed fluorescent proteins or the locations to which these proteins are targeted (Fig. 2)7,10,19. An overview of transgenic mouse lines that express fluorescent proteins in different neural cell types can be found in our recent review article20. Transgenic labeling of other peripheral nervous system (PNS) structures, such as Schwann cells (Fig. 2)10,21, muscle cells22 or macrophages23, has also been reported and can readily be combined with vital dye labeling (such as fluorescently tagged α-bungarotoxin (BTX), Invitrogen; Fig. 2).
Image analysis
The analyzed parameters depend on the experiment. In many of our experiments, the primary set of data is a movie of a recorded series of images. Two conditions are critical for obtaining good movies: stability of focus (absence of z-displacement) and absence of drift (x–y displacement). Whereas the former can only be ensured by careful setting up of the superfusion and suction lines and meticulous focusing during the experiment, the latter can to some degree be corrected by postprocessing using x–y alignment software (e.g., Autoquant, Molecular Devices or the open-source software ImageJ with the ‘stackreg’ plugin, http://bigwww.epfl.ch/thevenaz/stackreg/). The resulting x–y aligned image series can then be cropped and stored as a stacked tiff format, or alternatively visualized using a standard movie format such as .avi or .mov (Metamorph software offers these capabilities, but increasingly similar features can be found with open-source ImageJ, especially when adding some of the many plugins; http://rsb.info.nih.gov/ij/).
Materials
Reagents
Transgenic mice (e.g., thy1-XFP mice18, thy1-mitoXFP7, s100-GFP21) ! CAUTION Animals should be handled according to local animal care regulations.
Pentobarbital (dose: 200–400 mg per kg body weight intraperitoneally) or equivalent lethal anesthetic
Neurobasal A medium (Invitrogen, cat. no. 21103-049), bubbled with 95% O2/5% CO2
70% (vol/vol) ethanol solution in spray bottle
- Optional reagents for postfixation immunostaining:
- 0.1 M phosphate-buffered saline (PBS) (1×)
- 1× PBS/0.1% (wt/vol) NaN3 (sodium azide)
- 4% Paraformaldehyde (PFA; wt/vol) in 1× PBS ! CAUTION PFA and azide are toxic and represent an environmental hazard. Wear personal protective gear and work under a chemical fume hood. Collect and dispose of waste liquids according to local environmental health and safety procedures.
- 0.1 M glycine in 1 × PBS
- Alexa Fluor 594-conjugated BTX (Invitrogen, cat. no. B-13423), 50 μM in Neurobasal A or 1 × PBS, 200 μl aliquots (can be stored at −20 °C for several months)
- Antifading medium for fluorescence microscopy (e.g., Vectashield, Vector Laboratories, cat. no. H-1000)
Equipment
▲ CRITICAL If (optionally) carrying out nerve transection in vivo, the surgical equipment listed below should be sterilized.
1-ml syringe with fine hypodermic needle for i.p. injection
Large medical scissors
Small-angled spring scissors
2 × anatomical tweezers, size 1 and 5
10 × minuten pins (0.2-mm diameter, shortened to <4 mm) to fix the explant in the dish
2 × 10-cm tissue culture dishes with oxygenated medium
15-cm tissue culture dish filled with ice and covered by a metal plate
3.5-cm tissue culture dish filled with Sylgard polymer (Dow Corning, Sylgard 184 Silicone Elastomer Kit)
Tubing to oxygenate explants during the dissection procedure
Dissection microscope with cold-light illumination (e.g., Olympus SZ51 equipped with Schott KL 1500 LCD)
Gravity-driven superfusion system with in-line heater (Warner Instruments)
Vacuum system with suction tube
Heating ring for 3.5-cm dishes (Warner Instruments, cat. no. 64-0110 DH-35)
Two-channel temperature control system (one output for the in-line heater and one output for the heating ring; input for a temperature probe: Warner Instruments)
Upright fluorescence microscope (e.g., BX51WI, Olympus) equipped with the following long-working distance objectives: × 4/0.13 air objective; ×20/0.5 water-immersion dipping-cone objective; × 100/1.0 water-immersion dipping-cone objective
Neutral-density and infrared-filters in light path
Fast shutter and filter wheel (Sutter Instrument Company)
Light source with light-guide for oblique illumination (Linos)
Cooled charge-coupled device (CCD) camera (e.g., Sensicam QE, Cooke Company, or Retiga XR, Qimaging)
Computer and control software (e.g., Metamorph, Molecular Devices or μManager)
x–y alignment software (e.g., Autoquant, Molecular Devices; Image J—‘stackreg’ plugin)
Graphics software (e.g., Photoshop, Adobe)
Upright confocal microscope (optional) (e.g., FV1000, Olympus) for optical high-resolution analysis
Electrophysiological equipment (optional) (suction or bipolar electrode with stimulator, e.g., Grass) for nerve stimulation
- Dissection tools for fixed tissue and staining (optional):
- Razor blade
- Anatomical tweezers
- 1-ml syringe with hypodermic needle for fine dissection
- Small-angled spring scissors with pointed tips
- 2× hypodermic needles (G23) to pin down tissue
- 10-cm tissue culture dish filled with Sylgard polymer
Equipment Setup
Epifluorescence imaging system
We use an Olympus BX51WI microscope with objective focusing and a custom-built x–y stage. The microscope is equipped with an automated filter wheel (Sutter) and standard filters for fluorescent proteins (e.g., from Chroma). To reduce photo-damage, the amount of light should be kept at the lowest possible level. Therefore, we use a fast software-controlled shutter and insert neutral density and infrared-blocking filters in the light path. If multicolor imaging is planned, and fluorescence levels differ greatly between labels, inserting a selection of neutral density filters in a second filter wheel in the excitation light path is valuable to balance excitation. The system is controlled by Metamorph software (Molecular Devices). With the right combination of supported hardware, the open source software μManager developed by the Vale lab (UCSF) is worth careful consideration.
An inlet for warmed and oxygenated medium, a suction line and a thermistor probe are mounted on the arms of magnetic stands and fine-adjusted using a ‘ball-joint’ holding system (Harvard apparatus; Fig. 3). The fluid lines are tipped by bent and beveled glass capillaries made of filamented electrophysiology glass (WPI). Any vacuum source can be used, but we find cheap aquarium pumps with inverted valves an economical and quiet solution if central vacuum lines are not available. ▲ CRITICAL It is important to mount all inserted lines so that they do not touch the dish and to attach their supports off the microscope table. In addition, conditions of slow and steady flow should be established. This avoids vibrations and drift, and steady, uninterrupted flow also prevents temperature peaks that damage the tissue.
Image acquisition
Images are acquired using a standard, cooled CCD camera, e.g., a Sensicam QE (Cooke) or a Retiga EXi (Qimaging). The sophistication and expense of the camera is dictated by the desired signal-to-noise ratio, the brightness of the label and the speed of acquisition. The standard, cooled CCD cameras mentioned above are well suited for relatively bright samples (similar to muscles derived from the thy1-transgenic mouse lines18) recorded at frequencies of a few Hz. Dimmer samples imaged at higher frequencies might benefit from the use of electron multiplying or intensified CCD camera systems. Images are recorded onto electronic media and analyzed offline.
Maintenance of the explants during preparation and recording
To keep the explant in viable condition during preparation and recording (which together span up to 4–6 h), it is important to ensure sufficient supply of oxygen and energy substrates at all times of the experiment. Furthermore, temperature and pH have to be controlled at physiological levels. To ensure this, we perform all steps in Neurobasal A medium (Invitrogen) that has been bubbled with 95% O2/5% CO2 for at least 15 min. However, the much cheaper option of normal mouse Ringer's solution can be substituted without obvious detriment. To increase the tissue's tolerance of hypoxia during dissection, the temperature is kept low by placing the dissection dish on a container filled with ice and covered with a metal plate. The dissection medium, however, should not be ice-cold, as lowering the temperature below 10 °C can have undesired effects, such as transient cold depolymerization of microtubular transport tracts. During the imaging sessions, the explant is superfused with prewarmed 95% O2/5% CO2-bubbled medium.
For most experiments, it will be important to create conditions that are as close to physiological as possible. Therefore, the temperature of the explant should be stabilized at 32–37 °C during the experiment. This can be achieved, first, by surrounding the dish with a heating ring and, second, by superfusing with prewarmed medium. For the latter, an in-line heater (a heated cylinder, with a resistor wrapped around a piece of metal tubing, through which the solution passes; e.g., Warner Instruments), which is feedback-controlled by a temperature probe, is integrated into the superfusion system. As slow superfusion rates are generally sufficient (1 ml min−1), the in-line heater often needs to be set to temperatures a few degree above 37 °C because the medium cools down again before entering the recording dish. ▲ CRITICAL When adjusting superfusion rates, it is important to keep in mind that this can change the bath temperature. To avoid temperature spikes, which might damage the tissue, we often adjust flow first at low temperature settings and then adjust the temperature upward. For emergencies, we keep a supply of room-temperature (20–25 1C) 95% O2/5% CO2-bubbled medium nearby that can be added to the bath to blunt temperature spikes.
Generally, keeping the tissue well oxygenated after careful dissection and establishing steady flow rates and temperatures will ensure stable recordings with little drift and absence of spontaneous muscle twitches (for solutions to possible problems, see the TROUBLESHOOTING table).
Procedure
Explantation of triangularis sterni muscle ● TIMING 15 min
1| Lethally anaesthetize mouse by i.p. injection of pentobarbital (or induce lethal anesthesia in any other approved way). The preparation can be done using embryonic muscle as early as E13. In this case, a pregnant female mouse needs to be killed and an embryo isolated to start the dissection.
! CAUTION Ensure that local animal care regulations are followed.
2| Spray fur with 70% (vol/vol) ethanol to avoid contaminating the dissection dish with hair.
3| The dissection is different for young and adult mice: in young mice (option A, Fig. 3a), it is possible to explant both sides of the thorax, so the probability of finding a region worth imaging is doubled. In adults (option B), only a hemithorax can be placed into a 3.5-cm dish, so the preparation is restricted to one side; to keep orientation consistent, it is worth settling on either the left or right side for each mouse.
- Young mice (P0–P21): explantation of both sides of the thorax
- Using large medical scissors, decapitate the freshly killed animal.
- Transect the abdomen below the ribs to isolate the thorax.
- Perform a midline incision of the skin over the vertebral column.
- Remove skin, push back muscles, scapulae and pectoral muscles in one piece, being careful not to damage the intercostal muscles, to obtain the thorax (Fig. 3a, image 1).
- Transfer the thorax into a dish with cooled 95% O2/5% CO2-bubbled medium.
- Transfer the dish to the dissection microscope.
- Place thorax on its side (Fig. 3a, image 2) or with the ventral side down and grab the cervical vertebral column with anatomical tweezers.
-
Using small-angled spring scissors, transect the ribs near the costovertebral joints starting at the caudal edge of the thorax moving cranially.▲ CRITICAL STEP Perform the incision close to the vertebral column to leave the motor axons as long as possible.
- Remove the diaphragm by severing its rib insertion as close to the bone as possible around the entire circumference of the thorax.
- Remove the vertebral column, diaphragm and thoracic viscera from the rib cage. Often, heart and thymus remain attached to the ventral part of the rib cage and have to be removed separately.
- Remove remnants of pleura, diaphragm (inside) and pectoral muscles (outside) to obtain the isolated thorax preparation (Fig. 3a, image 3). Removing damaged tissue helps keep the explant healthy and stable.
- Wash the thorax in a dish with fresh 95% O2/5% CO2-bubbled medium.
-
Using fine minuten pins, secure the thorax in the Sylgard-coated 3.5-cm dish. Place two pins in the cartilaginous (white) parts of the sternum, and three pins through the ribs on each side, to gently stretch the muscle (Fig. 3a, image 4).▲ CRITICAL STEP The thorax should be flat. Be careful not to damage the triangularis sterni muscle with the pins or the tweezers; the muscle should be covered with 95% O2/5% CO2-bubbled medium at all times. Pinning down the muscle is the most difficult step of the procedure and is best accomplished by: going through cartilage rather than bone; holding the pin with one pair of forceps and using a second closed pair to press the pin into the Sylgard; and keeping the pin perpendicular and holding it near its head, so the risk of sliding off with a pair of forceps is minimized. Damaged muscle is apparent under the microscope, and such preparations should be discarded.
- Adult mice (>P21): explantation of the left side of the thorax
- Kill the animal by cervical dislocation.
- Using large medical scissors, make a midline incision of the skin over the sternum and two incisions parallel to the lower borders of the rib cage (so that an inverted ‘Y’ pattern of incisions results).
- Remove the skin and the pectoral muscle from the left side of the thorax. The pectoral muscle can best be dissected off by transecting its sternal insertion close to the bone. This is done by inserting the lower blade of a pair of scissors underneath the muscle's caudal edge and cutting upward parallel to the sternum. In the back, cut through the muscular attachments of the scapula to the thorax. At the end of this step, the left thorax should be exposed from sternum to vertebral column, and the left forelimb should essentially have been disconnected from the thorax.
- Open the abdominal wall from the xiphoid cartilage (an almost heart-shaped cartilaginous extension of the sternum), and cut it open following the left lower thorax border all the way to the vertebral column.
- Using a pair of small-angled spring scissors, open the diaphragm beneath the xiphoid cartilage (which induces bilateral pneumothorax, so the lung collapses away from the diaphragm) and dissect the diaphragm off its costal insertions along the left circumference of the thorax.
-
Mobilize the pectoral muscles on the right side of the thorax, and then cut through the ribs on the right-hand side of the thorax (destroying the right triangularis sterni muscle) from the xiphoid cartilage all the way to the manubrium sterni.▲ CRITICAL STEP Try to avoid damage to the subclavian vessels to reduce bleeding, which will impair visibility.
-
Cut the left ribs off the vertebral column near their insertion, starting at the caudal rim of the thorax. This cut converges onto the parasternal cut described in Step B(vi).▲ CRITICAL STEP Try to avoid damage to the subclavian vessels to reduce bleeding, which will impair visibility. Perform the incision close to the spinal cord to leave the motor axons as long as possible.
- Mobilize the left half of the thorax by cutting through the remaining bridge of tissue. This always leads to some bleeding, as the subclavian vessels are finally severed.
- Transfer the explanted hemithorax into a dish with cooled 95% O2/5% CO2-bubbled medium.
- Remove remnants of thymus, pleura, diaphragm (inside) and pectoral muscles (outside).
-
Pin the thorax into the Sylgard-coated 3.5-cm dish with fine minuten pins, two needles in the cartilaginous (white) parts of the sternum and three pins through ribs, to gently stretch the muscle.▲ CRITICAL STEP This is a slightly difficult procedure due to harder bone in adult tissue. Avoid trying to stick a pin through bone; opt for the softer cartilaginous parts.
Time-lapse microscopy ● TIMING 2–6 h
4| Transfer the dish with the explant to the imaging stage and insert it into the heating ring.
5| Install superfusion system (see EQUIPMENT SETUP) to cover the explants with prewarmed, 95% O2/5% CO2-bubbled medium (∼1 ml min−1 flow rate).
6| Place suction line to remove excess fluid.
7| Place temperature probe into the medium. None of the lines should touch the rim of the dish, the Sylgard or the tissue to avoid drift.
8| Use a low-magnification water-immersion objective (×20) and fluorescence excitation to get an overview of the innervation pattern and to find areas of interest.
9| Change magnification by inserting the ×100 dipping cone objective to image motor axons or synapses of interest.
10| Perform time-lapse imaging after establishing the lowest acceptable illumination intensity.
▲ CRITICAL STEP Time-lapse microscopy is critically limited by bleaching and resulting phototoxicty, so avoid too much light.
11| After completion of the time-lapse, document the innervation pattern of the imaged region by acquiring image stacks with lower magnification (×20, ×4) to be able to reidentify the region after tissue fixation. Keep notes about the location of the imaged region (e.g., by documenting the rib or intercostal space where it was located). If subsequent fixation and staining is required, proceed with Steps 12–24.
Fixation of muscle after experiment ● TIMING 1 h 45 min
12| Remove the explant carefully from the dish; this is best done by inserting a pair of forceps underneath the tissue and pushing the tissue up beyond the tips of the pins.
13| Transfer tissue to 4% (wt/vol) PFA in 1× PBS for 1.5 h at 4 °C.
▲ CRITICAL STEP Avoid contaminating the forceps with PFA if it is to be used for further live preparations.
14| Rinse in 1× PBS.
■ PAUSE POINT Store the fixed tissue in 1× PBS/0.1% (wt/vol) NaN3. Fixed muscles can be stored at 4 °C for several months. However, the quality of subsequent immunostainings generally starts to decline after about 1 week of storage.
Dissection of the muscle after fixation ● TIMING 20 min
15| Using a razor blade or pair of scissors, cut away the sternum, taking care to place the cut between the internal mammary vessels and the sternum. Trim the ribs to near the cartilage–bone transition to obtain a piece of tissue corresponding to the triangularis sterni muscle.
16| Pin the tissue onto a Sylgard dish dedicated to fixed tissue using two hypodermic needles placed cranially and caudally near the end of the muscle. Place the needles at an angle and insert them under the thin layer of muscle on top, which represents the triangularis sterni.
17| Detach the muscle carefully from the ribs and the intercostal muscles by holding on to one side of it (e.g., starting caudally—essentially as far away from the region of interest as possible) and using a fine hypodermic needle on a syringe as a miniature dissection tool. Slowly work parallel underneath the muscle, peeling it off the rib cage. Once well beyond the region of interest, cut off the muscle using a fine pair of forceps.
18| Clean the muscle from fat and connective tissue, but be careful not to rip off the nerves themselves.
■ PAUSE POINT Store in 1× PBS/0.1% (wt/vol) NaN3. Dissected fixed muscles can be stored at 4 °C for several months. However, the quality of subsequent immunostainings generally starts to decline after about 1 week of storage.
Staining of neuromuscular junctions ● TIMING 2 h
19| Wash the muscle for 10 min in 1× PBS at room temperature (20–25 °C).
20| Incubate the muscle with 0.1 M glycine in 1× PBS for 15 min at room temperature (20–25 °C) to block unsaturated aldehydes and to reduce background.
21| Stain postsynaptic acetylcholine receptors in the muscle with 50 μM Alexa Fluor 594-conjugated BTX (Invitrogen) in 1× PBS by incubating on an orbital shaker for 1 h at 4 °C.
22| Wash the muscle three times for 15 min in 1× PBS.
23| Mount the muscle on a slide with antifading medium (e.g., Vectashield, Vector Laboratories) and cover with no. 1.5 coverslip.
24| Relocate structures of interest from the low-resolution maps obtained during live microscopy and view them using standard microscopy procedures.
? TROUBLESHOOTING
● TIMING
Steps 1–3, explantation of triangularis sterni muscle: 15 min
Steps 4–11, time-lapse microscopy: 2–6 h
Steps 12–14, fixation of muscle: 1 h 45 min
Steps 15–18, dissection of muscle: 20 min
Steps 19–24, staining of neuromuscular junctions: 2 h
? TROUBLESHOOTING
The main problems impeding successful ex vivo imaging of the triangularis sterni explants can arise from the following major sources: the muscle explant itself can be damaged during preparation leading to twitching of the preparation, absence of cellular dynamics or abnormal morphology of axons and synapses; and excessive light exposure can give rise to phototoxicity and subsequent bleaching or morphological alterations of the sample. Troubleshooting advice can be found in Table 1.
TABLE 1.
Troubleshooting table.
| Problem | Possible reason | Solution |
|---|---|---|
| Preparation drifting | Explant is not properly pinned into the dish | Pin the explant stably and flat into the dish; make sure that no parts touch the objective |
| Superfusion or suction lines touch the rim of the dish | Place the superfusion lines in a way that their tips are in the fluid, but do not touch the dish | |
| Temperature has not yet stabilized | Wait until the temperature is stable; avoid temperature spikes; turn off auto-feedback control | |
| Preparation twitching | Muscle fibers have been damaged during the preparation | Discard preparation |
| Tissue is suffering from phototoxicity | Reduce excitation light | |
| Blurry images | Air bubble is trapped in front of the objective | Flush with physiological solution, taking care to avoid a temperature spike due to increased flow rate during flush. Have oxygenated room temperature solution ready for ‘rescue operations’ |
| Consider heating solution in reservoir to avoid ‘degassing’ as temperature rises in in-line heater | ||
| Superfusion or suction lines touch the rim of the dish and transmit vibrations—or air table is not floating | Place the superfusion lines in a way that their tips are in the fluid but do not touch the dish. Check that all four corners of table are floating | |
| Absence of cellular dynamics | Tissue has been mechanically damaged, suffered hypoxia or has been in chamber for too long | Discard the preparation |
| Organelles look abnormal (e.g., rounded mitochondria) | Tissue has been damaged or suffered hypoxia | Discard the preparation |
| Slow warping of imaged synapse | ‘Contraction clots’ in muscle fibers are forming as tissue has been mechanically damaged, suffered hypoxia or was exposed to phototoxicity | Discard the preparation. Reduce light exposure for new sample |
| Bleaching and phototoxicity | Light levels too high or exposure time too long | Reduce excitation light to lowest possible level, especially during search for suitable axons (dark-adapt your eyes before starting the experiment) |
| Undesired wavelengths (UV, infrared) present in excitation light | Check the presence of heat filters. Consider inserting extra UV-filters |
Anticipated Results
The triangularis sterni explant described in this protocol allows for time-lapse imaging of transgenically labeled mouse motor axons. Moreover, it provides access to motor nerves and the muscles they innervate for electrical stimulation, acute application of drugs, electrophysiology or microinjection. The method can be used to study axons from animals of all ages and can readily be applied to disease models (e.g., of motor neuron disease). The convenient imaging afforded by this ex vivo preparation resembles the ease with which cells can be studied in vitro. At the same time, the preservation of normal neuronal geometry, cellular interactions and the applicability to all developmental stages makes this preparation comparable with related in vivo approaches, in which imaging is often much more challenging12,13.
A typical imaging experiment using this explant system will provide subcellular resolution of structures inside motor axons and neuromuscular synapses approaching the theoretical limit of an epifluorescence microscopy system (∼0.3 μm for a 1.0 numerical aperture (NA) objective for typical yellow fluorescent protein (YFP) illumination with 515 nm light). This, however, requires careful selection of the most superficial axons and synapses, ideally such that only the parietal pleura or at most a single muscle fiber covers the imaged structure. In this way, image degradation due to scattering on superficial structures can be minimized. The following criteria can be used to confirm suitable imaging conditions: proper selection of an imaged axon can be ascertained by visibility of intensity variations inside the axonal fluorescence, which derive from the exclusion of the cytoplasmic label by membrane-bound organelles (such as mitochondria, which are typically <0.5 μm thick; Fig. 4). For imaging fluorescently labeled mitochondria, e.g., in transgenic mice with labeled neuronal mitochondria7, detection of mitochondrial caliber variations is a good-quality criterion (Fig. 4). For imaging synapses, e.g., after application of fluorescently tagged BTX, subsynaptic folds should be obvious inside the receptor-rich postsynaptic membrane, indicating optimal resolution (the banding pattern of such folds in mice typically represents a spacing of slightly more than 0.5 μm) (see ref. 24 and Fig. 4).
Figure 4.
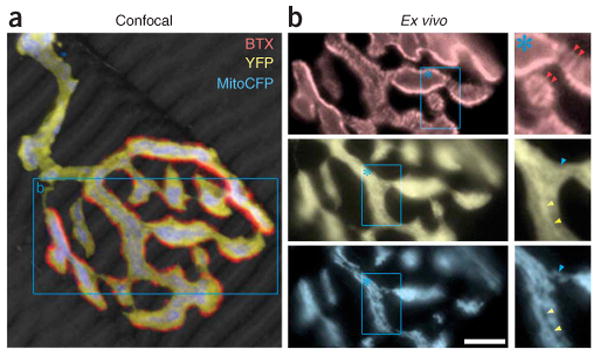
Quality criteria for ex vivo imaging of neuromuscular synapses. (a) Confocal reconstruction of a singly innervated neuromuscular junction that was fixed after ex vivo imaging. Muscle revealed by phalloidin stain, gray scale. (b) Details in the boxed area in a documented by epifluorescence ex vivo microscopy. Top: characteristic pattern of postsynaptic acetylcholine receptors (red) that form a striped pattern inside the synaptic gutter, which indicates subsynaptic folds (red arrowheads). Middle: inside the axoplasm (YFP, yellow) bright (yellow arrowheads) and dark (blue arrowhead) areas reveal sites devoid or occupied by membrane-bound organelles, respectively. Bottom: transgenic labeling of synaptic mitochondria (CFP, cyan) shows a pattern complementary to the cytoplasmic stain above. Caliber variations along mitochondria are also apparent. Scale bar, 5 μm.
Previous imaging applications of this and similar systems have been used to study axon remodeling during development6,25, to optically characterize synaptic release26, and to measure axonal transport of mitochondria7 (Fig. 2b,e). Further applications include studies of axonal changes in experimental motor neuron disease, measurements of acetylcholine receptor turnover (Fig. 2f) and investigations of the interplay of motor axons and their sheathing Schwann cells (Fig. 2c).
In summary, the described ex vivo nerve–muscle explant of the triangularis sterni muscle provides an easy-to-use system for visualizing the dynamics of motor axons, neuromuscular synapses, sheathing glial cells and muscle fibers with subcellular resolution. The system allows direct cross-reference to in vivo imaging studies, e.g., using the classical sternomastoid preparation developed by Lichtman et al.27, and to high-resolution studies of fixed tissue using either confocal microscopy or ultrastructural method6. By applying this explant procedure to tissue derived from different developmental stages and disease models, new insights into motor neuron changes associated with development and disease should be obtainable.
Acknowledgments
We thank A. Mauermayer (Technical University, Munich) for help with the photographs, and J.R. Sanes (Harvard University) for first pointing us to J.J. McArdle's work on the triangularis sterni muscle, which is the basis for the explant system described here. Work in M.K.'s laboratory is financed through grants from the Deutsche Forschungsgemeinschaft (DFG; Emmy-Noether Program and SFB 571), the Hertie-Foundation and the ‘Verein Therapieforschung für MS-Kranke e.V.’. M.R. is supported by a predoctoral fellowship of the International Research Training Group 1373 ‘Brain Signalling: From Neurons to Circuits’. T.M. is supported by the Institute of Advanced Studies (Technical University, Munich), by the Alexander-von-Humboldt-Foundation, the DFG, the Hertie-Foundation and the Center of Integrated Protein Science, Munich. Work on MitoMice was also supported by a grant from the Dana-Foundation to T.M. and M.K.
References
- 1.McArdle JJ, et al. Advantages of the triangularis sterni muscle of the mouse for investigations of synaptic phenomena. J Neurosci Methods. 1981;4:109–115. doi: 10.1016/0165-0270(81)90044-3. [DOI] [PubMed] [Google Scholar]
- 2.Brigant JL, Mallart A. Presynaptic currents in mouse motor endings. J Physiol. 1982;333:619–636. doi: 10.1113/jphysiol.1982.sp014472. [DOI] [PMC free article] [PubMed] [Google Scholar]
- 3.Angaut-Petit D, Mallart A. Electrical activity of mouse motor endings during muscle reinervation. Neurosci. 1985;16:1047–1056. doi: 10.1016/0306-4522(85)90115-0. [DOI] [PubMed] [Google Scholar]
- 4.Angaut-Petit D, et al. Electrophysiological and morphological studies of a motor nerve in ‘motor endplate disease’ of the mouse. Proc Soc Lond B Biol Sci. 1982;215:117–125. doi: 10.1098/rspb.1982.0031. [DOI] [PubMed] [Google Scholar]
- 5.Bournaud R, Mallart A. Potassium channel blockers and impulse propagation in murine motor endplate disease. Muscle Nerve. 1987;10:1–5. doi: 10.1002/mus.880100103. [DOI] [PubMed] [Google Scholar]
- 6.Bishop DL, Misgeld T, Walsh MK, Gan WB, Lichtman JW. Axon branch removal at developing synapses by axosome shedding. Neuron. 2004;44:651–661. doi: 10.1016/j.neuron.2004.10.026. [DOI] [PubMed] [Google Scholar]
- 7.Misgeld T, Kerschensteiner M, Bareyre FM, Burgess RW, Lichtman JW. Imaging axonal transport of mitochondria in vivo. Nat Methods. 2007;4:559–561. doi: 10.1038/nmeth1055. [DOI] [PubMed] [Google Scholar]
- 8.Duron B, Jung-Caillol MC, Marlot D. Myelinated nerve fiber supply and muscle spindles in the respiratory muscles of cat: quantitative study. Anat Embryol (Berl) 1978;152:171–192. doi: 10.1007/BF00315923. [DOI] [PubMed] [Google Scholar]
- 9.Keller-Peck CR, et al. Asynchronous synapse elimination in neonatal motor units: studies using GFP transgenic mice. Neuron. 2001;31:381–394. doi: 10.1016/s0896-6273(01)00383-x. [DOI] [PubMed] [Google Scholar]
- 10.Livet J, et al. Transgenic strategies for combinatorial expression of fluorescent proteins in the nervous system. Nature. 2007;450:56–62. doi: 10.1038/nature06293. [DOI] [PubMed] [Google Scholar]
- 11.Parson SH, et al. Axotomy-dependent and -independent synapse elimination in organ cultures of Wld(s) mutant mouse skeletal muscle. J Neurosci Res. 2004;76:64–75. doi: 10.1002/jnr.20016. [DOI] [PubMed] [Google Scholar]
- 12.Walsh MK, Lichtman JW. Imaging the development of the neuromuscular junction. In: Yuste R, Konnerth A, editors. Imaging in Neuroscience and Development. 2005. pp. 215–223. [Google Scholar]
- 13.Walsh MK, Lichtman JW. In vivo time-lapse imaging of synaptic takeover associated with naturally occurring synapse elimination. Neuron. 2003;37:67–73. doi: 10.1016/s0896-6273(02)01142-x. [DOI] [PubMed] [Google Scholar]
- 14.Schaefer AM, Sanes JR, Lichtman JW. A compensatory subpopulation of motor neurons in a mouse model of amyotrophic lateral sclerosis. J Comp Neurol. 2005;490:209–219. doi: 10.1002/cne.20620. [DOI] [PubMed] [Google Scholar]
- 15.Sanes JR, Lichtman JW. Development of the vertebrate neuromuscular junction. Annu Rev Neurosci. 1999;22:389–442. doi: 10.1146/annurev.neuro.22.1.389. [DOI] [PubMed] [Google Scholar]
- 16.Lichtman JW, Sanes JR. Watching the neuromuscular junction. J Neurocytol. 2003;32:767–775. doi: 10.1023/B:NEUR.0000020622.58471.37. [DOI] [PubMed] [Google Scholar]
- 17.Lichtman JW, Colman H. Synapse elimination and indelible memory. Neuron. 2000;25:269–278. doi: 10.1016/s0896-6273(00)80893-4. [DOI] [PubMed] [Google Scholar]
- 18.Feng G, et al. Imaging neuronal subsets in transgenic mice expressing multiple spectral variants of GFP. Neuron. 2000;28:41–51. doi: 10.1016/s0896-6273(00)00084-2. [DOI] [PubMed] [Google Scholar]
- 19.De Paola V, Arber S, Caroni P. AMPA receptors regulate dynamic equilibrium of presynaptic terminals in mature hippocampal networks. Nat Neurosci. 2003;6:491–500. doi: 10.1038/nn1046. [DOI] [PubMed] [Google Scholar]
- 20.Misgeld T, Kerschensteiner M. In vivo imaging of the diseased nervous system. Nat Rev Neurosci. 2006;7:449–463. doi: 10.1038/nrn1905. [DOI] [PubMed] [Google Scholar]
- 21.Zuo Y, et al. Fluorescent proteins expressed in mouse transgenic lines mark subsets of glia, neurons, macrophages, and dendritic cells for vital examination. J Neurosci. 2004;24:10999–11009. doi: 10.1523/JNEUROSCI.3934-04.2004. [DOI] [PMC free article] [PubMed] [Google Scholar]
- 22.Noguchi S, Wakabayashi-Takai E, Sasaoka T, Ozawa E. Analysis of the spatial, temporal and tissue-specific transcription of gamma-sarcoglycan gene using a transgenic mouse. FEBS Lett. 2001;495:77–81. doi: 10.1016/s0014-5793(01)02368-7. [DOI] [PubMed] [Google Scholar]
- 23.Jung S, et al. Analysis of fractalkine receptor CX(3)CR1 function by targeted deletion and green fluorescent protein reporter gene insertion. Mol Cell Biol. 2000;20:4106–4114. doi: 10.1128/mcb.20.11.4106-4114.2000. [DOI] [PMC free article] [PubMed] [Google Scholar]
- 24.Marques MJ, Conchello JA, Lichtman JW. From plaque to pretzel: fold formation and acetylcholine receptor loss at the developing neuromuscular junction. J Neurosci. 2000;20:3663–3675. doi: 10.1523/JNEUROSCI.20-10-03663.2000. [DOI] [PMC free article] [PubMed] [Google Scholar]
- 25.Parson SH, Mackintosh CL, Ribchester RR. Elimination of motor nerve terminals in neonatal mice expressing a gene for slow Wallerian degeneration (C57Bl/Wlds) Eur J Neurosci. 1997;9:1586–1592. doi: 10.1111/j.1460-9568.1997.tb01516.x. [DOI] [PubMed] [Google Scholar]
- 26.Wyatt RM, Balice-Gordon RJ. Heterogeneity in synaptic vesicle release at neuromuscular synapses of mice expressing synaptopHluorin. J Neurosci. 2008;28:325–335. doi: 10.1523/JNEUROSCI.3544-07.2008. [DOI] [PMC free article] [PubMed] [Google Scholar]
- 27.Lichtman JW, Magrassi L, Purves D. Visualization of neuromuscular junctions over periods of several months in living mice. J Neurosci. 1987;7:1215–1222. doi: 10.1523/JNEUROSCI.07-04-01215.1987. [DOI] [PMC free article] [PubMed] [Google Scholar]