Abstract
Decision analysis is a tool that clinicians can use to choose an option that maximizes the overall net benefit to a patient. It is an explicit, quantitative, and systematic approach to decision making under conditions of uncertainty. In this article, we present two teaching tips aimed at helping clinical learners understand the use and relevance of decision analysis. The first tip demonstrates the structure of a decision tree. With this tree, a clinician may identify the optimal choice among complicated options by calculating probabilities of events and incorporating patient valuations of possible outcomes. The second tip demonstrates how to address uncertainty regarding the estimates used in a decision tree. We field tested the tips twice with interns and senior residents. Teacher preparatory time was approximately 90 minutes. The field test utilized a board and a calculator. Two handouts were prepared. Learners identified the importance of incorporating values into the decision-making process as well as the role of uncertainty. The educational objectives appeared to be reached. These teaching tips introduce clinical learners to decision analysis in a fashion aimed to illustrate principles of clinical reasoning and how patient values can be actively incorporated into complex decision making.
KEY WORDS: tips, clinical learners, evidence-based medicine, decision analysis
INTRODUCTION
A construction worker with a badly infected compound fracture of the left ankle presents to your consulting room. The infection is not only threatening to destroy the ankle itself, but is spreading proximally and the septic complications are potentially life threatening. You are now faced with the difficult decision: (1) Should you perform a below knee amputation immediately? or (2) Should you perform a surgical debridement followed by antibiotic treatment to save the ankle? Although the second option offers a chance of complete recovery, it is associated with a substantial risk of infection that spreads, possibly leading to an above or below the knee amputation, or even death. Even if this second option is successful, there is still a chance of minor long term disability of the limb.
Frequently, in our day to day practice we are confronted with complex decisions as outlined above. Medical decision making requires choosing an option that maximizes the overall net benefit to a patient. A key approach to medical decision making is the use of decision analysis (an explicit, quantitative, and systematic approach to decision making under conditions of uncertainty).1 Often learners are not clear on the multiple steps, actions, and consequences of those actions, taken in these situations when making decisions. In this article we outline two scripts following a format developed by the Evidence-Based Medicine Teaching Tips Working Group2 to help clinicians spell out those steps when making decisions. We find that the use of these tips helps strengthen learners’ grasp of important aspects of clinical reasoning and decision making, even when they are unlikely to either use or encounter these techniques in a formal way.
For each of the two tips covered in this article, we have provided guidance on when to use the tip, the teaching script for the tip, a “bottom line” section and a summary card (Appendix 1). For these tips, the construction of a decision tree is highly recommended using software, such as TreeAge (TreeAge, Williamstown, MA, USA) or Foldback© (The Chinese University of Hong Kong, Hong Kong, available upon request from the authors). Otherwise, use a handout with a blank decision tree, calculators and prepared material with a sensitivity analysis solution to maximize the learner’s experience of ‘creating’ decision trees in real time. We recommend that the teacher have a basic understanding of decision analysis when using these scripts.1,3,4
TEACHING TIP 1: UNDERSTANDING THE STRUCTURE OF A DECISION TREE
When to use this Tip
This tip is suitable for all clinicians and clinical trainees who are encountering a decision analysis for the first time. The exercise takes 30 minutes and has the following specific goals:
Understand the components that make up a decision tree
Learn how to identify the optimal choice through calculations of probabilities of events and their outcome after constructing a decision tree
Preparing to Teach
Prior to the session, prepare handouts including Tables 1 and 2, and Figures 1 and 3. Have a blackboard or flip chart available which you will use to first develop and then complete Figure 1, using the information from the Tables. The use of these tips will generally require a planned session, although the presentation of the basic concept of a decision tree might be attempted ‘on the fly.’
Table 1.
Representative Probabilities to be Assigned to All Outcomes Represented in the Decision Tree in Tip 1
| Outcomes | Probability |
|---|---|
| Probability of foot saved using antibiotics | 0.50 |
| Probability of full recovery after foot saved | 0.80 |
| Probability of recovery with limp after foot saved using antibiotics | 0.20 |
| Probability of death after infection is not controlled by antibiotics | 0.10 |
| Probability of above the knee amputation if infection not controlled by antibiotics | 0.80 |
| Probability of below the knee amputation if infection not controlled by antibiotics | 0.10 |
| Probability of survival after immediate below knee amputation | 1.00 |
The probabilities all pertain to the branch of the tree corresponding to the choice of initial antibiotic therapy without amputation. These probabilities are best derived from published papers or documented individual or institutional case experience
Table 2.
Patient Valuation of Different Possible Outcomes are Proportionately Represented as “Utilities”on a Scale Ranging from 0 (Death) to 1 (Full Recovery with No Amputation or Limp)
| Possible outcome | Utility* |
|---|---|
| Recovery with a limp | 0.98† |
| Recovery with foot amputation | 0.70 |
| Recovery with leg amputation | 0.60† |
| Entire limb saved and no limp | 1.00 (assumed) |
| Death | 0.00 (assumed) |
†“Utility” may be understood as a number assigned to the quality of life a patient would attach to a particular outcome on a defined scale. It is a means of converting a qualitative statement of relative preference by a patient into a numerical value. These may be derived directly from your patient or in some cases from published studies
Figure 1.
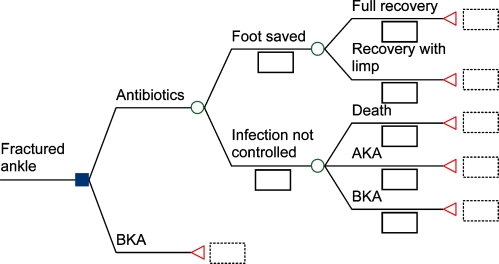
Skeleton of the decision tree for the construction worker scenario in Tip 1.
Figure 3.
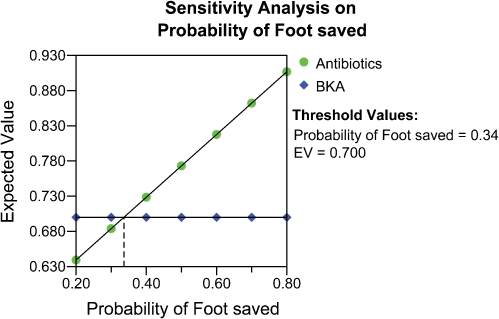
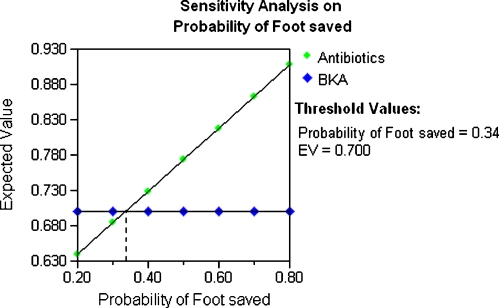
One-way sensitivity analysis graph of the probability of foot saved over a range from 0.20 to 0.80 to see if it changes the result of the decision analysis in Tip 1. If the probability of foot saved is less than 0.34, below knee amputation (BKA) is the better option. If the probability of foot saved is over 0.34, the better option is to use antibiotics and debridement. The threshold for the decision change is 0.34.
The Script
Begin by reading the clinical scenario about the construction worker outlined above. Tell the learners that the starting point in a decision analysis is a decision that must be made on behalf of an individual, groups of persons, or population.1 Ask the learners what the main clinical problem is (fractured ankle), the alternative or choice that has to be made (debridement and antibiotics or below the knee amputation), and the outcomes (infection not controlled, full recovery, partial recovery, death, above the knee amputation and below the knee amputation). This helps learners specify the decision problem and its components, which is the first step of a decision analysis. Some teachers may choose to list the problem, alternatives and outcomes on a whiteboard.
The next step is to develop a model to portray the time course of the different options. Explain to learners that the easiest way to do this is to draw a decision tree (Fig. 1), which is a graphical tool to show all the components of the problem and to relate all choices to consequences.1 You begin at the left-hand side of the screen by creating a decision node (□) with the alternatives ‘antibiotics and debridement’ (“antibiotics”) or ‘below the knee amputation’ (“BKA”). If “antibiotics” is chosen, there are two possible outcomes: the foot is saved or infection spreads. These two possible immediate outcomes (“Foot saved” and “Infection not controlled”) emanate from a chance node (○). Explain to learners that a chance node represents a point in time at which probability determines which of several possible events that may occur and is outside the control of the decision maker.1 Following the chance node at the “Foot saved” branch, there are two possible outcomes: full recovery or partial recovery with a limp. If the infection has spread, the patient may die, need an above knee amputation or below the knee amputation. An outcome at a particular pathway is known as a terminal node (◁) indicating the end point of each sequence of events. At this point, emphasize to the learners that you construct a decision tree from the left to right, starting with the initial decision node on the extreme left and moving to the final outcomes on the extreme right, following the temporal sequence of events. When you finish, the skeleton of the decision tree should look like Figure 1.
Following this, explain that the next steps in the construction of the decision tree are to estimate the probabilities of the various outcomes and the patient values to be assigned to the consequences (also known as utilities). For the purpose of the exercise, tell the learners that there is no published randomized controlled trial that compares these two approaches in patients with infected compound fracture of the ankle. However, there are some published data on what happens to patients if one or the other approach is used. You can explain that, although high quality evidence should be sought, when all else fails, probabilities of chance events can be derived from expert opinion, including your own. Present Table 1 to the learners and ask them to insert the relevant probabilities into the tree you have created. Ask for a volunteer to go to the board to demonstrate the result. At this point, highlight the rule that the probabilities under the successive branches emanating from any chance node must add up to 1.00.
Address the issue of how important the various levels of disability being considered are to the patient. You may choose to incorporate statements regarding patient values and preferences into the scenario, or to use published studies when they exist. You may also choose to engage your learners in a discussion regarding how they would themselves go about discerning and understanding the patient’s values if he were their own patient. One or more of them may likely propose to simply ask their patient “would you rather risk death than not have any chance at full recovery (without amputation).” Another learner may point out that this choice does not conform to the options reflected in the tree you have created and may further point out that the actual choice has to do with BKA now or take a chance that may lead to death, full recovery or something in between. At this point, the learners characteristically appreciate how the analytical approach of creating the tree helps guide both a clinician and their patient to an understanding of the nature of the choices before them.
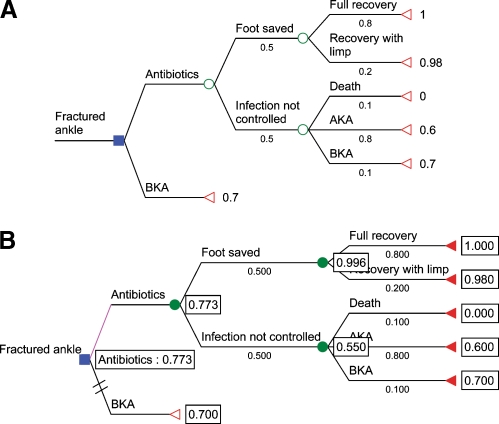
Now draw your learners’ attention to Table 2 and explain that the “utilities” attached to each of the possible outcomes in Figure 1 constitute proportionate patient valuations of the quality of life attached to these outcomes, with a value of 0 assigned to the outcome of death and a value of 1 assigned to the outcome of full recovery with no amputation. Have a learner write utility values that the group believes are likely to reflect the values of their own patients on the figure on the board. In this process, learners see how a decision tree evolves from an initial identification of therapeutic options, together with a set of estimates of probability of the potential consequences at every point and an independent estimate of relative patient valuations of the different possible outcomes. When you finish, the decision analysis tree should look like Figure 2A.
Figure 2.
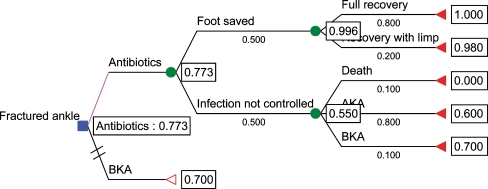
A. The completed decision tree showing the treatment choices and the possible outcomes related to the fractured ankle management problem. BKA=below knee amputation. AKA=above knee amputation. Notice that the probabilities assigned to the possible outcomes at every stage of the process must add to 1.0. Hence 0.5 (“foot saved”)+0.5 (“infection not controlled”)=1.0. B. The utility of each outcome on the right-hand side of the figure is multiplied by the probability of that outcome. The results of these calculations are added together for each chance node to yield the partial utility at that point. For example, at the top right of the tree, the utility value for “full recovery, 1.0, is multiplied by the probability of that outcome, 0.8 to yield 0.8 for that outcome within that chance node. The utility value for the alternative outcome, “recovery with limp”, of 0.98 is multiplied by the probability of that outcome, 0.2, to yield 0.196. The results of these two calculations, 0.196 and 0.8, are added together to yield the partial utility, or “expected value” for that chance node, i.e. 0.996. Likewise, the expected value for “Infection not controlled” is (0 × 0.10) + (0.60 × 0.80)+ (0.70 × 0.10)= 0.55. The overall expected value for “Antibiotics” is (0.996 × 0.50) + (0.55 × 0.50)= 0.773. The expected value of the alternative therapeutic choice, immediate partial amputation, is simply the utility assigned to it by the patient, or 0.7. Hence the value of debridement, fixation, plus antibiotics therapy has a higher expected value in this analysis.
Now you are ready to help your learners analyze the decision tree. This can be done by explaining to the learners that the main objective of constructing a decision tree is to enable you to estimate the “expected value” of the different therapeutic choices considered at the outset. “Expected value” (EV) is a term used to denote the overall value of each of those choices in a fashion that takes into account patient preferences and priorities. Another term that is used for the same thing is “expected utility”.4 EV is a way of expressing in numbers which alternative would provide the highest value for the patient.1 The process of calculating the expected value is “averaging out and folding back” and starts at the right-hand side of the tree and works back to the root (left-hand side) of the tree.1 Explain to the learners how the EVs at each chance node are calculated in a stepwise fashion along the lines of the legend to Figure 2B and demonstrate the process through one or two steps. Then invite the learners to complete the process. Learners rapidly understand how the final calculation of the expected values of the two alternatives is estimated. Compare the expected value for antibiotics and debridement approach (0.773) with below the knee amputation (0.70).
The Bottom Line
Decision analysis may be used to help patients objectify their own values and preferences in the context of complex decision making.
The analysis begins by identifying the important choices available to the patient.
Stumbling block: Understanding how the decision tree is folded back to arrive at the best alternative.
The analysis of the completed decision tree moves from right to left as partial utilities are developed for each chance node.
TEACHING TIP 2: UNDERSTANDING SENSITIVITY ANALYSIS
When to use this Tip
The second tip works best when presented after Tip 1. The exercise takes 20 minutes and has the following specific goal:
Understand how uncertainty regarding the estimates used in a decision tree can be addressed.
The script
Refer to Figure 2B as completed in the first part of the exercise. What would happen to our decision if we changed some of our values or probabilities where the data were weakest and where we were most unsure about those values? Is the decision altered if different probabilities and value consequences were assigned in the decision tree? Ask each learner to independently consider different probabilities and patient values from those listed in Tables 1 and 2, based on their intuition. Compare the learner responses and identify the 1 or 2 variables reflecting the greatest level of uncertainty. Ask the learners how they would handle the uncertainty. After a moment, a participant offers the suggestion that you could reanalyze the decision tree using a different value for the variable with the greatest level of uncertainty and see if this changes the expected values previously derived for the alternatives. Compliment this participant and then offer that she has just invented the concept of a “sensitivity analysis”. You may choose to interpolate a didactic explanation at this point: “A sensitivity analysis is the process of repeatedly folding back the decision tree using different values for the probabilities of outcomes and relative patient values to determine whether the implied decision would change as a result.”
To help learners understand how to interpret a sensitivity analysis, begin by assigning different probabilities of the foot ultimately being saved (“Food saved”) to each learner by varying the range from 0.20 to 0.80. Ask each learner to reanalyze their decision tree using their assigned probability to come up with the expected values for “Antibiotics” and “BKA” alternatives using the process outlined in the last tip. Then plot the results from each learner. When finished, the results should look like Figure 3, a one-way sensitivity analysis. Now ask the group to interpret the graph. Facilitate the process by asking the group to focus on where the lines cross (i.e. “threshold”). The learners will readily identify that the threshold occurs when the probability of “Foot saved” is at 0.34, at which point the decision changes. Remind learners that the higher expected values of the two alternatives provide the better alternative for the patient. Learners will notice that if the chance of antibiotics saving the foot is less than 34%, the better option is below knee amputation; and that when the chance of antibiotics saving the foot is more than 34%, the better option is to use antibiotics and debridement. Finally, tell the learners that multiple probabilities and relative patient values can be varied simultaneously to identify the most important variable(s) that may change a decision.
Additional Comments
How can decision analysis be applied to individual patients in real-time patient care? Proper use of evidence-based medicine involves more than identifying the best available evidence and applying the results to your patient. This is because patients have individual characteristics that make them different from the “average” patient in a clinical trial. Patients may value the effect of treatment and side-effects differently, and this different view of outcomes or value consequences needs to be taken into account. Also, the results of a trial will be reported as an average probability of effect, and this probability may need to be adjusted for your particular patient’s characteristics. The best way of taking account of all these adjustments is through the use of decision analysis. For common clinical problems, shared decision making between clinician and patient is possible when patient preferences are inserted into a generic decision tree with set probabilities during real-time patient care using computer programs (assuming that patients are comfortable and are able to state their preferences on a utility scale ranging from 0 to 100).
The Bottom Line
A sensitivity analysis is the process of repeatedly folding back the decision tree using different values for probabilities and value consequences to test of the stability of the decision tree result.
Report on Field-testing
We field tested the teaching tips to verify the clarity and practicality of the teaching script. One of the authors (S.K.), an experienced teacher of evidence-based practice who was not involved in the development of the teaching script, field tested the script used in this article on two occasions once in Durham, North Carolina and once in Miami, Florida. Learners were residents in internal medicine from interns to third-year residents. Regardless of the level of training, all learners in both settings reported that they had little to no experience with decision analysis. Despite this, in both sessions, learners were easily engaged in the interactive creation of the decision tree in Tip 1. As described in the script, starting with the case scenario, the learners easily identified the main problem, the choices to be made and then possible outcomes. These were written on a white board and served as the basis for the decision tree that was drawn interactively using the choices and outcomes that the learners identified. After generating the decision tree, the learners easily went through the steps of incorporating the probabilities and values provided in the tables onto a pre-prepared handout of the decision tree without probabilities or utilities (Figure 1). Initially, the learners were broken into groups of three to discuss the case and generate their own utilities for each outcome. These were then compared to other groups as well as to the utilities in Table 2. Remarkably, all groups of learners came up with similar utilities closely matching those in Table 2. The learners were also able to “fold back” and calculate the expected values following a demonstration of the first calculation. The completion and calculation of the decision tree (Tip 1) took 30 minutes to complete. Discussion of sensitivity analysis (Tip 2) flowed directly from Tip 1 as the learners asked questions expressing concern about the “estimated” probabilities and values and took 20 minutes.
Learners uniformly reported that the scenarios, tables and set up were extremely effective in allowing them to complete an exercise in an unfamiliar arena. They valued the clinical relevance of the scenario. Learners reported that the most important points they took away from the session pertained to the importance of incorporating values into the decision-making process, as well as the role of uncertainty in decision-making, a concept made clear through Tip 2 and the sensitivity analysis. The first time the session was taught, a non-medical example was used for Tip 1. Many learners reported that they did not see how they would use these principles in their practice of medicine. For the second field-test, the non medical example was replaced by a clinical scenario, and SK included a greater emphasis on relevance. She brought an example of a cost-effectiveness analysis from the current medical literature which relied heavily on the principles of decision analysis and also discussed how the decision analysis framework could be used to illustrate the general principles in every day decision making. Notably, in the feedback from the second group of learners several reported that the most important take home message for them was how they would apply these principles to every day decision making.
For most educators, this is a session that will require deliberate preparation. SK spent 3 hours preparing for the session the first time it was taught and another 90 minutes preparing for the second teaching. Handouts were pre-prepared to provide the “skeleton” of the decision analysis so that learners could label the probabilities and utilities themselves as they worked through each step. In order to avoid difficulties of navigating the math calculations in real time, SK brought a calculator to each session and assigned one of the learners to serve as the “math checker” to do calculations so that the learners (and teacher) could focus on the principles and flow of the session.
In a randomized controlled study of final year undergraduate medical students at The Chinese University of Hong Kong, the students’ clinical decision analysis skills under simulated conditions improved.5 This was attributed partly to these tips. This trial took place outside of the context of the EBM Teaching Tips project.
CONCLUSIONS
Most medical decisions are important and can benefit from more conscious attention to the decision-making process and use of more explicitly accurate data. Clinicians can use the decision tree approach to deal with uncertainty in complex clinical situations and identify important components of the decision process that might otherwise go unrecognized. We have described teaching tips to help learners overcome common difficulties when learning decision analysis.
Acknowledgments
Contributions AL contributed to the development of teaching tip, co-drafted the manuscript, coordinated input from coauthors and from field-testing and revised all drafts. AMH and GMJ developed and refined the teaching tip, co-drafted the manuscript, and reviewed all drafts and provided comments throughout development of the manuscript. SK conducted field-testing of the tips and contributed material from the field-testing to the manuscript. TM provided valuable guidance to the revision of this manuscript. PW edited the manuscript and provided suggestions for substantive changes.
Grant Support The work described in this paper is supported by a grant from the University Grants Committee Teaching Development Triennium Grant of the Hong Kong Special Administrative Region, PRC (Project No. CUHK-9).
Conflict of Interest None disclosed.
Appendix 1
Summary cards for 2 teaching tips on understanding decision analysis
This Appendix has been designed so that it can be printed on a single sheet of 8 1/2×11 inch paper. The individual summary cards can then be cut out, desired for use during teaching sessions.
Teaching Tip 1: Understanding the Structure of a Decision Tree
Goal: To understand the components that make up a decision tree and learn how to identify the optimal choice through calculations of probabilities of events and their outcome after constructing a decision tree
Learners: Physicians and clinical trainees
Teaching time: 30 minutes
Materials needed: Software OR whiteboard, calculator and empty version of the figure as a handout
Scenario: A construction worker with a badly infected compound fracture of the left ankle. The infection is not only threatening to destroy the ankle itself, but is spreading proximally and the septic complications are potentially life threatening. You are now faced with the difficult decision:
Should you perform a below knee amputation immediately? or
Should you perform a surgical debridement followed by antibiotic treatment to save the ankle?
Construct and analyze the decision tree:
Summary point
The analysis of the completed decision tree moves from right to left as partial utilities are developed for each chance node.
Teaching Tip 2: Understanding Sensitivity Analysis
Goal: To understand how uncertainty regarding the estimates used in a decision tree can be addressed.
Learners: Physicians and clinical trainees
Teaching time: 20 minutes
Materials needed: Software OR whiteboard, calculator and empty version of the figure as a handout
Scenario: Following Tip 1, ask each learner to assign different values to the probabilities and value consequences listed in Tables 1 and 2 based on their intuition. Identify the variable(s) with the greatest level of uncertainty and ask learners how they would handle the uncertainty.
Assigning different probabilities of the foot ultimately being saved (“Food saved”) to each learner by varying the range from 0.20 to 0.80. Then, ask each learner to reanalyze the decision tree using their assigned probability to come up with the expected values for “Antibiotics” and “BKA” alternatives. Compare results and plot the results from each learner.
Lead the learners to identify the threshold at which the decision changes and how to interpret results above and below the threshold.
Summary point
A sensitivity analysis is the process of repeatedly folding back the decision tree using different values for probabilities and value consequences to test of the stability of the decision tree result.
Footnotes
Members of the Evidence-Based Medicine Teaching Tips Working Group: Peter C. Wyer (project director), College of Physicians and Surgeons, Columbia University, New York, NY; Deborah Cook, Gordon Guyatt (general editor), Ted Haines, Roman Jaeschke, McMaster University, Hamilton, ON.; Rose Hatala, University of British Columbia, Vancouver, BC; Robert Hayward (editor, online version), Bruce Fisher, University of Alberta, Edmonton, AL.; Sheri Keitz (field test coordinator), University of Miami Miller School of Medicine, Miami, FL; Alexandra Barratt, University of Sydney, Sydney, Australia; Antonio L. Dans, University of the Philippines College of Medicine, Manila, The Philippines; Cassie Kennedy and Victor M Montori, Mayo Clinic College of Medicine, Rochester, MN; Jennifer Kleinbart, Emory University School of Medicine, Atlanta, GA; Anna Lee, Anthony Ho and Gavin M Joynt, The Chinese University of Hong Kong; Rosanne Leipzig, Thomas McGinn, Mount Sinai Medical Center, New York, NY; Virginia Moyer, Baylor College of Medicine, Houston, TX; Thomas B. Newman, University of California, San Francisco, San Francisco, CA; Kameshwar Prasad, All India Institute of Medical Sciences, New Delhi, India; W. Scott Richardson, Wright State University, Dayton, OH; Mark C. Wilson, University of Iowa, Iowa City, IA.
References
- 1.Haddix AC, Teutsch SM, Corso PS. Prevention effectiveness: a guide to decision analysis and economic evaluation. New York: Oxford University Press; 2003:103–26.
- 2.Wyer PC, Keitz S, Hatala R, et al. Tips for learning and teaching evidence-based medicine: introduction to the series. CMAJ. 2004;17:347–8. [DOI] [PMC free article] [PubMed]
- 3.Richardson WS, Detsky AS. Users’ guides to the medical literature. VII. How to use a clinical decision analysis. A. Are the results of the study valid? JAMA. 1995;273:1292–5. [DOI] [PubMed]
- 4.Richardson WS, Detsky AS. Users’ guides to the medical literature. VII. How to use a clinical decision analysis. B. What are the results and will they help me in caring for my patients. JAMA. 1995;273:1610–13. [DOI] [PubMed]
- 5.Lee A, Joynt GM, Ho AMH, Gin T, Hazlett CB. Effect of an integrated teaching intervention on clinical decision analysis: a randomized, controlled study of undergraduate medical students. Med Teach. 2007;29:231–36. [DOI] [PubMed]


