Abstract
A microheater and a thermal sensor were fabricated inside elastomeric polydimethylsiloxane microchannels by injecting silver paint (or other conductive materials) into the channels. With a high-precision control scheme, microheaters can be used for rapid heating, with precise temperature control and uniform thermal distribution. Using such a microheater and feedback system, a polymerase chain reaction experiment was carried out whereas the DNA was successfully amplified in 25 cycles, with 1 min per cycle.
INTRODUCTION
In recent years, microfluidic chips have been demonstrated to have significant potential applications to biological processing and chemical reactions.1 With sizes ranging from millimeters to a few square centimeters, microfluidic chips can handle smaller-than-picoliter-scale fluid volumes and can be designed to integrate multiple laboratory functions. Such multifunctional chips are composed of several key microcomponents. Microheaters for heat generation, and thermal sensors for thermal control, are of critical importance in some forms of droplet formation control,2 and in chemical and biochemical processes. Hence, microheaters have been widely applied to heat solid chemical propellant to generate pressure in microfluidic chips,3 to provide rapid thermal cycling in polymerase chain reaction (PCR) microfluidic devices,4 and to produce temperature jumps in electrophysiology,5 just to mention a few. Microheaters have been fabricated from various materials including platinum,6, 7, 8, 9, 10 polysilicon,11, 12, 13, 14 aluminum,15 Ni,16 tungsten,17 silver∕graphite inks,18 silver∕polydimethylsiloxane (PDMS),19, 20 and indium-tin-oxide.21 Microheaters, because they are manufactured on such exceedingly small scales, must be designed to avoid heating the entire chip,22 which would seriously limit independent thermal operations; for example, a microscale PCR needs three sections, each at a different temperature, within a single chip.23 Nowadays, the main challenge is to develop thermal devices of miniature dimensions and localized heating characteristics, which are also highly integrable with base materials. Among the available base materials, PDMS is highly desirable for its rapid prototyping, transparency and biocompatibility.24 However, PDMS is a nonconducting polymer and the metal can not adhere to PDMS strongly due to the low surface energy of PDMS. The bonding of metal (e.g., platinum) thin layer to PDMS usually cause failures in the fabrication process.25 So it is not easy to pattern metal structure on or inside PDMS. In this paper, we report the fabrication of microconductive wire inside PDMS by injection molding and use it as microheater and thermal sensor, and demonstrate the ease of fabrication and integration along with the controlled rapid heating and cooling. We believe that this method will be especially useful for development of PDMS-based disposable microchips that integrate various microcomponents.
EXPERIMENTS AND RESULTS
Normally, injection molding is a manufacturing process for producing desired structures from both thermoplastic and thermosetting plastic materials. Molten plastic is injected at high pressure into a mold, which is the inverse of the product’s shape. However, in this paper, we use the microchannels inside PDMS as mold and silver paint as injection material in order to pattern metal structure inside PDMS.
Microchannels inside a PDMS chip were fabricated by soft lithography. Here, glass was chosen as the substrate and a negative photoresist—SU 8 were patterned on it by photolithography. Then PDMS was poured on the patterned SU 8 which is used as a master to produce microgrooves on PDMS and heated to cure. The cure PDMS was carefully peeled off and bonded with another piece of PDMS by plasma treatment to form the microchannels.
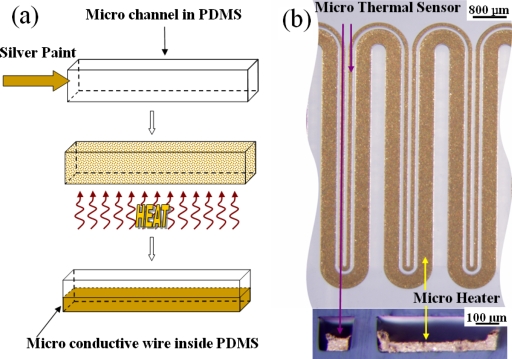
After the microchannels were fabricated, silver paint (SPI silver paste diluted by SPI thinner at a volume ratio of 1:3 and followed by an ultrasonic bath treatment; the silver particle is on the order of 1 μm) was injected into the channel, as shown in Fig. 1a. The chip was then heated to vaporize the solvent from the silver paint. The residual silver particles subsequently were heated to form conductive wires. The heating process included three stages. The first stage was room temperature to 60 °C at a heating rate of less than 1 °C∕min in order to avoid “bumping.” All of the volatile organics evaporated at this stage, with the silver particles beginning to form a uniform network permitting the continuous escape of any trapped vapors. The second stage entailed additional heating, from 60 to 100 °C. At this stage, the remaining organics decomposed and were expelled from the system without disrupting the uniform network of silver particles. The final stage was annealing, with a temperature of 100–150 °C. At this point the uniform network of silver particles sintered together, forming a conductive microwire inside the microchannel of the PDMS.
Figure 1.
(a) Processing flow of conductive microwire inside PDMS using molding injection. (b) Optical images of the microheater and thermal sensor. The upper view is the longitudinal view and the lower, the cross-sectional view.
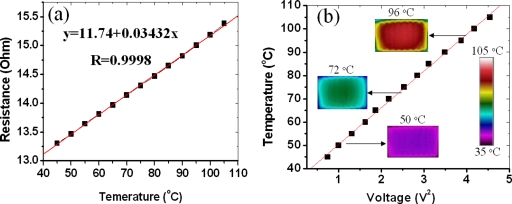
We used the microwire both as the heater and the thermal sensor. Two channels, spaced 100 μm apart with widths of 400 and 100 μm and height of 100 μm, were fabricated inside the PDMS. One narrow wire and one wide wire were then fabricated inside the channels in accordance to the process described above, shown in Fig. 1b. From the cross-sectional view, we can see that the dimensions of the narrow and wide wires are about 60 μm×50 μm and 400 μm×50 μm, respectively, and two gaps are formed due to solvent evaporation in silver paint. The narrow wire is to function as the temperature sensor (its resistance is variable with temperature), while the wider one is used as the microheater. When an electrical current is passed through the microheater, the temperature rise affects the resistance of the nearby temperature sensor. This resistance variation can be precisely calibrated to determine the corresponding temperature. In the present experiment, we used a precision digital multimeter (Agilent 34401A, Digit Multimeter) to determine the resistance. In order to obtain accurate temperature-calibration readings and examine the heating capability of the microheater, an infrared (IR) camera (FLIR Thermacam PM 695 with a 200 μm resolution close-up lens) was employed to detect both the thermal distribution and the local temperature. The IR camera was placed right over the microheater to record the thermal characteristics as the microheater was subjected to different applied voltages. The resistance∕temperature correlation for the microthermal sensor is shown in Fig. 2a. It can be seen that the resistance of the sensor shows a good linearity in the 45–105 °C range. Once calibrated, the thermal sensor is capable of in situ measuring of the reaction channel temperature, based on the sensor resistance. Figure 2b shows the temperature T dependence of microheater on input voltage V2 can be well linearly fitted. The microheater could attain 100 °C after 2.05 V was applied. Three actual IR images of the microheater taken at three temperatures, respectively, are shown in the insets of Fig. 2b. The images show that the thermal distribution of the heater is uniform in the center but shows a small temperature drop at the edge, indicating that the microheater can be useful for sample annealing or reactions carried out locally, such as with biochips or microchemical reactors.
Figure 2.
(a) Resistance-temperature correlation for the microthermal sensor. (b) Temperature-voltage correction for the microthermal heater. The three insets are IR images in (b) showing the thermal distributions at three specific temperatures.
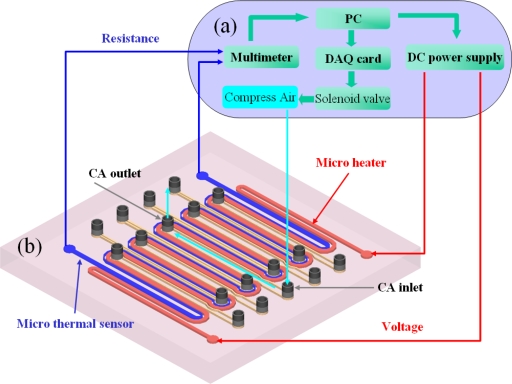
Precision temperature control and heating and cooling rates are the three important thermal characteristics of a heater. To obtain high-precision temperature control and effective heating rates, the temperature control system shown in Fig. 3a, custom-designed and constructed in our laboratory, was used. All the devices were connected to a computer and controlled by the LABVIEW program with a proportional integral differential (PID) module (National Instruments, Texas). The PID controller in the LABVIEW program calculated the output voltage based on the error between the set temperature and the actual temperature. The calculated output voltage was applied through a direct current power supply (HP 4192A). The solenoid valve (Burkert 6012), which was connected to the computer by a DAQ card (National Instrument PCI-6259), was used to turn the compressed air (CA) on or off, for the purpose of rapid cooling.
Figure 3.
(a) A self-made temperature control system. (b) A schematic 3D view of the microheater. The red column is the microheater and the blue column is the microthermal sensor. The yellow channels are the nine cooling channels with one CA inlet and one outlet for each.
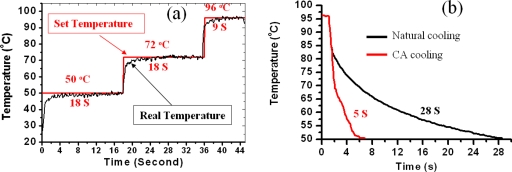
In order to evaluate the temperature control precision and the heating rate, we set three temperatures (50, 72, and 96 °C) and held them for 18, 18, and 9 s, respectively. The temperature variation versus time was plotted in Fig. 4a. The red line is the set temperature and the black line is the actual temperature measured from the micro thermal sensor. From experiments, the remarkable heating rate of approximately 20 °C∕s was obtained. Moreover, there was no overshoot and the steady-state error was about ±0.5 °C.
Figure 4.
(a) Temperature control result for the microheater. (b) Temperature profile of the microheater for natural cooling and CA cooling.
PDMS is a heat insulator having a thermal conductivity as low as 0.15 W∕m K. As it is difficult to obtain a rapid cooling rate inside the PDMS, the microheater was designed with nine CA-cooling channels. A schematic three-dimensional (3D) view of the microheater is presented in Fig. 3b. The cooling channels were integrated into the microheater, each with one CA inlet and one outlet. The CA is pumped through the cooling channels from the inlet to the outlet to bring out the heat whenever the set temperature is higher than the real temperature. Figure 4b shows the microheater’s cooling profiles for natural cooling and CA cooling, respectively. For natural air cooling, it took approximately 28 s to cool the temperature from 96 to 50 °C. Such a long cooling time is unacceptable for rapid thermal cycling. However, for CA cooling, the cooling time was as short as 5 s. In other words, the cooling rate was increased from 1.6 °C∕s (with normal cooling) to 11.5 °C∕s (with CA cooling).
The microheater was equipped for precise temperature control, temperature uniformity, as well as rapid heating and cooling. Thus, the microheater was suitable for reactions requiring rapid thermal control. To demonstrate this control, a PCR chip was employed.
PCR is a well known DNA amplification technique. This method uses repeated thermal cycling involving three PCR steps: denaturation (95 °C), annealing (55 °C), and extension (72 °C). A single cycle for a selective amplification of a certain segment of double-stranded DNA is completed in about 4 min with a conventional thermal cycling device. Accordingly, almost 2 h would be required to perform a full PCR process. Such a long reaction time is undesirable, because the activity of chemicals such as Taq DNA polymerase declines with time.26 Over the past few years, much attention has been paid to the development of miniaturized PCR devices.4 Different types of PCR microfluidic technologies have facilitated DNA amplification with much shorter reaction times, owing to a smaller thermal capacity and a higher heat-transfer rate between the PCR sample and the temperature-controlled components.27
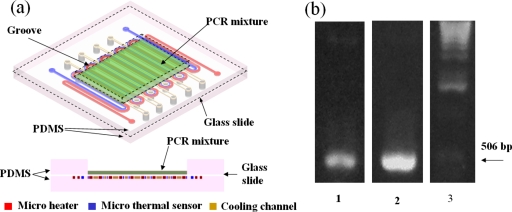
We have fabricated a PCR chip, shown in Fig. 5a. This chip is composed of three layers. The upper layer is PDMS with a 13 mm×9 mm groove in the center, loaded with 20 μl of PCR mixture.28 The middle layer is a glass slide of 140 μm thickness. The lower layer is PDMS embedded with the microheater, microthermal sensor, and the cooling channel. The middle layer is bonded to the other two layers by O2 plasma treatment.
Figure 5.
(a) A schematic 3D view of PCR chip composed of three layers. The upper layer is PDMS with a 13 mm×9 mm groove in the center which is loaded with 20 μl PCR mixture. The middle layer is a glass slide with a thickness of 140 μm. The lower layer is PDMS embedded with microheater, microthermal sensor and cooling channel. (b) Ultraviolet images of the PCR product for the chip (lane 1) and the conventional thermal cycler (lane 2). Lane 3 is a 1 kbp DNA ladder (Invitrogen), with an arrow indicating the 506-bp fragment of the 1 kbp DNA ladder, used as the reference.
The PCR mixture was spread flat in the groove to a thickness of 100 μm and covered by a layer of mineral oil to avoid sample evaporation at high temperatures. Then, the PCR mixture was heated to 94 °C for 2 min, after which it was cycled for 25 cycles: 9 s at 94 °C, 18 s at 52 °C, and 18 s at 72 °C. The 25 cycles required about 25 min to complete. For the purposes of a comparison, another PCR also was performed on a conventional thermal cycler (MyGenie 96, Bioneer, Inc.). The thermocycling conditions were as follows: 96 °C for 2 min in the initial heat activation, 25 cycles of 96 °C for 30 s, 50 °C for 1 min, and 72 °C for 1 min, followed by 2 min at 72 °C for a final extension. The total reaction time was about 3 h, which is at least seven times longer than that of our chip PCR, owing to the ramping rates being much slower than those in our PCR chip. The final PCR products for the chip and the conventional thermal cycler were detected by agarose gel electrophoresis stained with SYBR safe (Invitrogen), and photographed by a gel-imaging system (Alpha Innotech Corp.). The results are shown in Fig. 5b. Lanes 1 and 2 represent the PCR products for the chip and the conventional thermal cycler, respectively. Lane 3 represents a 1 kbp DNA ladder (Invitrogen.) The arrow indicates the reference 506 bp fragment of the ladder. As shown in Fig. 5b, the DNA was successfully amplified on the chip. However, the amount of amplification, compared with that of the conventional thermal cycler, was relatively small. This might be explained by the fact that the cycling time and temperature were not optimum, the PCR mixture having spread around to the corners of the groove after several thermal cycles without being distributed uniformly in the center of the heating area. It is believed that the amplification efficiency can be furthered increased by using a closed chamber to confine the PCR mixture in the center of the heating area so as to attain the optimum cycling time and temperature.
SUMMARY
We have developed a microheater integrated with a microthermal sensor and a cooling channel inside the PDMS. Using the microheater, we fabricated a PCR chip on which DNA was successfully amplified. The present PDMS-based microchip is expected to be integrable with other functions to realize an inexpensive, disposable, single microchip capable of carrying out many analytical steps.
ACKNOWLEDGMENTS
The authors would like to acknowledge Hong Kong RGC Grant No. HKUST 621006 for the financial support of this project. The work was partially supported by the Nanoscience and Nanotechnology Program at HKUST.
References
- deMello A. J., Nature (London) 10.1038/nature05062 442, 394 (2006). [DOI] [PubMed] [Google Scholar]
- Nguyen N., Ting T., Yap Y., Wong T., and Chai J. C., Appl. Phys. Lett. 10.1063/1.2773948 91, 084102 (2007). [DOI] [Google Scholar]
- Hong C., Murugesan S., Kim S., Beaucage G., Choi J., and Ahn C. H., Lab Chip 10.1039/b306116g 3, 281 (2003). [DOI] [PubMed] [Google Scholar]
- Zhang C., Xu J., Ma W., and Zhang W., Biotechnol. Adv. 10.1016/j.biotechadv.2005.10.002 24, 243 (2006). [DOI] [PubMed] [Google Scholar]
- Pennell T., Suchyna T., Wang J., Heo J., Felske J. D., Sachs F., and Hua S. Z., Anal. Chem. 10.1021/ac702169t 80, 2447 (2008). [DOI] [PubMed] [Google Scholar]
- El-Ali J., Perch-Nielsen I., Poulsen C., Bang D., Telleman P., and Wolff A., Sens. Actuators, A 10.1016/j.sna.2003.09.022 110, 3 (2004). [DOI] [Google Scholar]
- Lagally E. T., Emrich C. A., and Mathies R. A., Lab Chip 10.1039/b109031n 1, 102 (2001). [DOI] [PubMed] [Google Scholar]
- Lagally E. T., Scherer J. R., Blazej R. G., Toriello N. M., Diep B. A., Ramchandani M., Sensabaugh G. F., Riley L. W., and Mathies R. A., Anal. Chem. 10.1021/ac035310p 76, 3162 (2004). [DOI] [PubMed] [Google Scholar]
- Lee D., Park S. H., Yang H., Chung K., Yoon T. H., Kim S., Kim K., and Kim Y. T., Lab Chip 10.1039/b313547k 4, 401 (2004). [DOI] [PubMed] [Google Scholar]
- Lee D., Wu M., Ramesh U., Lin C., Lee T., and Chen P., Sens. Actuators B 10.1016/j.snb.2004.02.012 100, 401 (2004). [DOI] [Google Scholar]
- Belgrader P., Anal. Chem. 10.1021/ac034062u 75, 3446 (2003). [DOI] [PubMed] [Google Scholar]
- Erill I., Campoy S., Erill N., Barbé J., and Aguiló J., Sens. Actuators B 10.1016/S0925-4005(03)00522-7 96, 685 (2003). [DOI] [Google Scholar]
- Erill I., Campoy S., Rus J., Fonseca L., Ivorra A., Navarro Z., Plaza J. A., Aguiló J., and Barbé J., J. Multivariate Anal. 14, 1558 (2004). [Google Scholar]
- Yang H., Choi C. A., Chung K. H., Jun C., and Kim Y. T., Anal. Chem. 10.1021/ac035270p 76, 1537 (2004). [DOI] [PubMed] [Google Scholar]
- Rodriguez I., Lesaicherre M., Tie Y., Zou Q., Yu C., Singh J., Meng L. T., Uppili S., Li S. F. Y., Gopalakrishnakone P., and Selvanayagam Z. E., Electrophoresis 10.1002/elps.200390010 24, 172 (2003). [DOI] [PubMed] [Google Scholar]
- Arata H. F., Appl. Phys. Lett. 10.1063/1.2177374 88, 083902 (2006). [DOI] [Google Scholar]
- Liu J., Enzelberger M., and Quake S., Electrophoresis 23, 1531 (2002). [DOI] [PubMed] [Google Scholar]
- Koh C. G., Tan W., Zhao M., Ricco A. J., and Fan Z. H., Anal. Chem. 10.1021/ac0343836 75, 4591 (2003). [DOI] [PubMed] [Google Scholar]
- Liu L., Peng S., Niu X., and Wen W., Appl. Phys. Lett. 10.1063/1.2400065 89, 223521 (2006). [DOI] [Google Scholar]
- Liu L., Cao W., Wu J., Wen W., Chang D. C., and Sheng P., Biomicrofluidics 10.1063/1.2966453 2, 034103 (2008). [DOI] [PMC free article] [PubMed] [Google Scholar]
- Sun K., Yamaguchi A., Ishida Y., Matsuo S., and Misawa H., Sens. Actuators B 10.1016/S0925-4005(02)00016-3 84, 283 (2002). [DOI] [Google Scholar]
- Tadic S. C., Dernick G., Juncker D., Buurman G., Kropshofer H., Michel B., Fattinger C., and Delamarche E., Lab Chip 10.1039/b408964b 4, 563 (2004). [DOI] [PubMed] [Google Scholar]
- deMello A. J., Nature (London) 10.1038/422028a 422, 28 (2003). [DOI] [PubMed] [Google Scholar]
- McDonald J. C. and Whitesides G. M., Acc. Chem. Res. 10.1021/ar010110q 35, 491 (2002). [DOI] [PubMed] [Google Scholar]
- Niu X., Peng S., Liu L., Wen W., and Sheng P., Adv. Mater. (Weinheim, Ger.) 10.1002/adma.200602515 19, 2682 (2007). [DOI] [Google Scholar]
- Yoon D. S., Lee Y., Lee Y., Cho H. J., Sung S. W., Oh K. W., Cha J., and Lim G., J. Micromech. Microeng. 10.1088/0960-1317/12/6/312 12, 813 (2002). [DOI] [Google Scholar]
- Roper M. G., Easley C. J., and Landers J. P., Anal. Chem. 10.1021/ac050756m 77, 3887 (2005). [DOI] [PubMed] [Google Scholar]
- The 20 μl PCR mixture contains 0.2 μl (32 pg) DNA template sample YFP-N1, 2 μl (20 pmole) of each forward and reverse primer, 10 μl 2X PCR Master Mix® (Promega, Madison, WI) and H2O up to 20 μl. The template (YFP-N1) is a 462 bp segment encoding for the first 154 amino acid of eYFP (Accession No. AY818378), which is amplified with the forward primer 5′-CGGGATCCCGTGAGCAAGGGCGAGGAGC-3′ and reverse primer 5′-ATTTGCGGCCGCGGCCATGATATAGACGTTGTG-3′.


