The following guidelines were launched in Copenhagen in June 1998 and are based on an advisory statement by the Basic Life Support Working Group of the International Liaison Committee on Resuscitation.1
The term basic life support refers to maintaining airway patency and supporting breathing and the circulation without the use of equipment other than a protective shield.2 It comprises the elements: initial assessment, airway maintenance, expired air ventilation (rescue breathing), and chest compression. When all these elements are combined the term cardiopulmonary resuscitation is used. Basic life support implies that no equipment is used; when a simple airway, or face mask for mouth to mask resuscitation, is used this is defined as “basic life support with airway adjunct.” The development of automated defibrillation has allowed minimally trained people to extend their skills in basic life support.
The purpose of basic life support is to maintain adequate ventilation and circulation until means can be obtained to reverse the underlying cause of the arrest. It is therefore a “holding operation,” although on occasions, particularly when the primary disease is respiratory failure, it may itself reverse the cause and allow full recovery.
Failure of the circulation for 3-4 minutes (less if the patient is initially hypoxaemic) will lead to irreversible cerebral damage. Delay, even within that time, will lessen the eventual chances of a successful outcome. Emphasis must therefore be placed on rapid institution of basic life support by a rescuer, who none the less should follow the recommended sequence of action.
History
The earliest reference to mouth to mouth ventilation is considered to be in the Bible, when the prophet Elisha revived an apparently dead child. The first medical report of success was by Tossach in 1744. After this report, however, there was no further progress with the technique, and attention was turned towards the manual methods such as those described by Silvester, Schaefer, and Nielsen. It was not until the 1950s that mouth to mouth ventilation was rediscovered by Safar and Ruben and became accepted universally as the method of choice. The inefficiency of the manual methods has led to them being abandoned.
Closed chest cardiac massage was first described in 1878 by Boehm and successfully applied in a few cases of cardiac arrest over the next 10 years or so. After that, however, open chest massage became the standard management for cardiac arrest until 1960, when the classic paper by Kouwenhoven et al was published, showing the effectiveness of closed chest massage.3 As this coincided with the rebirth of mouth to mouth ventilation, 1960 could be considered the year in which modern cardiopulmonary resuscitation was born.
Theory of chest compression
The original term “cardiac massage” and its successor “external cardiac compression” reflect the initial theory as to how chest compressions achieve an artificial circulation—namely, by squeezing the heart. This “heart pump theory” was criticised in the mid-1970s because echocardiography showed that the cardiac valves become incompetent during resuscitation and because coughing alone was shown to produce a life sustaining circulation. The alternative “thoracic pump” theory proposes that chest compression, by increasing intrathoracic pressure, propels blood out of the thorax, forward flow occurring because veins at the thoracic inlet collapse while the arteries remain patent.
An extension of the controversy raised by these conflicting theories is the argument whether the rate of chest compression during resuscitation should be fast or slow. However, the current recommendation is for a rate of 100/minute, and this has been shown to be effective in practice.
It is important to recognise that even when performed optimally chest compressions do not achieve more than 30% of the normal cardiac output.
Sequence of actions
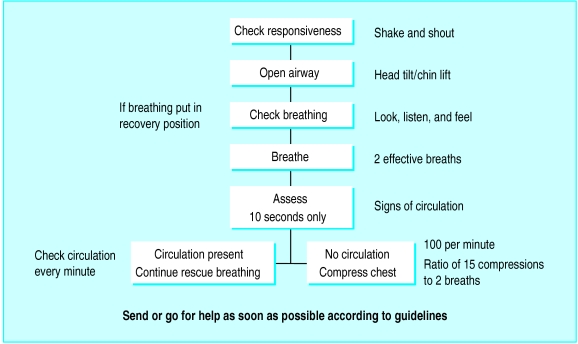
The sequence of actions in the algorithm for adult basic life support is aimed primarily at the single lay rescuer dealing with an adult victim (fig 1).
Figure 1.
Algorithm for adult basic life support
The following is the agreed sequence of actions that constitute the European Resuscitation Council guidelines for adult basic life support. In the text the use of the masculine includes the feminine.
(1) Ensure safety of rescuer and victim
(2) Check the victim and see if he responds:
Gently shake his shoulders and ask loudly: “Are you all right?” (fig 2-a)
(3) (a) If he responds by answering or moving:
Leave him in the position in which you find him (provided he is not in further danger), check his condition, and get help if needed
Reassess him regularly
(b) If he does not respond:
Shout for help
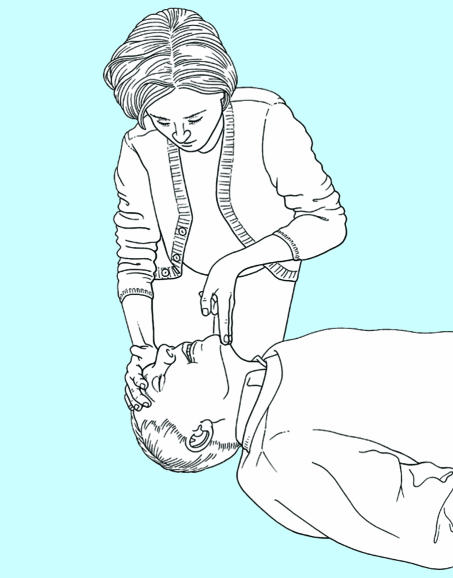
Open his airway by tilting his head and lifting his chin (fig 2-b):
If possible with the victim in the position in which you find him, place your hand on his forehead and gently tilt his head back, keeping your thumb and index finger free to close his nose if rescue breathing is required
At the same time, with your fingertip(s) under the point of the victim’s chin, lift the chin to open the airway
If you have any difficulty turn the victim on to his back and then open the airway as described
Try to avoid head tilt if trauma (injury) to the neck is suspected
(4) Keeping the airway open, look, listen, and feel for breathing (more than an occasional gasp):
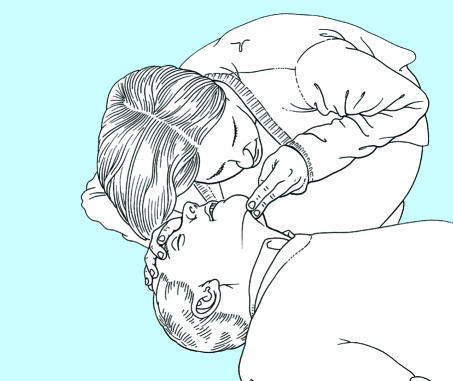
Look for chest movements (fig 2-c)
Listen at the victim’s mouth for breath sounds
Feel for air on your cheek
Look, listen, and feel for 10 seconds before deciding that breathing is absent
(5) (a) If he is breathing (other than an occasional gasp):
Turn him into the recovery position (see later)
Check for continued breathing
(b) If he is not breathing:
Send someone for help or, if you are on your own, leave the victim and go for help; return and start rescue breathing as below
Turn the victim on to his back if he is not already in this position
Remove any visible obstruction from the victim’s mouth, including dislodged dentures, but leave well fitting dentures in place
Give 2 effective rescue breaths, each of which makes the chest rise and fall:
Ensure head tilt and chin lift
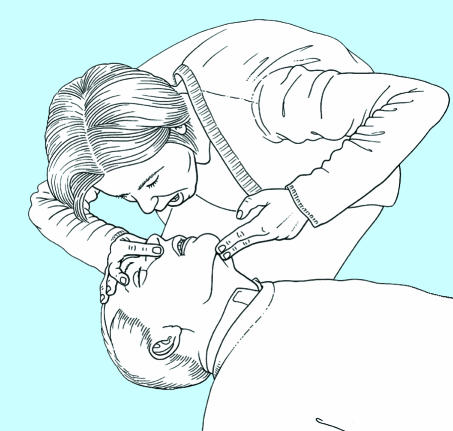
Pinch the soft part of his nose closed with the index finger and thumb of your hand on his forehead
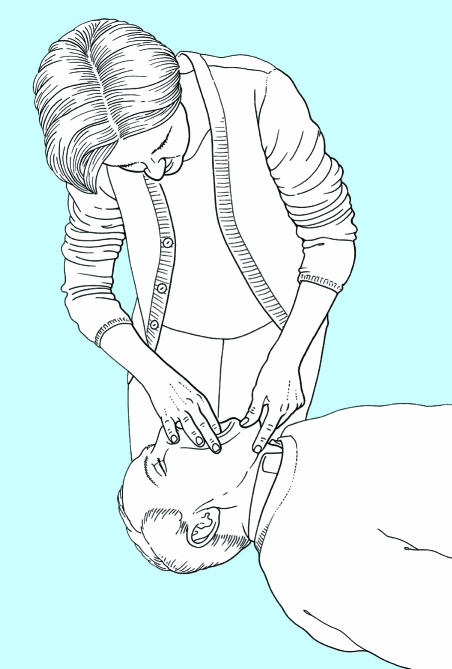
Open his mouth a little, but maintain chin lift (fig 2-d)
Take a breath and place your lips around his mouth, making sure that you have a good seal
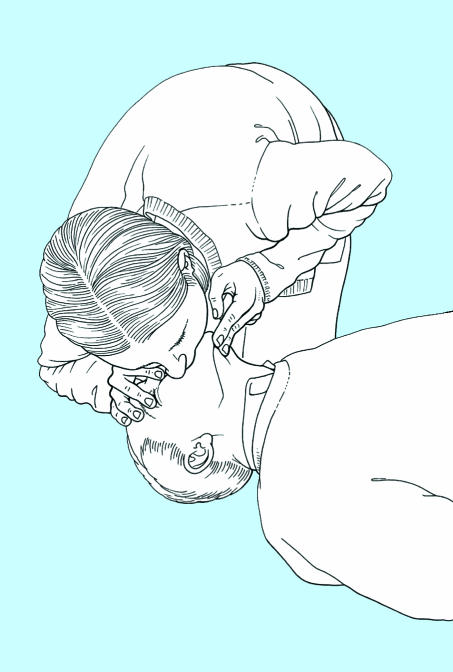
Blow steadily into his mouth for 1.5-2 seconds, watching for his chest to rise as in normal breathing (in an adult this usually requires 400-600 ml air) (fig 2-e)
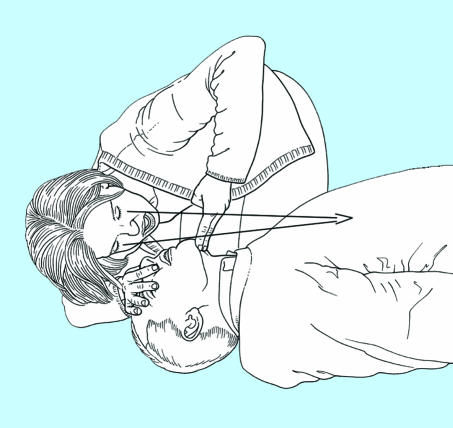
Maintaining head tilt and chin lift, take your mouth away from the victim and watch for his chest to fall as air comes out (fig 2-f)
Take another breath and repeat the sequence as above to give 2 effective rescue breaths in all
If you have difficulty achieving an effective breath:
Recheck the victim’s mouth and remove any obstruction (fig 2-g)
Recheck that there is adequate head tilt and chin lift
Make up to 5 attempts in all to achieve 2 effective breaths
Even if unsuccessful, move on to assessment of circulation
(6) Assess the victim for signs of a circulation:
Look for any movement, including swallowing or breathing (more than an occasional gasp)
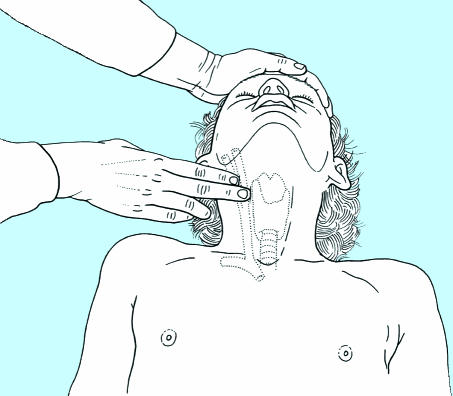
Check the carotid pulse (fig 2-h)
Take no more than 10 seconds to do this
(7) (a) If you are confident that you can detect signs of a circulation within 10 seconds:
Continue rescue breathing, if necessary, until the victim starts breathing on his own
About every 10 breaths (or about every minute) recheck for signs of a circulation; take no more than 10 seconds each time
If the victim starts to breathe on his own but remains unconscious, turn him into the recovery position. Check his condition and be ready to turn him on to his back and restart rescue breathing if he stops breathing
(b) If there are no signs of a circulation, or you are at all unsure, start chest compression:
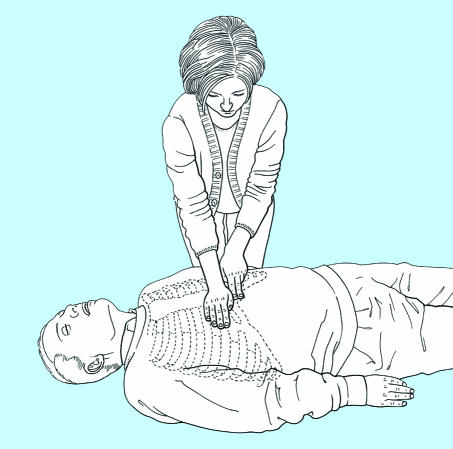
Locate the lower half of the sternum:
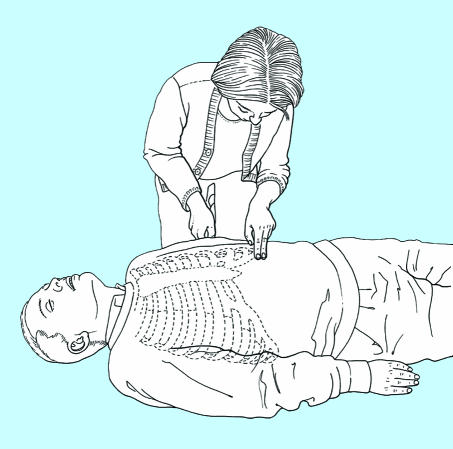
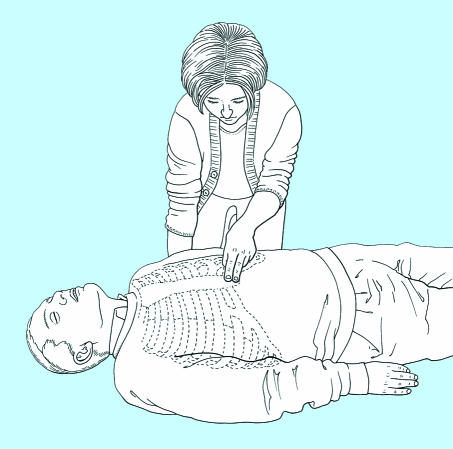
Using your index and middle fingers, identify the lower rib margin (fig 2-i(top)). Keeping your fingers together, slide them upwards to the point where the ribs join the sternum. With your middle finger on this point, place your index finger on the sternum (fig 2-i(middle))
Slide the heel of your other hand down the sternum until it reaches your index finger; this should be the middle of the lower half of the sternum (fig 2-i(bottom))
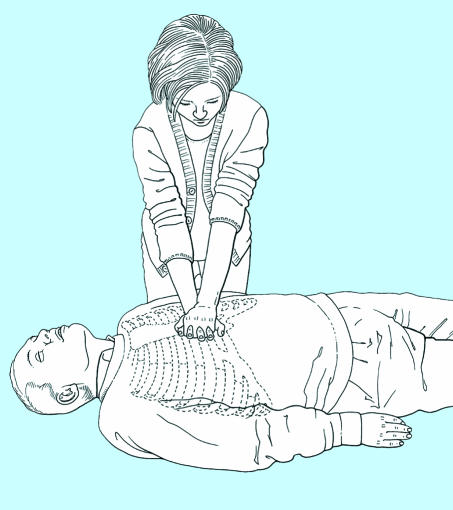
Leave the heel of your hand there, with the other hand on top
Interlock the fingers of both hands and lift them to ensure that pressure is not applied over the victim’s ribs. Do not apply any pressure over the upper abdomen or bottom tip of the sternum (fig 2-j)
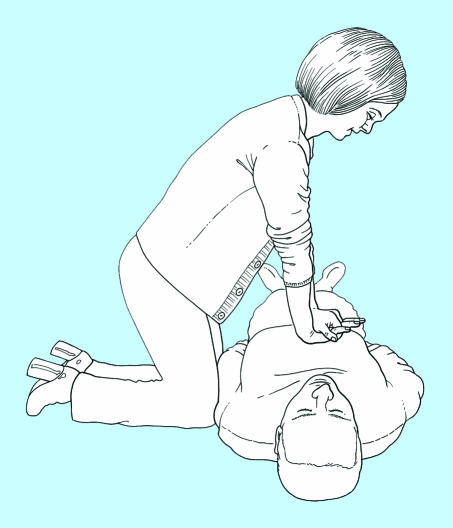
Position yourself vertically above the victim’s chest and, with your arms straight, press down on the sternum to depress it 4-5 cm (fig 2-k)
Release the pressure, without losing contact between the hand and sternum, then repeat at a rate of about 100 times a minute (a little less than 2 compressions a second). Compression and release should take an equal amount of time
Combine rescue breathing and compression:
After 15 compressions tilt the head, lift the chin, and give 2 effective breaths (fig 2-l)
Return your hands without delay to the correct position on the sternum and give 15 further compressions, continuing compressions and breaths in a ratio of 15 to 2
(8) Continue resuscitation until:
Qualified help arrives
The victim shows signs of life
You become exhausted.
Recovery position
There are a number of different recovery positions which fulfil most or all of the criteria recommended by the International Liaison Committee on Resuscitation, each of which has its advocates. National resuscitation councils and other major organisations should consider adopting one of the several available options so that training and practice can be consistent.
The Training and Education Group of the European Resuscitation Council recommends that the recovery position described in the 1992 guidelines be used for training purposes but that particular care is taken to ensure that a conscious volunteer is not left in this position for more than a few minutes.4 If this recovery position is used for a patient, care should be taken to monitor the peripheral circulation of the lower arm, and steps taken to ensure that the duration of pressure on this arm is kept to a minimum. A description of this position follows.
Remove the victim’s spectacles
Kneel beside the victim and make sure that both his legs are straight
Open the airway by tilting the head and lifting the chin
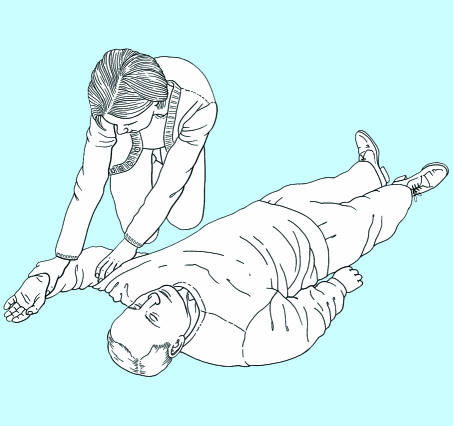
Place the arm nearest to you out at right angles to his body, elbow bent with the hand palm uppermost (fig 2-m)
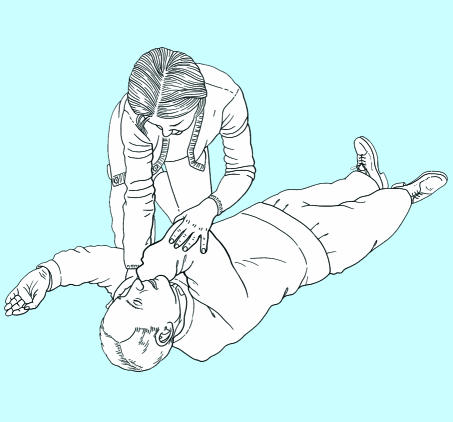
Bring his far arm across the chest, and hold the back of the hand against the victim’s nearest cheek (fig 2-n)
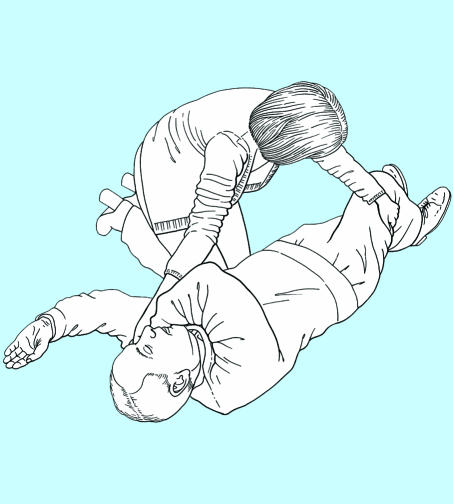
With your other hand, grasp the far leg just above the knee and pull it up, keeping the foot on the ground (fig 2-o)
Keeping his hand pressed against his cheek, pull on the leg to roll the victim towards you on to his side
Adjust the upper leg so that both the hip and knee are bent at right angles (fig 2-p)
Tilt the head back to make sure the airway remains open
Adjust the hand under the cheek, if necessary, to keep the head tilted
Check breathing regularly.
Finally, it must be emphasised that in spite of possible problems during training and in use, there is no doubt that placing an unconscious, non-breathing victim into the recovery position can be life saving.
When to get help
It is vital for rescuers to get help as quickly as possible.
When more than one rescuer is available, one person should start resuscitation while another goes for help
A lone rescuer will have to decide whether to start resuscitation or to go for help first. This decision will be influenced by the availability of emergency medical services and local practice
If the likely cause of unconsciousness is trauma (injury) or drowning or if the victim is an infant or a child the rescuer should perform resuscitation for about 1 minute before going for help
If the victim is an adult and the cause of unconsciousness is not trauma (injury) or drowning, the rescuer should assume that the victim has a heart problem and go for help immediately after it has been established that the victim is not breathing.
Resuscitation with two people
Cardiopulmonary resuscitation is less tiring with two people than with one person. However, it is important that both rescuers are proficient and practised in the technique. The following points should be noted:
(1) The first priority is to summon help. This may mean that one rescuer has to start cardiopulmonary resuscitation alone while the other leaves to find a telephone.
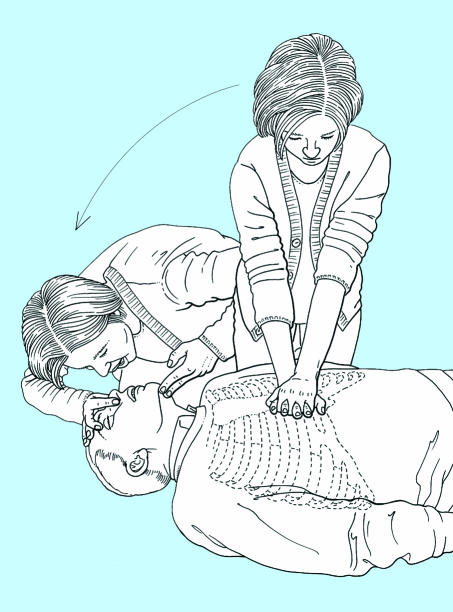
(2) When changing from single person to two person cardiopulmonary resuscitation the second rescuer should take over chest compressions after the first rescuer has given 2 ventilations. During these ventilations, the incoming rescuer should determine the correct position on the sternum and should be ready to start compressions immediately after the second inflation has been given. It is preferable that the rescuers work from opposite sides of the victim.
(3) A ratio of 5 compressions to 1 inflation should be used. By the end of each series of 5 compressions, the rescuer responsible for ventilation should be positioned ready to give an inflation with the least possible delay. It is helpful if the rescuer giving compressions counts out aloud: “1, 2, 3, 4, 5.”
(4) Chin lift and head tilt should be maintained at all times. Ventilation should take the usual 1.5-2 seconds, during which chest compressions should cease; they should be resumed immediately after inflation of the chest, waiting only for the rescuer to remove his or her lips from the victim’s face.
(5) If the rescuers wish to change places, usually because the one giving compressions becomes tired, this should be undertaken as quickly and smoothly as possible. The rescuer responsible for compressions should announce the change and, at the end of a series of 5 compressions, move rapidly to the victim’s head, obtain an open airway, and give a single inflation. During this manoeuvre the second rescuer should position himself or herself to start compressions as soon as the inflation has been completed.
Choking
If blockage of the airway is only partial the victim will usually be able to dislodge it by coughing, but if there is complete obstruction to flow of air, this may not be possible.
Diagnosis
The victim may have been seen to be eating, or a child may have put an object into his mouth
A victim who is choking often grips his throat with his hand
With partial airway obstruction the victim will be distressed and coughing. There may be inspiratory wheeze
With complete airway obstruction the victim will be unable to speak, breathe, or cough and will eventually lose consciousness.
Treatment
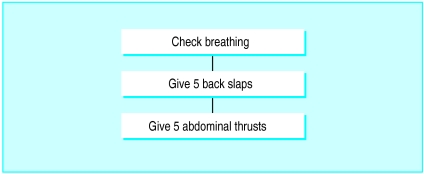
Treatment is summarised in fig 3.
Figure 3.
Summary of treatment of choking in adults
(1) If the victim is breathing, encourage him to continue coughing, but do nothing else
(2) If the victim shows signs of becoming weak or stops breathing or coughing:
Leave him in the position in which you find him, remove any obvious debris or loose false teeth from the mouth, and carry out back slapping:
(a) If he is standing or sitting:
Stand to the side and slightly behind him
Support his chest with one hand and lean him well forwards so that when the obstructing object is dislodged it comes out of the mouth rather than goes further down the airway
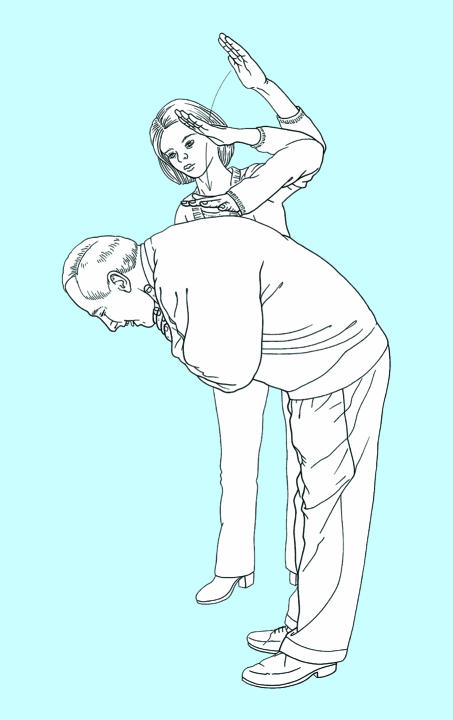
Give up to 5 sharp slaps between his shoulder blades with the heel of your other hand (fig 2-q)
(b) If he is lying:
Kneel beside him and roll him on to his side facing you
Support his chest with your thigh
Give up to 5 sharp slaps between his shoulder blades with the heel of your hand
With back slaps the aim should be to relieve the obstruction with each slap rather than necessarily to give all five.
(3) If back slapping fails, try giving abdominal thrusts:
(a) If the victim is standing or sitting:
Stand behind the victim and put both arms round the upper part of his abdomen
Make sure the victim is bending well forwards so that when the obstructing object is dislodged it comes out of the mouth rather than goes further down the airway
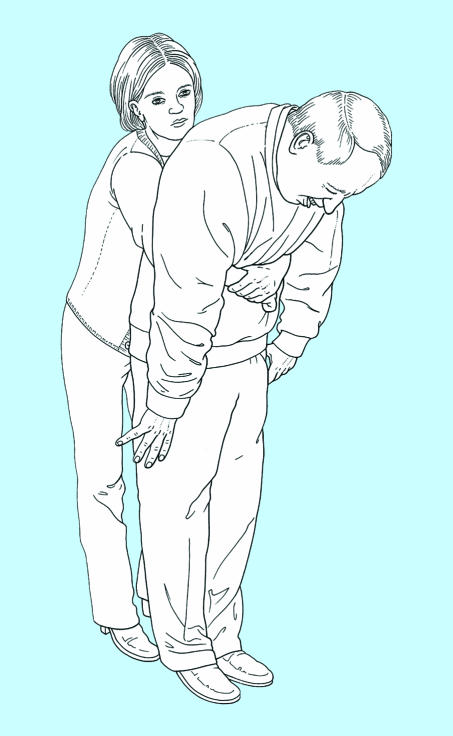
Clench your fist and place it between the umbilicus and xiphisternum. Grasp it with your other hand (fig 2-r)
Pull sharply inwards and upwards; the obstructing object should be dislodged and fly out of the mouth
(b) If the victim is lying on the ground:
Turn him on to his back if necessary
Kneel astride him
Place the heel of one hand in the upper part of his abdomen between the umbilicus and xiphisternum; take care to avoid any pressure on the ribs themselves
Place the other hand on top of the first and thrust sharply downwards and towards his head. If the obstruction is not relieved, repeat the action, giving up to 5 thrusts if necessary
If the obstruction is still not relieved, recheck the mouth for any obstruction that can be reached with a finger and continue alternating 5 back slaps with 5 abdominal thrusts
(4) If the victim at any time becomes unconscious follow the sequence of life support. Loss of consciousness may result in relaxation of the muscles around the larynx and allow air to pass down into the lungs. In summary:
Open his airway by lifting his chin and tilting his head
Check for breathing by looking, listening, and feeling
Remove any visible obstruction from the mouth
Attempt to give 2 effective rescue breaths:
If effective breaths can be achieved continue life support as appropriate
If effective breaths cannot be achieved continue to alternate 5 back slaps with 5 abdominal thrusts. Attempt rescue breaths at the end of each series of back slaps and abdominal thrusts.
Risks to the rescuer
A rescuer should never place himself or others at more risk than the victim. Unfortunately, the need for resuscitation is often allowed to override all other considerations, and danger to the rescuer may be ignored in an effort to reach and administer care to the victim. Before starting a resuscitation attempt, the rescuer must rapidly and correctly assess the risks; traffic, falling masonry, toxic fumes, and gas are obvious factors. In many cases proper assessment, a little care, and full cooperation with the rescue services can provide a safe environment. For example, a strategically placed vehicle will shield the victim and rescuer from oncoming traffic. Hazard triangles, hazard warning lights, and high visibility clothing will alert other road users. After a car accident, switching off the ignition will stop the fuel supply and lessen the risk of fire. Hazchem notices alert the rescuer to the risk of contact with hazardous chemicals.
Poisoning
Victims of poisoning may require basic or advanced life support, which should follow standard guidelines. If the poison can be identified, advice should be sought from poisons information centres when possible. In most cases there is little risk to the resuscitation team. Exceptions include incidents involving hydrogen cyanide and hydrogen sulphide gas poisoning.
Hydrogen cyanide impairs cellular oxygen usage. Early signs of cyanide poisoning are hyperventilation and tachycardia, followed by coma, cyanosis, and convulsions. Immediate treatment with oxygen at a high inspired concentration is indicated, but if assisted ventilation is required it should be performed only with a mask and non-return valve system, so that the rescuer is not exposed to exhaled air. Fixed dilated pupils should not preclude resuscitation; high success rates have been reported in such patients. On confirmation of the diagnosis an antidote (hydroxocobalamin or sodium thiosulphate) can be given.
Other cases of poisoning may involve corrosive chemicals (such as strong acids, alkalis, or paraquat), or substances such as organophosphorus compounds that are easily absorbed through the rescuer’s skin or respiratory tract. In such cases, care must be taken when handling the victim’s clothes or any of the victim’s body fluids, especially vomit. Correct protective clothing, including gloves, should be worn to protect against direct skin contact and the inhalation of toxic fumes.
Infection
The possibility of transmission of infection between a victim and a rescuer has caused much concern, especially more recently with the heightened anxiety over hepatitis and AIDS. To date there have been only anecdotal reports of isolated incidents. A small number of publications have indicated transmission of infection to the rescuer from mouth to mouth resuscitation. These have been concerned with the transmission of cutaneous tuberculosis, shigellosis, meningococcal meningitis, herpes simplex virus, and, most recently, salmonella. To put these reports into perspective, not a single case of transmission of an infectious disease by mouth to mouth ventilation was recorded in New York City firemen over a 22 year period.
Hepatitis B and HIV
Hepatitis B virus and HIV have recently given rise to concern, although there has been no reported case of transmission of either virus through mouth to mouth ventilation. Nevertheless, a recent report from the Centers for Disease Control and Prevention in the United States advises universal precautions against mucous membrane, parenteral, or non-intact skin exposures to hepatitis B virus and HIV. This report emphasises that blood is the single most important source of these viruses but recommends precautions against contact with semen; vaginal secretions; cerebrospinal, pleural, peritoneal, pericardial, and amniotic fluids; and any body fluid containing visible blood. Precautions are not considered necessary against contact with sputum, nasal secretions, faeces, sweat, tears, urine, or vomit.
Transmission of hepatitis B virus in humans through mouth to mouth ventilation involving contact only with saliva positive for antigen to hepatitis B virus is unlikely. However, it is possible that infection could be transmitted by saliva contaminated with positive blood penetrating small cracks in the oral mucosa. The only report of HIV transmission through saliva has been in laboratory animals that have received direct intravenous injections of HIV positive saliva. In addition, there have been many studies of occupational and social exposure to patients with HIV infection which have included direct exposure of mucous membranes or non-intact skin to infected body fluids. In those studies, which included needlestick injuries, the rate of seroconversion has been less than 1%. Mucous membrane exposure must be considered less of a risk than needlestick exposure, thus the chance of infection from mouth to mouth ventilation must be negligible.
Precautions
Although mouth to mouth ventilation seems to be safe, some healthcare workers may feel the need to use an interpositional airway device, particularly if the saliva of trauma victims has been contaminated with blood. Before selecting such a device, the user must be satisfied that it will function effectively in both its resuscitation and protective roles. There must be proper training in its use, cleaning, and disposal. Most importantly, the selected device must be immediately available at all times. A pocket handkerchief is ineffective as protection and may enhance the passage of virus material.
There is a small, but quantifiable risk of infection by direct needlestick injury. Care must be taken over needles and other “sharps,” and a sharps disposal box must be included in every advanced resuscitation pack. Blood is the infectious medium, and particular care must be taken when there is obvious spillage of blood or staining of body fluids with blood. Rescuers should wear plastic or rubber gloves and eye protection if an aerosol of blood particles is likely.
Manikins
Resuscitation practice is essential. Resuscitation manikins have been shown not to be a source of infection. Nevertheless, sensible precautions must be taken to minimise the potential for cross infection. Manikins should be regularly cleaned and disinfected after use, according to the manufacturer’s recommendations. Some of the more modern manikins have disposable face pieces and airways to simplify these procedures.
Further reading
Cummins RO, Ornato JP, Thies WH, Pepe PE. Improving survival from sudden cardiac arrest: The “chain of survival” concept. A statement for health professionals from the Advanced Cardiac Life Support Subcommittee and the Emergency Cardiac Care Committee, American Heart Association. Circulation 1991;83:1832-47.
Blenkharn JI, Buckingham SE, Zideman DA. Prevention of transmission of infection during mouth-to-mouth resuscitation. Resuscitation 1990;19:151-7.
Cardiopulmonary resuscitation, AIDS, and public panic. Lancet 1992;340:456-7.
Handley AJ. Recovery position. Resuscitation 1993;26:93-5.
Montgomery W, Brown DD, Hazinski MF, Clawse J, Newell LD, Flint L. Citizen response to cardiopulmonary emergencies. Ann Emerg Med 1993;22:428-34.
Figure 2.
(a) Check the victim and see if he responds
Figure.
(b) Open his airway by tilting his head and lifting his chin
Figure.
(c) Look, listen, and feel for breathing
Figure.
(d) Open his airway, pinch his nose, open his mouth, but maintain chin lift
Figure.
(e) Blow steadily into his mouth
Figure.
(f) Maintaining head tilt and chin lift, take your mouth away from the victim and watch for his chest to fall as air comes out
Figure.
(g) Recheck the victim’s mouth and remove any obstruction
Figure.
(h) Check the carotid pulse
Figure.
(i) (top) Locate the lower rib margins; (middle) Move your fingers to where the ribs join the sternum. With your middle finger on this point, place your index finger on the sternum; (bottom) Slide the heel of your other hand down the sternum until it reaches your index finger; this should be the middle of the lower half of the sternum
Figure.
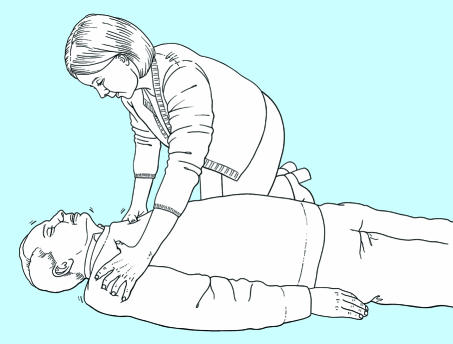
(j) Place the heel of your hand on the lower half of the sternum, with the other hand on top. Interlock the fingers of both hands and lift them to ensure that pressure is not applied over the victim’s ribs
Figure.
(k) Position yourself vertically above the victim’s chest and, with your arms straight, press down on the sternum to depress it 4-5 cm
Figure.
(l) After 15 compressions tilt the head, lift the chin and give 2 effective breaths, continuing compressions and breaths in a ratio of 15 to 2
Figure.
(m) Recovery position: Place the arm nearest to you out at right angles to his body, elbow bent with the hand palm uppermost
Figure.
(n) Recovery position: Bring his far arm across the chest and hold the back of the hand against the victim’s nearest cheek
Figure.
(o) Recovery position: With your other hand, grasp the far leg just above the knee and pull it up, keeping the foot on the ground
Figure.
(p) Recovery position: Keeping his hand pressed against his cheek, pull on the leg to roll the victim towards you on to his side. Adjust the upper leg so that both the hip and knee are bent at right angles
Figure.
(q) Give up to 5 sharp slaps between his shoulder blades with the heel of your hand
Figure.
(r) Clench your fist and place it between the umbilicus and xiphisternum. Grasp it with your other hand
Acknowledgments
Members of the Basic Life Support Working Group of the European Resuscitation Council are: A J Handley (chairman; United Kingdom), J Bahr (Germany), P Baskett (United Kingdom), L Bossaert (Belgium), D A Chamberlain (United Kingdom), W Dick (Germany), L Ekstrom (Sweden), R Juchems (Germany), D Kettler (Germany), A K Marsden (United Kingdom), K Monsieurs (Belgium), M Parr (United Kingdom), P Petit (France), A van Drenth (Netherlands).
Editorial by Nolan. Members of the working group are listed at the end of the article. These guidelines have been published in Resuscitation, the official journal of the European Resuscitation Council (Resuscitation 1998;37:67-80)
References
- 1.Handley AJ, Becker LB, Allen M, van Drenth A, Kramer EB, Montgomery WH. Single rescuer adult basic life support. An advisory statement by the Basic Life Support Working Group of the International Liaison Committee on Resuscitation. Resuscitation. 1997;34:101–108. doi: 10.1016/s0300-9572(97)01099-x. [DOI] [PubMed] [Google Scholar]
- 2.Chamberlain DC, Cummins RO Task Force. Recommended guidelines for uniform reporting of data from out-of-hospital cardiac arrest: the “Utstein style.”. Resuscitation. 1991;22:1–26. [PubMed] [Google Scholar]
- 3.Kouwenhoven WB, Jude JR, Knickerbocker GG. Closed-chest cardiac massage. JAMA. 1960;173:1064–1067. doi: 10.1001/jama.1960.03020280004002. [DOI] [PubMed] [Google Scholar]
- 4.Basic Life Support Working Party of the European Resuscitation Council. Guidelines for basic life support. Resuscitation. 1992;24:103–110. [PubMed] [Google Scholar]


