Abstract
The deformation-induced nanostructure developed during high-pressure torsion of B2 long-range ordered FeAl is shown to be unstable upon heating. The structural changes were analyzed using transmission electron microscopy, differential scanning calorimetry and microhardness measurements. Heating up to 220 °C leads to the recurrence of the chemical long-range order that is destroyed during deformation. It is shown that the transition to the long-range-ordered phase evolves in the form of small ordered domains homogeneously distributed inside the nanosized grains. At temperatures between 220 and 370 °C recovery of dislocations and antiphase boundary faults cause a reduction in the grain size from 77 to 35 nm. Grain growth occurs at temperatures above 370 °C. The evolution of the strength monitored by microhardness is discussed in the framework of grain-size hardening and hardening by defect recovery.
Keywords: Nanocrystalline materials, High-pressure torsion, Recovery, Ordering, Transmission electron microscopy (TEM)
1. Introduction
Nanocrystalline materials containing a large volume fraction of grain boundaries are of great interest as they frequently exhibit improved mechanical and new physical properties [1,2]. One widely used approach to produce nanocrystalline (NC) structures is severe plastic deformation (SPD) of coarse-grained materials, as achieved, for example, by high-pressure torsion (HPT) of bulk materials [3]. To understand the properties of NC materials, their physics and thermodynamics have to be studied. A detailed knowledge of the processes occurring during the thermal treatment is of prime importance not only for applications but also for a deeper understanding of the stability of the deformation-induced metastable phases. It has been shown that multiple changes in structure occur during annealing of SPD-processed nanocrystalline metals and alloys since they contain, in addition to small grains, a high dislocation density and high internal strains [4–7].
For intermetallic alloys the formation of the nanocrystalline structure during ball milling is accompanied by loss of the long-range order (LRO) present in the initial coarse-grained material [8]. For B2-ordered FeAl, the destruction of LRO also induces a transition from the paramagnetic to the ferromagnetic state [9–12]. Therefore, modifications during annealing of nanocrystalline disordered FeAl are manifold. The modifications at low annealing temperatures (below 250 °C) have been studied by several authors using different integral methods, like differential scanning calorimetry (DSC), X-ray and neutron diffraction, as well as magnetometer measurements [13,14,9,15]. The corresponding processes causing structural modifications are very sensitive to impurities. Consequently, in the studies of ball-milled FeAl powders. different behavior during annealing was revealed that can be attributed to contamination occurring during milling. For instance, mechanically milled FeAl powders annealed for 1 h exhibit a continuous decrease in microhardness [15] or a peak at 500 °C [16]; the latter was attributed to the precipitation and growth of fine oxide particles. In order to eliminate the effect of contamination on the processes causing structural modification, SPD of bulk materials has to be applied. To date, there have been few studies of intermetallic FeAl alloys deformed severely in the bulk due to their usually inherent brittleness. In addition, the structural state of nanocrystalline FeAl as a function of temperature has not been studied in detail using transmission electron microscopy (TEM), nor has a correlation with the DSC signal over the whole interesting temperature range been established. A few TEM studies have been conducted of disordered FeAl, though only for milled powders after compaction (e.g. [17]).
Recently, we have successfully achieved the production of bulk nanocrystalline disordered FeAl of high purity by high-pressure torsion of B2-ordered FeAl. Therefore, it was the aim of this paper to investigate the temperature-dependent structural modifications of the SPD-induced metastable state using integral methods, like DSC measurements and microhardness testing, in correlation with local systematic TEM studies.
2. Experimental procedure
Fe–45 at.% Al single crystals were grown from high-purity Fe (99.99%) and Al (99.9997%) under argon in alumina crucibles using the Bridgman technique at a growth rate of about 10 mm h−1 followed by an annealing treatment for 1 week at 400 °C. This treatment was used to achieve a defined initial state of order and of vacancy concentration [18].
HPT samples (8 mm in diameter, 0.8 mm thick) were cut from a single crystal by spark erosion. Several samples were HPT deformed by up to three rotations under a pressure of 8 GPa to achieve deformation grades larger than 10,000%. The deformation was done at room temperature, which corresponds to a temperature of 0.18 Tm (Tm being the melting temperature). For DSC and subsequent TEM investigations, discs of 2.3 mm diameter were prepared from the outer rim of the HPT samples using spark erosion.
DSC studies of the nanocrystalline samples were carried out using a Netsch DSC 204 Phoenix device in aluminum crucibles under argon flux at a heating rate of 20 K min−1 and the samples were heated up to 500 °C. Each sample was subjected to two subsequent heating runs and the second one was used as baseline.
For a systematic study of the evolution of microhardness and grain size, as well as the state of order, additional samples were heated in the DSC device to 130, 170, 220, 370 and 500 °C (corresponding to homologous temperatures of 0.24, 0.26, 0.29, 0.38 and 0.46Tm) at a heating rate of 20 K min−1 followed by an immediate cooling process at a cooling rate of 20 K min−1. Measurements of the microhardness were carried out at room temperature using the Vickers technique with a Paar MHT-4 indentor. Indentation was done at a gradient of 0.1 N s−1, with a final force of 2 N being applied for 10 s. Subsequently, the imprints were measured by digital imaging techniques after recording with a Zeiss Axioplan Optical microscope equipped with a CCD camera.
TEM samples were prepared by twin-jet electropolishing in a solution of methanol with 33% nitric acid at −25 °C [19]. TEM studies were carried out using a Phillips CM200 operating at an acceleration voltage of 200 kV.
3. Experimental results
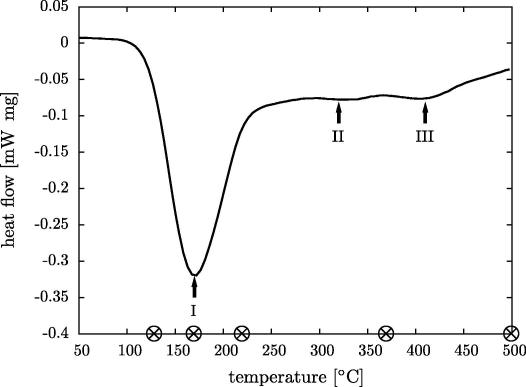
Fig. 1 shows the signal obtained from the DSC measurements containing three exothermic peaks. The onset of the pronounced first peak (I) was measured by putting a tangent at the slope of the peak. The first exothermic peak (I) has an onset at about 130 °C, the end is at about 220 °C and the center at about 170 °C; from the area an enthalpy change of about 54 J g−1 (4.5 kJ mol−1) was deduced. The other two exothermic peaks (II and III) are centered around 320 and 410 °C, respectively. They are strongly overlapping and too small for a proper analysis of their areas, onset- and endpoints.
Fig. 1.
DSC signal obtained by heating at a constant rate (20 K min−1) of disordered nanocrystalline FeAl after HPT deformation. The curve shows three exothermic peaks, I, II and III, at about 170, 320 and 410 °C, respectively. The temperatures at which samples were studied by TEM are marked by crosses (⊗).
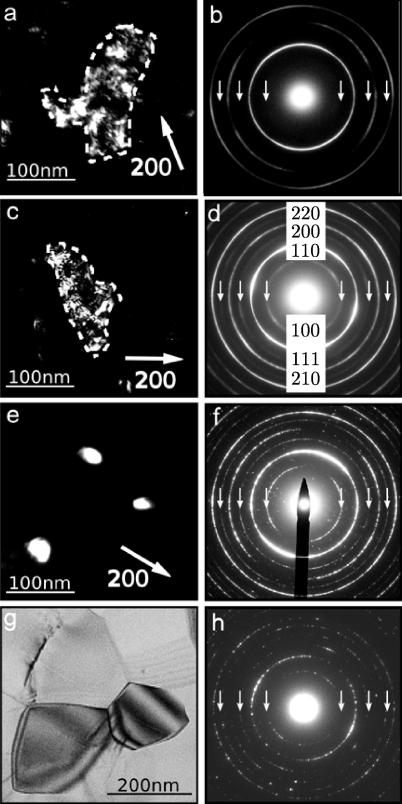
To identify the processes causing these exothermic peaks, individual samples were annealed to selected temperatures between the peaks (cf. the temperatures marked by the crosses in Fig. 1). The samples were then studied by TEM, always taking bright-field and dark-field images in combination with diffraction patterns. Fig. 2 shows the TEM images and the corresponding selected area diffraction (SAD) patterns obtained from a sample of the as-deformed state and from samples heated to 170, 220, 370 and 500 °C. In all cases the same size of SAD aperture (1.2 μm) was used. The dark-field image of the as-deformed sample shows a bright area, which reveals a grain. To measure the grain size by TEM methods, special care is needed to identify the large-angle (>15°) grain boundaries since the contrast caused by dislocation networks and subgrain boundaries can be complex. In addition, in the case of nanograins, their overlap is frequent even in TEM foils, and this leads to the formation of moiré contrast fringes [20]. Therefore, to get an unambiguous identification of the grains, it is necessary to tilt the beam or the specimen slightly (a few degrees) in different directions. In Fig. 2a the grain boundary is marked by a dashed line, which means that the contrast variations inside the grain are caused by dislocations and subgrain boundaries. The SAD pattern of the as-deformed sample (cf. Fig. 2b) shows diffraction rings corresponding to the body-centered cubic structure only since the superlattice reflections of the B2 structure are missing. The intensity along the rings is rather homogeneous, indicating that there is no pronounced texture. It should be noted that the same results in real and reciprocal space are obtained for samples heated up to 130 °C. Even for samples heated to 170 and 220 °C (cf. Fig. 2c), the grains observed in the TEM images do not change significantly in size or morphology compared to the as-deformed sample, and the larger grains show similar substructures caused by subgrain boundaries. However, the diffraction patterns of the samples annealed to 170 and 220 °C (cf. Fig. 2d) show the appearance of additional rings that are caused by the B2 superstructure. Therefore, the process responsible for peak I in the DSC curve can be identified unambiguously as chemical reordering. The TEM images obtained from samples heated to 370 °C (cf. Fig. 2e) show that most of the grains are nearly defect free, with clear grain boundaries, and the corresponding SAD pattern (cf. Fig. 2f) reveals sharp diffraction rings. Therefore, the broad second peak (II) in the DSC signal can be correlated to the recovery of defects inside the grains and at the grain boundaries. The third exothermic peak (III) is related to grain growth, which can be deduced from a comparison of the grain sizes of the samples annealed to 370 and 500 °C (cf. Fig. 2e and g), respectively. The bright-field image shows large grains with a very low density of dislocations (cf. Fig. 2g) and the corresponding diffraction pattern reveals sharp rings (cf. Fig. 2h).
Fig. 2.
FeAl, as deformed by HPT and heated up to temperatures above the peaks I, II and III (cf. Fig. 1). (a, b) The as-deformed state. (a) TEM dark-field image (g = [200]). The grain that is in contrast is encircled with a dotted white line. (b) Diffraction pattern. The positions of the rings of the B2 superstructure are marked by arrows; at this position, no contrast is encountered in (b). (c, d) Dark-field image (g = [200]) and diffraction pattern after heating up to 220 °C. The rings of all B2 reflections are indexed. (e, f) Dark-field image (g = [200]) and diffraction pattern after heating up to 370 °C. The reduction in the grain size is visible. (g, h) Bright-field image and diffraction pattern after heating up to 500 °C. The grain growth leads to large grains free of dislocations.
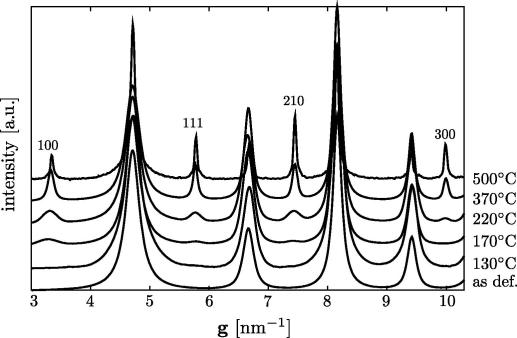
The results of the evolution of the SAD patterns are summarized in the intensity profiles shown in Fig. 3. The integration along the rings as well as an automatic background subtraction was performed using the PASAD software package [21]. The profiles confirm that both the intensity and the sharpness of the superlattice reflections ((1 0 0), (1 1 1), (2 1 0) and (3 0 0)) increase during heating. As shown by the intensity profiles, the superlattice reflections are emerging at 170 °C. It should be pointed out that the subgrain structure present in the form of scattering domain size increases with temperature (as can be concluded from the change in the intensity profile shown in Fig. 3), whereas the grain size measured in the TEM dark-field images decreases.
Fig. 3.
FeAl intensity profiles (intensity vs. diffraction vector g) obtained by azimuthal integration of TEM diffraction patterns taken from the as-deformed state and from samples heated to 130, 170, 220, 370 and 500 °C. The fundamental reflections ((1 1 0), (2 0 0), (2 1 1) and (2 2 0)) are present at all temperatures, whereas the intensity of the superlattice reflections increases with increasing temperature, indicating the transition from a disordered structure to a B2 LRO structure.
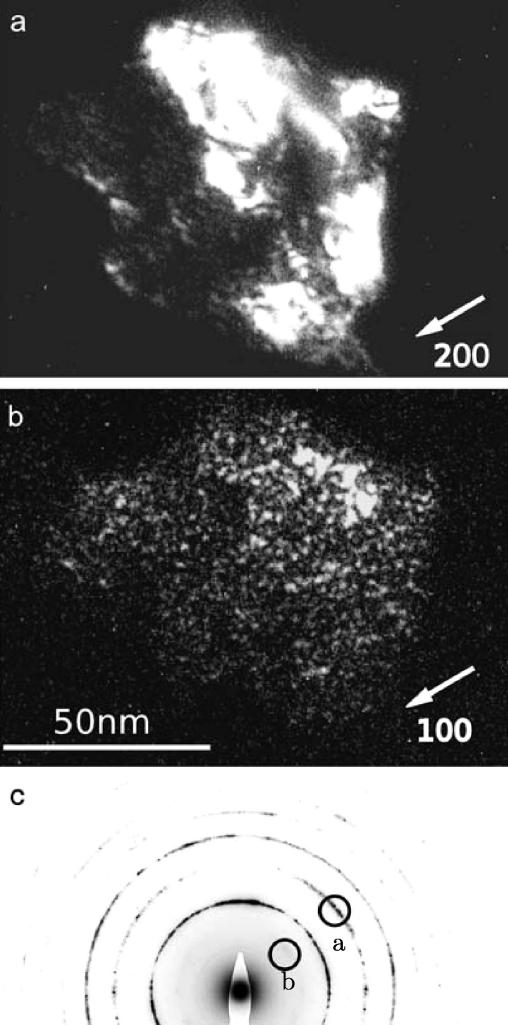
To analyze the thermally induced process of reordering, TEM dark-field images were taken with fundamental reflections and compared with those of superlattice reflections (cf.Fig. 4). In the case of the fundamental reflection (2 0 0) (cf. Fig. 4a), the variation in contrast inside the imaged grain is caused by structural defects leading to small changes in the orientation of the lattice with respect to the incoming beam. In the case of the dark-field image taken with the corresponding superlattice reflection (1 0 0) (cf. Fig. 4b), small nanosized domains show up that are not visible in Fig. 4a. Since the intensity of the superlattice reflections is sensitive to the chemical LRO, comparison of Fig. 4a and b shows that at 170 °C the grains contain small chemically ordered domains of nanometer size (<5 nm). Therefore, the recurrence of the B2 superstructure takes place inside the grains by small ordered domains that show a rather homogeneous distribution (cf. Fig. 4b). In Fig. 4c the corresponding diffraction pattern is shown to illustrate the positions of the objective aperture used to form the dark-field images of the fundamental reflection (cf. Fig. 4a) and of the superlattice reflection (Fig. 4b). In the aperture only a small sector of the diffraction ring is included (∼10°). (It should be mentioned that all the dark-field images were taken with a tilted incident beam to show the reflected beam forming the image on the optical axis.) The experimental results show that the ordered domains are completely out of contrast in fundamental reflections, indicating that in the B2 superlattice structure the antiphase boundary (APB) faults bounding the ordered domains do not contain non-chemical fault components. As explained in the discussion (cf. Section 4.2), the situation is different from that in other intermetallic structures (e.g. Fe3Al [22] and Ni3Al [23]).
Fig. 4.
Recurrence of the B2 superstructure in a HPT-deformed sample heated up to 170 °C. (a) Dark-field image taken with a fundamental reflection (g = [200]). The contrast variations show the substructure of the grain (dislocations and small angle grain boundaries). (b) Dark-field image of the same area as (a) taken with a superlattice reflection (g = [100]). Small ordered domains (<5 nm) inside the grain are revealed. (c) Diffraction pattern illustrating the positions of the objective apertures that were used for (a) and (b).
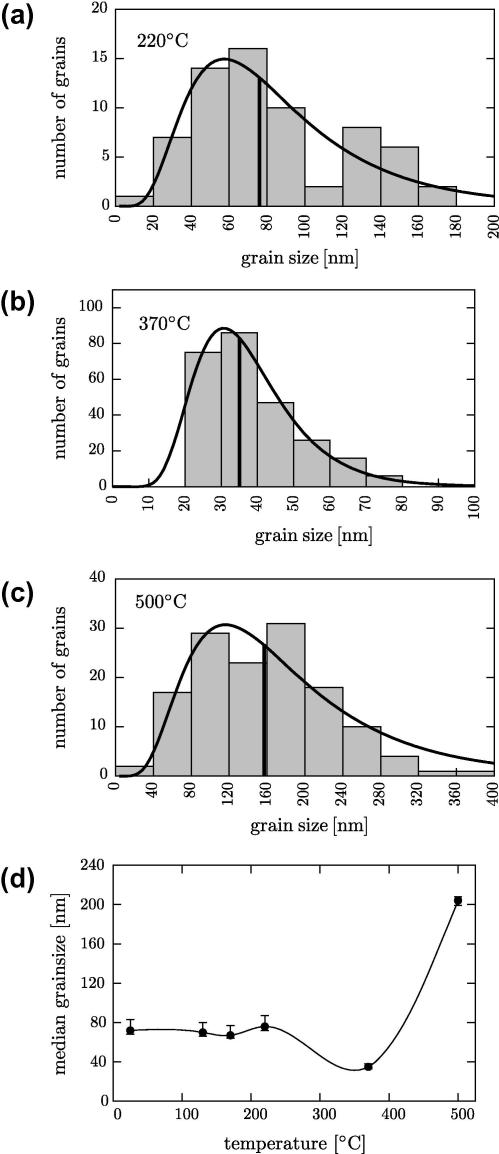
An analysis of the grain-size distribution was carried out from samples with different heat treatments (cf. Fig. 5). In total, more than 500 grains were analyzed using TEM dark-field images (as in the examples given in Fig. 2). The area of each grain was determined by digital imaging processing; the grain size is defined as the diameter of a circle with the same area as the actual grain. The histograms of the grain-size distribution together with their log-normal fits of the samples heated up to 220, 370 and 500 °C are shown in Fig. 5a–c, respectively. Fig. 5a reveals that the median of the grain diameter is ∼77 nm. (It should be mentioned that samples heated to lower temperatures have a similar median value.) From Fig. 5b, which shows the grain-size distribution at 370 °C, a median grain-size diameter of ∼35 nm only is deduced, which is smaller by a factor of 2 than that obtained at 220 °C. At 500 °C the median grain-size is ∼158 nm (cf. Fig. 5b); since in this case the thickness of the TEM foil and the grain size are similar, the measured grain size has to be multiplied by a factor of about 1.3 [24] leading to an actual grain size of ∼204 nm. In Fig. 5d the results of the measurements of the median grain sizes of the samples with different heat treatments are summarized.
Fig. 5.
Evaluation of the grain size as a function of temperature as determined by the analysis of the TEM dark-field images taken with fundamental reflections. (a–c) Histograms of the grain size distribution together with their log-normal fits of samples annealed to 220, 370 and 500 °C, respectively. Median values of the measured data are indicated. (d) Median values of the grain size as a function of temperature.
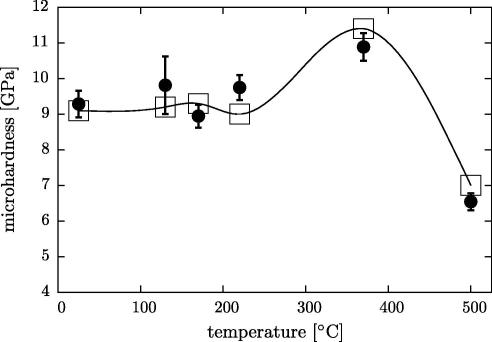
Fig. 6 shows the evolution of the microhardness as a function of the heat treatment. The values of the microhardness reveal an inverse temperature-dependent behavior compared to that of the grain size: a more or less constant value up to 220 °C, a maximum at 370 °C and a drastic drop at 500 °C. Based on the measured values of the grain size (cf. Fig. 5d), the microhardness can be calculated by using the Hall–Petch relationship [25,26]. From the calculated values a curve is drawn that fits the measured data (cf. Fig. 6).
Fig. 6.
Measured values of the microhardness (•) of HPT-deformed nanocrystalline FeAl as a function of the heating temperature. The curve shown is deduced from the calculated values (□) deduced from the Hall–Petch model using the measured grain sizes given in Fig. 5d.
4. Discussion
4.1. Recurrence of the long-range order
Metastable disordered nanocrystalline FeAl modifies its structure upon heating (heating rate 20 K min−1). The structural changes of nanocrystalline FeAl produced by HPT were tracked by combining the methods of DSC and TEM to identify the different processes occurring at different temperatures. The first exothermic peak (I) in the DSC signal that shows a strong maximum at 170 °C is interpreted by the occurrence of chemical reordering (cf. Fig. 1). The peak is asymmetric as the initial level of the heat flow is not reached after peak I because of an overlap with peak II. The recurrence of the B2 superstructure is indicated by the DSC curve, showing that it already starts above 130 °C (0.24Tm). The reordering is confirmed by analyzing the TEM diffraction patterns (cf. Fig. 3) that show rings corresponding to the B2 superstructure at temperatures above 130 °C, whereas the observed nanostructures do not change significantly in the temperature range up to 220 °C (cf. Fig. 2). The recovery of the B2 superstructure occurs in the form of small, chemically ordered domains (cf. Fig. 4), that are rather homogeneously distributed and grow during further heating, as indicated by the sharpening of superlattice reflections (cf. Fig. 3). It can be assumed that small ordered volumes retained after SPD as reported for L12 LRO Ni3Al [27] grow during the process of reordering. They are retained since the deformation induced process of disordering facilitated both by the formation of a high density of dislocations with APB faults and APB tubes is fragmenting the grains [28,29] and destroys the LRO locally by APB faults and not randomly as thermal disordering. As a consequence, a high density of very small ordered domains are retained in the course of severe plastic deformation.
During heating, the ordered nuclei grow, and the growth process is facilitated by the large number of dislocations and vacancies produced during the HPT deformation. During reordering, the deformation-induced dislocations can also act as nucleation sites, and at the temperatures at which they become mobile superlattice partial dislocations can remove APB faults by moving backward. This leads to the conclusion that in FeAl disordered by SPD the process of reordering is a combination of both thermal ordering and defect-induced ordering. (It should be mentioned that in stoichiometric B2 FeAl and in the present composition it is in principle impossible to separate these two processes since B2 FeAl is ordered up to the melting point and therefore disordered FeAl can only be achieved by means of SPD.)
The reduction in the area of APB faults occurring during the growth of the ordered domains causes the exothermic peak I in the DSC curve. The temperature regime in which recovery of the B2 superstructure takes place is in good agreement with several studies carried out on ball-milled samples [30,13,14,9]. The measured enthalpy change of 4.5 kJ mol−1 given by the area of peak I caused by reordering should be treated as an estimation since peak II centered around 320 °C is so broad that it overlaps with peak I. It is interesting to note that the value of enthalpy change determined in this study compares with that obtained for ball-milled samples [13] but is about a factor two larger than the value reported from the mechanically alloyed material [14]. This can be explained in the following ways: (i) in the case of ball-milled samples [13], already alloyed starting material was subjected to severe plastic deformation by ball milling; therefore the situation is similar to the present one, where an alloyed starting material is severely deformed by HPT. (ii) In the case of mechanical alloying, powders of the pure metals are used as starting materials and alloyed by the method of ball milling. The fact that in this case a smaller value of the enthalpy change was reported [14] than in case (i) indicates that only a fraction of the material had been alloyed.
4.2. Reduction of the grain size, defect recovery and grain growth as a function of temperature
The structural evolution during heating up to 500 °C reveals the nature of the two other peaks (II and III) in the DSC curve. According to the TEM investigations (cf. Figs. 2 and 5), two further processes were identified: (i) defect recovery, leading to static recrystallization, and (ii) grain growth. Peak II centered around 320 °C (0.35Tm). This can be attributed to the process of recovery of dislocations starting at low temperatures of about 200 °C (0.28Tm), at which the process of reordering is not finished, as concluded from the TEM study. Therefore, reordering and defect recovery occur simultaneously between 220 and 370 °C. From the TEM dark-field images and the temperature-dependent grain-size distribution, it can be concluded that during these early stages of dislocation recovery the grain size decreases by a factor of 2 by heating (cf. Fig. 6).
In this context, it is interesting to note that in FeAl the TEM images used to determine the grain size are not disturbed by the residual contrast of APB faults and therefore confusion of the grain-size measurements can be excluded. This is based on the experimental observations (cf. Fig. 3). The results of theoretical considerations show that in B2 alloys the APB faults are pure chemical faults, as deduced from pair potential calculations [31]. Therefore the situation is different from other intermetallic alloys. For example, in Fe3Al (DO3 structure) a residual contrast of the APB faults is visible in fundamental reflections that can be explained by an appropriate model [22]; in the case of Ni3Al (L12 structure) the observed residual contrast of the APB faults was analyzed [28] and agrees with a non-chemical-fault component as deduced by ab initio calculations [32].
The thermally induced reduction in grain size can be considered as continuous static recrystallization triggered by defect rearrangement since smaller grains with highly reduced defect density are formed. It is proposed that a possible mechanism to obtain smaller grains during this thermal treatment could be the transformation of subgrain boundaries into high-angle grain boundaries by absorbing dislocations. This transformation seems to be closely related to the process of reordering by the growth of chemically ordered domains as, first, their boundaries interact with dislocations, and secondly, the reduction in the grain size is reached at 370 °C (cf. Fig. 6), at which temperature the LRO is already pronounced (cf. Fig. 3).
Peak III in the DSC curve (cf. Fig. 1) is interpreted as classical grain growth starting at about 370 °C, at which temperature the recurrence of order is finished and the majority of defects are already recovered. Thus, the driving force for grain growth is mainly given by the reduction in the grain-boundary area in the ordered alloy. In the ordered state the migration of grain boundaries slows down and grain growth is expected to be reduced [33], which might explain the broad peak III.
4.3. Evolution of the microhardness after heating
Microhardness (cf. Fig. 6) is nearly constant (within the error bars) in the temperature regime of pronounced reordering (up to 220 °C). Therefore, ordering and the formation of ordered domains within nanograins have only little impact on the microhardness. The strong increase in the microhardness in the temperature regime of defect recovery leading to grain size reduction can be explained either by a Hall–Petch mechanism or by hardening due to the reduction in dislocation sources. The variation of microhardness according to the Hall–Petch relationship as it is shown in Fig. 6 indicates grain-size hardening as the maximum correlates with the minimum of the grain size (cf. Fig. 6). On the other hand, the dislocation density decreases considerably in the corresponding temperature regime, yielding grains of small size (∼30 nm) that have sharp boundaries and a reduced dislocation density. This leads to the conclusion that the recovery process could effect a reduction in the number of dislocation sources both by the formation of equilibrium grain boundaries and by the reduction in the dislocation density in the grain interior. This could also cause the observed increase in the hardness since a higher stress is needed to activate new dislocation sources in the small grains [34]. As a consequence, other deformation processes, such as grain-boundary mediated processes, can become active at high stresses [35]. Finally, the drop in microhardness above 370 °C is interpreted as a consequence of grain growth.
The identification of different processes resulting from different heat treatments allows the materials properties to be tuned. Therefore, for example, the production of fully dense bulk B2 ordered nanocrystalline FeAl exhibiting a low dislocation density is possible by HPT deformation followed by heating to 370 °C.
5. Conclusions
Systematic TEM investigations combined with DSC measurements are used to identify the processes of structural modification taking place during heating of bulk nanocrystalline disordered FeAl produced by HPT plastic deformation of B2 long-range ordered samples:
-
•
The recurrence of the B2 LRO taking place mainly between 130 and 220 °C (0.24 and 0.29Tm) can be explained by the formation of nanosized chemically ordered domains that are homogeneously distributed within the nanosized grains. It is assumed that ordered volumes retained during severe plastic deformation act as heterogeneous nuclei for ordering. Dislocation density and grain size were shown to be unaffected below 0.29Tm.
-
•
A thermally induced reduction in the grain size by a factor of two occurs in FeAl disordered by SPD. It is concluded that the reduction is caused by the rearrangement of a high density of superlattice partial dislocations transforming subgrain boundaries into high-angle grain boundaries. After heating to achieve reordering, the dislocations in the interior of the grains are, for topological reasons, connected with APB faults. By further heating up to 370 °C (0.38Tm, a temperature above the recovery peak), the density of the APB faults is reduced by dislocations moving to the subgrain boundaries. This leads to smaller grains, with a low dislocation density in their interior and large-angle grain boundaries.
-
•
Classical grain growth of nanograins occurs predominantly at about 410 °C (0.41Tm) and is governed by the reduction in the grain boundary area only, since dislocation recovery leading to defect-free grains takes place at lower temperatures.
-
•
The variation in the strength monitored by microhardness can be interpreted either by a Hall–Petch mechanism or by the reduction in dislocation sources as a consequence of the grain size reduction.
Acknowledgements
The authors thank Prof. H. Sassik (TU Wien, Vienna, Austria) for help with preparation of the initial alloy and Prof. R. Pippan (ESI, Leoben, Austria) for support during the HPT deformation. C. Mangler acknowledges the support of the NRN “NFN – Bulk Nanostructured Materials” funded by the Austrian Science Fund (FWF): [S104]. C. Gammer acknowledges the support of the IC “Experimental Materials Science – Nanostructured Materials”, a college for PhD students at the University of Vienna. Furthermore, the authors acknowledge the support of the project “Metastable Phases in Bulk Intermetallics” funded by the Austrian Science Fund (FWF): [P22440] and of the research project “Bulk Nanostructured Materials” within the research focus “Materials Science” of the University of Vienna.
References
- 1.Gleiter H. Acta Mater. 2000;48:1–29. [Google Scholar]
- 2.Meyers M., Mishra A., Benson D. Prog Mater Sci. 2006;51(4):427. [Google Scholar]
- 3.Valiev R.Z., Estrin Y., Horita Z., Langdon T.G., Zehetbauer M.J., Zhu Y.T. JOM. 2006;58(4):33–39. [Google Scholar]
- 4.Zhu Theodore, Jiang H., Butt D.P., Alexandrov I.V., Lowe T.C. Mater Sci Eng A. 2000;290:128–138. [Google Scholar]
- 5.Munoz-Morris M.A., Morris D.G. Acta Mater. 2002;50:4047–4060. [Google Scholar]
- 6.Ivanisenko Y., Wunderlich R.K., Valiev R.Z., Fecht H.J. Scripta Mater. 2003;49(10):947–952. [Google Scholar]
- 7.Schafler E., Kerber M. Mater Sci Eng A. 2007;462(1–2):139. [Google Scholar]
- 8.Bakker H., Zhou G.F., Yang H. Prog Mater Sci. 1995;39:159–241. [Google Scholar]
- 9.Hernando A., Amils X., Nogues J., Surinach S., Baro M.D., Ibarra M.R. Phys Rev B. 1998;58:864–867. [Google Scholar]
- 10.Amils X., Nogués J., Muñoz J.S., Suriñach S., Baró M.D. Mater Sci Forum. 1999;312:531–538. [Google Scholar]
- 11.Varin R.A., Bystrzycki J., Calka A. Intermetallics. 1999;7(8):917–930. [Google Scholar]
- 12.Amils X., Garitaonandia J.S., Nogues J., Surinach S., Plazaola F., Munoz J.S. J Non-Cryst Solids. 2001;287:272–276. [Google Scholar]
- 13.Gialanella S., Amils X., Baro M.D., Delcroix P., Le Caer G., Lutterotti L. Acta Mater. 1998;46:3305–3316. [Magnetische Kurve im Vergleich zu DSC S geht nicht gegen 0] [Google Scholar]
- 14.Zeng Q., Baker I. Intermetallics. 2006;14:396–405. [Google Scholar]
- 15.Amils X., Nogues J., Surinach S., Baro M.D., Munoz-Morris M.A., Morris D.G. Intermetallics. 2000;8(7):805. [Google Scholar]
- 16.Morris D.G., Gutierrez-Urrutia I., Munoz-Morris M.A. Scripta Mater. 2007;57(5):369–372. [Google Scholar]
- 17.Morris-Munoz M.A., Dodge A., Morris D.G. Nanostruct Mater. 1999;11:873–885. [Google Scholar]
- 18.Xiao H., Baker I. Acta Metall Mater. 1995;43:391–396. [Google Scholar]
- 19.Yoshimi K., Yoo M.H., Hanada S. Acta Mater. 1998;46:5769–5776. [Google Scholar]
- 20.Rentenberger C., Waitz T., Karnthaler H.P. Scripta Mater. 2004;51(8):789–794. [Google Scholar]
- 21.Gammer C., Mangler C., Rentenberger C., Karnthaler H.P. Scripta Mater. 2010;63:312–315. doi: 10.1016/j.actamat.2010.06.036. [DOI] [PMC free article] [PubMed] [Google Scholar]
- 22.Liu W., Gemperle A., Gemperlova J., Paidar V., Nembach E. Acta Mater. 1998;46(17):6173–6182. [Google Scholar]
- 23.Geist D., Gammer C., Mangler C., Rentenberger C., Karnthaler H.P. Phil Mag Lett. 2010 [Google Scholar]
- 24.Kong Maiying, Bhattacharya Rabi N., James Christina, Basu Abhijit. Geol Soc Am Bull. 2005;117(1):244. [Google Scholar]
- 25.Hall E.O. Proc Phys Soc B. 1951;64(9):747. [Google Scholar]
- 26.Petch N.J. J Iron Steel Inst. 1953;174:25. [Google Scholar]
- 27.Rentenberger C., Mangler C., Karnthaler H.P., Pippan R., Scheriau S. Mater Sci Forum. 2008;584–586:422–427. [Google Scholar]
- 28.Rentenberger C., Waitz T., Karnthaler H.P. Phys Rev B – Condens Matter Mater Phys. 2003;67(9):941091–941095. [Google Scholar]
- 29.Rentenberger C., Karnthaler H.P. Acta Mater. 2008;56(11):2526–2530. doi: 10.1016/j.actamat.2010.06.036. [DOI] [PMC free article] [PubMed] [Google Scholar]
- 30.Yang Y., Baker I., Martin P. Phil Mag B. 1999;79:449–461. [Google Scholar]
- 31.Yamaguchi M., Pope D.P., Vitek V., Umakoshi Y. Phil Mag A. 1981;43(5):1265–1275. [Google Scholar]
- 32.Schoeck G., Kohlhammer S., Fahnle M. Phil Mag Lett. 1999;79(11):849–857. [Google Scholar]
- 33.Baker I. Intermetallics. 2000;8:1183–1196. [Google Scholar]
- 34.Huang X.X., Hansen N., Tsuji N. Science. 2006;312(5771):249–251. doi: 10.1126/science.1124268. [DOI] [PubMed] [Google Scholar]
- 35.Chinh N.Q., Szommer P., Horita Z., Langdon T.G. Adv Mater. 2006;18(1):34–39. [Google Scholar]


