Abstract
Part I of this two-part series (presented in the May issue of NAJSPT) provided the background, rationale, and a complete reference list for the use of fundamental movements as an assessment of function during pre-participation screening. In addition, Part I introduced one such evaluation tool that attempts to assess the fundamental movement patterns of an individual, the Functional Movement Screen (FMS)™, and described three of the seven fundamental movement patterns that comprise the FMS™.
Part II of this series provides a brief review of the analysis of fundamental movement as an assessment of function. In addition, four additional fundamental tests of the FMS™, which complement those described in Part I, will be presented (to complete the total of seven fundamental tests): shoulder mobility, active straight leg raise, trunk stability push-up, and rotary stability. These four patterns are described in detail, a grading system from 0-III is defined for each pattern, and the clinical implications for receiving a grade less than a perfect III are proposed.
By reading Part I and Part II, it is hoped that the clinician will recognize the need for the assessment of fundamental movements, critique current and develop new methods of functional assessment, and begin to provide evidence related to the assessment of fundamental movements and the ability to predict and reduce injury. By using such a screening system, the void between pre-participation screening and performance tests will begin to close.
Keywords: pre-participation screening, performance tests, function
INTRODUCTION
The assessment of fundamental movements is an attempt to pinpoint deficient areas of mobility and stability that may be overlooked in the asymptomatic active population. The ability to predict injuries is equally as important as the ability to evaluate and treat injuries. The difficulty in preventing injury seems to be directly related to the inability to consistently determine those athletes who are predisposed to injuries. In many situations, no way exists for knowing if an individual will fall into the injury or non-injury category - no matter what the individual's risk factors are. Meeuwisse1 suggested that unless specific markers are identified for each individual, determining who is predisposed to injuries would be very difficult.
The inconsistencies surrounding the pre-participation physical and performance tests offer very little assistance in identifying individuals who are predisposed to injuries. These two evaluation methods do not offer predictable and functional tests that are individualized and may assist in identifying specific kinetic chain weaknesses. Numerous sports medicine professionals have suggested the need for specific assessment techniques that utilize a more functional approach in order to identify movement deficits.2–4
The Functional Movement System (FMS)™ is an attempt to capture movement pattern quality with a primitive grading system that begins the process of functional movement pattern assessment in normal individuals. It is not intended to be used for diagnosis, but rather to demonstrate limitations or asymmetries with respect to human movement patterns and eventually correlate these limitations with outcomes, which may lead to an improved proactive approach to injury prevention.5
The FMS™ may be included in the pre-placement/ pre-participation physical examination or be used as a stand-alone assessment technique to determine deficits that may be overlooked during the traditional medical and performance evaluations. In many cases, muscle flexibility and strength imbalances may not be identified during the traditional assessment methods. These problems, previously acknowledged as significant risk factors, can be identified using the FMS™. This movement-based assessment serves to pinpoint functional deficits (or bio-markers) related to proprioceptive, mobility and stability weaknesses.
Scoring the Functional Movement Screen™
The scoring for FMS™ was provided in detail in Part I. The exact same instructions for scoring each test are repeated here to allow the reader to score the additional tests presented in Part II without having to refer to Part 1. The scores on the FMS™ range from zero to three; three being the best possible score. The four basic scores are quite simple in philosophy. An individual is given a score of zero if at any time during the testing he/she has pain anywhere in the body. If pain occurs, a score of zero is given and the painful area is noted. A score of one is given if the person is unable to complete the movement pattern or is unable to assume the position to perform the movement. A score of two is given if the person is able to complete the movement but must compensate in some way to perform the fundamental movement. A score of three is given if the person performs the movement correctly without any compensation. Specific comments should be noted defining why a score of three was not obtained.
The majority of the tests in the FMS™ test right and left sides respectively, and it is important that both sides are scored. The lower score of the two sides is recorded and is counted toward the total; however it is important to note imbalances that are present between right and left sides.
Three tests have additional clearing screens which are graded as positive or negative. These clearing movements only consider pain, if a person has pain then that portion of the test is scored positive and if there is no pain then it is scored negative. The clearing tests affect the total score for the particular tests in which they are used. If a person has a positive clearing screen test then the score will be zero.
All scores for the right and left sides, and those for the tests which are associated with the clearing screens, should be recorded. By documenting all the scores, even if they are zeros, the sports rehabilitation professional will have a better understanding of the impairments identified when performing an evaluation. It is important to note that only the lowest score is recorded and considered when tallying the total score. The best total score that can be attained on the FMS™ is twenty-one.
DESCRIPTION OF THE FMS™ TESTS
The following are descriptions of the final four specific tests used in the FMS™ and their scoring system. Each test is followed by tips for testing developed by the authors as well as clinical implications related to the findings of the test.
Shoulder Mobility
Purpose.
The shoulder mobility screen assesses bilateral shoulder range of motion, combining internal rotation with adduction and external rotation with abduction. The test also requires normal scapular mobility and thoracic spine extension.
Description.
The tester first determines the hand length by measuring the distance from the distal wrist crease to the tip of the third digit in inches. The individual is then instructed to make a fist with each hand, placing the thumb inside the fist. They are then asked to assume a maximally adducted, extended, and internally rotated position with one shoulder and a maximally abducted, flexed, and externally rotated position with the other. During the test the hands should remain in a fist and they should be placed on the back in one smooth motion. The tester then measures the distance between the two closest bony prominences. Perform the shoulder mobility test as many as three times bilaterally (Figures 1–3).
Figure 1.
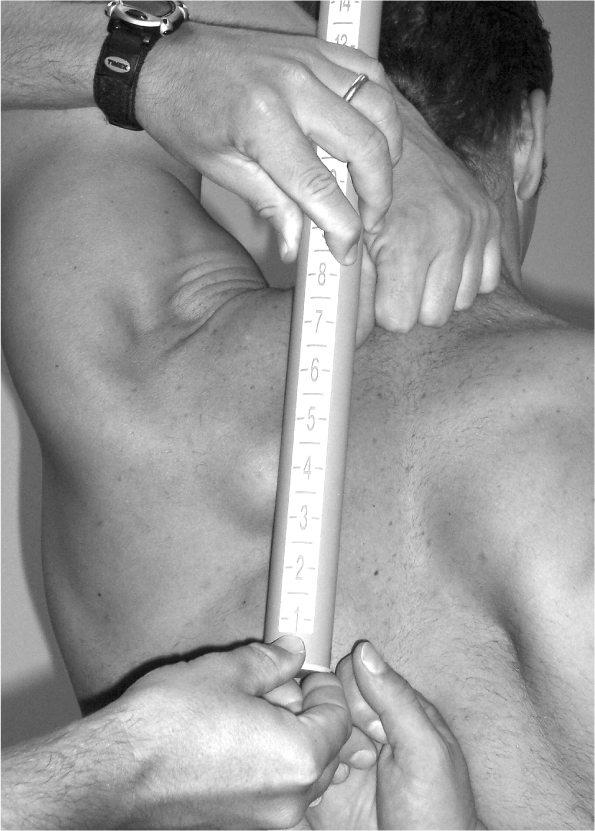
Shoulder Mobility III
- Fists are within one hand length (Assume one hand length is 8 inches)
Figure 3.
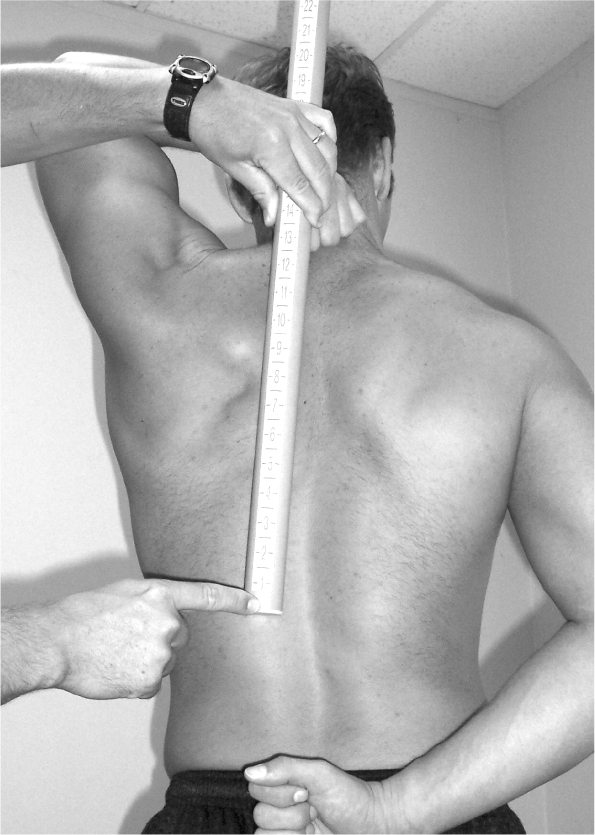
Shoulder Mobility I
- Fists are not within one and half hand lengths (Beyond 12 inches)
Figure 2.
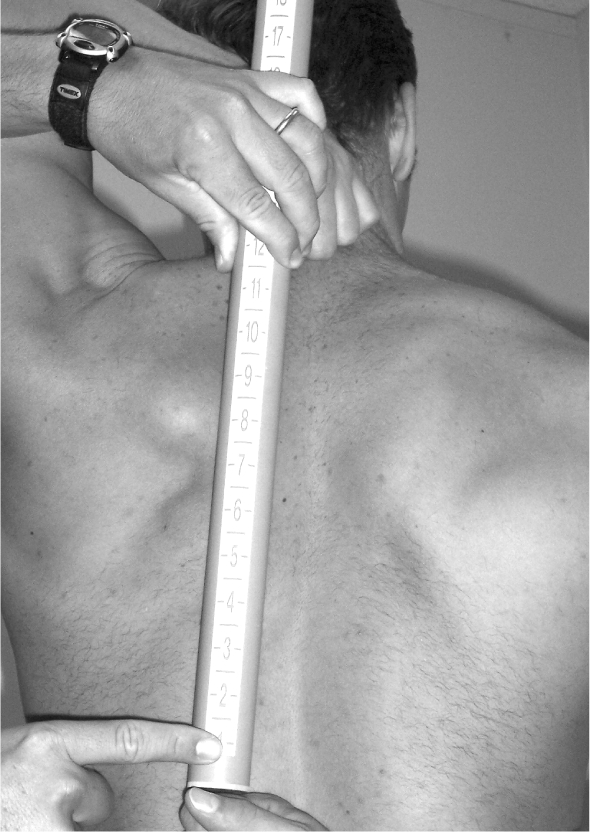
Shoulder Mobility II
- Fists are within one and a half hand lengths (Assume one and one half hand lengths is 12 inches)
Tips for Testing:
The flexed shoulder identifies the side being scored
If the hand measurement is exactly the same as the distance between the two points then score the subject low
The clearing test overrides the score on the rest of the test
Make sure individual does not try to “walk” the hands toward each other
Clearing exam.
A clearing exam should be performed at the end of the shoulder mobility test. This movement is not scored it is simply performed to observe a pain response. If pain is produced, a score of zero is given to the entire shoulder mobility test. This clearing exam is necessary because shoulder impingement can sometimes go undetected by shoulder mobility testing alone.
The individual places his/her hand on the opposite shoulder and then attempts to point the elbow upward (Figure 4). If there is pain associated with this movement, a score of zero is given. It is recommended that a thorough evaluation of the shoulder be done. This screen should be performed bilaterally.
Figure 4.
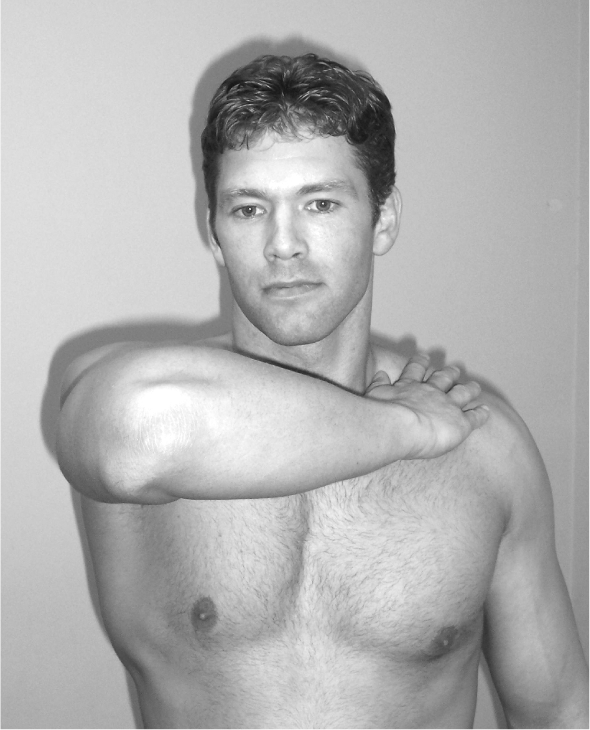
Shoulder Clearing Test
Clinical Implications for Shoulder Mobility
The ability to perform the shoulder mobility test requires shoulder mobility in a combination of motions including abduction/external rotation, flexion/extension, and adduction/internal rotation. This test also requires scapular and thoracic spine mobility.
Poor performance during this test can be the result of several causes, one of which is the widely accepted explanation that increased external rotation is gained at the expense of internal rotation in overhead throwing athletes. In addition, excessive development and shortening of the pectoralis minor or latissimus dorsi muscles can cause postural alterations of forward or rounded shoulders. Finally, a scapulothoracic dysfunction may be present, resulting in decreased glenohumeral mobility secondary to poor scapulothoracic mobility or stability.
When an athlete achieves a score less than III, the limiting factor must be identified. Clinical documentation of these limitations can be obtained by using standard gonio-metric measurements of the joints as well as muscular flexibility tests such as Kendall's6 test for pectoralis minor and latissimus dorsi tightness or Sahrmann's7 tests for shoulder rotator tightness.
Previous testing has identified that when an athlete achieves a score of II, minor postural changes or shortening of isolated axio-humeral or scapulo-humeral muscles exist. When an athlete scores a I or less, a scapulothoracic dysfunction may exist.
Active Straight Leg Raise
Purpose.
The active straight leg raise tests the ability to dis-associate the lower extremity from the trunk while maintaining stability in the torso. The active straight leg raise test assesses active hamstring and gastroc-soleus flexibility while maintaining a stable pelvis and active extension of the opposite leg.
Description.
The individual first assumes the starting position by lying supine with the arms in an anatomical position and head flat on the floor. The tester then identifies mid-point between the anterior superior iliac spine (ASIS) and mid-point of the patella, a dowel is then placed at this position perpendicular to the ground. Next, the individual is instructed to lift the test leg with a dorsiflexed ankle and an extended knee. During the test the opposite knee should remain in contact with the ground, the toes should remain pointed upward, and the head remain flat on the floor. Once the end range position is achieved, and the malleolus is located past the dowel then the score is recorded per the established criteria (explained later). If the malleolus does not pass the dowel then the dowel is aligned along the medial malleolus of the test leg, perpendicular to the floor and scored per the established criteria. The active straight leg raise test should be performed as many as three times bilaterally (Figures 5–7).
Figure 5.
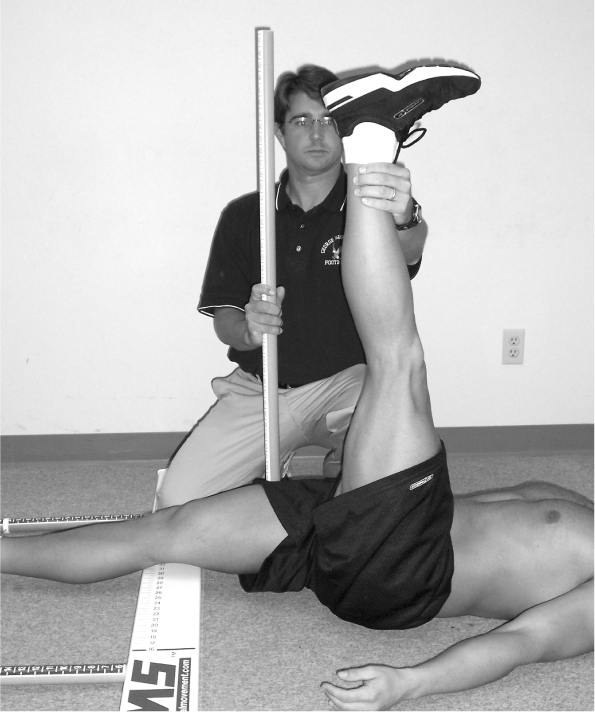
Active SLR III
- Ankle/Dowel resides between mid-thigh and ASIS
Figure 7.
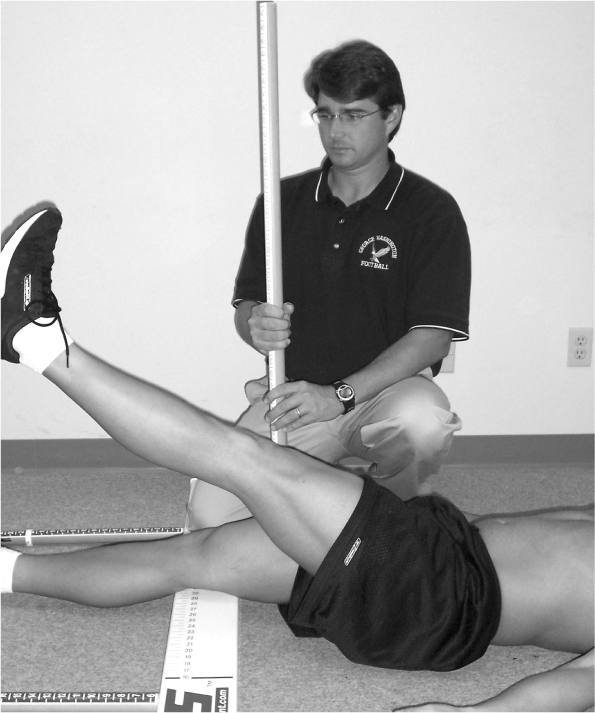
Active SLR I
- Ankle/Dowel resides below midpatella/joint line
Figure 6.
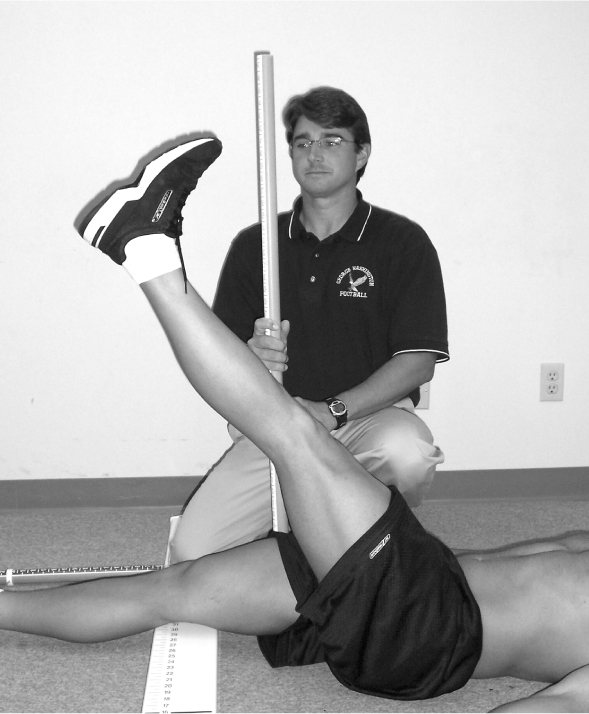
Active SLR II
- Ankle/Dowel resides between mid-thigh and mid-patella/joint line
Tips for Testing:
The flexed hip identifies the side being scored
Make sure leg on floor does not externally rotate at the hip
Both knees remain extended and the knee on the extended hip remains touching the ground
If the dowel resides at exactly the mid-point, score low
Clinical Implications for Active Straight Leg Raise
The ability to perform the active straight leg raise test requires functional hamstring flexibility, which is the flexibility that is available during training and competition. This is different from passive flexibility, which is more commonly assessed. The athlete is also required to demonstrate adequate hip mobility of the opposite leg as well as lower abdominal stability.
Poor performance during this test can be the result of several factors. First, the athlete may have poor functional hamstring flexibility. Second, the athlete may have inadequate mobility of the opposite hip, stemming from iliopsoas inflexibility associated with an anteriorly tilted pelvis. If this limitation is gross, true active hamstring flexibility will not be realized. A combination of these factors will demonstrate an athlete's relative bilateral, asymmetric hip mobility. Like the hurdle step test, the active straight leg raise test reveals relative hip mobility; however, this test is more specific to the limitations imposed by the muscles of the hamstrings and the iliopsoas.
When an athlete achieves a score less than III, the limiting factor must be identified. Clinical documentation of these limitations can be obtained by Kendall's sit-and-reach test as well as the 90-90 straight leg raise test for hamstring flexibility. The Thomas test can be used to identify iliopsoas flexibility.6
Previous testing has identified that when an athlete achieves a score of II, minor asymmetric hip mobility limitations or moderate isolated, unilateral muscle tightness may exist. When an athlete scores a I or less, relative hip mobility limitations are gross.
Trunk Stability Push-Up
Purpose.
The trunk stability push-up tests the ability to stabilize the spine in an anterior and posterior plane during a closed-chain upper body movement. The test asseses trunk stability in the sagittal plane while a symmetrical upper-extremity motion is performed.
Description.
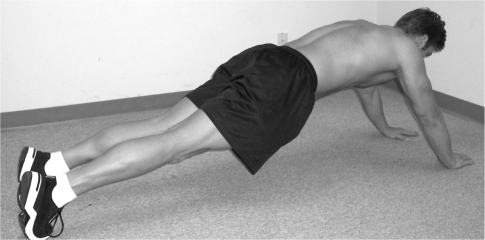
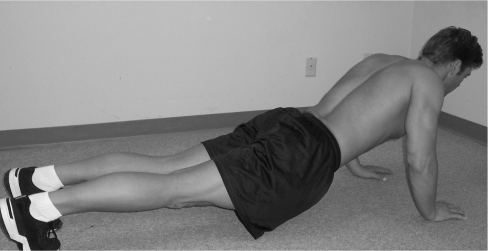
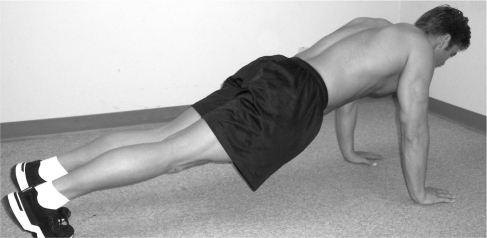
The individual assumes a prone position with the feet together. The hands are then placed shoulder width apart at the appropriate position per the criteria described later. The knees are then fully extended and the ankles are dorsiflexed. The individual is asked to perform one push-up in this position. The body should be lifted as a unit; no “lag” should occur in the lumbar spine when performing this push-up. If the individual cannot perform a push-up in this position, the hands are lowered to the appropriate position per the established criteria (Figures 8–10).
Figure 8.
Trunk Stab Push Up III (male)
- Males perform one repetition with thumbs aligned with the top of the forehead
- Females perform one repetition with thumbs aligned with chin
Figure 10.
Trunk Stab Push Up II (male)
- Males are unable to perform one repetition with hands aligned with chin
- Females are unable to perform one repetition with thumbs aligned with clavicle
Figure 9.
Trunk Stab Push Up II (male)
- Males perform one repetition with thumbs aligned with chin
- Females perform one repetition with thumbs aligned with clavicle
Tips for Testing:
Tell them to lift the body as a unit
Make sure original hand position is maintained and the hands do not slide down when they prepare to lift
Make sure their chest and stomach come off the floor at the same instance
When in doubt score it low
The clearing test overrides the test score
Clearing exam.
A clearing exam is performed at the end of the trunk stability push-up test. This movement is not scored; the test is simply performed to observe a pain response. If pain is produced, a score of zero is given for the entire push-up test. This clearing exam is necessary because back pain can sometimes go undetected during movement screening.
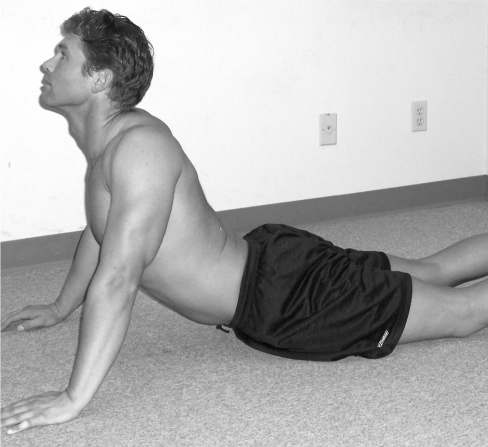
Spinal extension can be cleared by performing a press-up in the push-up position (Figure 11). If pain is associated with this motion, a zero is given and a more thorough evaluation should be performed.
Figure 11.
Spinal Extension Clearing Test
Clinical Implications for Trunk Stability Push-up
The ability to perform the trunk stability push-up requires symmetric trunk stability in the sagittal plane during a symmetric upper extremity movement. Many functional activities in sport require the trunk stabilizers to transfer force symmetrically from the upper extremities to the lower extremities and vice versa. Movements such as rebounding in basketball, overhead blocking in volleyball, or pass blocking in football are common examples of this type of energy transfer. If the trunk does not have adequate stability during these activities, kinetic energy will be dispersed and lead to poor functional performance, as well as increased potential for micro traumatic injury.
Poor performance during this test can be attributed simply to poor stability of the trunk stabilizers. When an athlete achieves a score less than III, the limiting factor must be identified. Clinical documentation of these limitations can be obtained by using test by Kendall6 or Richardson et al8 for upper and lower abdominal and trunk strength. However, the test by Kendall6 requires a concentric contraction while a push-up requires an isometric stabilizing reaction to avoid spinal hyperextension. A stabilizing contraction of the core musculature is more fundamental and appropriate than a simple strength test, which may isolate one or two key muscles. At this point, the muscular deficit should not necessarily be diagnosed. The screening exam simply implies poor trunk stability in the presence of a trunk extension force, and further examination at a later time is needed to formulate a diagnosis..
Rotary Stability
Purpose.
The rotary stability test is a complex movement requiring proper neuromuscular coordination and energy transfer from one segment of the body to another through the torso. The rotary stability test assesses multi-plane trunk stability during a combined upper and lower extremity motion.
Description.
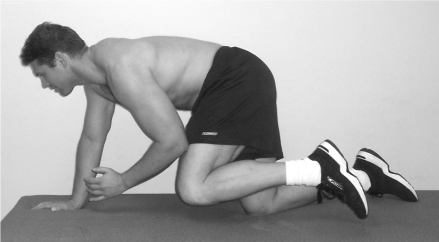
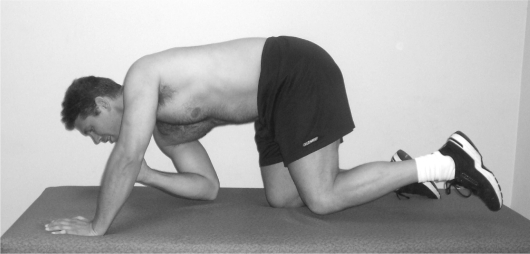
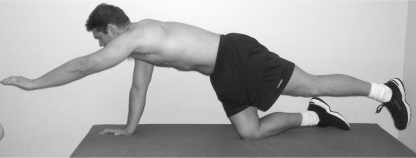
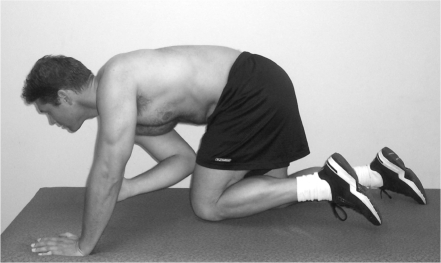
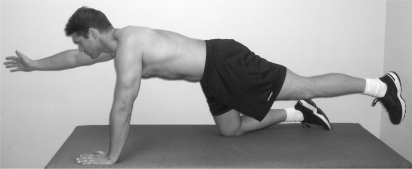
The individual assumes the starting position in quadruped with their shoulders and hips at 90 degrees relative to the torso. The knees are positioned at 90 degrees and the ankles should remain dorsiflexed. The individual then flexes the shoulder and extends the same side hip and knee. The leg and hand are only raised enough to clear the floor by approximately 6 inches. The same shoulder is then extended and the knee flexed enough for the elbow and knee to touch. This is performed bilaterally for up to three repetitions. If a III is not attained then the individual performs a diagonal pattern using the opposite shoulder and hip in the same manner as described (Figures 12–16).
Figure 12.
Rotary Stab Start III
- Performs one correct unilateral repetition while keeping spine parallel to surface
- Knee and elbow touch
Figure 16.
Rotary Stab Start I
- Inability to perform diagonal repetitions
Figure 13.
Rotary Stab Finish III
Figure 14.
Rotary Stab Start II
- Performs one correct diagonal repetition while keeping spine parallel to surface
- Knee and elbow touch
Figure 15.
Rotary Stab Finish II
Tips for Testing:
Scoring is identified by the upper extremity movement on the score sheet, but even if someone gets a three, both diagonal patterns must be performed and scored. The information should be noted
Make sure the elbow and knee touch during the flexion part of the movement
Provide cueing to let the individual know that he/she does not need to raise the hip and arm above 6 inches off of the floor
When in doubt, score the subject low
Do not try to interpret the score when testing
Clearing exam.
A clearing exam is performed at the end of the rotary stability test. This movement is not scored it is simply performed to observe a pain response. If pain is produced, a score of zero is given to the entire rotary stability test. This clearing exam is necessary because back pain can sometimes go undetected by movement screening.
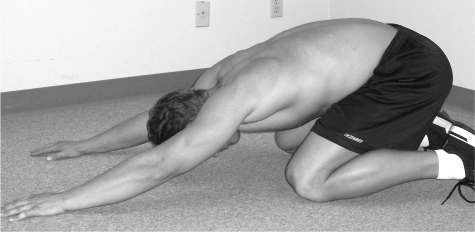
Spinal flexion can be cleared by first assuming a quadruped position and then rocking back and touching the buttocks to the heels and the chest to the thighs (Figure 17). The hands should remain in front of the body reaching out as far as possible.
Figure 17.
Spinal Flexion Clearing Test
Clinical Implications for Rotary Stability
The ability to perform the rotary stability test requires asymmetric trunk stability in both sagittal and transverse planes during asymmetric upper and lower extremity movement. Many functional activities in sport require the trunk stabilizers to transfer force asymmetrically from the lower extremities to the upper extremities and vice versa. Running and exploding out of a down stance in football and track are common examples of this type of energy transfer. If the trunk does not have adequate stability during these activities, kinetic energy will be dispersed, leading to poor performance and increased potential for injury.
Poor performance during this test can be attributed simply to poor asymmetric stability of the trunk stabilizers. When an athlete achieves a score less than III, the limiting factor must be identified. Clinical documentation of these limitations can be obtained by using Kendall's test for upper and lower abdominal strength.6
SUMMARY
The research related to movement-based assessments is extremely limited, mainly because only a few movement-based quantitative assessment tests are being utilized. According to Battie et al,4 the ultimate test of any pre-employment or pre-placement screening technique is its effectiveness in identifying individuals at the highest risk of injury. If the FMS™, or any similarly developed test, can identify at risk individuals, then prevention strategies can be instituted based on their scores. A proactive, functional training approach that decreases injury through improved performance efficiency will enhance overall wellness and productivity in many active populations.
Footnotes
The Functional Movement Screen™ is the registered trademark of FunctionalMovement.com with profits from the sale of these products going to Gray Cook and Lee Burton. The Editors of NAJSPT emphasize (and the authors concur) that the use of fundamental movements as an assessment of function is the important concept to be taken from Part I and Part II of this series and can be performed without the use of the trademarked equipment.
REFERENCES
- 1.Meeuwisse WH. Predictability of sports injuries: What is the epidemiological evidence? Sports Med. 1991;12:8–15 [DOI] [PubMed] [Google Scholar]
- 2.Cook G, Burton L, Fields K, Kiesel K. The Functional Movement Screen. Danville, VA: Athletic Testing Services, Inc; 1998 [Google Scholar]
- 3.Nadler SF, Moley P, Malanga GA, et al. Functional deficits in athletes with a history of low back pain: A pilot study. Arch Phys Med Rehabil. 2002;88:1753–1758 [DOI] [PubMed] [Google Scholar]
- 4.Battie MC, Bigos SJ, Fisher LD, et al. Isometric lifting strength as a predictor of industrial back pain reports. Spine. 1989;14:851–856 [DOI] [PubMed] [Google Scholar]
- 5.Cook G, Burton L, Hogenboom B. The use of fundamental movements as an assessment of function – Part I. NAJSPT. 2006;2:62–72 [PMC free article] [PubMed] [Google Scholar]
- 6.Kendall FP, McCreary EK. Muscles Testing and Function. 3rd ed.Baltimore: Williams and Wilkins; 1983 [Google Scholar]
- 7.Sahrmann SA. Diagnosis and Treatment of Movement Impairment Syndromes. St. Louis: Mosby; 2002 [Google Scholar]
- 8.Richardson C, Hodges P, Hides J. Therapeutic Exercise for Lumbopelvic Stabilization: A Motor Control Approach for the Treatment and Prevention of Low Back Pain. Edinburgh: Churchill Livingstone; 2004 [Google Scholar]


