

Introduction
This protocol describes a method for fixation and dissection of Aedes aegypti embryos, larvae, and pupae. Tissue processed in this manner can be used in subsequent in situ hybridization detection of mRNA or immunohistochemical analysis of protein expression experiments.
Materials
Equipment
Dissection microscope
Double sided tape
Depression slide
Forceps (#3, 5, or 55 are recommended)
Microfuge tubes/rack
Micropipetter
Nitex nylon mesh
Paint brush
Paper towels
Petri dish (100 × 15 mm)
Pipettes (Pasteur or transfer)
Scintillation vials
Squirt bottles (water and methanol)
Shaker (horizontal)
Sonifier (we use Branson Digital Sonifier Model 250 with a microtip attachment)
Timer
Transfer pipets
Tungsten wire needle (sharpened 0.005 inch diameter wire held in a 1cc syringe with a 26G1/2 needle)
Water bath (60° C)
Whatman filter paper cut to size of petri dish
Reagents
Aedes aegypti embryo, larvae, or pupae aged to desired stage
Bleach
Distilled water
Formaldehyde (37%)
Heptane
Methanol
PBS <R>
PEM <R>
PT <R>
Method
I. Preparation of embryos
i. Fixation
Use a squirt bottle to wet the egg paper with distilled water. Stroking with the paintbrush in combination with sprays from the water bottle will dislodge the eggs from striations in the paper towel. This may require forceful strokes. Use distilled water to rinse the eggs into a nylon mesh.
Remove the exochorion by incubating the eggs in 50% bleach for 3 min. Make sure the eggs are submerged at all times.
Rinse thoroughly with water to remove all traces of bleach. Blot the mesh containing eggs on a paper towel to remove excess water.
Using forceps, hold the mesh with eggs over a scintillation vial. Use a water bottle to wash eggs from the mesh screen into the scintillation vial.
Remove the water from the scintillation vial and add 10 ml fixative. Make sure the eggs are submerged.
Place the scintillation vial in a 60° water bath for 30 min.
Remove the fixative and add heptane that has been chilled in a -80° C freezer. Place the scintillation vial in a -80° C freezer for 5 min.
At room temperature, add 10 ml of methanol. Hold the scintillation vial under warm running water while shaking vigorously for 30 sec.
Remove the heptane layer (top). Remove most of the methanol (bottom). Wash 3-4 times with methanol to remove residual heptanes (use a methanol wash bottle).
Replace the last wash with 10 ml fresh methanol. Store the fixed embryos at -20° C or proceed directly to the PBS wash below.
ii. Dissection
Place a strip of double-sided tape across the well of a depression slide.
Place filter paper in a petri dish and dampen it with PBS.
Using a pipette, transfer the eggs stored in methanol into a microfuge tube. Transfer enough eggs to complete all of the desired experiments.
Being sure to keep the eggs submerged, remove most of the methanol from the microfuge tube and replace it with a 50:50 mixture of methanol:PBS. Exchange this with PBS, and then PT (volumes of 1 ml can be used for these rinses).
Using a pipette, transfer ∼15-30 eggs onto filter paper in a petri dish. If the filter paper is too wet, aligning them will be difficult. However, it is critical that the filter paper does not dry.
While viewing the eggs under a dissection microscope, use a tungsten needle or paint brush to align them such that the anterior (fattest end) points toward you. If you are a beginner, align no more than 15 eggs at a time until your technique develops. Lay the depression slide with double-sided tape on top of the eggs. Apply gentle pressure to the depression slide to allow for the eggs to stick to the tape. Do not prolong this step, as the eggs will dry.
Cover the eggs with PBS. Place the depression slide containing eggs under a dissection microscope. The anterior end of the eggs should be oriented toward you. Using a tungsten needle, poke the anterior end of all the eggs, which will create a crack in them. Insert your dissecting needle into the crack and remove the anterior tip (which will look like a cap once it is removed). Make sure the embryos stay covered in PBS.
Take the blunt side of your dissection needle and sweep it against the outside of the egg with a “squeezing the toothpaste out of the tube” motion.
Check to be sure that the serosal cuticle, the thin transparent membrane surrounding the embryo, is completely removed (Fig. 3F). If not, you will need to tweeze it away with your dissection needle.
Use a pipette to transfer the embryos into a microfuge tube. Proceed to in situ hybridization or immunohistochemical studies.
2. Preparation of larvae and pupae
Once the mosquitoes have aged to the larval or pupal stages, the fixation procedure is much simpler and does not require all of the steps described in the embryo fixation/dissection protocol.
Using a transfer pipette, transfer the larvae or pupae to a nylon mesh.
Next, transfer the animals to a microfuge tube containing PEM-F. Larvae should be fixed for 20 min, while pupae should be fixed for 1.5 hrs.
Following fixation, remove the PEM-F and rinse 2×10 min with PBS. Tissue can be used immediately or stored. For storage, tissue should be rinsed in 50% PBS/50% methanol, rinsed with methanol three times, and stored in methanol at -20° C. Larvae/pupae stored in this manner will need to be rehydrated in PBS.
Dissection/Sonication: After fixation, larvae and pupae should be sonicated or hand dissected to allow for better penetration of antibodies/probes. Such methodology, which is commonly used for fly larvae (Patel, 1994) and crustaceans (Patel et al. 1989, Duman-Scheel et al., 2007; Simanton et al., 2009), enhances staining of Ae. aegypti larvae and pupae. We perform sonication with a Branson Digital Sonifier-Model 250 outfitted with a microtip (amplitude: 10% on a constant duty cycle). Sonication times vary depending on the age of the larvae, but on our machine range from 0.5 sec to 3×10 sec treatments. Sonication should be performed in eppendorf tubes containing tissue in 0.5 ml of PBS.
Troubleshooting
Problem: Poor transfer of eggs (step 5); Solution: If eggs do not transfer from the filter paper to the tape, the filter paper was too damp. Use less water next time.
Problem: Over- or under-sonication of larvae (step 2.4); Solutions: Over-sonication will destroy the tissues to be stained. Under-sonication will result in weak or no staining. You will have to experiment with your own machine to determine what works best. Variation within the same sonicated tube is typical. A good rule of thumb is that in a successful sonication, approximately 10% of the animals will be slightly oversonicated with some obvious tissue disruption, while the others will be fairly in tact but are permeabilized enough that they will stain well.
Discussion
The embryo fixation protocol described here is modified from standard Drosophila protocols (Patel, 1994). Heating the mosquito embryos during fixation (step I.i.6) is a critical modification of the fly protocol which yields good Ae. aegypti tissue integrity. Furthermore, in addition to traditional bleach treatment and cracking steps (part i), successful preparation of Ae. aegypti embryos involves dissection to remove the black endochorion and serosal cuticle (part ii, Fig. 3). This methodology yields excellent results and has been successfully used to study development of Ae. aegypti (Simanton et al., 2009).
Dissection methodology for Ae. aegypti embryos.
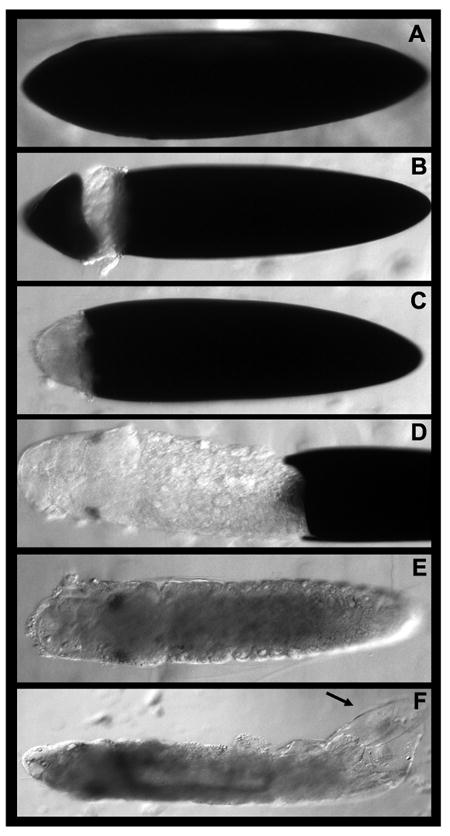
The process of dissecting a fixed embryo is shown in A-F (see text for details). It is critical to remove the black endochorion (A-D) and transparent serosal cuticle (arrowhead in F) in order to successfully perform immunohistochemical or in situ assays.
Acknowledgments
Development of the protocol described was funded by the following awards to MDS: NIH/NIAID Award R01 AI 081795-01 and NIH/NINDS Award R15 NS 048904-0. Kristopher Kast and Caitlin Jacowski were supported by the University of Notre Dame College of Science Summer Undergraduate Research Fellowship program.
Appendix A
RECIPES.
| PBS (10× stock) | ||
|---|---|---|
| Reagent | Quantity (for 1 L) | Final concentration |
| Na2HPO4 | 11.9 g | 84.1 mM |
| NaH2PO4 (anhydrous) | 2.23 g | 18.6 mM |
| NaCl | 102.2 g | 1.75 M |
| Bring the volume to 1 L with distilled water. Adjust the pH to 7.4 and autoclave before use. Prepare the working strength solution (1×, simply referred to as PBS in the protocol) by diluting 1:10 with sterile dH20. Both 1× and 10× PBS are stored at room temperature. | ||
| PEM-F | ||
|---|---|---|
| First, prepare PEM as follows: | ||
| Reagent | Quantity (for 1 lL) | Final concentration |
| PIPES Disodium salt | 34.63 g | 100 mM |
| EGTA | 10 ml | 2.0 mM |
| MgSO4 | 1 ml | 1.0 mM |
| Combine solid PIPES, EGTA, and MgSO4, add dH2O, mix for 20 min, and then adjust the pH to 7.0 with concentrated HCl. Adjust final volume to 1L with distilled water. Filter through a 0.22 μm filter. PEM can be stored for at least one year at 4° C. To prepare PEM-F, combine 9.0 ml PEM and 1.0 ml 37% formaldehyde (Fisher Cat. No. F79-500). The PEM-F solution should be made just before use. | ||
| PT | ||
|---|---|---|
| Reagent | Quantity (for 1 L) | Final concentration |
| 10× PBS | 100 ml | 1× |
| 100% Triton X-100 | 1 ml | 0.1% |
| Bring final volume to 1 L with sterile dH20. Mix and store at room temperature. | ||
Footnotes
Conflicts of interest: none declared
References
- Duman-Scheel M, Clark S, Grunow E, Hasley A, Hill B, Simanton W. Delayed onset of midline netrin expression in Artemia franciscana coincides with commissural axon growth and provides evidence for homology of midline cells in distantly related arthropods. Evol Dev. 2007;9(2):131–140. doi: 10.1111/j.1525-142X.2007.00144.x. [DOI] [PMC free article] [PubMed] [Google Scholar]
- Patel NH, Kornberg TB, Goodman CS. Expression of engrailed during segmentation in grasshopper and crayfish. Development. 1989;107:201–212. doi: 10.1242/dev.107.2.201. [DOI] [PubMed] [Google Scholar]
- Patel NH. Imaging neuronal subsets and other cell types in whole-mount Drosophila embryos and larvae using antibody probes. Methods Cell Biol. 1994;44:445–487. doi: 10.1016/s0091-679x(08)60927-9. [DOI] [PubMed] [Google Scholar]
- Simanton W, Clark S, Clemons A, Jacowski C, Farrell-VanZomeren A, Beach P, Browne WE, Duman-Scheel M. Conservation of arthropod midline netrin accumulation revealed with a cross-reactive antibody provides evidence for midline cell homology. Evol Dev. 2009;11:260–268. doi: 10.1111/j.1525-142X.2009.00328.x. [DOI] [PMC free article] [PubMed] [Google Scholar]