Abstract
PURPOSE
The purpose of this study was to compare the linear sintering behavior of presintered zirconia blocks of various densities. The mechanical properties of the resulting sintered zirconia blocks were then analyzed.
MATERIALS AND METHODS
Three experimental groups of dental zirconia blocks, with a different presintering density each, were designed in the present study. Kavo Everest® ZS blanks (Kavo, Biberach, Germany) were used as a control group. The experimental group blocks were fabricated from commercial yttria-stabilized tetragonal zirconia powder (KZ-3YF (SD) Type A, KCM. Corporation, Nagoya, Japan). The biaxial flexural strengths, microhardnesses, and microstructures of the sintered blocks were then investigated. The linear sintering shrinkages of blocks were calculated and compared.
RESULTS
Despite their different presintered densities, the sintered blocks of the control and experimental groups showed similar mechanical properties. However, the sintered block had different linear sintering shrinkage rate depending on the density of the presintered block. As the density of the presintered block increased, the linear sintering shrinkage decreased. In the experimental blocks, the three sectioned pieces of each block showed the different linear shrinkage depending on the area. The tops of the experimental blocks showed the lowest linear sintering shrinkage, whereas the bottoms of the experimental blocks showed the highest linear sintering shrinkage.
CONCLUSION
Within the limitations of this study, the density difference of the presintered zirconia block did not affect the mechanical properties of the sintered zirconia block, but affected the linear sintering shrinkage of the zirconia block.
Keywords: Zirconia block, Mechanical properties, Sintering behavior, Linear sintering shrinkage
INTRODUCTION
All-ceramic core crowns offer excellent esthetics and have been used successfully for restoring anterior as well as posterior teeth.1-3 Analogous to metal-ceramic crowns, the construction of all-ceramic core crowns uses a high strength ceramic coping to provide resistance against loading. Apart from high fracture resistance and esthetics, a good accuracy of fit is recognized as one of the many important criteria for the clinical quality and success of all-ceramic crowns.4-6
It is known that a ceramic crown coping can be produced from various high-strength ceramic materials via an array of manufacturing processes.7-9 The recent development of advanced dental ceramics has led to the application of partially stabilized zirconia in restorative dentistry. Partially stabilized zirconia can be produced from a computer-assisted design/computer-aided manufacture (CAD/CAM) system. The use of zirconia-based ceramics for dental restorations has risen in popularity due to their superior fracture strength and toughness compared with other dental ceramic systems.10-13
Yttria-stabilized zirconia is characterized by its high thermal resistance, low thermal conductivity, chemical stability, and high fracture strength. It is a high-performance material with excellent biocompatibility and mechanical properties, which render it suitable for posterior prostheses.14 This type of zirconia has been used in orthopedics (for hip joint heads) for more than 10 years and in dentistry (for implants, abutments, inlays, onlays, and crowns) for 8 - 9 years. Zirconia is a polymorphic material that exists in three allotropes: monoclinic, tetragonal, and cubic. However, the tetragonal form is, in fact, 'metastable' at room temperature. External stresses, such as sandblasting, grinding, and thermal aging, can trigger the transformation of tetragonal zirconia to monoclinic zirconia.15-18 This transformation is associated with a 3 - 4% volume expansion that induces compressive stresses. These stresses close the tips of any advancing cracks that formed due to the force exerted on the zirconia surface, thereby preventing them from propagating further.19 This unique characteristic has resulted in zirconia being superior to other dental ceramics.
In general, CAD/CAM systems have been used for the fabrication of fixed prosthodontic restorations, such as inlays, onlays, veneers, and crowns.20 Several commercial CAD/CAM systems that use zirconia-based ceramics include the Lava™ system (3M ESPE, Seefeld, Germany), Kavo Everest® (Kavo, Biberach, Germany), and Cercon® Smart ceramics (DeguDent, Hanau, Germany). The zirconia blocks provided with these ceramic systems are offered in fully sintered and presintered forms. Compared to presintered zirconia, the fully sintered zirconia has a lower volume fraction of pores, a greater strength, and an improved resistance to hydrothermal aging. In addition, the fully sintered zirconia can be milled to the final desired dimensions because no further heat treatment, which would result in a dimensional change, is required.21 Unfortunately, the high strengths of the dense fully sintered blocks result in long milling times and rapid wear of the machining tools. On the other hand, although the presintered blocks are easy to shape, they must be sintered after milling in order for them to achieve their maximum strength. Therefore, when using presintered blocks, sintering shrinkage needs to be taken into account before milling. Despite this disadvantage, due to shorter milling time, easier processing, and higher productivity, CAD/CAM systems usually use presintered blocks or blanks at the green stage.
It is essential to develop a new material with physical properties that match those of the materials currently in clinical use. The suitability of a new ceramic material for a range of indications can be judged by comparing its physical properties (as determined from in vitro studies) with those of already accepted materials. Consequently, the physical properties of newly developed dental materials must be tested before they can be recommended for clinical use.22 Therefore, the purpose of this study was to compare the sintering behavior (including the linear sintering shrinkage) of the presintered zirconia blocks of various densities. The mechanical properties of the resulting sintered zirconia blocks were then analyzed.
MATERIALS AND METHODS
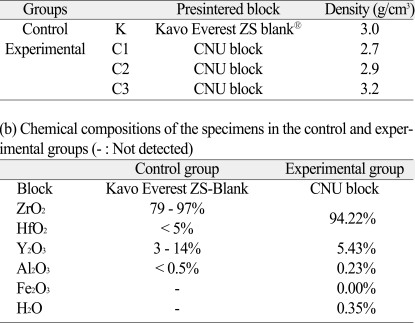
Four sets of dental zirconia blocks, with a different density each, were used in the present study (Table 1a). Among them, Kavo Everest® ZS blanks (Kavo, Biberach, Germany) were used as a control group. The experimental group specimens were fabricated from commercial yttria-stabilized tetragonal zirconia powder (Y-TZP, KZ-3YF (SD) Type A, KCM. Corporation, Nagoya, Japan). This powder had a nominal Y2O3 dopant content of 5.43 mol% and a specific surface area (determined by BET) of 12.7 m2/g. Table 1b shows the chemical compositions of the zirconia blocks used in the current study.
Table 1.
(a) Experimental groups of the specimens used in this study
In order to test the newly manufactured CNU (Chonnam national university) zirconia blocks for dental restorative applications, a number of in vitro tests were carried out. These included biaxial flexural strength, microhardness, and microstructural analysis tests. In addition, their linear sintering shrinkage behavior was measured and compared with that of the control group.
1. Fabrication of the blocks
1) Press forming
To make each block, 12.5 g of the KZ-3YF (SD) Type A zirconia powder was molded into a die (diameter 6 cm, height 20 cm) by uniaxial press forming at a pressure of 2.2 MPa. The pressure was applied through the upper punch, which entered the cavity holding the pressing powder. The lower punch and the die were kept immobile during this step. Application of the load was continued until the air in the die was removed. After compacting the block, the upper punch was withdrawn and the movement of the lower punch ejected the block from the mold.
2) Presintering
The green bodies (average diameter 2.01 cm, height 1.44 cm) were presintered in a furnace (Lindberg model 51524, Lindberg, Watertown, USA) at a heating rate of 1℃/min to 950, 1040, or 1070℃. The bodies were kept at these temperatures for 60, 90, and 120 min, respectively. After this presintering stage, the bodies were slowly cooled down to 23℃ while still in the furnace. According to this presintering process, the experimental groups were classified into three groups (C1, C2, and C3).
3) Sintering
Using a furnace (Kavo Therm, Kavo, Biberach, Germany), all of the presintered blocks were sintered at 1450℃ according to a cycle recommended by the furnace manufacturer.
2. Mechanical properties
1) Biaxial flexural strength (piston-on-three-ball test)
The sintered blocks were sectioned widthwise using a diamond wheel (Struers, Copenhagen, Denmark) mounted in a cutting machine (Accutom-2, Struers, Copenhagen, Denmark). All of the specimens were ground on both sides with a #360 diamond plate (Shinil Diamond industrial Co, Korea). Next, one side of each specimen was polished with a #600 diamond plate (Shinil Diamond industrial Co, Korea) and subsequently with 1000-grit silicon carbide paper (Struers, Copenhagen, Denmark) until a thickness of 1.2 mm was achieved. Then, using a polishing machine operating at a speed of 500 rpm, each specimen was polished using 9 µm and 3 µm polycrystalline diamond- containing suspensions (DP-Suspensions, Struers, Copenhagen, Denmark) for 20 min and 10 min, respectively. All of the specimens were finally wet polished with a Struers Labopol-2 grinding machine (Struers, Copenhagen, Denmark).
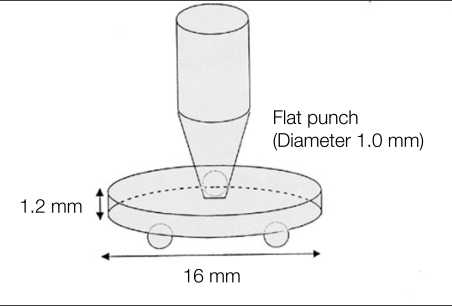
Nine specimens of each group were subjected to biaxial flexural strength tests (ISO 6872 standard) using a universal testing machine (RB Model 301 Unitech M™, R & B, Daejeon, Korea). Each disc specimen (diameter 16 mm, height 1.2 mm) was placed centrally on top of three hardened steel balls. These balls were 3 mm in diameter and were positioned 120° apart on a 10 mm in diameter support circle (Fig. 1).
Fig. 1.
Schematic illustration of the piston-on-three ball biaxial flexural test device.
The unpolished surface was loaded with a flat punch (diameter 1.0 mm) moving at a crosshead speed of 1.0 mm/min until failure occurred. This means that the polished surface of the specimen experienced tension during the testing. The load to failure (N) of each specimen was recorded and the biaxial flexural strength (MPa) was calculated according to ISO standard 6872 using the following equations (1-3)23:
S = -0.2387 P (X-Y) / d2 (1)
where S is the maximum tensile stress (Pa), P is the total load causing fracture (N), and d is the specimen thickness at the fracture origin (mm). X and Y were determined as follows:
X = (1 + υ) ln (r2/r3)2 + [(1 - υ)/2] (r2/r3)2 (2)
Y = (1 + υ) [1 + ln (r1/r3)2] + (1-υ) (r1/r3)2 (3)
in which υ is the Poisson's ratio (if the Poisson's ratio for the ceramic concerned is not known, a value of 0.25 is used), r1 is the radius (in mm) of the support circle, r2 is the radius (in mm) of the loaded area, r3 is the radius (in mm) of the specimen, and d is the specimen thickness (in mm) at the fracture origin.
2) Microhardness
One side of a piece of each sintered block was polished in sequence using #360, #600, #1200, #1500, #2400, and #3000 diamond plates (Shinil Diamond industrial Co, Korea). Then, using a polishing machine operating at a speed of 500 rpm, each specimen was polished with 9 µm and 3 µm polycrystalline diamond- containing suspensions (DP-Suspensions, Struers, Copenhagen, Denmark) for 20 min and 10 min, respectively.
The microhardness values of the samples were measured using a microhardness tester (HMV-2, Shimadzu Co, Kyoto, Japan) fitted with a Vickers indenter. Using a 100 N load, eight indentations were made on the polished surface of each sintered block. The indentation diagonal lengths (mm) were measured and the microhardness values were calculated automatically using CMT® software (Clemex, Longueuil, Canada).
3. Microstructural analysis
Scanning electron microscopy (SEM) (S-4700, Hitachi horiba, Tokyo, Japan) was used to examine the fractured surfaces of the sintered blocks after they had been subjected to the flexural strength tests. The size and shape of the grains in the presintered and sintered blocks were also investigated by SEM.
4. Linear sintering shrinkage
1) Density and linear sintering shrinkage of the blocks
A micrometer caliper and weighing machine were used to measure the lengths and weights of the presintered and sintered blocks. These measurements, which were repeated three times, were used to calculate the densities of the blocks. The linear sintering shrinkage of each block was then calculated using the following equation:
ΔL = (L0 - L) / L0 × 100
ΔL: linear sintering shrinkage (%)
L0: the length of the specimen before sintering
L: the length of the specimen after sintering
2) Linear sintering shrinkage of the three different sectioned regions of the presintered blocks
Each presintered block was divided into three equal parts (2 cm diameter, 0.45 cm height). These pieces were sintered as described in section 1.3. Their dimensions were measured three times both before and after sintering. The linear sintering shrinkage of each piece was then calculated using the formula above.
5. Statistical analysis
The obtained data was analyzed using a one-way analysis of variance (ANOVA) and paired Bonferroni test. The data was considered significant at P < .05. All calculations were made using SPSS Version 12.0 for Windows.
RESULTS
1. Mechanical properties
1) Biaxial flexural strength (piston-on-three-ball test)
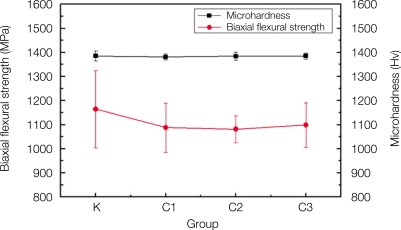
The mean biaxial flexural strengths of thirty-six zirconia discs are presented in Fig. 2. Group K had the highest mean biaxial flexural strength (1164 MPa), while group C2 had the lowest (1081 MPa). Multiple comparisons were performed using a one-way analysis of variance (ANOVA) and paired Bonferroni test at the 5% significance level. The 95% confidence intervals of the biaxial flexural strength indicated no significant difference between all of the groups.
Fig. 2.
Biaxial flexural strength and microhardness data for the experimental groups.
There were no statistically significant differences between the results obtained for all of the groups.
2) Microhardness
The mean microhardness values of the four different specimen groups were 1385, 1381, 1384, and 1384 HV. Fig. 2 shows that all of the groups had similar hardness values. Multiple comparisons were performed with a one-way analysis of variance (ANOVA) and paired Bonferroni test at the 5% significance level indicating no significant differences between the microhardness values of all of the groups.
2. Microstructural analysis
1) Fractured surfaces after the flexural strength tests
Many brittle materials display a characteristic pattern of mirror, mist, and hackle features surrounding the fracture origin. The cracked surface that forms during the initial propagation has a smooth area, which is appropriately termed the mirror region. As the crack advances, it becomes more unstable, creating a hollow surface known as mist. This instability eventually causes the crack to branch out, thereby producing the rough hackle region. The hackle region is composed of a set of striations of lines that radiate away from the crack source.24,25
In this study, the fracture started from the side of the sample that was under tension (the unloaded side) (Fig. 3A). Fig. 3B shows typical SEM images of the fractured surfaces of the control group and experimental group specimens (after the biaxial flexural strength tests). The images show the classic fracture patterns of ceramic materials. In the tension stress area, flaws triggered the formation of radical cracks. After the initial fracture, the cracks began to branch and change their propagation directions.
Fig. 3.
A: Schematic view of the zirconia disc specimen during the flexural strength test. B: SEM images (× 60) of the fractured surface (after the biaxial flexural strength tests) of: a) a control group sample, b) an experimental group sample.
2) Particle sizes of the powders in the presintered blocks
The control and experimental group powders had particles approximately 150 and 70 - 80 nm in size, respectively.
3) Images of the sintered blocks
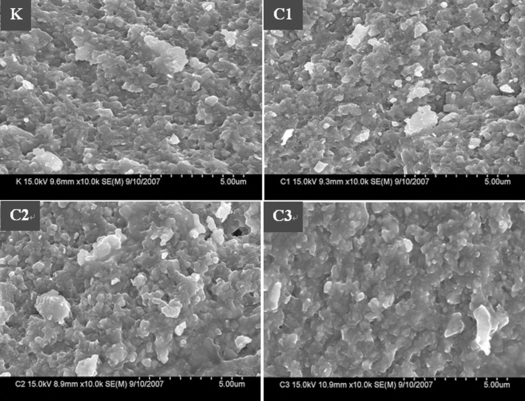
Fig. 4 shows SEM micrographs of the sintered blocks. These show that the powders formed agglomerates during the sintering procedure. After sintering at 1450℃, the size of the particles and aggregated grains had clearly increased.
Fig. 4.
Microstructures of the sintered blocks (× 10,000).
3. Linear sintering shrinkage
1) Densities of the sintered blocks
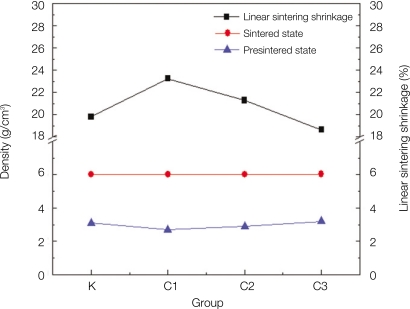
The average final densities of the sintered blocks were similar, as clear from Fig. 5. No significant differences were observed between the average final densities of all of the groups.
Fig. 5.
The average densities and linear sintering shrinkage values of the blocks.
2) Linear sintering shrinkage of the blocks
As shown in Fig. 5, the average range of the linear sintering shrinkage was 18.6 - 23.2%. It was observed that as the density of the presintered block increases, the extent of linear sintering shrinkage decreases. A significant difference was observed between the linear sintering shrinkage values of the different block groups.
3) Linear sintering shrinkage of the three different sectioned regions of the presintered blocks
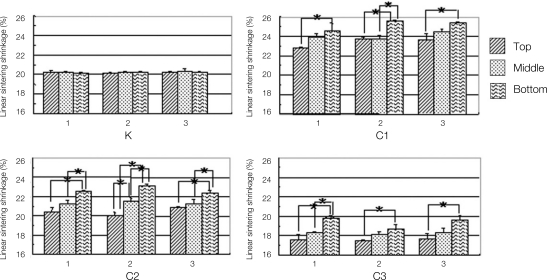
In the case of the experimental blocks, the extent of the linear sintering shrinkage was found to vary between the three different sectioned regions of each block. By contrast, the sectioned pieces of each control block experienced the same sintering shrinkage. It is also worth noting that the extents of linear shrinkage varied between the different experimental groups (Fig. 6). The tops of the experimental blocks showed the lowest linear sintering shrinkage, whereas the bottoms of the experimental blocks showed the highest linear sintering shrinkage.
Fig. 6.
The linear sintering shrinkage varied for different regions of the block.
*The mean difference is significant at the 0.05 level.
DISCUSSION
Kavo Everest® ZS blanks, which are widely used in zirconia all-ceramic dental fixed prostheses, were chosen as a control group in this study. Three sets of blocks with various densities (similar to the 3.0 g/cm3 of the Kavo Everest® ZS blanks) were designed. The presintering conditions (e.g., the presintering time, temperature, etc.) were varied in order to produce block densities of 2.7, 2.9, and 3.2 g/cm3. After sintering the presintered blocks, a number of static material tests were performed in order to confirm their sintering behavior. Various mechanical properties of these zirconia compacts were determined under standardized conditions.
The biaxial flexural tests were performed first. Flexural strength is the resistance of a specimen to a flexural load at the moment of fracture. Biaxial flexural testing is recognized as a reliable technique and method of choice (ISO 6872)23 for studying brittle materials since the maximum tensile stress occurs within the central loading area and edge failures are eliminated.26 In this study, there were no significant differences (P > .05) between the biaxial flexural strengths of all of the groups. In addition, the obtained biaxial flexural strength values of the experimental group samples met the requirements of ISO standard 6872, which recommends a minimum flexural strength of 100 MPa for this type of ceramic restorative material. Additionally, the experimental group samples possessed biaxial flexural strengths that are comparable to other all-ceramic materials27. However, further experiments need to be conducted to determine if the observed flexural strengths of the experimental ceramics are sufficient for clinical use.
The microhardness values of the sintered blocks tested in this study varied between 1356 HV and 1410 HV. These values are higher than the previously reported value of 1350 HV for typical zirconia28. When considering the clinical potential of a zirconia ceramic material, it is important to remember that it will be veneered to an oxide ceramic material before being placed as a restoration. Therefore, the microhardness of the zirconia ceramic material alone is not directly associated with the lifetime of the entire restoration. Although the lifetimes of restorations incorporating these zirconia ceramic materials were not measured, the manufactured zirconia blocks appear to be reliable for clinical use based on their mechanical properties compared to those of other all-ceramic dental materials.
In the present study, the microscopy showed that the grain sizes in the control and experimental group presintered blocks were different. However, the grain sizes did not significantly influence the mechanical properties (biaxial flexural strength and microhardness) of the sintered zirconia blocks.
After sintering, no significant difference between the densities of the sintered blocks of the various experimental groups was observed. It can be assumed that this is due to the use of the same sintering conditions for all of the samples. During the linear sintering shrinkage studies of the blocks, it was observed that as the densities of the presintered blocks increase, the linear sintering shrinkage decreases. A low linear sintering shrinkage of the block will result in a better accuracy of the restoration. Therefore, it is important for low linear sintering shrinkage blocks to be produced. This will improve the fit of the restoration with the coping produced by the presintered block.
It is very critical that the block undergoes uniform linear sintering shrinkage if it is to be used to make a zirconia coping for clinical use. In the case of each experimental block, the extent of the linear sintering shrinkage was found to vary between the three different sectioned regions of the block. By contrast, the sectioned pieces of each control block experienced the same sintering shrinkage. Observations from this study also suggested that the single-action uniaxial pressing resulted in the pressed density being different at different locations in the block. Since the upper punch compacted the block from the top only, the top and bottom parts of the block will have noticeably different densities. Additionally, it is also suggested that the friction between the powder particles and the die will cause density gradients within the block. Therefore, in order to reduce or eliminate these defects, the press forming technique and powder flowability must be optimized.
The present study has several limitations that make the results difficult to compare to those obtained directly from clinics. Measuring the performance of the ceramics in vitro does not take the influence of material fatigue in the oral cavity into account. Additionally, the clinical adaptation of the coping with the fabricated zirconia block has not been studied. Therefore, long-term clinical tests are needed in order to determine whether the all-ceramic crown with copings fabricated using these newly designed zirconia blocks will be clinically acceptable.
It is important to note that the mechanical tests undertaken in this study are the first systematic studies performed for the development of these newly designed zirconia blocks as prosthetic restorative materials. Future in vitro and in vivo studies and the consideration of esthetics will be necessary to provide conclusive evidence for the clinical use of these newly designed zirconia blocks.
CONCLUSION
In this study, the experimental blocks and Kavo Everest® ZS blanks showed no significant difference in their mechanical properties. However, their linear sintering shrinkage behavior was found to depend on their densities prior to sintering. In addition, the tops, middles, and bottoms of sectioned blocks underwent different linear sintering shrinkage. The density difference of the presintered zirconia block did not affect the mechanical properties of the sintered zirconia block but affected the linear sintering shrinkage of the zirconia block. Therefore, in a shrinkage point of view, it is important to make a presintered zirconia block with uniform density to obtain a uniform shrinkage of the zirconia block.
ACKNOWLEDGEMENTS
This study was supported by a grant from the Korea Healthcare technology R&D Project, Ministry for Health, Welfare and Family Affairs, Republic of Korea (A090973).
References
- 1.Lehner CR, Schärer P. All-ceramic crowns. Curr Opin Dent. 1992;2:45–52. [PubMed] [Google Scholar]
- 2.Bindl A, Mörmann WH. An up to 5-year clinical evaluation of posterior in-ceram CAD/CAM core crowns. Int J Prosthodont. 2002;15:451–456. [PubMed] [Google Scholar]
- 3.Mörmann WH, Bindl A. All-ceramic, chair-side computer-aided design/computer-aided machining restorations. Dent Clin North Am. 2002;46:405–426. doi: 10.1016/s0011-8532(01)00007-6. [DOI] [PubMed] [Google Scholar]
- 4.Pera P, Gilodi S, Bassi F, Carossa S. In vitro marginal adaptation of alumina porcelain ceramic crowns. J Prosthet Dent. 1994;72:585–590. doi: 10.1016/0022-3913(94)90289-5. [DOI] [PubMed] [Google Scholar]
- 5.Rinke S, Hüls A, Jahn L. Marginal accuracy and fracture strength of conventional and copy-milled all-ceramic crowns. Int J Prosthodont. 1995;8:303–310. [PubMed] [Google Scholar]
- 6.Sulaiman F, Chai J, Jameson LM, Wozniak WT. A comparison of the marginal fit of In-Ceram, IPS Empress, and Procera crowns. Int J Prosthodont. 1997;10:478–484. [PubMed] [Google Scholar]
- 7.Marquardt P, Strub JR. Survival rates of IPS empress 2 all-ceramic crowns and fixed partial dentures: results of a 5-year prospective clinical study. Quintessence Int. 2006;37:253–259. [PubMed] [Google Scholar]
- 8.Sorensen JA, Kang SK, Torres TJ, Knode H. In-Ceram fixed partial dentures: three-year clinical trial results. J Calif Dent Assoc. 1998;26:207–214. [PubMed] [Google Scholar]
- 9.Sorensen JA, Cruz M, Mito WT, Raffeiner O, Meredith HR, Foser HP. A clinical investigation on three-unit fixed partial dentures fabricated with a lithium disilicate glass-ceramic. Pract Periodontics Aesthet Dent. 1999;11:95–106. [PubMed] [Google Scholar]
- 10.Tinschert J, Natt G, Mautsch W, Augthun M, Spiekermann H. Fracture resistance of lithium disilicate-, alumina-, and zirconia-based three-unit fixed partial dentures: a laboratory study. Int J Prosthodont. 2001;14:231–238. [PubMed] [Google Scholar]
- 11.Guazzato M, Albakry M, Ringer SP, Swain MV. Strength, fracture toughness and microstructure of a selection of all-ceramic materials. Part II. Zirconia-based dental ceramics. Dent Mater. 2004;20:449–456. doi: 10.1016/j.dental.2003.05.002. [DOI] [PubMed] [Google Scholar]
- 12.Tinschert J, Zwez D, Marx R, Anusavice KJ. Structural reliability of alumina-, feldspar-, leucite-, mica- and zirconia-based ceramics. J Dent. 2000;28:529–535. doi: 10.1016/s0300-5712(00)00030-0. [DOI] [PubMed] [Google Scholar]
- 13.Porter DL, Heuer AH. Mechanisms of toughening partially stabilized zirconia (PSZ) J Am Ceram Soc. 1977;60:183–184. [Google Scholar]
- 14.Cales B. Colored zirconia ceramics for dental applications. Bioceramics. 1998;11:591–594. [Google Scholar]
- 15.Kosmac T, Oblak C, Jevnikar P, Funduk N, Marion L. The effect of surface grinding and sandblasting on flexural strength and reliability of Y-TZP zirconia ceramic. Dent Mater. 1999;15:426–433. doi: 10.1016/s0109-5641(99)00070-6. [DOI] [PubMed] [Google Scholar]
- 16.Garvie RC, Hannink RH, Pascoe RT. Ceramic steel? Nature. 1975;258:703–704. [Google Scholar]
- 17.Kitazaki H, Takahashi H, Hasegawa S, Nishimura F. Effect of amount of grinding on flexural strength of dental ceramics. J Med Dent Sci. 2001;48:7–13. [PubMed] [Google Scholar]
- 18.Chevalier J, Cales B, Drouin JM. Low-temperature aging of Y-TZP ceramics. J Am Ceram Soc. 1999;82:2150–2154. [Google Scholar]
- 19.Piconi C, Maccauro G. Zirconia as a ceramic biomaterial. Biomaterials. 1999;20:1–25. doi: 10.1016/s0142-9612(98)00010-6. [DOI] [PubMed] [Google Scholar]
- 20.Duke ES. The status of CAD/CAM in restorative dentistry. Compend Contin Educ Dent. 2001;22:968–972. [PubMed] [Google Scholar]
- 21.Suttor D, Bunke K, Hoescheler S, Hauptmann H, Hertlein G. LAVA-the system for all-ceramic ZrO2 crown and bridge frameworks. Int J Comput Dent. 2001;4:195–206. [PubMed] [Google Scholar]
- 22.Heydecke G, Butz F, Binder JR, Strub JR. Material characteristics of a novel shrinkage-free ZrSiO4 ceramic for the fabrication of posterior crowns. Dent Mater. 2007;23:785–791. doi: 10.1016/j.dental.2006.06.015. [DOI] [PubMed] [Google Scholar]
- 23.International standard for dental ceramic. 2nd ed 1995. ISO 6872. [Google Scholar]
- 24.Callister WD, Failure . In: Fundamental of materials science and engineering. An integrated approach. 2nd ed. Callister WD, editor. USA: John Wiley & Sons Inc; 2005. pp. 282–356. [Google Scholar]
- 25.Fréchette V. Failure analysis of brittle materials. Advances in ceramics. vol. 28. Westerville, OH: American Ceramic Society; 1990. [Google Scholar]
- 26.Ban S, Anusavice KJ. Influence of test method on failure stress of brittle dental materials. J Dent Res. 1990;69:1791–1799. doi: 10.1177/00220345900690120201. [DOI] [PubMed] [Google Scholar]
- 27.Giordano R. Materials for chairside CAD/CAM-produced restorations. J Am Dent Assoc. 2006;137:14S–21S. doi: 10.14219/jada.archive.2006.0397. [DOI] [PubMed] [Google Scholar]
- 28.Zirconia-Physical and mechanical property comparison of the different types of zirconias. 2003. http://www.azom.com.


