

Abstract
Fluorescent Cell Barcoding (FCB) enables high throughput, i.e. high content flow cytometry by multiplexing samples prior to staining and acquisition on the cytometer. Individual cell samples are barcoded, or labeled, with unique signatures of fluorescent dyes so that they can be mixed together, stained, and analyzed as a single sample. By mixing samples prior to staining, antibody consumption is typically reduced 10 to 100-fold. In addition, data robustness is increased through the combination of control and treated samples, which minimizes pipetting error, staining variation, and the need for normalization. Finally, speed of acquisition is enhanced, enabling large profiling experiments to be run with standard cytometer hardware. In this unit, we outline the steps necessary to apply the FCB method to cell lines as well as primary peripheral blood samples. Important technical considerations such as choice of barcoding dyes, concentrations, labeling buffers, compensation, and software analysis are discussed.
Keywords: flow cytometry, multiplex, barcode, fluorescence, dye, high throughput
INTRODUCTION
Fluorescent Cell Barcoding (FCB) was designed as a way to enable higher throughput flow cytometry while minimizing reagent consumption and maximizing data robustness (Krutzik and Nolan, 2006). The FCB technique encodes different cell samples with unique fluorescent signatures and combines the samples together for simultaneous antibody staining and data acquisition. This eliminates sample-to-sample variation arising from differences in staining volume and antibody concentration. In addition, because many samples are combined into one tube/well for acquisition, acquisition times are reduced, enabling entire 96 well plates to be run in 5–10 minutes without autosamplers. These advantages enable researchers to perform larger screening experiments, both for drug discovery and basic research in immunology, than would previously have been possible with standard one tube, one stain methods.
In FCB, cells are labeled with unique signatures or “barcodes” of fluorescent dyes. The fluorescent dyes are derivatized with N-hydroxysuccinimide and are therefore reactive to amine functional groups present primarily on protein lysine side chains and at the N-terminus. By staining cell samples with different concentrations of reactive fluorescent dye it is possible to impart samples with unique dye intensity distributions. Since reacted dye is covalently attached to the cells, non-reacted dye can be washed away enabling mixing of differentially labeled samples into one tube for antibody staining. The samples are distinguishable during software analysis based on their fluorescence intensity in the barcoding channel. Many different dyes are amenable to FCB, which permits multiparameter barcoding. The use of multiple FCB parameters facilitates high level multiplexing. For example, two parameters at four levels of barcoding each encode 16 populations (4 × 4), three parameters at four levels each encode 64 populations (4 × 4 × 4), and so on. We have previously used three dyes to encode an entire 96 well plate (in a 6 × 4 × 4 matrix) (Krutzik and Nolan, 2006).
The FCB method is typically used in experiments where cells have been fixed and permeabilized for analysis of intracellular cytokines or phospho-proteins (Krutzik and Nolan, 2003). This is preferable because the amine-reactive dyes used find orders of magnitude more protein targets inside the cell as compared to outside the cell. This enables higher level of barcoding intensity with lower amounts of dye when cells have been permeabilized. However, FCB of live cells is possible (manuscript in preparation).
Because of its ability to reduce antibody consumption, increase throughput, and minimize staining variability, the FCB method is well suited for experiments involving profiling of many samples, e.g. drug discovery, disease profiling, patient monitoring, and method optimization. The FCB platform is useful for both cell lines and primary cell samples such as human peripheral blood or murine splenocytes (Krutzik and Nolan, 2006). Among its applications, the method has enabled high-content drug screening in primary cells (Krutzik et al., 2008), profiling of lymphoma cell signaling (Irish et al., 2010), and more effective signal amplification of phospho-protein signaling using enzyme-mediated reporter deposition (Clutter et al., 2010).
This unit contains two Basic Protocols. The first applies FCB to a cell line, using one dye to barcode four samples. The second protocol uses three dyes to barcode 27 primary peripheral blood samples. Although particular dyes are used in these protocols, the methods are readily adaptable to use of other fluorescent dyes. Support Protocols for each of the Basic Protocols outline effective software analysis of the barcoded data, a critical step to application of the method.
BASIC PROTOCOL 1
FLUORESCENT CELL BARCODING WITH ONE BARCODING DYE IN CELL LINE
This basic protocol discusses the steps of the FCB method in a monocytic cell line, U937, and has been optimized from prior work (Krutzik and Nolan, 2006). This suspension cell line is representative of other lymphoid cell lines, and the steps outlined here can readily be applied to cell lines such as Jurkat, MOLT-4, K562, THP-1, and Ramos, among others. In this protocol, cell samples are distributed to individual tubes, fixed and permeabilized. Each sample is then labeled with a unique combination of fluorescent dyes (Figure 6.31.1). Once labeled, the different samples are mixed together and stained for the analytes/targets of interest such as phospho-proteins, transcription factors, cytokines, and other intracellular antigens. After the combined sample is acquired on the flow cytometer, the individual samples are deconvoluted, or unmixed, during software analysis based on their barcoding signatures (see Support Protocol 1). The method is based on phospho flow analysis of intracellular phospho-proteins (Krutzik and Nolan, 2003, Schulz et al., 2007) but the general protocol can be adapted for use with other fixation and permeabilization reagents (e.g., glutaraldehyde, saponin, Triton) with further testing.
Figure 6.31.1.

Fluorescent Cell Barcoding protocol. Cell samples are labeled with an amine-reactive fluorescent dye (FCB dye) at different concentrations. After covalent labeling has occurred, cells are washed to remove unbound dye, then combined into one tube and stained with antibodies against intracellular or surface antigens. The combined tube is then acquired on the cytometer. After acquisition, the original cell samples are identified by gating populations that display discrete fluorescent intensities in the FCB channel.
Materials
Cell line of interest (e.g. U937)
Barcoding dye stock solution at 5 mg/ml (amine reactive NHS/succinimidyl ester of Alexa Fluor 488, Invitrogen, see recipe)
Antibodies against intracellular antigen of interest (e.g., phospho-protein, cytokine, transcription factor)
Tissue culture media (see recipe)
Staining media (SM, see recipe)
5 ml polystyrene FACS tubes (BD Falcon)
16% paraformaldehyde in water (PFA, EM grade, Electron Microscopy Sciences)
100% methanol, cooled to 4°C
Phosphate buffered saline (PBS), cooled to 4°C
Benchtop centrifuge with swinging bucket rotor and 5 ml tube carrier
Flow cytometer with 488nm laser line (e.g., Becton Dickinson FACScan or FACSCalibur)
37°C, 5% CO2 incubator
Prepare cells
-
1.Grow U937 cells to 1 × 10⁶ cells/ml in tissue culture media. Distribute 1ml to each of four FACS tubes. Label the tubes 1–4 (Tube 1 will receive no barcoding dye, Tube 2 will receive a low dye concentration, Tube 3 will receive an intermediate dye concentration, and Tube 4 will receive a high dye concentration).OPTIONAL: In experiments testing different biological conditions, such as activation of cell signaling pathways, the cytokines and growth factors would be added at this step, prior to cell fixation (Krutzik and Nolan, 2003; Schulz et al., 2007).
-
2.
Fix cells by adding 100 µl of 16% PFA to each ml of media (for a final concentration of 1.5%). Vortex to mix and incubate for 10 min at room temperature.
-
3.Centrifuge for 5 min at 400 × g, 4°C, and aspirate or decant the supernatant.When decanting the supernatant, it is important to remove as much liquid as possible by blotting the tubes onto paper towels.
-
4.
Vortex to resuspend the cells in the residual volume (typically 30–50 µl) remaining after decanting.
-
5.Add 500 µl cold methanol to each tube and vortex to mix. Incubate for 5 min at 4°C.For phospho flow analysis, the samples can be stored overnight at −20°C or for several months at −80°C in methanol.
Prepare barcoding dye
-
6.In 1.5 ml microcentrifuge tubes, dilute the 5 mg/ml stock solution of AlexaFluor 488 NHS in DMSO to 25 µg/ml. Perform a four-fold serial dilution of the 25 µg/ml solution to generate solutions at the following concentrations (100× of the final concentration that will be used to barcode the cells):
- FCB dye tube 1: 0 µg/ml
- FCB dye tube 2: 1.6 µg/ml
- FCB dye tube 3: 6.3 µg/ml
- FCB dye tube 4: 25 µg/mlDifferent lots of fluorescent dyes may have different levels of reactivity, so it is recommended that each lot be tested and optimized prior to use in large experiments or with precious samples.When using dyes other than Alexa Fluor 488 for barcoding, it is important to titrate the dye and optimize the level of labeling. Some bright dyes achieve high intensity labeling at lower concentrations. We typically test labeling cells with 1 µg/ml and prepare multiple four-fold dilutions from that concentration. If the required number of populations cannot be resolved, the dye concentration is adjusted in a linear fashion, e.g. if three times more signal is required, three times more dye is added.
Add barcoding dye to samples
-
7.
Add 10 µl of the 100× barcoding dye solutions to the corresponding numbered cell sample tubes.
-
8.Vortex or pipette vigorously to mix. The barcoding dyes will be at 2× the final concentration after this step.IMPORTANT NOTE: DMSO solutions typically “fall” through solution and accumulate at the bottom of the tube. It is critical to mix the samples promptly and thoroughly to ensure even distribution of barcoding dye. Otherwise, populations may appear diffuse or spread out upon analysis.
-
9.Immediately after, add 500 µl ice-cold PBS to the cells in methanol. Total volume at this step is approximately 1 ml (500 µl methanol, 500 µl PBS, 10 µl barcoding dye). The final concentration of the barcoding dye is achieved in this step after adding PBS:
- Tube 1: 0 µg/ml
- Tube 2: 0.016 µg/ml
- Tube 3: 0.063 µg/ml
- Tube 4: 0.25 µg/ml
PBS enhances the barcoding reaction by holding the pH near 7, creating more reactive deprotonated amine groups inside the cells, increasing signal intensity relative to barcoding in methanol alone. This reduces the amount of dye required making the method more economical. -
10.
Vortex or pipette to mix.
-
11.
Incubate for 30 min at 4°C.
-
12.Wash each sample by adding 3 ml of SM, pelleting (400 × g, 5 min, 4°C), and decanting the supernatant. Repeat.Upon decanting, tap the tube against a paper towel to remove residual drops on the lip of the FACS tube. The purpose of this is to remove maximum amounts of free barcoding dye from the tubes. If samples that receive no dye (0 µg/ml) show significant signal after combining and analyzing on the cytometer, add an extra wash step at this stage.
-
13.
Resuspend each sample in 250 µl of SM.
Combine barcoded samples
-
14.Combine barcoded samples by transferring 200 µl of cells from each tube to an empty FACS tube (this tube can be labeled “combo”). The total volume will be 800 µl in the new combined tube (4 × 200 µl).Approximately 50–75 µl of sample will remain in the original tubes. Add 50 µl of SM to each of these tubes and keep them for acquisition below.For multicolor experiments, use the unlabeled sample and the sample labeled with the highest amount of dye (e.g., tubes 1 and 4) as compensation controls.
-
15.Add 3 ml of SM to the combination tube, pellet (400 × g, 5 min, 4°C), and decant.At this stage, the combined barcoded sample is ready for staining with antibodies or other reagents to analyze intracellular epitopes. For instance, in phospho flow, antibodies against phospho-proteins would be added and incubated for 30 minutes. Cells would then be washed and analyzed.
-
16.
Resuspend cells in 300 µl of SM.
-
17.Analyze the combination tube as well as the four original sample tubes on the flow cytometer:
-
Four distinct populations should be evident in the combined tube when analyzing the FITC/AlexaFluor 488 emission channel (Figure 6.31.2). The original sample tubes should each show a single, tightly distributed population. The populations of the individual tubes, if overlaid, should look similar to the combined tube.In some cases, the sample that received no dye might show increased signal in the combined tube. This is normal, and is due to a small amount of leaching of the dye from the highly labeled cells in the combined tube. The effect increases over time, so combination samples should not sit for longer than necessary prior to data acquisition on the flow cytometer.
- Use unmixed tubes as compensation controls in the AlexaFluor 488 channel. Tube 1 provides the negative sample, and Tube 4 provides the positive sample. These two tubes can be combined to yield one tube that contains both positive and negative populations, which is preferable in some software applications.
-
Figure 6.31.2.
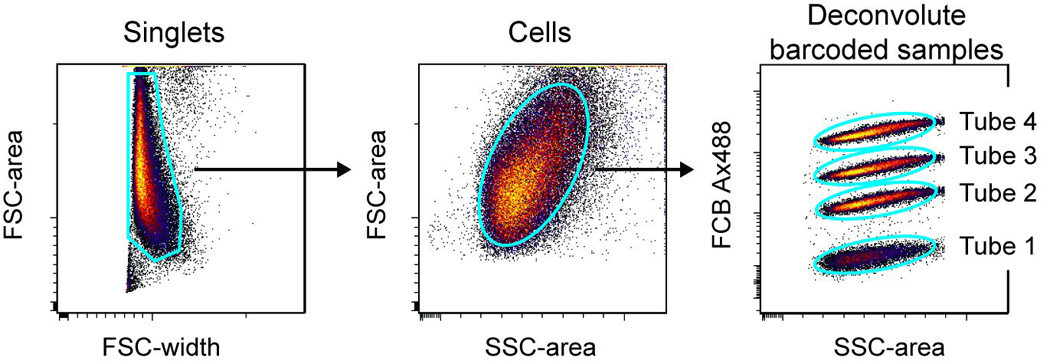
Deconvolution of four barcoded samples. Four independent tubes of U937 cells were barcoded with 0, 0.016, 0.063, or 0.25 µg/ml AlexaFluor 488 (Ax488), then combined into one tube and run on the flow cytometer. After identifying singlet events, intact cells are gated based on forward and side scatter characteristics. Plotting the FCB channel (Ax488 in this case) versus side scatter reveals four distinct populations that correspond to the four original tubes that were barcoded. Once gated, the populations can be analyzed for other antigens of interest.
SUPPORT PROTOCOL 1
ANALYSIS AND DECONVOLUTION OF FCB DATA
Analysis of experiments using FCB requires an additional step relative to “standard” experiments where each tube acquired is representative of one sample. In FCB, one acquired tube can contain from two to 96 samples. Therefore, when analyzing data acquired from FCB stained tubes, the first step is to deconvolute, or separate by gating, the barcoded populations into the individual samples that they represent (Figure 6.31.2). Once the populations have been deconvoluted, then analysis proceeds as usual, investigating the other parameters acquired. In order to effectively gate for deconvolution, it is important to recognize that barcode labeling correlates strongly to cell size and granularity. That is, cells that are large (have high forward scatter) or granular (high side scatter) tend to be labeled brighter than smaller, less granular cells. For instance, monocytes and granulocytes in peripheral blood samples are labeled with higher fluorescence intensity than lymphocytes. Therefore, barcoded populations are most readily gated from a two-dimensional plot with forward or side scatter as one parameter, and the barcoding channel as the other parameter.
Compensation
-
1.
Choose the compensation controls. Accurate compensation is critical to success of FCB experiments. Unmixed barcoded samples are optimal as compensation controls. Typically, a small volume of sample is saved for this purpose at the sample combination step, which can be diluted and used as the compensation control. The unlabeled population serves as the negative control, and the individually labeled, highly positive samples serve as the positive controls for each barcoded parameter.
Gate on cells
-
2.
After acquiring samples on the flow cytometer, import the FCS files into a flow cytometry analysis program (e.g., Cytobank; see Unit 10.17).
-
3.
(Optional) Gate on singlet cells using FSC-area vs. FSC-width or height.
-
4.
Gate on intact cells using FSC-area or height vs. SSC-area or height, eliminating debris and/or red blood cells.
Deconvolute barcoded populations
-
5.At this stage, barcoding deconvolution is performed. On a 2D density or contour plot, display a barcoding parameter (e.g. the AlexaFluor 488 channel for Basic Protocol 1) vs. SSC-area or -height.
- The number of barcoded samples should match the number of visible populations. For Basic Protocol 1, four populations that show different levels of AlexaFluor 488 intensity should be present (Figure 6.31.2).
- There will be a correlation or “tilt” in the populations, with cells that are higher in SSC displaying more intensity in the barcoding parameter.
- Note that if displayed on a one dimensional histogram plot, it may appear as though the populations overlap due to the spread of signal correlating to scatter. 2D plots are much more effective for barcoding deconvolution.
-
6.Draw gates around the four populations. In cases where the populations are nearly touching, draw gates around the center of each population and avoid contour or density plot outlier events that may belong to neighboring populations. This ensures high purity of each population.Most of the population density is present in the center of the population, with outer contours or density regions containing only a small fraction of the total events. Therefore, exclusion of the outer density areas of a barcoded population leads to a minor loss in cell yield, but a large gain in purity.
-
7.
Name the populations according to what differentiated each sample that was barcoded from the others, for example, “untreated”, “treatment1”, “treatment2”, etc.
Analyze barcoded populations for antigen of interest
-
8.The deconvoluted populations can now be treated as individual samples and analyzed with respect to other acquired parameters, e.g. surface marker expression, phospho-protein levels, cytokine levels.In cases where only one parameter is used for barcoding, a 2D display of the barcoding parameter vs. a parameter measuring an antigen of interest can be used to immediately identify which sample contains the desired phenotype.
-
9.
OPTIONAL: The deconvoluted barcoding populations can also be exported from some software packages as individual FCS files (e.g. Cytobank, Flowjo). The exported FCS files can then be opened in a new experiment, resulting in an experiment that has individual tubes/files, as if each sample had been acquired independently on the cytometer. Although slightly more time consuming, this method of exporting enables simpler down-stream analysis of large, multicolor experiments.
BASIC PROTOCOL 2
BARCODING WITH THREE DYES IN PRIMARY PBMC
This protocol outlines the use of three dyes to barcode 27 primary blood samples using a 3 × 3 × 3 barcoding matrix (three levels of intensity for each dye). Labeling peripheral blood mononuclear cells (PBMCs) is fundamentally the same as labeling a cell line. However, the optimal amount of dye to barcode the requisite number of populations may change slightly. Therefore, it is important to test and optimize labeling in the primary samples prior to performing large experiments. Primary monocytes are comparable in size to cell lines and barcode similarly. Lymphocytes, which are smaller, label less brightly and require more dye. Here also, because three dyes are used, the preparation of the barcoding dye matrix is more time consuming and requires careful planning to ensure correct dye concentrations in the final barcoding reaction with the cells. However, once the barcoding matrix is prepared, aliquots can be stored frozen for later use. Finally, the choice of barcoding dyes is critical to success of the experiment. In general, parameters which are not normally used for cell surface staining, such as Pacific Orange, DyLight 800 (APC-Cy7 detection channel), or DyLight 350 (UV excitable), are well-suited for FCB and do not require modification of existing antibody staining panels.
Additional Materials (see Basic Protocol 1)
Primary peripheral blood mononuclear cells (PBMCs)
Barcoding dye stock solution at 5 mg/ml, amine reactive NHS/succinimidyl ester of: DyLight 350 and DyLight 800 (Pierce Thermo Scientific), and Pacific Orange (Invitrogen, see recipe)
Antibodies against intracellular antigen of interest (e.g., phospho-protein, cytokine, transcription factor)
96 well polypropylene V-bottom deep block plate, 2 ml capacity
Flow cytometer with 355, 405, 488, and 633nm laser line (e.g., Becton Dickinson LSRII or LSRFortessa)
37°C, 5% CO2 incubator
Prepare cells
-
1.
Thaw or Ficoll-prepare PBMCs into tissue culture medium at approximately 2 × 10⁶ cells/ml. Rest for 1 hr at 37°C.
-
2.Aliquot 1 ml of cells into each of 27 different wells of a 96 well deep block (2ml capacity). Place the cells in columns 1–9 of rows A–C (in a 3 × 9 layout)The 3 × 9 layout correlates to the barcoding dye matrix below and enables simpler pipetting.OPTIONAL: Treat with drugs, stimuli, or other conditions to induce or modulate signaling.
-
3.
Fix cells by adding 100 µl of 16% PFA to each ml of media (for a final concentration of 1.5%). Pipette up and down to mix and incubate for 10 min at room temperature.
-
4.
Centrifuge for 5 min at 400 × g, 4°C, and decant or aspirate the supernatant.
-
5.
Vortex to resuspend the cells in the residual volume (typically 30–50 µl) remaining after removing the supernatant.
-
6.Add 500 µl cold methanol to each well and vortex to mix. Incubate for 5 min at 4°C.For phospho flow analysis, the samples can be stored overnight at −20°C or for several months at −80°C in methanol.
Prepare barcoding dyes
-
7.First, prepare the individual dyes (DyLight 350, Pacific Orange, and DyLight 800) at the appropriate 100× concentrations in DMSO as in Table 6.31.1. There will be nine tubes, one tube each for none, medium, and high dye concentrations. Prepare at least 150 µl of each dye at each concentration (135 µl will be used in the next step).The final barcoding dye matrix will consist of 27 wells, all with a different combination of dyes and concentrations of dyes.
-
8.
Add 15 µl of the appropriate 100× concentration dyes into 27 wells of a 96 well U-bottom plate following the matrix shown in Table 6.31.2 (see Figure 6.31.3 for a visual representation). DyLight 350 barcodes each of the rows, while Pacific Orange and DyLight 800 together barcode the nine columns. Each well will contain 45µl of mixed dye solution.
Table 6.31.1.
| Concentration µg/ml | |||
|---|---|---|---|
| None (−) | Medium (+) | High (++) | |
| DyLight 350 | 0 | 50 | 200 |
| Pacific Orange | 0 | 25 | 100 |
| DyLight 800 | 0 | 25 | 100 |
Table 6.31.2.
| 1 | 2 | 3 | 4 | 5 | 6 | 7 | 8 | 9 | ||
|---|---|---|---|---|---|---|---|---|---|---|
| A | DL350 | − | − | − | − | − | − | − | − | − |
| PO | − | − | − | + | + | + | ++ | ++ | ++ | |
| DL800 | − | + | ++ | − | + | ++ | − | + | ++ | |
| B | DL350 | + | + | + | + | + | + | + | + | + |
| PO | − | − | − | + | + | + | ++ | ++ | ++ | |
| DL800 | − | + | ++ | − | + | ++ | − | + | ++ | |
| C | DL350 | ++ | ++ | ++ | ++ | ++ | ++ | ++ | ++ | ++ |
| PO | − | − | − | + | + | + | ++ | ++ | ++ | |
| DL800 | − | + | ++ | − | + | ++ | − | + | ++ | |
Figure 6.31.3.
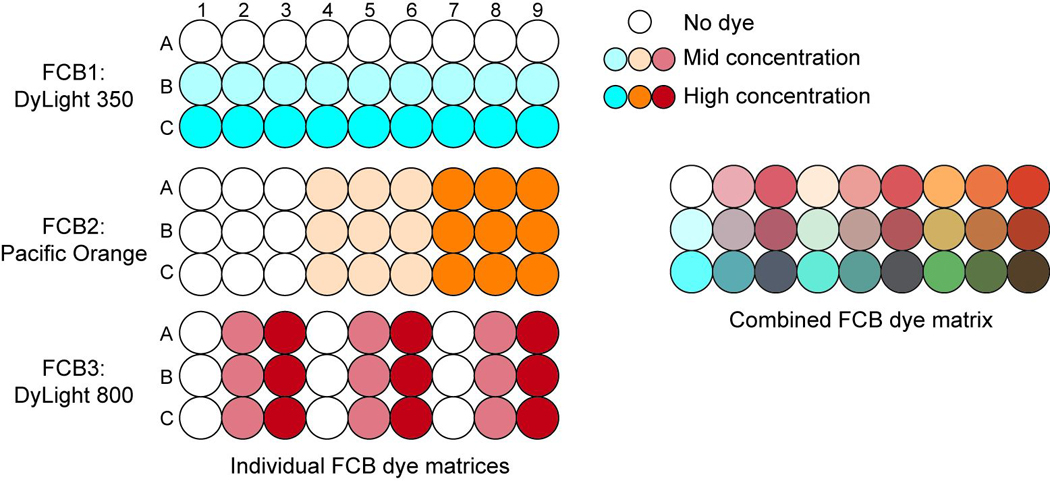
Layout of barcoding matrix used to encode 27 samples. Three FCB dyes were used: DyLight 350, Pacific Orange, and DyLight 800. Each dye was used at three concentrations. DyLight 350 encoded the three rows while the combination of Pacific Orange and DyLight 800 encoded the nine columns.
Add barcoding dyes to samples
-
9.Add 30 µl of the dye matrix prepared in the prior step to each of the corresponding 27 wells of cells in 500 µl methanol. Vortex or pipette to mix immediately after adding the dye.IMPORTANT NOTE: Do not allow the dyes to sit for more than 15–30 seconds before mixing.
-
10.Immediately add 500 µl ice-cold PBS to the cells in methanol. Total volume at this step will be approximately 1 ml (500 µl methanol, 500 µl PBS, 30 µl barcoding dyes). At this step, the final concentrations of the dyes will be as listed in Table 6.31.3.PBS enhances the barcoding reaction by holding the pH near 7, creating more reactive deprotonated amine groups inside the cells, increasing signal intensity 10-fold or more relative to barcoding in methanol alone. This reduces the amount of dye required making the method more economical.
-
11.Incubate for 30 min at 4°C.IMPORTANT NOTE: incubate at 4°C or on ice to maintain stability of some surface marker epitopes present in PBMC samples.
-
12.Wash the cells by adding 1ml of SM, pelleting (400 × g, 5 min, 4°C), and decanting or aspirating the supernatant. Repeat the wash with 2ml of SM.Aspiration of the supernatant after pelleting typically produces higher cell yields than decanting.
-
13.
Resuspend cells in 110 µl SM.
Table 6.31.3.
| Concentration µg/ml | |||
|---|---|---|---|
| None (−) | Medium (+) | High (++) | |
| DyLight 350 | 0 | 0.5 | 2 |
| Pacific Orange | 0 | 0.25 | 1 |
| DyLight 800 | 0 | 0.25 | 1 |
Combine barcoded samples
-
14.Combine barcoded samples by transferring 100 µl of cells from each well to an empty FACS tube for a final volume of 2.7 ml (27 × 100 µl).OPTIONAL: Approximately 30 µl of sample will remain in the original wells. Add 50 µl of SM to these tubes and acquire them individually along with the combined tube below to assess the effect of combining samples.For multicolor experiments, use the unlabeled sample and the samples labeled individually with the highest amount of dye as compensation controls. It is important that the positive controls contain only the dye being compensated, and no other dyes. Here, A1 is the negative compensation control, A3 is the DyLight 800 control, A7 is the Pacific Orange control, and C1 is the DyLight 350 control (Figure 6.31.3).
-
15.Add 2 ml of SM, pellet (400 × g, 5 min, 4°C), and decant.At this stage, the combined, barcoded sample is ready for staining with antibodies or other reagents to analyze intracellular epitopes. For instance, in phospho flow, antibodies against phospho-proteins would be added and incubated for 30 minutes. Cells would then be washed and analyzed.
-
16.
Resuspend cells in 500 µl of SM.
-
17.Acquire the combination sample on the flow cytometer:
- OPTIONAL: Analyze the 27 individual wells to determine the effects of combining the samples together.
- Three distinct populations should be visible for each barcoding dye (Figure 6.31.4). In some cases, the sample that received no dye might show some signal in the combined tube. This is normal, and is due to a small amount of dye leaching from highly labeled cells. To minimize this effect, acquire the samples within two hours of combination.
Figure 6.31.4.

Deconvolution of 27 barcoded primary cell populations. 27 individual wells were barcoded using all the unique combinations of DyLight 350 at 0, 0.5, or 2 µg/ml; Pacific Orange at 0, 0.25, or 1 µg/ml, and DyLight 800 at 0, 0.25, or 1 µg/ml. Cell events were first identified by gating on singlets (FSC-area vs. -width) and cells (FSC-area vs. SSC-area) as in Figure 6.31.2. Three populations are then clearly visible when plotting any of the barcoding parameters against side scatter. In this analysis, the rows were first gated based on staining intensity in the DyLight 350 parameter. The three rows were then analyzed for Pacific Orange staining, which was used to separate the columns into groups of three. Analyzing each of the levels of Pacific Orange for DyLight 800 revealed the samples from individual wells C1–C9. This analysis was repeated for each row, yielding 27 gated populations. The gating of the individual wells within rows A and B are not shown.
SUPPORT PROTOCOL 2
ANALYSIS AND DECONVOLUTION OF MULTIPARAMETER FCB DATA
Analysis of experiments using more than one dye for barcoding follows a similar procedure as for one dye (see Support Protocol 1). Because the intensity of barcoding correlates with cell size, it is important to gate barcoded populations on a two-dimensional plot with the barcoded parameter on one axis and a scatter parameter on the second axis. Although it is tempting to draw gates on two-dimensional plots of one barcoding dye versus another barcoding dye, this is not the optimal gating strategy. Instead, it is better to serially gate each barcoding dye parameter versus a scatter parameter.
Compensate and gate on cell events
-
1.
Repeat steps 1–4 of Support Protocol 1 to compensate and gate on singlet cell events.
Deconvolute barcoded samples
-
2.At this stage, barcoding deconvolution is performed. On a 2D density or contour plot, display one of the barcoding parameters (e.g. the DyLight 350 channel for Basic Protocol 2) vs. SSC-area (or height if area is not available). See Figure 6.31.4 for sample data.The number of barcoded samples should match the number of visible populations. For instance, in Basic Protocol 2, three populations that show different levels of DyLight 350 intensity should be present. These levels correlate to rows A, B, and C on the 96 well plate layout.There will be a correlation or “tilt” in the populations, with cells that are higher in SSC displaying more intensity in the barcoding parameter.
-
3.Draw gates around the three populations differentiated by DyLight 350. In cases where the populations are nearly touching, draw gates around the center of each population and avoid contour or density plot outlier events that may belong to neighboring populations. This ensures high purity of each population.Most of the population density is present in the center of the population, with outer contours or density regions containing only a small fraction of the total events. Therefore, exclusion of the outer density areas of a barcoded population leads to a minor loss in cell yield, but a large gain in purity.
-
4.
Name the gates according to the parameter that differentiated each barcoded sample from the others, for example, “350-neg”, “350-mid”, “350-hi”, etc.
-
5.
For each DyLight 350-gated population, display a contour or density plot of Pacific Orange vs. SSC-area.
-
6.
Draw gates around the three populations differentiated by Pacific Orange intensity.
-
7.
Name the gates according to their position: “PO-neg”, “PO-mid”, “PO-hi” for the negative, middle, and high intensity levels of Pacific Orange.
At this stage, nine populations have been created. Three populations differentiated by Pacific Orange barcoding for each of the three populations differentiated by DyLight 350.
-
8.
For each of these nine populations of cells, display a 2D contour or density plot of DyLight 800 against SSC-area.
-
9.
Draw gates around the three populations differentiated by DyLight 800.
-
10.
Name the gates according to the position in the plate (e.g. “A1”, “A2”, “A3”, etc), or by a descriptive name for the contents of the well (e.g. “patient1-control”, “patient1-treated”, etc). At this stage, the individual samples have been deconvoluted.
Analyze other antigens of interest
-
11.
Deconvoluted populations can now be treated as individual samples and analyzed for the other acquired parameters, e.g. surface marker expression, phospho-protein levels, cytokine levels.
-
12.
OPTIONAL: The deconvoluted barcoding populations can also be exported from some software packages as individual FCS files (e.g. Cytobank or Flowjo; see Unit 10.17). The exported FCS files can then be opened in a new experiment, resulting in an experiment with a single file corresponding to each original well, as if each well had been acquired independently on the cytometer. Although more time consuming, this method enables simpler down-stream analysis of large, multicolor experiments.
REAGENTS AND SOLUTIONS
Barcoding Dye Stock Solution
1 mg reactive fluorescent dye (NHS/succinimidyl ester)
200 µl anhydrous DMSO (Sigma)
Aliquot in 10–20 µl portions in 0.5ml microfuge tubes and store at −80°C
- Store for up to 6 months at −80°CWe recommend making stock solutions of the barcoding dyes at approximately 5 mg/ml to ensure long-term stability. If “working” aliquots of dyes (at 100×) are prepared, the stability at −80°C may be decreased. Use high quality, anhydrous DMSO, as water will hydrolyze the dye reactive groups and decrease barcoding efficiency. Storage at −80°C is recommended because DMSO that is saturated with water has a melting point lower than −20°C.
Tissue Culture Media
1× RPMI 1640 medium
10% (v/v) fetal bovine serum (FBS, heat-inactivated 1 hr at 55°C)
100 units penicillin / mL
100 µg streptomycin / mL
2 mM L-glutamine
Equilibrate to 37°C prior to use.
Staining Media
500 mL phosphate buffered saline (PBS)
0.1 g NaN3
2.5 g bovine serum albumin
Store up to 6 months at 4°C.
COMMENTARY
Background Information
Advantages of FCB
Simplify staining and acquisition
By combining many samples into one tube prior to staining and acquisition on the flow cytometer, FCB greatly simplifies these two steps. For instance, an experiment that originally consisted of 16 samples can be combined into one tube with a 4 × 4 dye matrix and stained as a single sample. During acquisition, only one tube is placed onto the cytometer, eliminating the need to load and unload 16 separate samples. These advantages are particularly apparent if staining samples with more than one antibody cocktail. Here, instead of running 32 samples for two stains on each of 16 samples, only two tubes would be stained and run with FCB.
Reduce antibody consumption
By reducing the number of samples to be stained, FCB can lower antibody consumption by 10 to 100-fold, depending on the size of the barcoding matrix. Even in relatively straightforward applications, such as a 3×3 matrix for barcoding nine samples, almost an order magnitude less antibody is used. However, savings in antibody consumption break down when the number of desired events to acquire is very large, for example in analysis of stem cells, regulatory T cells, or other rare cell types. If collection of one million events were desired for each original sample, a 3×3 matrix would demand that at least nine million cells be stained and acquired. Staining this many cells at antibody concentrations previously optimized for one million or less cells can result in sub-saturating antibody concentrations and poor staining results. In these cases FCB still has all of the other advantages listed in this section, just not the reduction in antibody consumption.
Increase acquisition speed
The typical bottleneck in running many samples on a flow cytometer is loading and unloading of the tubes. Even with automated carousels and plate samplers, considerable time is required between samples to clean the sample port and to register to the next well or tube. Since all FCB samples are located in a single tube, only one tube needs to be loaded onto the instrument. In our work with encoding 96 well plates with a 6 × 4 × 4 barcoding matrix, we were able to run the entire 96 well plate in 5 minutes. This is faster than most autosamplers, and requires no extra hardware.
Reduce staining errors
A common issue in flow cytometry staining is variability between samples due to inconsistent staining volumes or antibody concentrations. Furthermore, pipetting into a large number of samples can lead to the question “Was antibody added to that tube?” In FCB, because the samples are stained simultaneously, there is no variation in antibody concentration or staining volume between samples. All samples are exposed to an identical staining cocktail, greatly improving consistency of stains between the samples.
Increase quantitative robustness
Experimental samples are often quantitatively compared to control samples for analysis of flow cytometry data. Analysis can be hindered by variability between control and experimental samples due to pipetting errors, plate edge effects, and cytometry acquisition variables like flow cell clogging, PMT drift, and flow rate. In FCB, the control tube is barcoded and combined with the sample tube, allowing comparisons to be made within the same tube. Therefore, variation between samples is limited to experimental conditions prior to staining such as cell treatments, incubations, and fixation protocols.
Critical Parameters and Troubleshooting
Mixing
Perhaps the most important technical consideration is to thoroughly mix the samples upon addition of barcoding dye. DMSO solutions have a tendency to fall through solutions without mixing. Therefore, it is critical to either vortex tubes vigorously or pipette up and down several times to ensure complete sample mixing. Incomplete mixing is manifested by populations that have irregular shapes and/or show broad distributions. When performed correctly, FCB produces narrowly distributed populations.
FCB dye selection and working concentration
The concentration of dye required for optimal labeling and separation of populations is dependent upon 1) the cell type being analyzed, and 2) the identity of the barcoding dye. Because FCB labeling intensity correlates with cell size and abundance of amines within the cell, smaller cells, such as primary blood lymphocytes, label less intensely than cell lines such as the U937 cell line. Therefore, slight adjustment in the concentration is required for the different cell types. Secondly, use of different amine reactive dyes requires optimization. We have successfully used dyes from the Alexa Fluor (405, 488, 647, 700, 750), DyLight (350, 649, 800), Cy (5 and 7) and Pacific (Blue, Orange) series. In general, dyes which are excited optimally by a laser, e.g., AlexaFluor 647, require lower concentrations than dyes which are not optimally excited, e.g., AlexaFluor 750. However, the range of concentrations is typically within five-fold. To find an appropriate concentration for the most brightly labeled population for a given dye, we recommend first labeling cells with 1 µg/ml of that dye and then adjusting accordingly. Labeling correlates linearly with dye concentration. If the signal is 10× higher than required at 1 µg/ml, then 0.1 µg/ml should be used.
Labeling buffer
In initial experiments (Krutzik and Nolan, 2006), we performed the barcoding reaction in approximately 100% methanol. Although this leads to excellent barcoding results, we have optimized the method and found that a mixture of PBS with methanol yields more intense barcode labeling with the same amount of dye. In addition, the labeling is qualitatively more “sharp”, producing tighter population distributions that are more readily resolved from neighboring populations. PBS provides a more optimal labeling environment by deprotonating the amine groups present on lysine amino acid side chains. In methanol, these amines may be in a protonated state, and therefore unreactive toward the NHS ester of the barcoding dyes. Increasing the amount of PBS relative to methanol enhances the reaction further for some dyes. Once optimized, the ratio of PBS to methanol should not be changed.
Compensation
In multicolor experiments, compensation has a large impact on data visualization and quantitative measurements. With FCB, it is critically important to compensate the spillover of the barcoding parameters into neighboring channels accurately, particularly when performing quantitative experiments such as phospho flow. As outlined in the protocols in this unit, it is recommended to save a low volume of unmixed, unstained FCB samples for compensation. For instance, in an experiment using two FCB dyes, the compensation controls would be as follows: the double negative population as the negative control and the two single color highly barcoded samples as positive controls. To check the accuracy of the compensation matrix, set aside a sample that contains all of the mixed barcoded populations but that has not been subjected to antibody staining. Gate the barcoded populations and check that the median fluorescence intensity on other parameters of interest do not fluctuate in a pattern that corresponds to the barcode matrix. If clear MFI trends exist, adjust the compensation matrix until they are eliminated.
Anticipated Results
The expected results from applying FCB are shown in Figures 6.31.2 and 6.31.4. When applied correctly, FCB should yield uniformly distributed populations that do not have many outlier cell events. If populations are irregular in shape, sample mixing was probably inadequate. Fluorescence labeling is linearly related to dye concentration, so it is expected that populations will be separated by the dilution factors used in the barcoding matrix. If the populations are too close to one another, the dilution ratio between populations should be increased (from four-fold to five- or ten-fold).
When first applying the FCB method, results should be compared to samples that were not barcoded. This will reveal problems resulting from FCB dye spillover and compensation into the channels of interest. With proper choice of FCB dyes, it is possible to avoid these potential problems. In particular, FCB dyes should be chosen so that the parameters that are most affected by fluorescence spillover are not critical to the quantitative measurements being made, or that have large positive to negative ratios (such as CD4 staining).
The FCB method requires careful pipetting when preparing the dye matrix and when adding the dyes to the cell samples. Variation in staining intensity between samples in the matrix can be due to poor pipetting or inadequate mixing of samples. We recommend practicing the FCB method on a cell line, such as in Basic Protocol 1, before proceeding to primary cell samples.
Time Considerations
The FCB method integrates into the standard phospho flow method, and adds approximately 30 minutes to the protocol for the labeling reaction and 10–15 minutes to the protocol for sample combination after barcoding. However, FCB subsequently saves time during antibody addition and sample acquisition on the flow cytometer. Overall, the FCB method can be integrated into standard intracellular analysis procedures with little influence on total protocol time.
Acknowledgements
We would like to thank the members of the Nolan laboratory for application and optimization of the FCB technique, and for helpful discussions. This work was funded by NIH grant R01CA13082 and NHLBI Contract NHLBI-HV-10-05.
Literature cited
- Clutter MR, Heffner GC, Krutzik PO, Sachen KL, Nolan GP. Tyramide signal amplification for analysis of kinase activity by intracellular flow cytometry. Cytometry A. 2010 doi: 10.1002/cyto.a.20970. [DOI] [PMC free article] [PubMed] [Google Scholar]
- Irish JM, Myklebust JH, Alizadeh AA, Houot R, Sharman JP, Czerwinski DK, Nolan GP, Levy R. B-cell signaling networks reveal a negative prognostic human lymphoma cell subset that emerges during tumor progression. Proc Natl Acad Sci U S A. 2010;107:12747–12754. doi: 10.1073/pnas.1002057107. [DOI] [PMC free article] [PubMed] [Google Scholar]
- Krutzik PO, Crane JM, Clutter MR, Nolan GP. High-content single-cell drug screening with phosphospecific flow cytometry. Nat Chem Biol. 2008;4:132–142. doi: 10.1038/nchembio.2007.59. [DOI] [PubMed] [Google Scholar]
- Krutzik PO, Nolan GP. Intracellular phospho-protein staining techniques for flow cytometry: monitoring single cell signaling events. Cytometry A. 2003;55:61–70. doi: 10.1002/cyto.a.10072. [DOI] [PubMed] [Google Scholar]
- Krutzik PO, Nolan GP. Fluorescent cell barcoding in flow cytometry allows high-throughput drug screening and signaling profiling. Nat Methods. 2006;3:361–368. doi: 10.1038/nmeth872. [DOI] [PubMed] [Google Scholar]
- Schulz KR, Danna EA, Krutzik PO, Nolan GP. Chapter 8: Single-cell phospho-protein analysis by flow cytometry. Curr Protoc Immunol. 2007;(Unit 8):17. doi: 10.1002/0471142735.im0817s78. [DOI] [PubMed] [Google Scholar]