Abstract
Clinical photography of hair disorders is an extension of photography in dermatology practice. Some points should be kept in mind while taking images of the hair and hair bearing areas in view of the reflection of light and the subsequent glare that may spoil the result. For documentation of most conditions of the hair, the same general rules of dermatological photography apply. The correct lighting is the most important aspect of clinical photography in trichology practice and can be achieved by reflected light than direct light. Special care should be taken in conditions requiring serial images to document progress/response to treatment and the most important factor in this context is consistency with respect to patient positioning, lighting, camera settings and background. Dermoscopy/trichoscopy can also be incorporated in clinical practice for image documentation.
Keywords: Clinical photography, trichophotography, trichoscopy
INTRODUCTION
Photography of the hair bearing areas, especially the scalp is essentially just an extension of clinical dermatological photography. Some points should however be kept in mind while taking photographs of hair disorders and is technically more challenging in view of the tendency for the light to glare from the shiny surface. The first issue that needs to be addressed in clinical photography of the hair is: what is the main purpose? Is it just documentation of the condition or as part of assessing progress/response to treatment? For example, in a case of Tinea capitis or discoid lupus erythematosus (DLE) of the scalp, you may need to take only a single image of the affected area for documentation, while for a case of androgenetic alopecia where you need to progressively assess and document the response to medical or surgical treatment, you need serial photographs taken in standard views for comparison. For simple documentation, the same general rules of dermatological photography apply, while the key for a good image series for documenting progress/response to treatment is consistency – in terms of patient positioning, lighting, camera settings, and background.
Equipment
The camera-point and shoot versus single lens reflex
As far as the quality of photos is concerned the digital single lens reflexes (SLRs) definitely do outscore the common point-and-shoot (compact) varieties. Additionally, any SLR camera with an added overhead flash has the major advantage of being able to counter the glare from reflections, which would be a common issue with compact point-and-shoot cameras. However, for all practical purposes, point and shoot cameras are more than sufficient. Besides, the exorbitant cost of digital SLRs, and their accessories along with space constraints, especially in an outpatient clinic are other prohibitive factors. The disadvantage of earlier compact point and shoot cameras was a limitation in manual adjustments, specifically in relation to controlling factors like aperture size, shutter speed, flash intensity, etc. However, most point-and-shoot cameras available now function as an intermediate, “prosumer” or “bridging” cameras, which have functional capabilities between a simple compact camera and a digital SLR. Most of these are also quite affordable compared to a digital SLR. So basically it is great if you have a SLR with necessary lenses and are comfortable with it, but a simple point-and-shoot would do quite for all your documentation.[1]
Camera – resolution
How many megapixels (MP) do you really need? The amount of detail that the camera can capture is called the resolution, and it is measured in pixels. Basically, the more pixels a camera has the more detail it can capture. Also as the pixels increase, larger prints can be made without losing detail.[1] Earlier studies have suggested that even a resolution of 1.3 MP is sufficient for dermatological photography.[2] All modern dedicated digital cameras, even of the point-and-shoot variety have resolution upwards of 8 MP, so camera resolution is really not a major concern in terms of choosing a camera for clinical photography. Many mobile phone cameras now come at high resolution ranging from 5 to 12 MP; however in spite of this resolution mobile phone cameras have various problems making them unsuitable for precision clinical photography, these limitations include absence of dedicate close-up/macro modes and difficulty in maintaining a standardized/consistent positioning or setting. Moreover, the reflection of light from the camera flash is an issue with mobile phone cameras too.
Other equipment and setting
Background
The background is one of the most important things that have to be kept in mind. The best background would be a plain light blue or green non-reflective surface, like a linen cloth. Make it a point to remove accessories like hair bands and clips, which unnecessarily divert focus from the lesion of interest. Other accessories required are measurement tapes and skin markers.[1,3]
Lighting
Photography literally means “writing with light.” Lighting is as important in clinical hair photography as in any other form of photography. It should be understood that the aim of clinical photography is to capture the clinical condition and not aesthetics. Hence there is not much role for equipment like back – lights/ extensive reflectors which are commonly used for aesthetic photo-shoots of the hair. Photographs of hair disorders often require close-up or macro modes. Inbuilt camera flash units and sharp overhead lamps should be avoided as they tend to whiten out the area or interest and also produce sharp reflections especially on black hair. The best light source for hair photography is a ‘twin-flash’ system (a dual point light source) [Figure 1] which creates balanced illumination and enhances both depth and texture, maximizing the visualization of hair. Another option is using two soft box lights to balance out reflections, if space is not an issue in the clinic [Figure 2]. If the ambient light itself is producing distracting reflections a simple white reflector or a tilt flash would help [Figure 3]. If you are shooting with only the available room lighting, make sure that any lighting that you have is slightly in front and above the area to be photographed and the source of lighting should never be behind the subject. Again the important thing is ensure that whatever lighting set-up is used consistently.[4]
Figure 1.
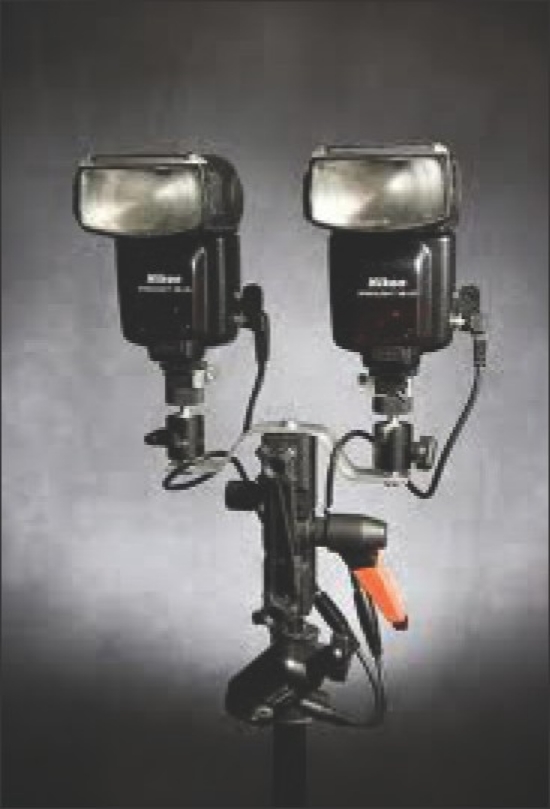
Twin flash system
Figure 2.
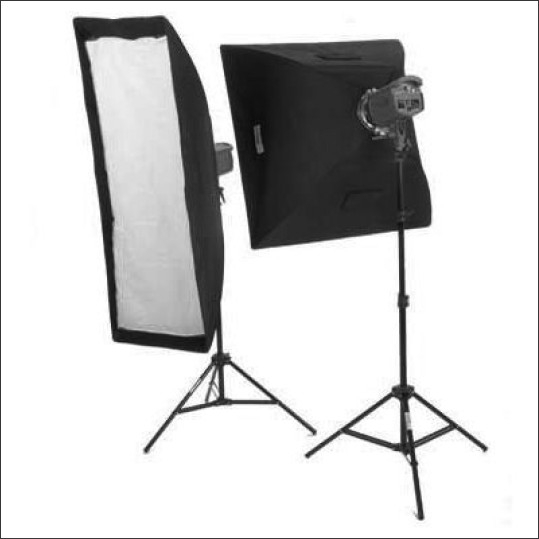
Twin softbox (Interfit-INT198-Stellar-X-Solarlite)
Figure 3.
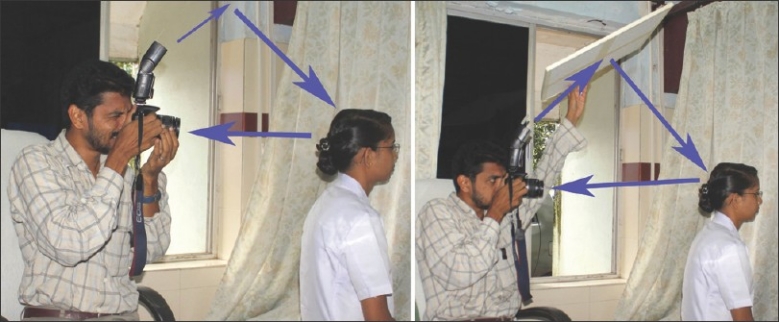
Bounce flash (arrow mark showing the direction of indirect flash light to minimise glare)
A ring flash (which is basically a ring like light around the camera lens) can be attached on SLR cameras and helps in taking very close shots in low-light conditions for lesions essentially needing focus on the scalp, without the shadow of the camera lens falling over the lesion. They are dedicated and synchronize with the camera just like the built-in or any other external flash [Figure 4].
Figure 4.
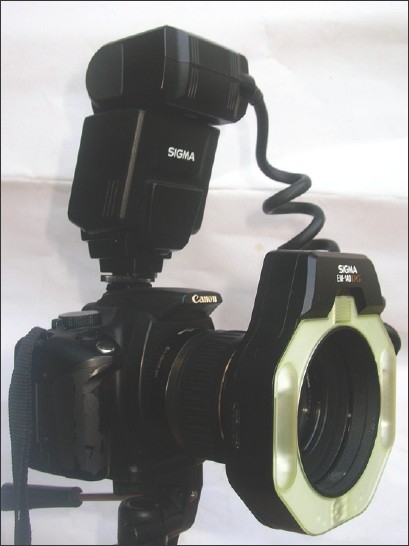
Ring flash (SIGMA EM-140 DG)
In Indian patients, oiled hair clumps and tend to produce more reflections. Hence, it is preferable to take photographs always when the hair is clean and dry. Another option is to use tissue paper to wipe and dry out the oil as much as possible prior to photography of scalp.
Other accessories
A tripod is an essential tool to ensure standardized imaging of the hair especially in conditions like androgenetic alopecia. It not only helps us to use a consistent camera position and height, but also helps to prevent blurring of images which might occur when you are shooting without a flash. However, in clinical practice especially where space is a constraint, this can be overcome if the clinician (photographer) is competent enough to use the camera without mounting it on to the tripod. It would be ideal to use a commercially available reflector or a simple thermocol sheet to bounce the flash from the camera indirectly to the subject by placing the reflector as in the picture [Figure 3].
Dermoscopy/Trichoscopy
A dermoscope unit with a camera attached (which in turn can be attached to a computer monitor or a television screen) is very useful in diagnosis, documentation, and patient counseling. Hair dermoscopy (Also called trichoscopy) usually uses a magnification of 10X and can be combined with still or video images (videodermoscopy). Digital photography by itself is a great tool to educate and counsel the patient regarding his/her condition.[5] Combination with dermoscopy enhances the ability to diagnose and document hair disorders. Specific changes have been reported on dermoscopy of different conditions affecting the hair, e.g. “yellow dots” in alopecia areata, peripilar brown depressions in androgenetic alopecia, and peripheral peripilar casts in Lichen planopilaris [Figures 5 and 6]. Trichoscopy is also useful in demonstrating structural defects like monilethrix.[6] There are many dermoscopes available in the market which have adapters to attach digital cameras (The authors have used a DERMLITE pro HR II® attached to a Sony® W 350 camera) [Figure 7]. Dermoscopy would also be valuable in evaluating structural abnormalities of hair. Interestingly, another simple method to shoot microscopic images for hair shaft abnormalities is to place the camera lens over the objective of the microscope, with a transparent polythene film in between to prevent damage to the camera lens[1][Figure 8].
Figure 5.
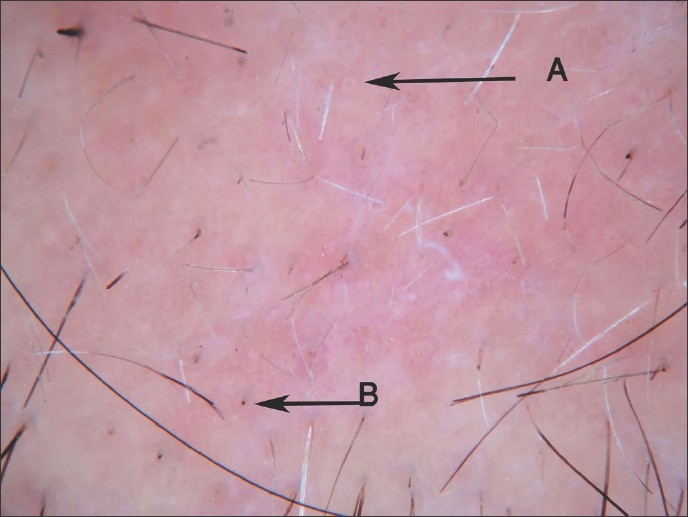
Alopecia areata dermoscopy - showing yellow dots (A) and short cadaverized hairs (B)
Figure 6.
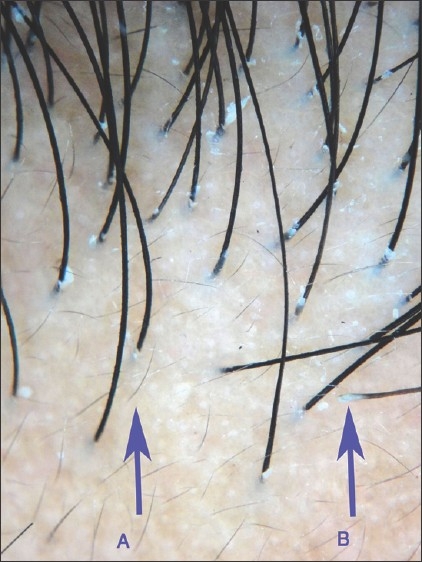
Dermascopy image of androgenetic alopecia: A-Vellus hairs; B-Peripilar casts
Figure 7.
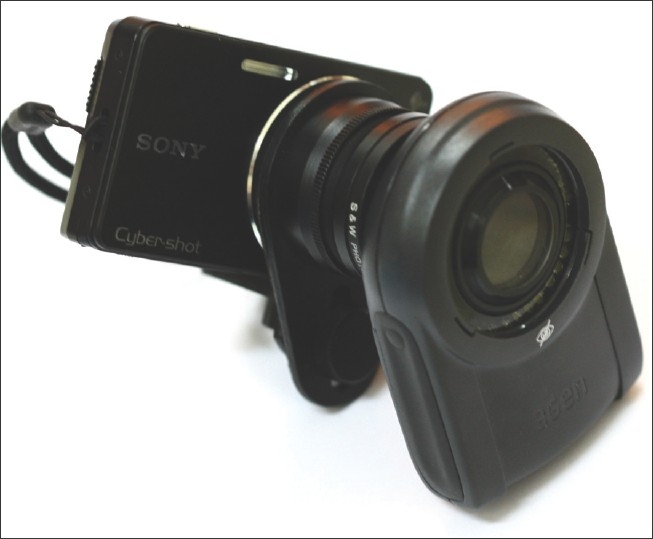
Dermoscope with camera attached to it (Dermlite pro HR II® with Sony® W 350)
Figure 8.
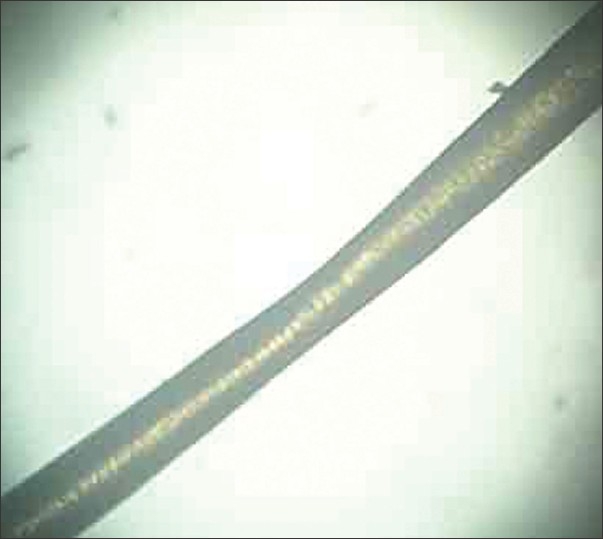
Hair microscopy-pili torti in Menke's kinky hair syndrome
General rules
Choosing what has to be photographed or in short what is to be included in the frame in the picture is the clinician's decision. It would be ideal if a normal anatomical area is included in at least one of the frames (e.g. Ear when taking lesions on the temporal area) so that the viewer gets an idea of the location. The area of clinical interest should preferably be kept in the middle of the frame [Figure 9].
Figure 9.
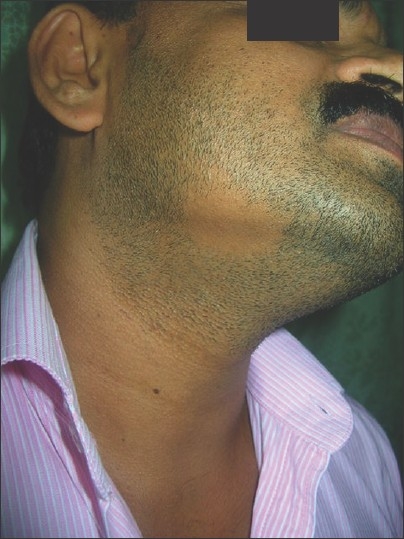
Alopecia areata on the beard
The general rule is to take both medium distance shots (3-4 feet from the patient) and close distance shots (1-2 feet from the patient). For all lesions make it a point to take at least two shots from each point of focus. Minimal blurring may not be obvious in the LCD screen and may be noticeable only after the images are viewed on the monitor. It is always better to have an extra copy from every focus point so that the best image can be selected.[1]
Specific contexts
Photographic documentation of diseases associated with localized alopecia (scarring or non-scarring)
The important lesions here is the lesion (not the hair as such) e.g. alopecia areata, DLE lesions over scalp, Lichen planopilaris, etc.
It is always good to have multiple images (frame) per patient, so that the pictures are more descriptive. Take images from a distance of 3 feet to show scalp/area and the location of the lesion. Follow this with close-up images of the lesion preferably with an assistant to separate and hold down surrounding hair to prevent distracting focus from the area of interest. Use the macro mode/close up mode (denoted by the symbol ![]() ) without flash (with good ambient light) or with a ring flash (if ambient light is too less). You can later check and delete the poor quality images. The assistant can also hold a scale to document size of the lesion. Always make it a point to document possible associations to explain the clinical condition better. For e.g. in alopecia areata document nail pitting if present. In Pediculosis, document excoriations over the neck and upper back [Figure 10] or a regional lymphadenitis if secondarily infected which are often seen in association [Figure 11].
) without flash (with good ambient light) or with a ring flash (if ambient light is too less). You can later check and delete the poor quality images. The assistant can also hold a scale to document size of the lesion. Always make it a point to document possible associations to explain the clinical condition better. For e.g. in alopecia areata document nail pitting if present. In Pediculosis, document excoriations over the neck and upper back [Figure 10] or a regional lymphadenitis if secondarily infected which are often seen in association [Figure 11].
Figure 10.
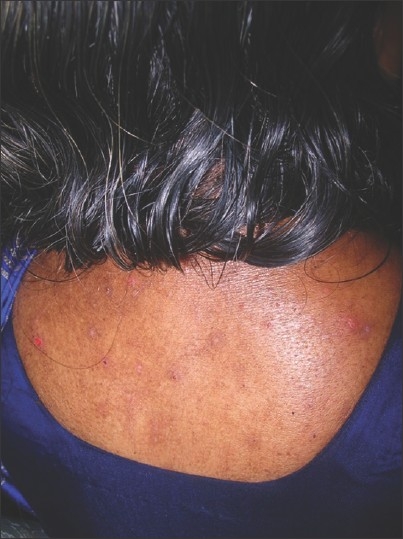
Pediculosis capitis associated with excoriations on the upper back
Figure 11.
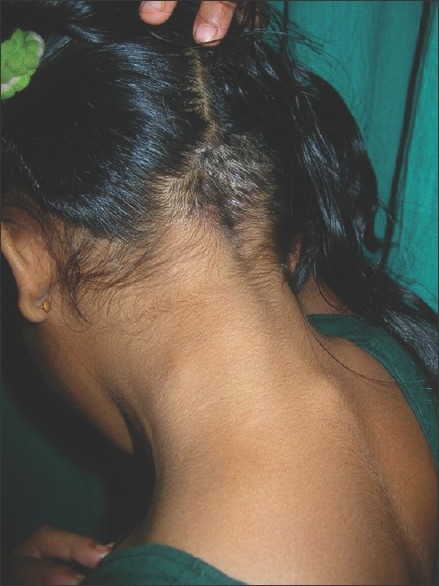
Pediculosis associated lymphadenitis
Photographic documentation of diseases associated with diffuse alopecia, including androgenetic alopecia (global assessment)
A global photograph of a patient with hair loss should record the complete cosmetic state of the patient's hair. This requires among other things, a cooperative patient with clean, dry hair and ideally a technician who is able to take the time to comb and prepare the hair precisely the same way at each office visit. If possible, the patient should be advised to maintain the same hair style and color. Ideally multiple images should be shot covering all areas of the scalp [Figure 12]. The four specific views recommended are the vertex, mid-pattern, frontal, and temporal views. The vertex photo is best taken by making the patient face away from the camera. The patient is instructed to look at the ceiling, which tilts the head back. Then instruct the patient to interlock his or her fingers and position his or her hands flat on a table, and then place the face on his or her hands. A piece of drape cloth placed across the hands can remove this distraction in the photograph. After taking the mid-pattern photos, have the patient place the chin between the thumbs and index fingers. This will angle the head up to capture the frontal hairline. Adjust the height of the camera on the tripod and move toward or away from the patient until focus is achieved and take the picture. The last picture to take is of the temporal area. Angle the patient approximately 45° to the camera. Instruct the patient to place his or her chin between the thumbs and index finger and take the picture.[4]
Figure 12.
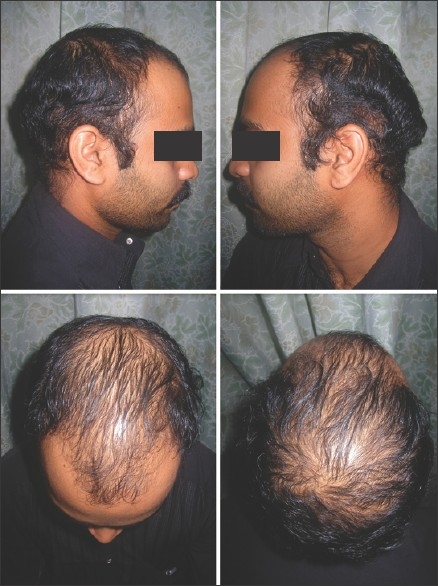
Androgenetic alopecia global assessment
Baseline photographs must be available for reference at all follow-up photo sessions. This allows the patient's hair and position to be consistently maintained.[4]
A small area of the scalp can be selected (Marked with a tattoo/permanent marker) and assessed for hair count. The target area on the scalp is chosen, clipped and prepared, and permanently landmarked with a single tattoo for future site location. Controlled photographs are then taken, centrally processed, monitored for technical adequacy, and counted (Manually or with specialized software for the same). One way to accomplish consistent results is, always keep the camera lens parallel to the floor and position the patient to the camera and the use of a tripod is very ideal. For global photography of androgenetic alopecia the camera should ideally be held in the vertical format to maximize the clinical information recorded. An adjustable stool can be used in adjusting the patient position[4] [Figure 12].
Photographic documentation of hirsutism
For documenting clinical improvement with treatment and for severity scores, if possible it is always best to document the entire body involvement to obtain the Ferriman-Gallwey score[7] [Figure 13]. Here too it is essential to avoid reflections on the hair. A twin flash system should be used when possible.
Figure 13.
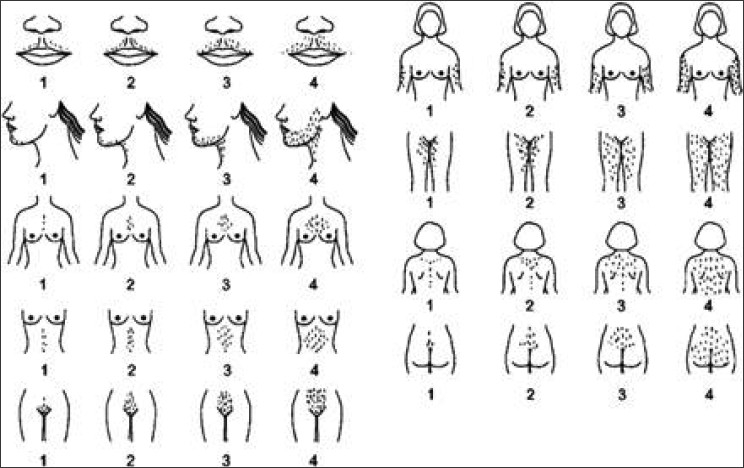
FG score for hirsutism-copyright Dr. Ricardo Azziz-used with permission
Photographic documentation of structural defects of the hair
Cover all angles as in androgenetic alopecia and take macro shots of representative areas. Make it a point to document associations on other parts of the body e.g. in Netherton's syndrome, always document the ichthyosis.
General recommendations and tips
Most of the recommendations apply as in general clinical photography -
Always ensure that patient's consent is documented before photographing, especially if the shots are taken during a surgical procedure when the patient may not be aware of the same. A written informed consent would be the best and is a must if one is planning to use the photograph for publications.
Include the patient's hospital card, tag or number in all or at least one of the images of a series so as to enable easy identification later.
Use auto-focus as often as possible, use manual controls only if you are well versed with them
While photographing very young children and infants make sure that the subject is comfortable and not anxious. Children tend to be fidgety and you often end up getting blurred images because of the movement. A toy or a pen or an assistant to divert attention of the child would come in handy to prevent this, though this should not be included in the frame.[1]
-
Storage: Most digital cameras save the images by default at a resolution of 72 dpi in the JPEG (joint photographic expert group) format. This can be converted to 300 dpi with the use of basic photo-editing software. The resolution of 300 dpi is the general standard for most journal submissions. The most preferred format is JPEG. Ensure that the images are backed up in at least two locations. Always catalog all saved images (or containing folders) tagging it with the patient's name, hospital number, date and provisional diagnosis where applicable. Meticulous cataloging is cumbersome, but makes future retrieval of imaging very convenient.[8] One methodology which the authors follow is to create multiple folders with diagnosis as folder names, and the files are renamed as quoted below.
Name/patient id_year_month_date_serial number
This helps in sequential arrangement by default in the folder when “arrange by name” is chosen in “view” option. Also freeware like Google Picasa™ can be easily used to catalogue and retrieve images very quickly from the stored files on the disk by simple search of any of the words on the file name as mentioned earlier. It is mandatory not to use short forms for year and month. (E.g. patient id _2011_01_08_sl no is the correct form and not patient id_11_1_8_sl no) to avoid technical confusion on the operating system of the computer.
Make it a point to show the images to the patient and discuss any clarification regarding the same that the patient requires.
Take plenty of images. You can always delete the unused ones later.
SUMMARY
Clinical photography of hair disorders is an extension of dermatological photography. Some points should be kept in mind while taking images of the hair. For documentation of most conditions of the hair, the same general rules of dermatological photography apply. Special care should be taken in conditions requiring serial images to document progress/response to treatment and the most important factor in this context is consistency with respect to patient positioning, lighting, camera settings and background.
Acknowledgments
We would like to thank Dr. Ricardo Azziz, Professor, Obstetrics, Gynecology, & Medicine and President, Georgia Health Sciences University (formerly the Medical College of Georgia), and CEO, MCG Health System, for giving permission to use his copyrighted image depicting the Ferriman-Gallway scoring system.
Footnotes
Source of Support: Nil
Conflict of Interest: None declared.
REFERENCES
- 1.Kaliyadan F, Manoj J, Venkitakrishnan S, Dharmaratnam AD. Basic digital photography in dermatology. Indian J Dermatol Venereol Leprol. 2008;74:532–6. doi: 10.4103/0378-6323.44334. [DOI] [PubMed] [Google Scholar]
- 2.Miot HA, Paixγo MP, Paschoal FM. Basics of digital photography in Dermatology. An Bras Dermatol. 2006;81:174–80. [Google Scholar]
- 3.Pak HS. Dermatologic Photography [homepage] American Telemedicine Association. 1999. [Last accessed on 2011 January 20]. Available from: http://www.americantelemed.org/files/public/membergroups/teledermatology/telederm_DermatologicPhotography.pdf .
- 4.Canfield D. Photographic documentation of hair growth in androgenetic alopecia. Dermatol Clin. 1996;14:713–21. doi: 10.1016/s0733-8635(05)70397-1. [DOI] [PubMed] [Google Scholar]
- 5.Kaliyadan F. Digital photography for patient counseling in dermatology-a study. J Eur Acad Dermatol Venereol. 2008;22:1356–8. doi: 10.1111/j.1468-3083.2008.02919.x. [DOI] [PubMed] [Google Scholar]
- 6.Tosti A, Duque-Estrada B. Dermoscopy in hair disorders. J Egypt Women Dermatol Soc. 2010;7:1–4. [Google Scholar]
- 7.Azziz R, Carmina E, Sawaya ME. Idiopathic hirsutism. Endocr Rev. 2000;21:347–62. doi: 10.1210/edrv.21.4.0401. [DOI] [PubMed] [Google Scholar]
- 8.Roach D. Imaging. In: Nouri K, Leal-Khouri S, editors. Techniques in dermatological surgery. 1st ed. USA: Mosby; 2003. pp. 33–42. [Google Scholar]


