

Abstract
The use of BAC/P1 as a vector for the generation of a transgene has gained popularity after the genomic annotation of many organisms was completed (often based on the respective BAC library). Large-scale generation of BAC transgenic mice has proven that BAC transgene approaches have less integration position effects and dosage artifacts when compared with traditional transgenic approaches. Also, a BAC can achieve the same tissue-specific expression as a Knock-in of the same gene with less effort and shorter time of establishment. The λ-RED recombinogenic system has been used to manipulate DNA constructs with site-directed mutagenesis, truncation, and tagging with an epitope tag or as a fusion protein by homologous recombination, as well as used here to modify many BACs with various transgenes. The recombineering plasmid, pKD46, is used to fabricate BAC transgenic constructs that can be used in generating transgenic organisms as well as used in mammalian cell culture.
Keywords for indexing: BAC, Recombineering, Transgene
Unit Introduction
This unit describes a method of using the λ-RED recombineering plasmid, pKD46, to fabricate BAC transgenic constructs. This method takes advantage of the BAC’s extensive flanking sequence, which likely contains the necessary regulatory components to direct the expression of foreign genes to resemble the expression of targeted genes in a tissue-specific manner while achieving the endogenous expression level within a cell.
A well thought-out design and proper execution are essential for generating a BAC transgene (BAC-tg) that can meet the desired goal. The protocols in this unit first describe the rationale behind designing a BAC transgene construct through inserting foreign DNA either in an ATG exon, 3’UTR or anywhere in between these sites on a targeted gene. Next, specific attention is given to choosing a BAC for targeting, then several methods for making the targeting cassettes (TC) are provided by flanking a transgene and selection marker with homologous arms. Furthermore, a description of how to employ interchangeable selection markers to produce a modified BAC for transgenic animals or cell cultures is included. Finally, a step-wise troubleshooting section is supplemented to aid in construct production.
Content
Basic Protocol: Fabrication of a BAC transgene construct through recombineering
Support Protocol 1: Purify targeting cassette with a Safeblue Gel
Support Protocol 2: Making electrocompetent cells
Support Protocol 3: Electroporation of a plasmid into DH10B and its derivatives
Support Protocol 4: Storing and handling recombinogenic bacteria strains
Support Protocol 5: Handling the BAC (acquisition and confirmation)
Support Protocol 6: Obtaining BAC DNA for transformation
Alternate Protocol 1: Assembling a targeting cassette by PCR with long primers
Alternate Protocol 2: Overlapping PCR
Alternate Protocol 3: Arm-extension
Alternate Protocol 4: Sequential Targeting
Alternate Protocol 5: Selection marker removal with titration of recombinase
Materials
Vector DNA
- Cloning vectors (use as needed for individual project requirements):
- PGEM-T-Easy (Promega) –TA cloning of PCR generated homologous arms.
- Selection cassette:
- pL452 - Contains dual prokaryotic and eukaryotic promoters for the neo cassette flanked by two loxP sites in pBluescript.
- pFRT-PGK-em7-Neo-pA-FRT –Same as pL452 but flanked with FRT sites to be used in conjunction with Flpe recombinase.
- FRT or LoxP floxed Hygromycin or Zeocin.
- Recombinogenic plasmids:
- pKD46 and its derivatives
E. coli strains
Competent cells for cloning: DH10B (Invitrogen), NEB 10-beta (NEB), Stable 2 or 4 (stb2/4, Invitrogen)
-
Recombinase Mediated Cassette Exchange (RMCE) cells: To exchange or delete selection marker.
EL250 (or galK− - SW105) – Tet R+ in DY380 replaced with Arabinose-inducible Flpe gene, for recombination between two FRT sites
EL350 (or galK− - SW106) – Tet R+ in DY380 replaced with Arabinose-inducible Cre gene, for recombination between two loxP sites
Culture Medium (UNIT 1.1)
Low salt LB medium (1.0% tryptone, 0.5% yeast extract, 0.5% NaCl)
Agar plates (1.0% tryptone, 0.5% yeast extract, 0.5% NaCl, 1.5% agar)
Antibiotics
20 µg/ml Chloramphenicol (CM, stock: 34 mg/ml in ethanol; Sigma)
100 µg/ml Ampicillin (Amp, stock: 50 mg/ml in water; Sigma)
25 µg/ml Kanamycin (Kan, stock: 50 mg/ml in water; Sigma)
25 µg/ml Zeocin (Zeo, stock: 100 mg/ml in water; Invitrogen)
50 µg/ml Hygromycin (Hyg, stock: 100 mg/ml in water; Invivogen)
Others
Isopropylthio-β-D-galactoside (IPTG; 1M, 20 µl/plate)
5-bromo-4-chloro-3-indolyl-β-D-galactopyranoside (X-gal, 50 mg/ml in dimethylformamide, 50 µl/plate)
0.1% L-Arabinose (stock: 10% in water; Sigma)
Safeblue Dye “SYBR® safe” (Invitrogen)
PCR Reaction (UNIT 15.1)
Phusion High-Fidelity DNA Polymerase (Finnzymes) or similar High-Fidelity enzyme
Taq DNA Polymerase with Thermopol Buffer (NEB)
PCR primers
PCR Nucleotide Mix
DNA manipulation (UNIT 3.1)
Restriction Endonucleases (NEB)
Miniprep Kit (Qiagen)
Gel Extraction Kit (Qiagen)
PCR Product clean-up Kit (Qiagen)
T4 DNA Ligase with associated buffer (Promega)
Rapid DNA Ligation Kit (Roche)
Additional reagents and equipment may be required for agarose gel electrophoresis (UNIT 2.5A) restriction endonuclease digestion (UNIT 3.1).
Required equipment
Orbital shaker incubators, temperature-controlled at 32°C
Incubators set at 32°C and 37°C.
Spectrophotometer with 1 ml disposable plastic cuvettes to monitor bacteria growth.
Bench top centrifuge with temperature control (Eppendorf 5810R) and tabletop centrifuge (Eppendorf 5415b) to make competent cells.
Electroporator (Eppendorf Electroporator 2510) with 1 mm Electroporation cuvettes
96-well Thermocycler
Safe Imager Blue-Light Transilluminator (Invitrogen)
Spectrophotometer to quantitate DNA (Nanodrop - ND1000) or monitor bacteria growth with 1 ml disposable plastic cuvettes (ThermoSpectronic-Biomate 3).
Strategic Planning
Preliminary Design of BAC transgene
Due to its size, a BAC is capable of containing most of the regulatory elements to direct the expression of a gene transcript in a spatio-temporal specific manner. To tap into the transcriptional machinery of a gene, any functional unit of foreign DNA can be inserted into a targeted gene between the transcription start site(s) and polyadenylation signal(s) as a transgene to be expressed either as functional RNAs or proteins. Furthermore, the copy number of the integrated BAC transgene into the chromosome after pronuclear injection or transfection is limited (1 ~ 3 copies), as such the expression level of a transgene is comparable with that of the endogenous gene thus reducing the possibility of gene dosage artifacts.
There are a few components that need to be addressed before making a BAC transgenic construct.
-
Targeted gene: choose a suitable target gene that hopefully can direct the expression of the transgene in a similar manner as endogenous expression.
Research focus- most of the time the gene of interest is predetermined, especially for an individual laboratory, based on the expression studies of RNA blot or microarray.
- Expression profile- to mark a specific cell type or manipulate in a tissue-specific manner. This can be determined from:
- Gene chip results.
- Atlas of gene expression based on In situ hybridization.
- GENSAT or similar BAC transgenic projects.
-
BAC finder: locate a BAC that covers the entire transcriptional unit of the targeted gene
Location: Use the Accession number for the protein or the mRNA to find the targeted gene in websites such as NCBI, UCSC genome browser, Ensembl (See Internet Resource).
-
Gene structure- Gather and download the DNA annotation sequences.
Initiation codon (ATG) exon: specifically notice alternative ATG sites and non-ATG initiation codons.
5’ Untranslated Region (UTR): From transcription start site(s) to translation start site(s).
Last exon: Stop codon with 3’ UTR and poly A signal(s).
Alternative splicing.
Repeats: need to be noted and avoided.
GC-rich area: complicates PCR reactions and cloning.
-
Choose BAC
A smaller BAC is easier to handle (BAC Finder at MitoCheck), yet it is vital to ensure complete coverage.
Transcription unit: nearby genes or Chromosome markers (CpG islands, p300 binding sites).
- Additional considerations:
- PCR confirmation of BAC coverage of genomic DNA to ensure it contains insertion sites as well as enough upstream and downstream sequence.
- Orientation of the inserted DNA in the BAC can be in either direction.
- Additional genes covered by the chosen BAC, which will be part of the BAC transgene construct that may be expressed.
- BAC vector backbone components can cause complications and may be manipulated.
-
Insertion site: Determine where and how to insert the transgene. The BAC transgene utilizes the targeted gene transcription machinery, so the transgene can be transcribed and translated. When generating a transgene fusion with an endogenous gene to generate a fusion protein, the translational regulation and modification of endogenous proteins needs to be considered.
Because the regulatory components can be found upstream of the gene (promoter), within the intron of the gene, or after the gene (enhancer), a general rule of thumb is to insert the transgene such that it produces minimal alteration of the targeted gene (Figure 1).
5’UTR: between transcriptional start site and translational start sites. Make note of upstream ATG of initiation codon.
Initiation codon insertion /replacement – can be a N-terminal fusion protein if skipping the stop codon of the transgene.
Stop codon replacement – only for C-terminal fusion.
3’UTR: transgenes with IRES between the translation stop site and poly A signals
In between – as intragenic fusion or as gene trap by using RNA splicing acceptor
- Tagging:
- N-terminal tag: in-frame without stop codon (notice signal peptide).
- C-terminal tag: in-frame before stop codon (notice C-terminal modification).
- Intragenic fusion: in frame both N- and C-terminal.
- Post-translational processing: signal peptide, end modification.
-
Transgene: Choose a transgene that meets the projects requirements. It may be any functional DNA fragments that are coding proteins or functional RNAs. Common transgenes include tracers (fluorescence proteins or enzymes (galactosidase, phosphatase)), recombinase (Cre, Flpe), transacting factors (Gal4, tTA/ rtTA) or toxins (Diphtheria Toxin). Pay attention to species-specific considerations such as codon usage and translational regulation.
- Messenger RNA
- Kozak Sequence: needs to be included as part of the transgene. Can be part of the endogenous sequence or included with targeting cassette. A good example of a Kozak sequence to −9 (gc/tcgccaccATG) of ATG.
- Poly A signal: transgene inserted in 3’UTR can usually use the endogenous one. Otherwise, the pA signal might need to be included with the transgene to stabilize its expression.
- Intron: to increase mRNA exportation from the nucleus.
- Others (optional): many viral components such as WRPE (Woodchuck hepatitis virus posttranscriptional regulatory element) can increase transcription and translation efficiency.
Functional RNA: such as RNAi or miRNA can be expressed by a strong tissue-specific promoter or combined general promoter (Human H1 or U6 promoter) with inducible components (rTA/TRE) to achieve tissue-specific knock-down.
- Polycistronic: Eukaryotic cells are monocistronic yet can use alternative splicing to make different gene products with same gene. It is necessary to add the transgene in front of the targeted gene to be expressed. In order to make multiple gene products from a transgene construct, the following components can be included:
- IRES – Internal ribosomal entry site to direct the expression of two transgenes or a single transgene after a stop codon in eukaryotic cells. Wild-type IRES from EMCV (Encephalomyocarditis Virus) will be the best, and the IRES sequence from mammalian mRNA can also serve as a splicing donor.
- 2a peptides – Self cleavage peptide with viral origin (such as Foot and Mouth Disease Virus)
- Bi-directional or inverted promoters.
- Inducible:
- Cre-dependent expression for a removable STOP cassette
- Tet-on/off with tetracycline-repressor rTA/rtTA and TRE
- Tag:
- Cellular localization tagging to direct the expression of the transgene in specific organelles.
- Immuno-tag for purification or staining.
- Fluorescence tag as tracker of protein of the target gene.
Composite: Combine two or more of the above functions.
-
Selection marker: Used in manipulating DNA in bacteria or selecting in the cell lines as positive selection.
Common selection markers that can be used for both bacteria and eukaryotic cells: Neomycin /Kanamycin, Hygromycin, Zeocin.
Flexibility with dual promoters: Contains both prokaryotic and eukaryotic promoters, so the vector can be shuttled between bacteria and eukaryotic cells.
Removable: Frt or loxP flanking antibiotic resistant genes or residing within an intron that can be removed by RNA splicing.
- Location:
- In between CDS and poly A of transgene, preferred.
- Upstream of 3’ homologous arm (Right arm)
- Downstream of 5’ homologous arms (Left arm): special occasions N-terminal tag or serves as STOP cassette.
- Inside an artificial intron for N-terminal tagging or disrupting protein CDS (i.e. Cre).
Figure 1. Insertion site of a transgene.
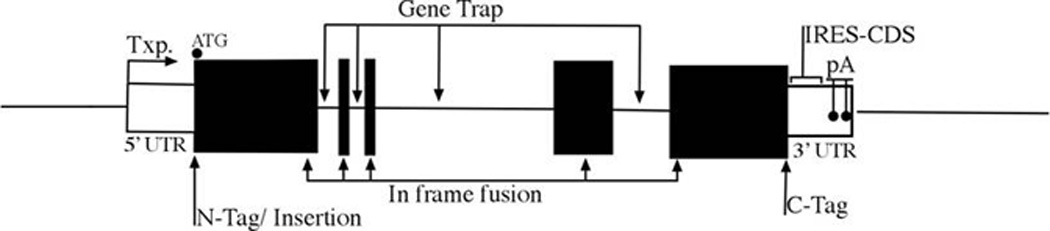
The transcription start site “Txp.” is located at the beginning of the 5’ UTR (untranslated region) all translated regions (coding sequence for protein-CDS-from start codon (ATG) to stop codon) are black. Inside the 3’ UTR the IRES-CDS should be located before the poly-A sites.
Basic Protocol Introduction
This Unit describes a protocol that utilizes the λ-RED system to manipulate a BAC through homologous recombination. This “recombineering” methodology is a powerful addition to the DNA engineering toolbox, especially after annotation of the genomic sequence of many organisms was completed. The recombinogenic plasmid, pKD46, was chosen for its ability to easily control the arabinose-inducible red operon, and to be easily cured from a cell. However, the same protocol can be modified slightly for using the ET system (as described by A.F. Stewart) or with recombinogenic bacteria such as DY380.
Some BAC libraries have been used to decipher genomic sequences, and additional libraries have been used with BAC end sequencing to map each BAC with its corresponding chromosome locus. Basic bioinformatics knowledge is needed to design the targeting construct (See Strategic Planning). PCR reactions, enzymatic manipulation of DNA, and proper handling of bacteria and plasmids are essential; details can be found in other chapters. This protocol starts with adding pKD46 to the bacteria containing the BAC, which serves as both a PCR template to generate targeting arms as well as a targeting acceptor, moves on to the construction of targeting cassettes, and then targeting through recombineering. An optional step involves removing the selection marker in the bacteria, or this can be accomplished later on by transfecting cells with a Cre or Flpe/Flpo construct or by mating the transgenic animal with another that expresses recombinase with Cre or Flpe/Flpo. Quality control is added to ensure that the BAC transgenic construct is done properly before using it to make transgenic animals or transfect the cell lines. Finally, an extensive trouble-shooting guide is provided to suggest possible solutions if problems arise.
Basic Protocol
Fabrication of BAC transgene construct through Recombineering
Transform bacteria cell carrying BAC with pKD46
-
1
Grow 3ml of bacteria containing the BAC overnight on an orbital shaker at 32°C in LB containing proper antibiotic selection (usually 20 µg/ml CM).
-
2
Place microcentrifuge tube containing 1µl of pKD46 (0.2 µg), ddH2O, and electroporation cuvette with 1mm gap on ice to chill.
-
3
Pour 2 ml of BAC cell culture into a 2ml tube and pellet the bacteria with a 30 second spin at 16.1K × g using a tabletop centrifuge.
-
4
Prepare electrocompetent cells (Supporting Protocol 2).
-
5
After last wash, aspirate as much water as possible.
-
6
Resuspend the cell pellet with 50 µl of ice-cold ddH2O.
-
7
Pipette the 50 µl into the microcentrifuge tube containing pKD46, mix gently, and then transfer to electroporation cuvette.
-
8
Electroporate at 1660 V. Expected time constant is between 4 to 6 msec.
-
9
Add 300µl SOC to flush out the bacteria and place into the microcentrifuge tube the pKD46 was in.
-
10
Incubate at 32°C for 1 hour with shaking.
-
11
Plate approximately 30 µl on a plate (or grow in a 3ml pool if targeting the BAC the next day) containing 20µg/ml CM and 100 µg/ml Amp then grow overnight at 32°C.
-
12
Overnight culture from colonies or from pool can be stored in 25% glycerol stock for future use.
Assemble targeting cassette in vector with short PCR products
Our protocol is for making a “clean” targeting at the desired location through using small PCR products (200 ~ 400 bp) as homologous sequences flanking the transgene. To harness the convenience of PCR-only TC making as well as to adapt long and complicated transgenes, we demonstrate the flanking homologous arms approach to make a TC and describe the long oligo PCR approach (Alternative Protocol 1) then combine both in the section of “Arms-extension” and “Sequential targeting” (Alternative Protocols 3 and 4).
-
13
Design primers to amplify the gene(s) of interest and the arms of homology with primer L/R. Depending on how the arms of homology are to be attached to the transgene will determine primer design (Alternative Protocol 2). For example whether the arms will be attached through an extant restriction site or through a unique restriction enzyme site generated through the overlapping PCR.
-
14
Through HFPCR amplify the homologous arms then purify with a Safeblue gel (Supporting Protocol 1).
-
15
Add arms of homology through a method such as overlapping PCR (Alternative Protocol 2) or by other means.
-
16
Overlapping PCR is preferable as it can link both arms together and at the same time generate multiple cloning sites for the insertion of a transgene. Alternatively, an extant restriction enzyme site in the right location can be used.
-
17
TA clone the L/R PCR product into pGEM-T-Easy vector and transform into chemically competent cells.
-
18
Grow on an agar plate with 100 µg/ml Amp and X-Gal / IPTG to screen the recombinants.
-
19
Blue/ white selection and PCR with primer L/R may be used to screen colonies with insert (pGEM-LR).
-
20
Digest pGEM-LR product with proper enzymes.
-
21
Insert transgene with selection marker that was digested at the flanking RE sites without cutting into the transgene or selection marker.
-
22
Ligate transgene with selection marker in between arms.
-
23
Transform into chemically competent cells.
-
24
Grow on an agar plate with 100 µg/ml Amp and the proper antibiotic for the selection marker located in the transgene.
-
25
Primer L / primer 53 (transgene specific reverse primer) can be used to screen the recombinant clones as well as for the correct orientation. To check the right arm, primer 35 (transgene specific forward primer or poly A primer) / Primer R may be used.
Prepare cassette for targeting
-
26
Excise the transgene from pGEM-T-Easy through digestion of two unique sites (ex: Not I, assuming the transgene and arms of homology do not contain a Not I site). It may be necessary to use another cut site (such as ScaI or XmnI on AmpR CDS) in the pGEM vector if the transgene is about 3 Kb in size or if a high level of background is present after targeting the BAC.
-
27
Purify the targeting cassette through gel purification with a Safeblue gel (Supporting Protocol 1).
-
28
Use Qiaquick gel purification kit to isolate DNA.
-
29
100 (up to 200) ng of DNA is needed for each targeting.
-
30
DNA precipitation by ethanol can be used to concentrate DNA and remove salt.
-
31
If necessary, the whole TC may be amplified with Primer L/R through HF-PCR.
Target BAC with targeting cassette
-
32
Grow (5 µl or glycerol stock from Step 12) of the bacteria culture carrying BAC and pKD46 in 3 ml of LB containing 20 µg/ml CM and 100 µg/ml Amp and grow overnight on an orbital shaker at 32°C.
-
33
Pipette 625µl of the bacteria culture in 12.5 ml of LB and incubate with shaking at 32°C for 2 hours.
-
34
Add arabinose to a concentration of 0.1% and allow to grow for an additional hour. (Alternatively, arabinose can be added in the beginning of inoculation and up to 0.15%).
-
35
Place microcentrifuge tubes containing 2–3 µl of the targeting cassette (should be at least 100ng), an empty 2 ml tube to make competent cells, one 1 mm electroporation cuvette, and 25 ml of ddH2O on ice to chill.
-
36
Measure bacteria culture with OD 600, a proper growth rate between OD 0.4 ~ 0.6 is desirable after 3 hours incubation.
-
37
Pour 10 ml of the BAC culture into the 50 ml Falcon tube and pellet the bacteria with a 5 min spin at 1,517 × g using a bench-top centrifuge at 4°C.
-
38
Prepare electrocompetent cells (Supporting protocol 2).
-
39
After last wash, aspirate as much water as possible.
-
40
Resuspend the cell pellet with 50 µl ice cold ddH2O.
-
41
Pipette the 50 µl bacteria into the microcentrifuge tube containing the targeting cassette, mix gently, and then transfer to electroporation cuvette.
-
42
Electroporate at 1660 V with expected time constant between 4 ~ 6 msec.
-
43
Flush cells from cuvette with 300 µl SOC and pipette into the microcentrifuge tube the targeting cassette was in.
-
44
Incubate at 32°C for 1 hour.
-
45
Plate all of the culture on an agar plate containing the proper antibiotic for selection.
Screening
-
46
Pin size colonies should form after overnight incubation at 32°C or 37°C.
-
47
Colonies with BAC-tg are usually smaller than the plasmid contamination.
-
48
Occasionally, some positive colonies can grow after 48 hours (especially with Zeocin as selection).
-
49
Pick individual colonies and grow in a 96-well assay plate with 50 µl LB and antibiotic selection. Incubate for 3 hours at 32 or 37°C.
-
50
Perform 5’ genotyping (Primer 55/53) and 3’ genotyping (Primer 35/33) to confirm the proper integration (Figure 2).
-
51
Usually 12 ~ 24 colonies will be sufficient.
Figure 2. Flow of BAC targeting with targeting cassette.
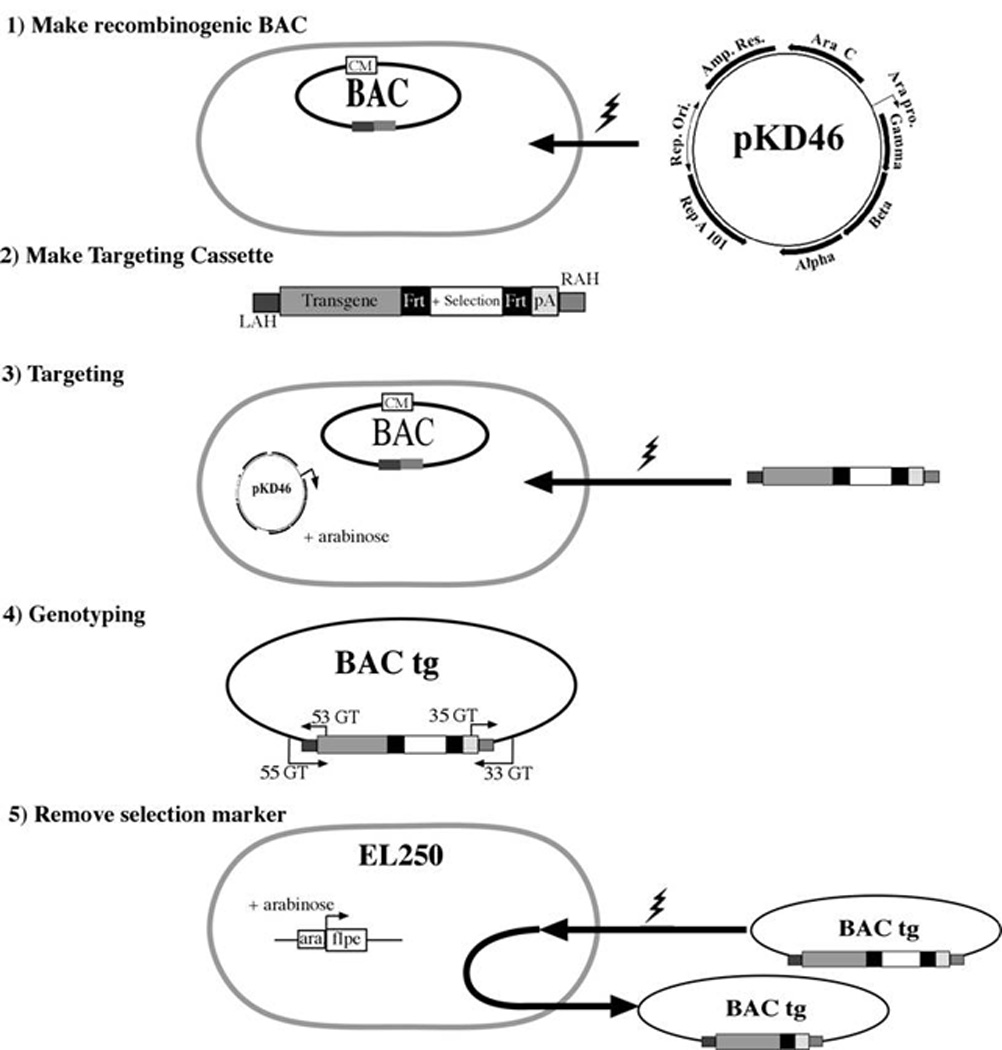
On the targeting cassette the left arm of homology (LAH) and right arm of homology (RAH) add a homologous region to the targeting cassette that matched with the left and right flanking portion of the targeted site on the BAC. The genotyping primers (GT) must be located outside of the arms of homology. If the selection marker is flanked by FRT sites then use EL250 to remove selection marker, flanked by LoxP sites use EL350.
Confirmation
-
52
Grow up to 4 positive colonies in 3 ml LB culture with proper selection.
-
53
Perform BAC prep (Supporting Protocol 6).
-
54
Repeat genotyping PCR and digest BAC with SpeI (or PstI). Run a standard 1% agarose gel.
-
55
Both ladder like BAC digested bands and PCR assay must be positive.
-
56
Stock BAC-tg with selection marker as glycerol stock in −80°C.
Remove selection marker (such as Neo) with EL250/EL350 bacteria
The loxP or FRT flanked selection cassette can be removed either in the bacteria, in the cell lines, or through mating the transgenic animal with a Cre/Flpe expressing animal. (If the selection contains no eukaryotic promoter then removing the selection marker is optional. However, the BAC will not be able to be selected in the cell lines.)
-
57
In a 14 ml Falcon tube, prepare 5 ml of LB without selection.
-
58
Pick EL250/EL350 bacteria from glycerol stock and inoculate the LB in the 14 ml Falcon tube from previous step.
-
59
Grow overnight in an orbital shaker at 32°C.
-
60
Add arabinose to a concentration of 0.1% and grow for an additional hour.
-
61
Place 2 µl of BAC-tg DNA solution from BAC miniprep (Supporting Protocol 6) into a microcentrifuge tube for transformation.
-
62
Place 25ml of ddH2O, microcentrifuge tube containing the BAC, overnight culture cells, and electroporation cuvette on ice to chill.
-
63
Pour 2 ml culture and pellet the bacteria with a 30 second spin at 16.1K × g using a tabletop centrifuge.
-
64
Repeat step 63 again so 4 ml of the saturated culture has been spun down into the 2 ml tube.
-
65
Prepare electrocompetent cells (Supporting Protocol 2).
-
66
After last wash, aspirate as much water as possible.
-
67
Resuspend the cell pellet with 50 µl ice cold ddH2O.
-
68
Pipette the 50 µl bacteria into the microcentrifuge tube containing the BAC, mix gently, and then transfer to electroporation cuvette.
-
69
Electroporate at 1660 V with expected time constant between 3 ~ 5.6 msec.
-
70
Flush cells from cuvette with 300µl SOC and place into the microcentrifuge tube the BAC was in.
-
71
Incubate at 32°C for 1 hour.
-
72
Plate all of the culture on an agar plate containing proper antibiotic (CM) for BAC but omit antibiotics coded by selection marker and grow overnight.
-
73
Pin-size colonies (from a few to a few thousand) should appear after overnight (O/N) incubation at 32°C.
-
74
Pick individual colonies into 50µl CM in a 96-well assay plate.
-
75
Confirm Neo deletion by CM+/Kan- assay and both 5’ and 3’ genotyping.
-
76
Grow Neo removed BAC/bacteria O/N, BAC prep, and confirm proper construct by PCR and enzyme digestion.
-
77
Optional: for long-term storage of a BAC-tg, transfer BAC-tgΔN (Neo removed BAC) to DH10B cells.
Quality Control
-
78
Perform genotyping PCR reactions to identify the junction between homologous arms and transgene. This ensures the transgene was inserted at the right place.
-
79
Run digested original BAC, BAC-tg and BAC-tgΔN into 1% agarose gel after enzyme digestion (Spe I).
-
80
BAC sequence, especially the transgene part (it often takes several primers to sequence an entire transgene). If not enough BAC-tg DNA is available a HFPCR amplification of the transgene will suffice for sequencing.
-
81
PCR BAC end and nearby genes on the BAC-tg.
-
82
Check BAC-tg size by pulsed-field gel electrophoresis.
-
83
Optional: assay the transgene function by transfecting BAC-tg into a cell line that the targeted gene is expressed.
Supporting Protocols
-
Purify targeting cassette with a Safeblue Gel
To harness the simple yet effective purification of DNA with agarose gel electrophoresis while avoiding UV damage the Safeblue Gel system is used to prepare DNA samples, such as a transgene, a targeting cassette, or homologous arms.
Pour a 1% agarose gel with 5µl of SYBR® safe stain (Invitrogen) per 50 ml of gel. EtBr (0.01 ng / 100 ml) can be included for documentation after desired DNA band is excised.
Run DNA sample to be purified through gel, visualize with Blue-light box (Invitrogen), and cut desired band size.
If needed, use UV box to confirm the proper excision.
Use Qiagen gel purification kit to purify dissolved gel following the manufactures protocol
Run DNA solution with dissolved gel through Qiagen column.
Check DNA concentration and purity with OD 260/280 or Nanodrop.
Run an aliquot (1/10) of eluted DNA solution with normal agarose gel to check the quality of DNA with the expected size.
-
Making electrocompetent cells
Electrocompetent cells show a higher efficiency and are better adapted for large constructs than chemically competent cells. Thus, they are essential for handling the BAC and for targeting. A simplified and convenient protocol is listed, which can be used with DH10B and its derived cells, as well as stb2 and stb4 cells.
For large constructs such as a BAC, high-density culture (a 5 ml culture grown to saturation) is used; for targeting or transforming small plasmids, freshly grown bacteria to OD600 ~ 0.6 is used.
Place 25 ml of ddH2O, an aliquot of a 10% glycerol in water, along with empty labeled microcentrifuge tubes on ice.
Pellet bacteria from liquid culture by spinning down at 1,157 × g in 50 ml tubes for 5 minutes in a pre-cooled 4°C centrifuge. For smaller volumes of less than 5 ml, using a bench-top centrifuge, incrementally spin down bacteria in 2 ml tubes for 30 seconds at 16.1K × g.
Completely resuspend bacteria pellet in 1 ml ddH2O with gentle swirling (for 50 ml tube) or pipetting (for 2 ml microcentrifuge tube). Pipette suspension into 2 ml microcentrifuge tube and then add 1 ml ddH2O. Gently invert to mix. Spin for 30 seconds at 16.1K × g. Avoid air bubbles during pipetting.
Remove supernatant, being careful not to disturb pellet. Gently but completely resuspend pellet in 1 ml ddH2O then add an additional 1 ml ddH2O. Spin for 30 seconds at 16.1K × g. With saturated culture or >10 ml OD600~=0.6, it is fine just to pour the water off by inverting the tube after each spin.
Remove supernatant and perform a 3rd 2 ml wash and 30 second spin at 16.1K × g.
After final spin, remove as much supernatant as possible without disturbing the pellet.
An additional spin may be used to compact pellet to aid the removed of supernatant.
Resuspend the pellet to a final volume of 50 µl for every 5 ml of bacteria culture with ddH2O by gently stirring.
To keep electrocompetent bacteria for future use (for smaller plasmids only), replace ddH2O in the final wash and resuspend with icy 10% glycerol then freeze at −80°C.
-
Electroporation of a plasmid into DH10B and its derivatives
Different bacteria strains require slightly different parameters for electroporation. This protocol is used with DH10B and its derived cells, DY380, EL250, EL350, which have been used as a BAC host and in recombineering.
Place a 1 mm electroporation cuvette, microcentrifuge tubes, resuspended electro-competent cells, and DNA (freshly prepared BAC, plasmid or targeting cassette) on ice to cool.
Place 2 µl of DNA in solution into a 1.5 ml microcentrifuge tube for transformation.
Add 50 µl of electro-competent cells to the microcentrifuge tube containing DNA, then pipette out all contents (cells and DNA) together.
Transfer the entire mixture into the cuvette, and avoid trapping air bubble.
Tap the cuvette gently on the bench top to settle and even the mixture in the crevasse of the cuvette.
Place the cuvette in the chamber of the electroporation device.
With Eppendorf Electroporator set at 1660 V, electro-shock the mixture (a time constant from 3 to 6 msec is expected).
Add 0.3~ 1 ml SOC to the cuvette to wash out the cells and place them in the same 1.5 ml microcentrifuge tube.
Incubate cells in an orbital shaking incubator set at 32°C (37°C for non-recombinogenic bacteria) for 1 hour.
Plate 100 to 300 µl of the culture onto a single LB agarose plate containing the appropriate antibiotics for selection.
Pin size colonies from a few to a few thousand should appear with an overnight incubation.
There are no adverse effects with the reuse of a 1 mm electroporation cuvette when 2 ml of ddH2O is applied to wash the cleft of the cuvette and the cuvette is chilled on ice between each electroporation.
-
Storing and handling recombinogenic bacteria Strains
Precautions for keeping recombinogenic strain of bacteria for further use:-
Select “good” recombinogenic bacteria by picking bacteria colonies and test temperature sensitivity individually
-
IUse transparent tubes such as 5 ml Falcon tubes.
-
IIGrow single colony in 2 ml LB at 32°C for 1 hour.
-
IIITransfer 1 ml of the culture into another tube and incubate at 42°C.
-
IVGrow both tubes overnight.
-
VCompare the two tubes. Expect a high concentration of cells in the 32°C culture and no visible cell mass in the 42°C culture.
-
VIStock the 32°C culture with glycerol.
-
I
- Additional Selection:
-
VIIEL250 (SW105) and EL350 (SW106) can be confirmed by PCR against Flpe or Cre respectively.
-
VIIIThe pKD46 can be selected by Amp.
-
VII
- Freeze stock in 25% glycerol or 7% DMSO at −80°C.
-
Grow a recombinogenic strain of bacteria (or BAC/DH10B with pKD46)
-
IXPick frozen stock with a sterilized inoculation loop.
-
XGrow in 3 ~ 5 ml LB with selection O/N.
-
XIUse saturated culture for BAC transformation.
-
XIIWith 1:20 dilution, the cell culture should reach an OD between 0.4 and 0.6 within 3 hrs.
-
XIIIDiscard if cell growth is too quick or too slow.
-
XIVWhen growing BAC with recombinogenic host or plasmid from stock, check targeting site with PCR.
-
IX
-
-
Handling the BAC (acquisition and confirmation)
Acquire – BAC Address ID for purchasing.
Confirmation – Gene of interest, BAC end, and coverage; if necessary PCR screen individual colonies with correct gene primers at the 5’ and 3’ ends of the gene.
Pulsed field gel electrophoresis for confirmation of the size of BAC (Optional).
With final targeting construct designed, synthesize primers for homologous arms (left and right arms), which need to be used for BAC and targeting site confirmation.
For long-term storage maintain the BAC in parental host (DH10B) rather than in recombinogenic bacteria strains or with recombinogenic plasmid.
- Obtain BAC DNA for transformation:
- In a 14 ml conical tube, prepare 3 ml of LB medium with 20µg/ml CM.
- Pick BAC-containing cells from a glycerol stock or agar stab and grow in the 14 ml tube overnight in a 32°C orbital shaking incubator.
- Using 2 ml centrifuge tube pour 2ml culture and pellet bacteria with a 30-sec spin at full speed at 16.1 K × g (13.2K rpm), room temperature (RT) in a tabletop centrifuge.
- Remove and discard supernatant. Resuspend the pellet thoroughly with 250 µl of 50 mM Tris50mM Tris-HCl, pH 8.0, 10mM EDTA, 100ug/mL RNase A and lyse bacteria using a traditional alkaline lysis method (e.g., using a miniprep kit but omit DNA binding column or (UNIT 5.9).
- Invert the tube to mix without vortexing. After debris form, centrifuge 4 min at 16.11K × g, RT.
- Using a 1 ml pipet tip, transfer supernatant into a new 1.5 ml microcentrifuge tube. Centrifuge for an additional 4 min at 16.1K × g, RT then transfer supernatant to another new tube.
- Add 0.5 ml isopropanol to the supernatant and mix well by inversion.
- To precipitate BAC DNA, centrifuge for 15 min at maximum speed with centrifuge tube hinge facing inward.
- A white pellet will form on the opposite wall. Discard the supernatant by pouring; take care not to discard the pellet.
- Add 1 ml of 70% ethanol to wash away salts and centrifuge for an additional 10 min at maximum speed with hinge of tube facing outward.
- Discard the supernatant, take care not to discard the pellet. Aspirate the remaining fluid and air dry for less than 5 min. Don’t over dry DNA, as it will be difficult to resuspend.(The BAC can be stored as a semi-dry pellet for several months at −20◦C prior to the transformation step.)
- Resuspend with 20 µl of 10 mM Tris-HCl buffer pH 8.5 through stirring without excess pipetting to help dissolve BAC before electroporation or enzyme digestion
Alternative Protocols
-
Assembling a targeting cassette by pcr with long primers
Design primers (Fw/Rv) to amplify the transgene with a selection maker. Another pair of primers composed of the arms of homology (50 mer each from targeted site) are added to the primers (Fw/Rv) referred to as the “long primers” (50+Fw/50+Rv).
The transgene specific primers (Fw/Rv) may be used to amplify the whole transgene with HF-PCR.
Remove plasmid template with Dpn I digestion.
Purify HF-PCR amplified transgene with selection marker with a Safeblue gel to serve as template to be amplified with the long primers.
To add the homologous arms use the 50+Fw/50+Rv primers to amplify the transgene (10 ng) through HFPCR to generate the targeting cassette then purify with a Safeblue gel.
-
HFPCR program based on the Phusion DNA polymerase
>1 cycle of 98°C for 30 sec.
>25~ 35 cycles of 98°C for 10 sec., 60°C for 15 sec., and 72°C for 60 sec.
>1 cycle of 720°C for 7 min.
>1 cycle of 4°C for 10 min.
Two-step HFPCR with long primers
>1 cycle of 98°C for 30 sec.
>5 cycles of 98°C for 10 sec., 60°C for 15 sec., and 72°C for 60 sec.
>1 cycle of 72°C for 5 min.
>25 ~30 cycles of 98°C for 10 sec., and 72°C for 60 sec.
>1 cycle of 72°C for 7 min.
>1 cycle of 4°C for 10 min.
To reduce the chance of mutation increase template concentration and lower the cycling times.
-
Overlapping PCR
Use an overlapping PCR (OLPCR) reaction to combine both homologous arms together and at the same time create restriction enzyme sites between them, which can be used to clone the transgene. When adding mutations within the 5’ end of primers, OLPCR can synthesize DNA fragments with desired mutation(s). This same procedure can be used to combine DNA fragments with a shared overlapping sequence together.
- Overlapping PCR Primers:
-
iSynthesize primer sets L/M and O/R with L/M being homologous to the left arm of homology on the target site and O/R being homologous to the right arm of homology target site on the BAC.
-
iiPrimer design includes a few unique restriction enzyme sites that match with the sites on the ends of the desired transgene if possible.
-
iiiMultiple cloning sites positioned between LM and OR, are formed by the overlap of primers M and O. These sites are unique to both the targeting cassette and the cloning vector (ex: pGEM-T Easy).
-
i
Use standard HFPCR to amplify the LM and OR arms of homology to the BAC and gel purify (Supporting Protocol 1). Quantify DNA concentration.
- With same ratio of each arm use an OLPCR program with annealing temp matching that of Tm of the overlapping area (52°C for 16bp) and extension time as 15 sec per 1 Kb:
- >1 cycle of 98°C for 30 sec.
- >5 cycles of 98°C for 10 sec., 52°C for 15 sec., and 72°C for 15 sec.
- >1 cycle of 72°C for 5 min.
- >35 cycles of 98°C for 10 sec., 60°C for 15 sec., and 72°C for 15 sec.
- >1 cycle of 72°C for 7 min.
-
>1 cycle of 4°C for 10 min.
- Add to the PCR mixture all normal constituents except the primers.
- Add primers during 1 cycle of 72°C for 5 min.
- If TA cloning into pGEM-T Easy add 0.1µl of Taq polymerase and run in a thermocycler at 72°C for 10 min. (adds an adenosine to the ends of the PCR product for TA cloning).
After PCR reaction is complete, digest PCR product with enzymes in overlapping junction and compare to undigested PCR product. If PCR product size is expected and restriction sites are present, gel purify with Safeblue.
The correct PCR product can be TA cloned into pGEM-T Easy vector, transformed into NEB-10β, and grown on a plate overnight with B/W selection. Pick white colonies and screen with L/R primers to ensure proper construct.
Digest at the unique restriction enzyme site formed by the overlap of primers M and O then ligate the transgene cassette.
Transform into NEB-10β, selected by both Amp and selection marker in transgene cassette, and grow overnight.
Pick colonies and screen with primers L / 53 and transgene 35 / R to ensure proper construct.
Optional: sequence homologous arms with transgene when necessary.
-
Arm-extension
The 50mer homologous arms on the targeting cassette can yield poor targeting results with either low efficiency or non-specific targeting, but the arms may be extended to solve both issues. Nesting PCR can be used to increase the arms’ length in 50 to 70 bp increments, but targeting with short PCR products flanking the insertion site can be more cost effective. An additional benefit of arm extension is that it can be used to assay either the recombinogenic property or the ability of a PCR-generated targeting cassette to target.
- Materials:
- Targeting cassette with the 50 mer homologous arms (Alternative Protocol 1) that is generated by two sets of primers:
- Transgene primers set
- 50mer+transgene primer set
- Primer L / R (can be same as overlapping PCR primer pairs or ID primers)
- Recombinogenic bacteria strain or plasmid
Make a 50mer targeting cassette by HFPCR and Safeblue gel purification (Alternative Protocol 1).
-
Amplify short PCR product flanking targeting site
-
iv
HFPCR with primer L/R and BAC as template.
-
v
Add 0.1µl of Taq polymerase (NEB) to the PCR reaction after HFPCR is complete and run in a thermocycler at 72°C for 10 min to add an “A”.
-
vi
Gel purify with Safeblue (Supporting Protocol 1).
-
vii
TA clone amplified L/R fragment into pGEM-T-Easy.
-
viii
Transform into chemically competent cells.
-
ix
Plate on an agar plate with 100 µg/ml ampicillin as well as X-Gal and IPTG then grow overnight.
-
x
Pick and screen white colonies with primer L / R.
-
xi
Grow 10µl of pGEM–LR in 3 ml of LB with 100 µg/ml Amp overnight and Miniprep.
-
iv
- Make pGEM-LR plasmid recombinogenic:
-
Transform DY380/EL350/EL250 with pGEM-LR plasmid
- Prepare electrocompetent cells (Supporting Protocol 2).
- Electroporation.
- Either plate the cells and select with Amp (and Tet for DY380), or grow as a pool in the LB with Amp (and Tet for DY380).
- Alternative: co-transform pKD46-derived (non-Amp version) with pGEM-LR.
-
- Targeting:
- Place 2 µl of 50-base pair arms targeting cassette (100 ng) into a microcentrifuge tube for targeting.
- Induce recombinogenic components by either heat (DY380) or arabinose. (pKD46-N or pET/Red); then make electrocompetent cells (Support Protocol 2).
- Place 25 ml of ddH2O, microcentrifuge tube containing the targeting cassette, electrocompetent cells, and electroporation cuvette on ice to chill.
After targeting, plate 1/3 of the culture on an agar plate containing the proper antibiotic for selection and grow overnight.
Pick colonies and PCR screen for the proper insertion with primer L/53 and 35/R.
Miniprep and digest to confirm the targeting. The miniprep should be a mixed population with original LR plasmids and targeted plasmids. Use an enzyme digestion that can distinguish both.
With unique site enzyme digestion (absent from targeting cassette) and transformation into competent cells, the targeted plasmid can be resolved and segregated.
Harvest the TC with longer arms by enzyme digestion or by HFPCR.
Optional: Once targeted to plasmid, PCR-generated targeting cassette can be confirmed by DNA sequencing
-
Sequential Targeting
This strategy is advantageous because it is sometimes difficult to generate a large targeting cassette initially. As long as the transgene shares the same 5’ and 3’ homologous arms the transgene can serve as a targeting cassette without flanking additional arms. As an example: BAC with eGFP-Frt-Neo-Frt-bGHpA can be targeted again with eGFP-CreERT2-Frt-Zeo-Frt-bGHpA or with eGFP-IRES-CreERT2-Frt-Zeo-Frt-bGHpA. Indeed, the eGFP BAC transgene constructs from GENSAT project can be modified by sequential targeting without relying on targeted gene sequence, as it contains eGFP-bGHpA and without any selection (but TetR).
- Materials:
- Targeting cassette with 50mer homologous arms (Alternative Protocol 1) that is generated by two sets of primers:
- Transgene primer set.
- 50mer+transgene primer set.
- Alternatively, Targeted BAC with shared components (such as eGFP-pA BAC).
- Larger transgene with shared components (2nd TC), preferably with a different selection marker then the 1st targeting cassette.
- Recombinogenic plasmid, pKD46.
- Genotyping primer-sets that can distinguish 1st targeting and 2nd targeting product
Make 50mer targeting cassette by HFPCR (1st TC) and Safeblue gel purification.
Target BAC as described in Basic Protocol.
If necessary, perform Arm-Extension (Alternative Protocol 3).
Once the smaller transgene is targeted transform BAC-tg-1st / bacteria with pKD46.
Target again with a longer transgene (2nd TC).
Removal of the selection marker during intermediate steps can be omitted if selection markers are different.
Genotyping PCR to confirm proper replacement.
-
Selection marker removal with titration of recombinase
Occasionally a BAC-tg residing in recombinogenic bacteria such as EL250/SW105 or EL350/SW106 will become unstable when removing a selection maker. Thus, one might need to use titration to shorten the amount of time the modified BAC remains in such cells without selection by varying the concentration of arabinose between 0.1% and 0.3% or by reducing the time of the arabinose treatment.
Transform BAC-tg into EL250 or EL350 without prior arabinose induction.
Plate transformant onto an agar plate with proper selection for BAC (CM) and for the transgene (ex: Kan).
Screen colonies with both 5’ and 3’ genotyping PCR
Grow 4 colonies of BAC-tg in EL250 or EL350 with proper selection and DH10B cells in LB.
Mix all 4 cultures and divide into 2 ml each, adding arabinose to 0.1% for duration of 0, 15 min, 30 min, 60 min.
BAC prep, genotyping (usually 3’GT) to check the removal of the selection marker.
The treatment that yields the best PCR signal indicating complete deletion of the selection marker yet maintains BAC integrity should be used to transform DH10B cells with high-density culture competent cells.
Plate the culture on an agar plate containing the proper antibiotic for BAC selection, but omit the antibiotic coded by the selection marker and grow overnight.
Pin-size colonies (from a few to a few thousand) should appear after overnight incubation at 32°C.
Confirm Neo deletion by C+/K- selection and both 5’ and 3’ genotyping.
Grow Neo removed bacteria O/N, BAC prep, and confirm by genotyping PCR
COMMENTARY
Background Information
For the past decade, Recombineering (recombination-mediated genetic engineering) has provided a powerful means to manipulate DNA in vivo. (Copeland et al, 2001) While homologous recombination based genetic manipulation has been used in mouse ES cell targeting and yeast chromosome modification, it has gained wide appreciation as the techniques and resources have become readily available to modify bacteria chromosomes and episomes. Genomic DNA annotation based on DNA sequences with different species of BAC clones enables not only easily accessible genetic material; but also greatly enhances design flow with the aid of computer software. In addition, through providing inducible homologous recombination components as a plasmid or phage the production of recombinogenic hosts with ease is allowed. Furthermore, incorporating selection and counter-selection methods has increased the chance to acquire recombinant targets. So far, using either dsDNA or ssDNA as a targeting cassette, recombineering approaches can be used to make target insertion, truncation, in-frame fusion and site-directed mutagenesis. Since this technique is restriction enzyme-site independent, recombineering has the benefit of being able to modify the chromosome or large constructs such as a BAC (Wanner & Koszinowski, 2004). Depending on the modified gene, locus, and copy number, the homologous arms for targeting can be as short as 35 ~50 bp.
Although there are several methods that employ homologous recombination to manipulate DNA, the Lambda Red operon controlled by the promoter of the L-arabinose operon may be widely used to provide recombinogenic activity. The plasmid, pKD46 (Datsenko & Wanner, 2000), uses arabinose and the araC repressor to induce the expression of the exo gene (also referred to as “redα” or “recE”) encoding a 5’-3’ exonuclease, the bet gene (also referred to as “redβ” or “recT”) producing a single stranded DNA binding protein, and the gam gene (“redγ”; lacking in ET) which inhibits RecBCD nuclease activity. The pET/Red system based on the pBAD backbone, which has similar properties, is commercially available (Zhang et al., 1998). pKD46 also contains a temperature sensitive replication origin, ts101, which enables the bacteria to be cured easily through increasing the incubation temperature. The same Lambda red genes can be used as an integrated phage in a chromosome and under the control of ts Lambda repressor c1857. When combined with arabinose inducible Flpe and Cre, those recombinogenic bacteria can be used for both homologous recombination and Flp/FRT and Cre/LoxP – dependent recombination (Lee et al 2001).
The BAC transgene approach has focused primarily on the development of transgenic mice. Multiple centers’ efforts have been developed to label specific tissues or cell types by expressing fluorescent proteins or a recombinase (the nervous system through the Gensat projects (Gong et al, 2003) or the genital-uterine tissues through the GUDMAP projects for example). The development of other transgenic species such as other rodents, fish, farm animals or plants can also utilize BAC transgenes.
Besides making BAC transgenic animals/plants, BACs can be used in cell lines to study the function of specific genes. This “BAC transgenomics” approach has incorporated high-throughput BAC-tg production, cell transfection, fluorescent tagging and microscopy techniques to greatly enhance the understanding of the cellular function of tagged proteins (Poser et el, 2008).
Critical Parameters
The BAC
Knowing your BAC
Whether it is a BAC (F’ plasmid) or a PAC (P1 phage), both vectors are low copy number plasmids that contain large inserts and can be treated in a similar way as other plasmids but with more gentle care. This means no vortexing, no harsh pipetting, and keeping the BAC in the proper host cells (usually DH10B). Different BACs are from different libraries, which contain different genomic DNA. When genomic DNA comes from eukaryotic cells, components such as repeats, GpC islands, or AT stretches may cause some instability inside of bacteria. Due to its original vector some libraries are CM resistant (BAC) and some are Kan resistant (PAC) though both may be modified to other selection markers if necessary.
Not all BACs covering a gene locus are identical
BAC DNA sequences have been used to map DNA and assemble the whole genome. However, BAC-end sequencing followed by mapping back to the location on a chromosome identified certain BACs that cover the same gene locus. This resulted in BACs with similar coverage that may contain different mutations such as SNPs or deletions. Such variations are rare in a pure mouse strain, but it is worth keeping these possibilities in mind and checking the quality of a BAC before and after manipulation.
Conflicts between a transgene and BAC vector backbone
The popular mouse C57/black 6 BAC library: RP23/24 is constructed in the vector pBACe3.6, which contains the T7 /Sp6 polymerase binding site for BAC end sequencing or PCR, a homing enzyme site (PI-SceI) for linearization of the BAC, as well as SacB for counter-selection. Additional features such as the presence of loxP and loxP511 might cause complications when using such BACs to express Cre. However, with a RMCE reaction a selection marker with dual promoters can be inserted in those loxP sites and selected in the cell lines.
Additional genes and positional effects
Due to their size, most BACs contain not only the targeted gene but also nearby genes. If these genes are intact, gain-of-function mutations of those genes are expected in transgenic animals. For the purpose of using a BAC to direct the expression of a transgene, such gain-of-function mutations may present an issue. One way to get around such an issue is to find a BAC with just enough coverage, or by BAC trimming to remove a nearby gene. Until a transcriptional unit can be defined easily, BAC transgenes still experience positional effects but with far less tendency than that of smaller transgenes. Different BAC coverage or multiple founders can be used to address this concern.
Assemble Targeting Constructs/ Cassette
Homologous arms
Depending on the targeting cassette size and targeting site location, the Red operon can effect recombination with as little as 50 mer homologous arms. However two 100 ~ 300 bp homologous arms increase efficiency and specificity. Two homologous arms and PCR reactions were used to create a targeting cassette for the following reasons:
Two homologous arms: Single arm homologous recombination used in GENSAT projects is possible (Yang el al, 1997). But two homologous arms are used in order to achieve “clean” targeting without including the vector backbone, to avoid including duplicate targeting arms that need resolving, and to silence a targeted gene. Furthermore, the arms can move along the target locus to generate a deletion or remove problematic areas.
PCR based: For the insertion of a transgene into a specific location traditional cloning procedures have limitations. PCR reactions in part or in whole are required to generate a targeting cassette especially when the insertion site is crucial. Thus, the benefits and limitations of a PCR reaction will need to be considered. For instance, large transgenes over 4 Kb are more difficult to be amplified, and PCR amplification increases the chance of point mutations.
Keep homologous arms together
When using two homologous arms, it is always necessary to make sure both arms are properly flanking the transgene. When using a high fidelity enzyme, the overhanging primer (50 mer) may be slightly chewed-in. In this case, PCR confirmation of arms is needed. When using longer homologous arms, overlapping PCR reactions were adapted to stitch the arms together and provide a multiple cloning site for the transgene. Arm-extension is another way to keep and extend homologous arms when shorter homologous arms are insufficient for targeting.
Transgene
The insertion of a transgene based on homologous recombination has very high fidelity, so any sequence in between homologous arms will be inserted. A well-characterized transgene is essential in making a BAC transgene. Any mutation or unwanted feature in a transgene will be carried to the BAC and it is very difficult to correct any error in a BAC-tg construct.
When a transgene such as toxin or recombinase is expressed in bacteria, it might cause an unwanted consequence and may necessitate a change in the transgene or insertion site.
For high thorough-put approaches excellent primer binding sites flanking transgenes facilitate the generation of a targeting cassette by PCR. Sequential targeting can be used to increase the complexity of a transgene where there is a shared 5’ and 3’ DNA sequence.
Generate BAC-tg Constructs
Due to its copy number the efficiency of BAC targeting is similar to that of targeting a bacterial chromosome. Proper selection and genotyping will allow the detection of contamination from the plasmid used to carry the targeting cassette or random integration.
Targeting cassette
The cleanness, integrity and quantity of a targeting cassette are vital for successful targeting and can be monitored with gel electrophoresis and measuring the OD260/280 ratio.
Targeting site
Not all loci are compatible with a selected transgene. Thus, flexibility in removing part of a targeted gene or relocation to a different site is needed if troubleshooting cannot help.
Pool Vs clone(s)
It is possible to use a pool of BAC-tg to reduce the effort when BAC-tg constructs are used in cell culture study. For making transgene animals/plants, it is better to use individual clones because individual colonies behave differently sometimes in terms of growth and it may be difficult to weed out the undesired product in a pool.
Genotyping
PCR reaction
It is desirable to use simple and straightforward PCR reactions to identify the proper integration of a transgene. These same PCR reactions may be used for the screening of the founder generation.
Follow the BAC modification
Proper genotyping assays in conjunction with BAC prep/digestion are necessary to monitor the fabrication of a BAC transgene throughout targeting, removal of a selection marker, and switching a host.
Removable selection marker
The purpose of a selection marker is to increase the ability of acquiring the proper construct. It is advantageous to use a “removable” cassette in order to keep, delete, or exchange a selection cassette depending on the experimental design. FRT and loxP flanking cassettes can take advantage of the RMCE method to be modified with different selection methods (Neo, Hygro, and Zeo) or with different components such as promoter and poly A signals.
Quality Control
In theory, the benefit of homologous recombination is that once targeted the transgene in the BAC is identical to the targeting cassette used for the targeting. This also means that any problem with the transgene such as a mutation will show up in the BAC-tg, and that sequencing of the transgene on the targeting cassette is sufficient. However, if the BAC-tg needs a lot of trouble-shooting to be generated then BAC sequencing between two homologous arms is essential. Pulsed field gel electrophoresis is required to separate and confirm the size of a BAC and to detect large truncations. Mammalian genomic DNA has many repeats and it is possible that some of them may recombine during gene manipulation. If this is a concern check the BAC with interval primer pairs and check the BAC ends. Alternatively if the transcription unit (TU) can be defined, PCR confirmation outside of the TU is a good way to ensure the integrity of the TU of a targeted BAC.
TROUBLESHOOTING
Transform bacteria cell carrying BAC with pKD46
pKD46
pKD46 is a low copy number plasmid with a temperature sensitive replication origin and AmpR. Always grow pKD46 containing bacteria at 32°C or lower with Amp. Otherwise, it can be handled as other plasmids with minipreps then checked by enzyme digestion.
Working Stock: Follow Qiagen maxiprep protocol for low copy number plasmids to yield enough for stocking. Keep 0.2 µg/µl or higher concentration as stock at 4°C.
Antibiotic conflicts
pKD46 is AmpR, so it can’t be used to modify other vector/bacteria that are Amp resistant. To use pKD46 in other recombineering procedures such as in making a CKO (Chapter 23.11) modified pKD46 with different selection markers should be used (ex:Kan, CM, Hygro or Zeo). Another possible issue in BAC modification is a targeting cassette contaminated with the AmpR-plasmid from which it wasa derived. In this case, selection with Amp would favor the high-copy contaminant and reduce retention of the low-copy pKD46.
Other versions
In addition to swapped selection markers, pKD46 can have RecA added to increase recombineering efficiency. pET/Red is similar to pKD46 with RecA and is Tet resistant (3 µg/ml).
Assemble targeting cassette in vector with short PCR arms
No PCR products
Template: Wrong BAC or BAC truncated; get new BAC. Use genomic DNA (1 µg) as a positive control with the PCR rxns to check the primer design and PCR conditions.
GC rich area: May use DMSO or a similar reagent to reduce the secondary structure, but it will also increase the chance of mutation.
Homologous Arms
Lost arms: Use an overlapping PCR method to link both arms together. Follow the pL/53; p35/R PCR process for construction of the targeting cassette.
Truncated arms: Rarely happens, but if it occurs use the following approaches: 1. Use low copy plasmids or copy number restriction bacteria stain (EPI400; Epicentre). 2. Change selection maker from Neo to Zeo. 3. Use PCR only approaches (Alternative Protocols 1 and 2). 4. Move arms.
TA cloning
High Fidelity DNA polymerase generates a blunt end PCR product. Blunt end ligation vectors can be used, but it is necessary to add A and use TA cloning.
No correct DNA fragment
DNA concentration: 0.5 ~ 1 µg DNA is required to use Blue Gel.
Size wrong: Possibly missing enzyme digestion site in the arms or within the transgene. Check individual enzyme digestions. Avoid partial digestion and star-activity through improving DNA quality, raising the reaction volume to reduce the glycerol concentration and using the proper enzyme reaction buffer.
Targeting BAC
No targeting
Targeting cassette: DNA concentration: Make sure there is enough of the targeting cassette used in targeting. With short homologous arms use 100 to 300 ng of DNA; with longer arms, 50 to 200 ng.
Homologous arms: PCR the targeting cassette with L/53 and R/35 to confirm homologous arms are present.
Targeting site: Check the BAC/pKD46 or BAC/DY380 with pL/R to confirm the BAC identity and integrity once it becomes recombinogenic.
Recombination control: Arms extension (Alternative Protocol 3) can be used to check the targeting cassette and determine the recombination efficiency. When targeting the longer LR in pGEM-LR with a 50mer targeting cassette, it is easy to check proper targeting by amplifying L/53 and R/35 as well as checking the targeted LR by enzyme digestion.
Recombination efficiency: Check the efficiency of the pKD46 plasmid being used in a known targetable system. It may be necessary to switch to DY380 cells. From our studies, DY380 efficiency is about the same as pKD46-recA and 2X higher than that of pKD46. However, higher recombination efficiency also increases BAC instability and improper targeting.
Longer arms: use overlapping PCR or arms extension to increase homologous arms and increase both targeting efficiency and specificity.
Screening
High background
Colony size: Initially targeted BACs grow slow on the agar plate with a selection marker when compared with that of the plasmid with the transgene (background). Take care to pick proper size of colonies.
Targeting cassette: when preparing the targeting cassette from a plasmid, make sure the plasmid DNA was destroyed by enzyme digestion and gel purification. Dpn I digestion alone is sometimes not sufficient enough to digest all of the plasmid background as methylation of the plasmids is not always complete,
Background control: Include an “uninduced” (no recombineering machinery activated) control during targeting and carry parallel with targeting of the “induced”. The ratio of colonies formed between the induced and uninduced can help to track the source of background. If the background is from the targeting cassette, add an additional enzyme digestion to remove plasmid; If it is off-target, follow the below procedure:
Off-target: Screen more colonies or increase the length of homologous arms to improve both specificity and efficiency.
Segregation: When high background and low targeting efficiency with many colonies on a plate is observed. Prepare a pool from the plate, BAC prep, perform a genotyping PCR to confirm the existence of properly targeted BAC, and then transform the mixed DNA to electrocompetent cells (Supporting Protocol 2). Re-Select the BAC with the antibiotic selection marker and then perform another genotyping PCR.
Genotyping
Genotyping PCR was designed to confirm the proper targeting. With the BAC as a template, it will give an easily detectable signal.
No PCR signal: Without high background issues and if the targeting cassette is correctly constructed, it is necessary to check the genotyping primers p55 and p33 (p53 and p35 are in the transgene and can be used to pair with pL and pR). Using the original BAC, p55/33 should yield the correct size. With a GC-rich area, include DMSO in the PCR reaction and reduce the annealing temperature. Also check the template quality for amount and purity, if either is off it may hinder the PCR reaction.
Weak PCR signal: In conjunction with BAC prep/enzyme digestion, usually indicates the BAC is not stable after targeting. Segregate to remove pKD46 or move into other strains of bacteria such as DH10B, Stb2 or Stb4.
Confirmation
BAC digestion
When digesting with SpeI the BAC should show a ladder-like banding pattern in 1% agarose gel.
No DNA: Overnight culture at 32° C will yield enough BAC to be harvested. In rare cases BAC DNA with the selection marker can integrate into the chromosome especially when growing a BAC culture for more than 2 days.
Too few bands: When only a few bands are present at about 12 kb, change Spe I to PstI. If a major band is present smaller than 10 kb, it is likely that plasmid contamination is present. Repeat targeting or perform segregation
Too many bands (smearing): genomic DNA contamination during BAC prep.
Too many small bands: If plasmid contamination is unlikely then it is possible the BAC has lost its integrity. It is more evident when running the original BAC and the targeted BAC side by side.
Remove selection marker (Such as Neo) with EL250/EL350 bacteria
Contamination
Unlike its parental strain, DY380, EL250/350 cannot be selected by Tet. Their colonies have an opaque, pale yellow appearance and grow slower (normal overnight culture at 32°C will only generate a pin size colony). When colonies have the wrong color (such as white, green, red) or grow much quicker, it is possible they are contaminated with another bacteria. As BAC transformation requires high-density culture, an overgrown culture increases the chance of contamination. Using disposable materials and practicing aseptic techniques will help solve the problem. If problems persist, start from the bacteria stock.
No colonies
Repeat transformation with freshly prepared BAC and competent cells of a high optical density (OD). Confirm BAC recovery by enzyme digestion and gel electrophoresis. Prepare competent cells gently: avoid creating air bubbles and harsh pipetting. Also, be careful not to lose any competent cells during preparation.
No deletion
Check by PCR or by antibiotic, removal of selection can be easily detected.
Strains: Use correct RMCE strain to remove selection: EL250: Flpe/FRT; EL350:Cre/LoxP.
FRT/LoxP sites: FRT (LoxP) sites need to be in the same orientation and free of mutations. Use a tested floxed selection cassette if necessary sequence the FRT/LoxP site.
Genotyping lost
If the genotyping PCR signal is lost on one or both sides the targeted BAC may have lost its integrity. An enzyme digestion with an agarose gel can help to assess the change.
LoxP issue: One or two additional loxP sites may be in the BAC vector and can cause problems when using loxP floxed selection cassette. Either screen more colonies to find the properly deleted clones or use an FRT flanked cassette
RMCE strains: Some BACs are not stable in EL250 or EL350 (even more so with SW105 and SW106). Recombinase titration (Alternate Protocol 5) can usually help.
Cre Transgene: When using a BAC to direct the expression of Cre some gene loci can serve as prokaryotic promoters to express Cre in the bacteria. To correct such a mishap one can change Cre to CreERT2 or use Cre with intron. Alternatively, one can remove the loxP sites on the BAC vector by targeting. If the transgene or selection marker is suspected in playing a role in BAC instability, they need to be changed.
Keep Selection: Usually keeping the selection in place can stabilize the locus and the BAC. If the selection cannot be removed in the bacteria a floxed cassette can be removed in ES cells or later.
Lower temperature: Sometimes growing unstable BAC at RT helps.
Quality Control
Lost transgene
BAC-tg may be unstable: Follow suggestions in the previous section
Mutation in transgene
When mutations occur in the coding region, BAC targeting needs to be repeated. It is good practice to sequence the targeting cassette before moving forward especially when the transgene is exposed to UV light or generated by PCR reactions. When using a Safe Blue gel to harvest DNA fragments mutations occur mostly through PCR amplification. Make sure the template is correct, reduce cycling number and use the “best” High Fidelity DNA polymerase.
Truncation in BAC
Depending on the gene locus the transgene may integrate properly but a truncation may occur when checked by Pulse-field electrophoresis or through PCR scanning. Using a BAC that covers the same gene but with different coverage can help. If the remaining coverage is extended to both upstream and downstream DNA and still covers the transcriptional unit the BAC transgene can still work.
BAC quality
Special requirements are followed by different facilities that make transgenic animals, follow their guidelines.
Support Protocol 1: Purify targeting cassette with a Safeblue Gel
EtBr with a UV box can only be used after the desired DNA fragment has been removed. Increase starting material when the band of interest can’ t be seen easily.
Support Protocol 2: Making electrocompetent cells
Time constant is too short: Caused by either high salt in the DNA solution or in the competent cells. To distinguish the problem, repeat the electroporation without DNA. If there is salt in the DNA, either reduce the DNA amount (to 1 or 0.5 µl) or clean up the targeting cassette through PCR purification column or by precipitation and follow by washing with 70% ethanol. If the salt is in the competent cells, make sure the cell pellet was completely resuspended
(Quick ligation reaction and enzyme digestion are incompatible with electroporation without prior desalting.)
Support Protocol 3: Electroporation of a plasmid into DH10B and its derivatives
No colonies: During competent cell preparation, avoid generating air bubble, and excess force. Reduce the pipetting frequency.
Support Protocol 4: Storing and handling recombinogenic bacteria strains
BAC problems
Even with BAC end sequence mapping a specific BAC to its corresponding gene, occasionally BACs still have the following issues:
Won’t grow: Check LB and antibiotics concentration, some libraries based on P1 use Kan instead of CM for selection. Streak BAC/bacteria on an agar plate with proper selection
Truncated BAC: PCR and pulse-field electrophoresis can be used to test for a DNA truncation. If an important area is lost, change the BAC
Support Protocol 5: Handling the BAC (acquisition and confirmation)
Wrong BAC: double check the BAC ID; if correct, get a new BAC with a different ID.
Mixed BAC: Streak BAC culture on an agar plate with selection and pick individual colonies, identify the correct clones by PCR.
Support Protocol 6: Obtaining BAC DNA for transformation
Harvest yields no BAC DNA
Incomplete cell lysis: Check individual buffers and make sure bacteria lysis is completed.
BAC shearing: Can’t vortex BAC prep in any step, use a shaker to resuspend cells and invert the tube to mix. Handle the BAC as gently as possible throughout all steps.
No pellet after spinning
There is always enough debris left to form a white visible pellet on the bottom of tubes after isopropanol precipitation. Be cautious of the pellet while emptying the supernatant by pouring or suction. If necessary run half of BAC preparation digested with common enzyme (such as XbaI, SpeI) and separate with 1% agarose gel to confirm BAC presence in which the BAC will appear as multiple distinct bands.
If needed, the volume of the cultured BAC may be increased up to 3X in one 2 ml tube to gain a better yield.
Alternative Protocol 1: Assembling a targeting cassette by PCR with long primers
No PCR product
Template quality: Check the transgene template by gel and use nanodrop to observe its OD: 260/280 ratio.
Primers: check the ability of the primers to amplify the transgene by pairing with internal primers. If both PCR products can be produced and there is an overlapping region, an overlapping PCR reaction can be performed (Alternative Protocol 2). Check primers and template to ensure both are correct and the correct annealing temperature is being used.
Can’t amplify the targeting cassette from the transgene fragment
Gradient HFPCR: try increasing annealing temperatures up to 72°C. If 72°C works well it may be possible to do a two-step HFPCR with annealing temp same as extension temp.
HFPCR amplify: either part of or the whole transgene with just the left arm and either part of or the whole transgene with just the right arm (if only amplifying part of the transgene ensure there is an overlap between the fragment with the left arm and fragment with the right arm). Use an overlapping HFPCR to amplify the entire targeting cassette.
A smear with specific, but low PCR product
Purify the correct size band, and clone the PCR product by TA cloning or by Arms extension (Alternative Protocol 3). Add a single A on the PCR product if TA cloning. Re-amplification of the PCR product can sometimes work.
Alternative Protocol 2: Overlapping PCR
PCR products (LA, RA) are fine but cannot be overlapped
Check overlapping area, and change annealing temperature accordingly. The PCR products need to be blunt end. Try using a ligation-mediated PCR. Digest the 3’ end of LM and the 5’ end of OR with the same enzyme, ligate and PCR the ligation product with L/R.
Overlapping PCR product without designed sites
Check overlapping sequence, which needs to be complimentary. Change annealing temperature to increase specificity. Gel purify to remove the original template.
Alternative Protocol 3: Arm-extension
Arm-extension serves two purposes: 1. A recombineering control and 2. Increasing the homologous arms length. Compared with BAC targeting, arm-extension will have a higher efficiency of targeting.
Arm-extension yields no target plasmid
Either targeting cassette or recombinogenic components may not have been properly handled, repeat pKD46 transformation or use DY380 instead. Check arm of targeting cassette by PCR or DNA sequence. Reducing plasmid copy numbers or moving homologous arms may be necessary if both targeting cassette and recombinogenic components are fine.
Titrate the concentration of the targeting cassette as there are more target sites within a cell. More copies of the plasmids can increase off-target and intra-plasmid recombination.
Targeted small plasmids may have undergone many changes to form a dimer and mixed populations. Use a segregation and resolution technique that can be used to acquire the targeted monomer (23.11). This step is necessary when using the targeted plasmid as a targeting cassette.
Alternative Protocol 4: Sequential Targeting
Sequential targeting is a convenient way to increase the complexity of the transgene while omitting a complicated cloning procedure.
Need to share both 5’ and 3’ ends to function as arms of homology.
Be aware that multiple targeting events can increase the chances the BAC becomes destabilized. If it is necessary to do so, transform BAC away from a recombinogenic environment such as into DH10B cells.
Alternative Protocol 5: Selection marker removal with titration of recombinase
Recombinase titration can be done in many ways. Control the induction time-period, concentration of inducer, or both.
Keep purified BAC on ice until electroporation.
If BAC-tg becomes unstable even in DH10B cells, Stb4 might help.
Anticipated Results
Due to its copy number, a BAC targeting event has a similar efficiency of targeting as a bacteria chromosome. In the majority of cases a few to a few thousand colonies should be expected to form on a plate with proper selection depending on the design and preparation of the targeting cassette as well as the targeting locus. The targeting efficiency will yield a BAC construct with the desired DNA sequence anywhere from less than 0.01% to more than 90% based on our experience when using genotyping PCR screening to verify the product. Since the targeted BAC must be isolated from bacteria there may be chromosomal DNA as well as other possible sources of contamination such as non-targeted BAC or a plasmid containing the targeting cassette, to improve the targeting efficiency segregation by transforming the BAC DNA from a pool to new competent cells can be used.
Time Consideration
It should take 1 to 1.5 months to complete a standard targeted BAC construct removed selection marker with recombineering after designing and acquiring the BAC and primers for the construct. Usually, it will take few hours to complete the design of a BAC tg construct after the decision is made regarding BAC, insertion site, and transgene. BAC and PCR primers should be ready within 3 days after placing the order. Moving a BAC into a recombinogenic bacteria or making a BAC with its host recombinogenic requires a day or two. The most time-consuming step is often making a targeting cassette. The targeting can be performed once the recombinogenic BAC is ready, the arms are confirmed as well as the transgene, and the background is reduced (from plasmid template) during TC preparation. The BAC targeting itself is simple and straightforward, though the author’s laboratory experiences around 10% of BAC tg constructs require some troubleshooting, especially those that were unstable in recombinase (EL250/350) bacteria without selection, used Cre as the transgene, or were unstable when the transgene was inserted. To solve these issues, some BAC tg will take much longer and a few never can be targeted. After trying to modify a targeting system a few times by various enhancements such as using longer targeting arms without success, it may be necessary to use a different transgene or insertion site.
Preparation of a BAC-tg for making transgenic animals requires due diligence to check the transgene, BAC coverage, and preparation of good quality BAC DNA which is necessary to establish the BAC transgene. Details can be acquired in a facility that prepares and injects the BAC DNA.
Acknowledgement
The authors wish to thank Dr. B.L. Wanner of Purdue University for pKD46 plasmid, which was distributed by E. Coli Genetic Stock Center at Yale. The protocol described here has been used in the UNC Neuroscience Center’s BAC Engineering Core and is supported by an NINDS Center Grant.
Footnotes
Internet Resources
- UCSC genome browser- http://genome.ucsc.edu
- Ensembl-http://www.ensembl.org/Mus_musculus/index.html
- CHORI; BAC and modified BAC from GENSAT-http://bacpac.chori.org
- BAC Finder - http://www.mitocheck.org/cgi-bin/BACfinder
- Allen Institue- http://mouse.brain-map.org/
- GENSAT - http://www.gensat.org
- GUDMAP projects -http://www.gudmap.org/
- Recombinogenic bacteria, floxed cassettes:http://recombineering.ncifcrf.gov
- pKD46 and E. Coli resource: http://cgsc.biology.yale.edu/
- Many others: http://www.addgene.org
Literature Cited
- Bouvier J, Cheng JG. Recombineering-based procedure for creating Cre-LoxP conditional knockouts. Current Protocol in Molecular Biology. 2009;Chapter 23 doi: 10.1002/0471142727.mb2313s85. Unit 23.13. [DOI] [PubMed] [Google Scholar]
- Copeland NG, Jenkins NA, Court DL. Recombineering: a powerful new tool for mouse functional genomics. Nat. Rev. Genet. 2001;2(10):769–779. doi: 10.1038/35093556. [DOI] [PubMed] [Google Scholar]
- Datsenko KA, Wanner BL. One-step inactivation of chromosomal genes in Escherichia coli K-12 using PCR products. Proc Natl Acad Sci U S A. 2000;97(12):6640–6645. doi: 10.1073/pnas.120163297. [DOI] [PMC free article] [PubMed] [Google Scholar]
- Gong S, Zheng C, Doughty ML, Losos K, Didkovsky N, Schambra UB, Nowak NJ, Joyner A, Leblanc G, Hatten ME, Heintz N. A gene expression atlas of the central nervous system based on bacterial artificial chromosomes. Nature. 2003;425(6961):917–925. doi: 10.1038/nature02033. [DOI] [PubMed] [Google Scholar]
- Lee EC, Yu D, Martinez de Velasco J, Tessarollo L, Swing DA, Court DL, Jenkins NA, Copeland NG. A highly efficient Escherichia coli-based chromosome engineering system adapted for recombinogenic targeting and subcloning of BAC DNA. Genomics. 2001;73(1):56–65. doi: 10.1006/geno.2000.6451. [DOI] [PubMed] [Google Scholar]
- Poser I, Sarov M, Hutchins JR, Hériché JK, Toyoda Y, Pozniakovsky A, Weigl D, Nitzsche A, Hegemann B, Bird AW, Pelletier L, Kittler R, Hua S, Naumann R, Augsburg M, Sykora MM, Hofemeister H, Zhang Y, Nasmyth K, White KP, Dietzel S, Mechtler K, Durbin R, Stewart AF, Peters JM, Buchholz F, Hyman AA. BAC TransgeneOmics: a high-throughput method for exploration of protein function in mammals. Nat Methods. 2008;5(5):409–415. doi: 10.1038/nmeth.1199. [DOI] [PMC free article] [PubMed] [Google Scholar]
- Wagner M, Koszinowski UH. Mutagenesis of viral BACs with linear PCR fragments (ET recombination) Methods in Molecular Biology. 2004;256:257–268. doi: 10.1385/1-59259-753-X:257. [DOI] [PubMed] [Google Scholar]
- Yang XW, Model P, Heintz N. Homologous recombination based modification in Escherichia coli and germline transmission in transgenic mice of a bacterial artificial chromosome. Nat. Biotechnol. 1997;15(9):859–865. doi: 10.1038/nbt0997-859. [DOI] [PubMed] [Google Scholar]
- Zhang Y, Buchholz F, Muyrers JP, Stewart AF. A new logic for DNA engineering using recombination in Escherichia coli. Nat Genet. 1998;20(2):123–128. doi: 10.1038/2417. [DOI] [PubMed] [Google Scholar]