

Abstract
Thorough preclinical testing of central nervous system (CNS) therapeutics includes a consideration of routes of administration and agent biodistribution in assessing therapeutic efficacy. Between the two major classifications of administration, local vs. systemic, systemic delivery approaches are often preferred due to ease of administration. However, systemic delivery may result in suboptimal drug concentration being achieved in the CNS, and lead to erroneous conclusions regarding agent efficacy. Local drug delivery methods are more invasive, but may be necessary to achieve therapeutic CNS drug levels. Here, we demonstrate proper technique for three routes of systemic drug delivery: intravenous injection, intraperitoneal injection, and oral gavage. In addition, we show a method for local delivery to the brain: convection-enhanced delivery (CED). The use of fluorescently-labeled compounds is included for in vivo imaging and verification of proper drug administration. The methods are presented using murine models, but can easily be adapted for use in rats.
Keywords: Neuroscience, Issue 42, mouse, in vivo optical imaging, preclinical, central nervous system, fluorescent imaging, convection-enhanced delivery, oral gavage, intravenous injection, intraperitoneal injection
Protocol
1. Systemic Delivery Methods
Although systemic delivery of drugs is not the most efficient approach for achieving high drug concentrations in the CNS, systemic deliveries are convenient and well accepted by patients. Here, we will demonstrate proper procedures for three routinely used systemic administration approaches: intravenous injection, intraperitoneal injection, and oral gavage.
A. Intravenous Injection (Tail Vein Injection)
Before beginning the procedure, the body weight of each mouse should be recorded. As with all preclinical studies, body weight should be monitored regularly (twice a week or greater) to assess potential drug toxicity. No more than 1% of the mouse's body weight in volume should be injected at a single time. For example, no more than 0.2mL of fluid should be injected in a 20g mouse. All fluids injected intravenously should be sterilized by an appropriate method.
The mouse should be warmed for 5-10 minutes using either a heating pad or a heat lamp to dilate the tail vein. If using a heat lamp, monitor the mouse at all times to avoid hyperthermia.
The mouse is transferred to a holding device, which restrains the mouse while allowing access to the tail vein (see video). In the mouse tail there are four visible vessels: the vessels on the dorsal and lateral sides are veins, and the vessel on the ventral side is an artery. To access the tail vein, the tail of the mouse is held at the most distal point, and rotated 90 degrees so that the vein is facing upwards. The injection site is cleaned with an alcohol swab and a 28g insulin syringe is inserted, beveled side up, into the vein (see video). If the needle is properly placed in the vein, it should move freely and without pressure. Slowly inject the drug with even pressure over 5-10 seconds. If a blister appears on the tail, stop injecting, as this indicates that the needle is no longer in the vein.
After injection, apply gentle pressure to the injection site until the bleeding stops. This normally takes 30-60 seconds. Monitor the mouse for 5-10 minutes after the injection to insure that there is no further bleeding.
B. Intraperitoneal Injection
Before beginning the injection, the drug should be loaded into a syringe attached to a 28g needle. Make sure that there is space in the syringe for drawing back the plunger before the injection (e.g., if injecting 200μL, make sure that the syringe capacity is 300μL or greater).
Remove the mouse from the cage by its tail and place it onto a textured surface, so that the mouse has something to grip. A cage lid is usually sufficient. Allow the mouse to stretch its body and then using your non-dominant hand, grasp the skin on the back of the mouse, taking care to lightly pinch as much skin as possible between your thumb and index and middle fingers (see video). Turn the mouse over so that the abdomen of the mouse is facing upwards. If the mouse can freely move its head, release the grip and try again, so as to avoid being bitten during the injection.
With your dominant hand, pick up the syringe and insert the needle at a 30 degree angle into the lower left quadrant of the mouse (see video). Holding the mouse slightly inverted will help move the organs away from the injection site. To ensure that the needle is in the intraperitoneal space, pull back on the syringe plunger. If any fluid or blood appears in the syringe, then the needle is not in the intraperitoneal space and should be removed. If no fluid is aspirated into the syringe, then inject the syringe contents with an even pressure over 1-5 seconds and release the mouse.
Monitor the mouse for 5-10 minutes after the injection to ensure that the mouse returns to normal activity levels.
C. Oral Gavage
Before beginning the injection, record the weight of the mouse. The maximum volume that can be delivered by oral gavage is 10mL per kilogram of body weight. For example, the maximum volume for a 20g mouse would be 200μL. Attempting to inject larger volumes may result in reflux, which will cause incomplete drug delivery. If it is necessary to administer volumes greater than indicated above, as many as three doses may be administered over 24 hours.
To avoid puncturing the esophagus, it is important to measure the length of the gavage needle for each mouse. Hold an 18g ball tip curved gavage needle at the last rib of the mouse, and then mark the length at the tip of the mouse's head using a permanent marker (see video). During the gavage, this mark will be a stopping point as you insert the needle into the mouth of the mouse.
Restrain the mouse using the same hand grip as for an intraperitoneal injection. Insert the gavage needle in the mouth, over the tongue, and advance the needle through the pharynx. Do not insert the needle past the stopping mark. The needle should proceed smoothly without any pressure (see video). If you encounter pressure, stop and withdraw the needle to avoid injecting fluid into the lungs.
With the needle in place, depress the plunger over 1-5 seconds and then remove the needle at the same angle that it was inserted. Monitor the mouse for 5-10 minutes, paying close attention to any signs of labored breathing which may indicate that fluid has entered the lungs.
2. Local Delivery
Acute Convection-Enhanced Delivery
A. Probe Construction
A reflux-resistant CED cannula for rodents is not yet commercially available. Here we will demonstrate a method for cannula construction that was adapted from a method first described by Krauze et al (Krauze 2005).
The cannula has three parts (Figure 1): 100uM diameter silica tubing through which the infusate flows, a rigid metal needle for structural support, and flexible Teflon tubing for loading the infusate.
To obtain the rigid metal needle, use an open flame to melt the plastic on a Surflo IV Catheter (24g stylet) and using tweezers remove the metal needle. The rest of the catheter can be discarded. Cut a length of silica tubing (OD 0.163mm), slightly longer than the metal needle, using a single-edge razor blade. Role the silica tubing in a small drop of cyanoacrylate based fast-acting adhesive (e.g. Krazy Glue), taking care not to get any glue on the ends of the tubing. Insert the silica tubing in the metal needle and let dry for 5 minutes.
Once dry, the silica tubing should be firmly affixed to the needle. The ends of the silica should be trimmed so that 2mm of silica tubing protrudes from the pointed end of the needle and 3mm of silica tubing protrudes from the flat end (see video).
Cut a section of Teflon tubing 20 cm in length. Roll the metal needle in a small drop of adhesive, again taking care not to get glue on the ends of the silica tubing as this will clog the cannula. Insert the needle into the Teflon tubing to a depth of 1cm. Let dry for 1 minute. Using a glue gun, apply a drop of hot glue to the joint between the metal needle and the Teflon tubing (see video). Ensure that the entire joint is covered on all sides and let dry for at least 1 hour. Cannulas can be made up to a week in advance and stored at room temperature.
B. Infusion Procedure
- To prepare the surgical area, all surfaces should be sprayed with a disinfectant, such as a 2% chlorhexidine solution. Sterile surgical gloves should be worn during the procedure. The surfaces are then covered with absorbent drapes. The following supplies should be placed in the surgical area:
- Heating pad to maintain mouse body temperature
- Two small Petri dishes; one containing 3% hydrogen peroxide, and one containing 2% chlorhexidine
- Sterile gauze and cotton swabs
- Sterile disposable scalpels (Number 21)
- Sterile 22g needles
- Mouse stereotaxic frame
- Controlled rate syringe pump
- Autoclaved mouse skin stapler, staples, and staple remover
To set-up the CED cannula, attach a 1mL syringe to the Teflon tubing using a set of plastic syringe adapters. The cannula should be affixed to the stereotaxic frame so that it is perpendicular to the surgical surface (see video). To disinfect the cannula, fill the 1mL syringe with 70% ethanol and depress the plunger to run the ethanol through the cannula. Repeat this process using sterile saline, and check for any leaks around the cannula joints. To disinfect the outside of the cannula, gently wipe with a 70% ethanol wipe.
Fill the cannula with sterile saline and then pull back on syringe so that a small air bubble is drawn into the cannula. This air bubble will separate the infusate from the saline in the cannula. Then, backload your infusate (see video). Connect the syringe to the syringe pump and prime the pump by briefly running the cannula.
Sedate the mouse using an injected anesthetic and prepare the skin by swabbing several times (for 5-10 seconds) with a piece of sterile gauze dipped in the 2% chlorhexidine solution. Ophthalmic ointment should be applied to the mouse to maintain adequate moisture during the procedure. Using a sterile scalpel, create a sagittal incision along the center of the skull, approximately 1.5cm long (see video). The skull surface is then cleaned using a cotton swab soaked in a 3% hydrogen peroxide solution. Take care to avoid getting hydrogen peroxide in the eyes of the mouse. The suture lines of the skull should be apparent at this point: if they are not visible, gently swab the skull with a fresh cotton swab soaked in 3% hydrogen peroxide solution.
Identify the bregma (Figure 2) and then measure 2mm to the right and 1mm posterior of this structure to locate the infusion site. Using the sterile 22g needle, gently create a hole in the skull at this point by twisting the needle against the skull (see video). Avoid forcing the needle downward against the skull.
At this point, the mouse should be placed in the stereotaxic frame and begin receiving inhaled anesthetic (see video). Administer the anesthetic at a low level (1%), and carefully monitor the mouse for changes in respiration rate, adjusting the anesthetic accordingly.
- Position the cannula over the skull hole and then lower 3mm below the skull surface. Begin the infusion, using the following rates and durations:
0.1 μL/min for 5 minutes 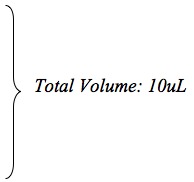
0.2 μL/min for 5 minutes 0.5 μL/min for 5 minutes .8 μL/min for 7.5 minutes OFF for 1 minute At the end of the infusion, slowly remove the cannula and swab the skull with 3% hydrogen peroxide. Apply sterile bone wax to the hole (see video). Using forceps, draw the skin together over the skull and staple to close. Buprenorphine should be administered for post-operative pain relief.
Monitor the mouse post-operatively until it regains consciousness and mobility. Due to the length of the procedure, it may take up to an hour for the mouse to regain full activity. During this time place the mouse cage on a heating pad to avoid hypothermia, and do not house the recovering mouse with other active mice.
Skin staples should be removed one week after surgery.
C. In Vivo Imaging
Fluorescently-labeled infusate can be imaged following CED administration, and can be monitored for changes in signal intensity as well as signal location. Typically, it is best to wait 2-3 hours after the infusion to image, so as to allow the mouse to recover from the infusion.
For anesthesia during imaging, use a low level of an inhaled anesthetic. Position the mouse, dorsal side up, in an imaging station (e.g., IVIS Lumina, Caliper Life Sciences, Alameda, CA). Using an appropriate filter setting for the fluor that is being imaged, acquire an image. For CED, a successful infusion should show most of the material in the brain near the infusion site (Figure 3).
3. Representative Results
A lack of adverse reaction to administration of therapy is an important indicator of successful injection. For example, following tail vein injection there should be no change in appearance (e.g., size, color) of the tail. A bubble or blister following tail vein injection would indicate subcutaneous, rather than intravenous, delivery of therapy. For intraperitoneal injections, a bump on the skin or discoloration of the abdomen may indicate subcutaneous injection or damage to internal structures. In oral gavage, a mouse with labored breathing or coughing may indicate that fluid was injected into the lungs, rather than into the stomach.
For CED, neurologic function is important for assessing successful administration of therapy. A mouse that is exhibiting seizures or hemiparesis may have received an improper infusion. If a fluorescent infusate is used, in vivo imaging can be applied for assessing successful administration (Figure 3). If the infusate is not localized to the site of injection, the infusion was not successful.
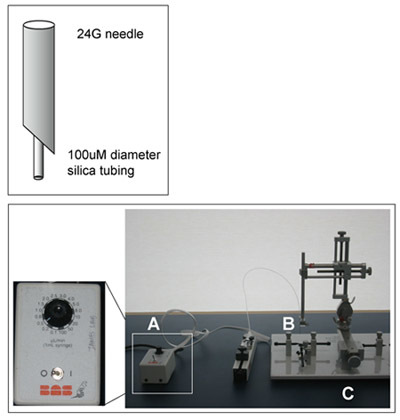 Figure 1: CED Cannula and Surgical Set-up. The basic elements of the convection-enhanced delivery surgical set-up are shown. A microinfusion pump (A) is attached to the infusion cannula (B, shown enlarged at top). A stereotaxic frame (C) is used to position the probe. This image does not include heating and anesthetic equipment also used during the procedure.
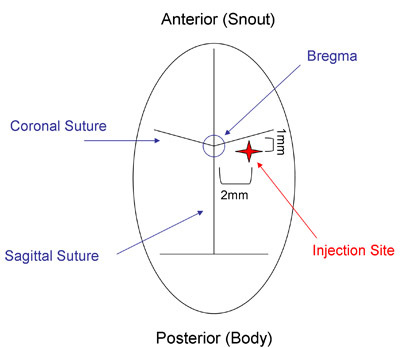 Figure 2: Mouse Skull Suture Lines. The CED infusion site (red star) can be located by identifying the intersection of the sagittal and coronal sutures (the bregma) and then measuring 2mm lateral and 1mm posterior of the bregma.
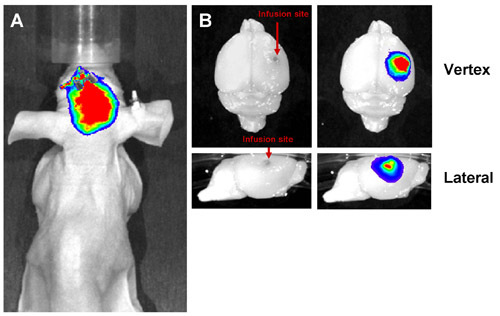 Figure 3: Representative Results from Successful CED. Liposomes labeled with a far-red fluorescent dye were infused into the mouse brain by CED and imaged both in vivo and ex vivo. A successful infusion shows a fluorescent signal localized to the site of infusion both in vivo (A) and ex vivo (B). The signal should be localized to the infused hemisphere without leakage into the contralateral hemisphere.
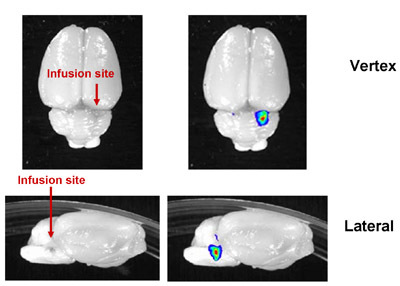 Figure 4: Representative Image of Successful CED into the Rat Brainstem. Fluorescently-labeled liposomes were infused into the rat brainstem. In rats, as much as 20μL can be infused. The increased thickness of the rat skull and depth of injection precluded in vivo imaging, but correct infusion location could be verified by ex vivo imaging of the dissected brain.
Discussion
Preclinical evaluation of the efficacy of any therapeutic agent must take into account pharmacological properties of the agent and the target tissue of interest. While systemic methods of administration are in general more facile and better tolerated by patients, the selectivity of the blood-brain barrier often necessitates local delivery of therapy for treating CNS disease. Here, we have demonstrated one method of direct delivery to the brain: CED. Other forms of local delivery to the brain include direct administration to the cerebrospinal fluid, intratumoral bolus injection, and ventricular injection. For these methods, diffusibility of therapeutic is critically important, with poor diffusion limiting the region of coverage to a few millimeters from the injection site (Jain 1989, Bobo 1994). In contrast, CED uses positive pressure to increase the area of drug distribution (Bobo 1994), while still enabling therapeutic targeting to specific neuroanatomical structures. In our laboratory, we have successfully performed CED into the brainstem as well as into the caudate putamen in rodents (Figure 4).
The ability to conduct CED in rodent models has become increasingly important in association with increasing interest in maximizing therapeutic efficacy when treating various types of CNS disease. CED can be used to deliver a variety of agents, including purified proteins, small molecule drugs, and viruses (Gill 2003, Degen 2003, Szerlip 2007). The range of diseases that can be treated with CED includes cancers of the CNS (Yamashita 2007) as well as neurodegenerative diseases such as Parkinson's disease(Gill 2003). As CED research continues to expand, the need for in vivo imaging of CED administered therapy is similarly increasing. While the fluorescent imaging demonstrated here would likely not be visible through the human skull, other methods employing co-infusion of MRI contrast agents (Dickinson 2008) are attracting interest for assessing applicability for monitoring infusates in patients with CNS disease.
Disclosures
All procedures demonstrated here were approved by the UCSF Institutional Animal Care and Use Committee.
Acknowledgments
NS65819 (CDJ, TO), NS049720 (CDJ), CA097257 (CDJ, TO), CIRM DR1-01426We would like to thank Raquel Santos for technical assistance.
References
- Bobo RH, Laske DW, Akbasak A, Morrison PF, Dedrick RL, Oldfield EH. Convection-enhanced delivery of macromolecules in the brain. Proc. Natl. Acad. Sci. 1994;91:2076–2080. doi: 10.1073/pnas.91.6.2076. [DOI] [PMC free article] [PubMed] [Google Scholar]
- Degen JW, Walbridge S, Vortmeyer AO, Oldfield EH, Lonser RR. Safety and efficacy of convection-enhanced delivery of gemcitabine or carboplatin in a malignant glioma model in rats. J Neurosurg. 2003;99:893–898. doi: 10.3171/jns.2003.99.5.0893. [DOI] [PubMed] [Google Scholar]
- Dickinson PJ, LeCouteur RA, Higgins RJ, Bringas JR, Roberts B, Larson RF, Yamashita Y, Krauze MT, Noble CO, Drummond DC, Kirpotin DB, Park JW, Berger MS, Bankiewicz KS. Canine model of convection-enhanced delivery of liposomes containing CPT-11 monitored with real-time magnentic resonance imaging: laboratory investigation. J Neurosurg. 2008;108:989–998. doi: 10.3171/JNS/2008/108/5/0989. [DOI] [PubMed] [Google Scholar]
- Gill SS, Patel NK, Hotton GR, O'Sullivan K, McCarter R, Bunnage M, Brooks DJ, Svendsen CN, Heywood P. Direct brain infusion of glial cell line-derived neurotrophic factor in Parkinson disease. Nature Medicine. 2003;9:589–595. doi: 10.1038/nm850. [DOI] [PubMed] [Google Scholar]
- Jain RK. Delivery of novel therapeutic agents in tumors: physiological barriers and strategies. J Natl Cancer Inst. 1989;81:570–576. doi: 10.1093/jnci/81.8.570. [DOI] [PubMed] [Google Scholar]
- Krauze MT, Saito R, Noble CO, Tamas M, Bringas J, Park JW, Berger MS, Bankiewicz K. Reflux-free cannula for convection-enhanced high-speed delivery of therapeutic agents. J Neurosurg. 2005;103:923–929. doi: 10.3171/jns.2005.103.5.0923. [DOI] [PMC free article] [PubMed] [Google Scholar]
- Krauze MT, Vandenberg SR, Yamashita Y, Saito R, Forsayeth J, Noble CO, Park JW, Bankiewicz K. Safety of real-time convection-enhanced delivery of liposomes to primate brain: a long-term retrospective. Exp Neurol. 2008;210:638–644. doi: 10.1016/j.expneurol.2007.12.015. [DOI] [PMC free article] [PubMed] [Google Scholar]
- Murad GJ, Walbridge S, Morrison PF, Garmestani K, Degen JW, Brechbiel MW, Oldfield EH, Lonser RR. Real-time, image-guided, convection-enhanced delivery of interleukin 13 bound to pseudomonas exotoxin. Clin Cancer Res. 12:3145–3151. doi: 10.1158/1078-0432.CCR-05-2583. [DOI] [PubMed] [Google Scholar]
- Ozawa T, James CD. Human Brain Tumor Cell and Tumor Tissue Transplantation Models. In: Van Meir E, editor. CNS Cancer: Models, Markers, Prognostic Factors, Targets, and Therapeutic Approaches. New York, NY: Humana Press-Springer; 2009. pp. 147–162. [Google Scholar]
- Szerlip NJ, Walbridge S, Yang L, Morrison PF, Degen JW, Jarrell ST, Kouri J, Kerr PB, Kotin R, Oldfield EH, Lonser RR. Real-time imaging of convection-enhanced delivery of viruses and virus-sized particles. J Neurosurg. 2007;107:560–567. doi: 10.3171/JNS-07/09/0560. [DOI] [PubMed] [Google Scholar]
- UCSF Animal Care & Use Program - Standard Procedures & Guidelines [Internet] San Francisco, California: University of California, San Francisco; [January 8, 2010]. Available from: http://www.iacuc.ucsf.edu/Policies/awStandardProcedures.asp. [Google Scholar]
- Yamashita Y, Krauze MT, Kawaguchi T, Noble CO, Drummond DC, Park JW, Bankiewicz KS. Convection-enhanced delivery of a topoisomerase I inhibitor (nanoliposomal topotecan) and a topoisomerase II inhibitor (pegylated liposomal doxorubicin) in intracranial brain tumor xenografts. Neuro Oncol. 2007;9:20–28. doi: 10.1215/15228517-2006-016. [DOI] [PMC free article] [PubMed] [Google Scholar]