Abstract
The ability to systematically probe in vitro cellular response to combinations of mechanobiological stimuli for tissue engineering, drug discovery or fundamental cell biology studies is limited by current bioreactor technologies, which cannot simultaneously apply a variety of mechanical stimuli to cultured cells. In order to address this issue, we have developed a series of microfabricated platforms designed to screen for the effects of mechanical stimuli in a high-throughput format. In this protocol, we demonstrate the fabrication of a microactuator array of vertically displaced posts on which the technology is based, and further demonstrate how this base technology can be modified to conduct high-throughput mechanically dynamic cell culture in both two-dimensional and three-dimensional culture paradigms.
Protocol
A. Device description and operation
Devices are fabricated using multilayer soft lithography1 in polydimethylsiloxane (PDMS), and are capable of simultaneously generating a range of mechanical conditions in individual cell culture locations across the microfabricated array. In this protocol, the steps to fabricate an array of pneumatically-actuated microposts are first described, followed by steps to modify the device to enable mechanically dynamic culture in both two-dimensional (2D) and three-dimensional (3D) culture paradigms. The outlined microfabricated approach increases throughput over existing macroscale systems, and is best suited for screening for the effects of a variety of mechanical conditions.
The operational principle for the device is based on an array of vertically actuated microposts. Microposts are fabricated on a freely-suspended diaphragm, and are raised and lowered by applying positive and negative pressures beneath the actuation diaphragm (Figure 1). A key feature of the array is that by varying the size of the actuation diaphragm, a single pressure source can be used to obtain a range of vertical displacements across the array. This principle is used to rapidly screen cellular response to a large number of mechanical stimulatory conditions across a single device.
Based on an analogous macroscale design by Schaffer et al.2, our design includes a second suspended and lubricated cell culture film over the post, allowing cells to experience 2D substrate deformation as the culture film slips over the raised loading post. Alternatively, photopatterning an array of cell-laden hydrogels over the loading posts allows for compressive stimulation of cells in 3D culture. Detailed instructions in setting up these systems follow.
B. Fabrication of the pneumatic microactuator array
Fabricating the pneumatic microactuator array requires stringent alignment in multilayer PDMS structures. This is challenging, due to shrinkage-induced alignment registration errors. To address this, we use a fabrication process termed 'sandwich mold fabrication'3, shown to effectively eliminate this issue4.
Materials Preparation
Single- or multi-level SU-8 masters for each of the various levels are fabricated in a cleanroom using standard procedures. For these devices, masters are 200-400 μm thick, depending on the application. Masters are hardbaked at 80 °C for three days prior to use.
Clean glass slides and the SU-8 masters are silanized in a vacuum chamber, to prevent adhesion of curing PDMS to the materials. In a fumehood, 60 μL of the silanization agent (tridecafluoro-1,1,2,2-tetrahydrooctyl)-1-trichlorosilane (United Chemical Technologies, Bristol, PA) is pipetted into a petri dish in the chamber. The bare glass and SU-8 masters are placed in the chamber and kept under vacuum overnight.
Two foam pads (available at craft supply stores) and an overhead inkjet transparency film are cut to sizes slightly larger than the SU-8 master used for sandwich mold fabrication.
Sandwich Mold Fabrication
Each layer of the multilayer device requires a PDMS layer molded using this method. A schematic of the sandwich mold fabrication process is provided in Figure 1.
PDMS monomer and crosslinker are thoroughly mixed in the standard 10:1 ratio. 3 mL of uncured PDMS mixture are deposited onto a previously fabricated SU-8 master, and degassed in a vacuum chamber.
The foam pad and SU-8 master are placed on a plexiglass base plate.
The transparency is carefully lowered onto the uncured PDMS, making sure to avoid trapping any air bubbles. Inkjet transparencies have a rough and a smooth side, and it is important that the smooth side contacts the uncured PDMS.
A silanized glass slide is placed on top of the transparency, beneath the second foam pad and a plexiglass top plate. The sandwich is then clamped together using a C-clamp.
The PDMS sandwich is cured in an oven at 80 °C for at least 4 hours.
The sandwich is removed from the oven and allowed to cool before removing the clamp.
The clamp is removed and the sandwich disassembled, and the foam pads are discarded. The transparency is carefully peeled away from the SU-8 master, retaining the patterned PDMS film.
These patterned PDMS layers and their handling transparency layers can then be stored in a dust-free environment until they are ready for use. We have successfully used PDMS layers up to two months old, with no noticeable deleterious effects.
Constructing the multilayer device
The schematic for fabrication of the microactuator array is provided in Figure 2A, and operation of the actuators is shown in Figures 2B and C. To fabricate the device:
The lowermost patterned PDMS layer is prepared by sandwich mold fabrication. For these experiments, circular patterns ranging from 600 to 1200μm in diameter were used.
The PDMS layer is then transferred to a clean glass slide. A corona discharge unit is used to treat the PDMS and glass surfaces with oxygen plasma, and the two surfaces are placed in contact with each other. The stack is then placed on a hotplate at 80 °C to complete the bonding process. The transparency can then be peeled away and discarded. During this process, the patterned PDMS film is never released from a rigid substrate, preventing shrinkage of the individual layers.
Depending on the success of the sandwich molding step, thin films of PDMS which have not been squeezed out from between the SU-8 features and the transparency may need to be removed. This can be done manually using a 25G needle under a stereoscope.
The second sandwich molded layer is formed as a negative replica mold of the desired diaphragm-and-post structure. This is because fabrication of large-area SU-8 masters is challenging, but the use of alternate fabrication processes could eliminate this extra step. In this demonstration, circular posts 500 μm in diameter were used. The negative replica mold is silanized, and temporarily affixed to a glass slide using double-sided tape. Uncured PDMS is deposited, degassed and spin-coated onto this sandwich mold layer for 45 seconds at 1000 RPM, yielding an actuation diaphragm 60 μm thick. The spin-coated PDMS layer is partially-cured at 80 °C for ~20 minutes, or until the PDMS is sticky but does not deform permanently when touched.
The glass slide and double sided tape are removed from the partially-cured PDMS layer, which is then plasma-treated, inverted and placed in a custom-made aligner. The aligner consists of a vacuum chuck mounted to a micromanipulator (Siskiyou; Mission Viego, CA, USA). The first PDMS layer is then plasma-treated and placed on a rotary stage (Newmark, Grants Pass, OR, USA), beneath the vacuum chuck, and alignment between the two layers is observed using a Navitar 12x zoom machine vision system (Navitar; Rochester, NY, USA).
The layers are aligned using the manipulator, and carefully brought into contact. The sandwich is then removed from the aligner, and cured in an oven at 80 °C for a further 30 minutes. The transparency and silanized replica PDMS mold can then be peeled from the device and discarded. The device is then fully cured at 80 °C for at least four hours.
Depending on the type of mechanical stimulation experiment being conducted, additional PDMS layers can then be bonded to this base device by repeating the outlined process. Details for the various types of mechanical stimulation experiments are provided in sections C and D.
Connectors
Once the device is completed, a needle can be used to clear the PDMS layer at the point of connection.
Commercial connectors such as the Nanoport (Upchurch Scientific; Oak Harbor, WA, USA) can then be used to interface with external tubing. To avoid the height requirements of commercial connectors, and thereby use standard petri dishes as device containers, we fabricate our own as follows.
Approximately 35 g of PDMS is cast and cured in an omni-well tray (Nunc; Rochester, NY, USA). The device is peeled, and cut into small gasket sections, from which a 1/8" hole is removed using a punch.
An 18G blunted needle is used to core out a section from the side of the gasket. A smaller 21G needle is used to remove the central core before withdrawing the 18G needle.
Approximately 15g of PDMS is cast and cured in an omni-well tray lid, peeled and cut into similarly sized section. This section is then cleaned with scotch tape, plasma-bonded to the top of the gasket, and the unit is plasma-bonded to the device, punched side down.
A second blunt 18G needle is then separated from the colored plastic luer connector, inserted into the cored hole and sealed in place with a few drops of PDMS. The resulting connector is quite effective, economical and has a dead-space volume large enough to prevent air bubbles from entering the channels during liquid filling stages.
C. Mechanically active 2D culture substrates
The array of actuated microposts can be used to create various strain profiles in a suspended polymer film, on which cells are cultured. Raising the post into a lubricated film causes the film to slip and deform around the post. Using a circular loading post results in an equibiaxial strain distribution, but the design is versatile in that different post shapes can be used to create a variety of strain fields. To modify the actuator array for 2D culture experiments (schematic in Figure 3):
Bond a third PDMS layer to the device, as shown in Figure 3a. The third PDMS layer consists of a two layer structure. The lower circle matches the size of the actuation cavity beneath the actuated microposts. The diameter of the upper circle is 100μm greater than the diameter of the loading posts. A 200 μm wide microchannel connects these features to a connection area, and will be used to lubricate the loading posts and culture film.
Fabricate and bond connectors to the device, as previously described.
Spin coat a 10-15 μm thick layer of PDMS onto the smooth side of a transparency (spin parameters: 4000 RPM, 120 seconds). Cure at 80 °C for at least 4 hours.
Appy a low-level vacuum (Barnant Air Cadet aspiration pump) to the actuators, lowering the array of posts.
Plasma treat and bond the spin coated PDMS film to the actuated microdevice. Place on a hotplate at 80 °C for 10 minutes. The posts and culture film will remain hydrophilic for a short time.
Fill the lubrication channels with a 90% glycerol in deionized water solution. In addition to lubrication, this formulation maintains the hydrophilicity of the PDMS indefinitely, reducing friction coefficients. Air bubbles will remain trapped between the post and culture film. Place the device on a hotplate at 40 °C, and continue to inject lubricant into the channel, causing a small pressure increase. After a few minutes, the air bubbles will diffuse through the PDMS, and all surfaces will be lubricated.
Remove the negative pressure, releasing the posts.
Using a scalpel, cut around the thin PDMS film. Carefully peel the transparency backing away from the device.
Plasma bond a hand-cut PDMS gasket around the device culture area.
Sterilize the device by soaking in 70% ethanol for 5 minutes, and then under a germicidal UV light in a biological safety cabinet for 45 minutes.
Plasma treat the surface and incubate with 100 μg/mL collagen (or alternative ECM protein) overnight at 4 °C.
Wash the device with phosphate buffered saline (PBS), and seed cells at 10-15000 cells/cm2, following standard cell culture protocols.
Detailed characterization of microdevice operation and biological experiments conducted on this platform have been published elsewhere7.
D. Mechanically active 3D hydrogels
Modifications to the device can also be used to enable compression of photopatterned. cell-laden, three-dimensional hydrogels in a high-throughput manner. In this example, we create 350 μm diameter polyethylene glycol (PEG) hydrogel cylinders, encapsulating C3H10T1/2 mouse mesenchymal stem cells, and apply compressive strains ranging from 5 to 25% across the array. This protocol can be used with more advanced hydrogel photopolymerization chemistries. To use the platform for experiments in three-dimensional mechanobiology (schematic in Figure 4):
Device modifications:
Coat the posts with a 1 μm thick layer of Parylene-C to reduce gas permeability and improve polymerization times in the PEG hydrogel system. This will reduce the cytotoxic effects of the free radical-based photopolymerization reaction. Pieces of scotch tape are used to mask the areas around the post, and the device is coated in a PDS 2010 LabCoter 2 system (Specialty Coating Systems; Indianapolis, IN, USA).
The coated device is removed from the coating system, and the scotch tape peeled away, leaving a conformal layer of Parylene-C over the posts.
A glass coverslip is methacrylated8 by immersion in a 2% v/v solution of 3-(trimethoxysilyl) propyl methacrylate in 95% ethanol for 2 minutes.
The coverslip is rinsed in 100% ethanol, and baked at 100 °C, leaving methacrylate groups on the surface.
A 200 μm thick PDMS spacer film is cast in a petri dish, and cut into small sections. Four of these small sections are plasma bonded around the edge of the methacrylated coverslip.
The spacers are then plasma bonded to the PDMS-areas of the device, covering the Parylene-C coated posts.
Device is sterilized by washing in 70% ethanol, and exposure to germicidal UV light in a biological safety cabinet for 45 minutes.
In situ polymerization:
Cell-laden PEG hydrogels were then photolithographically patterned into the devices8,9 as follows:
Prepare a 10% w/v PEGDA (3.4kDa, Laysan Bio; Arab, AL, USA) and 10% w/v PEG (8kDa, Sigma-Aldrich) solution in unsupplmented cell culture media.
Prepare a photoinitiator stock solution of 100 mg/mL of Irgacure 2959 (Ciba Specialty Chemicals; Tarrytown, NY, USA) in 1-vinyl-2-pyrolidinone.
Thoroughly mix the two prepared solutions together to obtain a solution with a concentration of 0.4% w/v of photoinitiator. Filter the mixture through a 0.45 μm syringe filter to sterilize and remove particulates.
Trypsinize cell cultures and prepare a cell suspension in culture media, at twice the desired end-point cell concentration.
Mix the cell suspension and the filtered hydrogel precursor/photoinitiator solution in a 1:1 ratio.
Inject the solution into the microdevice using a long 25G needle. Carefully avoid trapping bubbles in the device.
Align a printed transparency mask to alignment marks on the device surface. Set up a UV illumination system to provide a UV dose of 17.5 mW/cm2 at the device surface. Illuminate the hydrogel through the mask for 195 s. This time has been optimized for our system, and may need to be adjusted.
Wash away unpolymerized hydrogel precursor solution with PBS, and replace the PBS with culture media. Actuate the loading posts to compress the hydrogel constructs.
Detailed characterization of microdevice operation and biological experiments conducted on this platform have been published elsewhere10.
E. Peripheral equipment
Modified petri dishes are used to maintain sterility of cell cultures during actuation of the devices. A blunted and stripped 18G needle is epoxied into a hole drilled in the side of the petri dish. Tubing (Clay Adams Intramedic PE190; VWR International, Arlington Heights, IL, USA) is press-fitted to these connectors and connects to the controlled solenoid valves and pressure source.
Pressures to the devices are provided by external micropumps. For the 2D experiments, positive pressure values from 30-55 kPa were generated using a voltage-controlled eccentric diaphragm pump (SP 500 EC-LC 4.5VDC; Schwarzer Precision, Germany). A pulse-width modulation based voltage controller is used to vary the applied voltage to control pressure output. Solenoid valves and manifolds (S10MM-30-12-3 and MSV10-1; Pneumadyne, Plymouth, MN, USA) are used to create a cyclic pressure waveform. The valves are actuated with a 12 V signal, controlled by a square waveform function generator.
F. Device characterization and use
Imaging on the device
A common issue with imaging cells or particles on the device is poor optical resolution due to the condensation of droplets beneath the PDMS film supporting the loading post. This condensation arises from temperature and humidity differences inside the incubator and after fixation or on a microscope stage. To resolve this problem:
Connect an open reservoir to the pressure inlet port, and fill it with deionized water. We use an open syringe with a luer lock connector for convenience.
Place the device and filled reservoir in a vacuum chamber, and pump down.
Wait 5 minutes, and bring the chamber to atmospheric pressure. Repeat two or three times. As air is displaced out of the channels of the device, it is replaced with water from the reservoir, eliminating the droplet condensates and providing a clear optical path for microscopy.
Image culture areas using bright field or fluorescence microscopy.
For live cell imaging, this procedure can be done before seeding the cells on the devices. However, channels must be designed large enough to prevent any viscous losses of pressure between units on the device.
Strain characterization by bead tracking
On the 2D culture systems:
Dilute 1 μm diameter fluorescent beads (Bangs Laboratories; Fisher, IN) in methanol to the desired concentration. Dilutions of 1:150 from the original concentrations (1% solids in bead buffer solution) were found to be suitable for our needs.
Plasma treat the device surface, and deposit 5-10 μL of bead suspension.
Wait for the methanol to evaporate. Repeat if bead concentration is too low.
Image the cell culture areas at rest, and under load.
Open-source automated particle tracking algorithms can then be used in ImageJ (NIH) to track bead displacements.
Displacement magnitude, direction and location parameters can then be used in a mathematical model to characterize strain fields on the device surface.
A similar procedure can be followed to characterize strains in 3D systems. Mix a quantity of fluorescent beads into the hydrogel precursor solution. In the case of the PEG hydrogel system, the pore sizes are much smaller than those of the 1 μm diameter beads. Beads are encapsulated in the hydrogel, and the system can be imaged using a confocal microscope. Bead displacements can then be tracked, analyzed and fitted to a deformation model.
G. Representative Results
Representative results for device fabrication, characterization and operation are provided in Figures 5 and 6.
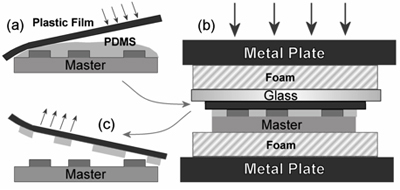 Figure 1. Sandwich mold fabrication process. (A) An overhead transparency is carefully lowered onto uncured PDMS on an SU-8 master. (B) The sandwich is placed in a foam, glass and metal stack, and cured in an oven under compression. (C) The stack is disassembled and the transparency peeled away, retaining the patterned PDMS layer3. Reproduced
by permission of the Institute of Physics.
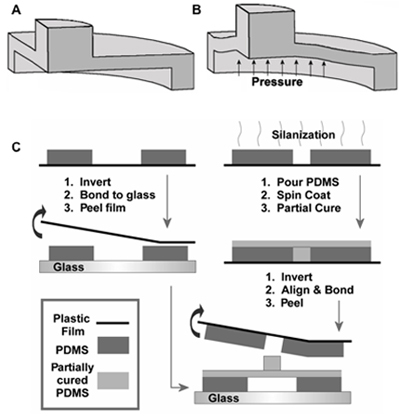 Figure 2. Schematic of vertically actuated micropost at (A) rest and (B) when actuated. (C) Schematic of multilayer fabrication process required to make an array of microposts3. Adapted by permission of the Institute of Physics.
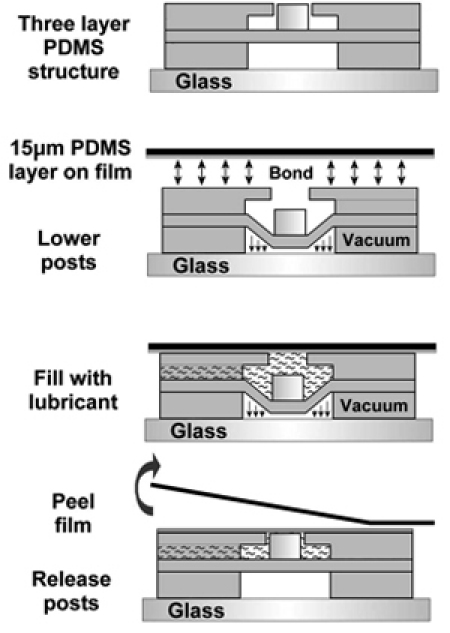 Figure 3. Process to modify microactuator array to conduct experiments for cells cultured on a deforming two-dimensional substrate7. Reproduced by permission of the Royal Society of Chemistry http://dx.doi.org/10.1039/B914460A.
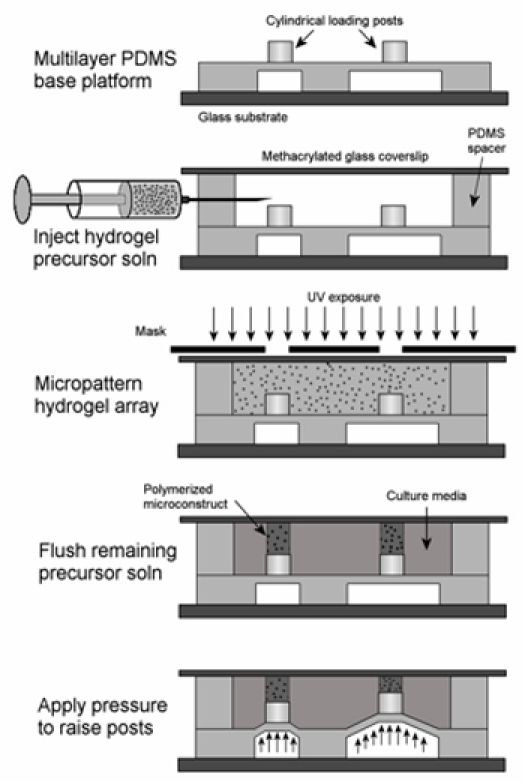 Figure 4. Process to modify microactuator array to conduct experiments for cells cultured in three-dimensional photopatterned hydrogel constructs10. Reproduced by permission of Elsevier.
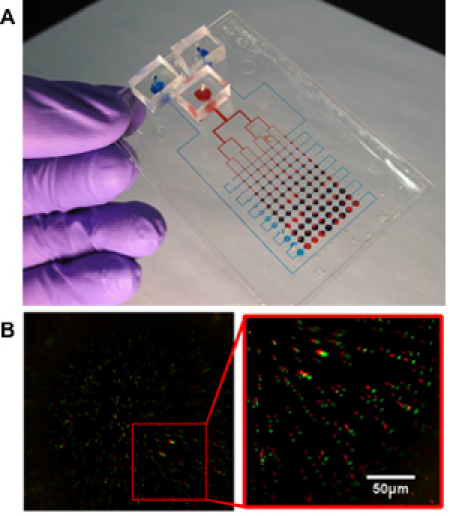 Figure 5. (A) Sample device for 2D mechanostimulatory culture. Red dye used to mark the actuating pressure delivery channels, and blue dye used to mark the lubrication channels. (B) Sample image of a strain characterization experiment. Red spots represent the undeformed location of the beads, while green spots represent the deformed locations7. Reproduced by permission of the Royal Society of Chemistry http://dx.doi.org/10.1039/B914460A.
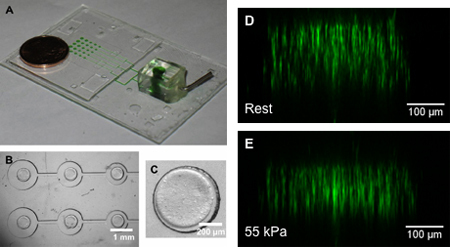 Figure 6. (A) Sample device for 3D compressive experiments. Green dye used to mark actuation pressure channels. (B) Top-down view of micropost array with (C) a hydrogel construct patterned on top of the post. (D, E) Side-reconstructed images of fluorescent beads in the hydrogel construct under (D) rest and (E) 55 kPa actuation pressures, demonstrating the strain characterization process in a 3D culture system10. Reproduced by permission of Elsevier.
Discussion
Though conceptually simple, device fabrication does take some experimental skill and practice. Particularly in the case of 2D cell culture, alignment of the multiple layers in the device can be challenging, especially over a large-area array. Practically speaking, we can reliably achieve a 100% alignment success rate using devices with 50 μm of tolerance in spacing between adjacent features in multiple layers. We have also successfully demonstrated alignment with tolerances as low as 15 μm, but the alignment time required is substantially greater and is achieved at a lower success rate. Alignment of the mask to photopattern biomaterials onto the array is similarly challenging, but the posts can be designed to be quite large in comparison to the hydrogel cylinders, alleviating this constraint.
Other challenges involve cell culture on the materials described in this protocol. In the 2D stretching system, using PDMS as a culture film limits biological investigation to short-term experiments, as cell adhesion to the substrate begins to be substantially affected after 6 hours of stimulation. This can be rectified by covalently binding matrix proteins to the PDMS surface11, or by replacing the PDMS cell culture substrate with a more clinically relevant polyurethane material, to improve cell adhesion and provide greater flexibility in conducted biological experiments12. In the described 3D system, the hydrogel chemistry is intended as an illustrative example only. Long-term culture of adherent cells requires the use of alternative natural or synthetic hydrogels, or the inclusion of adhesive ligands into the PEG matrix (which can be easily achieved using standard PEGylation chemistries)13.
Disclosures
No conflicts of interest declared.
Acknowledgments
We acknowledge financial support from the Natural Sciences and Engineering Research Council of Canada and the Canadian Institutes of Health Research (CHRPJ 323533-06), the Ontario Graduate Scholarship program to CM, and the Canada Research Chairs in Micro and Nano Engineering Systems to YS, and in Mechanobiology to CAS.
References
- Unger MA, Chou HP, Thorsen T, Scherer A, Quake SR. Monolithic microfabricated valves and pumps by multilayer soft lithography. Science. 2000;288:113–116. doi: 10.1126/science.288.5463.113. [DOI] [PubMed] [Google Scholar]
- Schaffer JL. Device for the application of a dynamic biaxially uniform and isotropic strain to a flexible cell culture membrane. J Orthop Res. 1994;12:709–719. doi: 10.1002/jor.1100120514. [DOI] [PubMed] [Google Scholar]
- Jo B, Lerberghe LVan, Motsegood K, Beebe D. Three-dimensional micro-channel fabrication in polydimethylsiloxane (PDMS) elastomer. Journal of Microelectromechanical Systems. 2000;9:76–81. [Google Scholar]
- Moraes C, Sun Y, Simmons CA. Solving the shrinkage-induced PDMS alignment registration issue in multilayer soft lithography. J. Micromech. Microeng. 2009;19:065015–065015. [Google Scholar]
- Haubert K, Drier T, Beebe D. PDMS bonding by means of a portable, low-cost corona system. Lab on a chip. 2006;6:1548–1549. doi: 10.1039/b610567j. [DOI] [PubMed] [Google Scholar]
- Bongaerts J, Fourtouni K, Stokes J. Soft-tribology: Lubrication in compliant PDMS-PDMS contact. Tribology International. 2007;40:1531–1542. [Google Scholar]
- Moraes C, Chen JH, Sun Y, Simmons CA. Microfabricated arrays for high-throughput screening of cellular response to cyclic substrate deformation. Lab on a chip. 2010;10:227–234. doi: 10.1039/b914460a. [DOI] [PubMed] [Google Scholar]
- Liu VA, Bhatia SN. Three-dimensional photopatterning of hydrogels containing living cells. Biomedical Microdevices. 2002;4:257–266. [Google Scholar]
- Hahn MS. Photolithographic patterning of polyethylene glycol hydrogels. Biomaterials. 2006;27:2519–2524. doi: 10.1016/j.biomaterials.2005.11.045. [DOI] [PubMed] [Google Scholar]
- Moraes C, Wang G, Sun Y, Simmons CA. A microfabricated platform for high-throughput unconfined compression of micropatterned biomaterial arrays. Biomaterials. 2010;31:577–584. doi: 10.1016/j.biomaterials.2009.09.068. [DOI] [PubMed] [Google Scholar]
- Wipff PJ. The covalent attachment of adhesion molecules to silicone membranes for cell stretching applications. Biomaterials. 2009;30:1781–1789. doi: 10.1016/j.biomaterials.2008.12.022. [DOI] [PubMed] [Google Scholar]
- Moraes C. Integrating polyurethane culture substrates into poly(dimethylsiloxane) microdevices. Biomaterials. 2009;30:5241–5250. doi: 10.1016/j.biomaterials.2009.05.066. [DOI] [PubMed] [Google Scholar]
- Ifkovits JL, Burdick JA. Review: photopolymerizable and degradable biomaterials for tissue engineering applications. Tissue engineering. 2007;13:2369–2385. doi: 10.1089/ten.2007.0093. [DOI] [PubMed] [Google Scholar]


