Abstract
The Drosophila larvae neuromuscular junction (NMJ) is an excellent model for the study of synaptic structure and function. Drosophila is well known for the ease of powerful genetic manipulations and the larval nervous system has proven particularly useful in studying not only normal function but also perturbations that accompany some neurological disease (Lloyd and Taylor, 2010). Many key synaptic molecules found in Drosophila are also found in mammals and like most CNS excitatory synapses in mammals, the Drosophila NMJ is glutamatergic and demonstrates activity-dependent remodeling (Kohet al. , 2000). Additionally, Drosophila neurons can be individually identified because their innervation patterns are stereotyped and repetitive making it possible to study identified synaptic terminals, such as those between motor neurons and the body-wall muscle fibers that they innervate (Keshishian and Kim, 2004). The existence of evolutionarily conserved synapse components along with the ease of genetic and physical manipulation make the Drosophila model ideal for investigating the mechanisms underlying synaptic function (Budnik, 1996).
The active zones at synaptic terminals are of particular interest because these are the sites of neurotransmitter release. NC82 is a monoclonal antibody that recognizes the Drosophila protein Bruchpilot (Brp), a CAST1/ERC family member that is an important component of the active zone (Waghet al. , 2006). Brp was shown to directly shape the active zone T-bar and is responsible for effectively clustering Ca2+ channels beneath the T-bar density (Fouquetet al. , 2009). Mutants of Brp have reduced Ca2+ channel density, depressed evoked vesicle release, and altered short-term plasticity (Kittelet al. , 2006). Alterations to active zones have been observed in Drosophila disease models. For example, immunofluorescence using the NC82 antibody showed that the active zone density was decreased in models of amyotrophic lateral sclerosis and Pitt-Hopkins syndrome (Ratnaparkhiet al. , 2008; Zweieret al. , 2009). Thus, evaluation of active zones, or other synaptic proteins, in Drosophila larvae models of disease may provide a valuable initial clue to the presence of a synaptic defect.
Preparing whole-mount dissected Drosophila larvae for immunofluorescence analysis of the NMJ requires some skill, but can be accomplished by most scientists with a little practice. Presented is a method that provides for multiple larvae to be dissected and immunostained in the same dissection dish, limiting environmental differences between each genotype and providing sufficient animals for confidence in reproducibility and statistical analysis.
Protocol
1. Preparation for Immunofluorescence:
To create a dissecting surface, pour Sylgard 184 Silicone Elastomer Base into a small tissue culture plate. Make sure not to fill the plate completely so that the dissection area is lower than the rim.
Trim dissection pins to a length of approximately 3.5mm for increased ease of manipulation, and make sure to have at least 6 pins per larva.
You will need blunt forceps that will allow to you grasp the pins for the dissection.
2. Dissection of Larvae:
Select wandering third instar larvae that are crawling around the sides of the vial and have not begun to pupate.
Place a larva on the dissection surface under a stereomicroscope. Wick away excess moister using a Kimwipe.
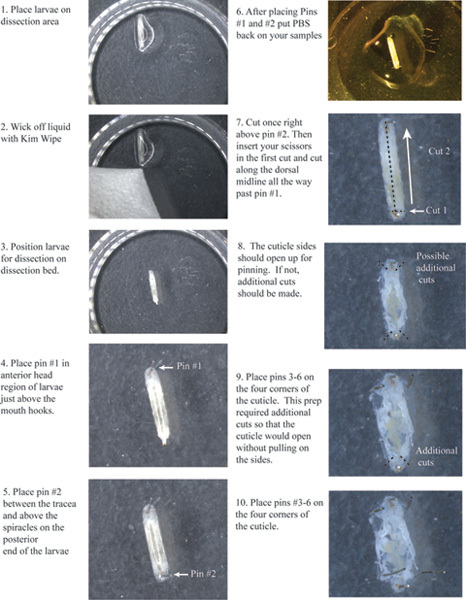
Arrange each larva so that the dorsal side is facing up. You will be able to see two trachea, white lines along the dorsal side of the larvae. Try to center these in the middle as much as possible because this marks the dorsal midline.
Place pin #1 just above the mouth hooks (Figure 1).
Place pin #2 in the tail just above the spiracles between the tracheae.
Add a small amount of PBS to the larvae to prevent drying of the cuticle.
Repeat the above steps with all the larvae, making sure that the genotypes are separated spatially by placing a pin between each genotype.
Make a small transverse cut right above pin #2 across both tracheas (Figure 1).
Insert your scissors in the first cut and cut along the dorsal midline between the tracheas all the way up past pin #1.
You will need to make other small cuts at the very top and bottom of each side of the cuticle, so that the left and right sides will open up allowing you to pin them down without pulling on the cuticle.
Place pin #'s 3, 4, 5, and 6 at each corner.
Fix the sample with 4% PFA for 20-25 minutes at room temperature
Decant the PFA and rinse with PBS 3-4 times, decanting each time.
3. Removal of Tissue:
Start by removing tissues at the posterior end because typically you want to protect the area where the brain is located.
While using a steromicroscope and with the larvae under a drop of PBS, first grab the posterior end of one of the trachea and pull it out which may remove some of the fat body with it. Repeat for the second trachea.
Grab some of the posterior fat body or intestine and pull them out of the prep. Once most of the posterior tissue has been removed, focus on removing the small tissues around the brain. If you are only interested in the muscles, or morphology of the NMJ you can remove the brain as well.
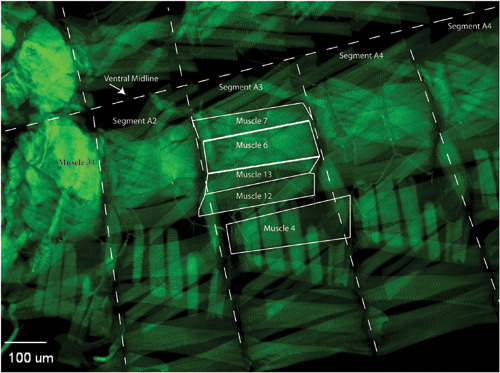
Removal of the brain allows for better visualization of Muscle 31, which is a helpful marker for abdominal segment orientation.
4. Immunofluorescence for Active Zones:
Add blocking agent (5% Normal Goat Serum in PBS) to the dissected preps in the dissection dish. Block for 1 hour at room temperature. If you would like to only make one solution for blocking and antibody dilutions, include 0.1% TritonX-100 to your blocking agent for tissue permeabilization.
Apply the Primary antibody diluted in blocking reagent with 0.1% TritonX-100. The active zone antibody is attainable through the Developmental Studies Hybridoma Bank (DSHB, http://dshb.biology.uiowa.edu/). Use a reference antibody (e.g. horseradish peroxidase-Cy3 conjugate) to label the NMJ membrane and axons.
Incubate the primary antibodies at 4°C overnight. So that the dryness of the refrigerator will not evaporate the antibody solution, create a humidity chamber by putting some water in the bottom of a used pipette tip box. Cover the translucent lid with aluminum foil to reduce fluorescent bleaching. Place the dissection slide in the humidity chamber and put the whole box in the 4°C incubator overnight.
The next morning, wash with PBST (PBS with 0.2% Triton-X-100) 5-10 times for 5-10 minutes each.
Incubate with the secondary antibody (e.g. Invitrogen Alexa Goat anti-Mouse-488) diluted in blocking reagent with 0.1% TritonX-100 at room temperature for 2-4 hours in the covered humidity chamber. Include a nuclear stain (e.g. DAPI) in the secondary, if you would like to identify the location of the nucleus in the muscles or brain.
Wash with PBST (PBS with 0.02% Triton-X-100) 5-10 times for 5-10 minutes each.
5. Mounting the Larval Samples on Slides:
Decant and wick off the last PBST wash.
Pipette approximately 1mL 80% glycerol to cover the pinned down larval pelts.
Remove 5 of the 6 pins in all the larvae.
When you are ready to put the first genotype on a slide remove the last pin for all the larvae of that genotype.
Prepare a "wash" slide by putting two drops of your mounting medium on a clean slide. This step is important to wash the water solution off the larvae for mounting and clearer imaging.
Grab one larva by the tail with your blunt forceps, drag the larva around in the glycerol and then along the dry edges of your dissection dish, to remove a majority of the glycerol. Place the larvae in the first mounting medium drop.
Repeat step 6 for all of the larvae of the same genotype.
Once all the larvae are in the first mounting medium drop, grab the first larva by the tail and pull it through the drop and then along the dry edges of the dish to remove a majority of the medium. Then place the larvae in the second mounting medium drop.
Repeat step 8 for all the larvae with the same genotype.
Prepare your final slide by labeling it and placing a small "T" shape of mounting medium on the slide.
As in step 5.8, grab the larva by the tail; pull the pelt through the second mounting medium drop and then along the dry sides of the "Wash" slide. After the majority of the medium has come off, place the larval pelt on the final slide in the mounting medium.
Repeat for all larval pelts.
Make sure that all the larval pelts are arranged as desired making sure that the cuticle side is down and the exposed muscle is facing up.
Place a cover slip on the slide to cover the dissected larvae, with the starting edge in the upper line of the "T."
Put a small weight (e.g. 9 volt battery) on the cover slip, making sure that the mounting medium spreads completely under the cover slip.
To reduce possible fluorescent quenching, place the slide in a drawer or dark space until the mounting medium has cured.
Clean up the mounting medium that overflowed the edged of the cover slip. Clean off excess dry mounting medium on the cover slip or slide with 70% ethanol.
To create a final seal, seal with fingernail polish.
6. Representative Results:
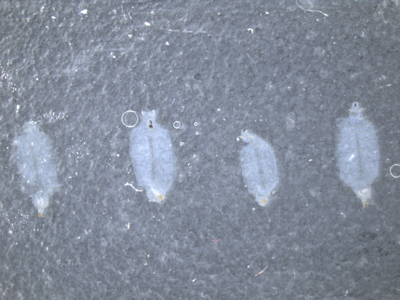
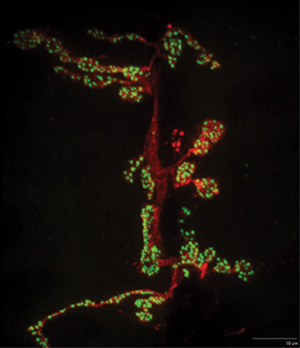
An example slide of dissected and immunostained larvae is shown in Figure 2. When the larvae dissections, stains, and mounting are done properly, the user can identify the larvae muscle of interest (Figure 3) in segments A2-A6. Hoanget al. provides a detailed description of muscle position as well as characterization of specific synaptic boutons (Hoang and Chiba, 2001). Using a high power objective the user can focus on a single synapse and take z-stack image. A representative maximum projection image of a portion of synapse 6/7 is shown (Figure 4). Then using imaging software, the active zones can be quantitatively evaluated for characteristics that are particular to your mutant phenotype. Examples of features that may be altered in a particular mutant phenotype include the total number, flourescence intensity, and spacing between active zones.
Potential Pitfalls:
Immunofluorescence evaluation of the larval neuromuscular junction is a valuable system that can provide valuable insight into synaptic biology, although there are potential pitfalls that can limit the utility of this system. For example, frequently it is desirable to image the staining pattern of two or more primary antibodies in the same sample. The choice of appropriate primary antibodies, appropriate fluorophores, and appropriate negative controls is essential to success.
If imaging two antigens in your experiment, be certain that the primary antibodies are from different species so that each protein of interest can be uniquely identified with a fluorescently labeled secondary antibody. A recommended way to reduce background is to use a blocking agent containing the normal serum of the species from which the secondary antibodies were derived (e.g. use normal goat serum as a blocking agent when using goat anti-rabbit or anti-mouse secondary antibodies).
After planning the primary and secondary antibodies that you will use in your experiment, you must also consider including controls in your staining sets to ensure that the fluorescent signal that you are seeing is real and not just background. If possible, include negative control samples that do not contain the protein of interest. This is easily done in studies of exogenous transgene overexpression by including a wild type animal, but in some cases can be accomplished by using a homozygous mutant of your protein of interest. Another essential negative control, useful for measuring the background levels of your fluorescent signal, is to use the secondary antibody without including the primary. When imaging your resulting preps, it is important to understand that all of the fluorescent signal that you are seeing might not be real, and might be background from your secondary antibodies or from endogenous tissue background. You may need to normalize your images to consider background fluorescence when assaying for changes between fluorescence intensity.
Choice of fluorophore must also be made with care. Consideration of the excitation and emission spectra for each fluorophore and the ability to uniquely detect each signal is essential to avoid channel bleed through. If there is any uncertainty, a simple way to determine whether the extent of bleed through is to immunostain with a single fluorophore-labeled antibody at a time and check the image with each channel that you will be using in your final experiment. This should reveal if bleed through is occurring with your microscope filter set.
 Figure 1. Flow chart of cuticle cutting and placement of pins 1-6. Click here to view a larger image
 Figure 2. Placement of larvae on the final slide. Make sure that the larvae preps are exposed muscle side up and cuticle side down. Leave at least a larval body width in-between each sample.
 Figure 3. When imaging, locate the muscles and segments of interest. Common neuromuscular junctions characterized innervate muscles 6/7, muscle 13, muscle 12, or muscle 4. On the opposite side of the ventral midline, there is a mirror image muscle structure of the shown hemi-segment. Use Muscle 31 as a marker to identify which segment you are imaging. Image the same synapses and segments for the rest of your samples, collecting many synaptic images per genotype that can be used for quantification.
 Figure 4. A representative maximum projection image of a portion of the NMJ innervating muscle 6/7 is shown. NC82 (Bruchpilot) staining is shown in green. HRP pre-synaptic stain is shown in red. Note the active zone punctae that can be further quantified by imaging software.
Discussion
For neurons, the synaptic terminal area is of critical importance, and is the bridge for proper communication between the post- and pre-synaptic cells. A powerful way to investigate the health of the neuron in disease models is to analyze proteins of the synaptic terminal by immunofluorescence. The immunofluorescence method presented here enables the researcher to examine many larvae simultaneously while limiting the environmental differences between groups. The central nervous system ofDrosophila third-instar larvae has many advantages including glutamatergic synapses, mapped and repeated synaptic terminals, accessibility, reproducibility and power of genetic manipulation. Specifically in Drosophila neuronal disease models, the levels of the active zone protein Bruchpilot has been altered. Because of the large number of larvae assayed simultaneously, the active zone analysis using the method presented enables the researcher to detect subtle differences between groups that could reflect a fundamental defect in the health of the neuron.
Disclosures
No conflicts of interest declared.
Acknowledgments
We thank Dr. Nael Alami and Dr. Nam Chul Kim for their helpful comments about this manuscript.
References
- Budnik V. Synapse maturation and structural plasticity at Drosophila neuromuscular junctions. Curr Opin Neurobiol. 1996;6:858–867. doi: 10.1016/s0959-4388(96)80038-9. [DOI] [PubMed] [Google Scholar]
- Fouquet W, Owald D, Wichmann C, Mertel S, Depner H, Dyba M, Hallermann S, Kittel RJ, Eimer S, Sigrist SJ. Maturation of active zone assembly by Drosophila Bruchpilot. J Cell Biol. 2009;186:129–145. doi: 10.1083/jcb.200812150. [DOI] [PMC free article] [PubMed] [Google Scholar]
- Hoang B, Chiba A. Single-Cell Analysis of Drosophila Larval Neuromuscular Synapses. Developmental Biology. 2001;229:55–70. doi: 10.1006/dbio.2000.9983. [DOI] [PubMed] [Google Scholar]
- Keshishian H, Kim Y-S. Orchestrating development and function: retrograde BMP signaling in the Drosophila nervous system. Trends in Neurosciences. 2004;27:143–147. doi: 10.1016/j.tins.2004.01.004. [DOI] [PubMed] [Google Scholar]
- Kittel RJ, Wichmann C, Rasse TM, Fouquet W, Schmidt M, Schmid A, Wagh DA, Pawlu C, Kellner RR, Willig KI, Hell SW, Buchner E, Heckmann M, Sigrist SJ. Bruchpilot Promotes Active Zone Assembly, Ca2+ Channel Clustering, and Vesicle Release. Science. 2006;312:1051–1054. doi: 10.1126/science.1126308. [DOI] [PubMed] [Google Scholar]
- Koh YH, Gramates LS, Budnik V. Drosophila larval neuromuscular junction: Molecular components and mechanisms underlying synaptic plasticity. Microscopy Research and Technique. 2000;49:14–25. doi: 10.1002/(SICI)1097-0029(20000401)49:1<14::AID-JEMT3>3.0.CO;2-G. [DOI] [PubMed] [Google Scholar]
- Lloyd TE, Taylor JP. Flightless flies: Drosophila models of neuromuscular disease. Ann N Y Acad Sci. 2010;1184:e1–e20. doi: 10.1111/j.1749-6632.2010.05432.x. [DOI] [PMC free article] [PubMed] [Google Scholar]
- Ratnaparkhi A, Lawless GM, Schweizer FE, Golshani P, Jackson GR. A Drosophila model of ALS: human ALS-associated mutation in VAP33A suggests a dominant negative mechanism. PLoS One. 2008;3:e2334–e2334. doi: 10.1371/journal.pone.0002334. [DOI] [PMC free article] [PubMed] [Google Scholar]
- Wagh DA, Rasse TM, Asan E, Hofbauer A, Schwenkert I, Dürrbeck H, Buchner S, Dabauvalle M-C, Schmidt M, Qin G, Wichmann C, Kittel R, Sigrist SJ, Buchner E. Bruchpilot, a Protein with Homology to ELKS/CAST, Is Required for Structural Integrity and Function of Synaptic Active Zones in Drosophila. Neuron. 2006;49:833–844. doi: 10.1016/j.neuron.2006.02.008. [DOI] [PubMed] [Google Scholar]
- Zweier C, Jong EKde, Zweier M, Orrico A, Ousager LB, Collins AL, Bijlsma EK, Oortveld MA, Ekici AB, Reis A, Schenck A, Rauch A. CNTNAP2 and NRXN1 are mutated in autosomal-recessive Pitt-Hopkins-like mental retardation and determine the level of a common synaptic protein in Drosophila. Am J Hum Genet. 2009;85:655–666. doi: 10.1016/j.ajhg.2009.10.004. [DOI] [PMC free article] [PubMed] [Google Scholar]


