Abstract
A small, hermetic, wirelessy-controlled retinal prosthesis has been developed for pre-clinical studies in Yucatan minipigs. The device was attached conformally to the outside of the eye in the socket and received both power and data wirelessly from external sources. Based on the received image data, the prosthesis drove a subretinal thin-film polyimide array of sputtered iridium oxide stimulating electrodes. The implanted device included a hermetic titanium case containing a 15-channel stimulator and receiver chip and discrete circuit components. Feedthroughs in the hermetic case connected the chip to secondary power- and data-receiving coils, which coupled to corresponding external power and data coils driven by power amplifiers. Power was delivered by a 125 KHz carrier, and data were delivered by amplitude shift keying of a 15.5 MHz carrier at 100 Kbps. Stimulation pulse strength, duration and frequency were programmed wirelessly from an external computer system. The final assembly was tested in vitro in physiological saline and in vivo in two minipigs for up to five and a half months by measuring stimulus artifacts generated by the implant’s current drivers.
Keywords: retinal prosthesis, retinal implant, biomedical electrodes, neuromuscular stimulation, iridium oxide, integrated circuit design, telemetry, medical devices
1 Introduction
Vision prostheses are being developed by a number of groups worldwide [1–14]. These devices aim to restore visual function lost due to degenerative retinal diseases such as retinitis pigmentosa (RP) and age-related macular degeneration (AMD). These conditions cause a gradual loss of photoreceptors, yet a substantial fraction of the retinal ganglion cells remain forming an intact pathway to the visual cortex. The prevalence of RP is approximately 1 in every 4000 live births, and there are approximately 1,700,000 affected individuals worldwide. AMD is the leading cause of blindness in the developed world, with roughly 2 million affected patients in the United States alone. This number is expected to increase 50% by the year 2020 as the population ages [15]. The best existing treatments slow the progress of these diseases, but there is no known method to restore functional vision. While there is evidence that significant reorganization of the retina occurs after the loss of input signals from the photoreceptors [16], our group and others have nevertheless shown that focal electrical stimulation of retinal ganglion cells yields responses corresponding to the strength and location of the stimuli (e.g., [17]). Our group showed the retinal prosthesis concept in six acute human retinal stimulation trials, in which microfabricated thin-film electrode arrays were surgically inserted into the subjects’ eyes, resting on or just above the epiretinal surface. An external stimulator system [18] delivered current pulses for a few hours through connections through the eye, and subjects reported their perceptions [4, 5]. These experiments led us to begin development of a chronically-implantable device to fully explore the prospects of restoring useful vision.
Other groups are engaged in similar efforts (e.g., [10–14]), most developing either epiretinal [6, 7] (on the front of the retina inside the eye) or subretinal [8, 9] (behind the retina, between the retina and choroid) devices. Others focus on less direct stimulation of the retina using a supra-choroidal (behind the choroid, between the choroid and the sclera) or trans-scleral (outside of all or part of the sclera) approach [10–12]. Our team began with an epiretinal approach, used in the acute human surgical trials described above [4, 5], but has changed to an ab externo subretinal surgery. This approach results in improved biocompatibility and a less invasive surgery, and it leaves the bulk of the implant device outside the eye.
Our first-generation wirelessly-powered chronic retinal stimulation device [1] was implanted in Yucatan minipigs during the spring and summer of 2008. We now describe an improved version of the implant, with the circuits encased in a hermetic titanium enclosure, the coils moved to a more magnetically-favorable position, and easier surgical access for electrode array insertion. We also describe in detail our power and data telemetry systems.
2 Implant Design Methods
2.1 System Description
Our retinal prosthesis system includes an external PXI computer-based controller with a user interface for selecting which electrodes to drive and with what level of current. Data from the computer system were sent to a power amplifier, which then transmitted wirelessly to the implant by near-field inductive coupling. Data at 100 Kbps were encoded by amplitude shift keying (ASK) on a 15.5 MHz carrier. Power was also wirelessly transmitted to the implant using a 125 KHz carrier, and was rectified by the implant to create ±2.5 V power supplies.
A custom integrated circuit [19], shown in Fig. 2 and fabricated in 0.5 μm CMOS, received and decoded the incoming data and delivered stimulating current to the appropriate electrodes based on the timing of transmitted commands. The chip was capable of delivering up to 930 μA of current per channel at steps of 30 μA. This circuit was designed to be an extremely flexible research tool, and was capable of delivering more current than was needed for this animal work. Currents typically delivered to electrodes ranged from 30 to 240 μA. The chip consumes 1.3 mW, excluding current sources. In typical stimulation modes (180 μA, 1 ms per phase biphasic pulses, repeated every 20ms), the total implant power consumption is approximately 2 mW.
Fig. 2.
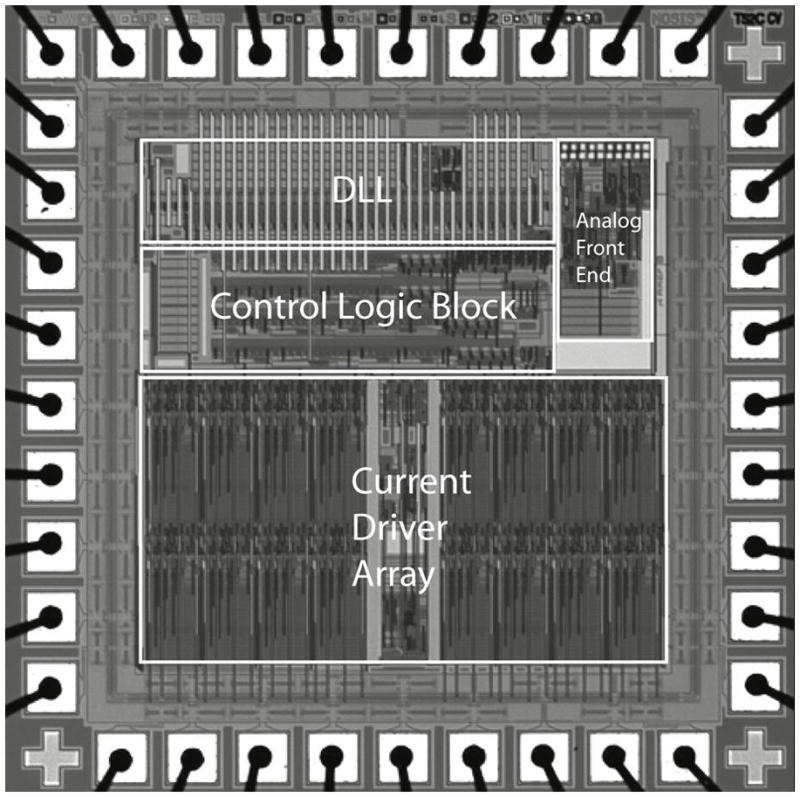
Custom integrated circuit for the retinal prosthesis. This 0.5 μm CMOS (3M2P) chip with 30,000 transistors received incoming stimulation data, decoded it with an envelope detector and a delay locked loop, and delivered the appropriate stimulation currents to electrodes with 15 current sources.
The package containing the chip was attached to the outside of the eye, and its electrical stimulation current was delivered to the retinal nerve cells via a thin-film microfabricated array of sputtered iridium oxide film (SIROF) electrodes, which was surgically inserted into the subretinal space through a flap in the sclera.
In a future clinical implant, patients will wear a camera mounted on glasses, and will carry a small battery-powered controller which will perform the required image signal processing, intelligently extracting features from a megapixel image and re-creating that image with dozens or hundreds of electrodes.
2.2 Differences from First-Generation Device
Our first-generation implant [1] was assembled on a flexible substrate that wrapped around the eye inside the socket, attaching to the sclera of the eye (Fig. 3). This device had three significant design drawbacks: (1) small receiver coils limited power and data telemetry effectiveness due to poor coupling; (2) the silicone coating held up well in studies of up to 10 months, but did not appear to be viable for chronic trials of 5–10 years; and (3) the required surgical approach for electrode array insertion was very challenging, due to the need to insert the array through the coils. In addition, the power and data telemetry amplifiers used with the first-generation device had limited range and reliability. The class E amplifier used for power transmission used a startup circuit which didn’t always start reliably, and the class A amplifier used for data transmission was not well impedance-matched, and could not deliver data signals over a large enough distance.
Fig. 3.
First-generation retinal prosthesis. The flexible implant wrapped around the eye, with coils and 15-electrode array in the superior-temporal quadrant and circuitry in the superior-nasal quadrant. The prosthesis received power and data by inductive coupling on separate telemetry channels, and the electrode array accessed the subretinal space via an incision through the sclera of the eye.
Our newer-generation device [2], [3] used the same controller chip [19] and power and data telemetry scheme, but solved the three problems outlined above, with, respectively: (1) larger coils on the front of the eye, surrounding the cornea, under the conjunctiva, and conformally wound to fit the curvature of the eye; (2) a hermetic, titanium case enclosing the electronic circuitry, attached to the sclera deep in the superior-nasal quadrant; and (3) a serpentine electrode array which extends from the case to the superior-temporal quadrant, allowing better surgical access to create the scleral flap and insert the array into the subretinal space. The concept of this hermetic implant is shown in Fig. 4. The external power and data transmitters were redesigned to provide increased telemetry distance and startup reliability.
Fig. 4.
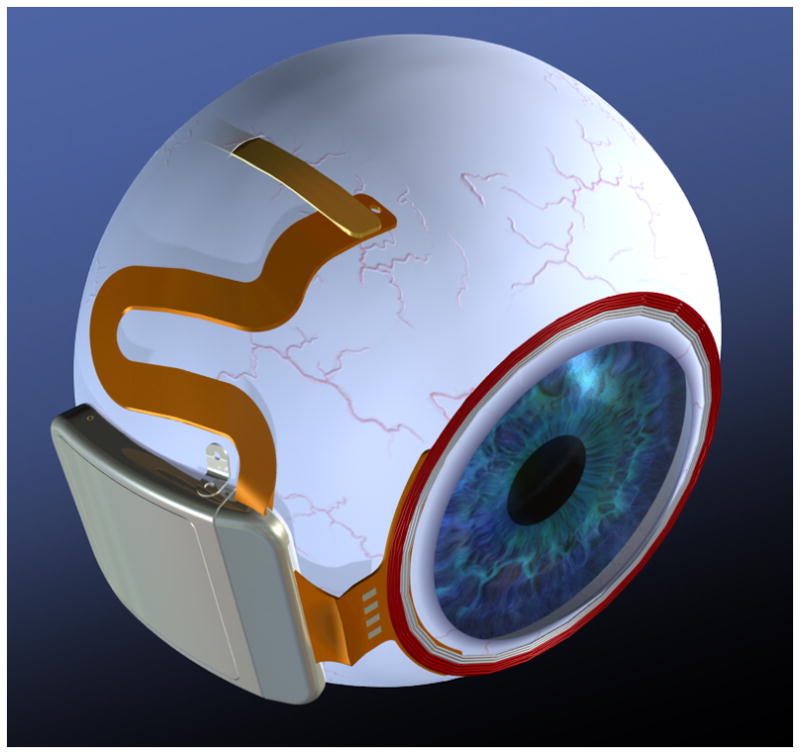
Drawing of hermetic implant concept. In this modified implant, the power and data receiver coils rest on the front of the eye, surrounding the cornea, just beneath the conjunctiva. The electronics are encased in a hermetic titanium package, and the electrode array inserts into its own quadrant, for ease of surgical access.
2.3 Improved Implant Components
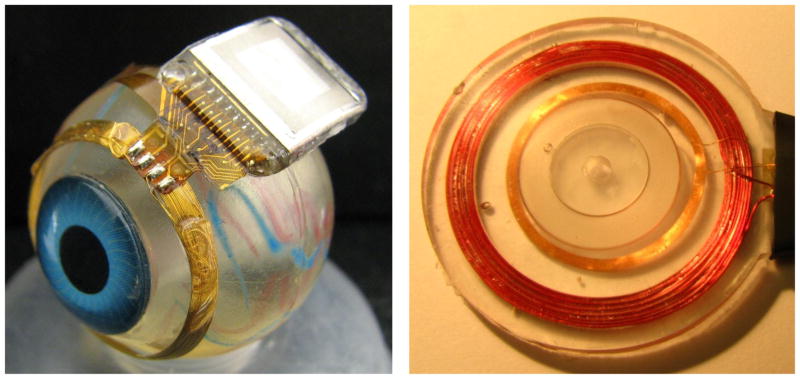
Relocating the secondary power and data coils from the temporal side of the eye to the anterior of the eye allowed for much larger coils, giving much better inductive coupling. However, these coils rested against the delicate conjunctiva and can wear through and become exposed, creating a risk of infection. To reduce this risk, the coils were carefully wound on a steel sphere so that they matched the curvature of the eye. The secondary coils included separate power and data windings and leads, but they were wound together for structural support and ease of implantation. They were made of 40 AWG gold magnet wire, with 28 turns for the 32 μH power coil and two 6-turn coils for a 12-turn center-tapped 4.5 μH data receiver. The spherically-molded coil had a mean radius of 9.5 mm and a height off of the eye of less than 0.2 mm. The secondary coils are shown on a model eye in Fig. 5. The primary coils sat in front of the eye, and were made of separate power and data coils in a molded poly(dimethylsiloxane) body. The primary power coil had a mean radius of 19 mm, while the data coil had a mean radius of 12.5 mm. The primary coils are also shown in Fig. 5.
Fig. 5.
Hermetic retinal prosthesis and associated primary power and data coils. The implant on the left is a prototype of the device in Fig. 4, shown attached to a plastic model eye. The gold power secondary coil and center-tapped data secondary coil were formed as one piece on a sphere to match the eye’s curvature. The titanium case with welded lid, hermetic feedthrough, and epoxy header protected the internal circuitry. The electrode array is out of view over the top of the model eye. The primary coils on the right were potted in poly(dimethylsiloxane) (PDMS).
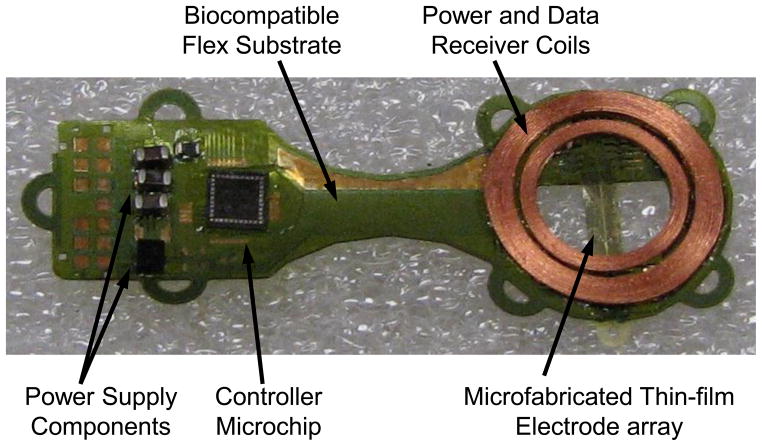
The implant’s electronic circuitry was encased in the titanium enclosure, which measured 11 mm × 11 mm × 2 mm and was curved to conform more closely to the eye. A small ceramic piece, 8.8mm × 1 mm × 1 mm thick, had 19 staggered holes drilled in it, and titanium pins 3.3 mm long were inserted through the holes. Gold rings were fitted around the titanium pins and brazed to the ceramic for an airtight seal. A curved frame was machined from titanium, and the ceramic feedthrough with a gold strip around its edge was brazed into the case. The integrated circuit, which includes the telemetry receiver, digital controller, analog current sources, biases, and startup circuitry, was flip-chip bonded to a circuit board, shown in Fig. 6. Additionally, Schottky rectifier diodes, two power supply capacitors, a discrete resistor and capacitor for power-up reset delay, a resonating capacitor for the power secondary coil, and a 5.1 V Zener diode for power supply regulation were soldered to the board. The pads on the top and bottom of the edge of the board were soldered to the inside pins of the feedthrough, and ground pads at the two corners opposite the feedthroughs were soldered to pins attached to the corners of the case, allowing the titanium case itself to serve as a current return counter electrode for stimulation. The assemblies were baked for 24 hours to drive off residual water, then titanium lids were laser-welded onto the top and bottom of the case in a helium/argon ambient environment. Hermeticity was evaluated using a Varian helium leak detection system, and leakage rates lower than 1×10⁻⁹ std cc He/sec were considered passing. With this leakage rate, the projected lifetime of the packaged system is estimated to be several years. No desiccant was added to this device, but one may be incorporated into future versions. Before being welded to the implant case, the top and bottom lids were sputtered with platinum to improve the current-carrying effectiveness of the case. The external feedthrough pins were soldered to the external flex circuit with gold-tin solder, and an epoxy header was molded over the external feedthrough connections, as shown in Fig. 5.
Fig. 6.
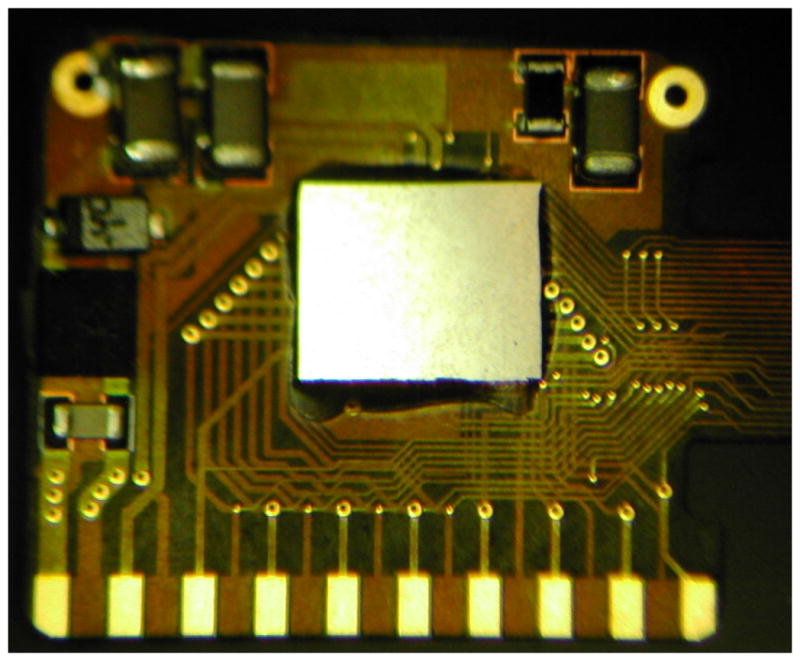
Retinal implant circuit board. The communication, control, and stimulation chip was attached alongside power supply components, and this board was inserted into the curved titanium package. The pads at the bottom of the photo were soldered to the hermetic feedthrough pins of the package, and the ground pads at the top were soldered to the package itself to allow the titanium package to serve as a current return.
The novel, serpentine design of our flexible, thin-film 16 μm thick polyimide array of 400 μm diameter SIROF electrodes allowed the surgeon to route it under the superior rectus muscle and insert the electrodes from the superior-temporal quadrant. Since the titanium case was in the superior-nasal quadrant and the secondary coil was low-profile, there was nothing blocking surgical access to the area of the eye where the scleral flap was made. The retina was first separated from the choroid with a bleb of fluid injected from inside the eye, then the array was inserted into the bleb space. The retina slowly settled on top of the array and held it in place [20], [21]. The placement of the electrode array in the subretinal space took advantage of the eye’s natural forces holding the retina against the choroid. The array was sutured to the sclera just outside the point where it enters the eye, but no attachment was necessary in the subretinal space.
2.4 Improved telemetry
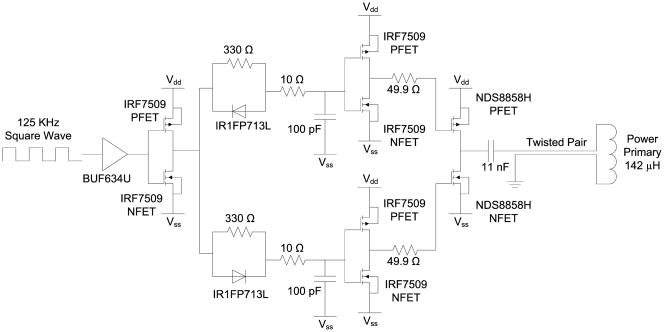
Power was transmitted to the implant by a class D power amplifier operating at 125 KHz, shown in Fig. 7. The 125 KHz square wave, generated by a Texas Instruments MSP430-F2013 microcontroller, was buffered and sent through two separate asymmetric delay circuits to create non-overlapping p- and n-clocks, which were buffered again before driving the class D switches. A series capacitance of 11 nF resonated with the 142 μH primary coil, which was connected to the power amplifier by a 1.5 m twisted pair cable. Power received by the 32 μH secondary coil was rectified by dual half-wave Schottky rectifiers, creating ± 2.5 V anodal and cathodal voltage supplies, clamped by a simple 5.1 V Zener diode.
Fig. 7.
Class D power transmitter. A 125 KHz square wave was buffered and separated into non-overlapping clocks to alternately drive a power PFET and NFET, which in turn drove the series tuned capacitor and inductor (primary coil) alternately to Vdd and Vss. The resonant tank voltage rose to more than 50V peak.
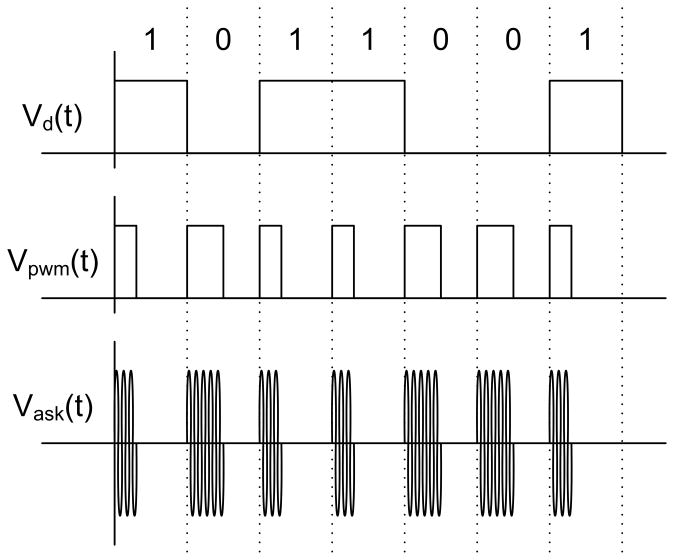
Stimulation data were created by a PXI-based system with a graphical user interface and an arbitrary waveform generator. The system created a 15.5 MHz carrier, amplitude shift keyed (ASK) at a 100% modulation index. Bits were encoded by pulse width modulation (PWM), with 30% duty cycle representing a digital 1 and 50% duty cycle representing a digital 0, as shown in Fig. 1. The signal was sent to a class A power amplifier, shown in Fig. 8, via a 50 Ω coaxial cable. The output of the amplifier included an impedance matching network before connecting to the 6.45 μH primary coil via an 80 Ω coaxial cable. The data were received by the center-tapped 4.5 μH secondary coil, and were decoded by the implant chip. A transistor-based envelope detector with a peak-locked loop extracted the PWM signal from the ASK signal, and an adaptive bandwidth delay-locked loop extracts the clock and digital data from the PWM signal [19]. The command structure for this chip was fairly simple, and consisted of four 16-bit commands. A configuration command was followed by 160 bits of current amplitude data and 10 bias configuration bits. A pulse down command began the negative current pulse, and a stop command ended the current pulse. Similarly, a pulse up command began the second phase of positive current, which in turn was ended by a stop command. This simple control structure was sufficient for use in our research device.
Fig. 1.
Data were encoded in the carrier by amplitude shift keying (ASK), with pulse width modulation (PWM) encoding of bits. The carrier was fully modulated, with a duty cycle of 30% to represent a 1, and 50% to represent a 0.
Fig. 8.
Class A data transmitter. Amplitude shift-keyed (ASK) signals were delivered from the PXI system. The incoming signal was AC coupled to the npn transistor, which provided current amplification. The 18 pF – 8 μH L-network provided impedance matching to the 80 Ω coaxial cable to the primary data coil resonant network.
3 Testing Methods
The full implant system was tested dry on the bench, as well as in vitro in a phosphate buffered saline solution. On the lab bench, dry testing was performed by connecting to the device though a polyimide test tail that was fabricated as part of the external flex and electrode array. Electrode loads, each consisting of a resistor in series with a parallel resistor-capacitor pair, were attached to the current source outputs. Power and stimulation commands were transmitted to the device over distances ranging between 5 mm and 30 mm, and balanced biphasic current pulses ranging from 30 to 240 μA were delivered to the mock electrode loads with pulse durations of 1 ms. The load voltage was directly measured and recorded during wireless operation of the device.
During in vitro testing, the device was attached to a plastic model eye, as in Fig. 5, and submerged in a saline bath. Power and data were transmitted to the device from the primary coils in Fig. 5, over distances ranging from 10 mm to 30 mm. The PXI system transmitted commands to the implant to drive the electrodes with balanced biphasic pulses of current, 30 to 240 μA at 1 ms pulse width per phase (24–192 μC/cm2), with the implant’s case serving as the current return. Similar stimulation parameters were used during in vivo stimulation trials performed in two Yucatan minipigs. Electrode voltage was recorded via the polyimide test tail used in bench tests. The test tail was then cut off, and the edge coated in silicone in preparation for implantation in the minipig. The device was retested in the saline bath. Without the test tail, less-direct measurements of implant function were required. Needle electrodes, insulated up to the tip, were immersed in the saline, and the differential voltage was measured with a custom-built instrumentation amplifier. To ensure that the device was working in the pig eye, the same type of measurement was made in vivo with a contact lens electrode on the eye surface and an ear reference electrode. These measurements were entirely non-invasive and were meant to show continued function of the implant over time. We did not test any response from the minipig’s visual system in these experiments. While it is common to test electrically-evoked responses in the visual cortex of an animal, as we have done in rabbits in the past [22], it is logistically difficult to record these signals in the pig in a chronic experiment. Since we have documented perceptual responses from humans under similar stimulation conditions [4], [5], we determined that there was not enough to be learned from electrically-evoked response recordings in minipigs to justify the effort.
The devices were implanted in two minipigs, each weighing roughly 20 kg. Electroretinograms (ERGs) were taken pre-operatively to assess the general health of each pig’s retina, and they were also taken at the beginning of subsequent exams. The conjunctiva was cut open by periotomy and dissected, the location of the sclera flap was marked in the superior temporal quadrant, a partial vitrectomy was performed, and a retinal bleb of saline was raised with a needle from the front of the eye to separate the retina from the RPE and the choroid. Next, the front of the prosthesis was sutured to the sclera through titanium suture tabs, and the back of the prosthesis was attached around the opposite side of the eye with long sutures. A flap was made through the sclera for the insertion of the electrode array into the subretinal space. The array was inserted through the scleral flap and through a choroidal incision into the subretinal space. The internal portion of the array was held in place by the retina as the bleb collapsed, and the external portion of the array was sutured into place on the sclera. The conjunctiva was sutured back over the implant to complete the surgery. The device on the pig eye is shown in Fig. 9.
Fig. 9.
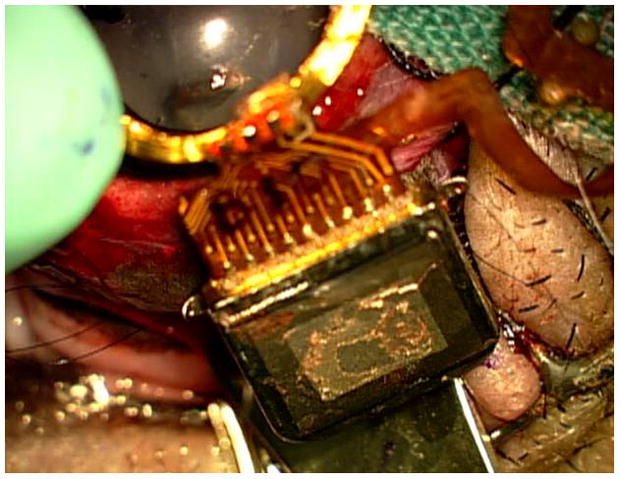
Photo of the surgical implantation of a hermetic prosthesis onto the minipig eye. The molded gold telemetry coil surrounded the cornea, while the titanium hermetic case containing the custom stimulation electronics was attached to the sclera. The conjunctiva was later sutured over the implant to maintain sterility.
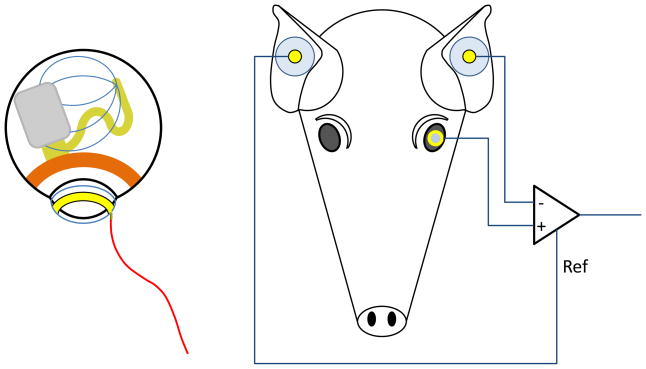
To establish function of the device, a contact lens electrode commonly used for ERGs was placed on the cornea of the pig’s eye, and two EKG-type electrodes were placed on the ears. A differential measurement was made between the contact lens electrode and one of the ear electrodes, while the second ear electrode served as a reference voltage for the differential amplifier circuit. This electrode configuration is shown in Fig. 10. The primary telemetry coils were then placed near the front of the eye. Power and data were delivered to the implant and adjusted until the recording electrode showed stimulus artifact from the pulsing current sources of the implant. Control measurements were made by transmitting power and data to the implant, but commanding zero stimulation current.
Fig. 10.
In vivo measurement electrode configuration. Left: The implant sits on the pig’s eye, with a pulse of current spreading from the subretinal electrode array to the implant case, which serves as the current return. A contact lens electrode on the pig’s cornea picks up a small voltage from this current pulse. Right: The contact lens electrode voltage is monitored by a differential amplifier, with an ear electrode as the negative input. A second ear electrode serves as the reference voltage for the differential amplifier.
Follow-up exams were conducted on the animals one week after implantation and approximately every three to four weeks thereafter. These exams took place in the surgical facility but were non-sterile procedures. The pig was anesthetized and ERG recordings were taken. The contact lens electrode, ear reference electrodes, and primary power and data coils were placed by the surgeon. Power and data were delivered to the implant and the stimulus artifact was recorded as in the original surgery.
4 Results
4.1 Telemetry system testing
Telemetry of power and data has been tested in the laboratory up to a 30 mm separation between primary and secondary coils. This is far greater than was needed in most animal experiments. Once the telemetry link was established, power and data transmission were robust, and no bit errors were recorded. A typical electrode in vitro test waveform is shown in Fig. 11. The RF power and data waveforms are visible in the figure. Also note the step-ramp shape of the electrode voltage waveform. This waveform shows the characteristic shape seen when delivering a biphasic current pulse through an electrode in saline or tissue. A typical coil separation under normal use is 10 mm, resulting in a primary side power consumption of approximately 50 mW. Given the 2 mW implant power consumption reported above, the transmission system displayed 4% efficiency. Power efficiency on the transmitter side was not a priority in this design, but will be improved in the future. The magnetic field strength delivered to the body by this transmitter is modest and is thought to be similar to other FDA-approved wirelessly-powered devices. The safety of the wireless power transmission system will be explored in pre-clinical animal trials on future versions of this system.
Fig. 11.
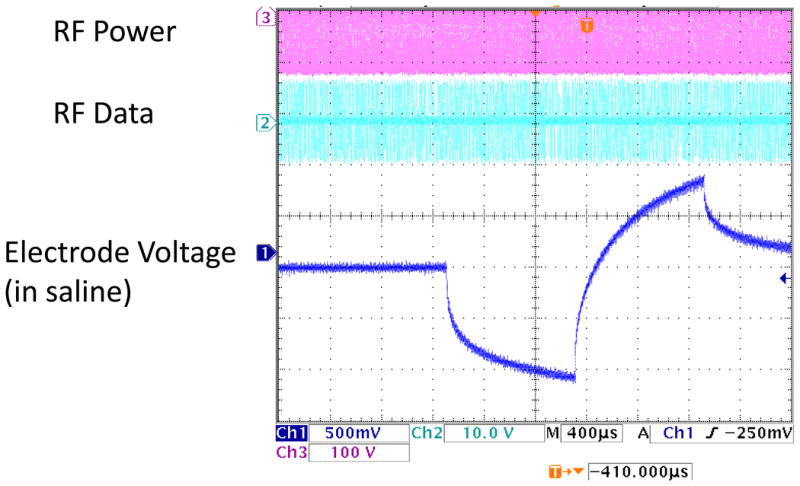
In vitro electrode test waveform for a wirelessly-driven implant. The bottom waveform shows the electrode waveform in saline, measured via a test tail which is trimmed off before surgery. ASK data are visible in the middle waveform.
4.2 Implant in vitro and in vivo testing
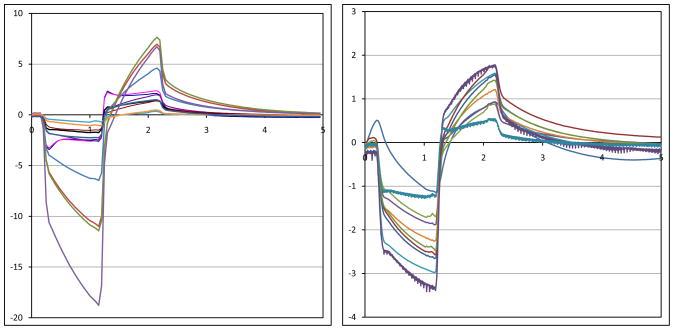
Recorded stimulus artifact waveforms from stimulation of the minipig eye are shown in Fig. 12. Because of the measurement setup, these waveforms show only the resistive voltage of current flowing through fluid. The capacitive ramp in Fig. 11 shows charge buildup at the electrode-tissue interface, which is not measured by the contact lens electrode. The waveforms in Fig. 12 show a great deal of variation, largely due to inconsistencies in the placement of the contact lens electrode and the use of a distant reference electrode on the ear. With the reference electrode on the ear, well outside the field distribution from the electrode, the contact lens voltage is measured with respect to the pig’s body potential. The measurement electrode is placed on the cornea, which we believe may be near the center of the field distribution, where the potential is nearly equal to the pig’s body potential. Our amplifiers can show small differences in potential, but inconsistent placement, or even movement, of the contact lens electrode can result in drastic changes of the size of the measured stimulus artifact waveforms. Placing one electrode in the eye near the stimulating electrodes and another behind the eye near the hermetic case would yield much larger and more consistent waveforms, but would require sterile surgical procedures for each examination. Since the goal of this measurement is to show the existence, not the amplitude, of stimulus artifact, the method presented here is sufficient. When the artifact waveform is present, it is unmistakable. We have performed control tests with the RF transmitters on but commanding zero-current pulses, and we have seen no stimulus artifact [1]. This method of artifact measurement was non-invasive, and it greatly simplified the testing, allowing for non-sterile follow-up studies after surgical implantation of the device.
Fig. 12.
Measured electrical stimulus artifact from two minipig eyes. An ERG electrode was used to measure artifact from electrical stimulation pulses delivered by the implant. Variation in waveform size is thought to be a result of variation in recording electrode position on the eye.
In both minipigs, the conjunctiva over the device wore through and caused exposure of the coils and case. This required explantation of the devices, one after three months and one after five and a half months. A number of factors may have caused this exposure. The coil edge met the conjunctiva at an angle that may have caused tension in the thin conjunctiva. The winding radius of the coil has been changed to correct this. Also, it was thought that the hermetic case was too far anterior, and was increasing the tension in the conjunctiva, or that the case was being pushed forward by movement of the eye in the socket. The first concern was addressed by redesigning the flex circuit connecting the coil and the case, placing the case farther back in the socket. The second concern was addressed by redesigning the way the case is sutured to the eye, with various different shapes of suture tabs to ensure that the case remains in place. This development effort is still underway.
5 Conclusion
A hermetic, wirelessly-driven retinal prosthesis device has been developed and built. It has been tested both in saline environments and in two Yucatan minipigs. Operation of the implant has been verified in the minipig eye for up to five and a half months. The device presented here is capable of being implanted for a much longer time than our previous PDMS-coated device. This allows for the 5–10-year survivability expected by the FDA for clinical trials. While our implant worked reliably during animal testing for three months in one minipig and five and a half months in another, exposure problems at the conjunctiva forced an early end to both experiments. We have slightly redesigned the coil molding process and the connection between the case and the coil to ease the tension on the conjunctiva for future trials. The human conjunctiva is similar to the pig conjunctiva, but the shape of the orbit should allow more room for the implant, easing the pressure on the conjunctiva. The coil and implant modifications will allow longer-term animal implantation trials in the near future, with a view toward human clinical trials and the ultimate goal of a subretinal prosthesis that is viable for 10 years and is capable of restoring useful vision to blind patients.
Acknowledgments
Funding sources had no involvement in the execution of this work. MOSIS provided in-kind foundry services, but not funding.
The authors acknowledge technical support and assistance from P. Troyk, O. Mendoza, T. Plante, S. Behan, J. Dumser, G. Swider, B. Yomtov, and J. Loewenstein, as well as administrative support from K. Quinn, P. Davis, and J. Palumbo. The authors acknowledge C. Pina, W. Hansford, and MOSIS for in-kind foundry services in support of their research, as well as the Cornell NanoScale Science and Technology Facility (CNF) for fabrication support. The Department of Veterans Affairs and the Boston VA Healthcare System, the National Institutes of Health, the Department of Defense, and the Massachusetts Lions Foundation supported this research.
Abbreviations
- RP
Retinitis Pigmentosa
- AMD
Age-related Macular Degeneration
- PXI
PCI eXtensions for Instrumentation
- ASK
Amplitude Shift Keying
- SIROF
Sputtered Iridium Oxide Film
- PWM
Pulse Width Modulation
- ERG
Electroretinogram
- PDMS
Poly(dimethylsiloxane)
Footnotes
Publisher's Disclaimer: This is a PDF file of an unedited manuscript that has been accepted for publication. As a service to our customers we are providing this early version of the manuscript. The manuscript will undergo copyediting, typesetting, and review of the resulting proof before it is published in its final citable form. Please note that during the production process errors may be discovered which could affect the content, and all legal disclaimers that apply to the journal pertain.
Contributor Information
Shawn K. Kelly, Email: skkelly@mit.edu.
Douglas B. Shire, Email: dbs6@cornell.edu.
Jinghua Chen, Email: jinghua_chen@meei.harvard.edu.
Patrick Doyle, Email: billd@mit.edu.
Marcus D. Gingerich, Email: mdg37@cornell.edu.
Stuart F. Cogan, Email: scogan@eiclabs.com.
William A. Drohan, Email: wpd@mit.edu.
Luke S. Theogarajan, Email: ltheogar@ece.uscb.edu.
John L. Wyatt, Email: jlw@mit.edu.
Joseph F. Rizzo, Email: joseph_rizzo@meei.harvard.edu.
References
- 1.Shire DB, Kelly SK, Chen J, Doyle P, Gingerich MD, Cogan SF, Drohan W, Mendoza O, Theogarajan L, Wyatt JL, Rizzo JF. Development and Implantation of a Minimally-Invasive, Wireless Sub-Retinal Neurostimulator. IEEE Trans Biomed Eng. 2009 Oct;56(10):2502–2511. doi: 10.1109/TBME.2009.2021401. [DOI] [PMC free article] [PubMed] [Google Scholar]
- 2.Kelly SK, Shire DB, Chen J, Doyle P, Gingerich MD, Drohan WA, Theogarajan LS, Cogan SF, Wyatt JL, Rizzo JF. The Boston Retinal Prosthesis: A 15-Channel Hermetic Wireless Neural Stimulator. IEEE ISABEL conference; 2009. [Google Scholar]
- 3.Kelly SK, Shire DB, Chen J, Doyle P, Gingerich MD, Drohan WA, Theogarajan LS, Cogan SF, Wyatt JL, Rizzo JF. Realization of a 15-Channel, Hermetically-Encased Wireless Subretinal Prosthesis for the Blind. Proc. IEEE Engineering in Medicine and Biology Conference; 2009. pp. 200–203. [DOI] [PMC free article] [PubMed] [Google Scholar]
- 4.Rizzo JF, III, Wyatt J, Loewenstein J, Kelly S, Shire D. Perceptual Efficacy of Electrical Stimulation of Human Retina with a Microelectrode Array During Short-Term Surgical Trials. Invest Ophthalmol Vis Sci. 2003;44:5362–5369. doi: 10.1167/iovs.02-0817. [DOI] [PubMed] [Google Scholar]
- 5.Rizzo JF, III, Wyatt J, Loewenstein J, Kelly S, Shire D. Methods and Perceptual Thresholds for Short-Term Electrical Stimulation of Human Retina with Microelectrode Arrays. Invest Ophthalmol Vis Sci. 2003;44:5355–5361. doi: 10.1167/iovs.02-0819. [DOI] [PubMed] [Google Scholar]
- 6.Yanai D, Weiland JD, Mahadevappa M, Greenberg RJ, Fine I, Humayun MS. Visual Performance Using a Retinal Prosthesis in Three Subjects with Retinitis Pigmentosa. Am J Ophthalmol. 2007;143:820–827. doi: 10.1016/j.ajo.2007.01.027. [DOI] [PubMed] [Google Scholar]
- 7.Gerding H, Benner FP, Taneri S. Experimental Implantation of Epiretinal Retina Implants (EPI-RET) With an IOL-Type Receiver Unit. J Neural Eng. 2007;4:S38–S49. doi: 10.1088/1741-2560/4/1/S06. [DOI] [PubMed] [Google Scholar]
- 8.DeMarco PJ, Jr, Yarbrough GL, Yee CW, Mclean GY, Sagdullaev BT, Ball SL, McCall MA. Stimulation via a Subretinally Placed Prosthetic Elicits Central Activity and Induces a Trophic Effect on Visual Responses. Invest Ophthalmol Vis Sci. 2007;48:916–926. doi: 10.1167/iovs.06-0811. [DOI] [PubMed] [Google Scholar]
- 9.Schanze T, Sachs HG, Wiesenack C, Brunner U, Sailer H. Implantation and Testing of Subretinal Film Electrodes in Domestic Pigs. Exp Eye Res. 2006;82:332–340. doi: 10.1016/j.exer.2005.07.007. [DOI] [PubMed] [Google Scholar]
- 10.Zhou JA, Woo SJ, Park SI, Kim ET, Seo JM, Chung H, Kim SJ. A Suprachoroidal Electrical Retinal Stimulator Design for Long-Term Animal Experiments and In-Vivo Assessment of Its Feasibility and Biocompatibility in Rabbits. J Biomed Biotech. 2008:547428-1–547428-10. doi: 10.1155/2008/547428. [DOI] [PMC free article] [PubMed] [Google Scholar]
- 11.Wong YT, Dommel N, Preston P, Hallum LE, Lehmann T, Lovell NH, Suaning GJ. Retinal Neurostimulator for a Multifocal Vision Prosthesis. IEEE Trans Neural Syst Rehab Eng. 2007;15:425–434. doi: 10.1109/TNSRE.2007.903958. [DOI] [PubMed] [Google Scholar]
- 12.Terasawa Y, Tashiro H, Uehara A, Saitoh T, Ozawa M, Tokuda T, Ohta J. The Development of a Multichannel Electrode Array for Retinal Prostheses. J Artif Organs. 2006;9:263–266. doi: 10.1007/s10047-006-0352-1. [DOI] [PubMed] [Google Scholar]
- 13.Hornig R, Zehnder T, Velikey-Parel M, Laube T, Feucht M, Richard G. The IMI Retinal Implant System. In: Humayun MS, Weiland JD, Chader G, Greenbaum E, editors. Artificial Sight: Basic Research, Biomedical Engineering, and Clinical Advances. New York: Springer; 2007. pp. 111–128. [Google Scholar]
- 14.Zrenner E. Restoring Neuroretinal Function: New Potentials. Doc Ophthalmol. 2007;115:56–59. [Google Scholar]
- 15.Friedman D, O’Colmain B, Munoz B, Tomany SC, McCarty C, de Jong PT, Menesure B, Mitchell P, Kempen J. Prevalence of Age-Related Macular Degeneration in the United States. Arch Ophthalmol. 2004;122:564–572. doi: 10.1001/archopht.122.4.564. [DOI] [PubMed] [Google Scholar]
- 16.Marc RE, Jones BW, Anderson JR, Kinard K, Marshak DW, Wilson JH, Wensel TG, Lucas RJ. Neural Reprogramming in Retinal Degenerations. Invest Ophthalmol Vis Sci. 2007;48:3364–3371. doi: 10.1167/iovs.07-0032. [DOI] [PMC free article] [PubMed] [Google Scholar]
- 17.Jensen RJ, Rizzo JF., III Responses of Ganglion Cells to Repetitive Electrical Stimulation of the Retina. J Neural Eng. 2007;4:S1–S6. doi: 10.1088/1741-2560/4/1/S01. [DOI] [PubMed] [Google Scholar]
- 18.Kelly SK. M Eng Thesis, MIT. 1998. A System for Electrical Retinal Stimulation for Human Trials. [Google Scholar]
- 19.Theogarajan LS. A Low-Power Fully Implantable 15-Channel Retinal Stimulator Chip. IEEE J Solid-State Circuits. 2008;43:2322–2337. [Google Scholar]
- 20.Chen J, Shah HA, Herbert C, Loewenstein JI, Rizzo JF. Extraction of a Chronically-Implanted, Microfabricated, Subretinal Electrode Array. Ophthalmic Res. 2009;43(3):128–137. doi: 10.1159/000227278. [DOI] [PubMed] [Google Scholar]
- 21.Chen J, Doyle P, Cai C, Dumser J, Akhmechet R, Gingerich MD, Kelly SK, Shire DB, Rizzo JF. Surgical Implantation of 1.5 Generation Retinal Implant in Minipig Eyes. Invest Ophthalmol Vis Sci. 2010;51:E-abstract 3052. [Google Scholar]
- 22.Shah HA, Montezuma SR, Rizzo JF., III In Vivo Electrical Stimulation of Rabbit Retina: Effect of Stimulus Duration and Electric Field Orientation. Exp Eye Res. 2006;83(2):247–254. doi: 10.1016/j.exer.2005.11.023. [DOI] [PubMed] [Google Scholar]


