Abstract
Functioning of a complete denture depends to a great extent on the impression technique. Several impression techniques have been described in the literature since the turn of this century when Greene [Clinical courses in dental prothesis, 1916] brothers introduced the first scientific system of recording dental impression. Advocates of each technique have their own claim of superiority over the other. The introduction of elastomeric impression materials [Skinner and Cooper, J Am Dent Assoc 51:523–536, 1955] has made possible new techniques of recording impression for complete denture construction. These rubber like materials are of two types; one has a polysulfide base and is popularily known as polysulfide rubber (Thiokol and Mercaptan). The other variety has a silicone base known as silicone rubber or silicone elastomer. Silicone elastomers are available in four different consistencies; a thin easy flowing light bodied material,a creamy medium bodied material, a highly viscous heavy bodied material and a kneadable putty material. This paper describes an active closed mouth impression technique with one stage border molding using putty silicone material as a substitute for low fusing compound.
Keywords: Active and passive impression techniques, Closed mouth impression, Putty border molding, Peripheral tracing, Posterior palatal seal, Post dam
Introduction
Since several years it has been the practice to use low fusing compound for border molding. The technique of border molding with this material has certain limitations. It is not possible to complete the border molding in one stage. Stage by stage or incremental border molding leaves much to be desired since only a part of the functional depth of the vestibular sulcus and associated musculature molds the periphery of the tray during each insertion. Ideally, the material used for border molding when it is in its plastic state, should contact the entire vestibular sulcus area at one insertion and not mold the periphery of the tissues initially in one area and subsequently the remaining areas in stages.
Further low fusing compound hardens soon after it is placed in the mouth as its manipulation time is short. Thus it does not provide sufficient time for the vestibular tissues to act and mold the periphery of the special tray.
A frequent error during border molding is the operator himself trying to mold the vestibular tissues around the periphery of the tray by forcing the various movements of the lip and cheek with his finger. Pulling the cheek and lip passively by the operator does not involve muscular contraction of these tissues (Fig. 1). When true muscle contraction takes place, the length of muscle is reduced and belly formation occurs. This is never seen in the passive method of recording the impression.
Fig. 1.
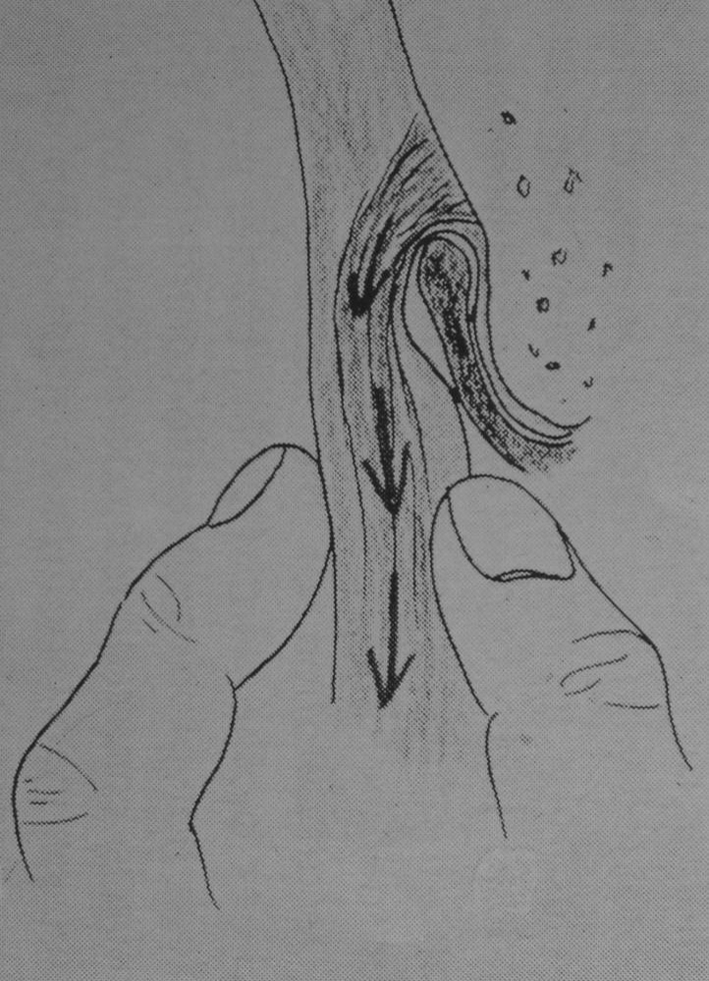
Conventional passive method of manual border molding is an exaggerated form of movement which does not occur in nature
Recently a slow setting heavy bodied silicone material known as Xantopren Function has been developed by BAYER AG,Leverkussen, Germany [1]. The setting time of this material is about 3–5 min depending on the amount of catalyst. The relatively slow setting quality of this material makes it ideal for recording the border molding as compared to the low fusing compound which has an insufficient working time. After the border molding is completed, final wash impression is taken with a freely flowing, light bodied silicone material such as Xantopren Blue BAYER AG.
A New Trend in Border Molding Technique1
Border molding is an important procedure in complete denture construction since it promotes the development of border seal which is necessary for the maintenance of contact of the denture border with the adjacent vestibular tissues during rest as well as in functional activity. Several terms like peripheral sealing, border sealing, peripheral tracing, muscle trimming have been used in the literature to designate border molding. It is defined as the shaping of an impression material by manipulation or action of the tissues adjacent to the borders of an impression tray.
Gutta percha, zinc oxide eugenol paste, low fusing compound and methyl methacrylate resins have been used to record border molding. Among these, low fusing compound has traditionally remained the material of choice for many practitioners, dental students and academicians. It is felt that the technique of completing border molding with low fusing compound has a few shortcomings. These are explained in the light of the author’s experience with putty silicone as a border molding material.
Limitations of Low Fusing Compound
Manipulation Time
Low fusing compound has a very short manipulation time. It becomes hard soon after it is placed in the mouth, and the final border is established before the various functional movements of the vestibular sulcus is completed. The shape of the border is determined only by limited movements of the border tissues. It is desirable that the material should remain in a plastic stage until most of the functional movements of tissues and muscles of the vestibular and alveolo-lingual sulcus is completed.
Multiple Stage Border Molding
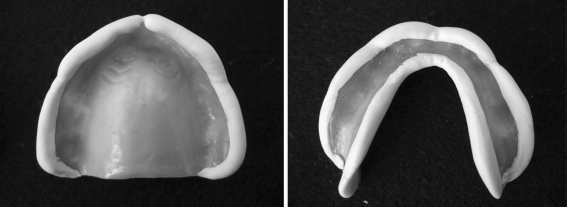
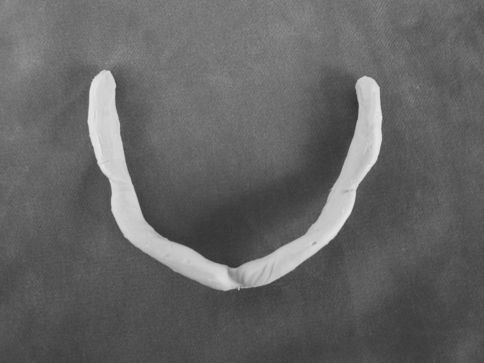
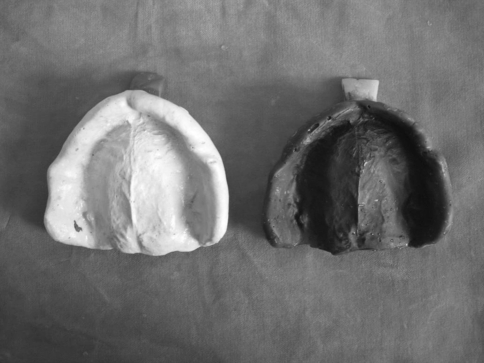
In view of the short manipulation time of low fusing compound, it is difficult to complete border molding in one stage; and it is a common practice to record border molding in successive stages along the border of an individual tray. Incremental procedure of completing a stage by stage overlapping border molding which molds a partial length of the sulcus is questionable, since only a limited length of the vestibular and alveolo-lingual sulcus molds the border molding material during each insertion of the custom made tray. It is preferable that the border molding material is placed continuously along the entire border of an individual tray and that the border molding procedure is completed in a single stage to record the width, depth and the entire length of the sulcus (Figs. 2–3, 4, 5).
Figs. 2–3.
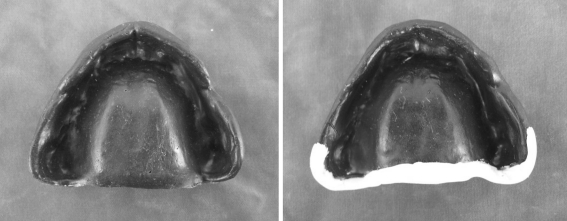
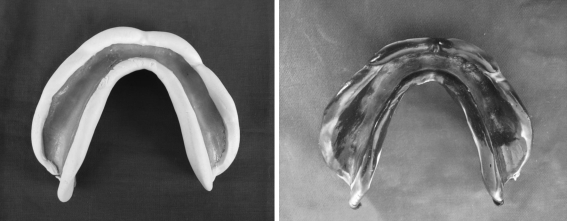
Upper and lower single stage closed mouth border molding with putty silicone
Fig. 4.
Putty silicone removed from the custom tray showing the single stage border molding
Fig. 5.
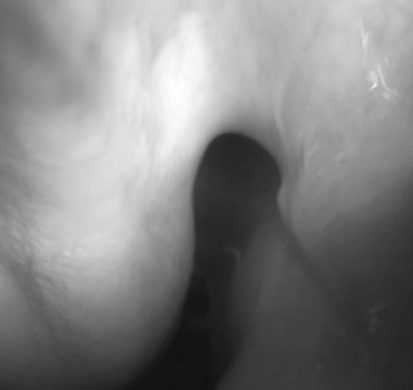
Depth and width of the vestibular sulcus
Consistency and Homogeneity
Border molding material should possess a homogenous consistency so that it can offer uniform resistance to displacement by the vestibular tissues. This is not truly possible with low fusing compound. The softening and hardening rate of low fusing compound varies from one portion of the individual tray to another depending on the application of external heat. Thus the viscosity of softened low fusing compound may differ from one area of the tray to another. As a result, that part of the tray having softened low fusing compound of higher viscosity may offer greater resistance to displacement by the tissues than that part having low viscosity material. It is the practice to softened low fusing compound in an open flame, and later to temper in warm water before it is placed in the mouth. In spite of this procedure, it is doubtful whether the material will give an homogenous consistency specially with a beginner.
Low fusing compound is not a thixotropic material. It slumps because of gravity, therefore after insertion of the softened compound in the mouth the operator presses it against the cheek to push the material into the sulcus. Further since it lacks thixotropicity, this material when unsupported cannot maintain its height when bulk is added along the border. The width of vestibular sulcus varies according to its location. In some areas it is quite wide as compared to the other areas. The tracing material should be able to record this dimension of the sulcus (Fig. 5). Silicone putty can be added along the border of the tray in sufficient quantity without slumping as compared to low fusing compound while recording the functional width of the sulcus.
Silicone as a Substitute for Low Fusing Compound
The advent of Silicone elastomer represents and important advancement in impression techniques [1]. This is because of its high degree of accuracy, dimensional stability and ease of manipulation. Heavy body putty silicone, which is viscous and kneadable, has been tried for border molding as a preference to low fusing compound. Heavy-bodied silicone is slow-setting, and is made available in a homogenous consistency. It can be placed continuously along the entire border of an individual tray, and the border of the tray can be molded at a single stage (Figs. 2–3).
Evaluation of Border Molding Technique
Open Mouth or Closed Mouth Method
The use of the finger to hold the individual tray with the border molding material keeps the jaws in an open position, prevents the lips from coming in contact with each other. When the mouth is kept in an open posture, the vestibular sulcus is not in its true functional state, but in a more stretched condition. When the border molding is done with the mouth kept wide open, it records only this position of the vestibular sulcus. Further, the presence of the finger between the upper and lower lip interferes with the patient’s efforts to perform the normal functional movements of lip and cheek and also phonation. During border molding procedure, the jaws should preferably be held in centric occlusion position, as well as in other functional opening position. Advocates of this philosophy construct occlusal rim over the individual tray so that the patient himself can perform the movements.
Recording Anterior Lingual Sulcus Extension–Phonetics–Swallowing Movements
Closed mouth method with occlusal rims records the anterior lingual sulcus extension better than the open mouth technique. Normally the sides of the tongue rests on the occlusal surface of the posterior teeth and its tip on the lower lingual and palatal surface of the upper teeth. The anterior lingual sulcus in this position is at a much lower level than when the tongue is protruded as in open mouth method. Open mouth method of border molding therefore gives lesser sublingual extension as compared to custom tray with occlusal rims which allows the tongue to position against the anterior occlusal rim. Recording the position of lingual vestibular sulcus during various sounds like linguodental (Th), linguo alveolar (T,D), is possible only with an occlusal rim which represents the dental arch. In a mouth open situation these sounds cannot be produced. These sounds influence the position of the alveolingual sulcus. More importantly the position of tongue during swallowing cannot be recorded with the mouth kept open. Swallowing is not possible with the operators finger present between the lips.
Active or Passive Method
It is a common practice to manipulate the vestibular tissues and muscles manually by the operator to force various movements of the lip and cheek along the border of an individual tray (Fig. 1). This imitation of functional movement of the vestibular tissues is an exaggerated form of natural movement which does not produce muscle contraction.Physiological movement of the vestibular tissues cannot be imitated by operator controlled movements. Further the extent of movement given by the operator varies from one operator to another. This variation is a significant disadvantage in the passive method of border molding. Actually these movements do not occur in nature. Pulling, patting and pressing the lip and the cheek tissues by the dentist does not produce true muscle contraction. Instead, the vestibular sulcus is stretched and lifted in an occlusal outward and inward direction.
Normally, when a muscle contracts, there is a reduction in its length; and belly formation takes place. This pattern of muscle contraction does not occur if the dentist manipulates the various movements which should be done by the denture wearer himself. For this reason the passive method of border molding is not truly functional nor physiological. During border molding procedure, patient should be instructed to perform active functional movements of lip, cheek and tongue, viz. smiling, speaking, swallowing, yawning, whistling, pursing and wetting the lips. The rationale should be “Do not ‘do’ border molding, but let the patient ‘give you’ border molding.”
Posterior Palatal Border Molding
Before or after secondary impression Should posterior border seal be done before or after recording the functional impression? (Figs. 6, 7) The Glossary of Prosthodontic terms defines posterior palatal seal as “The seal at the posterior border of the upper denture produced by displacing some of the soft tissues covering the palate by extra pressure developed in the impression.” In short, it is a slight compression given at the posterior palatal border to develop a seal. It does not state whether the compression should be before or after the impression is recorded. It is important that the compression effect achieved by posterior palatal seal should not be lost or altered after recording the functional impression. A subsequent change in the previously shaped posterior palatal border seal is undesirable.
Fig. 6.
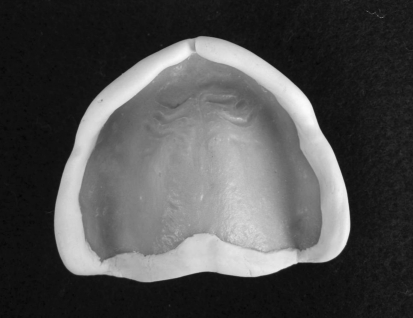
Posterior palatal seal completed with putty silicone
Figs. 7–8.
Posterior palatal seal completed over the functional impression
A thick layer of impression material over the posterior palatal seal should be avoided. Presence of a thick layer of impression material between the posterior palatal seal and the palate nullifies the compression effect achieved by the posterior palatal seal. An attempt to reduce the thickness of impression material at the posterior palatal border, by exerting pressure, is undesirable since this results in pressure spots and pressure areas in the completed impression specially when stops are not given in the custom tray. Considering this, it is preferable to complete posterior palatal border molding after recording the functional impression. This is done by placing a roll of putty silicone or impression wax over the previously marked posterior palatal seal area in the impression and reseating the impression in the mouth (Figs. 6, 7–8).
Border Molding Procedure with Silicone Putty
Upper and lower preliminary impressions are taken in alginate. The outline for the acrylic trial base is marked on the impression with an indelible pencil providing sufficient relief along vestibular sulcus and frenal attachments. Casts are made and upper lower trial bases are constructed with tray resin material according to the indelible marks transferred in the cast and wax occlusal rims are made. The working time in patient is considerably reduced when the height of the occlusal rim made to recommended norms. According to McGrane the average height of the upper occlusal rim from the base of labial frena to the occlusal plane is approximately 22 mm and the height between the similar landmarks in the lower is 18 mm. In most of the cases these values are acceptable and only a slight increase or decrease in the height of the occlusal rim is necessary.
The bases are tried in the mouth, checked and corrected for extension,retention and stability.
Vertical and centric jaw relations are tentatively recorded and the occlusal rims are fixed to each other in this position with a plastic Bite Key( Ivoclar,Liecthenstein [2]. The Bite Key is fixed to the lower occlusal rim in the molar region on either side and soft wax is placed on the upper occlusal rim against the contacting surface of the Bite Key. When the jaws are held in centric relation the Bite Key makes an indentation on the soft wax which serves a similar purpose like the notch and niche. The Bite Key and its impression on the upper occlusal rim serve to maintain centric relation during border moulding, recording impression and later the articulation of the casts. The various reference lines such as high lip line, canine lines and middle line are marked on the occlusal rims.
Tray adhesive is applied over the border of the acrylic bases (which now serves as a custom tray) to facilitate the retention of the silicone border molding material. Xantopren Function (putty silicone) is kneaded and a roll of 3-4 mm width is placed along the entire periphery of the upper base. Similar procedure is done when the lower ridge is large and wide. When lower ridge is flat and narrow the entire impression surface of the base is covered with the putty Xantopren Function. Upper and lower bases are then immediately inserted in the mouth and held in centric position. The patient is instructed to leisurely perform the normal functional movements viz. swallowing, speaking, smiling, yawning, whistling, pursing and wetting the lips. Since the material remains in a plastic state for about 3 to 5 minutes in the mouth there is enough time to develop a functional border molding (Figs. 2–3).
The border molded bases are removed and final wash impression is taken [1] with Xantopren Blue (thin flowing light bodied silicone) as the patient now forcibly performs the active muscle movements with the bases held in centric occlusion. Any subsequent change of the previously shaped functional border should be avoided in the impression. Post dam is done over the wash impression with heavy bodied silicone material (Figs. 7–8, 9–10, 11).
Figs. 9–10.
Border molding with putty and secondary impression with light bodied silicone
Fig. 11.
Plaster of Paris and silicone impression taken for the same patient shows identical tissue reproduction
Summary
One of the limitations of using low fusing compound for border molding is its short manipulation time. It hardens quickly in the mouth and does not remain in a plastic stage till the functional movements of the vestibular and alveolo-lingual sulcular tissues are completed. Stage by stage border molding is questionable. Preferably border molding should be completed at a single stage. It is also doubtful whether a homogenous consistency can be obtained with this material. In view of these limitations in the use of low fusing compound, heavy bodied putty silicone has been tried, and it appears to be a good material for border molding.
Manipulation of the patient’s lip and cheek by the dentist during border molding does not produce true muscle contraction. Muscle contraction is characterized by a reduction in is length, and belly formation. This happens only when the patient actively participates in the movement of lip and cheek. Closed mouth border molding records the true position of vestibular tissues which exists after the insertion of the denture. The seal at the posterior palatal border is better achieved and maintained when this area is border molded after the recording of the final impression.
A technique of completing border molding in one stage with silicone putty followed by a wash impression in light bodied silicone with the edentulous jaws held in centric position is described. Silicone putty can also be used in single stage as a border molding material when the operator prefers the open mouth impression method.
Footnotes
Presented at the 63rd FDI Congress and 116th Annual Session of the American Dental Association, Chicago, October 1975.
References
- 1.Marxkors R. Die funktionsabformung. Dtsch Zahnarztl Z. 1970;25:58–63. [PubMed] [Google Scholar]
- 2.Strandberg N. Neue Gesichtspunkte fur die Totalprosthesen konstruction. lvoclar Circ. 1965;15:1–4. [Google Scholar]
- 3.Greene JW. Clinical courses in dental prosthesis. Detroit: Detroit Dental Manufacturing Co; 1916. [Google Scholar]
- 4.Skinner EW, Cooper EN. Desirable properties and uses of rubber impression materials. J Am Dent Assoc. 1955;51:523–536. doi: 10.14219/jada.archive.1955.0230. [DOI] [PubMed] [Google Scholar]


