Abstract
The ability to manipulate gene expression is the cornerstone of modern day experimental embryology, leading to the elucidation of multiple developmental pathways. Several powerful and well established transgenic technologies are available to manipulate gene expression levels in mouse, allowing for the generation of both loss- and gain-of-function models. However, the generation of mouse transgenics is both costly and time consuming. Alternative methods of gene manipulation have therefore been widely sought. In utero electroporation is a method of gene delivery into live mouse embryos1,2 that we have successfully adapted3,4. It is largely based on the success of in ovo electroporation technologies that are commonly used in chick5. Briefly, DNA is injected into the open ventricles of the developing brain and the application of an electrical current causes the formation of transient pores in cell membranes, allowing for the uptake of DNA into the cell. In our hands, embryos can be efficiently electroporated as early as embryonic day (E) 11.5, while the targeting of younger embryos would require an ultrasound-guided microinjection protocol, as previously described6. Conversely, E15.5 is the latest stage we can easily electroporate, due to the onset of parietal and frontal bone differentiation, which hampers microinjection into the brain. In contrast, the retina is accessible through the end of embryogenesis. Embryos can be collected at any time point throughout the embryonic or early postnatal period. Injection of a reporter construct facilitates the identification of transfected cells.
To date, in utero electroporation has been most widely used for the analysis of neocortical development1,2,3,4. More recent studies have targeted the embryonic retina7,8,9 and thalamus10,11,12. Here, we present a modified in utero electroporation protocol that can be easily adapted to target different domains of the embryonic CNS. We provide evidence that by using this technique, we can target the embryonic telencephalon, diencephalon and retina. Representative results are presented, first showing the use of this technique to introduce DNA expression constructs into the lateral ventricles, allowing us to monitor progenitor maturation, differentiation and migration in the embryonic telencephalon. We also show that this technique can be used to target DNA to the diencephalic territories surrounding the 3rd ventricle, allowing the migratory routes of differentiating neurons into diencephalic nuclei to be monitored. Finally, we show that the use of micromanipulators allows us to accurately introduce DNA constructs into small target areas, including the subretinal space, allowing us to analyse the effects of manipulating gene expression on retinal development.
Protocol
1. Set-up
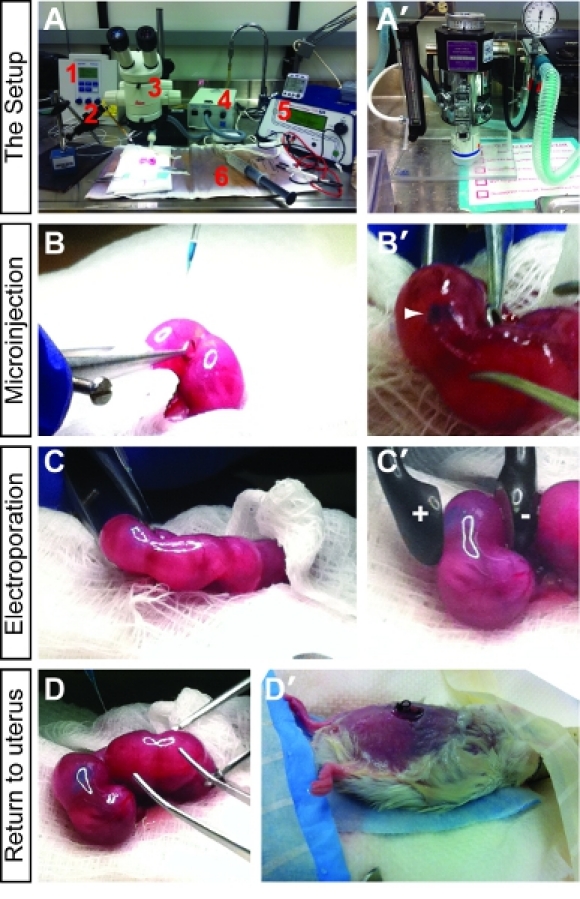
Set-up surgical area as shown in Fig. 1A,A'. Key components of the set-up include an Eppendorf Femtojet microinjector, Narishige micromanipulator with needle holder, Leica steromicroscope, fiber optic lighting system, ECM 830 Square Wave Electroporation System with electrodes, heating pad and a vaporizer for isoflurane anesthetic.
Clean all tools with a Bransonic Ultrasonic Cleaner using Metriclean2 Low foaming solution for sonicating surgical tools. Sterilize tools by autoclaving. Sterilized tools are then kept in Germex.
Prepare syringes with warm sterile saline and sterile Lactated Ringer’s solution.
2. Anesthesia
Place animal inside a small (12cm x 20cm) anesthetic chamber. Using a vaporizer, deliver 5% isoflurane anesthetic and oxygen at 1L/min (Fig. 1A,A'). Notably, it is important to collect isoflurane exhaust using a scavenging system.
Remove animal from the chamber when breathing becomes deep and regular. Toe pinching and eye blink reflex tests are used to ensure full anesthesia.
Place pregnant mouse on its back on top of a heating pad (37°C). The heating pad is first sterilized by wiping with 70% ethanol, and is then covered with a sterilized, lintless gauze pad. Use a respirator tube and mask apparatus to deliver isoflurane (2.25%) during surgery.
Inject buprenorphine (0.1mg/kg body weight) subcutaneously under the skin at the nape of the neck.
Monitor animal throughout surgery for deep and regular breathing. The animal should not gasp, breathe shallowly or rapidly. Shallow, rapid breathing may be a sign of light anaesthesia, and the flow of isoflurane should be increased. If the animal begins to gasp, reduce the flow of isoflurane. In the case of a respiratory arrest, turn isoflurane off, and increase flow of oxygen until animal recovers. Restart isoflurane at a lower concentration.
3. Animal Preparation for Surgery
Tape forelimbs of animal to the heating pad and check again for a retraction response by pinching the hind foot with blunt forceps.
Using a sterile cotton-tipped swab, spread a thick layer of depilatory cream (i.e., Nair) onto the abdomen. In firm strokes, ensure the underfur is completely coated. Leave on for an average of three minutes, checking intermittently with a sterile clean swab for hair removal. Wet a sterile gauze pad with sterile water and wipe the abdomen until all traces are gone. Repeat with chlorhexidine (i.e., Stanhexidine) skin cleaner and more water. Dry the abdomen with clean, sterile gauze.
Sterilize incision site with a chlorhexidine (i.e., Stanhexidine) followed by more sterile water. Dry the abdomen with clean, sterile gauze. Repeat this step using 70% ethanol and a fresh, sterilized cotton swab.
Place a sterile gauze pad over the abdomen with a slit in the middle through which the uterine horns will be pulled during surgery.
4. Incision and Exposure of Uterine Horns
To expose the uterine horns, first locate the linea alba as the faint line under the skin at the midline. Using forceps, pull the skin away from the abdominal wall and cut a small, straight incision from the mid-abdomen downwards with skin scissors (approximately 1 cm in length).
Using curved forceps and scissors, repeat the process with the peritoneum.
Place sterile gauze with a small vertical slit over incision and dampen with warmed sterile saline.
Slide forceps into the incision and locate the uterus. Hold open incision with forceps while removing the uterine horns.
Carefully grasp the uterus between the first and second visible embryos and pull the embryos onto the gauze. Remove both sides of the uterine horns, placing onto the sterile gauze and count the number of embryos, noting any resorptions or “unhealthy” (e.g. smaller body size) embryos. Wet the uterine horns with saline and carefully return half of the uterus into the abdomen.
5. Injection of DNA into Ventricles
Surgical needles are prepared with a Sutter Flaming Micropipette Puller using borosilicate micropipettes with capillaries (Program: heat=750, Pull=30, Vel= 90, Time= 150). Using a sterile scalpel blade, the needle tip is gently shaved off at a 45 degree angle.
To load the needle, Pasteur pipettes are pulled to a narrow diameter under a flame. A mouth piece is attached to the loading pipette to draw up ˜10 μl of 3mg/ml endotoxin-free DNA mixed with 0.01% methyl green (note: methyl green dye allows DNA injections to be visualized). The filled needle is then mounted on a micromanipulator stand and attached to the Femtojet injector.
Starting with the embryo closest to the ovary, circular forceps are used to gently turn the embryo within the decidua so that it is positioned “face-forward”, allowing injections to occur in a rostral to caudal direction. A fiber optic light source for illumination is used to help visualize the midline of the embryonic brain, which is flanked by the large lateral ventricles in rostral regions (Fig. 1B,B').
The embryo is held in position using circular forceps. The needle is positioned above the uterus so that the angle of entry into the brain is approximately 45 degrees. Using the micromanipulator, and a quick and steady motion, the needle tip is inserted through the uterine wall and into the lateral ventricle of the embryo. Injections are directed towards the lateral ventricles, 3rd ventricle or subretinal space to target the telencephalon, diencephalon and retina, respectively. Note that the embryonic brain vesicles are open at early embryonic stages such that DNA injected into the lateral ventricles will flow into the 3rd ventricle.
Press the foot pedal to inject endotoxin-free DNA (1-3 μL) using an Eppendorf Femtojet microinjector. A successful injection is easily visualized by spreading of the methyl green dye throughout the embryonic brain ventricles. The needle is then slowly removed by drawing back up to avoid breakage.
6. Electroporation
The injected embryo (still within the uterus) is placed on the sterile gauze overlying the mother’s abdomen and wet thoroughly with warmed saline. Please note** The addition of saline to the membrane surface is essential to allow efficient passage of an electrical current.
GenePaddle electrodes are used to grip the uterus following the injection of DNA. Five square electric pulses of 40-50V and 50 ms are delivered at a rate of one pulse per second using an ECM8300 BTX electroporation system (Fig. 1C,C').
Cover the injected/electroporated embryo with protective wet gauze and continue to the next embryo.
Upon completion of the injection/electroporation of all desired embryos, carefully push the uterine horns back into the abdomen (Fig. 1D).
Carefully remove the other uterine horn and begin again with the embryo closest to the ovary.
7. Suture and Stapling
Once all embryos are back inside the uterus, add to the abdominal cavity ˜2-3 ml warm saline.
To close the wound, begin by removing the gauze on the abdomen and identifying the sides of the peritoneum. Begin suturing the peritoneum using black braided silk line. It is not recommended to use absorbable suture for this procedure as it is typically weaker and may lead to post-surgical bleeding and infection. Anchor the line on the peritoneum closest to the sternum and proceed to stitch away from the anchor. Ensure all sutures are tight, and that no underlying organs or skin has been inadvertently sewn into the peritoneum. Clip the remaining suture line and discard.
Pull skin closed over the suture line with forceps. Using 9 mm Reflex™ skin closure staples, clip the skin over the wound, taking care not to staple the suture line underneath, or to pull the skin too tightly. The preferred method is to hold the skin up and away from the body with forceps, and come in at a 90 degree angle with the staple tool. Continue until wound is closed (approximately three staples). Once finished, ensure staples are tight by gently pressing together with the suture tool (Fig. 1D').
8. Post-surgical Care
To monitor anesthetic recovery, turn female onto her stomach and turn off isoflurane. Keeping the animal’s face inside the breathing apparatus, turn oxygen up to 3% to help recovery from anesthesia. The animal should be placed on a clean dry gauze pad on top of the heating pad to prevent hypothermia.
While the animal is groggy, inject 2 mL Ringer’s solution subcutaneously under the animal’s neck skin.
Continue holding the animal under oxygen flow for several minutes and warming gauze pads in order to rouse the animal. Short spurts of movement from the animal should be observed as it returns to a normal breathing pattern. Observe for several minutes until animal seems conscious and awake.
Spray the female’s abdomen with Gentamicin spray and wrap the animal in a sterile gauze pad.
Transfer the animal into a sterile cage with autoclaved bedding and cardboard housing.
Water bottles should be thoroughly cleaned, sterilized and filled with sterile water. To 500 mL of water add 2 mL of sulfamethazine antibiotic (25% stock).
Administer 0.05 mg/kg buprenorphine subcutaneously the morning following surgery.
Monitor the female closely for the first 24 hours post-surgery. If animals are kept longer than 24 hrs, females are moved to new sterile cages on day 2.
9. Representative Results
Neocortex
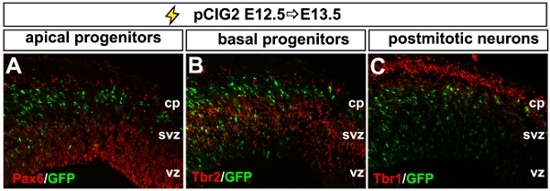
The neocortex is the region of the CNS that is responsible for visual and sensorimotor processing and higher cognitive functioning. It is comprised of glutamatergic projection neurons and GABAergic interneurons that are derived from the dorsal and ventral telencephalon, respectively. To address the roles of different genes in neocortical development, we use in utero electroporation to either misexpress or block the expression (i.e., through the use of shRNA constructs) of different genes in the dorsal or ventral telencephalon1,3,4. To misexpress genes in the embryonic telencephalon, we use a bicistronic expression vector (pCIG2), containing a CMV-βactin promoter-enhancer and an internal ribosome entry site (IRES)-enhanced green fluorescent protein (EGFP; in pCIG2) cassette, allowing transfected cells to be detected by epifluorescence (Fig. 2A-C). We used this technology to introduce expression constructs into the telencephalon from E11.5 to E15.5 (data shown is at E12.5; Fig. 2). By allowing embryos to develop several days post-electroporation, we are able to track the differentiation and migration of GFP-labeled progenitors. As differentiation proceeds, 3 days post-electroporation GFP+ cells differentiate and migrate out of the ventricular zone (vz), subventricular zone (svz) and intermediate zone (iz) and into the cortical plate (cp; Fig. 2C). If brains electroporated at E12.5 are analyzed after 24 hr, we can monitor earlier events in progenitor maturation and neuronal migration by co-labeling with markers of apical progenitors (i.e., Pax6; Fig. 2A), basal progenitors (i.e., Tbr2; Fig. 2B) and postmitotic neocortical neurons (i.e., Tbr1; Fig. 2C).
Diencephalon
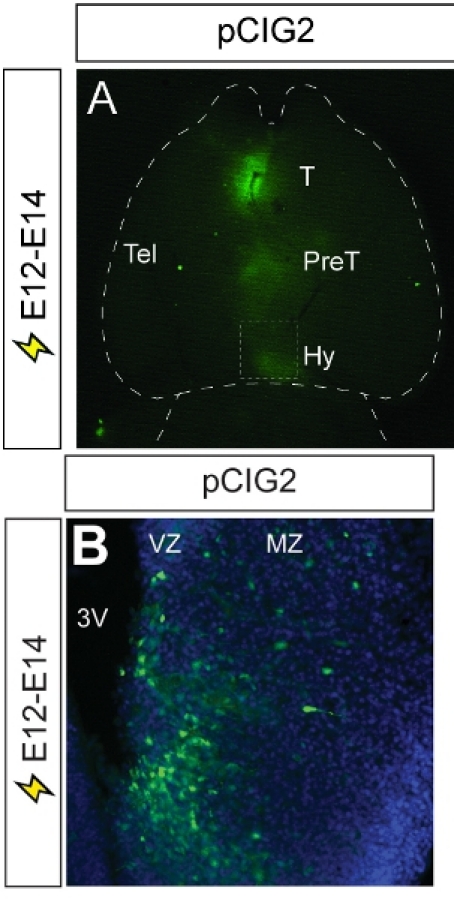
The hypothalamus lies at the ventral base of the CNS and functions as a gateway between the endocrine and autonomic nervous systems. During development, the multiple nuclei that make up the mature hypothalamus differentiate from a common progenitor zone that lines the ventral-most region of the embryonic diencephalon. Currently, the molecular pathways that regulate progenitor cell proliferation, neuronal differentiation and the formation of hypothalamic nuclei are poorly understood. We used in utero electroporation to target reporter gene expression to the embryonic diencephalon by injecting DNA into the 3rd ventricle of E12 embryos.We then followed the distribution of GFP in differentiating neurons at E14. With this methodology, we have successfully targeted GFP expression to the thalamus, pre-thalamus and hypothalamus (Fig. 3A). Analysis of coronal sections reveals that we have successfully targeted GFP expression to progenitor cells that line the ventricular zone of the 3rd ventricle and neurons that migrate out to the mantle zone to form nuclei (Fig. 3B)
Retina
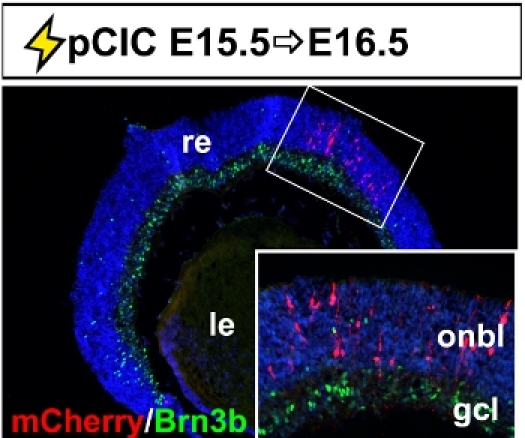
The retina is the neural layer of the eye, responsible for converting light photons into electrical impulses transmitted to the brain. It develops as an outpocketing of the embryonic diencephalon, and hence, is derived from the neural tube. The neural retina develops from an apical progenitor compartment that lies adjacent to the subretinal space, a cavity that separates the eye from the head mesenchyme. Targeting DNA constructs to retinal progenitors therefore requires that injections are made into a small target area. Using micromanipulators, we have managed to successfully target this small area in embryos from E13.5 to E15.5 (shown is E15.5 electroporations of pCIC with mCherry reporter; Fig. 4). If electroporated retinae are examined 24 hr post-transfection, we observe that most mCherry+ cells are located in the outer neuroblast layer (onbl), where dividing progenitors are located, and not in the retinal ganglion cell layer (gcl; inset image), where postmitotic cells localize.
 Figure 1. Introduction to in utero electroporation set-up and methodology. (A) The key components of the surgical set-up include an Eppendorf Femtojet microinjector (1), Narishige micromanipulator with needle holder (2), Leica steromicroscope (3), fiber optic lighting system (4), ECM 830 Square Wave Electroporation System with electrodes (5) and heating pad (6). (A') The animal is anesthetized using a vaporizer for isoflurane anesthetic. (B,B') Briefly, after anesthesia, the uterine horns are exposed and DNA mixed with fast green is injected into the embryonic brain vesicles. A successful injection is visualized by tracking of the fast green dye (B'). (C,C') After the DNA is successfully injected, the paddle electrodes are placed on either side of the uterus, positioning the embryo so that the DNA will be pulled towards the positive pole into the brain region of choice. (D,D') Once all the desired embryos are injected, the uterus is pushed back into the abdomen (D), the peritoneum is sutured, and the skin is stapled (D'). The pregnant female is then allowed to recover and the electroporated pups are collected at the desired time points.
 Figure 2. Representative example of dorsal telencephalic electroporation. (A-C) Photomicrograph of a coronal section through an E13.5 dorsal telencephalon electroporated at E12.5 with pCIG2. Electroporated GFP+ cells are analysed for their expression of markers of apical progenitors (Pax6+, red, A), basal progenitors (Tbr2+, red, B) and postmitotic neurons (Tbr1+, red, C). cp, cortical plate; svz, subventricular zone, vz; ventricular zone.
 Figure 3. Representative example of diencephalic electroporation. (A) A ventral view of an E14 brain that has been electroporated at E12 with pCIG2. GFP epifluorescence is visible in the thalamus, pre- thalamus and hypothalamus, demonstrating the spread of the microinjected pCIG2 plasmid throughout the 3rd ventricle. (B) Photomicrograph of coronal section through electroporated brain, showing the migration of GFP+ cells out of the ventricular zone and into the mantle zone, where hypothalamic nuclei will form. 3V, third ventricle; T, thalamus; Hy, hypothalamus; mz, mantle zone; Tel, telencephalon; PreT, prethalamus; vz, ventricular zone.
 Figure 4. Representative example of retinal electroporation. Coronal section through an E16.5 eye electroporated with pCIC at E15.5 showing the accumulation of mCherry+ cells in the outer neuroblast layer and not in Brn3b+ retinal ganglion cells in the ganglion cell layer. The inset is a higher magnification image of the boxed area. gcl, retinal ganglion cell layer; le, lens; onbl, outer neuroblast layer; re, retina.
Discussion
In utero electroporation can be used to analyze a wide variety of developmental processes. For example, transfection of reporter genes such as GFP, mCherry or alkaline phosphatase can be used to conduct lineage tracing and neuronal migration experiments. Alternatively, Cre recombinase can be transiently expressed to selectively eliminate a floxed allele in a spatially- and/or temporally-controlled manner. Furthermore, shRNA or dominant negative constructs can be electroporated to knockdown target gene function. Finally, targeted overexpression or misexpression of key genes in both wild type and/or genetically mutant mouse lines can be used to study cell fate decisions. The high throughput of this assay is critical as it allows for the testing of many combinations of factors in a very short time. One note of caution is that this procedure does cause changes in gene expression in cells that line the needle entry site (i.e., injury-response genes upregulated in wound; as observed by us and others13). It is thus recommended to focus on electroporated cells outside of the wound site. In addition, embryonic survival rates are low when first learning this technique but quickly rise to >95% with practice. To date, we have successfully used in utero electroporation technologies to identify genes regulated by proneural bHLH transcription factors in the telencephalon4. We have also validated the use of this technique for the analysis of telencephalic cis-regulatory elements3.
Disclosures
No conflicts of interest declared.
Acknowledgments
The authors would like to thank Eva Hadzimova, Pierre Mattar and Christopher Kovach for their initial work in establishing in utero electroporation technology in the CS lab. This work was funded by a Canadian Institute of Health Research (CIHR) grant (MOP 44094) and CIHR/Foundation Fighting Blindness (FFB) Emerging Team Grant (00933-000) to CS and an Alberta Children’s Hospital Research Foundation Grant to DMK. RD was supported by a CIHR Canada Hope Scholarship, RC is supported by an FFB Studentship and LML was supported by a CIHR Training Grant in Genetics and Child Development.
References
- Saito T, Nakatsuji N. Efficient gene transfer into the embryonic mouse brain using in vivo electroporation. Dev Biol. 2001;240:237–246. doi: 10.1006/dbio.2001.0439. [DOI] [PubMed] [Google Scholar]
- Takahashi M, Sato K, Nomura T, Osumi N. Manipulating gene expressions by electroporation in the developing brain of mammalian embryos. Differentiation. 2002;70:155–162. doi: 10.1046/j.1432-0436.2002.700405.x. [DOI] [PubMed] [Google Scholar]
- Langevin LM. Validating in utero electroporation for the rapid analysis of gene regulatory elements in the murine telencephalon. Dev Dyn 236. 2007:1273–1286. doi: 10.1002/dvdy.21126. [DOI] [PubMed] [Google Scholar]
- Mattar P. Basic helix-loop-helix transcription factors cooperate to specify a cortical projection neuron identity. Mol Cell Biol. 2008;28:1456–1469. doi: 10.1128/MCB.01510-07. [DOI] [PMC free article] [PubMed] [Google Scholar]
- Nakamura H, Katahira T, Sato T, Watanabe Y, Funahashi J. Gain- and loss-of-function in chick embryos by electroporation. Mech Dev. 2004;121:1137–1143. doi: 10.1016/j.mod.2004.05.013. [DOI] [PubMed] [Google Scholar]
- Gaiano N, Kohtz JD, Turnbull DH, Fishell G. A method for rapid gain-of-function studies in the mouse embryonic nervous system. Nat Neurosci. 1999;2:812–819. doi: 10.1038/12186. [DOI] [PubMed] [Google Scholar]
- Matsuda T, Cepko CL. Electroporation and RNA interference in the rodent retina in vivo and in vitro. Proc Natl Acad Sci U S A. 2004;101:16–22. doi: 10.1073/pnas.2235688100. [DOI] [PMC free article] [PubMed] [Google Scholar]
- Petros TJ, Rebsam A, Mason CA. In utero and ex vivo electroporation for gene expression in mouse retinal ganglion cells. J Vis Exp. 2009 doi: 10.3791/1333. [DOI] [PMC free article] [PubMed] [Google Scholar]
- Garcia-Frigola C, Carreres MI, Vegar C, Herrera E. Gene delivery into mouse retinal ganglion cells by in utero electroporation. BMC Dev Biol. 2007;7:103–103. doi: 10.1186/1471-213X-7-103. [DOI] [PMC free article] [PubMed] [Google Scholar]
- Kataoka A, Shimogori T. Fgf8 controls regional identity in the developing thalamus. Development. 2008;135:2873–2881. doi: 10.1242/dev.021618. [DOI] [PubMed] [Google Scholar]
- Vue TY. Sonic hedgehog signaling controls thalamic progenitor identity and nuclei specification in mice. J Neurosci. 2009;29:4484–4497. doi: 10.1523/JNEUROSCI.0656-09.2009. [DOI] [PMC free article] [PubMed] [Google Scholar]
- Tsuchiya R, Takahashi K, Liu FC, Takahashi H. Aberrant axonal projections from mammillary bodies in Pax6 mutant mice: possible roles of Netrin-1 and Slit 2 in mammillary projections. J Neurosci Res. 2009;87:1620–1633. doi: 10.1002/jnr.21966. [DOI] [PubMed] [Google Scholar]
- Buffo A. Expression pattern of the transcription factor Olig2 in response to brain injuries: implications for neuronal repair. Proc Natl Acad Sci U S A. 2005;102:18183–18188. doi: 10.1073/pnas.0506535102. [DOI] [PMC free article] [PubMed] [Google Scholar]


