Abstract
Single particle electron microscopy (EM) reconstruction has recently become a popular tool to get the three-dimensional (3D) structure of large macromolecular complexes. Compared to X-ray crystallography, it has some unique advantages. First, single particle EM reconstruction does not need to crystallize the protein sample, which is the bottleneck in X-ray crystallography, especially for large macromolecular complexes. Secondly, it does not need large amounts of protein samples. Compared with milligrams of proteins necessary for crystallization, single particle EM reconstruction only needs several micro-liters of protein solution at nano-molar concentrations, using the negative staining EM method. However, despite a few macromolecular assemblies with high symmetry, single particle EM is limited at relatively low resolution (lower than 1 nm resolution) for many specimens especially those without symmetry. This technique is also limited by the size of the molecules under study, i.e. 100 kDa for negatively stained specimens and 300 kDa for frozen-hydrated specimens in general.
For a new sample of unknown structure, we generally use a heavy metal solution to embed the molecules by negative staining. The specimen is then examined in a transmission electron microscope to take two-dimensional (2D) micrographs of the molecules. Ideally, the protein molecules have a homogeneous 3D structure but exhibit different orientations in the micrographs. These micrographs are digitized and processed in computers as "single particles". Using two-dimensional alignment and classification techniques, homogenous molecules in the same views are clustered into classes. Their averages enhance the signal of the molecule's 2D shapes. After we assign the particles with the proper relative orientation (Euler angles), we will be able to reconstruct the 2D particle images into a 3D virtual volume.
In single particle 3D reconstruction, an essential step is to correctly assign the proper orientation of each single particle. There are several methods to assign the view for each particle, including the angular reconstitution1 and random conical tilt (RCT) method2. In this protocol, we describe our practice in getting the 3D reconstruction of yeast exosome complex using negative staining EM and RCT. It should be noted that our protocol of electron microscopy and image processing follows the basic principle of RCT but is not the only way to perform the method. We first describe how to embed the protein sample into a layer of Uranyl-Formate with a thickness comparable to the protein size, using a holey carbon grid covered with a layer of continuous thin carbon film. Then the specimen is inserted into a transmission electron microscope to collect untilted (0-degree) and tilted (55-degree) pairs of micrographs that will be used later for processing and obtaining an initial 3D model of the yeast exosome. To this end, we perform RCT and then refine the initial 3D model by using the projection matching refinement method3.
Protocol
1. Principle of the Random Conical Tilt Method
The principle of the random conical tilt method requires taking a pair of micrographs of the same region of specimen inside the electron microscope. One picture is taken of the specimen in an untilted position (Figure 1A) and the other picture is taken of the specimen tilted at an angle between 50 to 70 degrees (in our case, we use 55 degrees). (Figure 1B)
Using the computer, the digitized micrograph pair is put side by side and images from the same particles are selected. (Figure 1C)
In three-dimensional coordinates, the images of untilted particles and their tilted partners are correlated to each other by the direction of the tilt axis and the tilt angle. (Figure 1D)
The alignment of the untilted particle images brings the images of tilted particles to their corresponding azimuthal locations. (Figure 1E)
Using multiple images of tilted particles filling the azimuthal space, the three-dimensional structure of the molecule can be reconstructed using a back-projection algorithm. (Figure 1F)
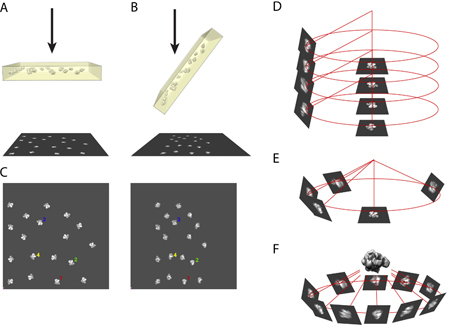 Figure 1. An illustration of the principle for RCT reconstruction.
2. Prepare the Grids of Holey Carbon Covered with Thin Carbon
Rationale: We use negative staining method to fix the protein sample for random conical tilt reconstruction. In order to preserve the macromolecules without too much flattening during drying, we try to embed the protein molecules in a deep stain with a thickness about the dimension of proteins4. In general, continuous carbon is used in making negatively stained specimens. Such kind of carbon, however, is difficult to control the stain thickness around the protein particles. We thus use home-made holey carbon grids covered with a thin layer of carbon film (~5 nm thickness) to make negatively stained specimens. Little wells formed by the holes allow retaining the protein solution and the stain solution on the grid so it is much easier to embed protein in an optimal stain thickness. Furthermore, the thin layer of carbon over the hole reduces the background noise greatly.
Prepare 0.5% Formvar solution. In the fume hood, add 0.45 g polyvinyl formal resin and 90 mL chloroform in a 100 mL glass beaker. Use aluminum foil to cover the beaker, and use a small stir bar to help dissolving formal resin on a magnetic stirrer. It takes about 15 minutes to dissolve the resin.
During the dissolution of the Formvar, clean microscopy glass slides in methanol and wipe dry with Kimwipes.
After the Formvar resin is fully dissolved in chloroform, add 1 mL 50% glycerol to the surface of the solution. Adjusting the volume of the added glycerol affects the density of the holes on the holey carbon. Dip the tip of an ultrasonicator in the solution at about 1 inch depth and use maximum power to sonicate 1 min to make emulsion of glycerol droplets in Formvar solution. The solution becomes milky after this step. Longer sonication causes smaller size of holes on the holey carbon.
Immediately after the sonication, dip the cleaned glass slides vertically into the emulsion for 1 second, take them out, and blot the slides' bottoms using filter paper to form a thin plastic film over the surface of the slides. After the choloroform evaporates, check the density and size of the holes in the film under a light microscope. Adjust the preparation condition according to the needs. With the condition described here, we generally obtain holes with diameter of 3~4 micro-meters and 10~20 holes in each square of a 400 mesh grid.
After the glass slides are dry, cut the edge of the plastic film on the slide surface. Float the film off on the surface of distilled water. The thin film on the water surface can be observed at a glancing angle against the light reflection. Place 400-mesh copper grids on the film one by one, with the grids' smooth surface facing down.
Pick up the plastic film with grids on it using a piece of paper. Flip the paper and let it dry in a petri dish. Soak the paper in methanol to remove the residual glycerol in the holes and let the paper dry in air.
Coat the grids with a layer of carbon with the thickness of ~20 nanometer in a carbon evaporator. The thickness can be determined by the gray color of the carbon.
Soak the grids with carbon in chloroform for half an hour to remove the Formvar. After the grids are dried, we have obtained home-made holey carbon grids.
Evaporate thin layer of carbon with about 5 nanometer in thickness onto freshly cleaved mica surface.
Carefully put the holey carbon grids underneath distilled water. Float the thin carbon from the mica surface onto the water surface and deposit it onto the holey carbon grids slowly. Dry the grids in a fume hood.
3. Negative Staining of the Exosome Complex
Rationale: There are quite a few heavy metal stain solutions that can be used for negative staining EM, including uranyl acetate, uranyl formate, phosphotungstic acid, ammonium molybdate, and others. Different stain solution has different unique properties. For instance, uranyl acetate provides high contrast of the particle but may crash protein complexes that do not like acidic environment. For those samples, phosphotungestic acid at neutral pH may be a good stain solution. We choose saturated Uranyl Formate (UF) solution due to its fine granularity and high penetration capability into molecules.
Boil distilled water for 1 min. Cool it down slowly to room temperature. This step is to remove dissolved oxygen from the water.
Make fresh 2% Uranyl Formate (UF) solution. Mix 1 mL water and 20 mg UF in a 1.5 mL tube. Vortex for 10 min.
Adjust the pH value to 5.0 by adding 2 microliter of 10 M potassium hydroxide. Mix immediately. The solution color should be more yellow. The pH of the solution should not be too high, otherwise the stain precipitates.
Put the tube on vortexer for another 10 min.
Spin the solution on a desktop centrifuge at maximum speed for 10 min.
Filter the solution through a 0.2 micrometer PVDF membrane. This is the fresh UF solution. Cover the solution tube in a piece of aluminum foil to prevent light. The solution has to be used in the same day.
Glow discharge one thin-carbon-over-holey carbon grid using a glow-discharge apparatus for 30 seconds at 25 mA current.
Put a piece of clean parafilm on the bench. Put 3 droplets of 50 microliter UF stain solution on top of the parafilm.
Dilute the exosome complex to a concentration of 50 ~ 100 nM using the dilution buffer (25 mM Tris-HCl pH 7.5, 100 mM NaCl, 2 mM DTT). Put 4 microliter of the diluted protein on the glow-discharged grid. Let the sample stay on the grid for one minute. (Note: Such a final concentration of molecules generally gives an optimal density of well-dispersed particles on the negatively stained grid. For uranyl formate or uranyl acecate stain solution, the phosphate or high concentration of salt (more than 0.5 M) in general is not good for getting good staining results. Our experience suggests that Hepes or Pipes work well with the uranyl stain solutions.)
Use a piece of filter paper to blot the residual solution from the edge of the grid and flip the grid immediately on top of the stain droplets and rinse the grid for about 10 seconds on each droplet.
After the last rinse, let the stain stay on the grid for another 1 min and then blot the stain away by a piece of filter paper. Keep a thin layer of stain solution on the grid surface in order to get a good deep stain results. Let the grid dry quickly in a fume hood.
4. Electron Microscopy of the Exosome Complex
Rationale: Any transmission electron microscope with a tilting stage can be used to collect tilt pairs of the specimen for RCT reconstruction. In theory, the higher angle the specimen can be tilted to collect data, the better. In practice, due to the design of the specimen holder and the geometry of the grid, the maximum operable angle is limited from 50 to 70 degrees. In this protocol, we only describe our procedure using a FEI Tecnai-12 electron microscope. For the other models of microscopes, the operations need to be adjusted according to the requirement of the project and property of the instrument.
Put the sample grid in the sample holder and then put the holder into an FEI Tecnai -12 electron microscope. The microscope is operated at 120 kV. We use Gatan Ultrascan4000 CCD camera to take pictures. Make sure that the 'Flip around vertical axis' in the 'config camera' dialog of Digital Micrograph interface is unchecked to ensure the correct handedness determination. (Note: this is important especially if the reader relies on SPIDER RCT reconstruction procedures to get a 3D model.)
Check the sample grid at low magnification to find the best stained squares. Such kind of squares should have a dozen of holes with dimension of about 1~2 micrometer and dark stain areas in them. (Figure 2)
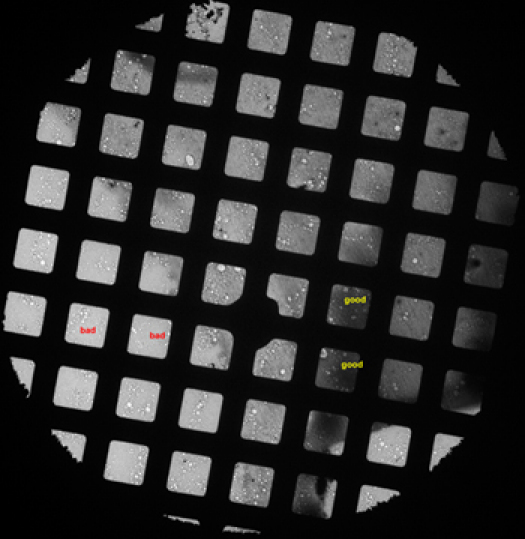 Figure 2. A low magnification micrograph of a grid showing squares with good and bad stains.
Turn on the low dose mode of the FEI User Interface and align the search, focus and expose position in low dose mode. We use magnifications of 150,000 for focus, 52,000 for exposure and 1.5 meter camera length in diffraction for search. The exposure time is adjusted to 1 second. Set the focus position 2 micrometer away from the exposure position along the tilting axis.
Find the holes with good staining in search mode, and save the locations. The good holes generally have dark stain gradient in them observed under the search mode. Take a CCD picture of the square. Tilt the specimen to 55 degrees, take another picture. Compare the two pictures, identify the paired holes in the two micrographs. (Figure 3)
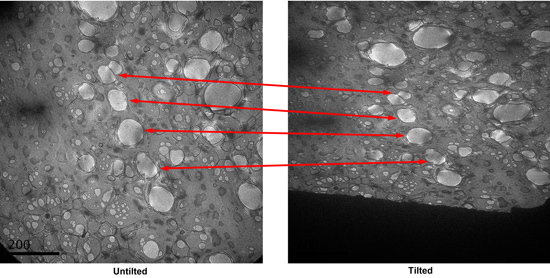 Figure 3. A tilt pair of micrographs of a square in search mode. Corresponding paired holes are indicated.
Tilt the stage back to 0 degree. Using the low-dose kit to take pictures of each hole identified in the search mode at high magnification. The defocus used is about -0.7 micrometer.
After all the holes have been taken pictures of, tilt the stage to 55 degrees. Take micrographs of the tilted specimen at the same magnification as untilted ones with a defocus of about -1.2 micrometer. Identify the corresponding tilted pairs of micrographs based on the patterns in the low magnification micrographs. The irregular pattern of the home-made holey carbon grids helps the correlation. Examine tilt pairs of micrographs and remove the micrographs with bad stains such as shallow stained areas (particles appear to have a halo around them under tilted condition). (Figure 4)
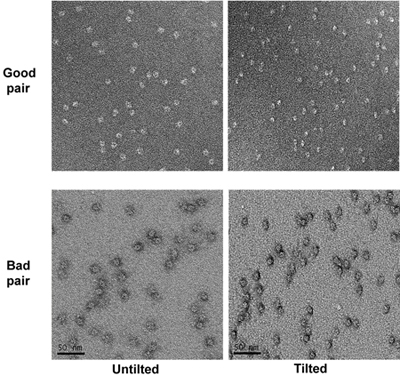 Figure 4. Two tilt pairs of micrographs of the specimen at high magnification. The good and bad micrographs are marked.
5. Image Processing of the Data
Rationale: There are different options and software packages to perform the RCT reconstruction in computer. The most generally used is SPIDER5. A basic protocol to perform RCT in SPIDER can be found in the webpage http://www.wadsworth.org/spider_doc/spider/docs/techs/rancon/recn.html. A detailed protocol to perform RCT in SPIDER is described in the article by Shaikh et al.6 In our protocol, we use a combination of IMAGIC-5 7 and SPIDER in the video version of the protocol. We also provide an alternative procedure to solely use SPIDER in the text version of the protocol.
Setup the programs. We use the proc2d in the EMAN8 package to change the image format from Gatan Digital image to SPIDER image format. IMAGIC-5 is used to do the 2D alignment. SPIDER is used to do the 3D reconstruction and refinement.
Sub-section 1: Picking tilt pairs of the particles.
Convert the *.dm3 Gatan Digital image to SPIDER image format using the proc2d command in EMAN. The tilted and untilted pairs are named in pattern as ***t.spi and ***u.spi, respectively.
Pick the particle pairs using 'WEB' program distributed in SPIDER program package. Follow the instruction in the webpages http://www.wadsworth.org/spider_doc/web/docs/web.html and http://www.wadsworth.org/spider_doc/web/docs/particles.html. Coordinates are automaticly saved in dcu***.spi and dct***.spi for untilted and tilted particles respectively. Another document dcb***.spi contains the tilt angle information between tilted and untilted particles.(Note: The three angles during the fitting in WEB between the tilt pairs do not guarantee the correct handedness of the final reconstruction because theta does not have the sign (positive value) and phi and gamma rely on the initial values set to them. Examining the direction of the defocus gradient on the tilted micrograph would help set the correct initial values of the phi and gamma before the fitting in order to get a correct handedness of the reconstruction. Figure 5 illustrates the correct convention.)
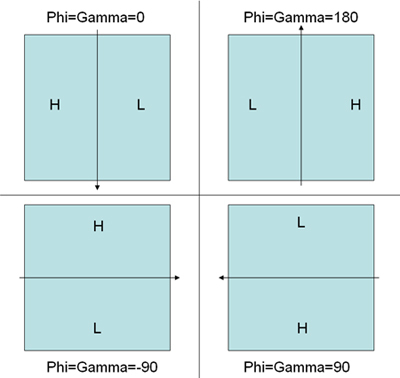 Figure 5. An illustration to explain the convention of angle determination in WEB tilt-pair particle picking fitting mode determined by the defocus gradient. H represents high-defocus area while L represents low-defocus area. The arrow represents tilting axis. The corresponding correct initial angles for PHI and GAMMA are indicated for each scheme.
Box out all the picked particles using a modified version of the SPIDER script as shown in the webpage http://www.wadsworth.org/spider_doc/spider/docs/partpick.html. Script saves the untilted and tilted particle stacks as u.spi and t.spi. The numbers of micrograph where the particles are from should be saved in particle_list.spi. (Note: This is very important for generating the correct euler angle files for RCT.)
Sub-section 2: Two-dimensional alignment and classification of the untilted particle images.
Convert the untilted particles into IMAGIC-5 format using em2em program in Imagic-5 package. Align and classify the particles into homogeneous classes iteratively using the IMAGIC-5 programs (Appendix A). Using the msa-names-in-class command in IMAGIC-5 to generate classes lookup table of the particles, which we save as imagic_classes.lis. (Note: The classification and alignment is to increase the number of particles with the same shape as well as reduce the variation in a class. Variance map of each class can provide information about the quality of the class.)
Generate a plot file (ali_50.plt in the video demonstration) for translation and rotation values of alignment of each particle using header command in IMAGIC-5.
Convert the classes look-up table into SPIDER document files base_file***.spi using a perl script lis2spi.pl distributed in http://cryoem.berkeley.edu.
Convert the translation and rotation values of alignment of each particle from the plot file generated for translation and rotation values in step 5.6 into SPIDER document file ali_50.spi using a script plt2spi.pl distributed in http://cryoem.berkeley.edu. We use IMAGIC-5 for the 2D alignment and classification because it gives the best performance on this job in our hands. Alternative strategy in SPIDER for the two-dimensional alignment and classification can be found at http://www.wadsworth.org/spider_doc/spider/docs/align.html. We have also used SPIDER to perform the 2D analysis on the untilted particles of the exosome. Following is a simple procedure. Alternative 5.5) Use the reference-free alignment as described in the webpages http://www.wadsworth.org/spider_doc/spider/docs/align.html#refree and http://www.wadsworth.org/spider_doc/spider/docs/reffreealign.html to align the images. Two simple scripts can be found in http://www.wadsworth.org/spider_doc/spider/docs/techs/rancon/proc/b05.aps and http://www.wadsworth.org/spider_doc/spider/docs/techs/rancon/proc/b06.rts. Save the rotation and shift of all the particles in a document file angular_file.spi. Alternative 5.6) Classify the aligned particles into groups with the same view as described in webpages http://www.wadsworth.org/spider_doc/spider/docs/techs/MSA/index.htm and http://www.wadsworth.org/spider_doc/spider/docs/techs/classification/tutorial.html. We have used K-means method for the classification. Generate base_file***.spi based on the classification.
Sub-section 3: Three-dimensional reconstruction using the tilted particle images.
Band-pass filter, mask and center the tilted particles just as for the untilted particles in IMAGIC-5. Generate a new dataset for titled particles. (Note: This step is optional. It can be done in SPIDER.)
Create anglular document files from the classes look-up table documents ali_50.spi, the dcb***.spi files generated by web in step 5.3 and the particle list file partile_list.spi from step 5.4 using the SPIDER script as in Appendix B.
Use reconstruction scripts in SPIDER to do the reconstruction of each class as described in http://www.wadsworth.org/spider_doc/spider/docs/techs/rancon/recn.html. Every class of particles contributes to one 3D reconstruction volume. The 3D models can be examined in UCSF-Chimera9. A two-dimensional projection of the 3D model at euler angle (0,0,0) can be compared to the corresponding 2D class average from the untilted particles to verify the quality of the reconstruction. Find similar volumes, align and merge them to generate initial volumes following the procedure http://www.wadsworth.org/spider_doc/spider/docs/techs/rancon/recn.html.
Sub-section 4: Refinement of the 3D reconstruction using untilted particle images.
Do projection matching refinement of the merged initial volume against all the untilted particles to get a higher resolution volume without missing cone and flattening artifact using SPIDER scripts as described in http://www.wadsworth.org/spider_doc/spider/docs/techs/recon/refine.html.
6. Representative Results:
Using the RCT method, we have obtained about 50 reconstructions of the exosome from a total of 5,000 tilt pairs (Figure 6). From the 50 3D models, we can see different orientations of the complex sitting on the grid with mainly two orthogonal views. A flattening artifact is also detectable in many of the volumes in the direction perpendicular to the carbon surface. We performed alignment and merging of the 3D volumes to generate two initial volumes at orthogonal views. Using the 5,000 untilted particle images, we have obtained the same final 3D reconstruction of the exosome at about 18 Angstrom resolution from both initial models (Figure 7). The structure revealed the architecture of the yeast exosome and provided insights onto the RNA substrate recruitment pathway10.
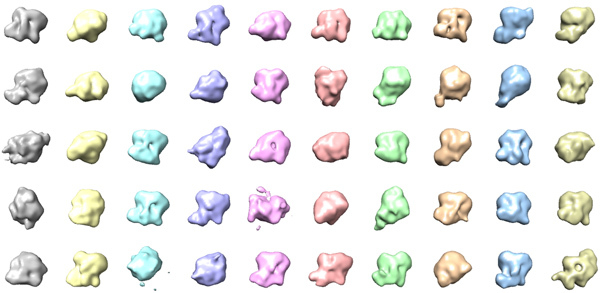 Figure 6. 50 3D models of the exosome complex by RCT reconstruction.
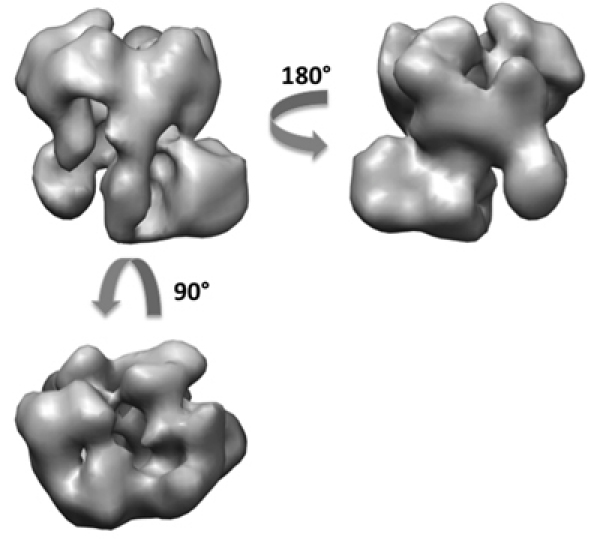 Figure 7. 3D reconstruction of the exosome complex after refinement.
Appendix:
Appendix A. The script file for 2D alignment and classification in IMAGIC-5. File: auto_align_i.sh Click here for file
Appendix B. The script file for generating angular file for 3D reconstruction in SPIDER. File: generate_angular_file.spi Click here for file
Discussion
In this article we present a detailed protocol of sample preparation and three dimensional reconstruction of the exosome complex using negative staining electron microscopy. Using this method, we obtained the 3D reconstruction using random conical tilt method without any prior knowledge of the structure. Random conical tilt method does not necessarily require a homogeneous sample but the following projection matching refinement step would need a homogeneous specimen in order to achieve high resolution.
For negatively stained samples, the stain thickness is very important for the random conical tilt method to work. Too thin stain causes the black halo of the molecule in high tilt angle, which introduces artifacts in the reconstruction. Too thick stain reduces the signal-to-noise ratio of the particles in the micrograph. The holey carbon grids covered by a thin layer of continuous carbon film that we are using can help achieving optimal staining conditions more easily. The home-made holey carbon can be replaced by commercially available holey grids such as Quantifoil or C-flat. The irregular pattern of the holes in the home-made holey carbon, however, may help align the tilted micrographs in both low and high magnifications.
In this protocol, special attention should be paid to the electron microscopy part, in which alignment should be very careful in order to get the corresponding area of the tilted and untilted micrographs, and to get the largest overlap between the tilt and untilt micrograph. The random conical tilt method can help determine the handedness unambiguously. During practice, however, one has to be very cautious about the convention difference in settings of the detector (CCD, film scanner), image format conversion, software packages, and script parameter settings. The most reliable way is to get a reconstruction of a known structure to set up the correct convention of the handedness determination and to use exactly the same procedure and convention for any further reconstructions.
In this protocol, we used a combination of different image processing packages during the random conical tilt reconstruction because we want to take advantage of unique features in different packages. But all these steps can be done within one package, such as SPIDER. Xmipp11 is a recently developed package with an RCT reconstruction plugin embedded in it. Some automation methods in both data collection and image processing have been implemented12. Our protocol described here may serve to help beginners to understand the entire process of the random conical tilt reconstruction.
Disclosures
No conflicts of interest declared.
Acknowledgments
The authors would like to thank the members of Nogales lab at UC-Berkeley in helping establish the initial protocols and the members of Wang lab at Yale University in their help to establish the full protocols. We also acknowledge the staffs in cryo-EM facility and High-Performance Computation Center at Yale School of Medicine for their support. HW is a Smith Family Awardee.
References
- van Heel M. Angular reconstitution: a posteriori assignment of projection directions for 3D reconstruction. Ultramicroscopy. 1987;21:111–123. doi: 10.1016/0304-3991(87)90078-7. [DOI] [PubMed] [Google Scholar]
- Radermacher M. Three-dimensional reconstruction of single particles from random and nonrandom tilt series. J Electron Microsc Tech. 1988;9:359–394. doi: 10.1002/jemt.1060090405. [DOI] [PubMed] [Google Scholar]
- Penczek PA, Grassucci RA, Frank J. The ribosome at improved resolution: new techniques for merging and orientation refinement in 3D cryo-electron microscopy of biological particles. Ultramicroscopy. 1994;53:251–270. doi: 10.1016/0304-3991(94)90038-8. [DOI] [PubMed] [Google Scholar]
- Ohi M, Li Y, Cheng Y, Walz T. Negative staining and image classification - powerful tools in modern electron microscopy. Biol Proced Online. 2004;6:23–34. doi: 10.1251/bpo70. [DOI] [PMC free article] [PubMed] [Google Scholar]
- Frank J, Radermacher M, Penczek P, Zhu J, Li Y, Ladjadj M, Leith A. SPIDER and WEB: processing and visualization of images in 3D electron microscopy and related fields. J Struct Biol. 1996;116:190–199. doi: 10.1006/jsbi.1996.0030. [DOI] [PubMed] [Google Scholar]
- Shaikh TR, Gao H, Baxter WT, Asturias FJ, Boisset N, Leith A, Frank J. SPIDER image processing for single particle reconstruction of biological macromolecules from electron micrographs. Nat Protoc. 2008;3:1941–1974. doi: 10.1038/nprot.2008.156. [DOI] [PMC free article] [PubMed] [Google Scholar]
- Heel Mvan, Harauz G, Orlova EV, Schmidt R, Schatz M. A new generation of the IMAGIC image processing system. J Struct Biol. 1996;116:17–24. doi: 10.1006/jsbi.1996.0004. [DOI] [PubMed] [Google Scholar]
- Ludtke SJ, Baldwin PR, Chiu W. EMAN: semiautomated software for high-resolution single-particle reconstructions. J Struct Biol. 1999;128:82–97. doi: 10.1006/jsbi.1999.4174. [DOI] [PubMed] [Google Scholar]
- Pettersen EF, Goddard TD, Huang CC, Couch GS, Greenblatt DM, Meng EC, Ferrin TE. UCSF Chimera--a visualization system for exploratory research and analysis. J Comput Chem. 2004;25:1605–1612. doi: 10.1002/jcc.20084. [DOI] [PubMed] [Google Scholar]
- Wang HW, Wang J, Ding F, Callahan K, Bratkowski MA, Buttler JS, Nogales E, Ke A. Architecture of the yeast Rrp44 exosome complex suggests routes of RNA recruitment for 3' end processing. Proc Natl Acad Sci USA. 2007;104:16844–16849. doi: 10.1073/pnas.0705526104. [DOI] [PMC free article] [PubMed] [Google Scholar]
- Scheres SH, Nunez-Ramirez R, Sorzano CO, Carazo JM, Marabini R. Image processing for electron microscopy single-particle analysis using Xmipp. Nat Protoc. 2008;3:977–990. doi: 10.1038/nprot.2008.62. [DOI] [PMC free article] [PubMed] [Google Scholar]
- Yoshioka C, Pulokas J, Fellmann D, Potter CS, Milligan RA, Carragher B. Automation of random conical tilt and orthogonal tilt data collection using feature-based correlation. J Struct Biol. 2007;159:335–346. doi: 10.1016/j.jsb.2007.03.005. [DOI] [PMC free article] [PubMed] [Google Scholar]


