Abstract
There are multiple sample types that may be collected from a euthanized animal in order to help diagnose or discover infectious agents in an animal colony. Proper collection of tissues for further histological processing can impact the quality of testing results. This article describes the conduct of a basic gross examination including identification of heart, liver, lungs, kidneys, and spleen, as well as how to collect those organs. Additionally four of the more difficult tissue/sample collection techniques are demonstrated. Lung collection and perfusion can be particularly challenging as the tissue needs to be properly inflated with a fixative in order for inside of the tissue to fix properly and to enable thorough histologic evaluation. This article demonstrates the step by step technique to remove the lung and inflate it with fixative in order to achieve optimal fixation of the tissue within 24 hours. Brain collection can be similarly challenging as the tissue is soft and easily damaged. This article demonstrates the step by step technique to expose and remove the brain from the skull with minimal damage to the tissue. The mesenteric lymph node is a good sample type in which to detect many common infectious agents as enteric viruses persist longer in the lymph node than they are shed in feces. This article demonstrates the step by step procedure for locating and aseptically removing the mesenteric lymph node. Finally, identification of infectious agents of the respiratory tract may be performed by bacterial culture or PCR testing of nasal and/or bronchial fluid aspirates taken at necropsy. This procedure describes obtaining and preparing the respiratory aspirate sample for bacterial culture and PCR testing.
Protocol
1. Preparation for the necropsy
Important parts of any gross postmortem examination (gross necropsy) are the history of the animal and the description of the findings.
A veterinary pathologist reading your histopathology slides may not have seen the animal and is relying on you for the background information.
Describe exactly what you see before you euthanize the animal. For example, "female mouse; one of five in the cage; C57BL/6N; head tilted to the right" or "brown male rat; strain unknown; animal is scratching; there is patchy hair loss on the dorsum, near the tail and head".
Use clear, descriptive, objective language. Modifiers such as "mild", "moderate", and "severe" may be useful if the cutoffs between levels are clearly demarcated. Describing things in terms of food or household objects is generally not recommended.
Weighing and measuring animals, findings, or organs is often useful. A "large spleen" to you might be a normal spleen to another observer. Saying that the spleen measures 3cm x 1.5cm provides more objective information.
Photodocumentation can be invaluable.
Observe all relevant occupational health and personal protective equipment required for working with live animals, potentially infectious carcasses, or chemicals such as formalin.
2. Gross postmortem location and examination of heart, lungs, liver, kidneys, and spleen
Gather the necessary supplies prior to euthanasia of the animal. Minimally, this should include a dissection board or similar work surface, forceps, scissors, labels for containers, fixative, and any media or collection tubes/cups that may potentially be needed.
Briefly assess the condition, behavior, and movement of the animal. Observe and record breathing patterns (e.g., rapid, shallow) as well as ambulatory ability and gait (e.g., limping, circling, tremors).
Euthanize the animal according to standard procedures at your institution, always adhering to the AVMA guidelines.
Assess the animal's body condition for skin and coat abnormalities, emaciation, or dehydration. Make note of any artificial manipulations, implants, or surgical scarring.
Examine all external orifices (ears, eyes, nose, anus, genital openings, and oral cavity). Use of a dissecting scope is recommended for closer observation.
Lay the euthanized mouse or rat carcass in dorsal recumbency on a clean dissection board or similar work surface.
Using scissors, incise the skin the full length of the ventrum from the anus to the chin, reflecting the skin and incising the abdominal wall, exposing the abdominal viscera, salivary and preputial/clitoral glands, and cervical and axillary lymph nodes. Cut the rib cage to expose and examine the thoracic viscera by making 2 cuts laterally up each side of the ribcage, then one across, at the top of the sternum, to open a space wide enough to thoroughly examine all the lobes of the lung.
Examine the appearance of the musculoskeletal structure.
Evaluate all organs for abnormalities. Specifically find and identify the heart and lungs in the thoracic cavity. Specifically find and identify the liver, kidneys and spleen in the abdominal cavity. Note any color changes, size differences, and missing or mislocated organs. Note the consistency of surfaces, any additional tissue (e.g., masses), fluid pockets, or the presence of fluid in the abdominal/thoracic cavities.
Observe the gastrointestinal tract for contents, or lack of contents, paying particular attention for thickened walls, masses, and/or hemorrhage. Incise the kidneys (left-longitudinal section, right-cross section, on midline, but off-center) with a scalpel or razor blade to check parenchyma for any abnormality. Check the mesentery for enlarged lymph nodes and/or masses.
Examine the urogenital system, looking for blockages, fluid pockets, hemorrhage or other abnormalities.
3. Postmortem collection of heart, liver, kidneys, and spleen for histopathology
Gather appropriately sized, labeled container(s) filled with a suitable amount of 10% neutral buffered formalin (NBF). Adjust the amount of 10% NBF in order to obtain a 20:1 ratio of fixative to tissue.
Place the mouse or rat carcass in dorsal recumbency on a clean dissection board or similar work surface and expose the tissue of interest.
Remove the tissue from the carcass using forceps and scissors.
Tissue should be closely trimmed to remove fat and unnecessary connective tissue. Tissue should be clean of blood; use normal (or physiologic) saline) to rinse as necessary. Never use distilled or tap water to rinse tissues.
Place the tissue into the container of 10%NBF.
4. Postmortem collection and perfusion of lung tissue
Gather appropriately sized, labeled container(s) filled with a suitable amount of 10% NBF. Adjust amount of 10% NBF in order to obtain a 20:1 ratio of fixative to tissue.
Place the mouse or rat carcass in dorsal recumbency on a clean dissection board or similar work surface.
Expose the trachea, heart, and lungs.
Using scissors and forceps remove the skin and muscle overlying the ventral thoracic and cervical regions.
Using scissors and forceps, remove the ribcage exposing the heart and lungs by making 2 cuts laterally up each side of the ribcage, then one across near the clavicle to open a space wide enough to thoroughly examine all the lobes of the lung.
Cut away the neck muscles extending from the sternum and ribs to the jaw, including those overlying the trachea.
Insert scissors beneath the anterior edge of the rib cage and make 2 cuts, one on either side, to remove the section of bone overlying the trachea.
Grasp the trachea near the jaw with forceps and cut completely through the trachea with scissors placed above the forceps
Gently tug the trachea upwards using the forceps, snipping ventral tissue connections with scissors until the entire set of thoracic tissues (trachea, lungs, and heart; this is sometimes called the "pluck") has been removed from the body.
Lay the lungs flat on the work surface.
Loosely tie a piece of suture material or kitchen twine around the trachea taking care not to pull tight.
Fill a syringe with fixative and attach a needle that is small enough to enter the trachea. For mice, a 1ml or 3ml syringe with a 26 gauge needle works well. For rats, a 5ml syringe with an 18 gauge syringe works well.
Insert the needle into the opening of the trachea and use forceps to hold the trachea surrounding the needle. Begin slowly filling the lungs with fixative.
- Fill the lungs until fully inflated. Do not over- or underinflate. The amount of fixative needed to fully inflate the lungs varies by age, strain, and health of the animal.
- Over-inflation is detected by fluid seeping and foaming from the lung tissue.
- Underinflation is detected by lungs appearing flat and not full in all areas.
Remove the needle from the trachea.
Tighten the suture material or string surrounding the trachea to prevent backflow of fixative out of the lungs.
Place the inflated lungs into fixative using an approximate 20:1 fixative to tissue ratio.
5. Postmortem collection of brain
Gather appropriately sized, labeled container(s) filled with a suitable amount of 10% NBF. Adjust amount of 10% NBF in order to obtain a 20:1 ratio of fixative to tissue.
Place the euthanized mouse or rat carcass in ventral recumbency on a clean dissection board or similar work surface.
Using scissors and forceps, remove the skin and muscle overlying the calvaria.
Using scissors remove the head completely from the carcass.
Using small scissors insert the bottom blade into the foramen magnum, the opening where the skull opens into the spinal canal, and keeping scissor tips pointed upwards, begin cutting directly up and through the midline of the calvaria.
- Using forceps, reflect back both halves of the calvaria exposing the brain.
- When possible, place the exposed brain into fixative while still in the skull. This will allow the tissue to become firm prior to removal from the skull, if this is required. Many pathologists prefer that sections are cut from the brain while still in the skull.
Gently invert the skull so that gravity will help the tissue to fall from the skull.
Using curved forceps, carefully slide the forceps along the outer edge of the brain and under the brain starting at the olfactory lobes, moving under the cerebrum and towards the cerebellum. Gently pinch with the forceps any connective tissue or nerves that inhibit the brain from falling from the skull.
Place the brain into fixative using an approximate 20:1 ratio of tissue to fixative.
6. Postmortem collection of the mesenteric lymph nodes (MLN)
Tissue collection for PCR analysis should be done using aseptic technique. Flame sterilized, autoclaved or equivalently sterilized instruments should be used.
Assemble sterile Eppendorf tubes and sterile scissors and forceps.
Place the euthanized mouse or rat carcass in dorsal recumbency on a clean dissection board or similar work surface.
Using sterilized scissors and forceps incise the ventral abdominal wall from the genital area to the base of the ribcage, removing both skin and muscle and exposing the intestines.
The MLN are located in the abdominal cavity in the mesenteric tissue along the colon, immediately adjacent to the cecum.
To locate the MLN, first locate the cecum which is the large, comma shaped section of the intestine. The colon extends from the cecum and it can often be identified by the presence of fecal pellets. The MLN are located in the mesentery along the colon adjacent to cecum. It can be identified as a yellow, ovoid or spherical small lump of tissue in the white mesenteric tissue and is often slightly thicker and firmer in texture than the surrounding mesentery and fat. Use anatomy text books as necessary for orientation.
Using aseptic technique and sterile instruments remove the MLN and place into an Eppendorf tube labeled with identifying information.
7. Postmortem collection of respiratory aspirate
Assemble needed supplies - sterile pipette, sterile scissors and forceps, sterile solutions to be flushed through the respiratory tract, and a clean dissecting board or similar work surface.
Lay the euthanized mouse or rat carcass in dorsal recumbency on the dissecting board.
For bronchial aspirate in rats, access the respiratory tract by way of the trachea. For nasal aspirate in rats, access either through the trachea or through the nasopharyngeal meatus. For bronchial or nasal aspirates in mice, access the respiratory tract through the nasopharyngeal meatus.
If both nasal and bronchial aspirates are needed, perform the bronchial aspirate first. Perform nasal aspirate using a new sterile pipette.
- Tracheal access (recommended method for rats):
- Reflect the skin away from the cervical area to expose subcutaneous tissues.
- Remove the salivary glands and cervical musculature to expose the trachea.
- Using sterile instruments, incise the trachea to allow access to the lumen. Maintain asepsis throughout collection (Go to step 7.7).
- Nasopharyngeal meatus access (nasal aspirate and bronchial aspirate, recommended method for mice due to the smaller size of the trachea):
- This procedure may be performed for both the nasal aspirate and bronchial aspirate.
- Using flame-sterilized or autoclaved instruments, sever the temporomandibular (jaw) joint and reflect the mandible away from the maxilla, exposing the nasopharyngeal meatus. Maintain asepsis throughout collection (Go to step 7.7).
Draw approximately 1ml of sampling fluid into a sterile pipette. This may be normal saline, phosphate buffered saline, or trypticase soy broth. (Go to step 7.8 or 7.9, depending on which aspirate you are collecting.)
- Bronchial aspirate:
- Aseptically insert pipette into tracheal lumen, directed caudally, and slowly inject the sampling fluid into the bronchi and the lung. Withdraw the sampling fluid from the bronchi and lungs into the pipette and remove the pipette from the trachea. Not all of the fluid will return into the pipette. Repeat if more fluid is needed for testing.
- Nasal aspirate:
- Aseptically insert pipette into the nasopharyngeal meatus (mice) or tracheal lumen (rats), directed cranially, and slowly inject the sampling fluid into the nasal cavity.
- Ensure that the nasal cavity is reached by contact of the nasal palate with the pipette tip, or by observation of fluid forced into the cavity, seen as menisci forming at the nasal orifice (nares) or as fluid visible through the translucent oral palate. Fluid should not be seen exiting through the mouth. If so, re-orient the pipette.
- Withdraw the sampling fluid from the nasal cavity into the pipette and remove the pipette from the meatus or trachea.
Aseptically transfer sample to appropriate media or container for testing.
8. Representative results
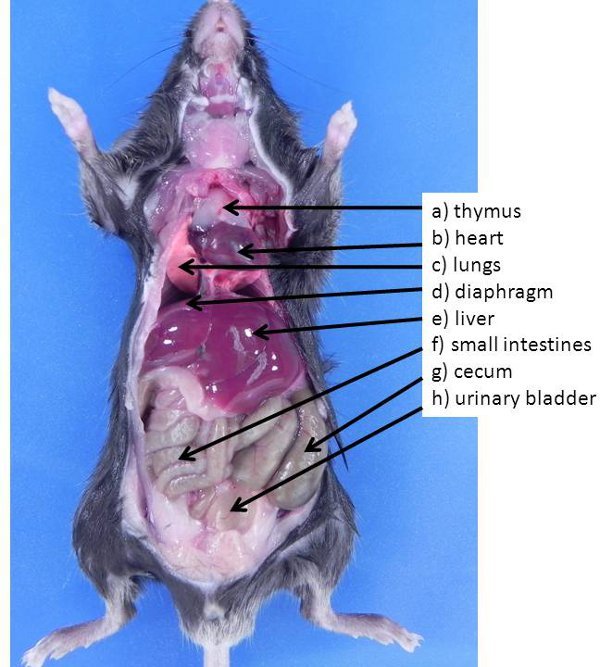
 Figure 1. Abdominal and thoracic organs in the mouse. These organs are typically visible when an animal is first opened (none of the organs have been moved to expose other organs also present in the abdominal cavity). a) thymus, b) heart, c) lungs, d) diaphragm, e) liver, f) small intestines, g) cecum, h) urinary bladder.
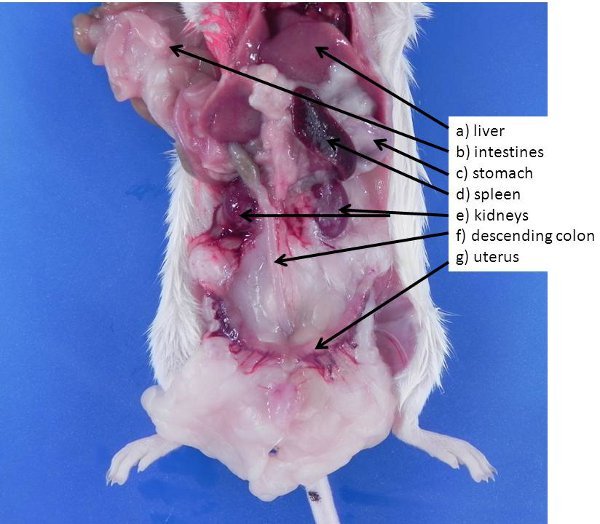
 Figure 2. Abdominal and retroperitoneal organs in the mouse. If the intestines and liver are lifted and moved (or removed), these organs can be seen. a) liver (for reference), b) intestines (for reference), c) stomach, d) spleen, e) kidneys, f) descending colon, g) uterus.
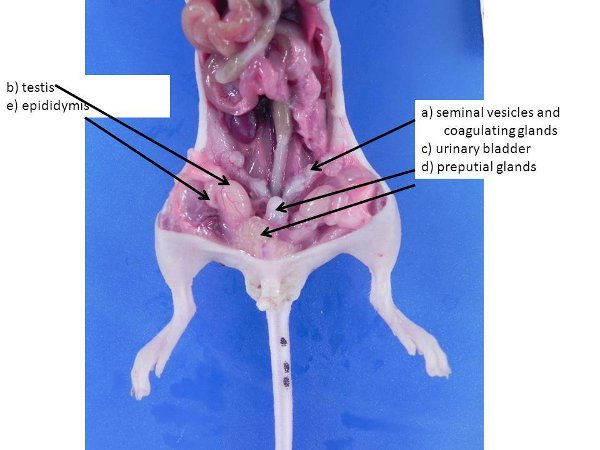
 Figure 3. Male reproductive organs. These can be larger in larger, sexually mature males. a) seminal vesicles and coagulating glands, b) testis (pushed into the abdominal cavity from the scrotum through the inguinal rings, which remain open in mice and rats), c) urinary bladder, d) preputial glands, e) epididymis.
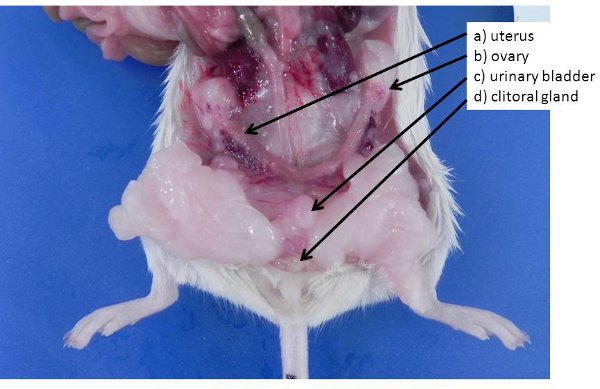
 Figure 4. Female reproductive organs. a) non-gravid uterus (mice and rats have a bicornuate uterus) b) ovary, buried in an ovarian fat pad, c) urinary bladder, d) clitoral glands (analogous to the male preputial glands).
Discussion
Data collection at the end of a study may require a postmortem examination of animals. Describe well what is seen and remember to examine all tissues. These procedures are designed primarily to optimize necropsy and sample collection for infectious disease surveillance, but most are easily adapted to focused investigations of suspected disease incidents or outbreaks in which perhaps only a subset of the procedures would be employed. Many of the procedures are also relevant to necropsies more commonly performed at the conclusion of research studies as part of an overall morphological evaluation coupled with collection of study-specific samples for subsequent analysis.
Disclosures
The authors are all employees of Charles River's laboratory rodent diagnostic lab, where these services are offered commercially.
References
- AVMA. AVMA Guidelines on Euthanasia. 2007. [Google Scholar]
- Feldman DB, Seely JC. Necropsy Guide: Rodents and the rabbit. CRC Press; 1988. [Google Scholar]
- King JM, Dodd DC, Roth L. The Necropsy Book. 4th edn. C.L. Davis Foundation; 2006. [Google Scholar]
- Kittel B. Revised guides for organ sampling and trimming in rats and mice--Part 2. A joint publication of the RITA and NACAD groups. Exp Toxicol Pathol. 2004;55:413–431. doi: 10.1078/0940-2993-00349. [DOI] [PubMed] [Google Scholar]
- Komarek V. Fox JG. The Mouse in Biomedical Research. Elsevier; 2007. Chapter 1; pp. 1–22. Vol. 3: Normative biology, husbandry, and models. [Google Scholar]
- Morawietz G. Revised guides for organ sampling and trimming in rats and mice--Part 3. A joint publication of the RITA and NACAD groups. Exp Toxicol Pathol. 2004;55:433–449. doi: 10.1078/0940-2993-00350. [DOI] [PubMed] [Google Scholar]
- Popesko P, Raijtová V, Horák J. Colour Atlas of Anatomy of Small Laboratory Animals. 1st edn. Vol. 2. Saunders; 2002. pp. 91–106. vol. 2: Rat, mouse, hamster. [Google Scholar]
- Ruehl-Fehlert C. Revised guides for organ sampling and trimming in rats and mice--part 1. Exp Toxicol Pathol. 2003;55:91–106. [PubMed] [Google Scholar]


