Abstract
In this study, we propose a precise 3D lug pose detection sensor for automatic robot welding of a lug to a huge steel plate used in shipbuilding, where the lug is a handle to carry the huge steel plate. The proposed sensor consists of a camera and four laser line diodes, and its design parameters are determined by analyzing its detectable range and resolution. For the lug pose acquisition, four laser lines are projected on both lug and plate, and the projected lines are detected by the camera. For robust detection of the projected lines against the illumination change, the vertical threshold, thinning, Hough transform and separated Hough transform algorithms are successively applied to the camera image. The lug pose acquisition is carried out by two stages: the top view alignment and the side view alignment. The top view alignment is to detect the coarse lug pose relatively far from the lug, and the side view alignment is to detect the fine lug pose close to the lug. After the top view alignment, the robot is controlled to move close to the side of the lug for the side view alignment. By this way, the precise 3D lug pose can be obtained. Finally, experiments with the sensor prototype are carried out to verify the feasibility and effectiveness of the proposed sensor.
Keywords: automatic robot welding, structured-light vision system, lug pose detection
1. Introduction
Automation of welding processes has been a challenging field of research in robotics, sensor technology, control systems and artificial intelligence because of its severe environmental conditions such as intense heat, fumes and so on [1]. In the field of robotics, industrial robot welding is by far the most popular application worldwide, since various manufacturing industries require welding operations in their assembly processes [2]. The most significant application of robot welding can be found in the automobile industry. In the case of the representative Korean automobile company, Hyundai Motor Company, the most manufacturing processes, except for delicate assembly processes, are automated with automotive assembly lines, and the welding process is almost fully automated. As a result, the productivity and quality of the products have been improved remarkably. On the contrary, the shipbuilding process is much less automated than the automobile manufacturing process due to its large-scale unstructured production environment. The welding process in shipbuilding is automated just 60%. Thus, the fact is that the study of robotic welding is still required in the field of shipbuilding, taking into consideration its complex and unstructured production environment.
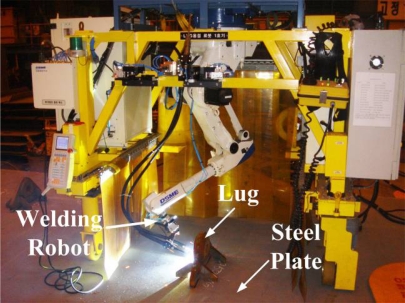
Shipbuilding is achieved by welding numerous steel plates according to a ship blueprint. Since the steel plates are too big and heavy to carry as is, a lug is attached to the plates as a handle, as shown in Figure 1. In this study, for robotic welding of the lug to the steel plate, a 3D lug pose detection sensor is proposed based on a structured-light vision system. In fact, a structured-light vision system has been commonly used for robotic welding with high precision and low disturbance [3,4]. In general, the structured-light vision system for robotic welding consists of a camera and more than one laser diode. In this case, the baseline (or distance) between a camera and a diode and the projection angle of the diode relative to the central axis of the camera determine the intrinsic system characteristics related to the performance. Kim et al. [5,6] proposed a mechanism to change the projection angle of a structured-light vision system according to the working distance. The system, however, needs additional parts such as an actuator and a controller, and also requires additional operating time to adjust the projection angle in accordance with the working distance. In this study, the proposed pose detection sensor consists of a camera and four laser line diodes. In our system, the baseline between a camera and a diode and the projection angle of a diode are key design parameters to determine the sensor performance. Thus, we first analyzed the sensor performance relative to the design parameters, and then determined the values for the parameters, taking the lug shape into consideration.
Figure 1.
An automatic lug welding system with an overhead type robot manipulator developed by Daewoo Shipbuilding and Marine Engineering (DSME) Co., Ltd.
In robotic welding, the acquisition of the initial welding position is one of the most important steps [7,8]. In this study, we also focus on lug pose acquisition including its position and orientation through the coarse-to-fine alignment. First, the rough lug pose is obtained over the lug. According to the rough pose, the robot is controlled to move close to the side of the lug, and then the precise lug pose is obtained. Since the lug pose includes its position and orientation, the initial welding position and the welding line can be obtained from the lug pose. In this case, the structured laser lines are obtained by several image processing algorithms such as the vertical threshold algorithm [9], the Zhang-Suen thinning algorithm [10], the Hough transform algorithm [11] and the separated Hough transform algorithm robust to illumination change.
The organization of this paper is as follows. Section 2 describes the automatic robot welding procedure, and the design and performance analysis of the sensor. Section 3 proposes the coarse-to-fine alignment to obtain the precise lug pose consisting of position and orientation. In section 4, experimental results and discussion are provided to verify the feasibility and effectiveness of the proposed sensor. Finally, Section 5 will present concluding remarks.
2. Automatic Robot Welding System with a 3D Lug Pose Detection Sensor
2.1. Automatic Robot Welding Procedure
In this study, the automatic robot welding with the proposed 3D lug pose detection sensor proceeds in three stages: top view alignment, side view alignment and automatic welding stages. First, the lug pose consisting of both position and orientation is exactly obtained through the top and side view alignments. Next, the robot is controlled to move along the predefined welding path for automatic lug welding. In this study, we focus on the precise robot alignment with the proposed sensor since the success of the alignment is decisive in the success of the automatic robot welding.
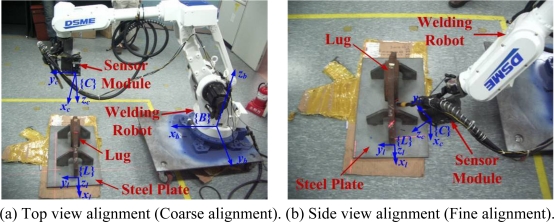
Two possible configurations of the robot for the top and side view alignments are shown in Figure 2, where the proposed sensor is attached to the robot end-effector. In the figure, {B}, {C} and {L} represent the robot base frame, the camera frame and the lug frame, respectively. In this case, the problem to align the end-effector with the lug is the same problem to find {L} relative to {C}, where {L} relative to {C} can be simply transformed to {L} relative to {B} using the forward and inverse kinematics of the robot. Thus, the problem can be formulated as the 3D lug pose detection problem. In the top view alignment stage in Figure 2a, the lug frame {L} can be obtained relative to {C} with the premeasured lookup table (LUT) about the lug shape. However, the obtained frame {L} has some position and orientation errors since the camera resolution is relatively low at such a long distance. Thus, the top view alignment is called the coarse alignment. According to the obtained rough frame {L}, the robot is controlled to move close to the side of the lug for the side view alignment. In the side view alignment stage in Figure 2b, the fine alignment is carried out to find the precise lug frame {L}. Finally, according to the resultant lug frame {L}, the robot automatically welds. Table 1 describes the whole procedure of the automatic robot welding in details.
Figure 2.
Possible robot configurations for the top and side view alignments.
Table 1.
Automatic robot welding procedure.
| Procedure: automatic robot welding |
|---|
|
2.2. 3D Lug Pose Sensor Design
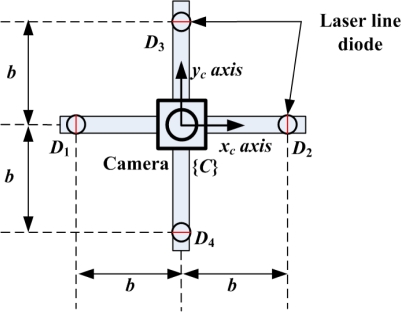
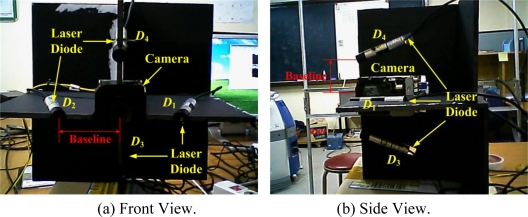
The front view of the proposed 3D lug pose sensor, which consists of a camera and four laser line diodes, is shown in Figure 3, where Di for i = 1,2,3,4 indicates each diode, and b is the baseline (or distance) between the camera and each diode. The origin of the camera frame {C} coincides with the center position of the camera, and the zc axis of {C} is defined perpendicular to both xc axis and yc axis according to the right-hand rule. In this study, we employ FCB-EX480CP developed by Sony, Co. as a camera. The image size is 720 × 576 in pixel and the focal length f is 849 Pixels, where the focal length is empirically obtained by the MATLAB toolbox for camera calibration [12]. Also, we employ LM-6535MS developed by Lanics, Inc. as a laser diode, where the optical power is 20 mW, the wavelength is 658 nm, and the fan angle is 90°. The camera detects four laser lines projected on the lug put on the steel plate for obtaining the 3D lug pose.
Figure 3.
Front view of the 3D lug pose sensor with a monocular camera and four laser line diodes, D1, D2, D3 and D4.
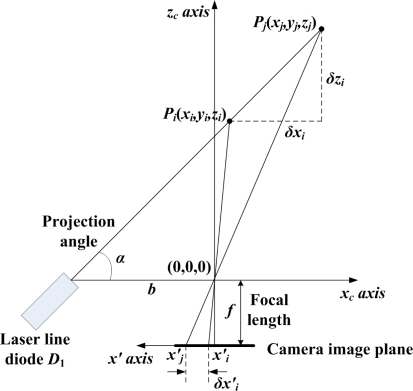
The geometry of the camera and the laser diode D1 in the xc-zc plane [11] is shown in Figure 4. The 3D object point Pi(xi,yi,zi) of the projected line of the diode D1 can be obtained relative to the camera frame {C} as follows:
| (1) |
where α is the projection angle which is defined as the angle between the central axis of D1 and the xc axis, and pi(x′i,y′i) is the measured point on the image plane. Similarly, for pj(x′j,y′j), the 3D object point Pj(xj,yj,zj) can be obtained.
Figure 4.
Acquisition of the 3D points, Pi(xi,yi,zi) and Pj(xj,yj,zj), on the laser line projected by the diode D1, and analysis of their resolutions.
In this case, the baseline b and the projection angle α are the design parameters to determine the intrinsic sensor characteristics related to its performance. First, b is determined by the allowable sensor size to attach to the robot end-effector. In this study, b is set to be 7 cm. Next, for given b, α is determined according to the desirable sensor resolution and detectable range. Here, the sensor resolution is defined as the displacement in the 3D real space per one pixel in the image plane. Let x′i and x′j be the ith pixel and the (i+1)th pixel, respectively. Then, δx′i is one pixel since δx′i is (x′j−x′i). In this case, the displacements, δxi and δzi, for the ith pixel about the x′ axis can be obtained by using Equation 1 as follows:
| (2) |
| (3) |
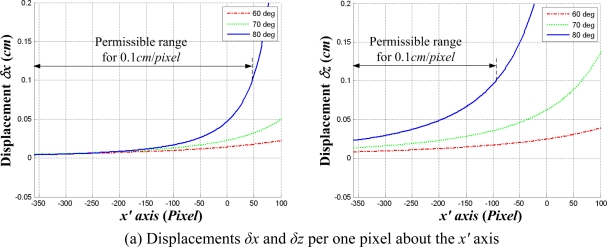
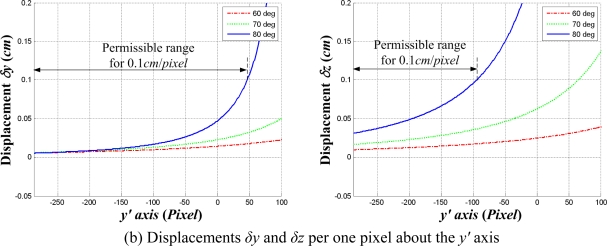
Calculating Equations 2 and 3, the displacements δxi and δzi for i = −360, −359,…, 359 about the x′ axis can be obtained for three projection angles of 60°, 70° and 80° as shown in Figure 5a. For the projection angle of 80° and the permissible resolution of 0.1 cm/pixel for fine alignment, the permissible image ranges are represented as an example. In other words, the robot must move close to the lug to satisfy the permissible range for automatic welding. In the coarse alignment, the permissible range is not satisfied since the robot is relatively far from the lug compared with the fine alignment. In this case, the resolution is exponentially reduced as shown in Figure 5. Thus, the fine alignment should be required for automatic robot welding. Similarly, the displacements δyj and δzj for j = −288, −287,…,287 about the y′ axis and their permissible image ranges can be obtained as shown in Figure 5b. The Figure 5 shows that the permissible ranges decrease as the projection angle increases. Therefore, the projection angle α should be determined, taking all four resolutions in Figure 5 into consideration.
Figure 5.
Permissible image ranges for the permissible resolution of 0.1 cm/pixel, where the baseline b is 7 cm.
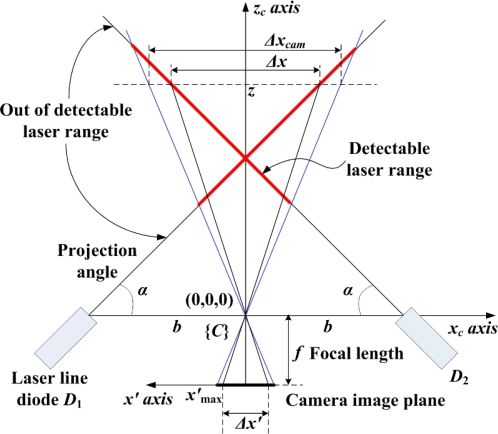
To determine the projection angle α, the detectable range of the sensor should also be considered. The geometry of the camera along with two diodes, D1 and D2, in the xc−zc plane is shown in Figure 6, where two laser lines are symmetrically projected with the same b and α.
Figure 6.
Detectable range about the xc axis according to the depth z.
For given depth z, the detectable range Δx about the xc axis is obtained by using Equation 1 as follows:
| (4) |
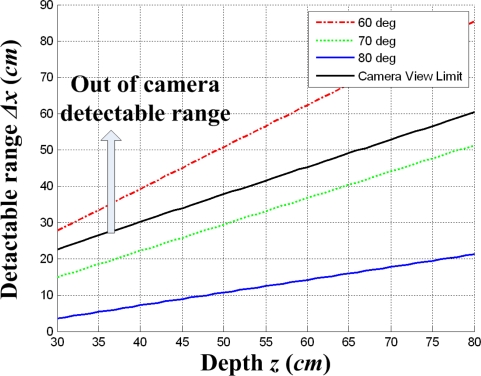
where Δx′ is the width between two projected lines in image plane. The detectable range Δx increases as the depth z increases, and Δx decreases as the projection angle α increases as shown in Figure 7. In this case, the detectable range Δx should be bounded by the camera view limit Δxcam, where Δxcam is obtained as follows:
| (5) |
where x′max is 360 pixels, half the size of the image width. Thus, the projection angle of 60° is not allowable since the detectable range Δx for α = 60° is out of the camera detectable range Δxcam as shown in Figure 7. Similarly, the detectable range Δy about the yc axis can be obtained in the yc−zc plane, where the baseline is set as b but the projection angle is differently set as β. According to both detectable ranges, Δx and Δy, the projection angles α and β should be determined, where the detectable ranges are determined by the lug size. Through the above mentioned design process, we can determine proper projection angles α and β, taking a trade-off between the sensor resolution and the detectable range into consideration.
Figure 7.
Detectable range Δx about the xc axis according to the depth z.
3. 3D Lug Pose Detection
3.1. Rough Lug Pose Detection
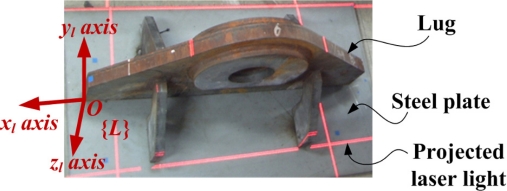
The top view alignment is first carried out for detecting the rough lug pose. In this case, the lug pose detection is the same problem as the lug frame acquisition. The local frame {L} of the lug which is temporarily welded to the steel plate is defined as shown in Figure 8. The xl axis and yl axis of {L} are defined in the longitudinal and lateral directions of the lug, respectively. The zl axis can be obtained by the cross product of xl with yl. In this case, four laser lines are projected on the lug and the steel plate.
Figure 8.
Top view image with the lug frame {L}.
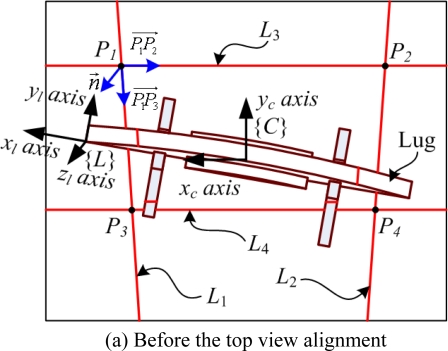
Through the top view alignment, the rough lug frame is obtained as shown in Figure 9. In Figure 9a, the zl axis of {L} can be obtained by the surface normal to the steel plate as follows:
| (6) |
where z⃗l is a unit vector along the zl axis, and Pi for i=1,2,3,4 are intersections of each pair of lines. In this case, the intersection Pi(xi,yi,zi) can be easily obtained by using its mapped point pi(x′i,y′i) onto the image plane and Equation 1.
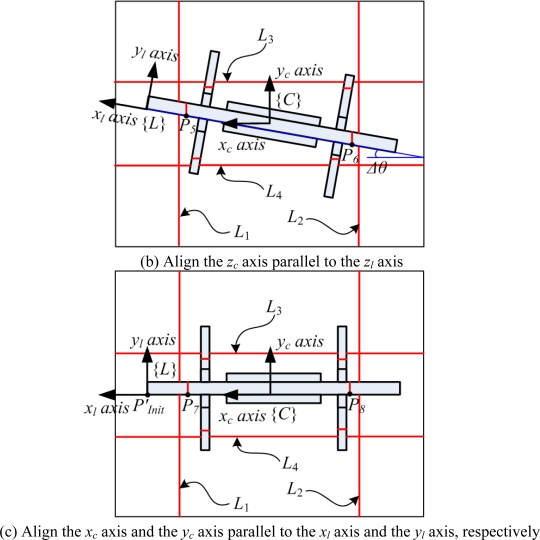
Figure 9.
Top view alignment with four laser lines, L1, L2, L3 and L4, projected by the laser diodes, D1, D2, D3 and D4, respectively.
For obtaining pi from the camera image, we first separate the projected laser lines from the background using the vertical threshold algorithm [9] robust to the illumination change. Next, the Zhang-Suen thinning algorithm [10] is applied to the threshold image. And then, the Hough transform algorithm [11] is applied to the thinning image for obtaining each laser line equation in x′ and y′ as follows:
| (7) |
where ρi is the distance from the origin of the image plane to the laser line Li, and θi is the angle between the normal line to Li and the x′ axis. Thus, the point p1 can be obtained by solving the following linear system of L1 and L3.
| (8) |
Similarly, the points, p2, p3 and p4, can be obtained. Then, the robot is controlled to align the xc axis of {C} with the obtained xl axis of {L} in parallel.
After the zc axis alignment with the zl axis, the camera image is obtained as shown in Figure 9b. Here, the robot is controlled to align the xc axis with the xl axis. In this case, the xl axis is parallel to the vector from P6 to P5, where P5 and P6 are the points on the laser lines, L1 and L2, projected on the central beam of the lug, respectively. Thus, the difference angle Δθ between the xc axis and the xl axis can be obtained as follows:
| (9) |
where x⃗l is a unit vector along the xl axis. By the robot rotation of Δθ, the xc axis can be aligned with the xl axis. As a result of the xc alignment with the xl axis, the yc axis is also aligned with the yl axis.
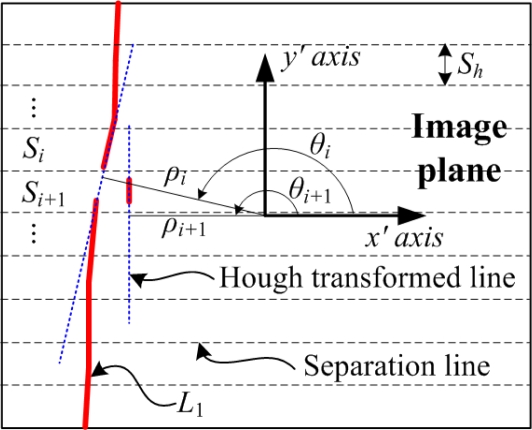
In Figure 9b, the points, P5 and P6, are obtained as follows. First, the line segments on the central beam are separated from the segments on the background by the separated Hough transform algorithm proposed in this study. This algorithm separates the image into several sections at the interval of Sh, and then applies the Hough transform to each section Si for I = 1,2,…,N as shown in Figure 10. As a result of the separated Hough transform, the line parameters, ρi and θi, for the line segment in Si can be obtained by the maximum voting parameters. Next, two line segments in the consecutive sections, Si and Si+1, are merged as one segment if |ρi+1−ρi| < ε1 and |θi+1−θi| < ε2 are satisfied, where ε1 and ε2 are the acceptable boundaries for the same line. The line segment merging is repeated until there is no line segment satisfying the same line conditions. As a result, the line segment projected on the central beam can be obtained since its line parameters are clearly distinguished from those of the background line segments. Finally, from two central beam line segments, two points, P5 and P6, can be obtained by Equation 1.
Figure 10.
Separated Hough transform for obtaining the line segment of L1 projected on the lug center.
After each axis alignment of {C} with {L}, the camera image is obtained as shown in Figure 9c. By the separated Hough transform, the points, P7 and P8, on the central beam can be obtained similarly. In this case, the initial point P′Init of the lug is obtained by using the lookup table (LUT) about the central beam shape of the lug, where the LUT is manually formed by measuring the height of the lug along the zl axis at regular intervals along the xl axis. In this case, since the zc axis is aligned with the zl axis, the height of the lug at P7 can be calculated by the camera as the difference between the depth of the steel plate and that of P7 along zc axis. Then, the xl position for the lug height at P7 can be obtained by using the LUT. The absolute value of the xl position is same as the distance d between P′Init and P7 along the xl axis (or xc axis). Using the position of P7 relative to {C} and the distance d between P7 and P′Init, the point P′Init can be obtained relative to {C}. However, the obtained lug frame {L} is not precise enough to carry out automatic robot welding as mentioned in Section 2.2. Therefore, the additional fine alignment is needed.
3.2. Precise Welding Line Detection
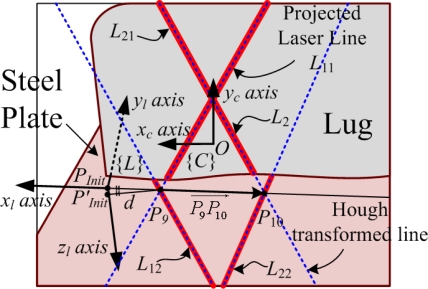
For successful automatic robot welding, the precise welding line detection is very critical. Thus, the robot is controlled to move close to the side of the lug, and then the side view alignment is carried out with two laser lines L1 and L2 as shown in Figure 11. In this case, L11 and L12 represent the laser line segments of L1 projected onto the side of the lug and the steel plate, respectively. By the same way, L21 and L22 represent the laser line segments of L2 projected onto the lug side and the plate, respectively. Here, the line equations of L11, L12, L21 and L22 can be obtained by the threshold, thinning, and Hough transform algorithms like Equation 7 in Section 3.1. Then, the intersection p9(x′9,y′9) between L11 and L12 and the intersection p10(x′10,y′10) between L21 and L22 are obtained like Equation 8. From the points, p9 and p10, on the image plane, the real points, P9 and P10, can be obtained by Equation 1. In this case, the parametric line equation of the welding line is obtained by two points, P9 and P10, as follows:
| (10) |
where , and are the position vectors on the welding line from the origin of {C}, is ( ), and t is the parameter in (−∞,∞). For automatic robot welding, the robot is controlled to follow the welding line from the initial point. However, the initial point P′Init obtained by the top view alignment may not locate on the welding line because of its position error. In this case, the robot cannot continuously follow the welding line from P′Init because of the discontinuity between the welding line and P′Init. As a result, there is little possibility of robot welding successfully. Thus, for removing the discontinuity, we newly define the initial point PInit to locate on the welding line at a distance of d from P9 as shown in Figure 11. The new initial point PInit can be obtained as follows:
| (11) |
This way, the precise initial point and the welding line equation can be obtained by the proposed sensor.
Figure 11.
Side view alignment with two laser lines, L1 and L2, projected by the laser diodes, D1 and D2, respectively.
4. Experimental Results and Discussion
Experiments for the top view alignment and the side view alignment were sequentially carried out with a prototype of the 3D lug pose detection sensor as shown in Figure 12. The design parameters of the sensor were determined, taking the detectable range and the sensor resolution into consideration, as shown in Table 2.
Figure 12.
Prototype of the proposed 3D lug pose detection sensor with a monocular camera and four laser line diodes.
Table 2.
Sensor parameters used for experiments.
| Sensor Parameters | Descriptions |
|---|---|
| b = 7 cm | Baseline between the camera and each laser line diode |
| α = 70° | Projection angle of diodes, L1 and L2 |
| β = 96.5° | Projection angle of diodes, L3 and L4 |
| ε1 = 5 pixels | Acceptable boundary of the line parameter ρ for the same line |
| ε2 = 5° | Acceptable boundary of the line parameter θ for the same line |
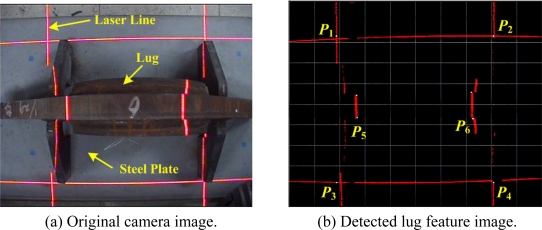
First, we carried out the top view alignment at a distance of about 71.0 cm to the lug, as shown in Figure 13. By successively applying the vertical threshold, thinning, Hough transform and separated Hough transform algorithms to the original image in Figure 13a, the feature points, P1, P2, P3 and P4, on the steel plate were obtained as shown in Figure 13b. From the obtained feature points, the surface normal n⃗ to the steel plate could be calculated, where n⃗ = z⃗l. As a result, the angular error between the normal vector n⃗ and the actually measured vector was just 0.03°. Thus, the robot can be controlled to align the zc axis with the zl axis. Then, the feature points, P5 and P6, on the central beam of the lug were obtained to align the xc axis with the xl axis. Using the feature points, the angle between the xc axis with the xl axis could be obtained as Δθ = 0.05°. The robot can be controlled to align the xc axis with the xl axis again. Finally, the rough initial point P′Init could be obtained by the lookup table (LUT), which mapped the xl position of the lug to the zl position relative to {L} as shown in Table 3. Here, for each xl position of the lug, the zl position was manually measured in advance.
Figure 13.
Results of feature extraction from the top view image.
Table 3.
Lookup table (LUT) about the central beam shape of the lug (unit cm).
| xl | 0 | −1 | −2 | −3 | −4 | −5 | −6 | −7 | −8 | −9 | −10 |
| zl | −10.3 | −11.3 | −12.4 | −13.4 | −14.4 | −15.5 | −16.5 | −17.6 | −18.6 | −19.7 | −20.7 |
| xl | −12 | −13 | −14 | −15 | −16 | −17 | −18 | −19 | −20 | −21 | −22 |
| zl | −22.8 | −23.8 | −24.8 | −25.9 | −26.9 | −27.9 | −28.9 | −30.0 | −31.0 | −31.3 | −31.5 |
| xl | −24 | −25 | −26 | −27 | −28 | −29 | −30 | −31 | … | ||
| zl | −32.0 | −32.3 | −32.5 | −32.8 | −33.0 | −33.3 | −33.5 | −33.5 | … |
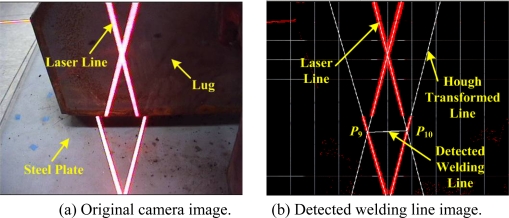
In accordance with the rough lug frame, the robot can be controlled to move close to the side of the lug. Next, we carried out the side view alignment at a distance of about 25.5 cm to the lug as shown in Figure 14. Similarly to the top view alignment, from the original image in Figure 14a, the feature points, P9 and P10, were obtained as shown in Figure 14b. Finally, the precise initial position PInit on the welding line could be obtained by the distance from P9 to P′Init from the LUT.
Figure 14.
Results of the feature extraction from the side view image.
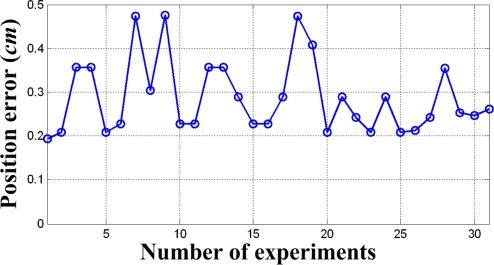
As a result of 31 times experiments, the errors of the initial welding position PInit were obtained as shown in Figure 15. In this case, the proposed sensor had the average error of 0.29 cm, the standard deviation of 0.0844 cm, the maximum error of 0.48 cm, and the minimum error of 0.19 cm. In this case, 68% of the 31 position errors are less than 0.3 cm, and 87% of them are less than 0.4 cm. The position error of the proposed sensor system is small enough to practically weld the lug in the field of shipbuilding.
Figure 15.
Position error of the initial welding position versus the number of experiments.
5. Conclusions
A precise 3D lug pose detection sensor which consists of a camera and four laser line diodes was proposed for automatic robot welding of the lug to the huge steel plate. The lug pose, consisting of position and orientation, could be obtained from the coarse-to-fine alignment. In this case, the vertical threshold, thinning, Hough transform and separated Hough transform algorithms, which are robust to illumination change, were used for robustly extracting feature points from the camera image. As a result of the coarse-to-fine alignment with the proposed sensor, the lug pose could be obtained precise enough to automatically weld the lug to the steel plate. In the experiments, the initial position on the welding line could be obtained with the average error of 0.29 cm, the standard deviation of 0.0844 cm, the maximum error of 0.48 cm, and the minimum error of 0.19 cm. The experimental results are acceptable for practical lug welding in the field of shipbuilding. Consequently, the proposed sensor is expected to make technological innovations of productivity and quality for shipbuilding automation.
Acknowledgments
This work was supported by National Research Foundation of Korea Grant funded by the Korean Government (2009-0069856).
References and Notes
- 1.Sicard P., Levine M.D. An approach to an expert robot welding system. IEEE Trans. Syst. Man. Cybern. 1988;18:204–222. [Google Scholar]
- 2.Pires J.N., Loureiro A., Godinho T., Ferreira P., Fernando B., Morgado J. Welding robots. IEEE Robot. Automat. 2003;10:45–55. [Google Scholar]
- 3.Kim J.S., Son Y.T., Cho H.S. A Robust Method for Vision-Based Seam Tracking in Robotic Arc Welding. Proceedings of The 10th IEEE International Symposium on Intelligent Control; Monterey, CA, USA. 1995; pp. 363–368. [Google Scholar]
- 4.Haug K., Pristrchow G. Robust Laser Stripe Sensor for The Automated Weld Seam Tracking in the Shipbuilding Industry. Proceedings of IECON’98 Proceedings of the 24th Annual Conference of the IEEE Industry Electronics Society; Aachen, Germany. 1998; pp. 1236–1241. [Google Scholar]
- 5.Kim C.H., Choi T.Y., Lee J.J., Suh J., Park K.T., Kang H.S. Development of welding profile measuring system with vision sensor. IEEE Sensors. 2006:392–395. doi: 10.1109/ICSENS.2007.355488. [DOI] [Google Scholar]
- 6.Kim C.H., Choi T.Y., Lee J.J., Suh J., Park K.T., Kang H.S. Intelligent Vision Sensor for the Robotic Laser Welding. Proceedings of IEEE International Conference on Industrial Informatics; Glasgow, UK. 2008; pp. 406–411. [Google Scholar]
- 7.Lin X., Maoyong C, haixia W., Michael C. A Method to Locate Initial Welding Position of Container Reinforcing Plates using Structured-Light. Proceedings of the 27th Chinese Control Conference; Kunming, Yunnan, China. 2008; pp. 310–314. [Google Scholar]
- 8.Xu L., Cao M.Y., Wang H.X., Sun N. Location of Initial Welding Position Based on Structured-light and Fixed in Workspace Vision. Proceedings of IEEE International Conference on Multisensor Fusion and Integration for Intelligent Systems; Seoul, Korea. 2008; pp. 588–592. [Google Scholar]
- 9.Park J.B., Lee B.H. Mobile Robots, Moving Intelligence. ARS; Linz, Austria: 2006. Supervisory Control for Turnover Prevention of A Teleoperated Mobile Agent with A Terrain-prediction Sensor Module; pp. 1–28. [Google Scholar]
- 10.Zhang T.Y., Suen C.Y. A fast parallel algorithm for thinning digital patterns. Commun. ACM. 1984;27:236–239. [Google Scholar]
- 11.Jain R., Kasturi R., Schunck B.G. Machine Vision. McGraw-Hill Science; New York, NY, USA: 1995. [Google Scholar]
- 12.Camera Calibration Toolbox for Matlab. Available online: http://www.vision.caltech.edu/bouguetj/calib_doc (accessed on September 22, 2009).


