

Abstract
The study of gross specimens is an integral part in learning oral pathology. Unfortunately their storage and handling using traditional formalin is discouragingly difficult. This review describes an alternative approach called “plastination” to study and teach gross specimens using silicone polymers. The process is simple, inexpensive, and can be carried out in any histology laboratory to produce dry, odorless, durable, life-like, maintenance-free, and nonhazardous specimens. Unfortunately the process of plastination for oral specimens has received little attention since its invention. Therefore, an innovative attempt on oral specimens using locally available resin was tried by us. The specimens remained well preserved in dry state without any color change. We recommend this process for any oral pathology department for maintaining museum and for both undergraduate and postgraduate training.
Keywords: Dry preservation, plastination, teaching
INTRODUCTION
The study of gross specimens is an integral part in learning oral pathology. They provide an illustrative and explanatory adjunct in understanding the disease.[1] They also have a useful role in postgraduate oral pathology training.
Decay is a vital process in nature but an impediment to morphological studies, teaching, and research.[2] This is particularly true for biological specimens that shrink considerably when exposed to normal atmospheric conditions. Therefore, it has always been a goal to find suitable preservation techniques. The most common method of preserving specimens is by suspension in fixatives such as formalin-based solution as open, wet preparations, or by enclosure in glass or Perspex “pots.”[1] Open specimens are unpleasant to work with due to objectionable odors and skin and eye irritation due to emitted formalin vapors. There is also reluctancy on the part of students to examine or handle such specimens.[1] Specimens preserved in glass jars or Perspex “pots” may overcome these problems but are bulky and fragile, and they need frequent regular maintenance to avoid the fluid becoming cloudy which may obscure the details. In addition, color preservation is poor and the parallax error caused by spatial separation from the pot surface leads to difficulties in pointing out features. All these factors in addition to the health hazards associated with formalin[3] limit the usefulness of such methods of specimen preservation.
Any student or even a pathologist always desires for a “real” or “ideal” specimen which is dry, odorless, durable, and nontoxic and which can be used in class rooms and in laboratory without protective equipment such as gloves. Whole specimen paraffinization and infiltration with high-molecular weight polyethylene glycols have been tried in the past[1] but are proved unsatisfactory due to excess specimen shrinkage, poor color preservation as specimens tend to get charred when paraffinized, and improper glycol impregnation occurs if clearing of the paraffin is not done perfectly, as paraffin is immiscible with glycols. However, a process called plastination is the most acceptable method of specimen preservation which to a large extent yields the “ideal” specimen. The process is covered by several patents;[3] however, producing specimens for educational purposes is unrestricted, so long as they are not sold or traded commercially.
Plastination was invented in 1978 by Dr Gunter Von Hagens of University of Heidelberg.[4] Even though the word “plastination” is derived from the Greek (plassein = to shape, to form), the term is, in fact, a creation of Gunther von Hagens. The first ever paper describing this revolutionary technique was published by the inventor himself in 1979.[5] The method was adopted first in Europe and then in North America and now more than 250 universities and colleges around the world use this method. A first “International conference on Plastination” was held in April 1982 in San Antonio, Texas.[5] In April 1986, participants at the 3rd International Conference on Plastination created the “International Society for Plastination.” In January 1987, the inaugural issue of the "Journal of the International Society for Plastination" was published. Recently in July 2008, 14th International Conference was held in Heidelberg and Guben, Germany. Recently, a new plastination index[6] has been developed which contains nearly everything published on plastination from its first paper to most recent.[6] Although the technique rapidly expanded through human anatomy halls and pathology laboratories, it never entered the field of oral pathology even after three decades of its invention. According to the available literature, very few have tried this technique for oral specimens.
PRINCIPLES OF PLASTINATION
The principle of plastination involves removal of water and lipid from the tissues and their replacement by a plastic (curable polymer). Plastination has been performed with a number of different polymers, the most common being epoxy, silicone rubber, and polyester. To obtain the best results, the polymer must have the following desirable properties:[7]
It must have lowest possible viscosity in uncured state and should be easy to handle.
Its refractive index must differ from that of tissue (unless a transparent specimen is desired outcome).
Resin activator mixture (base and catalyst) must have long working time or a relatively long liquid phase life to allow time for impregnation of the tissues.
Curing should not be inhibited by presence of tissue.
It should have appropriate mechanical properties when cured, that is, rubber like to simulate a natural state, or firm to permit its surface to be ground.
It should be affordable.
Considering these requirements, the polymer that has enjoyed widest acceptance in the preparation of specimens for teaching is silicone rubber.[8]
THE PROCESS
Surprisingly, the technique roughly parallels routine methods of tissue processing. It involves four basic steps: (1) fixation, (2) dehydration and defatting, (3) forced impregnation with polymer, and (4) curing of the polymer, followed by finishing and storage.
The following hardware is required: a vacuum pump with a regulator, a freezer set to –25°C, vacuum tubing, glass jars, heavy duty plastic bags, and so on. Many of this equipment may be found within a department. Polymers, formalin, and acetone are the only consumables. The plastination process steps are described below and summarized schematically in Figure 1.
Figure 1.

Flow diagram depicting the steps in plastination process
Fixation
Biological material must be fixed before plastination to prevent putrefaction and stop the action of other enzymes.[8] Plastination of freeze-dried material has been tried, but such specimens tend to develop an offensive odor. Thus, fixation is considered an essential step in the process. Any established fixation method using formalin solution in concentration between 5% and 20% can be used. To enhance color preservation, it is recommended to use a cold (4°C) Kaiserling solution containing 5% formalin.[8] Depending on the size of the oral specimen and fixation method used, this step may take 24–48 hours. Specimens with high lipid content are recommended to be fixed at higher concentrations of formalin over a bit longer period of time. Old museum specimens that have been kept in formalin for up to 10 years can also be plastinated.[9] The only restriction would be with specimens stored in solution containing glycerol, because this will interfere with later curing of silicone. However otherwise, these specimens would have to be rinsed off thoroughly to remove all the glycerol before being plastinated.
For the most natural appearing specimen, one should start with fresh tissue; however, if a specimen is rendered colorless by long exposure to formalin, it can still be successfully plastinated and some color restored by staining or coloring. Because fixation imparts some rigidity, the specimen should be fixed in the form that will exhibit when finished. Cysts or cavitatory defects in jaws for example should be fixed by inflation with fixative under some pressure, and solid organs such as tongue should be infiltrated with fixative in addition to being immersed in the same solution.[8] For display purposes, coloring material may be injected to illustrate vascular system, although this can only be done successfully with large, fresh specimens, before fixation.
Dehydration
Cryosubstitution is the method of choice. An ethanol series may be used but usually takes longer and is detrimental to coloration and results in greater shrinkage. The cooled fixed specimen is immersed in acetone in 25°C, whereupon it rapidly freezes retaining its shape. Over a period of time acetone replaces the water crystals within the tissue. The volume of the acetone must be at least 10 times that of specimen and the duration depends on the size of the specimen. Three changes of acetone can be used; finally the concentration of water should not exceed 1%. If ethanol dehydration is used, an additional step is required in which the final saturation of absolute alcohol is replaced with a suitable intermediary solvent such as acetone or methylene chloride. Acetone will enhance dehydration but methyl chloride is immiscible with water.[8]
Defatting
The lipid-rich specimens have to be transferred in acetone at room temperature for few hours depending on the size of the specimen, during which lipids dissolve out of the tissues. Specimens prepared for epoxy plastination need an extra defatting bath in methylene chloride to improve their transparency.[5]
Forced impregnation
This crucial step is performed in a vacuum chamber [Figure 2] where the acetone saturated specimens are submerged into bath of liquid polymer. It involves the replacement of a low boiling point, high vapor pressure acetone by a high boiling point, low vapor pressure polymer. Once the specimen is placed in the vacuum chamber, with a vacuum pump the pressure is slowly decreased which leads acetone to change from its liquid phase to vapor phase which ultimately boils out as vapors which gets aspirated by vacuum pump. The extraction of acetone creates a vacuum inside the specimens which forces the penetration of polymer into them, down to their microscopic level.[10] If the applied vacuum is too high, the acetone is removed much before the more viscous polymer can infiltrate the tissue and the specimen collapses. Controlling the vacuum with a regulator and regular visual monitoring are therefore essential. With the correct vacuum continuous bubbles should be seen arising from the specimen surface. Over a period of time the pressure should be gradually reduced, when bubbling should have ceased the specimen can be removed and allowed to drain.
Figure 2.
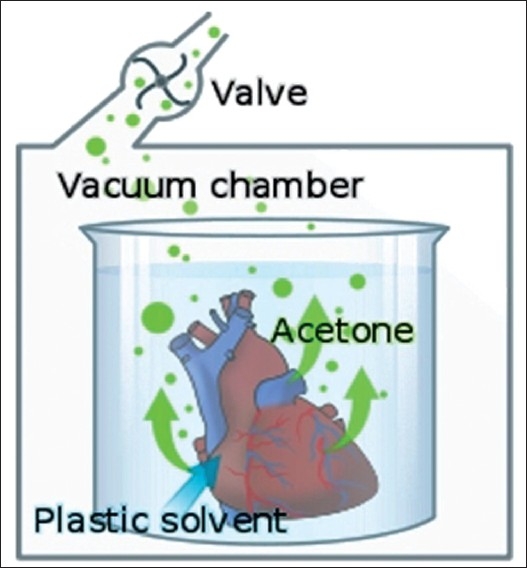
Vacuum pump mechanism during impregnation step. [*Borrowed from http://en.wikipedia.org/wiki/File:PlastinationProcess_ EN.svg]
Curing
Once impregnation step is completed, the specimens are removed from polymer bath. The residual polymer is still liquid and can be reused. There are three different curing techniques depending on the polymer that is used. In case of silicone specimens, the polymer/hardener mix used in impregnation will eventually harden over a period of days to weeks. An accelerator in the form of vapor or gas considerably speeds up the process by promoting cross linking between the polymer chains.[1] Specimens are placed on a platform above the volatile accelerator in an airtight container. A desiccant is also present because any moisture causes whitish discoloration of the specimen surface. Initially polymer expands and oozes out from surface which must be wiped off until surface gets hardened. After few days the specimen may be removed to a closed container containing only desiccant for few more days where accelerator already in the tissue can diffuse evenly and complete the curing process. The curing time for oral specimens may be shortened depending on their size.
Curing of epoxy resin-impregnated specimens is performed by heat treatment at 45°C. Final curing in an oven takes few days to complete. Specimens impregnated with polyester is cured by a 45-minute UV light exposure and completed in an oven at 45°C for few days.[11,12]
Finishing and storage
Plastinated specimens can be made more appealing by trimming the unwanted areas or flash polymer with a scalpel, a dilute detergent or a lubricant can be applied to clean, and the surface can be made smooth by buffing to get a display specimen. As far as storage is considered required specimens can be mounted on Perspex stands for display purposes and others can be easily stored in plastic bags at room temperature.
HISTOLOGIC EXAMINATION OF SILICONE-IMPREGNATED SPECIMENS
One of the most interesting, important and potentially useful qualities of tissue plastination by silicone is that its microscopic structure remains intact.[8] This implies that the specimen can be preserved almost indefinitely in a form that is easily stored while still retaining full potential for histologic examination. The key to this is “deplastination.” This takes advantage of the unusual ability of sodium ion to depolymerize silicone rubber. Tissue samples to be deplastinated are exposed to a saturated solution of sodium methylate in anhydrous methanol until free of polymerized silicone rubber and then subjected to standard histologic techniques. Although some staining procedures are slightly prolonged, the results are comparable to those obtained with more conventional methods.
Plastinated specimens as teaching aids:
Preservation of autopsy or surgical tissue samples in a form useful for teaching.
Plastinated specimens are individually superior to their counterparts both in terms of esthetic superiority and in their demonstration of specific features.
Plastinated specimens are generally easier to interpret than the usual “pots”, so students are more interested in examining plastinated specimens than those preserved in formalin jars.
Can be easily carried to class rooms during lectures and can be easily passed to each student without gloves to appreciate the features which is impossible in jar specimens.
Long-term storage of autopsy or surgical specimens for later histologic examination.
They can be easily used as spotters in undergraduate practical examinations.
They probably will not undergo significant deterioration over many years of continuous use. Thus, rare or unusual specimens can be made available for study when they are no longer seen in clinical practice.
They can be used as an adjunct to problem-based type of curriculum in postgraduate training.
Plastinated specimens may be pinned and/or photographed and labeled to highlight salient landmarks which should make student to identify easily.
They also act as patient educative tools; a doctor can explain to a patient the anomaly or pathology he is suffering from with the help of plastinated specimen of such anomaly.
Other uses/advantages of plastination in anatomic pathology and forensic include the following:
They are nontoxic, noninfectious, and do not exude fumes or fluids.
Preparation of unusual or historically important material for museum display.
Preparation of surgically removed facial organs (nose and ear) for use as their own prosthetic replacement.[13]
Preparation of tissue sample for use as evidence.[8]
They can be stored in simple plastic bags, along with appropriate documentation.
Preservation of whole organism such as parasites, insects, snakes, or plants for instructional use.
Plastinated specimens require little storage and no maintenance. Thus, the time saved can be usefully redirected to expanding the collection rather than just maintaining it.
Limitations/disadvantages of plastination:
Process is technique sensitive, time consuming, and hence needs a dedicated pathologist.
Beginner has to do a lot of trial and error during the process to achieve the desired outcome which might lead to consumption/wastage of rare and unusual specimens.
Slightly more expensive and needs more equipment than the conventional laboratory methods.
Process needs lot of postcuring works such as trimming, polishing, coloring, and mounting to obtain a good display specimen.
Learning anatomy on only plastinated specimens is a compromise because of its limitations in terms of tactile and emotional experience that is provided by wet cadavers.[14]
Deplastination is not possible with all types of resins.[8]
Has a limited application in oral pathology, as the technique is more suitable for large specimens.
However, many authors have commented favorably on the value of plastinated specimens in teaching pathology and have indeed judged equal or superior to the formalin pots specimens.[6] The method is indeed proved popular with both students and staff.[15]
Few anatomists have tried many indigenous methods of plastination and are successful.[2,16] Even in our attempt for oral specimens, we developed our own methods for whole organ plastination, sheet plastination, and block plastination using the available resources within our laboratory; surprisingly even without the use of a vacuum pump, although the process was time consuming, the results were appreciable. Equipped with only theoretical knowledge of this novel technique, we have satisfactorily plastinated many specimens with few trial and error methods using a locally available resin mixture used in small rubber industry and by rubber foot ware manufacturers. Specimens have retained good color and shape even after 5 years [Figures 3–6]. Few anatomists have tried plastination at room temperature even using commercially available quickfix.[2] The technical expertise required for plastination is no more than exists already within a routine histopathology laboratory.
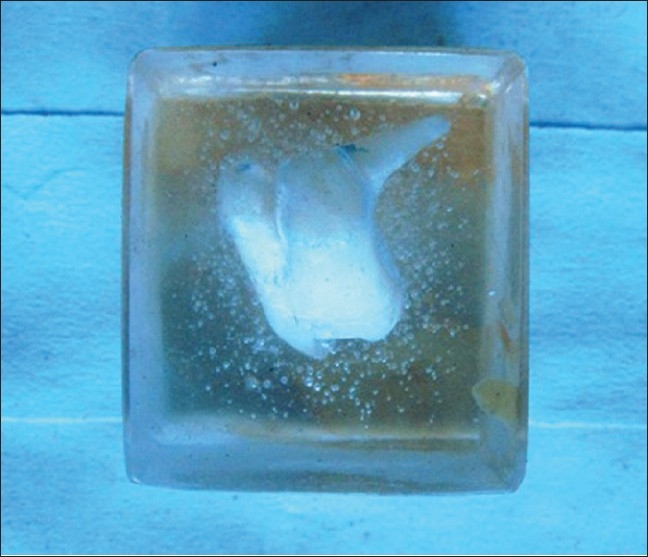
Figure 3.
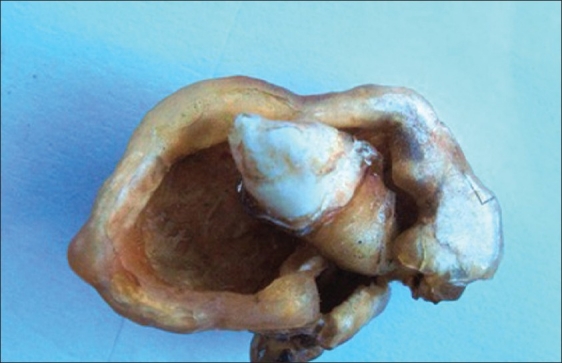
Plastinated adenomatoid odontogenic tumor with impacted canine
Figure 6.
Plastinated radicular cyst specimen held in bare hands
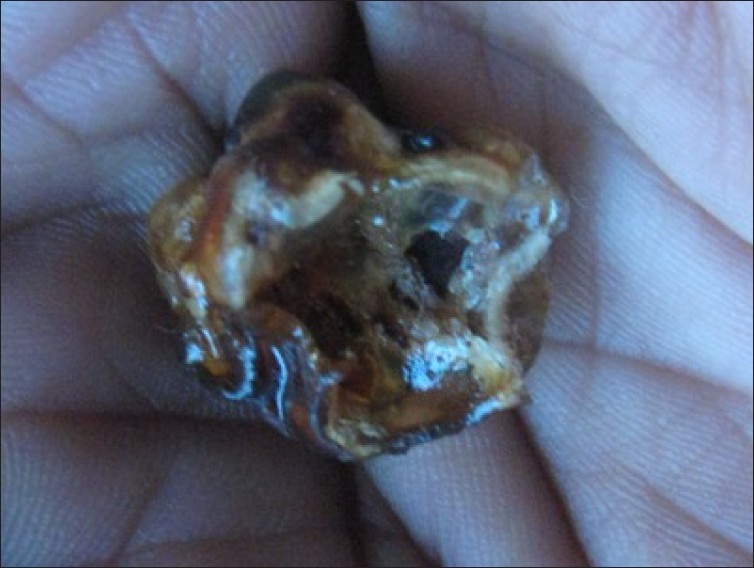
Figure 4.
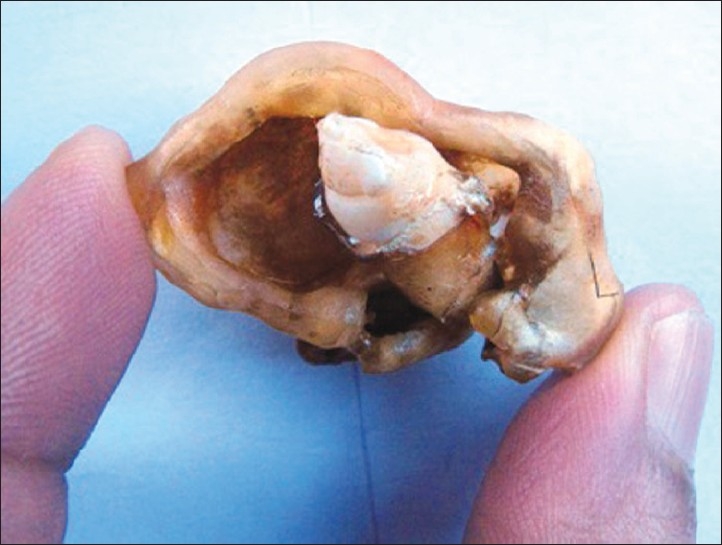
Plastinated AOT. Note that specimen is held in ungloved hand
Figure 5.
Block plastination of a dilacerated molar tooth. Air bubbles are incorporated due to improper curing
CONCLUSION
Having tried plastination for many oral specimens successfully, we now strongly believe that this technique is superior to those preserved in formalin, both in terms of user acceptance and ease of maintenance. Running a simple plastination laboratory is a straight forward task for anyone with a basic knowledge of histopathology laboratory, and moreover it involves only moderate expenses. In the process, many indigenous methods can be tried upon to successfully achieve a beautiful plastinated specimen. Although it appears time consuming, we recommend plastination to any oral pathology department for maintenance of student museum, for preservation of rare specimens, or for postgraduate use.
ACKNOWLEDGEMENTS
The authors wish to thank Dr. Sham Sunder, Professor in Anatomy, JSS Medical College, Mysore, for guiding us through his indigenous methods of plastination. Authors also wish to thank Dr. Bhavana VK and Dr. Hemanth Jogi for their selfless support during the plastination process.
Footnotes
Source of Support: Nil
Conflict of Interest: None declared.
REFERENCES
- 1.Dawson TP, James RS, Williams GT. How do we teach Pathology? Silicone plastinated pathology specimens and their teaching potential. J Pathol. 1990;162:265–72. doi: 10.1002/path.1711620314. [DOI] [PubMed] [Google Scholar]
- 2.Mehra S, Choudhary R, Tuli A. Dry preservation of cadaveric hearts: An innovative trial. J Int Soc Plastination. 2003;18:34–6. [Google Scholar]
- 3.Slater D. Health hazards of formaldehyde. Lancet. 1981;1:1099. doi: 10.1016/s0140-6736(81)92261-3. [DOI] [PubMed] [Google Scholar]
- 4.Lischka M, Prihoda M. Establishing and operating a plastination laboratory at the institute of anatomy, university of Vienna. J Int Soc Plastination. 1987;1:12–6. [Google Scholar]
- 5.Gordin Plastination a modern approach to chiropractic teaching. J Can Chiropr Assoc. 1998;42:107–12. [Google Scholar]
- 6.Latorre RM, García-Sanz MP, Moreno M, Hernández F, Gil F, López O, et al. How usefull is plastination in learning anatomy? J Vet Med Educ. 2007;34:172–6. doi: 10.3138/jvme.34.2.172. [DOI] [PubMed] [Google Scholar]
- 7.Bickley HC, von Hagens G, Townsend FM, Townsend An improved method for preservation of teaching specimens. Arch Pathol Lab Med. 1981;105:674–6. [PubMed] [Google Scholar]
- 8.Bickley HC, Conner RS, Walker AN, Jackson L. Preservation of tissues by silicone rubber. J Int Soc Plastination. 1987;1:30–1. [Google Scholar]
- 9.Cannas M, Fuda P. Plastination of old formalin-fixed specimens. J Int Soc Plastination. 1991;5:11–5. [Google Scholar]
- 10.Grondin G, Grondin GG, Talbot BG. A study of criteria permitting the use of plastinated specimens for light and electron microscopy. Biotech Histochem. 1994;69:219–34. doi: 10.3109/10520299409106291. [DOI] [PubMed] [Google Scholar]
- 11.Weber W, Henry RW. Sheet plastination of body slices- E12 technique, filling method. J Int Soc Plastination. 1993;7:16–22. [Google Scholar]
- 12.Weber W, Henry RW. Sheet plastination of the brain-P35 technique, filling method. J Int Soc Plastination. 1992;6:29–33. [Google Scholar]
- 13.Parel Sm, Bickley HC, Holt GR, Shuler BS. Prosthetic use of plastinated facial structures: A feasibility study. J Prosth Dent. 1983;49:529–31. doi: 10.1016/0022-3913(83)90317-7. [DOI] [PubMed] [Google Scholar]
- 14.Fruhstorfer BH, Palmer J, Brydges S, Abrahams PH. The use of plastinated prosections for teaching anatomy-the view of medical students on the value of this learning resource. Clin Anat. 2011;24:246–52. doi: 10.1002/ca.21107. [DOI] [PubMed] [Google Scholar]
- 15.Aufdemorte TB, Bickley HC, Krauskopf DR, Townsend FM. An epoxy resin and silicone impregnation technique for preservation of oral pathology teaching specimens. Oral Surg Oral Med Oral Pathol. 1985;59:74–6. doi: 10.1016/0030-4220(85)90119-7. [DOI] [PubMed] [Google Scholar]
- 16.Rumph PF, Garrett PD, Marshall AV. A versatile vacuum control system for plastination. J Int Soc Plastination. 1987;1:4–8. [Google Scholar]